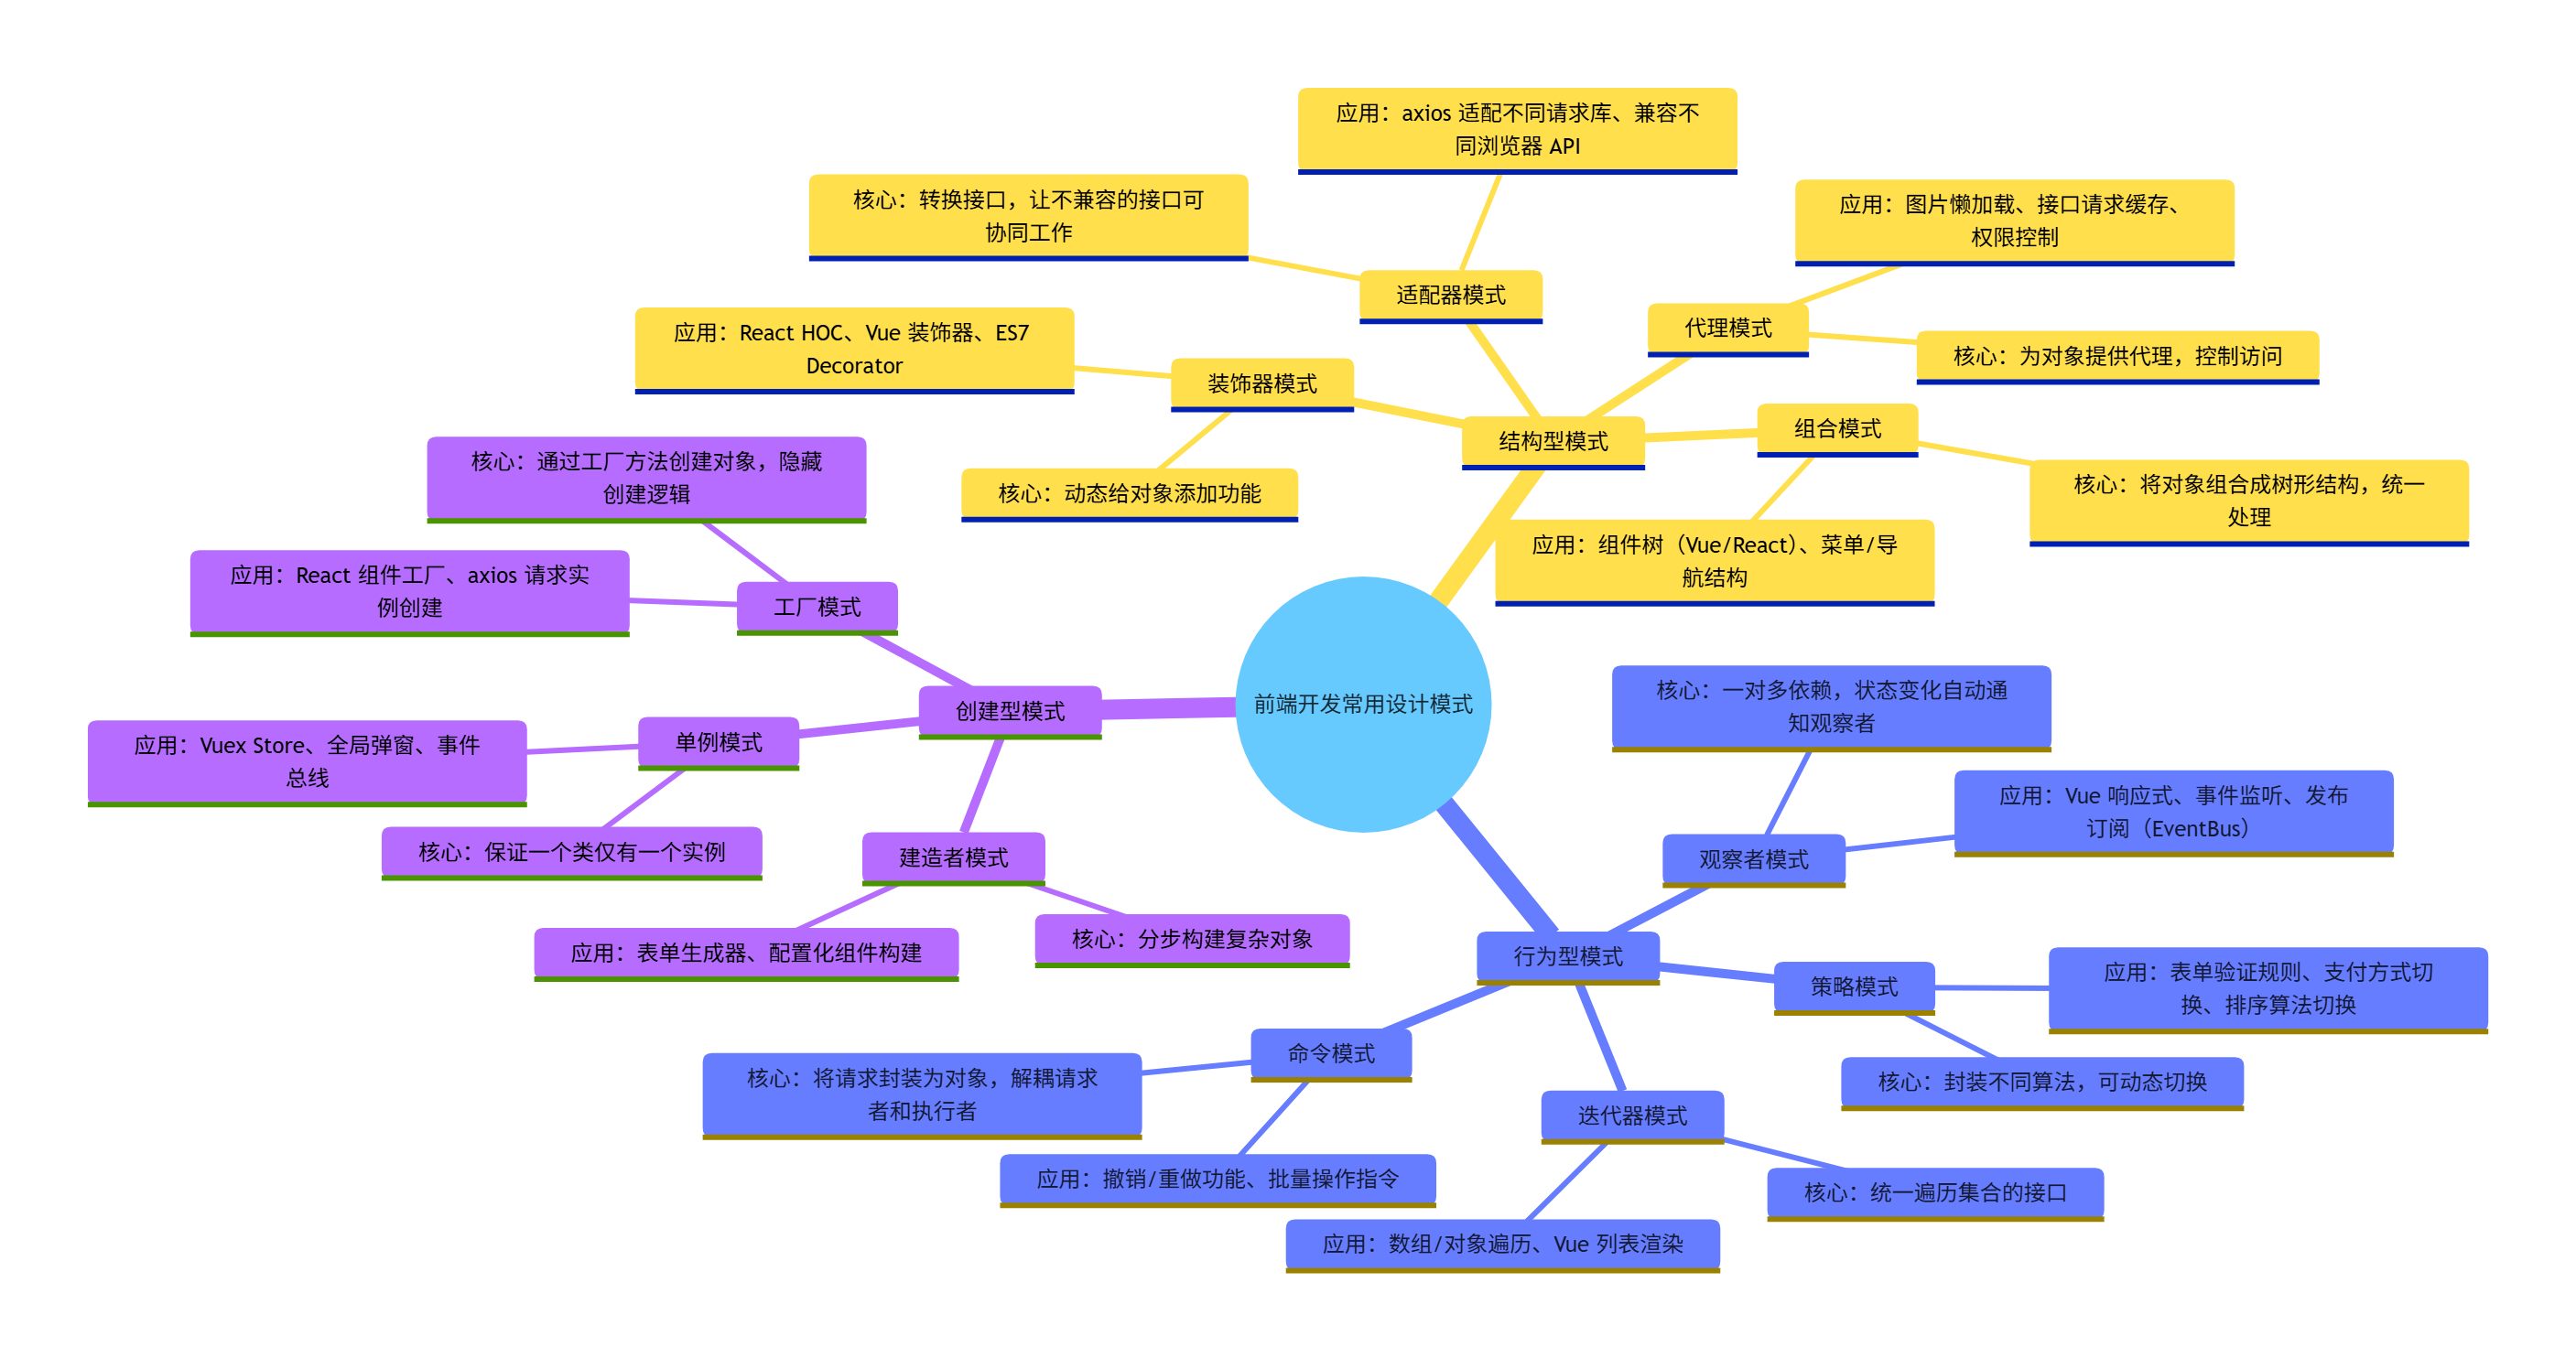
前言
最近在系统的整理一下JavaScript的设计模式,发现把所有的模式按照生活场景结合起来去记,会加深记忆力且更扎实。所谓的设计模式更愿意称之为习惯性写法而形成的不同代码习惯模式,以下内容为本人基于B站相关内容学习及个人了解所写
模式一:构造器模式
首先理解什么是构造器,构造器(Constructor)本质上是一个特殊函数,用于创建和初始化对象实例,当通过 new Constructor创建和初始化对象的时候,称该函数为构造器,如果不new,直接使用,则与一般函数没有差别。以下模式为通过new Constructor实现,因此称为构造器模式。
日常场景结合:假设工厂里面有很多员工,我们需要将其进行分类,我们用Person进行标识,每一位员工都可以称呼为Person,因此,实现构造器模式函数如下
html
function Person(name, age) {
          this.name = name;
          this.age = age;
          this.sayName = function() {
            console.log("My name is " + this.name);
          }
      }
      // 使用构造器创建对象
      // 创建两个 Person 实例
      var person1 = new Person("Alice", 30);
      var person2 = new Person("Bob", 25);
      console.log(person1, person2)
      person1.sayName()
      person2.sayName()
模式二:原型模式
由于构造器模式每次new一个实例,公共方法sayName也需要单独创建一个新的内存去存储,构造函数的原型prototype是唯一的,因此,有了原型模式提取出公共方法进行优化。
html
      // 构造器模式示例
      function Person(name, age) {
          this.name = name;
          this.age = age;
          // 提取到prototype中,避免每次创建实例时都创建一遍方法
          // this.sayName = function() {
          //   console.log("My name is " + this.name);
          // }
      }
      Person.prototype.sayName = function() {
          console.log("My name is " + this.name);
      }
      // 使用构造器创建对象
      // 创建两个 Person 实例
      var person1 = new Person("Alice", 30);
      var person2 = new Person("Bob", 25);
      console.log(person1, person2)
      person1.sayName();
      person2.sayName();
es6 class构造器和原型写法,constructor,sayName都挂载在Person.prototype下
html
class Person {
      constructor(name, age, job) {
        this.name = name;
        this.age = age;
        this.job = job;
      }
      sayName() {
        console.log("My name is " + this.name);
      }
    }
    var employee = new Person("Nicholas", 29, "Software Engineer");
    console.log(employee);
    employee.sayName();
应用:
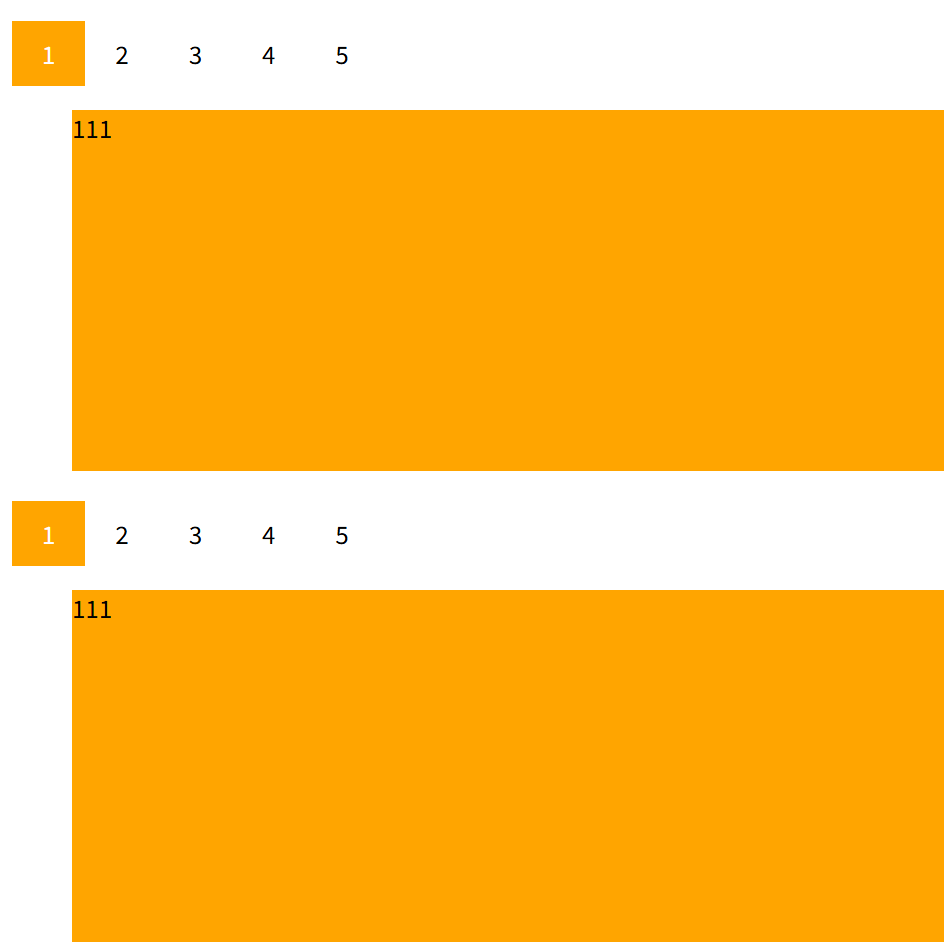
多个重复样式tab切换
html
<!DOCTYPE html>
<html lang="en">

<head>
  <meta charset="UTF-8">
  <title>原型模式距离</title>
  <style>
    .container1,
    .container2 {
      width: 100%;
      height: 300px;
      overflow: hidden;
      margin-top: 20px;
    }

    .box li {
      float: left;
      margin: 0;
      padding: 0;
      list-style: none;
      height: 300px;
      background-color: lightslategray;
      display: none;
    }

    .box li.active {
      background-color: orange;
      display: block;
      width: 100%;
    }

    .header {
      margin: 0;
      padding: 0;
      list-style: none;
      overflow: hidden;
    }

    .header li {
      float: left;
      list-style: none;
      padding: 10px 20px;
      cursor: pointer;
    }

    .header li.active {
      background-color: orange;
      color: white;
    }
  </style>
</head>

<body>
  <div class="container1">
    <ul class="header">
      <li class="active">1</li>
      <li>2</li>
      <li>3</li>
      <li>4</li>
      <li>5</li>
    </ul>
    <ul class="box">
      <li class="active">111</li>
      <li>222</li>
      <li>333</li>
      <li>444</li>
      <li>555</li>
    </ul>
  </div>
  <div class="container2">
    <ul class="header">
      <li class="active">1</li>
      <li>2</li>
      <li>3</li>
      <li>4</li>
      <li>5</li>
    </ul>
    <ul class="box">
      <li class="active">111</li>
      <li>222</li>
      <li>333</li>
      <li>444</li>
      <li>555</li>
    </ul>
  </div>
  <script>

    function Tabs(container, eventType) {
      this.container = document.querySelector(container);
      this.headerItems = this.container.querySelectorAll('.header li');
      this.boxItems = this.container.querySelectorAll('.box li');
      this.eventType = eventType || 'click';
      this.change();
    }
    Tabs.prototype.change = function () {
      this.headerItems.forEach((item, index) => {
        item.addEventListener(this.eventType, () => {
          this.headerItems.forEach((header) => header.classList.remove('active'))
          this.boxItems.forEach((box) => box.classList.remove('active'))
          this.headerItems[index].classList.add('active')
          this.boxItems[index].classList.add('active')
        }, false)
      })
    }
    new Tabs('.container1', 'click');
    new Tabs('.container2', 'mouseover');
  </script>
</body>

</html>
html
// es6写法
<!DOCTYPE html>
<html lang="en">

<head>
  <meta charset="UTF-8">
  <title>原型模式距离</title>
  <style>
    .container1,
    .container2 {
      width: 100%;
      height: 300px;
      overflow: hidden;
      margin-top: 20px;
    }

    .box li {
      float: left;
      margin: 0;
      padding: 0;
      list-style: none;
      height: 300px;
      background-color: lightslategray;
      display: none;
    }

    .box li.active {
      background-color: orange;
      display: block;
      width: 100%;
    }

    .header {
      margin: 0;
      padding: 0;
      list-style: none;
      overflow: hidden;
    }

    .header li {
      float: left;
      list-style: none;
      padding: 10px 20px;
      cursor: pointer;
    }

    .header li.active {
      background-color: orange;
      color: white;
    }
  </style>
</head>

<body>
  <div class="container1">
    <ul class="header">
      <li class="active">1</li>
      <li>2</li>
      <li>3</li>
      <li>4</li>
      <li>5</li>
    </ul>
    <ul class="box">
      <li class="active">111</li>
      <li>222</li>
      <li>333</li>
      <li>444</li>
      <li>555</li>
    </ul>
  </div>
  <div class="container2">
    <ul class="header">
      <li class="active">1</li>
      <li>2</li>
      <li>3</li>
      <li>4</li>
      <li>5</li>
    </ul>
    <ul class="box">
      <li class="active">111</li>
      <li>222</li>
      <li>333</li>
      <li>444</li>
      <li>555</li>
    </ul>
  </div>
  <script>

    class Tabs {
      constructor(container, eventType) {
        this.container = document.querySelector(container);
        this.headerItems = this.container.querySelectorAll('.header li');
        this.boxItems = this.container.querySelectorAll('.box li');
        this.eventType = eventType || 'click';
        this.change();
      }
      change() {
        this.headerItems.forEach((item, index) => {
          item.addEventListener(this.eventType, () => {
            this.headerItems.forEach((header) => header.classList.remove('active'))
            this.boxItems.forEach((box) => box.classList.remove('active'))
            this.headerItems[index].classList.add('active')
            this.boxItems[index].classList.add('active')
          }, false)
        })
      }
    }
    new Tabs('.container1', 'click');
    new Tabs('.container2', 'mouseover');
  </script>
</body>

</html>
模式三:工厂模式
概念:由一个工厂对象决定创建某一种产品对象类的实例。简单理解为一个函数里面传入特定选择参数,返回根据条件判断后的某个对象的具体实例。下面的例子,根据用户角色返回对应角色的菜单权限,总的侧边栏工厂函数中返回每个用户对应的角色与对应的页面权限
html
  <!DOCTYPE html>
  <html lang="en">

  <head>
    <meta charset="UTF-8">
    <title>工厂模式</title>
  </head>

  <body>
    <h1>工厂模式</h1>
    <script>
      // 工厂模式示例
      function User(name, page) {
        this.name = name;
        this.page = page;
      }
      function FactoryUser(role) {
        switch (role) {
          case 'admin':
            return new User('admin', ["home", "manage", "detail"]);
          case 'customer':
            return new User('customer', ["home", "detail"]);
          default:
            throw new Error('Unknown role: ' + role);
        }
      }
      var adminUser = FactoryUser('admin');
      var customer = FactoryUser('customer');
      console.log(adminUser);
      console.log(customer);
    </script>
  </body>
  </html>
html
// es6写法
<!DOCTYPE html>
<html lang="en">

<head>
  <meta charset="UTF-8">
  <title>工厂模式</title>
</head>

<body>
  <h1>工厂模式</h1>
  <script>
    // 工厂模式示例
    class User {
      constructor(name, page) {
        this.name = name;
        this.page = page;
      }
      static FactoryUser(role) {
        switch (role) {
          case 'admin':
            return new User('admin', ["home", "manage", "detail"]);
            break;
          case 'customer':
            return new User('customer', ["home", "detail"]);
            break;
          default:
            throw new Error('Unknown role: ' + role);
        }
      }
    }
    var adminUser = User.FactoryUser('admin');
    var customer = User.FactoryUser('customer');
    console.log(adminUser);
    console.log(customer);
  </script>
</body>

</html>
模式四:抽象工厂模式
抽象工厂对比上面的工厂模式区别在于,工厂模式返回具体的实例,即new Constructor(),而抽象工厂函数,在抽象工厂函数中返回的是类(构造函数),具体实例需要new调用去实现,以下基于上面的例子进行扩展,假设现在用户进入了对应页面后,对进入的页面也有一些展示区别和操作方法的区别,因此我们需要基于上面的函数进行扩展如下
html
<!DOCTYPE html>
<html lang="en">

<head>
  <meta charset="UTF-8">
  <title>抽象工厂模式</title>
</head>

<body>
  <h1>抽象工厂模式</h1>
  <script>
    // 工厂模式示例
    class User {
      constructor(name, role, page) {
        this.name = name;
        this.role = role;
        this.page = page;
      }
      dataShow() {
        throw new Error('抽象方法在各个扩展中实现')
      }
    }
    class SuperAdmin extends User {
      constructor(name) {
        super(name, 'admin', ["home", "manage", "detail"]);
      }
      dataShow() {
        console.log('管理员页面展示');
      }
      addUser() {
        console.log('添加用户');
      }
    }
    class Customer extends User {
      constructor(name) {
        super(name, 'customer', ["home", "detail"]);
      }
      dataShow() {
        console.log('客户页面展示');
      }
    }

    function getAbstractFactoryUser(role) {
      switch (role) {
        case 'admin':
          return SuperAdmin;
        case 'customer':
          return Customer;
        default:
          throw new Error('Unknown role: ' + role);
      }
    }
    let adminUser = getAbstractFactoryUser('admin');
    let customer = getAbstractFactoryUser('customer');
    let user1 = new adminUser('张三');
    let user2 = new customer('李四');
    console.log(user1);
    console.log(user2);
  </script>
</body>

</html>
模式五:单例模式
保证一个类只有一个实例,主要解决一个全局使用的类频繁的创建和销毁,占用内存的问题。经典例子:模态弹框
html
<!DOCTYPE html>
<html lang="en">

<head>
  <meta charset="UTF-8">
  <title>单例模式</title>
</head>

<body>
  <h1>单例模式</h1>
  <script>
    // 单例模式示例
    const Singleton = (function(){
      var instance;
      function User(name, age){
        this.name = name;
        this.age = age;
      }
      return function(name, age){
        if(!instance){
          instance = new User(name, age);
        }
        return instance;
      }
    })()
    console.log(Singleton("Alice", 30));
    console.log(Singleton("Bob", 25));
    // 单例模式闭包机制使用的是第一次初始化的实例对象,输出两次都是同一个实例
  </script>
</body>

</html>
html
// es6写法
<!DOCTYPE html>
<html lang="en">

<head>
  <meta charset="UTF-8">
  <title>单例模式</title>
</head>

<body>
  <h1>单例模式</h1>
  <script>
    // 单例模式ES6示例
    class Singleton {
      constructor(name, age) {
        if (!Singleton.instance) {
          this.name = name;
          this.age = age;
          Singleton.instance = this;
        }
        return Singleton.instance;
      }
    }
    console.log(new Singleton('Alice', 30)  === new Singleton('Bob', 25)) // true
  </script>
</body>

</html>
应用:
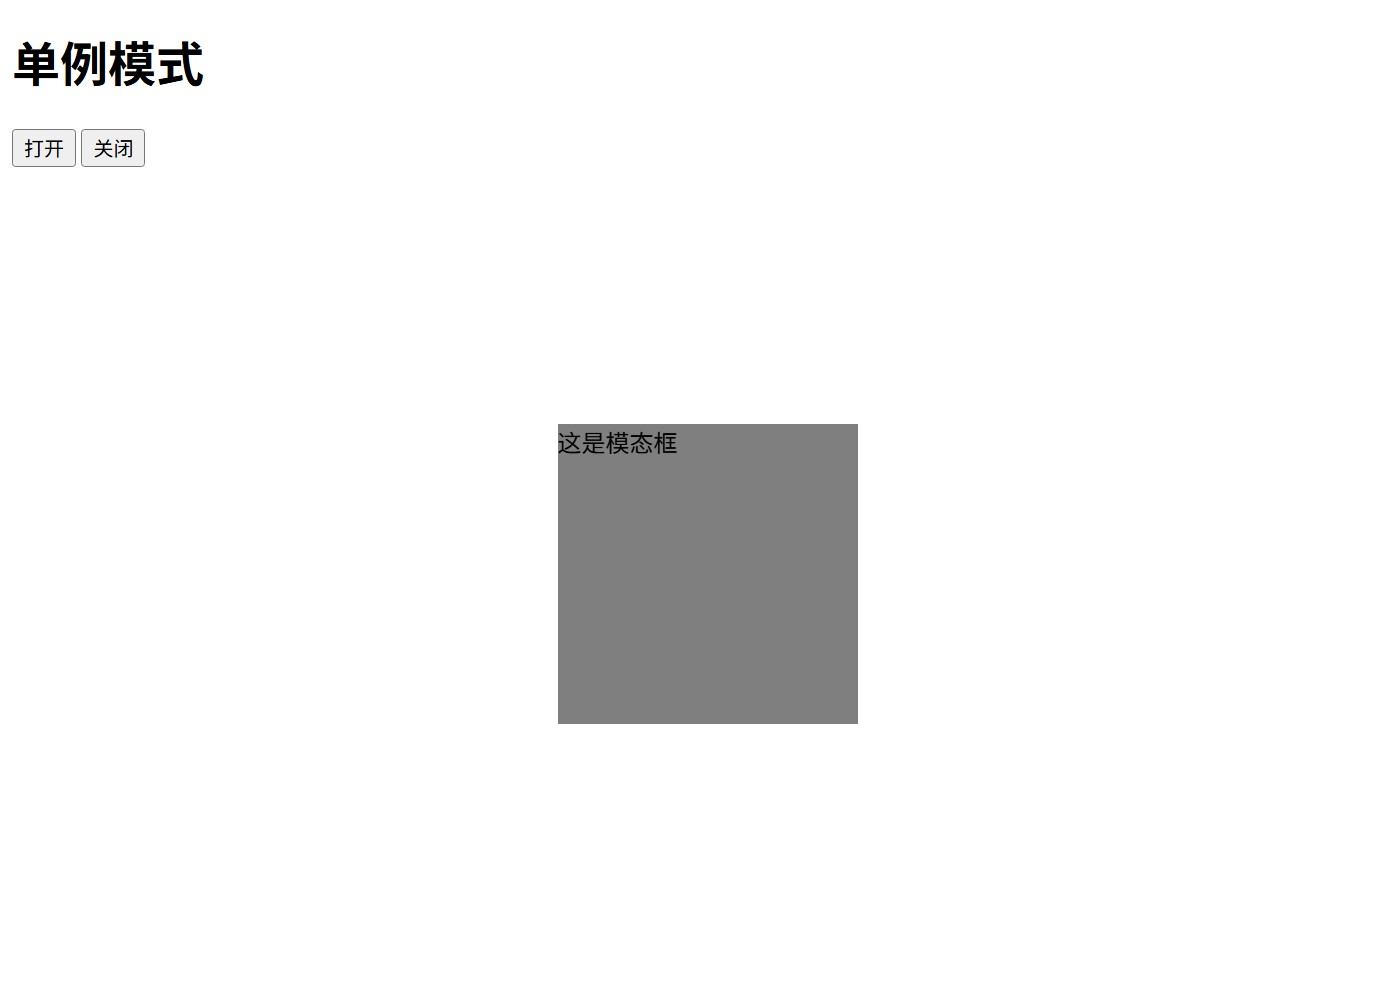
html
<!DOCTYPE html>
<html lang="en">

<head>
  <meta charset="UTF-8">
  <title>单例模式</title>
  <style>
    #modal{
      position: fixed;
      top: 50%;
      left: 50%;
      transform: translate(-50%, -50%);
      width: 200px;
      height: 200px;
      background-color: rgba(0,0,0,0.5);
    }
  </style>
</head>

<body>
  <h1>单例模式</h1>
  <button id="open">打开</button>
  <button id="close">关闭</button>
  <script>
    const Modal = (function(){
      let instance = null;
      return function(){
        if(!instance){
          instance = document.createElement('div');
          instance.id = 'modal';
          instance.innerHTML = '这是模态框'
          instance.style.display = 'none';
          document.body.appendChild(instance);
        }
        return instance;
      }
    })()
    document.getElementById('open').onclick = function(){
      const modal = Modal();
      modal.style.display = 'block';
    }
    document.getElementById('close').onclick = function(){
      const modal = Modal();
      modal.style.display = 'none';
    }

  </script>
</body>

</html>
模式六:代理模式
代理模式使用到的是es6的Proxy,Proxy是ES6引入的一个元编程特性,它允许你创建一个代理对象,用于拦截并自定义 JavaScript 对象的基本操作。通过代理对象,你可以拦截并重定义对象的基本操作,比如属性查找、赋值、枚举等。Proxy的核心思想是在目标对象和代码之间建立一个拦截层,使得可以对目标对象的操作进行拦截和监视。
<!--
target:要代理的目标对象。
handler:一个对象,定义了代理对象的行为,包括捕获器(handlers)等。
-->
let proxy = new Proxy(target, handler);
设计模式中的代理模式是指为其他对象提供一种代理以控制对这个对象的访问,以下为一个简易的vue3响应式代码
html
<!DOCTYPE html>
<html lang="en">

<head>
  <meta charset="UTF-8">
  <title>代理模式</title>
</head>

<body>
  <h1>代理模式</h1>
  <div id="box"></div>
  <script>
    const box = document.getElementById('box');
    const vueobj = {}
    const proxy = new Proxy(vueobj,{
      get(target, prop){
        return target[prop]
      },
      set(target, prop, value){
        if(prop === 'data'){
          box.innerHTML = value
        }
        target[prop] = value
      }
    })
    // 模拟vue数据变化
    proxy.data = 'Hello Proxy Pattern!'
    console.log(vueobj);
  </script>
</body>

</html>
模式七:观察者模式
观察者模式包含观察目标和观察者两个对象,一旦观察目标的状态发生改变,所有的观察者都会收到对应的通知。即当一个对象的状态发生改变时,所有依赖于它的对象都收到通知并触发更新函数,解决了主体对象与观察者直接功能的耦合
html
<!DOCTYPE html>
<html lang="en">
<head>
<meta charset="UTF-8">
<title>观察者模式</title>
</head>
<body>
<h1>观察者模式</h1>
<script>
class Subject {
constructor() {
this.observers = []
}
add(observer) {
this.observers.push(observer)
}
remove(observer) {
this.observers = this.observers.filter(item => item !== observer)
}
notify() {
this.observers.forEach(observer => {
observer.update()
});
}
}
class Observer {
constructor(name) {
this.name = name
}
update() {
console.log(this.name + ' 收到通知');
}
}
// 主体
const subject = new Subject()
// 观察者
const observer1 = new Observer('观察者1')
const observer2 = new Observer('观察者2')
// 添加观察者
subject.add(observer1)
subject.add(observer2)
console.log(subject.notify());
</script>
</body>
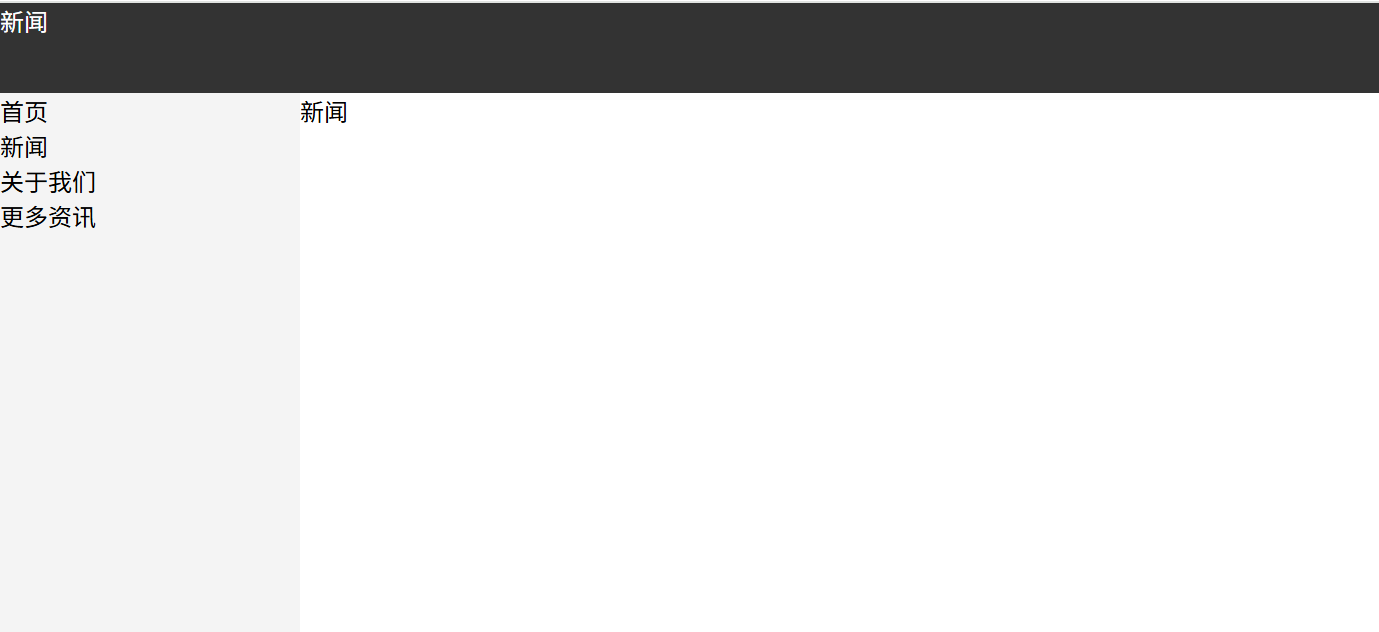
</html>应用:
点击左侧页面组件菜单头部及右侧面包屑组件同步更新菜单,有其他实现方法,此场景仅为基于无vue框架等最原始的实现方式,以下例子左侧菜单栏为观察目标,观察者为右侧和头部面包对应标题
html
<!DOCTYPE html>
<html lang="en">

<head>
  <meta charset="UTF-8">
  <title>观察者模式</title>
  <style>
    body{
      padding: 0;
      margin: 0;
    }
    .box{
      width: 100%;
    }
    ul,li{
      padding: 0;
      margin: 0;
      list-style: none;
    }
    li{
      cursor: pointer;
    }
    li:hover{
      background-color: #ddd;
      color: #fff;
    }
    .header{
      width: 100%;
      height: 60px;
      background-color: #333;
      color: #fff;
    }
    .left{
      width: 200px;
      background-color: #f4f4f4;
      float: left;
      height: calc(100vh - 60px);
    }
    .right{
      flex: 1;
      background-color: #fff;
    }
  </style>
</head>

<body>
  <div class="box">
    <div class="header">

    </div>
    <div class="left">
      <ul>
        <li>首页</li>
        <li>新闻</li>
        <li>关于我们</li>
        <li>更多资讯</li>
      </ul>
    </div>
    <div class="right">
      <div class="bread"></div>
    </div>
  </div>
  <script>
    class Subject {
      constructor() {
        this.observers = []
      }
      add(observer) {
        this.observers.push(observer)
      }
      remove(observer) {
        this.observers = this.observers.filter(item => item !== observer)
      }
      notify(data) {
        this.observers.forEach(observer => {
          observer.update(data)
        });
      }
    }
    class Observer {
      constructor(name) {
        this.ele = document.querySelector(name)
      }
      update(data) {
        this.ele.innerHTML = data
      }
    }
    // 主体
    const subject = new Subject()
    // 观察者
    const observer1 = new Observer('.bread')
    const observer2 = new Observer('.header')
    // 添加观察者
    subject.add(observer1)
    subject.add(observer2)
    console.log(subject.notify());
    let oli = document.querySelectorAll('.left ul li')
    for(let i = 0; i < oli.length; i++) {
      oli[i].onclick = function() {
        console.log('点击了' + this.innerHTML);
        subject.notify(this.innerHTML)
      }
    }
    oli[0].click()
  </script>
</body>

</html>
缺点:无法对事件通知进行管控,如筛选通知的对象和具体事件,因此有了下面的发布订阅模式
模式八:发布订阅模式
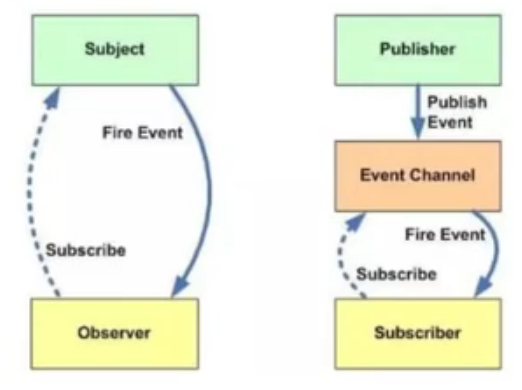
下面图片左边为观察者模式,整体即为整个发布订阅者模式,发布订阅者模式中,观察者和目标要相互知道,发布者和订阅者不需要相互知道,通过第三方实现调度,属于经过解耦合的观察者模式,个人理解与观察者模式的区别在于多传入了参数进行一些数据和事件类型的筛选,相当于观察模式结合了策略模式进行筛选,可以实现指定的类型加入观察不像观察者模式一样写了固定的方法与输出。
html
<!DOCTYPE html>
<html lang="en">

<head>
  <meta charset="UTF-8">
  <title>订阅发布者模式模式</title>
</head>

<body>
  <h1>订阅发布者模式模式</h1>
  <script>
    // publish发布
    // subscribe订阅
    const PubSub = {
      list: {},
      publish(type, data){
        if(!this.list[type]) return
        this.list[type].forEach(item => item(data))
      },
      subscribe(type,cb){
        if(!this.list[type]){
          this.list[type] = []
        }
        this.list[type].push(cb)
      },
      unSubscribe(type, cb){
        if(!this.list[type]) return
        this.list[type] = this.list[type].filter(item => item !== cb)
      }
    }

    function testA(data){
      console.log('testA', data);
    }
    function testB(data){
      console.log('testB', data);
    }
    PubSub.subscribe('testA', testA)
    PubSub.subscribe('testB', testB)
    console.log(PubSub.publish('testA', "aaaa"));
    console.log(PubSub.publish('testB', "bbbb"));
    // 取消订阅testA
    PubSub.unSubscribe('testA', testA)
    console.log(PubSub.publish('testA', "aaaa"));
    // 得到undefined
    // 重新订阅即可重新发布
  </script>
</body>

</html>
应用:
基于上面观察者模式去扩展应用发布订阅模式,修改后代码如下:
html
<!DOCTYPE html>
<html lang="en">

<head>
  <meta charset="UTF-8">
  <title>观察者模式</title>
  <style>
    body{
      padding: 0;
      margin: 0;
    }
    .box{
      width: 100%;
    }
    ul,li{
      padding: 0;
      margin: 0;
      list-style: none;
    }
    li{
      cursor: pointer;
    }
    li:hover{
      background-color: #ddd;
      color: #fff;
    }
    .header{
      width: 100%;
      height: 60px;
      background-color: #333;
      color: #fff;
    }
    .left{
      width: 200px;
      background-color: #f4f4f4;
      float: left;
      height: calc(100vh - 60px);
    }
    .right{
      flex: 1;
      background-color: #fff;
    }
  </style>
</head>

<body>
  <div class="box">
    <div class="header">

    </div>
    <div class="left">
      <ul>
        <li>首页</li>
        <li>新闻</li>
        <li>关于我们</li>
        <li>更多资讯</li>
      </ul>
    </div>
    <div class="right">
      <div class="bread"></div>
    </div>
  </div>
  <script>
    // publish发布
    // subscribe订阅
    const PubSub = {
      list: {},
      publish(type, data){
        if(!this.list[type]) return
        this.list[type].forEach(item => item(data))
      },
      subscribe(type,cb){
        if(!this.list[type]){
          this.list[type] = []
        }
        this.list[type].push(cb)
      },
      unSubscribe(type, cb){
        if(!this.list[type]) return
        if(!cb){
          this.message[type] && (this.message[type].length=0);
        }else{
          this.list[type] = this.list[type].filter(item => item !== cb)
        }

      }
    }

    function testA(data){
      console.log('testA', data);
    }
    function testB(data){
      console.log('testB', data);
    }
    PubSub.subscribe("UpdateBread",function(data){
      document.querySelector('.bread').innerHTML = data
    })
    PubSub.subscribe("UpdateHeader",function(data){
      document.querySelector('.header').innerHTML = data
    })
    let oli = document.querySelectorAll('.left ul li')
    for(let i = 0; i < oli.length; i++) {

      oli[i].onclick = function() {
        PubSub.publish("UpdateBread", this.innerHTML)
        PubSub.publish("UpdateHeader", this.innerHTML)
      }
    }
    PubSub.publish("UpdateBread", oli[0].innerHTML)
        PubSub.publish("UpdateHeader", oli[0].innerHTML)
  </script>
</body>

</html>
以上就是前端常用的设计模式及其应用,尽量用容易理解的语言输出,后续继续完善更正,如有觉得不对的地方,也欢迎各位大神指出进行修正!