代码如下:
cpp
#include <openssl/evp.h>
#include <openssl/pem.h>
#include <openssl/err.h>
#include <iostream>
#include <string>
void handleErrors() {
ERR_print_errors_fp(stderr);
abort();
}
// 生成SM2密钥对并保存到文件
void generate_sm2_keypair(const char* pub_key_file, const char* priv_key_file) {
EVP_PKEY_CTX* ctx = EVP_PKEY_CTX_new_id(EVP_PKEY_EC, NULL);
if (!ctx) handleErrors();
if (EVP_PKEY_keygen_init(ctx) <= 0) handleErrors();
if (EVP_PKEY_CTX_set_ec_paramgen_curve_nid(ctx, NID_sm2) <= 0) handleErrors();
EVP_PKEY* pkey = NULL;
if (EVP_PKEY_keygen(ctx, &pkey) <= 0) handleErrors();
// 保存公钥
BIO* pub_bio = BIO_new_file(pub_key_file, "w");
if (!pub_bio) handleErrors();
if (!PEM_write_bio_PUBKEY(pub_bio, pkey)) handleErrors();
// 保存私钥
BIO* priv_bio = BIO_new_file(priv_key_file, "w");
if (!priv_bio) handleErrors();
if (!PEM_write_bio_PrivateKey(priv_bio, pkey, NULL, NULL, 0, NULL, NULL)) handleErrors();
BIO_free(pub_bio);
BIO_free(priv_bio);
EVP_PKEY_free(pkey);
EVP_PKEY_CTX_free(ctx);
}
// SM2加密
std::string sm2_encrypt(EVP_PKEY* pub_key, const std::string& plaintext) {
EVP_PKEY_CTX* ctx = EVP_PKEY_CTX_new(pub_key, NULL);
if (!ctx) handleErrors();
if (EVP_PKEY_encrypt_init(ctx) <= 0) handleErrors();
size_t ciphertext_len;
if (EVP_PKEY_encrypt(ctx, NULL, &ciphertext_len,
(const unsigned char*)plaintext.c_str(), plaintext.size()) <= 0) {
handleErrors();
}
unsigned char* ciphertext = (unsigned char*)OPENSSL_malloc(ciphertext_len);
if (!ciphertext) handleErrors();
if (EVP_PKEY_encrypt(ctx, ciphertext, &ciphertext_len,
(const unsigned char*)plaintext.c_str(), plaintext.size()) <= 0) {
handleErrors();
}
std::string result((char*)ciphertext, ciphertext_len);
OPENSSL_free(ciphertext);
EVP_PKEY_CTX_free(ctx);
return result;
}
// SM2解密
std::string sm2_decrypt(EVP_PKEY* priv_key, const std::string& ciphertext) {
EVP_PKEY_CTX* ctx = EVP_PKEY_CTX_new(priv_key, NULL);
if (!ctx) handleErrors();
if (EVP_PKEY_decrypt_init(ctx) <= 0) handleErrors();
size_t plaintext_len;
if (EVP_PKEY_decrypt(ctx, NULL, &plaintext_len,
(const unsigned char*)ciphertext.c_str(), ciphertext.size()) <= 0) {
handleErrors();
}
unsigned char* plaintext = (unsigned char*)OPENSSL_malloc(plaintext_len);
if (!plaintext) handleErrors();
if (EVP_PKEY_decrypt(ctx, plaintext, &plaintext_len,
(const unsigned char*)ciphertext.c_str(), ciphertext.size()) <= 0) {
handleErrors();
}
std::string result((char*)plaintext, plaintext_len);
OPENSSL_free(plaintext);
EVP_PKEY_CTX_free(ctx);
return result;
}
int main() {
OpenSSL_add_all_algorithms();
ERR_load_crypto_strings();
const char* pub_key_file = "sm2_pub.pem";
const char* priv_key_file = "sm2_priv.pem";
// 1. 生成SM2密钥对
generate_sm2_keypair(pub_key_file, priv_key_file);
std::cout << "SM2密钥对已生成\n";
// 2. 加载公钥
BIO* pub_bio = BIO_new_file(pub_key_file, "r");
if (!pub_bio) handleErrors();
EVP_PKEY* pub_key = PEM_read_bio_PUBKEY(pub_bio, NULL, NULL, NULL);
BIO_free(pub_bio);
if (!pub_key) handleErrors();
// 3. 加载私钥
BIO* priv_bio = BIO_new_file(priv_key_file, "r");
if (!priv_bio) handleErrors();
EVP_PKEY* priv_key = PEM_read_bio_PrivateKey(priv_bio, NULL, NULL, NULL);
BIO_free(priv_bio);
if (!priv_key) handleErrors();
// 4. 加密测试
std::string plaintext = "Hello, SM2 encryption with OpenSSL 3.5!";
std::string ciphertext = sm2_encrypt(pub_key, plaintext);
std::cout << "加密成功\n";
// 5. 解密测试
std::string decrypted = sm2_decrypt(priv_key, ciphertext);
std::cout << "解密结果: " << decrypted << "\n";
// 6. 验证
if (decrypted == plaintext) {
std::cout << "SM2加密解密验证成功!\n";
} else {
std::cout << "验证失败!\n";
}
EVP_PKEY_free(pub_key);
EVP_PKEY_free(priv_key);
EVP_cleanup();
ERR_free_strings();
return 0;
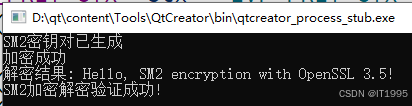
}运行截图如下:
代码功能说明:
① 使用OpenSSL 3.5的EVP API实现SM2加密解密,支持密钥生成、数据加密和解密操作;
② 生成SM2密钥对并保存为PEM格式文件,包含公钥和私钥;
③ 实现了完整的加密解密流程,包括错误处理;
④ 使用NID_sm2指定SM2椭圆曲线参数;
⑤ 包含内存管理和资源释放,避免内存泄漏。
⑥ 代码中通过OpenSSL的NID_sm2参数指定使用SM2椭圆曲线,这是国密标准中定义的曲线。以下是关键点说明:
a. 密钥生成:使用EVP_PKEY_CTX_set_ec_paramgen_curve_nid设置NID_sm2曲线。
b. 加密解密:通过EVP_PKEY_encrypt/decrypt接口实现。