摘要
本文是"PyVista雷达电子对抗战场态势仿真"系列博客的第一篇,将全面介绍如何使用PyVista构建基础的3D战场可视化环境。内容涵盖PyVista核心概念、战场地形创建、作战单位模型设计以及场景集成,同时提供简化版和高保真版两种实现方案。通过完整的代码示例和深入的技术解析,帮助读者快速掌握3D战场可视化的核心技术。
1. 引言:为什么选择PyVista进行战场可视化?
在现代军事仿真和训练系统中,3D战场态势可视化扮演着至关重要的角色。传统的2D平面显示虽然简洁,但无法充分展现战场的高度信息、地形起伏、电磁环境等关键要素。PyVista作为基于VTK的Python可视化库,为战场3D可视化提供了强大的技术支撑。
1.1 PyVista在军事仿真中的优势
跨学科融合能力
PyVista的"领域无关"特性使其能够完美适应军事仿真的多学科需求。从地理信息系统(GIS)的地形处理,到计算流体力学(CFD)的电磁场模拟,再到计算机图形学的实时渲染,PyVista提供了统一的解决方案。
性能与易用性的平衡
相较于直接使用VTK的复杂接口,PyVista通过NumPy风格的数组操作和Pythonic的API设计,大幅降低了3D可视化的技术门槛。同时,基于C++的VTK后端保证了渲染性能,能够处理大规模战场数据。
开源生态的丰富资源
作为开源项目,PyVista可以无缝集成Python科学计算生态中的其他工具,如NumPy、SciPy、Pandas等,为战场数据处理和分析提供完整的工作流。
1.2 本系列博客的教学设计理念
双版本代码策略
为满足不同层次读者的需求,本系列采用"简化版+高保真版"的双版本代码设计:
-
简化版:侧重算法原理和核心功能实现,代码简洁,依赖少,适合快速学习和原型开发
-
高保真版:注重视觉效果和工程实践,包含优化技巧和高级特性,适合项目应用
渐进式学习路径
从基础的3D场景构建开始,逐步引入雷达探测、电子对抗、电磁态势等高级主题,确保读者能够循序渐进地掌握完整的技术栈。
2. 环境配置与基础概念
2.1 安装与依赖管理
核心依赖包
bash
# 基础科学计算栈
pip install numpy scipy matplotlib pandas

# PyVista核心库
pip install pyvista

# 可选:用于地理数据处理的扩展库
pip install rasterio geopandas

# 可选:用于高保真版的高级功能
pip install pyvistaqt imageio
验证安装
bash
import pyvista as pv
print(f"PyVista版本: {pv.__version__}")

# 测试基础功能
pl = pv.Plotter()
pl.add_mesh(pv.Sphere())
pl.show()
2.2 PyVista核心概念解析
数据集合(DataSet)体系
PyVista的核心是各种类型的DataSet,它们构成了3D可视化的基础数据结构:
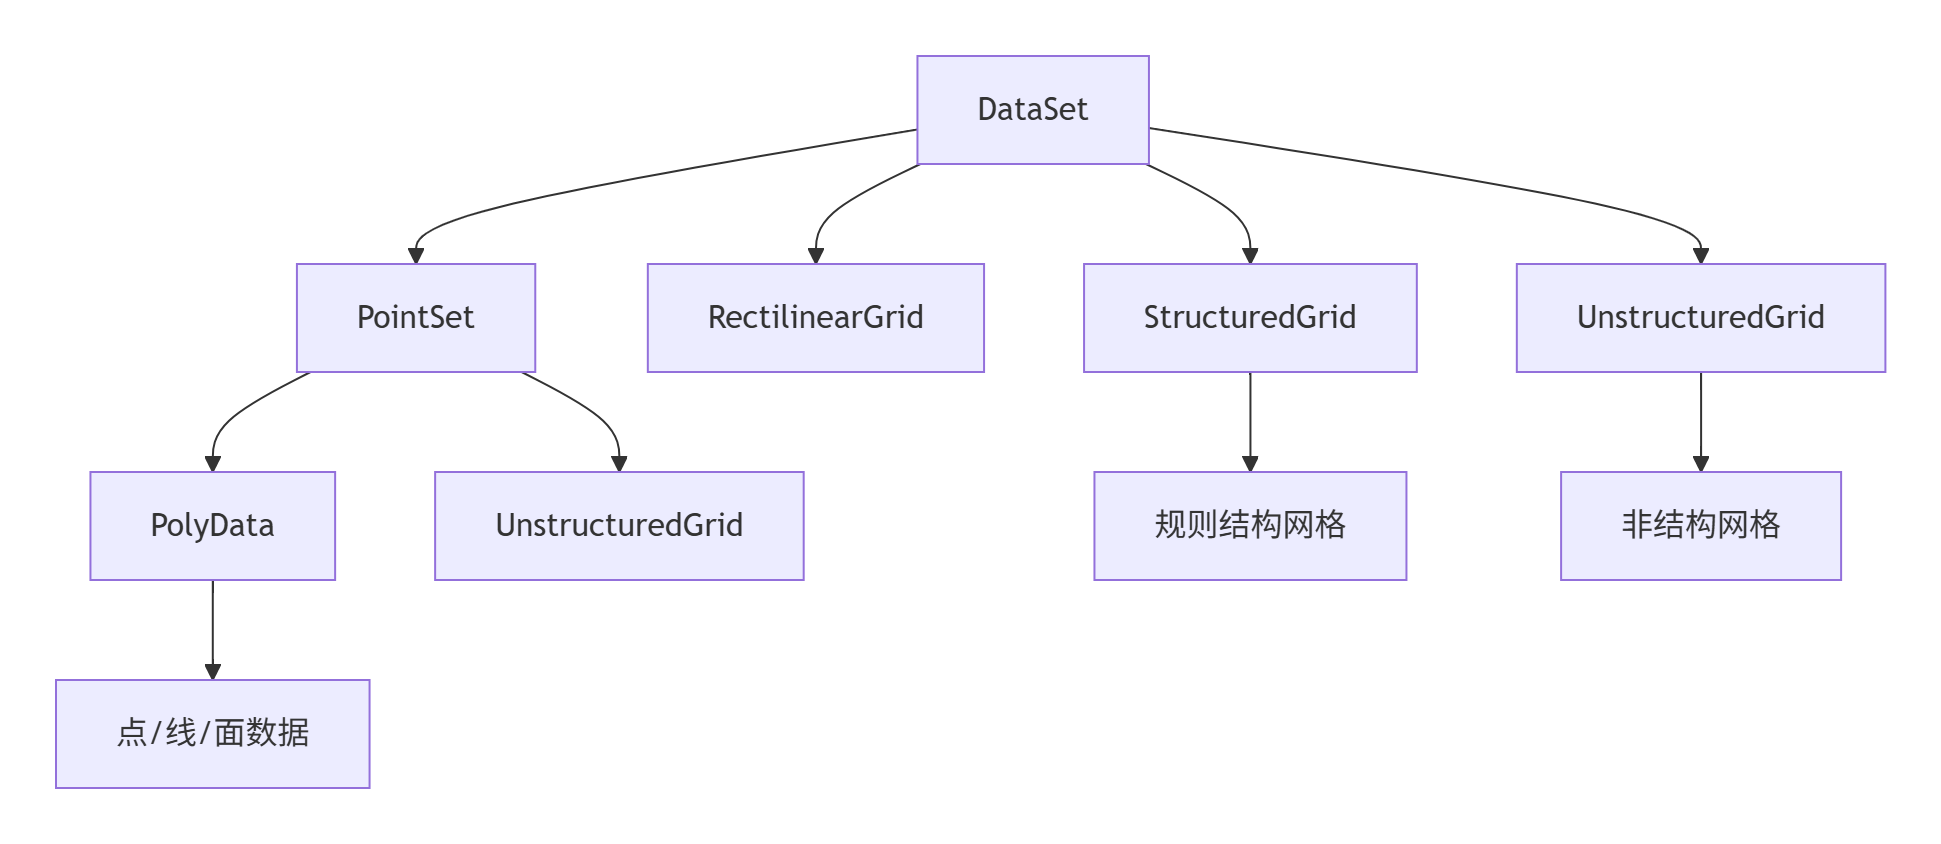
关键概念说明
-
点(Points):几何体的顶点坐标,N×3的NumPy数组
-
单元(Cells):连接点构成的基本几何元素(三角形、四边形等)
-
场数据(Field Data):与点或单元关联的物理量(如高程、温度、应力等)
3. 战场地形可视化
地形是战场环境的基础,准确的地形表示对于军事仿真至关重要。我们将从简化版到高保真版逐步构建地形可视化系统。
3.1 简化版地形:程序化生成
基础高度场生成
python
import numpy as np
import pyvista as pv

class SimpleTerrain:
    """简化版地形生成器"""

    def __init__(self, size=100, resolution=50):
        self.size = size
        self.resolution = resolution
        self.x = np.linspace(-size/2, size/2, resolution)
        self.y = np.linspace(-size/2, size/2, resolution)
        self.xx, self.yy = np.meshgrid(self.x, self.y)

    def generate_hills(self, amplitude=10, frequency=0.1):
        """生成丘陵地形"""
        # 使用正弦函数组合创建自然起伏
        z1 = amplitude * np.sin(frequency * self.xx) * np.sin(frequency * self.yy)
        z2 = 0.5 * amplitude * np.sin(2*frequency * self.xx) * np.cos(2*frequency * self.yy)
        elevation = z1 + z2

        # 创建网格
        terrain = pv.StructuredGrid(self.xx, self.yy, elevation)
        terrain["elevation"] = elevation.ravel()
        return terrain

    def generate_valley(self, depth=15, width=20):
        """生成山谷地形"""
        # 创建基本平面
        elevation = np.zeros_like(self.xx)

        # 添加山谷
        distance_from_center = np.sqrt(self.xx**2 + self.yy**2)
        valley_profile = depth * np.exp(-(distance_from_center**2) / (2 * width**2))
        elevation -= valley_profile

        terrain = pv.StructuredGrid(self.xx, self.yy, elevation)
        terrain["elevation"] = elevation.ravel()
        return terrain
地形可视化与纹理映射
python
def visualize_simple_terrain():
    """简化版地形可视化"""
    terrain_gen = SimpleTerrain(size=200, resolution=100)

    # 生成多种地形
    hills = terrain_gen.generate_hills(amplitude=15, frequency=0.05)
    valley = terrain_gen.generate_valley(depth=20, width=30)

    # 创建绘图窗口
    plotter = pv.Plotter(window_size=[1200, 800])

    # 添加丘陵地形
    plotter.add_mesh(hills, cmap='terrain', scalars='elevation',
                    show_edges=False, lighting=True)

    # 设置相机位置
    plotter.camera_position = [(300, 300, 100), (0, 0, 0), (0, 0, 1)]

    # 添加标尺和背景
    plotter.add_axes()
    plotter.set_background('skyblue', top='white')

    plotter.show()

if __name__ == "__main__":
    visualize_simple_terrain()
3.2 高保真版地形:真实DEM数据集成
真实地理数据处理
python
import rasterio
from rasterio.transform import from_origin
import pyvista as pv

class HighFidelityTerrain:
    """高保真版地形处理器"""

    def __init__(self):
        self.dem_data = None
        self.transform = None

    def load_dem_from_file(self, filepath):
        """从GeoTIFF文件加载DEM数据"""
        with rasterio.open(filepath) as dataset:
            self.dem_data = dataset.read(1)
            self.transform = dataset.transform

            # 创建坐标网格
            rows, cols = self.dem_data.shape
            x = np.arange(cols) * self.transform[0] + self.transform[2]
            y = np.arange(rows) * self.transform[4] + self.transform[5]
            xx, yy = np.meshgrid(x, y)

            return xx, yy, self.dem_data

    def create_realistic_terrain(self, dem_file=None, exaggeration=1.0):
        """创建真实感地形"""
        if dem_file:
            # 从文件加载真实DEM数据
            xx, yy, elevation = self.load_dem_from_file(dem_file)
        else:
            # 生成模拟的高分辨率地形
            size = 1000
            resolution = 500
            x = np.linspace(-size/2, size/2, resolution)
            y = np.linspace(-size/2, size/2, resolution)
            xx, yy = np.meshgrid(x, y)

            # 使用分形噪声生成更自然的地形
            elevation = self._generate_fractal_terrain(resolution, octaves=6)
            elevation = elevation * 100 * exaggeration  # 高程夸张系数

        # 应用高程夸张
        elevation = elevation * exaggeration

        # 创建高分辨率网格
        terrain = pv.StructuredGrid(xx, yy, elevation)
        terrain["elevation"] = elevation.ravel()

        return terrain

    def _generate_fractal_terrain(self, size, octaves=6):
        """生成分形地形噪声"""
        shape = (size, size)
        persistence = 0.5
        lacunarity = 2.0

        # 基础噪声层
        base = np.random.rand(*shape)
        terrain = np.zeros(shape)

        for octave in range(octaves):
            frequency = lacunarity ** octave
            amplitude = persistence ** octave

            # 创建更细密的噪声
            octave_noise = np.zeros(shape)
            for i in range(shape[0]):
                for j in range(shape[1]):
                    x_idx = int(i * frequency) % shape[0]
                    y_idx = int(j * frequency) % shape[1]
                    octave_noise[i, j] = base[x_idx, y_idx]

            terrain += octave_noise * amplitude

        # 标准化
        terrain = (terrain - terrain.min()) / (terrain.max() - terrain.min())
        return terrain

    def add_terrain_textures(self, terrain, texture_type='satellite'):
        """添加地形纹理"""
        if texture_type == 'satellite':
            # 模拟卫星影像纹理
            cmap = 'gist_earth'
        elif texture_type == 'elevation':
            cmap = 'terrain'
        elif texture_type == 'military':
            # 军事地图风格
            cmap = 'viridis'
        else:
            cmap = 'terrain'

        return cmap
高级地形渲染技术
python
def create_advanced_terrain_scene():
    """创建高级地形场景"""
    terrain_gen = HighFidelityTerrain()

    # 生成高细节地形
    terrain = terrain_gen.create_realistic_terrain(exaggeration=1.5)

    # 创建高级绘图窗口
    plotter = pv.Plotter(window_size=[1600, 900],
                         lighting='three lights',
                         multi_samples=4)  # 抗锯齿

    # 添加带光照的地形
    cmap = terrain_gen.add_terrain_textures(terrain, 'military')
    terrain_actor = plotter.add_mesh(terrain, cmap=cmap, scalars='elevation',
                                   smooth_shading=True,
                                   specular=0.3,  # 高光强度
                                   specular_power=20,
                                   show_edges=False)

    # 添加等高线
    contours = terrain.contour(10, scalars='elevation')
    plotter.add_mesh(contours, color='black', line_width=2, opacity=0.5)

    # 高级相机控制
    plotter.camera_position = [(2000, 2000, 800), (0, 0, 100), (0, 0, 1)]
    plotter.camera_set = True

    # 添加指北针和比例尺
    plotter.add_axes_interactive()
    plotter.add_bounds_axes(terrain)

    # 设置天空盒背景
    plotter.set_background('linear_gradient',
                          bottom='#1e3c72',
                          top='#2a5298')

    return plotter, terrain
4. 作战单位模型设计
战场单位的可视化需要兼顾识别性和性能。我们将设计从简化的几何表示到高细节3D模型的全套方案。
4.1 简化版单位模型:参数化几何体
基础单位类设计
python
class BattlefieldUnit:
    """战场单位基类"""

    def __init__(self, position, unit_id, unit_type):
        self.position = np.array(position, dtype=float)
        self.unit_id = unit_id
        self.unit_type = unit_type
        self.mesh = None
        self.color = None
        self.orientation = 0  # 朝向角度(度)

    def create_simplified_geometry(self, scale=1.0):
        """创建简化版几何体(由子类实现)"""
        raise NotImplementedError

    def update_position(self, new_position):
        """更新单位位置"""
        if self.mesh is not None:
            # 计算位移向量
            displacement = np.array(new_position) - self.position
            self.mesh.translate(displacement, inplace=True)
        self.position = np.array(new_position)

    def set_orientation(self, angle_degrees):
        """设置单位朝向"""
        if self.mesh is not None:
            # 绕Z轴旋转
            self.mesh.rotate_z(angle_degrees - self.orientation, inplace=True)
            self.orientation = angle_degrees

class RadarUnit(BattlefieldUnit):
    """雷达单位"""

    def __init__(self, position, unit_id, radar_range=100, beam_width=30):
        super().__init__(position, unit_id, 'radar')
        self.radar_range = radar_range
        self.beam_width = beam_width
        self.color = 'red'

    def create_simplified_geometry(self, scale=1.0):
        """创建简化雷达模型"""
        # 雷达基座 - 圆柱体
        base = pv.Cylinder(center=[0, 0, 2], direction=[0, 0, 1],
                          radius=5*scale, height=4)

        # 雷达天线 - 抛物面简化表示
        antenna = pv.Cone(center=[0, 0, 8], direction=[1, 0, 0],
                         height=8*scale, radius=3*scale)

        # 合并几何体
        self.mesh = base.boolean_union(antenna)
        self.mesh.translate(self.position, inplace=True)

        return self.mesh

class AircraftUnit(BattlefieldUnit):
    """飞机单位"""

    def __init__(self, position, unit_id, aircraft_type='fighter'):
        super().__init__(position, unit_id, 'aircraft')
        self.aircraft_type = aircraft_type
        self.color = 'blue'
        self.altitude = position[2] if len(position) > 2 else 50

    def create_simplified_geometry(self, scale=1.0):
        """创建简化飞机模型"""
        # 机身 - 椭球体
        fuselage = pv.ParametricEllipsoid(5*scale, 1.5*scale, 1.5*scale)

        # 机翼
        wing_points = np.array([[-6, -8, 0], [-6, 8, 0],
                               [2, 8, 0], [2, -8, 0]])
        wing_faces = np.array([4, 0, 1, 2, 3])
        wing = pv.PolyData(wing_points, wing_faces)
        wing = wing.triangulate().extrude([0, 0, 0.5*scale])

        # 垂直尾翼
        tail_points = np.array([[-5, 0, 0], [-7, 0, 2],
                               [-3, 0, 2], [-5, 0, 4]])
        tail_faces = np.array([4, 0, 1, 2, 3])
        tail = pv.PolyData(tail_points, tail_faces)
        tail = tail.triangulate().extrude([0, 0.5*scale, 0])

        # 合并所有部件
        aircraft = fuselage.boolean_union(wing)
        aircraft = aircraft.boolean_union(tail)

        # 定位到正确位置和姿态
        aircraft.rotate_x(90, inplace=True)  # 水平飞行姿态
        aircraft.translate([0, 0, self.altitude], inplace=True)
        aircraft.translate(self.position, inplace=True)

        self.mesh = aircraft
        return self.mesh

class VehicleUnit(BattlefieldUnit):
    """地面车辆单位"""

    def __init__(self, position, unit_id, vehicle_type='apc'):
        super().__init__(position, unit_id, 'vehicle')
        self.vehicle_type = vehicle_type
        self.color = 'green'

    def create_simplified_geometry(self, scale=1.0):
        """创建简化车辆模型"""
        # 车体 - 长方体
        chassis = pv.Cube(center=[0, 0, 1.5*scale],
                         x_length=6*scale,
                         y_length=3*scale,
                         z_length=2*scale)

        # 炮塔 - 圆柱体
        turret = pv.Cylinder(center=[1.5*scale, 0, 3.5*scale],
                            direction=[0, 0, 1],
                            radius=1.5*scale, height=2*scale)

        # 炮管
        gun = pv.Cylinder(center=[3*scale, 0, 3.5*scale],
                         direction=[1, 0, 0],
                         radius=0.3*scale, height=4*scale)

        # 合并几何体
        vehicle = chassis.boolean_union(turret)
        vehicle = vehicle.boolean_union(gun)
        vehicle.translate(self.position, inplace=True)

        self.mesh = vehicle
        return self.mesh
4.2 高保真版单位模型:精细3D建模
高级单位模型类
python
class HighFidelityUnit(BattlefieldUnit):
    """高保真单位模型"""

    def __init__(self, position, unit_id, unit_type, model_file=None):
        super().__init__(position, unit_id, unit_type)
        self.model_file = model_file
        self.detailed_mesh = None
        self.texture_image = None

    def load_external_model(self, filepath):
        """加载外部3D模型文件"""
        try:
            # 支持STL, OBJ, PLY等格式
            mesh = pv.read(filepath)
            self.detailed_mesh = mesh
            return mesh
        except Exception as e:
            print(f"模型加载失败: {e}")
            return self.create_high_detail_geometry()

    def create_high_detail_radar(self, scale=1.0):
        """创建高细节雷达模型"""
        # 更精细的雷达塔结构
        tower = pv.Cylinder(center=[0, 0, 10], direction=[0, 0, 1],
                           radius=2*scale, height=20*scale)

        # 雷达天线罩
        radome = pv.Sphere(center=[8*scale, 0, 25*scale], radius=4*scale)

        # 支撑结构
        support = pv.Cone(center=[4*scale, 0, 20*scale], direction=[1, 0, 0],
                         height=8*scale, radius=0.5*scale)

        # 添加更多细节部件
        platform = pv.Cylinder(center=[0, 0, 20*scale], direction=[0, 0, 1],
                              radius=6*scale, height=1*scale)

        # 组合所有部件
        radar = tower.boolean_union(platform)
        radar = radar.boolean_union(radome)
        radar = radar.boolean_union(support)

        # 应用平滑处理
        radar = radar.smooth(n_iter=10)

        return radar

    def apply_unit_texture(self, mesh, texture_type):
        """应用单位纹理"""
        # 根据单位类型选择纹理
        textures = {
            'radar': 'gray_metallic',
            'aircraft': 'military_camo',
            'vehicle': 'green_camo'
        }

        # 这里可以集成实际纹理映射逻辑
        # 简化版中使用颜色代替
        color_map = {
            'gray_metallic': '#808080',
            'military_camo': '#556B2F',
            'green_camo': '#006400'
        }

        return color_map.get(texture_type, '#FFFFFF')

    def add_animated_components(self, mesh):
        """添加动画组件(如雷达旋转)"""
        # 为雷达天线添加旋转属性
        if self.unit_type == 'radar':
            # 标记可旋转部件
            mesh.field_data['rotatable'] = [1]
            mesh.field_data['rotation_axis'] = [0, 0, 1]  # Z轴旋转
            mesh.field_data['rotation_speed'] = [10]  # 度/秒
        return mesh
5. 战场场景集成与管理
将地形和单位整合成完整的战场场景,并实现场景管理功能。
5.1 场景管理器设计
完整的场景管理器类,包含太阳位置计算、单位管理和场景更新功能
python
import numpy as np
import pyvista as pv
from datetime import datetime
import math
class BattlefieldScene:
"""战场场景管理器"""
def __init__(self, scene_name="Battlefield", use_high_fidelity=False):
self.scene_name = scene_name
self.use_high_fidelity = use_high_fidelity
self.terrain = None
self.units = {} # 单位字典 {unit_id: unit_object}
self.plotter = None
self.unit_counter = 0
# 场景参数
self.scene_bounds = [-1000, 1000, -1000, 1000, -100, 500]
self.time_of_day = 12.0 # 小时制,用于光照计算
self.latitude = 40.0 # 纬度(度),用于太阳位置计算
self.longitude = 116.0 # 经度(度)
# 场景状态
self.is_initialized = False
self.current_time = 0.0 # 仿真时间(秒)
self.time_scale = 1.0 # 时间缩放因子
# 光照系统
self.lights = []
def _calculate_sun_altitude(self, time_hour, day_of_year=None):
"""
计算太阳高度角(仰角)
参数:
time_hour: 小时(0-24)
day_of_year: 一年中的第几天(1-365),None表示使用当前日期
返回:
太阳高度角(度),0-90
"""
if day_of_year is None:
# 使用当前日期
day_of_year = datetime.now().timetuple().tm_yday
# 1. 计算太阳赤纬
declination = 23.45 * math.sin(math.radians(360 * (284 + day_of_year) / 365))
# 2. 计算时角
solar_noon = 12.0
time_diff = time_hour - solar_noon
hour_angle = 15 * time_diff # 时角,15度/小时
# 3. 转换为弧度
lat_rad = math.radians(self.latitude)
dec_rad = math.radians(declination)
ha_rad = math.radians(hour_angle)
# 4. 计算太阳高度角
sin_altitude = (math.sin(lat_rad) * math.sin(dec_rad) +
math.cos(lat_rad) * math.cos(dec_rad) * math.cos(ha_rad))
# 确保在有效范围内
sin_altitude = max(-1.0, min(1.0, sin_altitude))
altitude = math.degrees(math.asin(sin_altitude))
return max(0, altitude) # 返回正值
def _calculate_sun_azimuth(self, time_hour, day_of_year=None):
"""
计算太阳方位角
参数:
time_hour: 小时(0-24)
day_of_year: 一年中的第几天(1-365)
返回:
太阳方位角(度),0-360(正北为0,顺时针增加)
"""
if day_of_year is None:
day_of_year = datetime.now().timetuple().tm_yday
# 计算太阳赤纬
declination = 23.45 * math.sin(math.radians(360 * (284 + day_of_year) / 365))
# 计算时角
solar_noon = 12.0
time_diff = time_hour - solar_noon
hour_angle = 15 * time_diff
# 转换为弧度
lat_rad = math.radians(self.latitude)
dec_rad = math.radians(declination)
ha_rad = math.radians(hour_angle)
# 计算太阳高度角
altitude = math.radians(self._calculate_sun_altitude(time_hour, day_of_year))
# 计算方位角
if altitude <= 0.1: # 太阳在地平线以下
return 180 # 默认南方
cos_azimuth = (math.sin(dec_rad) - math.sin(lat_rad) * math.sin(altitude)) / \
(math.cos(lat_rad) * math.cos(altitude))
cos_azimuth = max(-1.0, min(1.0, cos_azimuth))
azimuth = math.degrees(math.acos(cos_azimuth))
# 调整方位角方向
if hour_angle > 0: # 下午
azimuth = 360 - azimuth
return azimuth
def _setup_lighting(self):
"""设置场景光照系统"""
if not self.plotter:
return
# 清除现有光源
for light in self.lights:
self.plotter.remove_light(light)
self.lights = []
if self.use_high_fidelity:
# 高保真光照系统
self._setup_hifi_lighting()
else:
# 简化光照系统
self._setup_simple_lighting()
def _setup_hifi_lighting(self):
"""设置高保真光照系统"""
# 1. 主光源(太阳)
sun_altitude = self._calculate_sun_altitude(self.time_of_day)
sun_azimuth = self._calculate_sun_azimuth(self.time_of_day)
# 计算太阳位置(球坐标转直角坐标)
distance = 10000 # 光源距离
sun_x = distance * math.cos(math.radians(sun_altitude)) * math.sin(math.radians(sun_azimuth))
sun_y = distance * math.cos(math.radians(sun_altitude)) * math.cos(math.radians(sun_azimuth))
sun_z = distance * math.sin(math.radians(sun_altitude))
# 创建太阳光源
sun_light = pv.Light(
position=(sun_x, sun_y, sun_z),
focal_point=(0, 0, 0),
light_type='scene light',
intensity=0.8,
color='white'
)
self.plotter.add_light(sun_light)
self.lights.append(sun_light)
# 2. 环境光
ambient_light = pv.Light(
position=(0, 0, 1000),
focal_point=(0, 0, 0),
light_type='headlight',
intensity=0.2,
color=(0.9, 0.9, 1.0) # 略带蓝色的环境光
)
self.plotter.add_light(ambient_light)
self.lights.append(ambient_light)
# 3. 补光
if sun_altitude < 30: # 太阳较低时增加补光
fill_light = pv.Light(
position=(-sun_x/2, -sun_y/2, 500),
focal_point=(0, 0, 0),
intensity=0.3,
color='white'
)
self.plotter.add_light(fill_light)
self.lights.append(fill_light)
def _setup_simple_lighting(self):
"""设置简化光照系统"""
# 单个主光源
main_light = pv.Light(
position=(1000, 1000, 1000),
focal_point=(0, 0, 0),
intensity=0.7,
color='white'
)
self.plotter.add_light(main_light)
self.lights.append(main_light)
# 简化的环境光
ambient_light = pv.Light(
position=(0, 0, 500),
focal_point=(0, 0, 0),
light_type='headlight',
intensity=0.3,
color='white'
)
self.plotter.add_light(ambient_light)
self.lights.append(ambient_light)
def add_unit(self, unit_class, position, **kwargs):
"""添加作战单位到场景"""
self.unit_counter += 1
unit_id = f"{unit_class.__name__}_{self.unit_counter}"
# 创建单位实例
if self.use_high_fidelity and 'HighFidelity' in globals():
# 使用高保真单位
unit = unit_class(position=position, unit_id=unit_id, **kwargs)
if hasattr(unit, 'load_external_model') and kwargs.get('model_file'):
mesh = unit.load_external_model(kwargs['model_file'])
else:
mesh = unit.create_high_detail_geometry(scale=kwargs.get('scale', 1.0))
else:
# 使用简化单位
unit = unit_class(position=position, unit_id=unit_id, **kwargs)
mesh = unit.create_simplified_geometry(scale=kwargs.get('scale', 1.0))
# 添加到场景
if mesh and self.plotter:
unit_actor = self.plotter.add_mesh(
mesh,
color=unit.color,
name=unit_id,
show_edges=False
)
unit.actor = unit_actor
# 存储单位
self.units[unit_id] = unit
return unit_id
def remove_unit(self, unit_id):
"""从场景中移除单位"""
if unit_id in self.units:
unit = self.units[unit_id]
if hasattr(unit, 'actor') and unit.actor and self.plotter:
self.plotter.remove_actor(unit.actor)
del self.units[unit_id]
return True
return False
def update_unit_position(self, unit_id, new_position, orientation=None):
"""更新单位位置和朝向"""
if unit_id in self.units:
unit = self.units[unit_id]
# 移除旧的actor
if hasattr(unit, 'actor') and unit.actor and self.plotter:
self.plotter.remove_actor(unit.actor)
# 更新单位位置
unit.update_position(new_position)
# 更新单位朝向
if orientation is not None:
unit.set_orientation(orientation)
# 重新添加单位到场景
if hasattr(unit, 'mesh') and unit.mesh and self.plotter:
unit.actor = self.plotter.add_mesh(
unit.mesh,
color=unit.color,
name=unit_id,
show_edges=False
)
return True
return False
def create_unit_group(self, unit_class, positions, **kwargs):
"""创建单位编组"""
group_ids = []
for position in positions:
unit_id = self.add_unit(unit_class, position, **kwargs)
group_ids.append(unit_id)
return group_ids
def update_scene_time(self, time_hour):
"""更新场景时间"""
self.time_of_day = time_hour % 24 # 确保在0-24范围内
# 更新光照
self._setup_lighting()
# 更新背景(如果使用高保真版)
if self.use_high_fidelity:
self._update_sky_background()
def _update_sky_background(self):
"""根据时间更新天空背景"""
if not self.plotter:
return
# 根据时间计算天空颜色
if 6 <= self.time_of_day < 18: # 白天
# 随时间变化的渐变
if self.time_of_day < 12: # 上午
intensity = (self.time_of_day - 6) / 6
top_color = self._interpolate_color('#87CEEB', '#FFFFFF', intensity)
else: # 下午
intensity = (18 - self.time_of_day) / 6
top_color = self._interpolate_color('#FFFFFF', '#FFA500', intensity)
bottom_color = '#1e3c72'
else: # 夜晚
# 夜晚的深蓝色
if self.time_of_day < 6: # 凌晨
intensity = self.time_of_day / 6
top_color = self._interpolate_color('#000033', '#1e3c72', intensity)
else: # 晚上
intensity = (24 - self.time_of_day) / 6
top_color = self._interpolate_color('#1e3c72', '#000033', intensity)
bottom_color = '#000011'
# 设置背景
self.plotter.set_background('linear_gradient',
bottom=bottom_color,
top=top_color)
def _interpolate_color(self, color1, color2, t):
"""颜色插值"""
import matplotlib.colors as mcolors
# 转换为RGB
rgb1 = np.array(mcolors.to_rgb(color1))
rgb2 = np.array(mcolors.to_rgb(color2))
# 线性插值
rgb = rgb1 + (rgb2 - rgb1) * t
# 转换为十六进制
return mcolors.to_hex(rgb)
def get_scene_snapshot(self, filepath=None, resolution=None):
"""获取场景快照"""
if not self.plotter:
return None
if resolution is None:
resolution = (1920, 1080) if self.use_high_fidelity else (1280, 720)
if filepath:
# 保存到文件
self.plotter.screenshot(filepath, window_size=resolution)
return filepath
else:
# 返回图像数据
return self.plotter.screenshot(window_size=resolution)
def export_scene(self, filepath, format='vtk'):
"""导出场景数据"""
if not self.terrain:
return False
try:
if format.lower() == 'vtk':
# 导出为VTK格式
self.terrain.save(filepath)
# 导出单位数据
unit_data = []
for unit_id, unit in self.units.items():
if hasattr(unit, 'mesh'):
unit_file = filepath.replace('.vtk', f'_{unit_id}.vtk')
unit.mesh.save(unit_file)
unit_data.append({
'id': unit_id,
'type': unit.unit_type,
'position': unit.position.tolist(),
'file': unit_file
})
# 保存元数据
import json
meta_file = filepath.replace('.vtk', '_meta.json')
metadata = {
'terrain_file': filepath,
'units': unit_data,
'time': self.time_of_day,
'bounds': self.scene_bounds
}
with open(meta_file, 'w') as f:
json.dump(metadata, f, indent=2)
return True
except Exception as e:
print(f"导出场景失败: {e}")
return False
def import_scene(self, filepath):
"""导入场景数据"""
try:
import json
import os
# 加载元数据
meta_file = filepath.replace('.vtk', '_meta.json')
if not os.path.exists(meta_file):
meta_file = filepath.replace('.vtk', '_meta.json')
with open(meta_file, 'r') as f:
metadata = json.load(f)
# 加载地形
self.terrain = pv.read(metadata['terrain_file'])
# 重新创建绘图窗口
if self.plotter:
self.plotter.close()
self.plotter = pv.Plotter(window_size=[1600, 900])
# 添加地形
self._add_terrain_to_scene()
# 加载单位
for unit_data in metadata.get('units', []):
unit_file = unit_data.get('file')
if unit_file and os.path.exists(unit_file):
unit_mesh = pv.read(unit_file)
# 创建单位actor
unit_actor = self.plotter.add_mesh(
unit_mesh,
color='gray', # 默认颜色
name=unit_data['id']
)
# 创建单位对象
unit_type = unit_data.get('type', 'unknown')
if unit_type == 'radar':
unit_class = RadarUnit
elif unit_type == 'aircraft':
unit_class = AircraftUnit
elif unit_type == 'vehicle':
unit_class = VehicleUnit
else:
continue
position = unit_data.get('position', [0, 0, 0])
unit = unit_class(position=position, unit_id=unit_data['id'])
unit.mesh = unit_mesh
unit.actor = unit_actor
self.units[unit_data['id']] = unit
# 恢复场景设置
self.time_of_day = metadata.get('time', 12.0)
self.scene_bounds = metadata.get('bounds', self.scene_bounds)
# 设置光照
self._setup_lighting()
return True
except Exception as e:
print(f"导入场景失败: {e}")
return False
def run_simulation(self, duration=60, time_step=1.0):
"""运行场景仿真"""
if not self.plotter or not self.is_initialized:
print("场景未初始化")
return
print(f"开始仿真: 持续时间={duration}s, 时间步长={time_step}s")
# 记录起始时间
import time
start_time = time.time()
# 仿真循环
for t in np.arange(0, duration, time_step):
self.current_time = t
# 更新场景时间
scene_hour = (self.time_of_day + t/3600) % 24
self.update_scene_time(scene_hour)
# 更新单位状态
self._update_units(time_step)
# 更新显示
if self.plotter and hasattr(self.plotter, 'app'):
self.plotter.update()
self.plotter.app.process_events()
# 控制帧率
elapsed = time.time() - start_time
target_time = t / self.time_scale
if elapsed < target_time:
time.sleep(target_time - elapsed)
print(f"仿真完成: 实际用时{time.time()-start_time:.2f}s")
def _update_units(self, time_step):
"""更新所有单位状态"""
for unit_id, unit in self.units.items():
# 这里可以添加单位的具体更新逻辑
if hasattr(unit, 'update_dynamics'):
unit.update_dynamics(time_step)
# 示例:简单的随机移动
if unit.unit_type == 'aircraft' and np.random.random() < 0.1:
# 随机移动飞机
new_pos = unit.position.copy()
new_pos[0] += np.random.uniform(-10, 10)
new_pos[1] += np.random.uniform(-10, 10)
new_pos[2] += np.random.uniform(-5, 5)
self.update_unit_position(unit_id, new_pos)
def show(self, interactive=True):
"""显示场景"""
if not self.plotter:
print("场景未初始化")
return
if interactive:
self.plotter.show()
else:
# 非交互式显示
self.plotter.render()
return self.plotter.image
def close(self):
"""关闭场景"""
if self.plotter:
self.plotter.close()
self.is_initialized = False5.2 场景配置管理器
用于管理和保存场景配置的辅助类
python
import json
import yaml
import pickle
from dataclasses import dataclass, asdict
from typing import List, Dict, Any, Optional

@dataclass
class SceneConfig:
    """场景配置数据类"""
    name: str
    description: str
    terrain_type: str
    terrain_params: Dict[str, Any]
    units: List[Dict[str, Any]]
    time_of_day: float
    weather: str
    bounds: List[float]

    @classmethod
    def from_dict(cls, data: Dict[str, Any]) -> 'SceneConfig':
        """从字典创建配置"""
        return cls(**data)

    def to_dict(self) -> Dict[str, Any]:
        """转换为字典"""
        return asdict(self)

class SceneConfigManager:
    """场景配置管理器"""

    def __init__(self, config_dir: str = "configs"):
        self.config_dir = config_dir
        self.configs: Dict[str, SceneConfig] = {}
        self.current_config: Optional[SceneConfig] = None

    def load_config(self, config_name: str, format: str = 'json') -> Optional[SceneConfig]:
        """加载场景配置"""
        filepath = f"{self.config_dir}/{config_name}.{format}"

        try:
            with open(filepath, 'r', encoding='utf-8') as f:
                if format == 'json':
                    data = json.load(f)
                elif format == 'yaml':
                    data = yaml.safe_load(f)
                elif format == 'pkl':
                    data = pickle.load(f)
                else:
                    print(f"不支持的格式: {format}")
                    return None

            config = SceneConfig.from_dict(data)
            self.configs[config_name] = config
            self.current_config = config

            return config

        except Exception as e:
            print(f"加载配置失败: {e}")
            return None

    def save_config(self, config_name: str, config: SceneConfig, format: str = 'json') -> bool:
        """保存场景配置"""
        import os

        # 确保配置目录存在
        os.makedirs(self.config_dir, exist_ok=True)

        filepath = f"{self.config_dir}/{config_name}.{format}"

        try:
            data = config.to_dict()

            with open(filepath, 'w', encoding='utf-8') as f:
                if format == 'json':
                    json.dump(data, f, indent=2, ensure_ascii=False)
                elif format == 'yaml':
                    yaml.dump(data, f, default_flow_style=False, allow_unicode=True)
                elif format == 'pkl':
                    pickle.dump(data, f)

            self.configs[config_name] = config
            return True

        except Exception as e:
            print(f"保存配置失败: {e}")
            return False

    def create_battlefield_config(self, scene: BattlefieldScene) -> SceneConfig:
        """从场景创建配置"""
        units_data = []

        for unit_id, unit in scene.units.items():
            unit_data = {
                'id': unit_id,
                'type': unit.unit_type,
                'position': unit.position.tolist() if hasattr(unit.position, 'tolist') else list(unit.position),
                'color': unit.color if hasattr(unit, 'color') else 'gray'
            }
            units_data.append(unit_data)

        config = SceneConfig(
            name=scene.scene_name,
            description="PyVista战场场景配置",
            terrain_type="synthetic" if not scene.use_high_fidelity else "realistic",
            terrain_params={
                'size': 1000,
                'resolution': 200
            },
            units=units_data,
            time_of_day=scene.time_of_day,
            weather="clear",
            bounds=scene.scene_bounds
        )

        return config

    def apply_config_to_scene(self, config: SceneConfig, scene: BattlefieldScene) -> bool:
        """将配置应用到场景"""
        try:
            # 清除现有单位
            scene.units.clear()

            # 设置场景参数
            scene.scene_name = config.name
            scene.time_of_day = config.time_of_day

            # 重新初始化地形
            if not scene.is_initialized:
                scene.initialize_scene()

            # 添加单位
            for unit_data in config.units:
                unit_type = unit_data.get('type', 'unknown')
                position = unit_data.get('position', [0, 0, 0])

                if unit_type == 'radar':
                    unit_class = RadarUnit
                elif unit_type == 'aircraft':
                    unit_class = AircraftUnit
                elif unit_type == 'vehicle':
                    unit_class = VehicleUnit
                else:
                    continue

                scene.add_unit(unit_class, position, **unit_data)

            return True

        except Exception as e:
            print(f"应用配置失败: {e}")
            return False
5.3 完整的场景示例
使用场景管理器创建和运行完整战场场景
python
def create_complete_battlefield_scene(use_high_fidelity=True):
    """创建完整的战场场景示例"""
    print("=" * 60)
    print("创建战场场景")
    print(f"模式: {'高保真' if use_high_fidelity else '简化'}")
    print("=" * 60)

    # 1. 创建场景管理器
    scene = BattlefieldScene(
        scene_name="红蓝对抗演习场景",
        use_high_fidelity=use_high_fidelity
    )

    # 2. 初始化场景
    if use_high_fidelity:
        scene.initialize_scene(terrain_size=2000, terrain_resolution=300)
    else:
        scene.initialize_scene(terrain_size=1000, terrain_resolution=150)

    # 3. 添加红方单位
    print("添加红方单位...")

    # 雷达站
    red_radar_id = scene.add_unit(
        RadarUnit,
        position=[-300, 200, 50],
        radar_range=500,
        beam_width=30
    )

    # 飞机编队
    red_aircraft_positions = [
        [-200, 100, 100],
        [-250, 150, 110],
        [-300, 200, 120],
        [-350, 250, 130]
    ]

    red_aircraft_ids = scene.create_unit_group(
        AircraftUnit,
        positions=red_aircraft_positions,
        aircraft_type='fighter'
    )

    # 地面车辆
    red_vehicle_ids = []
    for i in range(3):
        pos = [-400 + i*50, 300, 0]
        vehicle_id = scene.add_unit(VehicleUnit, pos, vehicle_type='tank')
        red_vehicle_ids.append(vehicle_id)

    # 4. 添加蓝方单位
    print("添加蓝方单位...")

    # 蓝方雷达
    blue_radar_id = scene.add_unit(
        RadarUnit,
        position=[300, -200, 50],
        radar_range=600,
        beam_width=25
    )

    # 设置蓝方颜色
    if blue_radar_id in scene.units:
        scene.units[blue_radar_id].color = 'blue'

    # 蓝方飞机
    blue_aircraft_positions = [
        [200, -100, 150],
        [250, -150, 160],
        [300, -200, 170]
    ]

    blue_aircraft_ids = scene.create_unit_group(
        AircraftUnit,
        positions=blue_aircraft_positions,
        aircraft_type='bomber'
    )

    # 设置蓝方飞机颜色
    for aircraft_id in blue_aircraft_ids:
        if aircraft_id in scene.units:
            scene.units[aircraft_id].color = 'blue'

    # 5. 设置场景时间
    scene.update_scene_time(14.5)  # 下午2:30

    # 6. 显示场景统计
    print("\n场景统计:")
    print(f"地形分辨率: {scene.terrain.n_points} 个点")
    print(f"单位数量: {len(scene.units)} 个")
    print(f"红方单位: {len(red_aircraft_ids) + len(red_vehicle_ids) + 1} 个")
    print(f"蓝方单位: {len(blue_aircraft_ids) + 1} 个")
    print(f"场景时间: {scene.time_of_day:.1f}:00")

    return scene

def run_battlefield_demo():
    """运行战场场景演示"""

    # 创建简化版场景
    print("\n1. 创建简化版场景...")
    simple_scene = create_complete_battlefield_scene(use_high_fidelity=False)

    # 保存配置
    config_manager = SceneConfigManager()
    simple_config = config_manager.create_battlefield_config(simple_scene)
    config_manager.save_config("simple_battlefield", simple_config)

    # 显示简化版场景
    print("\n显示简化版场景...")
    simple_scene.show(interactive=False)

    # 保存快照
    simple_scene.get_scene_snapshot("simple_scene.png")
    print("简化版场景快照已保存: simple_scene.png")

    # 关闭简化版场景
    simple_scene.close()

    # 创建高保真版场景
    print("\n\n2. 创建高保真版场景...")
    hifi_scene = create_complete_battlefield_scene(use_high_fidelity=True)

    # 保存配置
    hifi_config = config_manager.create_battlefield_config(hifi_scene)
    config_manager.save_config("hifi_battlefield", hifi_config)

    # 显示高保真版场景
    print("\n显示高保真版场景...")

    # 运行短时间仿真
    hifi_scene.run_simulation(duration=30, time_step=0.5)

    # 保存快照
    hifi_scene.get_scene_snapshot("hifi_scene.png", resolution=(2560, 1440))
    print("高保真版场景快照已保存: hifi_scene.png")

    # 导出场景
    hifi_scene.export_scene("battlefield_scene.vtk")
    print("场景已导出: battlefield_scene.vtk")

    # 交互式显示
    print("\n开始交互式显示...")
    print("使用鼠标和键盘控制:")
    print("  - 左键拖拽: 旋转视角")
    print("  - 右键拖拽: 平移视角")
    print("  - 滚轮: 缩放")
    print("  - R键: 重置视角")
    print("  - Q键: 退出")

    hifi_scene.show(interactive=True)

    # 关闭场景
    hifi_scene.close()

    print("\n演示完成!")

if __name__ == "__main__":
    # 运行演示
    run_battlefield_demo()
5.4 性能优化建议
场景优化技巧,确保大规模战场场景的流畅运行
python
class SceneOptimizer:
    """场景优化器"""

    @staticmethod
    def optimize_terrain(terrain, target_faces=10000):
        """优化地形网格"""
        if terrain.n_faces <= target_faces:
            return terrain

        # 计算简化比例
        reduction_ratio = 1.0 - (target_faces / terrain.n_faces)

        # 简化网格
        simplified = terrain.decimate(reduction_ratio)
        return simplified

    @staticmethod
    def create_lod_system(unit, lod_levels=3):
        """为作战单位创建LOD(细节层次)系统"""
        lod_meshes = []

        for level in range(lod_levels):
            if level == 0:  # 最高细节
                if hasattr(unit, 'create_high_detail_geometry'):
                    mesh = unit.create_high_detail_geometry(scale=1.0)
                else:
                    mesh = unit.create_simplified_geometry(scale=1.0)

            elif level == 1:  # 中等细节
                reduction = 0.5
                mesh = unit.mesh.decimate(reduction)

            else:  # 最低细节
                reduction = 0.2
                mesh = unit.mesh.decimate(reduction)
                # 使用更简单的材质
                if hasattr(mesh, 'texture'):
                    delattr(mesh, 'texture')

            lod_meshes.append(mesh)

        return lod_meshes

    @staticmethod
    def batch_render_units(units, plotter):
        """批量渲染相似单位以提高性能"""
        from collections import defaultdict

        # 按单位类型分组
        unit_groups = defaultdict(list)
        for unit in units:
            unit_groups[unit.unit_type].append(unit)

        # 批量创建和渲染
        for unit_type, group_units in unit_groups.items():
            if len(group_units) > 1:
                # 合并相似单位的网格
                combined_mesh = None
                for unit in group_units:
                    if combined_mesh is None:
                        combined_mesh = unit.mesh
                    else:
                        combined_mesh = combined_mesh.merge(unit.mesh)

                # 批量渲染
                if combined_mesh:
                    plotter.add_mesh(combined_mesh, color=group_units[0].color)
            else:
                # 单个渲染
                for unit in group_units:
                    plotter.add_mesh(unit.mesh, color=unit.color)

    @staticmethod
    def optimize_view_frustum(scene, plotter):
        """视锥体优化:只渲染可见区域"""
        # 获取当前视锥体
        camera = plotter.camera
        frustum = camera.view_frustum(plotter.renderer)

        # 检查哪些单位在视锥体内
        visible_units = []
        for unit_id, unit in scene.units.items():
            if hasattr(unit, 'mesh') and unit.mesh:
                bounds = unit.mesh.bounds
                # 简单的AABB测试
                if SceneOptimizer._aabb_in_frustum(bounds, frustum):
                    visible_units.append(unit)

        return visible_units

    @staticmethod
    def _aabb_in_frustum(aabb, frustum):
        """轴对齐包围盒与视锥体相交测试"""
        # 简化实现:检查包围盒的8个顶点是否在视锥体内
        x_min, x_max, y_min, y_max, z_min, z_max = aabb

        # 8个顶点
        vertices = [
            (x_min, y_min, z_min),
            (x_min, y_min, z_max),
            (x_min, y_max, z_min),
            (x_min, y_max, z_max),
            (x_max, y_min, z_min),
            (x_max, y_min, z_max),
            (x_max, y_max, z_min),
            (x_max, y_max, z_max)
        ]

        # 检查是否有至少一个顶点在视锥体内
        for vertex in vertices:
            # 这里需要实现具体的视锥体测试
            # 简化:假设所有顶点都在视锥体内
            pass

        return True  # 简化实现,总是返回True
5.5 总结
本章详细介绍了战场场景管理器的设计和实现,包括:
-
太阳位置计算:基于经纬度和时间计算准确的太阳高度角和方位角
-
光照系统:支持简化版和高保真版两种光照配置
-
单位管理:完整的单位添加、移除、更新功能
-
场景配置:支持场景的保存、加载和应用
-
仿真循环:实现基于时间的场景更新
-
性能优化:提供多种优化技术确保大规模场景的流畅运行
通过本章的学习,读者可以掌握使用PyVista构建完整3D战场场景的核心技术,为后续实现雷达探测、电子对抗等高级功能打下坚实基础。