系列文章目录
第一章 速学兼复习之vue3章节1
第二章 速学兼复习之vue3章节2
文章目录
- 系列文章目录
- 前言
- 一、生命周期
- 二、生命周期的函数如何使用
-
- 1.created阶段
- [2.mounted 阶段](#2.mounted 阶段)
- [3.beforeUnmount 阶段](#3.beforeUnmount 阶段)
- 举例
- 总结
前言
本章介绍vue的生命周期,可能涉及vue2内容
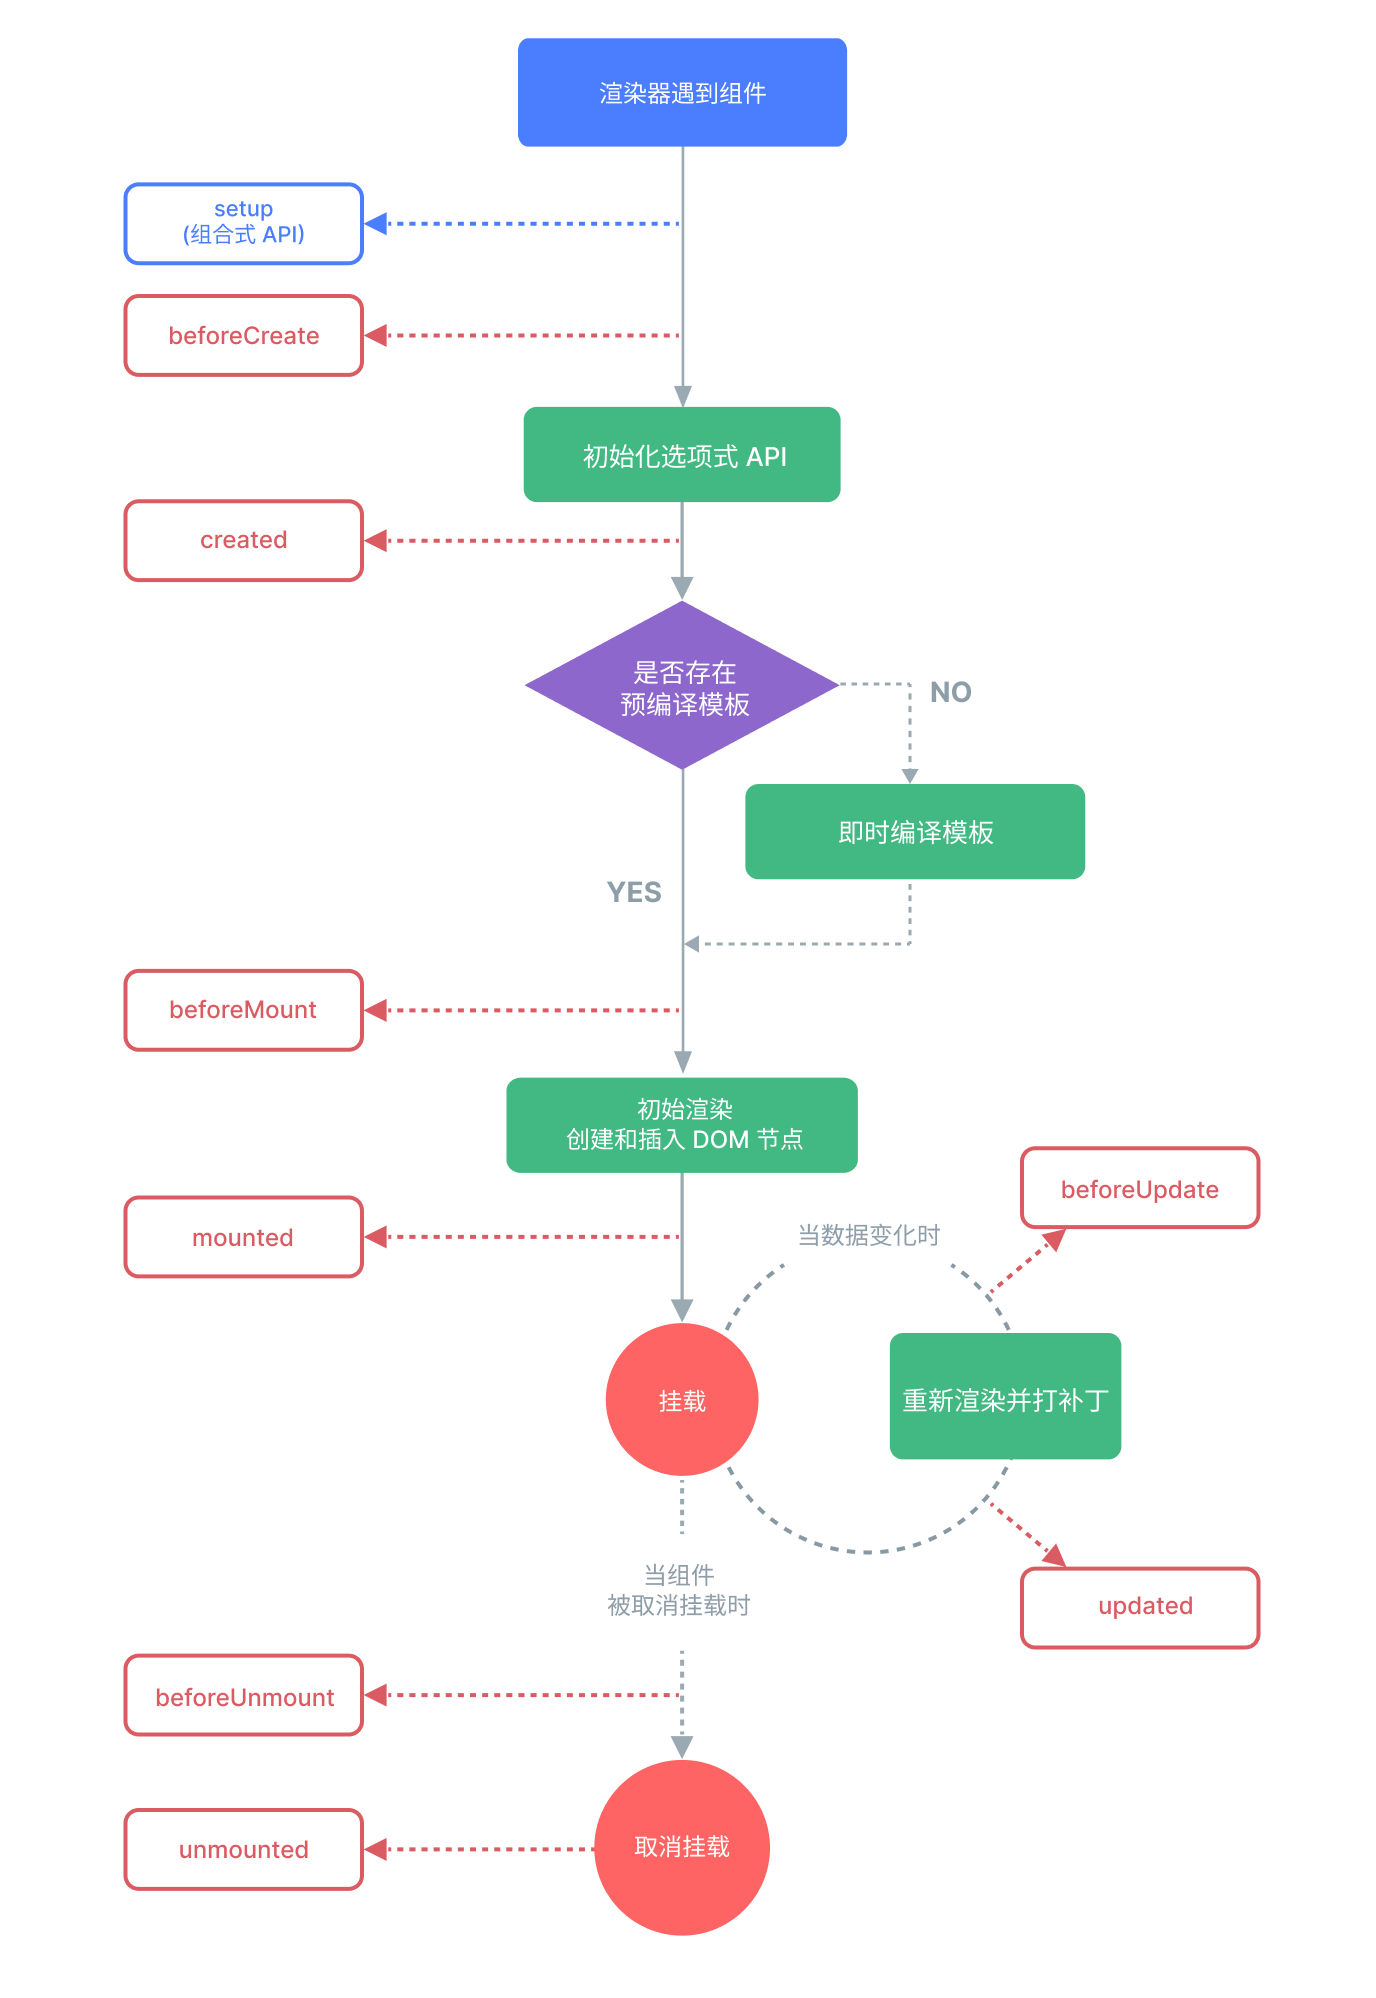
一、生命周期
有哪些生命周期呢?
beforeCreate :准备创建
created :创建好了
beforeMount:准备渲染
mounted:渲染好了
beforeUpdate:准备更新
updated:更新好了
beforeUnmount:准备卸载
unmounted:卸载好了
⚠️注意: beforeUnmount和unmounted是vue3的写法,到了vue2改名为:beforeDestroy,destroyed;
理解
生命周期顾名思义,一个组件的"一生";
开始 → beforeCreate → created → beforeMount → mounted →
beforeUpdate → updated → beforeUnmount → unmounted → 结束
| Vue 生命周期 | 人的生命周期比喻 | 详细说明 |
|---|---|---|
| beforeCreate | 怀孕准备期 | 父母开始准备婴儿用品、取名字,但婴儿还没有出生 |
| created | 婴儿出生 | 婴儿出生了,有了身份(身份证号),有了基本的生命体征,但还不能独立生活 |
| beforeMount | 上学准备期 | 准备书包、文具,为进入社会(DOM)做准备 |
| mounted | 成年独立 | 大学毕业,正式进入社会,有了自己的位置,可以独立工作和生活(DOM 已挂载) |
| beforeUpdate | 准备改变 | 决定要换工作、搬家、改名前的思考和准备阶段 |
| updated | 改变完成 | 新工作已入职、新家已入住、新名字已生效 |
| beforeUnmount | 退休准备期 | 办理退休手续,处理未完成的事务,为离开做准备 |
| unmounted | 生命结束 | 离开世界,一切资源释放,从社会中消失(DOM 中移除) |
一个组件生命周期的示意图:
二、生命周期的函数如何使用
⚠️注意:
vue2使用生命周期不需要import { xxx} form "vue" ,可以this.onUnmounted()直接使用。this的指该组件,是贯穿整个组件的方法调用的。
vue3使用生命周期需要import { onUnmounted ,xxx,} form "vue" ,才直接使用
1.created阶段
代码如下(示例):
c
created() {
  // 像刚出生的婴儿:
  // - 有了名字(data 初始化)
  // - 有了基础能力(methods 可用)
  // - 但还看不见世界(不能访问 DOM)
  // - 还不能独立生活(未挂载到 DOM)

  console.log(this.message) // ✓ 可以访问数据
  console.log(this.$refs)   // ✗ $refs 为空,DOM 未挂载
}
2.mounted 阶段
代码如下(示例):
c
mounted() {
  // 像刚毕业的年轻人:
  // - 有了自己的房子(DOM 元素)
  // - 可以自己赚钱(操作 DOM)
  // - 可以社交(绑定事件)

  this.$refs.myButton.addEventListener('click', this.handleClick)
  // ✓ 现在可以安全操作 DOM 了
}
3.beforeUnmount 阶段
代码如下(示例):
c
beforeUnmount() {
  // 像退休前的准备:
  // - 交接工作(清除定时器)
  // - 退还物品(移除事件监听)
  // - 整理文件(清理数据)

  clearInterval(this.timer)
  window.removeEventListener('resize', this.handleResize)
  // 做好"身后事"安排,避免内存泄漏
}
}
举例
vue2写法
使用生命周期,有this的使用。
bash
// 一个"人"组件的一生
export default {
  data() {
    return {
      name: '小明',
      age: 0,
      isAlive: true
    }
  },

  // 怀孕期:准备名字和生活用品
  beforeCreate() {
    console.log('准备迎接新生命,买婴儿床、取名字...')
    // 但 this.name 还不存在
  },

  // 婴儿出生:有了身份
  created() {
    console.log(`${this.name} 出生了!`)
    this.age = 0
    // 但还看不见世界(DOM)
  },

  // 准备上学:买书包课本
  beforeMount() {
    console.log(`${this.name} 准备上小学,买书包...`)
  },

  // 成年独立:进入社会
  mounted() {
    console.log(`${this.name} 18岁了,可以考驾照了!`)
    // 现在可以开车(操作DOM)了
    this.driveCar() // ✓
  },

  // 中年改名:准备阶段
  beforeUpdate() {
    console.log(`${this.name} 决定改名为"大明",正在填表...`)
  },

  // 改名完成
  updated() {
    console.log(`现在正式改名为 ${this.name}!`)
  },

  // 退休准备:处理未了之事
  beforeUnmount() {
    console.log(`${this.name} 要退休了,交接工作...`)
    this.cleanup() // 清理工作
  },

  // 生命结束
  unmounted() {
    console.log(`${this.name} 的一生结束了`)
    this.isAlive = false
  },

  methods: {
    driveCar() {
      console.log('开车上路')
    },
    cleanup() {
      console.log('清理未完成的事务')
    }
  }
}
vue3写法
分为 Composition API 和 Options API 两种:
Composition API写法:
bash
import {
  onBeforeMount,
  onMounted,
  onBeforeUpdate,
  onUpdated,
  onBeforeUnmount,
  onUnmounted,
  onErrorCaptured,
  onActivated,
  onDeactivated,
  onRenderTracked,
  onRenderTriggered
} from 'vue'

export default {
  setup() {
    console.log('setup() 执行 - 相当于 beforeCreate + created')

    // 挂载阶段
    onBeforeMount(() => {
      console.log('onBeforeMount - 准备上小学,买书包...')
    })

    onMounted(() => {
      console.log('onMounted - 18岁了,可以考驾照了!')
    })

    // 更新阶段
    onBeforeUpdate(() => {
      console.log('onBeforeUpdate - 决定改名,正在填表...')
    })

    onUpdated(() => {
      console.log('onUpdated - 改名完成!')
    })

    // 卸载阶段
    onBeforeUnmount(() => {
      console.log('onBeforeUnmount - 要退休了,交接工作...')
    })

    onUnmounted(() => {
      console.log('onUnmounted - 一生结束了')
    })

    // 错误捕获
    onErrorCaptured((error, instance, info) => {
      console.log('onErrorCaptured - 人生遇到了错误:', error)
    })

    // KeepAlive 缓存组件特有
    onActivated(() => {
      console.log('onActivated - 从"休眠"中恢复')
    })

    onDeactivated(() => {
      console.log('onDeactivated - 进入"休眠"状态')
    })

    // 调试用(开发模式)
    onRenderTracked((event) => {
      console.log('onRenderTracked - 追踪依赖:', event)
    })

    onRenderTriggered((event) => {
      console.log('onRenderTriggered - 触发更新:', event)
    })

    return {
      // 返回数据和方法
    }
  }
}
Options API写法(类似 Vue 2)
bash
export default {
  data() {
    return {
      name: '小明',
      age: 0,
      isAlive: true
    }
  },

  // 创建阶段
  beforeCreate() {
    console.log('beforeCreate - 准备迎接新生命...')
  },

  created() {
    console.log('created - 小明出生了!')
    this.age = 0
  },

  // 挂载阶段
  beforeMount() {
    console.log('beforeMount - 准备上小学,买书包...')
  },

  mounted() {
    console.log('mounted - 18岁了,可以考驾照了!')
  },

  // 更新阶段
  beforeUpdate() {
    console.log('beforeUpdate - 决定改名,正在填表...')
  },

  updated() {
    console.log('updated - 改名完成!')
  },

  // 卸载阶段(注意:名称变了!)
  beforeUnmount() {  // Vue 2 是 beforeDestroy
    console.log('beforeUnmount - 要退休了,交接工作...')
  },

  unmounted() {      // Vue 2 是 destroyed
    console.log('unmounted - 一生结束了')
    this.isAlive = false
  },

  // 错误捕获
  errorCaptured(err, instance, info) {
    console.log('errorCaptured - 人生遇到了错误:', err)
    return false // 阻止错误继续向上传播
  },

  // KeepAlive 缓存组件特有
  activated() {
    console.log('activated - 从"休眠"中恢复')
  },

  deactivated() {
    console.log('deactivated - 进入"休眠"状态')
  },

  // 服务端渲染
  serverPrefetch() {
    console.log('serverPrefetch - 服务端预取数据')
  }
}
总结
以上就是今天要讲的内容,本文仅仅简单介绍了生命周期和其使用;你可能有点疑惑,什么是Composition API 和 Options API?不着急,请看下一章vue3的语法讲解