Lyra的相机系统采用分层架构和栈式混合的设计模式,主要包含继承自APlayerCameraManager的作为总管理器的组件ALyraPlayerCameraManager,负责协调所有相机的工作,继承自UCameraComponent的相机组件,每个角色都有一份相机组件实例,这个组件包含一个很重要的相机模式栈ULyraCameraModeStack,用于管理多个相机模式的混合,一个普通对象ULyraCameraMode,作为相机模式的对象存在,定义相机的基本行为,每个相机都有自己的视角计算逻辑,支持平滑过渡混合,使用不同的混合函数,ULyraCameraMode_ThirdPerson是第三人称的具体实现。
ALyraPlayerCameraManager
LyraPlayerCameraManager 主要做了两件事,第一件事是创建并保存了UICamera的引用,第二件事是判断UICamera是否需要更新摄像机状态。
首先LyraPlayerCameraManager分别设置了三个宏,一个是相机默认FOV(视野)的值,另外两个是最大/最小俯仰角
如果UI相机需要更新,那么会先调用父类的相机更新逻辑,再让UI相机去覆盖,UI相机的优先级高于父类
plain
void ALyraPlayerCameraManager::UpdateViewTarget(FTViewTarget& OutVT, float DeltaTime)
{
	// If the UI Camera is looking at something, let it have priority.
	if (UICamera->NeedsToUpdateViewTarget())
	{
		Super::UpdateViewTarget(OutVT, DeltaTime);
		UICamera->UpdateViewTarget(OutVT, DeltaTime);
		return;
	}

	Super::UpdateViewTarget(OutVT, DeltaTime);
}UICamera重写没有实现,但是在父类中,它的实现是这样的:
plain
void APlayerCameraManager::UpdateViewTarget(FTViewTarget& OutVT, float DeltaTime)
{
	// Don't update outgoing viewtarget during an interpolation
	if ((PendingViewTarget.Target != NULL) && BlendParams.bLockOutgoing && OutVT.Equal(ViewTarget))
	{
		return;
	}

	// Store previous POV, in case we need it later
	FMinimalViewInfo OrigPOV = OutVT.POV;

	// Reset the view target POV fully
	static const FMinimalViewInfo DefaultViewInfo;
	OutVT.POV = DefaultViewInfo;
	OutVT.POV.FOV = DefaultFOV;
	OutVT.POV.OrthoWidth = DefaultOrthoWidth;
	OutVT.POV.AspectRatio = DefaultAspectRatio;
	OutVT.POV.bConstrainAspectRatio = bDefaultConstrainAspectRatio;
	OutVT.POV.ProjectionMode = bIsOrthographic ? ECameraProjectionMode::Orthographic : ECameraProjectionMode::Perspective;
	OutVT.POV.PostProcessBlendWeight = 1.0f;
	OutVT.POV.bAutoCalculateOrthoPlanes = bAutoCalculateOrthoPlanes;
	OutVT.POV.AutoPlaneShift = AutoPlaneShift;
	OutVT.POV.bUpdateOrthoPlanes = bUpdateOrthoPlanes;
	OutVT.POV.bUseCameraHeightAsViewTarget = bUseCameraHeightAsViewTarget;

	bool bDoNotApplyModifiers = false;

	if (ACameraActor* CamActor = Cast<ACameraActor>(OutVT.Target))
	{
		// Viewing through a camera actor.
		CamActor->GetCameraComponent()->GetCameraView(DeltaTime, OutVT.POV);
	}
	else
	{

		static const FName NAME_Fixed = FName(TEXT("Fixed"));
		static const FName NAME_ThirdPerson = FName(TEXT("ThirdPerson"));
		static const FName NAME_FreeCam = FName(TEXT("FreeCam"));
		static const FName NAME_FreeCam_Default = FName(TEXT("FreeCam_Default"));
		static const FName NAME_FirstPerson = FName(TEXT("FirstPerson"));

		if (CameraStyle == NAME_Fixed)
		{
			// do not update, keep previous camera position by restoring
			// saved POV, in case CalcCamera changes it but still returns false
			OutVT.POV = OrigPOV;

			// don't apply modifiers when using this debug camera mode
			bDoNotApplyModifiers = true;
		}
		else if (CameraStyle == NAME_ThirdPerson || CameraStyle == NAME_FreeCam || CameraStyle == NAME_FreeCam_Default)
		{
			// Simple third person view implementation
			FVector Loc = OutVT.Target->GetActorLocation();
			FRotator Rotator = OutVT.Target->GetActorRotation();

			if (OutVT.Target == PCOwner)
			{
				Loc = PCOwner->GetFocalLocation();
			}

			// Take into account Mesh Translation so it takes into account the PostProcessing we do there.
			// @fixme, can crash in certain BP cases where default mesh is null
//			APawn* TPawn = Cast<APawn>(OutVT.Target);
// 			if ((TPawn != NULL) && (TPawn->Mesh != NULL))
// 			{
// 				Loc += FQuatRotationMatrix(OutVT.Target->GetActorQuat()).TransformVector(TPawn->Mesh->RelativeLocation - GetDefault<APawn>(TPawn->GetClass())->Mesh->RelativeLocation);
// 			}

			//OutVT.Target.GetActorEyesViewPoint(Loc, Rot);
			if( CameraStyle == NAME_FreeCam || CameraStyle == NAME_FreeCam_Default )
			{
				Rotator = PCOwner->GetControlRotation();
			}

			FVector Pos = Loc + ViewTargetOffset + FRotationMatrix(Rotator).TransformVector(FreeCamOffset) - Rotator.Vector() * FreeCamDistance;
			FCollisionQueryParams BoxParams(SCENE_QUERY_STAT(FreeCam), false, this);
			BoxParams.AddIgnoredActor(OutVT.Target);
			FHitResult Result;

			GetWorld()->SweepSingleByChannel(Result, Loc, Pos, FQuat::Identity, ECC_Camera, FCollisionShape::MakeBox(FVector(12.f)), BoxParams);
			OutVT.POV.Location = !Result.bBlockingHit ? Pos : Result.Location;
			OutVT.POV.Rotation = Rotator;

			// don't apply modifiers when using this debug camera mode
			bDoNotApplyModifiers = true;
		}
		else if (CameraStyle == NAME_FirstPerson)
		{
			// Simple first person, view through viewtarget's 'eyes'
			OutVT.Target->GetActorEyesViewPoint(OutVT.POV.Location, OutVT.POV.Rotation);

			// don't apply modifiers when using this debug camera mode
			bDoNotApplyModifiers = true;
		}
		else
		{
			UpdateViewTargetInternal(OutVT, DeltaTime);
		}
	}

	if (!bDoNotApplyModifiers || bAlwaysApplyModifiers)
	{
		// Apply camera modifiers at the end (view shakes for example)
		ApplyCameraModifiers(DeltaTime, OutVT.POV);
	}

	// Synchronize the actor with the view target results
	SetActorLocationAndRotation(OutVT.POV.Location, OutVT.POV.Rotation, false);
	if (bAutoCalculateOrthoPlanes && OutVT.Target)
	{
		OutVT.POV.SetCameraToViewTarget(OutVT.Target->GetActorLocation());
	}

	UpdateCameraLensEffects(OutVT);
}
父类主要是基于目标参数Actor计算基本的相机位置和旋转,应用相机抖动,后处理等效果,确保相机在合理范围内,保持玩家控制器与相机视角一致
Lyra重写的可能情况:假设场景里出现一个3D的UI,但是由于摄像机一直处于并跟随角色后方,如果此时打开这个UI,那么角色的摄像机就会移动(UpdateViewTarget)到指定的对象中,主要是灵活地运镜那种效果。
DisplayDebug是显示当前相机的Debug信息,显示基础相机信息,如果角色有相机组件,显示器调试信息
plain
void ALyraPlayerCameraManager::DisplayDebug(UCanvas* Canvas, const FDebugDisplayInfo& DebugDisplay, float& YL, float& YPos)
{
	check(Canvas);

	FDisplayDebugManager& DisplayDebugManager = Canvas->DisplayDebugManager;

	DisplayDebugManager.SetFont(GEngine->GetSmallFont());
	DisplayDebugManager.SetDrawColor(FColor::Yellow);
	DisplayDebugManager.DrawString(FString::Printf(TEXT("LyraPlayerCameraManager: %s"), *GetNameSafe(this)));

	Super::DisplayDebug(Canvas, DebugDisplay, YL, YPos);

	const APawn* Pawn = (PCOwner ? PCOwner->GetPawn() : nullptr);

	if (const ULyraCameraComponent* CameraComponent = ULyraCameraComponent::FindCameraComponent(Pawn))
	{
		CameraComponent->DrawDebug(Canvas);
	}
}
LyraUICameraManagerComponent
然后来看一下上面提到的UICamera是怎么实现的,这个组件继承自ActorComponent,我目前看的这个Lyra项目是5.6的,在当前版本里,这个UI相机优先级系统 并没有真正生效。但是目前架构推测可能是要做对话系统那种电影级相机,如果未来不是这么弄的那当我没说。
它构建了一个单例的Getter函数,主要从LyraPlayerCameraManager里获取
plain
ULyraUICameraManagerComponent* ULyraUICameraManagerComponent::GetComponent(APlayerController* PC)
{
	if (PC != nullptr)
	{
		if (ALyraPlayerCameraManager* PCCamera = Cast<ALyraPlayerCameraManager>(PC->PlayerCameraManager))
		{
			return PCCamera->GetUICameraComponent();
		}
	}

	return nullptr;
}
它自己 SetViewTarget函数,这个函数的作用是把相机切换到目标的相机上
plain
void ULyraUICameraManagerComponent::SetViewTarget(AActor* InViewTarget, FViewTargetTransitionParams TransitionParams)
{
	TGuardValue<bool> UpdatingViewTargetGuard(bUpdatingViewTarget, true);

	ViewTarget = InViewTarget;
	CastChecked<ALyraPlayerCameraManager>(GetOwner())->SetViewTarget(ViewTarget, TransitionParams);
}
TGuardValue 是一个RAII(资源获取即初始化)模式的工具类,它的作用是
plain
template <typename RefType, typename AssignedType = RefType>
struct TGuardValue : private FNoncopyable
{
	[[nodiscard]] TGuardValue(RefType& ReferenceValue, const AssignedType& NewValue)
	: RefValue(ReferenceValue), OldValue(ReferenceValue)
	{
		RefValue = NewValue;
	}
	~TGuardValue()
	{
		RefValue = OldValue;
	}

	/**
	 * Overloaded dereference operator.
	 * Provides read-only access to the original value of the data being tracked by this struct
	 *
	 * @return	a const reference to the original data value
	 */
	FORCEINLINE const AssignedType& operator*() const
	{
		return OldValue;
	}

private:
	RefType& RefValue;
	AssignedType OldValue;
};这个对象会在析构的时候将引用对象恢复成原来的值,所以TGuardValueUpdatingViewTargetGuard(bUpdatingViewTarget, true);的意思是在进入函数的时候将bUpdatingViewTarget设置为true,函数结束的时候就会自动将其恢复成原来的值,其一目的是防止函数被递归调用。
LyraCameraComponent
LyraCameraComponent主要管理多个相机模式的平滑混合和过渡,维护一个相机的栈结构,处理多个相机模式的权重混合,实现相机模式之间的平滑过渡;每帧计算相机应该在哪里,朝向哪里,视野多大;保持玩家输入方向和相机视角一致;提供相机决策模式接口,是Lyra相机系统的核心执行对象。
首先在组件开始注册的时候,会创建并保存相机模式栈,相机模式栈在构造的时候强制置空确保引用干净。
plain
void ULyraCameraComponent::OnRegister()
{
	Super::OnRegister();

	if (!CameraModeStack)
	{
		CameraModeStack = NewObject<ULyraCameraModeStack>(this);
		check(CameraModeStack);
	}
}
GetCameraView是最重要的方法,负责计算最终的相机视图
plain
void ULyraCameraComponent::GetCameraView(float DeltaTime, FMinimalViewInfo& DesiredView)
{
	check(CameraModeStack);

	UpdateCameraModes();

	FLyraCameraModeView CameraModeView;
	CameraModeStack->EvaluateStack(DeltaTime, CameraModeView);

	// Keep player controller in sync with the latest view.
	if (APawn* TargetPawn = Cast<APawn>(GetTargetActor()))
	{
		if (APlayerController* PC = TargetPawn->GetController<APlayerController>())
		{
			PC->SetControlRotation(CameraModeView.ControlRotation);
		}
	}

	// Apply any offset that was added to the field of view.
	CameraModeView.FieldOfView += FieldOfViewOffset;
	FieldOfViewOffset = 0.0f;

	// Keep camera component in sync with the latest view.
	SetWorldLocationAndRotation(CameraModeView.Location, CameraModeView.Rotation);
	FieldOfView = CameraModeView.FieldOfView;

	// Fill in desired view.
	DesiredView.Location = CameraModeView.Location;
	DesiredView.Rotation = CameraModeView.Rotation;
	DesiredView.FOV = CameraModeView.FieldOfView;
	DesiredView.OrthoWidth = OrthoWidth;
	DesiredView.OrthoNearClipPlane = OrthoNearClipPlane;
	DesiredView.OrthoFarClipPlane = OrthoFarClipPlane;
	DesiredView.AspectRatio = AspectRatio;
	DesiredView.bConstrainAspectRatio = bConstrainAspectRatio;
	DesiredView.bUseFieldOfViewForLOD = bUseFieldOfViewForLOD;
	DesiredView.ProjectionMode = ProjectionMode;

	// See if the CameraActor wants to override the PostProcess settings used.
	DesiredView.PostProcessBlendWeight = PostProcessBlendWeight;
	if (PostProcessBlendWeight > 0.0f)
	{
		DesiredView.PostProcessSettings = PostProcessSettings;
	}


	if (IsXRHeadTrackedCamera())
	{
		// In XR much of the camera behavior above is irrellevant, but the post process settings are not.
		Super::GetCameraView(DeltaTime, DesiredView);
	}
}它首先会断言检查相机模式栈 是否存在,然后,它调用了更新相机模式的函数UpdateCameraModes,决定当前应该使用哪个相机模式,在这个函数里,它主要广播获取对应的LyraCameraMode,而这个广播绑定在角色的HeroComponent里
在对应的回调函数里,从该角色所拥有的PawnData中获取默认的相机模式,因此UpdateCameraModes是尝试从角色的PawnData中获取相机模式的。
调用EvaluateStack来评估模式栈,这里和上面有关于相机模式栈的部分会写在下面,这里先知道它的一些函数会在这里调用。
然后调用SetControlRotaiton来将玩家角色(Pawn)旋转至相机所看方向
plain
	// Keep player controller in sync with the latest view.
	if (APawn* TargetPawn = Cast<APawn>(GetTargetActor()))
	{
		if (APlayerController* PC = TargetPawn->GetController<APlayerController>())
		{
			PC->SetControlRotation(CameraModeView.ControlRotation);
		}
	}
然后应用视野偏移,这个是支持一次性的视野变化效果,比如受伤时候的屏幕晃动(参考我的世界那种),特殊技能的镜头震动,环境交互的视觉反馈
plain
// Apply any offset that was added to the field of view.
CameraModeView.FieldOfView += FieldOfViewOffset;
FieldOfViewOffset = 0.0f;
然后是同步相机组件状态,确保相机组件本身的Transform和相机模式中评估计算出来的结果一致。
plain
// Keep camera component in sync with the latest view.
SetWorldLocationAndRotation(CameraModeView.Location, CameraModeView.Rotation);
FieldOfView = CameraModeView.FieldOfView;
然后是一些后处理效果,这里可以扩展
plain
// See if the CameraActor wants to override the PostProcess settings used.
DesiredView.PostProcessBlendWeight = PostProcessBlendWeight;
if (PostProcessBlendWeight > 0.0f)
{
    DesiredView.PostProcessSettings = PostProcessSettings;
}
最后是判断是否是VR/AR设备,这些设备有特殊需求,但是后处理设置依然很重要
最后在实际项目流程是这样的
plain
// 按下瞄准键之前
GetCameraView被调用:
1. UpdateCameraModes() → 委托返回"第三人称模式"
2. EvaluateStack() → 计算纯第三人称视角
3. 同步控制器 → 正常视角方向
4. 返回视图数据 → 标准第三人称画面

// 按下瞄准的第1帧 (按下一瞬间)
GetCameraView被调用:
1. UpdateCameraModes() → 委托返回"瞄准模式"
2. EvaluateStack() → 推入瞄准模式,开始混合
   - 栈状态:[第三人称模式权重80%] + [瞄准模式权重20%]
3. 混合计算 → 80%第三人称 + 20%瞄准的过渡视角
4. 返回视图数据 → 相机开始向瞄准位置移动

// 按下瞄准的第10帧(大概就是完全按下这样)
GetCameraView被调用:
1. UpdateCameraModes() → 委托返回"瞄准模式"
2. EvaluateStack() → 混合完成
   - 栈状态:[第三人称模式权重0%] + [瞄准模式权重100%]
3. 混合计算 → 纯瞄准视角
4. 返回视图数据 → 标准的瞄准画面
LyraCameraMode
LyraCameraMode继承自UObject,是个普通的基础对象类,它标记成不能直接实例化需要子类化的抽象类(Abstract)和不可蓝图化(NotBlueprintable),只能在C++中实现
首先是FLyraCameraModeView - 相机视图数据结构,内部包含封装相机的基本视图参数,用于模式间的混合计算。
plain
struct FLyraCameraModeView
{
public:

    FLyraCameraModeView();

    void Blend(const FLyraCameraModeView& Other, float OtherWeight);

public:

    FVector Location;  // 相机位置
    FRotator Rotation;    // 相机旋转
    FRotator ControlRotation;  // 控制器旋转(用于同步)
    float FieldOfView;  // 视野角度
};
ELyraCameraModeBlendFunction - 混合函数枚举,定义相机模式过渡的数学曲线模型,实现不同的过渡效果
plain
enum class ELyraCameraModeBlendFunction : uint8
{
    Linear,    // 线性插值
    EaseIn,    // 加速进入,平滑退出
    EaseOut,   // 平滑进入,不减速退出
    EaseInOut  // 平滑进入和退出
};
混合相关参数,控制相机模式的 过渡动画 行为。
plain
float BlendTime;           // 混合时间(秒)
ELyraCameraModeBlendFunction BlendFunction;  // 混合函数类型
float BlendExponent;       // 混合曲线指数
float BlendAlpha;          // 线性混合Alpha值
float BlendWeight; // 计算出的混合权重相机参数,定义该相机模式的基本视觉参数。
首先是**GetPivotLoccation()**方法,计算相机的基础位置
plain
FVector ULyraCameraMode::GetPivotLocation() const
{
    const AActor* TargetActor = GetTargetActor();
    check(TargetActor);

    if (const APawn* TargetPawn = Cast<APawn>(TargetActor))
    {
       // Height adjustments for characters to account for crouching.
       if (const ACharacter* TargetCharacter = Cast<ACharacter>(TargetPawn))
       {
          const ACharacter* TargetCharacterCDO = TargetCharacter->GetClass()->GetDefaultObject<ACharacter>();
          check(TargetCharacterCDO);

          const UCapsuleComponent* CapsuleComp = TargetCharacter->GetCapsuleComponent();
          check(CapsuleComp);

          const UCapsuleComponent* CapsuleCompCDO = TargetCharacterCDO->GetCapsuleComponent();
          check(CapsuleCompCDO);

          const float DefaultHalfHeight = CapsuleCompCDO->GetUnscaledCapsuleHalfHeight();
          const float ActualHalfHeight = CapsuleComp->GetUnscaledCapsuleHalfHeight();
          const float HeightAdjustment = (DefaultHalfHeight - ActualHalfHeight) + TargetCharacterCDO->BaseEyeHeight;

          return TargetCharacter->GetActorLocation() + (FVector::UpVector * HeightAdjustment);
       }

       return TargetPawn->GetPawnViewLocation();
    }

    return TargetActor->GetActorLocation();
}
首先获取对象,这个对象是从创建这个相机模式的外部对象中获取的
plain
ULyraCameraComponent* ULyraCameraMode::GetLyraCameraComponent() const
{
    return CastChecked<ULyraCameraComponent>(GetOuter());
}然后将对象转换成我们的角色,获取角色的胶囊体,然后计算蹲伏高度调整,对这个函数主要是处理蹲伏的;DefaultHalfHeight就是角色站立时的胶囊体默认半高 ,ActualHalfHeight就是角色当前胶囊体的实际半高 ,HeightAdjustment就是最终的高度调整, ++高度调整 = (默认高度 - 实际高度) + 基础眼睛高度++。
最终位置 : 角色位置 + 向上向量 × 高度调整
具体效果表现为:当角色蹲下时,胶囊体会变矮(这个功能和相关配置在角色的移动组件里有),相机也会相应降低高度,不同的角色相机计算出的基础位置也不同
然后是GetPivotRotation() 方法 - 计算相机的基础旋转
plain
FRotator ULyraCameraMode::GetPivotRotation() const
{
    const AActor* TargetActor = GetTargetActor();
    check(TargetActor);

    if (const APawn* TargetPawn = Cast<APawn>(TargetActor))
    {
        return TargetPawn->GetViewRotation();
    }

    return TargetActor->GetActorRotation();
}
具体计算过程:如果是Pawn角色,返回角色的视角旋转(玩家控制的方向),如果是普通Actor,返回Actor自身的旋转,具体表现为相机会跟随玩家鼠标/手柄的输入方向,Actor自身旋转的话就是让相机始终朝着角色面对的方向。
然后是UpdateView方法,计算每帧相机应该在哪里,朝向哪里,视野多大
plain
void ULyraCameraMode::UpdateView(float DeltaTime)
{
    FVector PivotLocation = GetPivotLocation();
    FRotator PivotRotation = GetPivotRotation();

    PivotRotation.Pitch = FMath::ClampAngle(PivotRotation.Pitch, ViewPitchMin, ViewPitchMax);

    View.Location = PivotLocation;
    View.Rotation = PivotRotation;
    View.ControlRotation = View.Rotation;
    View.FieldOfView = FieldOfView;
}
首先调用上面说到的两个函数获取相机的位置和旋转,然后限制相机的旋转俯仰角

然后设置最终的视图参数,位置、朝向、控制器旋转、视野高度
接下来我们来看UpdateBlending() 方法 - 相机模式混合计算
plain
void ULyraCameraMode::UpdateBlending(float DeltaTime)
{
	if (BlendTime > 0.0f)
	{
		BlendAlpha += (DeltaTime / BlendTime);
		BlendAlpha = FMath::Min(BlendAlpha, 1.0f);
	}
	else
	{
		BlendAlpha = 1.0f;
	}

	const float Exponent = (BlendExponent > 0.0f) ? BlendExponent : 1.0f;

	switch (BlendFunction)
	{
	case ELyraCameraModeBlendFunction::Linear:
		BlendWeight = BlendAlpha;
		break;

	case ELyraCameraModeBlendFunction::EaseIn:
		BlendWeight = FMath::InterpEaseIn(0.0f, 1.0f, BlendAlpha, Exponent);
		break;

	case ELyraCameraModeBlendFunction::EaseOut:
		BlendWeight = FMath::InterpEaseOut(0.0f, 1.0f, BlendAlpha, Exponent);
		break;

	case ELyraCameraModeBlendFunction::EaseInOut:
		BlendWeight = FMath::InterpEaseInOut(0.0f, 1.0f, BlendAlpha, Exponent);
		break;

	default:
		checkf(false, TEXT("UpdateBlending: Invalid BlendFunction [%d]\n"), (uint8)BlendFunction);
		break;
	}
}具体计算过程:++BlendAlpha += (DeltaTime / BlendTime)++,限制进度不超过0,然后根据混合函数计算权重
这个是上面介绍的ELyraCameraModeBlendFunction枚举
1.Linear : 线性混合,直接使用进度
2.EaseIn : 缓入效果,开始慢,后面快
3.EaseOut : 缓出效果,开始快,后面慢
4.EaseInOut : 缓入缓出,开始和结束都慢
这个方法确保相机模式切换的时候不会突然跳变,同时支持不同的过渡曲线,也可以设置不同的过渡事件
SetBlendWeight(float Weight) - 设置混合权重
plain
void ULyraCameraMode::SetBlendWeight(float Weight)
{
    BlendWeight = FMath::Clamp(Weight, 0.0f, 1.0f);

    // Since we're setting the blend weight directly, we need to calculate the blend alpha to account for the blend function.
    const float InvExponent = (BlendExponent > 0.0f) ? (1.0f / BlendExponent) : 1.0f;

    switch (BlendFunction)
    {
    case ELyraCameraModeBlendFunction::Linear:
        BlendAlpha = BlendWeight;
        break;

    case ELyraCameraModeBlendFunction::EaseIn:
        BlendAlpha = FMath::InterpEaseIn(0.0f, 1.0f, BlendWeight, InvExponent);
        break;

    case ELyraCameraModeBlendFunction::EaseOut:
        BlendAlpha = FMath::InterpEaseOut(0.0f, 1.0f, BlendWeight, InvExponent);
        break;

    case ELyraCameraModeBlendFunction::EaseInOut:
        BlendAlpha = FMath::InterpEaseInOut(0.0f, 1.0f, BlendWeight, InvExponent);
        break;

    default:
        checkf(false, TEXT("SetBlendWeight: Invalid BlendFunction [%d]\n"), (uint8)BlendFunction);
        break;
    }
}
具体计算过程:
- ++权重限制 : BlendWeight = FMath::Clamp(Weight, 0.0f, 1.0f)++
- ++指数计算 : InvExponent = 1.0f / BlendExponent++
- ++Linear : BlendAlpha = BlendWeight (直接相等)++
- ++EaseIn : BlendAlpha = pow(BlendWeight, InvExponent) (指数函数)++
- ++EaseOut : BlendAlpha = 1 - pow(1 - BlendWeight, InvExponent) (反向指数)++
- ++EaseInOut : 结合EaseIn和EaseOut的S形曲线++
这个函数用于实现相机抖动的,比如角色受到攻击时: SetBlendWeight(0.3f) 产生轻微相机抖动;爆炸效果: SetBlendWeight(0.8f) 产生强烈相机震动
三种函数协同工作示例:
plain
// 1. 游戏逻辑决定需要切换到瞄准模式
ULyraCameraMode* AimMode = CameraModeStack->PushCameraMode(AimModeClass);

// 2. 查询瞄准模式的混合时间
float AimBlendTime = AimMode->GetBlendTime(); // 返回0.2秒

// 3. 每帧更新混合进度
AimMode->UpdateBlending(DeltaTime);

// 4. 查询当前权重
float CurrentWeight = AimMode->GetBlendWeight(); // 从0.0到1.0变化

// 5. 如果需要特殊效果,手动设置权重
if (PlayerHitByBullet) {
    AimMode->SetBlendWeight(0.5f); // 相机抖动效果
}
LyraCameraModeStack
ULyraCameraModeStack也是一个UObject对象,它定义在LyraCameraMode类里,这个类是管理多个相机模式 (就是上面的CameraMode)的堆叠 和混合 ,实现的是"栈式混合系统 ",允许多个相机模式同时生效 并按权重混合。
深入研究一下这个类的设计思想:
ULyraCameraModeStack类似一个 相机效果的Photoshop图层系统 ,有多个图层,可以叠加效果,可以同时有"第三人称" + "瞄准" + "抖动" + "过场动画"效果,每个效果都有自己的透明度和过渡时间。
而对于LyraCameraModeStack来说,每一个"图层"就是一个相机模式。
比如正常游戏状态下:
栈状态:第三人称模式 (100%生效)
效果:角色背后视角,正常视野
当按下瞄准的时候:
栈状态变化:
瞄准模式 (开始混合) → 第三人称模式 (100%)
实际效果表现为:0.2秒内,相机从背后平滑地移动到肩膀的位置,视野从正常缩小到瞄准视野,自然地过渡,不会突然地跳变
plain
// Lyra做法:效果叠加
if (isAiming) {
    stack->PushCameraMode(aimMode);  // 添加瞄准效果
}
if (isShaking) {
    stack->PushCameraMode(shakeMode); // 添加抖动效果
}
// 结果:瞄准和抖动效果同时生效加入的镜头效果,放大,变换会在最顶层添加相机模式(栈思想),然后移除的时候最先移除最后一个添加的效果。
因此,这个了类里的所有方法和定义的属性都是围绕以上方法实现的
先来看PushCameraMode() 方法 - 添加相机模式到栈顶
plain
void ULyraCameraModeStack::PushCameraMode(TSubclassOf<ULyraCameraMode> CameraModeClass)
{
    if (!CameraModeClass) return;

    ULyraCameraMode* CameraMode = GetCameraModeInstance(CameraModeClass);
    check(CameraMode);

    int32 StackSize = CameraModeStack.Num();

    // 检查是否已经是栈顶
    if ((StackSize > 0) && (CameraModeStack[0] == CameraMode))
    {
        return; // 已经是栈顶,无需重复添加
    }

    // 计算现有贡献度
    int32 ExistingStackIndex = INDEX_NONE;
    float ExistingStackContribution = 1.0f;

    for (int32 StackIndex = 0; StackIndex < StackSize; ++StackIndex)
    {
        if (CameraModeStack[StackIndex] == CameraMode)
        {
            ExistingStackIndex = StackIndex;
            ExistingStackContribution *= CameraMode->GetBlendWeight();
            break;
        }
        else
        {
            ExistingStackContribution *= (1.0f - CameraModeStack[StackIndex]->GetBlendWeight());
        }
    }

    // 移除已存在的模式
    if (ExistingStackIndex != INDEX_NONE)
    {
        CameraModeStack.RemoveAt(ExistingStackIndex);
        StackSize--;
    }
    else
    {
        ExistingStackContribution = 0.0f;
    }

    // 决定初始权重
    const bool bShouldBlend = ((CameraMode->GetBlendTime() > 0.0f) && (StackSize > 0));
    const float BlendWeight = (bShouldBlend ? ExistingStackContribution : 1.0f);

    CameraMode->SetBlendWeight(BlendWeight);

    // 添加到栈顶
    CameraModeStack.Insert(CameraMode, 0);

    // 确保栈底权重为100%
    CameraModeStack.Last()->SetBlendWeight(1.0f);

    // 通知新激活的模式
    if (ExistingStackIndex == INDEX_NONE)
    {
        CameraMode->OnActivation();
    }
}
获取相机模式实例 : 通过 GetCameraModeInstance 获取或创建实例,如果获取不到就重新创建一个新的
然后,栈是有限的,判断如果已经到达栈顶或栈顶就是该模式就直接返回
然后计算当前模式的贡献度(这个贡献度说的是当前模式在整个栈中效果强度的消耗量)
如果模式已在栈中: ExistingStackContribution = 当前权重
如果模式不在栈中: ExistingStackContribution = 0.0f
plain
	for (int32 StackIndex = 0; StackIndex < StackSize; ++StackIndex)
	{
		if (CameraModeStack[StackIndex] == CameraMode)
		{
			ExistingStackIndex = StackIndex;
			ExistingStackContribution *= CameraMode->GetBlendWeight();
			break;
		}
		else
		{
			ExistingStackContribution *= (1.0f - CameraModeStack[StackIndex]->GetBlendWeight());
		}
	}
然后决定初始权重:如果需要混合且栈不为空,使用现有贡献度,否则直接为1(立即生效),插入栈顶 : CameraModeStack.Insert(CameraMode, 0),确保栈底权重 : 栈底模式始终100%生效
plain
	// Decide what initial weight to start with.
	const bool bShouldBlend = ((CameraMode->GetBlendTime() > 0.0f) && (StackSize > 0));
	const float BlendWeight = (bShouldBlend ? ExistingStackContribution : 1.0f);

	CameraMode->SetBlendWeight(BlendWeight);

	// Add new entry to top of stack.
	CameraModeStack.Insert(CameraMode, 0);
现有贡献度计算 : ++ExistingStackContribution = ∏(1 - 上层模式权重) × 当前模式权重++
初始权重 : ++BlendWeight = bShouldBlend ? ExistingStackContribution : 1.0f++
这个方法的作用是将新模式推入栈顶 ,根据现有贡献度决定初始权重,防止同一模式重复添加,确保总有基础相机模式生效。
然后是EvaluateStack() 方法 - 评估栈并计算最终相机视图
plain
bool ULyraCameraModeStack::EvaluateStack(float DeltaTime, FLyraCameraModeView& OutCameraModeView)
{
    if (!bIsActive) return false;

    UpdateStack(DeltaTime);
    BlendStack(OutCameraModeView);

    return true;
}
检查激活状态 : 如果栈未激活,返回false,更新栈 : 调用 UpdateStack(DeltaTime),混合栈 : 调用 BlendStack(OutCameraModeView)
这是一个主入口点,值得说明的是,查询该函数的用法 ,会发现是每帧调用的此方法,获得最终相机视图,确保所有模式正确更新和混合。
UpdateStack() 方法 - 更新栈中所有相机模式
首先遍历栈,从栈顶(索引0)到栈底(索引StackSize-1),更新每个模式 : 调用 CameraMode->UpdateCameraMode(DeltaTime),检查权重 : 如果某个模式权重达到100%,其下方的模式可以移除
plain
	for (int32 StackIndex = 0; StackIndex < StackSize; ++StackIndex)
	{
		ULyraCameraMode* CameraMode = CameraModeStack[StackIndex];
		check(CameraMode);

		CameraMode->UpdateCameraMode(DeltaTime);

		if (CameraMode->GetBlendWeight() >= 1.0f)
		{
			// Everything below this mode is now irrelevant and can be removed.
			RemoveIndex = (StackIndex + 1);
			RemoveCount = (StackSize - RemoveIndex);
			break;
		}
	}
移除过期模式 : 通知模式被移除,并从栈中删除
plain
if (RemoveCount > 0)
{
    // Let the camera modes know they being removed from the stack.
    for (int32 StackIndex = RemoveIndex; StackIndex < StackSize; ++StackIndex)
    {
       ULyraCameraMode* CameraMode = CameraModeStack[StackIndex];
       check(CameraMode);

       CameraMode->OnDeactivation();
    }

    CameraModeStack.RemoveAt(RemoveIndex, RemoveCount);
}
作用是自动清理不再需要的模式,移除已经完成混合的模式,减少计算量,然后移除的时候就调用通知OnDeactivation()
BlendStack() 方法 - 混合栈中所有相机模式
plain
void ULyraCameraModeStack::BlendStack(FLyraCameraModeView& OutCameraModeView) const
{
    const int32 StackSize = CameraModeStack.Num();
    if (StackSize <= 0) return;

    // 从栈底开始混合(基础模式)
    const ULyraCameraMode* CameraMode = CameraModeStack[StackSize - 1];
    check(CameraMode);

    OutCameraModeView = CameraMode->GetCameraModeView();

    // 从栈底向上混合(索引递减)
    for (int32 StackIndex = (StackSize - 2); StackIndex >= 0; --StackIndex)
    {
        CameraMode = CameraModeStack[StackIndex];
        check(CameraMode);

        OutCameraModeView.Blend(CameraMode->GetCameraModeView(), CameraMode->GetBlendWeight());
    }
}具体计算过程:获取栈底模式作为基础视图,这个很重要,然后从栈底向上混合 : 遍历索引从 StackSize-2 到 0,再逐层混合 : 调用 FLyraCameraModeView::Blend() 方法
++最终视图 = 栈底视图 × (1 - 上层权重) + 上层视图 × 上层权重++
混合顺序 : 从基础到特殊,确保特殊效果覆盖基础行为
目的就是合成多个相机模式,上层的权重会影响到下层,同时允许特殊效果(比如抖动)叠加在基础相机上
然后说一下怎么混合的:混合方法在每个效果单位(模式)的结构体FLyraCameraModeView 中的方法Blend。
plain
void FLyraCameraModeView::Blend(const FLyraCameraModeView& Other, float OtherWeight)
{
    // 1. 检查权重边界
    if (OtherWeight <= 0.0f)
    {
        return; // 其他视图权重为0,不混合
    }
    else if (OtherWeight >= 1.0f)
    {
        *this = Other; // 其他视图权重为1,完全替换
        return;
    }

    // 2. 位置混合:线性插值
    Location = FMath::Lerp(Location, Other.Location, OtherWeight);

    // 3. 旋转混合:角度差值计算
    const FRotator DeltaRotation = (Other.Rotation - Rotation).GetNormalized();
    Rotation = Rotation + (OtherWeight * DeltaRotation);

    // 4. 控制旋转混合:角度差值计算
    const FRotator DeltaControlRotation = (Other.ControlRotation - ControlRotation).GetNormalized();
    ControlRotation = ControlRotation + (OtherWeight * DeltaControlRotation);

    // 5. 视野混合:线性插值
    FieldOfView = FMath::Lerp(FieldOfView, Other.FieldOfView, OtherWeight);
}
计算的细节如下:
1.位置混合 代码 : ++Location = FMath::Lerp(Location, Other.Location, OtherWeight);++
++最终位置 = 当前位置 × (1 - OtherWeight) + 其他位置 × OtherWeight++
plain
// 假设:
// 当前位置: (0, 0, 100)
// 其他位置: (50, 0, 120)
// 权重: 0.5

最终X = 0 × 0.5 + 50 × 0.5 = 25
最终Y = 0 × 0.5 + 0 × 0.5 = 0
最终Z = 100 × 0.5 + 120 × 0.5 = 110

最终位置: (25, 0, 110)
如果只是位移的话,那么最终效果就是相机在两个位置之间平滑移动
2.旋转混合(Rotation)代码:
**const FRotator DeltaRotation = (Other.Rotation - Rotation).GetNormalized(); **
**Rotation = Rotation + (OtherWeight * DeltaRotation); **
plain
旋转差值 = 规范化(其他旋转 - 当前旋转)
最终旋转 = 当前旋转 + 权重 × 旋转差值

// 假设:
// 当前旋转: (0°, 0°, 0°)   // 面向正前方
// 其他旋转: (0°, 45°, 0°)  // 面向右前方45度
// 权重: 0.5

// 计算差值
DeltaRotation = (0°, 45°, 0°) - (0°, 0°, 0°) = (0°, 45°, 0°)
// 规范化(确保角度在合理范围内)
DeltaRotation.GetNormalized() = (0°, 45°, 0°)

// 应用权重
最终旋转 = (0°, 0°, 0°) + 0.5 × (0°, 45°, 0°) = (0°, 22.5°, 0°)
因为旋转有角度环绕的问题(比如从350°到10°)所以不能用插值,差值计算的话能正确处理最短路径,旋转方向也不会错误。
控制旋转混合(ControlRotation) 代码:const FRotator DeltaControlRotation = (Other.ControlRotation - ControlRotation).GetNormalized();
ControlRotation = ControlRotation + (OtherWeight * DeltaControlRotation);
计算过程与旋转相同,但是用途不同,Rotation是相机的实际朝向,ControlRotation是玩家控制器的朝向(用于角色动画等)
视野混合(FieldOfView) 代码 : FieldOfView = FMath::Lerp(FieldOfView, Other.FieldOfView, OtherWeight);
plain
最终视野 = 当前视野 × (1 - OtherWeight) + 其他视野 × OtherWeight

// 假设:
// 当前视野: 90度(正常视角)
// 其他视野: 60度(瞄准视角)
// 权重: 0.5

最终视野 = 90 × 0.5 + 60 × 0.5 = 75度
因此游戏里实际情况是:
plain
当前视图(第三人称):
位置: (0, -200, 100)    // 角色背后2米,高度1米
旋转: (0, 0, 0)         // 面向正前方
视野: 90度

其他视图(瞄准模式):
位置: (30, -50, 120)    // 角色右肩位置
旋转: (0, 10, 0)        // 稍微向上看
视野: 60度

// 位置混合
最终位置 = FMath::Lerp((0,-200,100), (30,-50,120), 0.5)
         = (15, -125, 110)

// 旋转混合
旋转差值 = (0,10,0) - (0,0,0) = (0,10,0)
最终旋转 = (0,0,0) + 0.5×(0,10,0) = (0,5,0)

// 视野混合
最终视野 = FMath::Lerp(90, 60, 0.5) = 75度
LyraPenetrationAvoidanceFeeler
PertrationAvoidance是一个相机防穿墙探测器系统,确保玩家能够始终看到角色,与直接配置相机碰撞不同,它是提前预测性的,在相机运动的同时发射射线,对特定的接口对象进行检测,从而做出相应的避障处理;是一个抽象的探测器对象。
PertrationAvoidance类有一个核心结构体,用于储存探测器避障数据
plain
/**
 * Struct defining a feeler ray used for camera penetration avoidance.
 */
USTRUCT()
struct FLyraPenetrationAvoidanceFeeler
{
    GENERATED_BODY()

    /** FRotator describing deviance from main ray */
    UPROPERTY(EditAnywhere, Category=PenetrationAvoidanceFeeler)
    FRotator AdjustmentRot;

    /** how much this feeler affects the final position if it hits the world */
    UPROPERTY(EditAnywhere, Category=PenetrationAvoidanceFeeler)
    float WorldWeight;

    /** how much this feeler affects the final position if it hits a APawn (setting to 0 will not attempt to collide with pawns at all) */
    UPROPERTY(EditAnywhere, Category=PenetrationAvoidanceFeeler)
    float PawnWeight;

    /** extent to use for collision when tracing this feeler */
    UPROPERTY(EditAnywhere, Category=PenetrationAvoidanceFeeler)
    float Extent;

    /** minimum frame interval between traces with this feeler if nothing was hit last frame */
    UPROPERTY(EditAnywhere, Category=PenetrationAvoidanceFeeler)
    int32 TraceInterval;

    /** number of frames since this feeler was used */
    UPROPERTY(transient)
    int32 FramesUntilNextTrace;


    FLyraPenetrationAvoidanceFeeler()
       : AdjustmentRot(ForceInit)
       , WorldWeight(0)
       , PawnWeight(0)
       , Extent(0)
       , TraceInterval(0)
       , FramesUntilNextTrace(0)
    {
    }

    FLyraPenetrationAvoidanceFeeler(const FRotator& InAdjustmentRot,
                            const float& InWorldWeight,
                            const float& InPawnWeight,
                            const float& InExtent,
                            const int32& InTraceInterval = 0,
                            const int32& InFramesUntilNextTrace = 0)
       : AdjustmentRot(InAdjustmentRot)
       , WorldWeight(InWorldWeight)
       , PawnWeight(InPawnWeight)
       , Extent(InExtent)
       , TraceInterval(InTraceInterval)
       , FramesUntilNextTrace(InFramesUntilNextTrace)
    {
    }
};
AdjustmentRot是探测器相对于主相机射线的偏移角度,使用 FRotator(Pitch, Yaw, Roll) 表示三维空间中的方向
plain
// 正前方探测器(无偏移)
FRotator(0, 0, 0)

// 向上30度探测器(防止天花板卡住)
FRotator(30, 0, 0)

// 向左45度探测器(防止左侧墙壁)
FRotator(0, -45, 0)

// 向右上方探测器(综合检测)
FRotator(20, 45, 0)
WorldWeight是世界物体碰撞权重,表示探测器碰撞到世界静态物体(墙壁,地面)时的影响强度
plain
// 碰撞到墙壁时的相机调整量
相机调整量 = 碰撞距离 × WorldWeight

// 示例:探测器撞到墙壁,距离为50单位,权重0.8
最终调整 = 50 × 0.8 = 40单位
PawnWeight则是角色碰撞权重,当探测器碰撞到角色(Pawn)时的影响强度,如果设为0,则完全忽略角色碰撞。
Extent是探测器碰撞体积,描述探测器碰撞范围大小。
TraceInterval是检测间隔,这个是用来控制探测器的检测间隔的,比如当探测器没有碰撞的时候,将该值调整,目的是优化性能,减少不必要的碰撞检测
FramesUntilNextTrace - 下次检测倒计时,它被标记为transient,意味着它不会被序列保存,只在运行时参与计算,记录距离下次检测还有多少帧
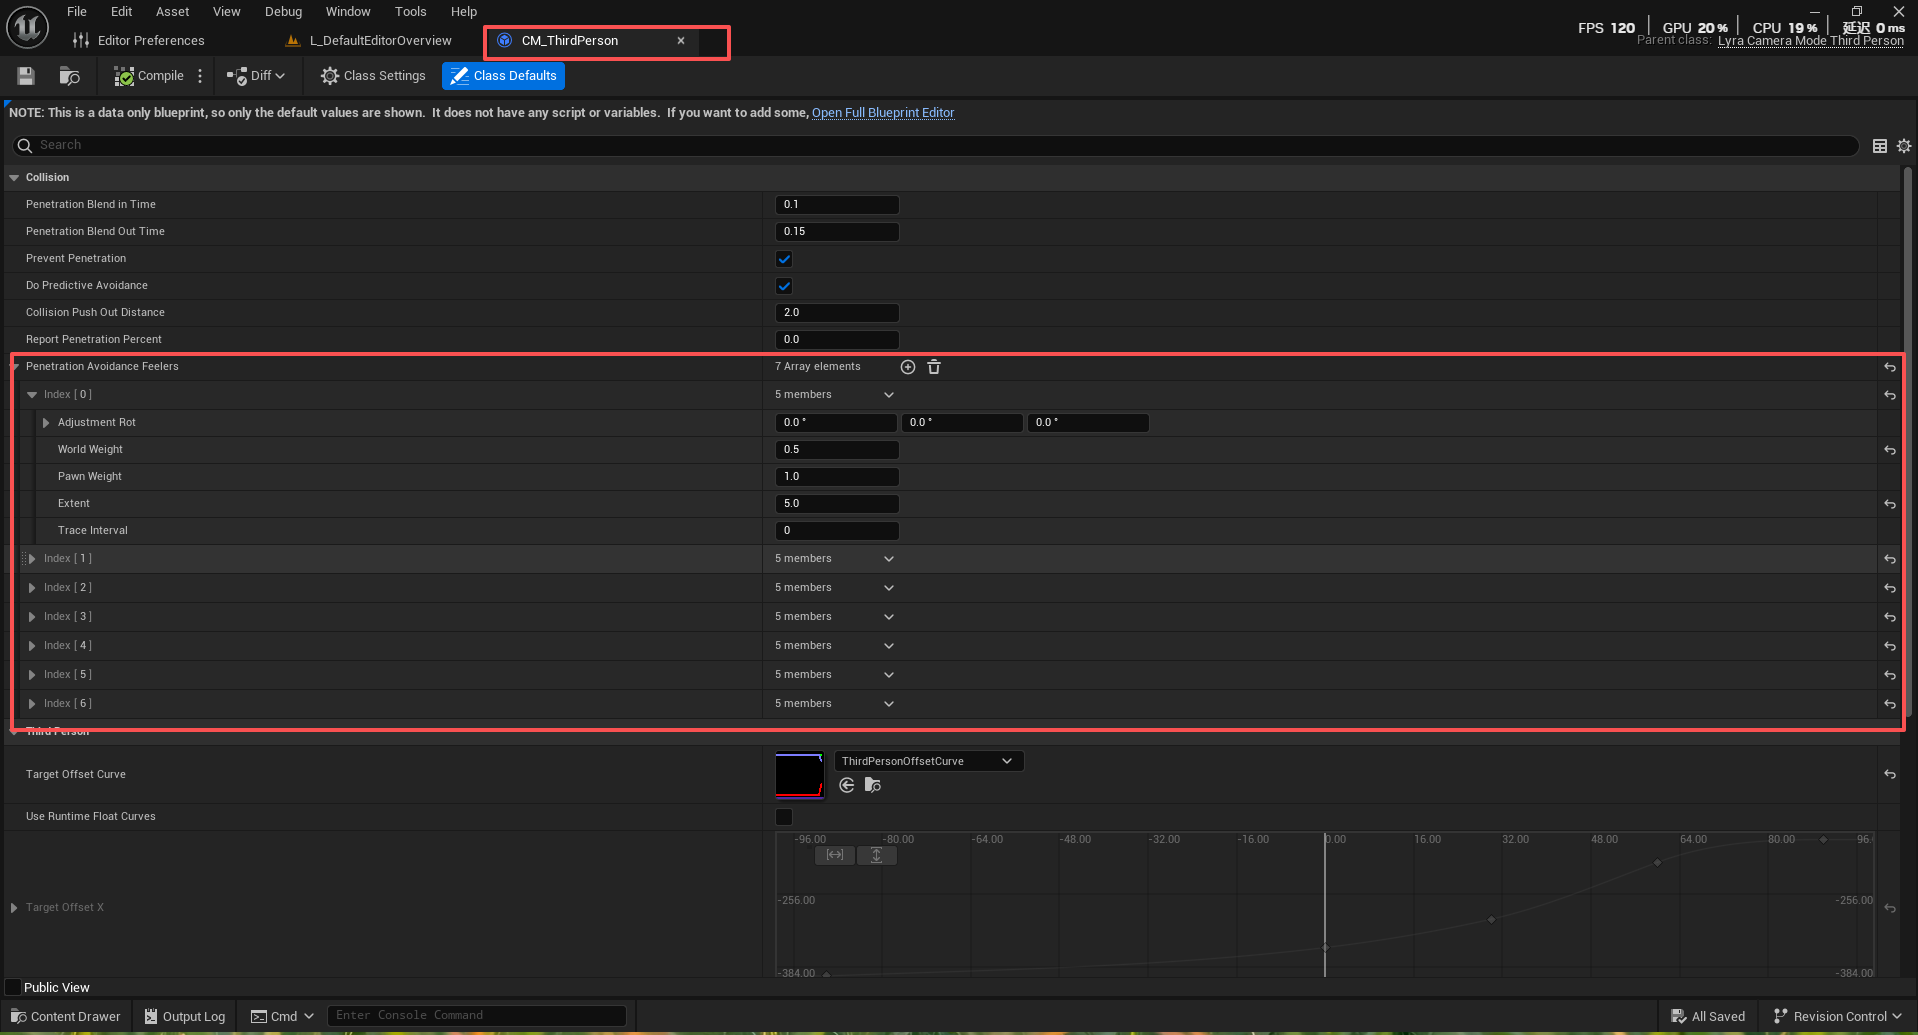
然后看一下它的具体应用,打开LyraCameraMode_ThirdPerson或者直接查找结构体用法就可以看到
plain
// 配置一组探测器,像触角一样从相机各个方向伸出
TArray<FLyraPenetrationAvoidanceFeeler> ConfigureThirdPersonFeelers()
{
    TArray<FLyraPenetrationAvoidanceFeeler> Feelers;

    // 1. 主探测器 - 正前方(防止正面墙壁)
    Feelers.Add(FLyraPenetrationAvoidanceFeeler(
        FRotator(0, 0, 0),      // 正前方
        1.0f,                   // 撞墙影响最大
        0.3f,                   // 撞角色影响中等
        12.0f,                  // 较粗的探测器
        1,                      // 每帧检测
        0                       // 立即检测
    ));

    // 2. 上方探测器 - 向上30度(防止天花板)
    Feelers.Add(FLyraPenetrationAvoidanceFeeler(
        FRotator(30, 0, 0),     // 向上30度
        0.8f,                   // 撞天花板影响大
        0.1f,                   // 基本忽略角色
        8.0f,                   // 中等粗细
        2,                      // 每2帧检测一次
        1                       // 下一帧开始检测
    ));

    // 3. 侧方探测器 - 向左45度(防止左侧墙壁)
    Feelers.Add(FLyraPenetrationAvoidanceFeeler(
        FRotator(0, -45, 0),    // 向左45度
        0.6f,                   // 中等影响
        0.2f,                   // 轻微角色影响
        6.0f,                   // 较细探测器
        3,                      // 每3帧检测
        2                       // 2帧后开始检测
    ));

    // 4. 侧方探测器 - 向右45度(防止右侧墙壁)
    Feelers.Add(FLyraPenetrationAvoidanceFeeler(
        FRotator(0, 45, 0),     // 向右45度
        0.6f,                   // 中等影响
        0.2f,                   // 轻微角色影响
        6.0f,                   // 较细探测器
        3,                      // 每3帧检测
        1                       // 1帧后开始检测
    ));

    return Feelers;
}
对应的UObject蓝图中也可以看到
例如在该第三人称相机模式中,自身实现的UpdateView 里调用UpdatePreventPenetration ,这个函数主要是更新探测器逻辑,使用多个探测器检测相机与环境的碰撞,根据碰撞情况计算相机需要调整的程度
探测器只会探测继承了ILyraCameraAssistInterface接口的对象,防止对任何对象产生反应
plain
    // 获取相机观察的目标Actor
    AActor* TargetActor = GetTargetActor();

    // 获取相机辅助接口(用于特殊情境处理)
    APawn* TargetPawn = Cast<APawn>(TargetActor);
    AController* TargetController = TargetPawn ? TargetPawn->GetController() : nullptr;
    ILyraCameraAssistInterface* TargetControllerAssist = Cast<ILyraCameraAssistInterface>(TargetController);

    ILyraCameraAssistInterface* TargetActorAssist = Cast<ILyraCameraAssistInterface>(TargetActor);
然后确定防穿墙目标,允许某些Actor制定不同的防穿墙目标
plain
    // 确定防穿墙检测的目标
    TOptional<AActor*> OptionalPPTarget = TargetActorAssist ?
        TargetActorAssist->GetCameraPreventPenetrationTarget() : TOptional<AActor*>();
    AActor* PPActor = OptionalPPTarget.IsSet() ? OptionalPPTarget.GetValue() : TargetActor;
    ILyraCameraAssistInterface* PPActorAssist = OptionalPPTarget.IsSet() ?
Cast<ILyraCameraAssistInterface>(PPActor) : nullptr;接着进行安全位置计算,这是函数的核心算法。
plain
    // 检查目标是否有碰撞组件
    const UPrimitiveComponent* PPActorRootComponent = Cast<UPrimitiveComponent>(PPActor->GetRootComponent());
    if (PPActorRootComponent)
    {
        // 计算安全位置(在角色胶囊体内)

        // 计算瞄准线与胶囊体中心的最近点
        FVector ClosestPointOnLineToCapsuleCenter;
        FVector SafeLocation = PPActor->GetActorLocation();
        FMath::PointDistToLine(SafeLocation, View.Rotation.Vector(), View.Location, ClosestPointOnLineToCapsuleCenter);
FMath::PointDistToLine 计算点到直线的最短距离,找到瞄准线与角色胶囊体中心的最接近点 。
plain
        // 调整安全位置的高度,确保在胶囊体内
        float const PushInDistance = PenetrationAvoidanceFeelers[0].Extent + CollisionPushOutDistance;
        float const MaxHalfHeight = PPActor->GetSimpleCollisionHalfHeight() - PushInDistance;
        SafeLocation.Z = FMath::Clamp(ClosestPointOnLineToCapsuleCenter.Z,
                                     SafeLocation.Z - MaxHalfHeight,
SafeLocation.Z + MaxHalfHeight);确保安全位置在角色胶囊体的垂直范围内 ,避免相机位置过高或过低。
plain
        // 计算安全位置到胶囊体表面的距离
        float DistanceSqr;
        PPActorRootComponent->GetSquaredDistanceToCollision(ClosestPointOnLineToCapsuleCenter, DistanceSqr, SafeLocation);

        // 将安全位置推入胶囊体内部,避免初始穿透
        if (PenetrationAvoidanceFeelers.Num() > 0)
        {
            SafeLocation += (SafeLocation - ClosestPointOnLineToCapsuleCenter).GetSafeNormal() * PushInDistance;
        }
将安全位置 稍微推入胶囊体内部 ,为探测器检测留出缓冲空间 ,避免一开始就检测到穿透。PenetrationAvoidanceFeelers序列里的每一个检测器都会参与计算
这一套防穿透设计在实际项目中,可能会应用像这样的设计。
plain
安全位置 → 角色胶囊体内靠近墙壁的位置
探测器检测 → 主探测器碰撞墙壁,阻塞百分比=0.3
相机调整 → 平滑向角色移动70%的距离
玩家体验 → 角色始终可见,相机移动自然
最后是整个相机系统的完整思维图