七. Linux下的软件管理
1.软件的类型
bash
压缩包(绿色安装包、源码编译)
DEB(类DEBIN)
RPM(类RHEL)
2.RPM命令的用法
RPM : Red Hat Package Manager 的缩写,是一种用于打包、安装、查询、升级和卸载软件的文件格式和工具
包文件 : 通常以 .rpm 为扩展名
主要功能:
- 安装软件包
bash
rpm -ivh package.rpm
# -i: 安装 (install)
# -v: 详细输出 (verbose)
# -h: 显示进度条 (hash)- 查询已安装或可用的软件包
bash
# 查询所有已安装的包
rpm -qa

# 查询特定已安装的包
rpm -q package_name

# 查询包的详细信息
rpm -qi package_name

# 查询包包含的文件
rpm -ql package_name

# 查询文件属于哪个包
rpm -qf /path/to/file- 升级软件包
bash
rpm -Uvh package.rpm
# -U: 升级 (upgrade),如果包未安装则自动安装- 卸载软件包
bash
rpm -e package_name
# -e: 卸载 (erase)- 验证软件包完整性
bash
# 验证已安装包的完整性
rpm -V package_name

# 验证未安装包的完整性
rpm -K package.rpm- 查询软件包文件列表
已安装的
bash
rpm -ql package_name未安装的
bash
rpm -qlp package.rpm查询特定类型的文件:
可以结合管道和 grep 命令过滤特定类型的文件:
bash
# 查询已安装的 nginx 包中的配置文件
rpm -ql nginx | grep "\.conf$"

# 查询已安装的 nginx 包中的可执行文件
rpm -ql nginx | grep "/bin/"
bash
常用选项说明:
- -i : 安装包
- -U : 升级包
- -e : 卸载包
- -q : 查询包
- -a : 所有包
- -l : 列出包中的文件
- -i : 显示包详细信息
- -f : 查询文件所属包
- -v : 详细输出
- -h : 显示进度条
- -V : 验证包
- -K : 检查包签名
3.利用镜像搭建本地网络仓库
1)开机自动挂载到指定目录
bash
[创建挂载光驱读取内容的目录]# mkdir /rhel9

[手动挂载光驱]# mount /dev/cdrom /rhel9/
mount: /rhel9: WARNING: source write-protected, mounted read-only.
[开启自动运行mount命令实现自动挂载]# vim /etc/rc.d/rc/local

mount /dev/cdrom /rhel9/


[root@localhost ~]# chmod +x /etc/rc.d/rc.local
2)编辑本地仓库
bash
[进入存放软件仓库的目录]# cd /etc/yum.repos.d/
[root@localhost yum.repos.d]# ls
redhat.repo
[创建编辑本地仓库]# vim rhelbendi.repo

[root@localhost yum.repos.d]# cat rhelbendi.repo
[AppStream]
name = AppStream
baseurl = file:///rhel9/AppStream
gpgcheck = 0


[BaseOS]
name = BaseOS
baseurl = file:///rhel9/BaseOS
gpgcheck = 0
[检查是否可用]# dnf list httpd
正在更新 Subscription Management 软件仓库。
无法读取客户身份

本系统尚未在权利服务器中注册。可使用 "rhc" 或 "subscription-manager" 进行注册。

AppStream                                                                                           119 MB/s | 7.7 MB     00:00
BaseOS                                                                                              167 MB/s | 2.1 MB     00:00
可安装的软件包
httpd.x86_64                                                 2.4.62-4.el9                                                  AppStream
[root@localhost yum.repos.d]#
5.网络软件仓库的使用
1)加载docker容器的网络repo源
https://mirrors.aliyun.com/docker-ce/linux/rhel/9.6/x86_64/stable/
2)创建编辑网络源
bash
 cd /etc/yum.repos.d/  //(先进到存放仓库的目录)

[root@localhost ~]# cd /etc/yum.repos.d/
[root@localhost yum.repos.d]# ls
redhat.repo  rhelbendi.repo
[root@localhost yum.repos.d]# vim docker.repo
[root@localhost yum.repos.d]# ls
redhat.repo  rhelbendi.repo
[root@localhost yum.repos.d]# vim rhelbendi.repo
[root@localhost yum.repos.d]# vim docker.repo
[root@localhost yum.repos.d]# dnf search docker
正在更新 Subscription Management 软件仓库。
无法读取客户身份

本系统尚未在权利服务器中注册。可使用 "rhc" 或 "subscription-manager" 进行注册。

docker                                                                                               81 kB/s |  42 kB     00:00
==================================================== 名称 和 概况 匹配:docker =====================================================
docker-buildx-plugin.x86_64 : Docker Buildx plugin for the Docker CLI
docker-ce-rootless-extras.x86_64 : Rootless support for Docker
docker-compose-plugin.x86_64 : Docker Compose plugin for the Docker CLI
docker-model-plugin.x86_64 : Docker Model Runner plugin for the Docker CLI
pcp-pmda-docker.x86_64 : Performance Co-Pilot (PCP) metrics from the Docker daemon
podman-docker.noarch : Emulate Docker CLI using podman
======================================================== 名称 匹配:docker =========================================================
docker-ce.x86_64 : The open-source application container engine
docker-ce-cli.x86_64 : The open-source application container engine
[root@localhost yum.repos.d]# cat docker.repo
[docker]
name = docker
baseurl = https://mirrors.aliyun.com/docker-ce/linux/rhel/9.6/x86_64/stable/
gpgcheck = 0
[root@localhost yum.repos.d]#
6.epel源使用
1)epel源地址
https://mirrors.aliyun.com/epel-archive/9.6-2025-11-11/Everything/x86_64/
2)进到配置目录创建编辑epel.repo
bash
[root@localhost yum.repos.d]# ls
docker.repo  redhat.repo  rhelbendi.repo
[root@localhost yum.repos.d]# vim epel.repo
[root@localhost yum.repos.d]# cat epel.repo
[epel]
name = epel
baseurl = https://mirrors.aliyun.com/epel-archive/9.6-2025-11-11/Everything/x86_64/
gpgcheck = 0

[root@localhost yum.repos.d]# dnf search ansible
正在更新 Subscription Management 软件仓库。
无法读取客户身份

本系统尚未在权利服务器中注册。可使用 "rhc" 或 "subscription-manager" 进行注册。

上次元数据过期检查:0:01:49 前,执行于 2026年01月15日 星期四 09时53分26秒。
==================================================== 名称 和 概况 匹配:ansible ====================================================
ansible.noarch : Curated set of Ansible collections included in addition to ansible-core
ansible-collection-ansible-posix.noarch : Ansible Collection targeting POSIX and POSIX-ish platforms
ansible-collecti Ansible use case for libssh
python3-pytest-testinfra+ansible.noarch : Metapackage for python3-pytest-testinfra: ansible extras
vim-ansible.noarch : Vim plugin for syntax highlighting ansible's common filetypes
======================================================== 名称 匹配:ansible ========================================================

ansible-freeipa.noarch : Roles and playbooks to deploy FreeIPA servers, replicas and clients
======================================================== 概况 匹配:ansible ========================================================
rhc-worker-playbook.x86_64 : Python worker for Red Hat connector that launches Ansible Runner
standard-test-roles.noarch : Standard Test Interface Ansible roles
[root@localhost yum.repos.d]#
7.自建软件仓库的方法
目的:把网络软件仓库中的软件下载下来后分享给本地主机,或直接把网上下载下来的rpm加入到软件仓库中
bash
[root@localhost ~]# dnf install httpd -y
通过http共享自建软件仓库

[root@localhost ~]# systemctl enable --now httpd
Created symlink /etc/systemd/system/multi-user.target.wants/httpd.service → /usr/lib/systemd/system/httpd.service.

建立共享目录
[root@localhost ~]# mkdir /var/www/html/software
[root@localhost ~]# dnf install docker-ce --downloadonly --destdir /mnt/

[root@localhost ~]# ls /var/www/html/software/
containerd.io-2.2.1-1.el9.x86_64.rpm          docker-ce-29.1.4-1.el9.x86_64.rpm      docker-ce-rootless-extras-29.1.4-1.el9.x86_64.rpm
docker-buildx-plugin-0.30.1-1.el9.x86_64.rpm  docker-ce-cli-29.1.4-1.el9.x86_64.rpm  docker-compose-plugin-5.0.1-1.el9.x86_64.rpm

[root@localhost ~]# createrepo -v /var/www/html/software/

采集软件包信息
测试
bash
[root@localhost ~]# cd /etc/yum.repos.d/
[root@localhost yum.repos.d]# ls
docker.repo  epel.repo  redhat.repo  rhelbendi.repo
[root@localhost yum.repos.d]# vim software.repo
[root@localhost yum.repos.d]# ls
docker.repo  epel.repo  redhat.repo  rhelbendi.repo  software.repo

[root@localhost yum.repos.d]# cat software.repo
[software]
name = software
baseurl = http://172.25.254.130/software/
gpgcheck = 0
[root@localhost yum.repos.d]#
[root@localhost yum.repos.d]# dnf info docker-ce.x86_64
正在更新 Subscription Management 软件仓库。
无法读取客户身份

本系统尚未在权利服务器中注册。可使用 "rhc" 或 "subscription-manager" 进行注册。

software                                                                                                                                                          1.8 MB/s | 3.0 kB     00:00
可安装的软件包
名称         : docker-ce
时期         : 3
版本         : 29.1.4
发布         : 1.el9
架构         : x86_64
大小         : 22 M
源           : docker-ce-29.1.4-1.el9.src.rpm
仓库         : docker
概况         : The open-source application container engine
URL          : https://www.docker.com
协议         : Apache-2.0
描述         : Docker is a product for you to build, ship and run any application as a
             : lightweight container.
             :
             : Docker containers are both hardware-agnostic and platform-agnostic. This means
             : they can run anywhere, from your laptop to the largest cloud compute instance
             : and everything in between - and they don't require you to use a particular
             : language, framework or packaging system. That makes them great building blocks
             : for deploying and scaling web apps, databases, and backend services without
             : depending on a particular stack or provider.

名称         : docker-ce
时期         : 3
版本         : 29.1.4
发布         : 1.el9
架构         : x86_64
大小         : 22 M
源           : docker-ce-29.1.4-1.el9.src.rpm
仓库         : software
概况         : The open-source application container engine
URL          : https://www.docker.com
协议         : Apache-2.0
描述         : Docker is a product for you to build, ship and run any application as a
             : lightweight container.
             :
             : Docker containers are both hardware-agnostic and platform-agnostic. This means
             : they can run anywhere, from your laptop to the largest cloud compute instance
             : and everything in between - and they don't require you to use a particular
             : language, framework or packaging system. That makes them great building blocks
             : for deploying and scaling web apps, databases, and backend services without
             : depending on a particular stack or provider.
八.Linux下的网络管理
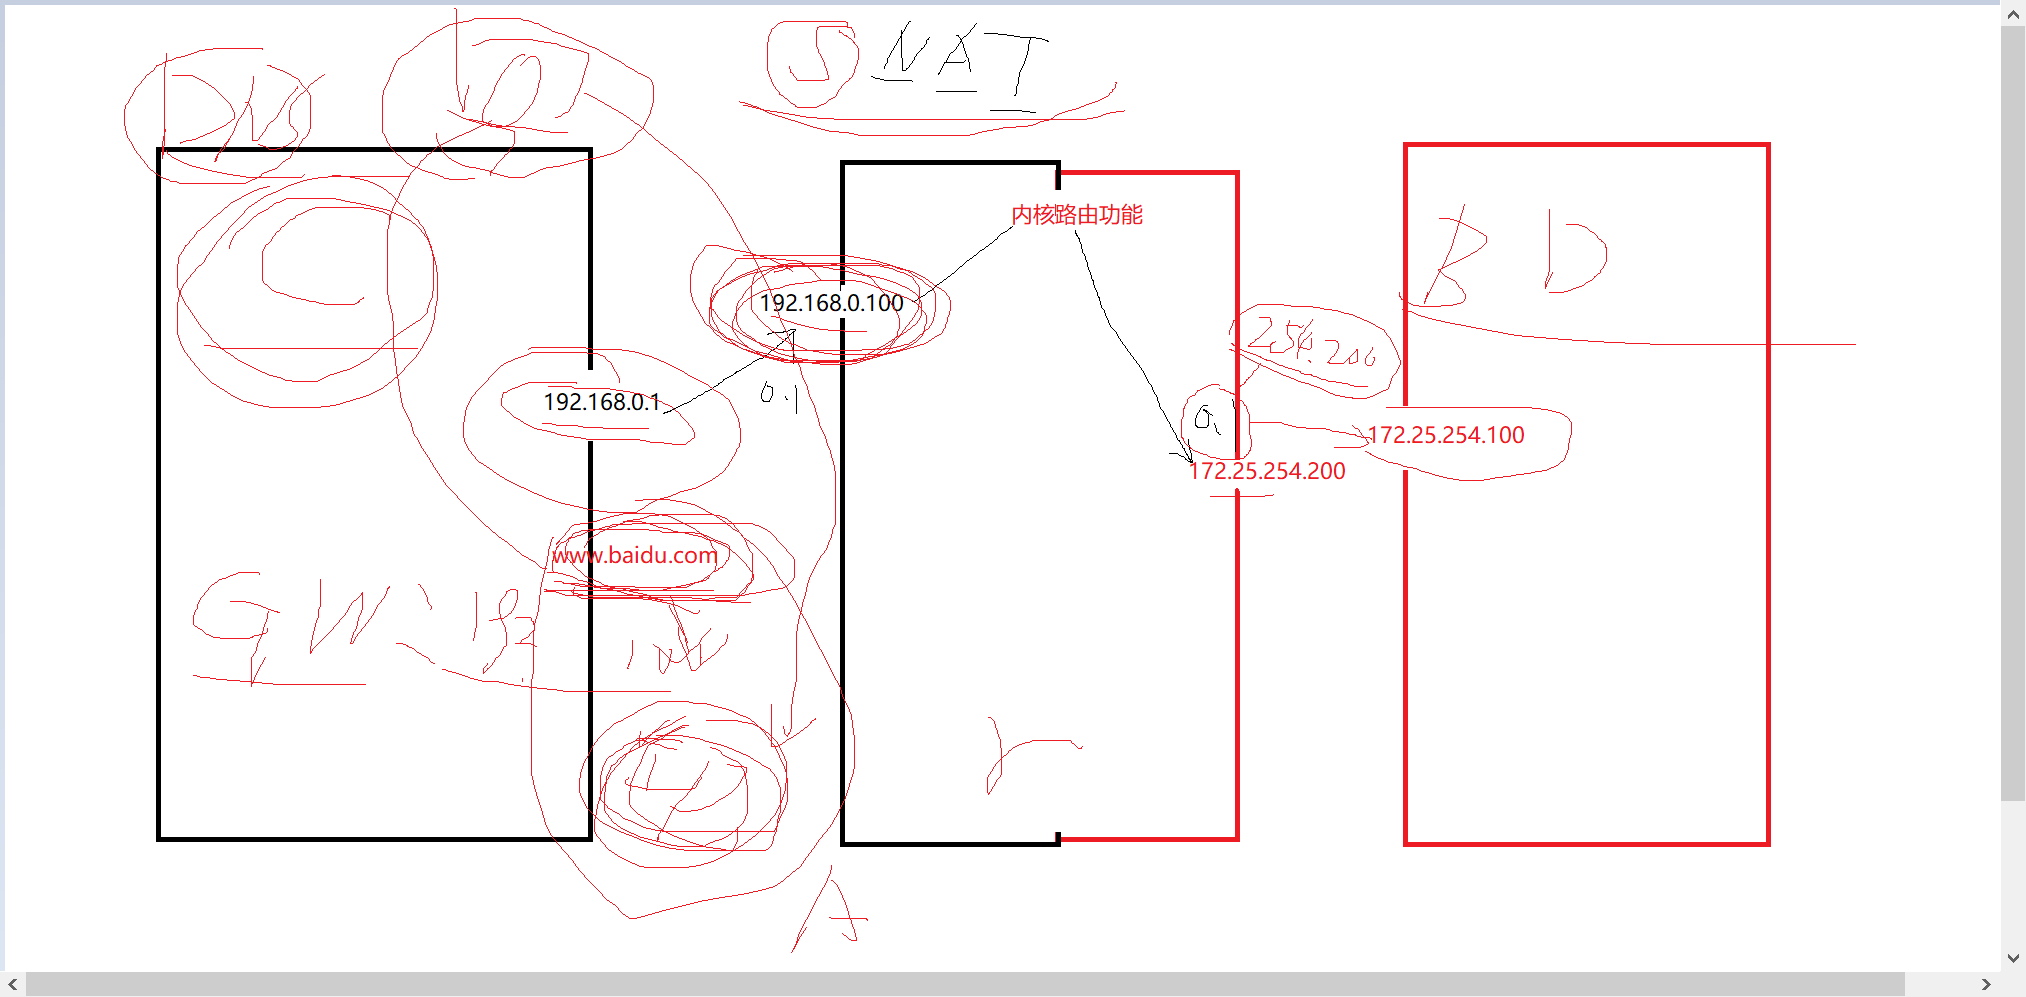
1.网络ip通信原理
2.网络ip的配置方法
bash
[root@localhost ~]#


[root@localhost ~]# cd /etc/NetworkManager/system-connections/
[root@localhost system-connections]# ls
eth0.nmconnection
[root@localhost system-connections]# vim eth1.nmconnection
[root@localhost system-connections]# ll
总用量 8
-rw------- 1 root root 183  1月 14 19:30 eth0.nmconnection
-rw-r--r-- 1 root root 146  1月 16 11:06 eth1.nmconnection
[root@localhost system-connections]# chmod 600 eth1.nmconnection
[root@localhost system-connections]# ip addr show eth1;route -n ;cat /etc/resolv.conf
3: eth1: <BROADCAST,MULTICAST,UP,LOWER_UP> mtu 1500 qdisc mq state UP group default qlen 1000
    link/ether 00:0c:29:62:c1:cd brd ff:ff:ff:ff:ff:ff
    altname enp11s0
    altname ens192
Kernel IP routing table
Destination     Gateway         Genmask         Flags Metric Ref    Use Iface
0.0.0.0         172.25.254.2    0.0.0.0         UG    100    0        0 eth0
172.25.254.0    0.0.0.0         255.255.255.0   U     100    0        0 eth0
# Generated by NetworkManager
search localdomain
nameserver 172.25.254.2
[root@localhost system-connections]# nmcli connection reload
[root@localhost system-connections]# ip addr show eth1;route -n ;cat /etc/resolv.conf
3: eth1: <BROADCAST,MULTICAST,UP,LOWER_UP> mtu 1500 qdisc mq state UP group default qlen 1000
    link/ether 00:0c:29:62:c1:cd brd ff:ff:ff:ff:ff:ff
    altname enp11s0
    altname ens192
    inet 172.25.254.100/24 brd 172.25.254.255 scope global noprefixroute eth1
       valid_lft forever preferred_lft forever
    inet6 fe80::4e0f:8f97:36be:fda9/64 scope link noprefixroute
       valid_lft forever preferred_lft forever
Kernel IP routing table
Destination     Gateway         Genmask         Flags Metric Ref    Use Iface
0.0.0.0         172.25.254.2    0.0.0.0         UG    100    0        0 eth0
0.0.0.0         172.25.254.2    0.0.0.0         UG    101    0        0 eth1
172.25.254.0    0.0.0.0         255.255.255.0   U     100    0        0 eth0
172.25.254.0    0.0.0.0         255.255.255.0   U     101    0        0 eth1
# Generated by NetworkManager
search localdomain
nameserver 172.25.254.2
nameserver 114.114.114.114
[root@localhost system-connections]# 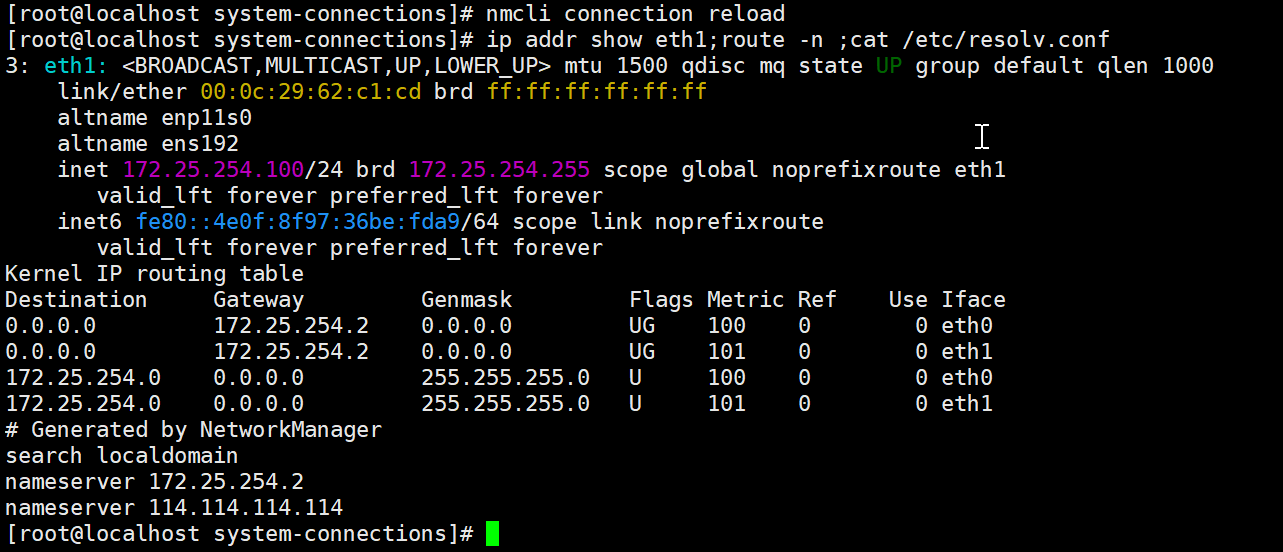
bash
[root@localhost system-connections]# ls /sys/class/net/ | grep eth1		#判定网卡是否存在
[root@localhost ~]# nmcli connection show				#判断网卡是否被使用

#如果要配置的网卡已经被使用了。那么修改配置文件后一定要刷新网络并重启连接
[root@localhost ~]# nmcli connection modify eth0  ipv4.addresses 172.25.254.100/24
[root@localhost ~]# nmcli connection  reload
[root@localhost ~]# nmcli connection up eth0

#如果没有被系统使用那么直接可以设定或者编辑配置文件激活
[root@localhost ~]# cd /etc/NetworkManager/system-connections/
[root@localhost system-connections]# vim eth1.nmconnection


#检测
[root@localhost system-connections]# ip a s eth1			#查看ip

[root@localhost system-connections]# route  -n			#网关

[root@localhost system-connections]# cat /etc/resolv.conf		#查看dns
3.网关的作用及配置方式
4.dns的作用及配置方式
九.Linux下的本地存储管理
1.磁盘分区表原理
2.磁盘分区命令
3.文件系统的作用及制作方式
4.raid磁盘阵列
5.lvm逻辑卷
附加内容:系统引导过程及修复
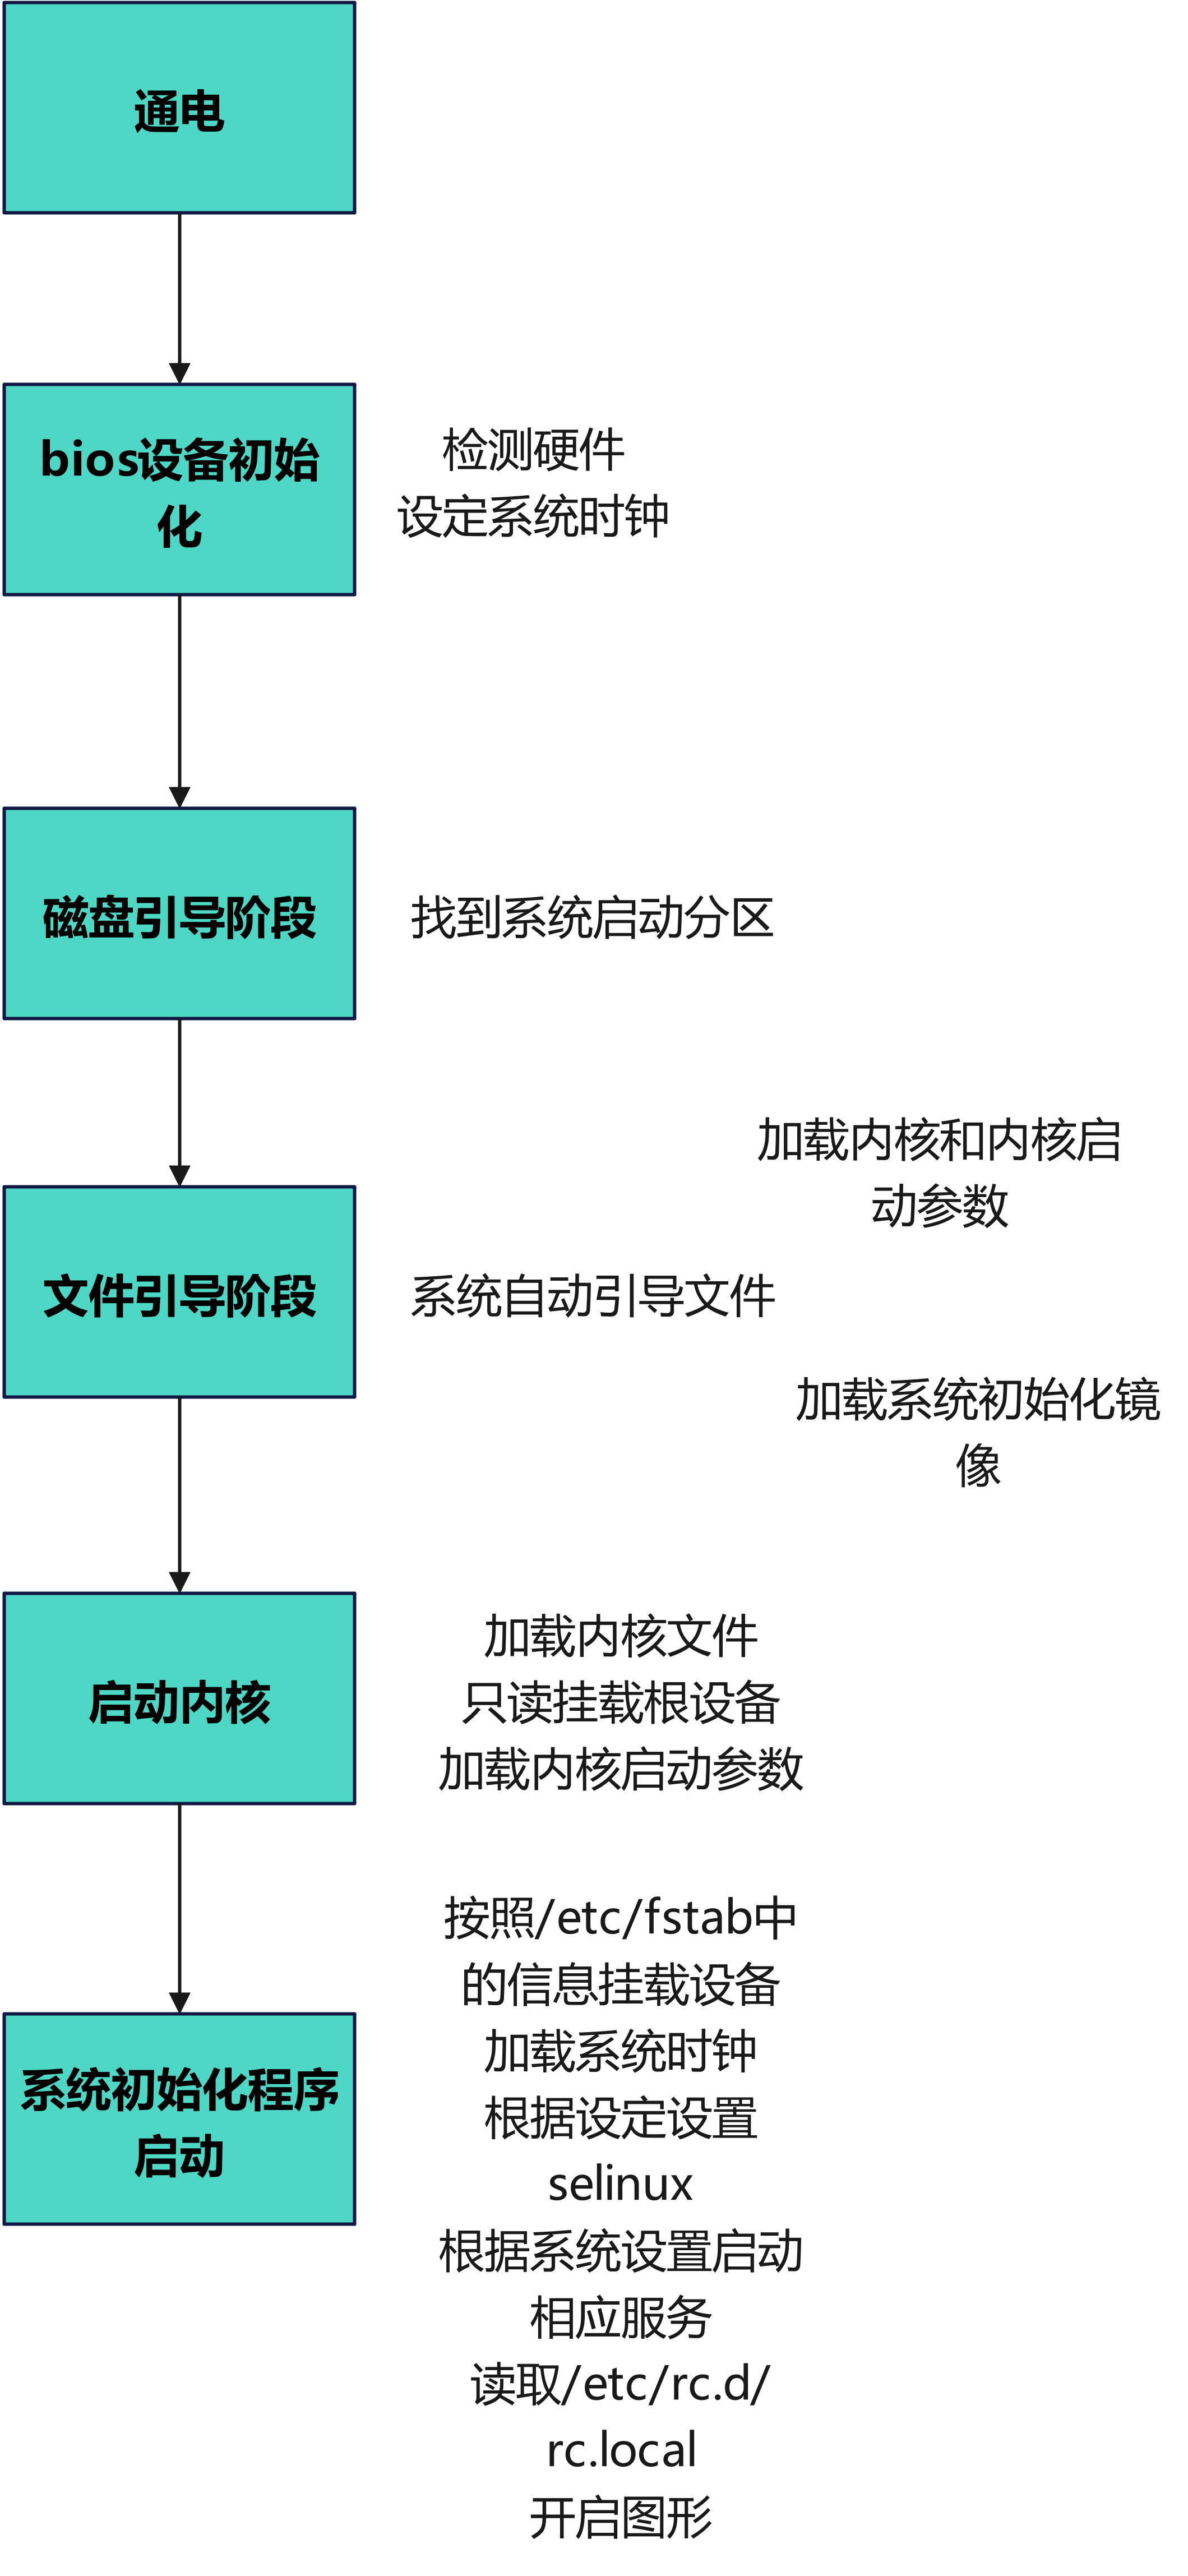
1.系统引导过程
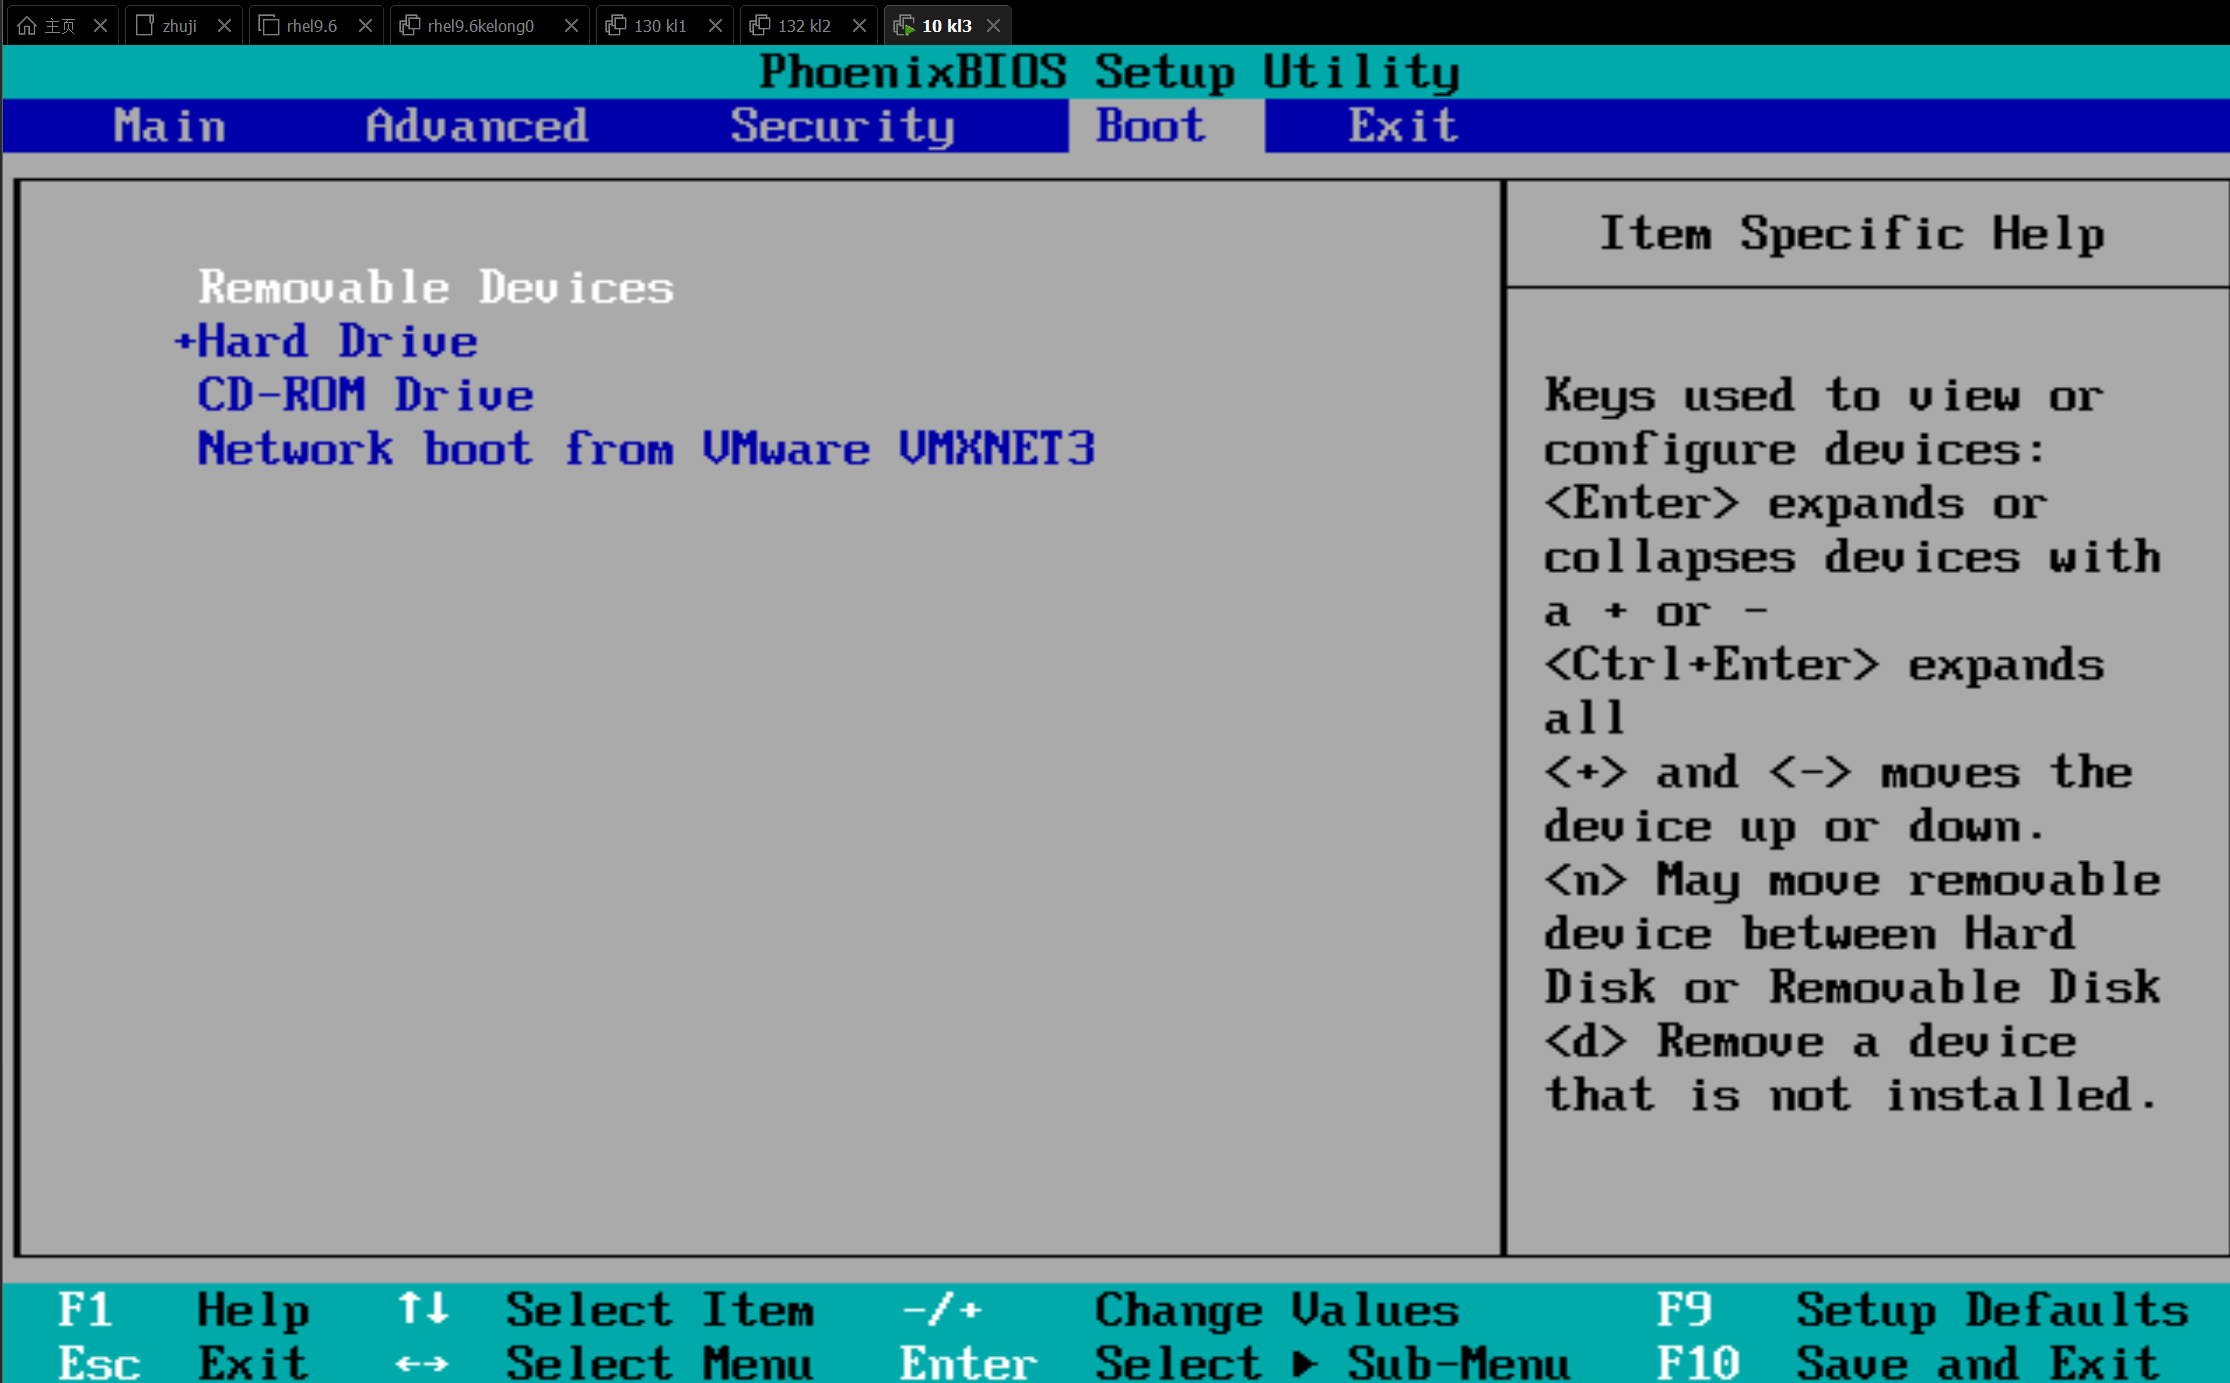
引导过程问题修复
1.磁盘引导阶段问题复现
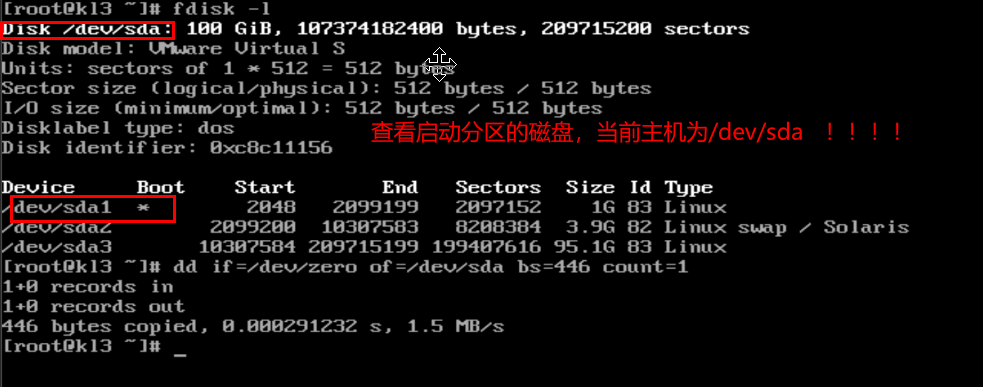
删除磁盘引导文件后重启状态
解决方式:
1.关机
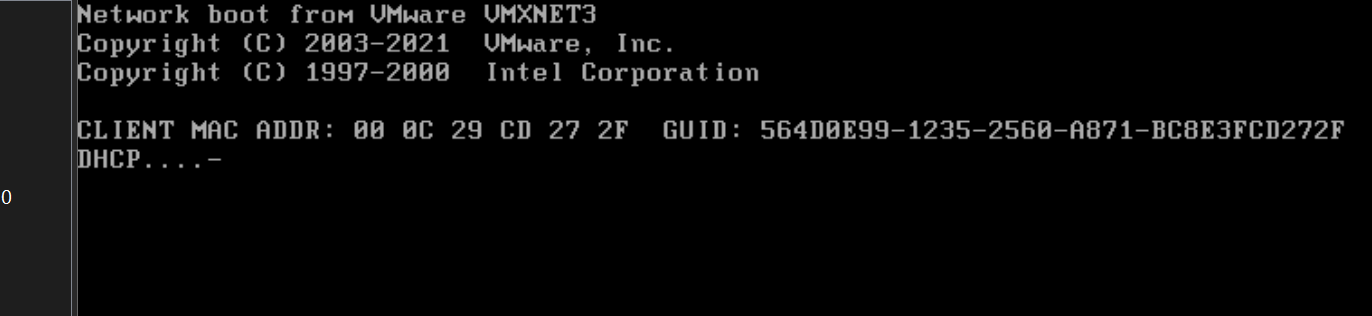
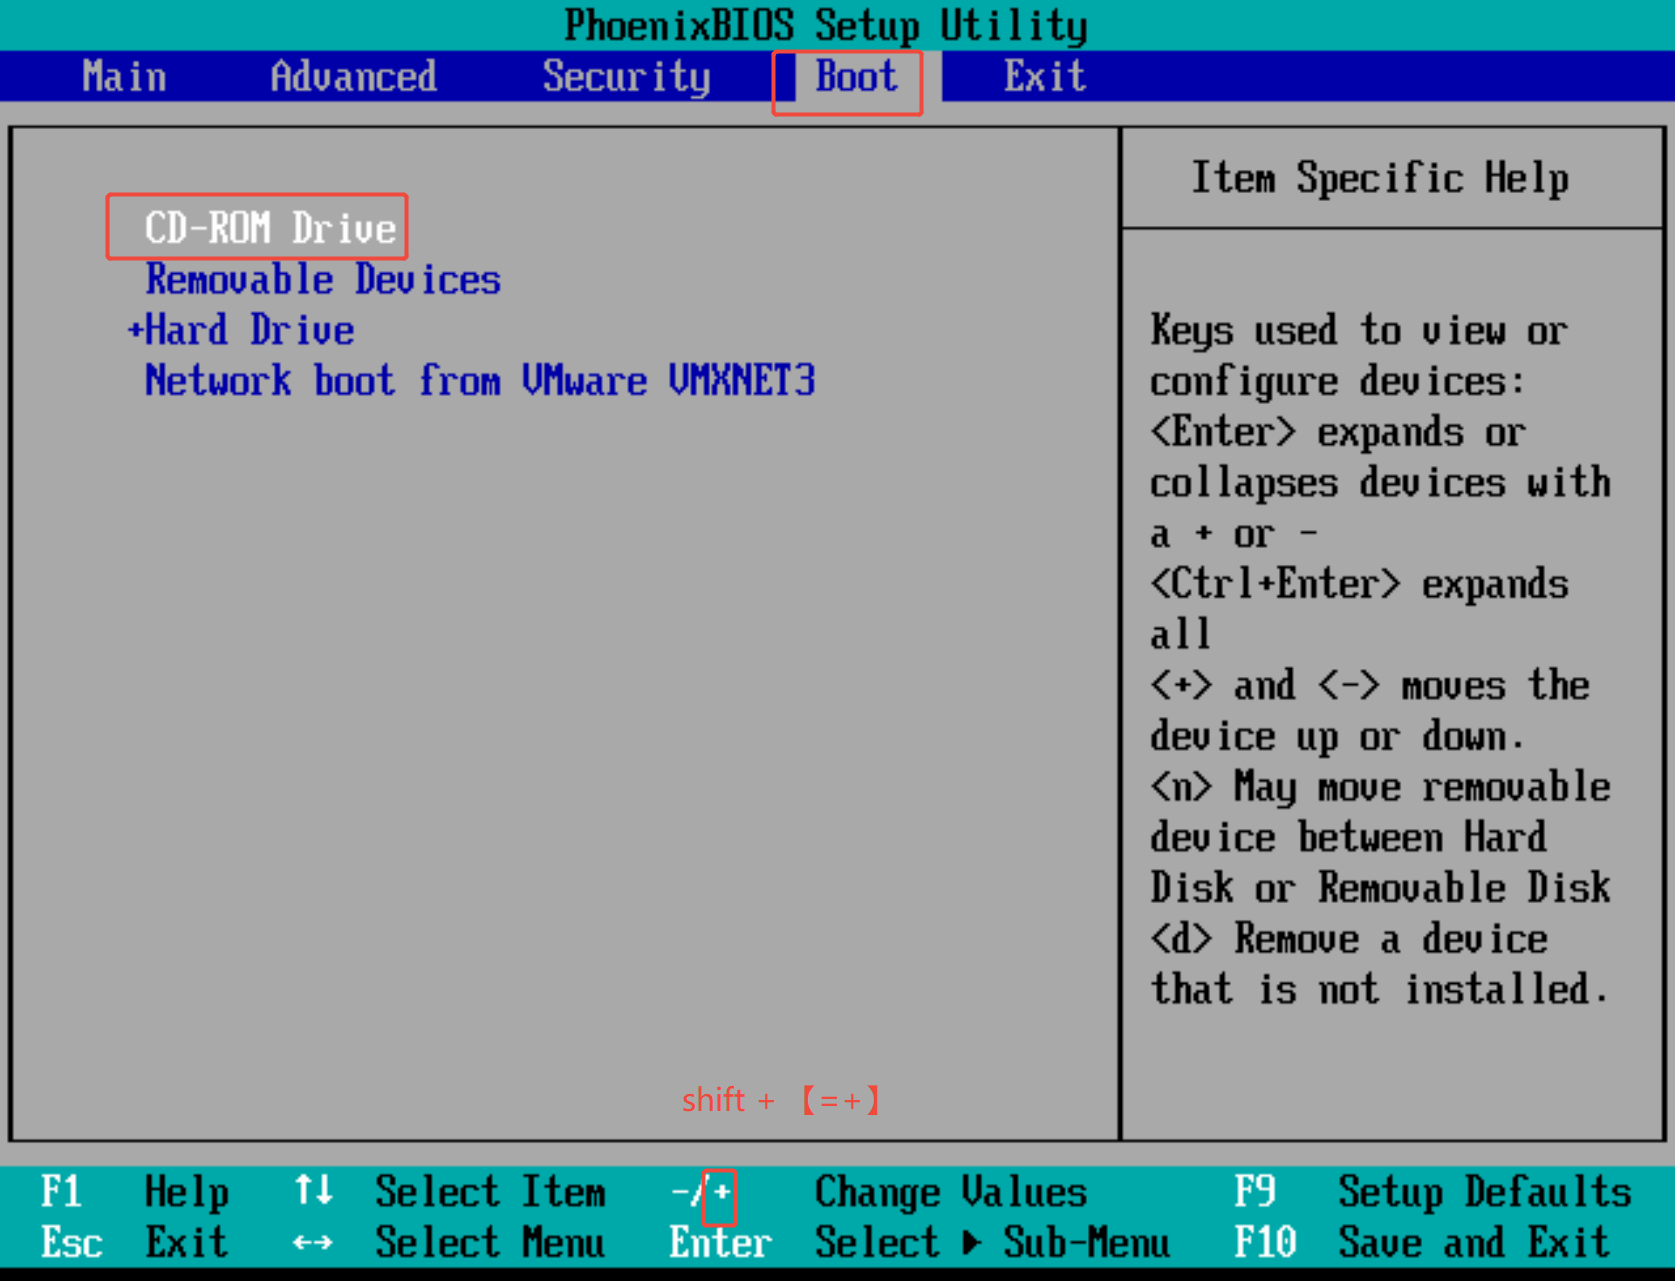
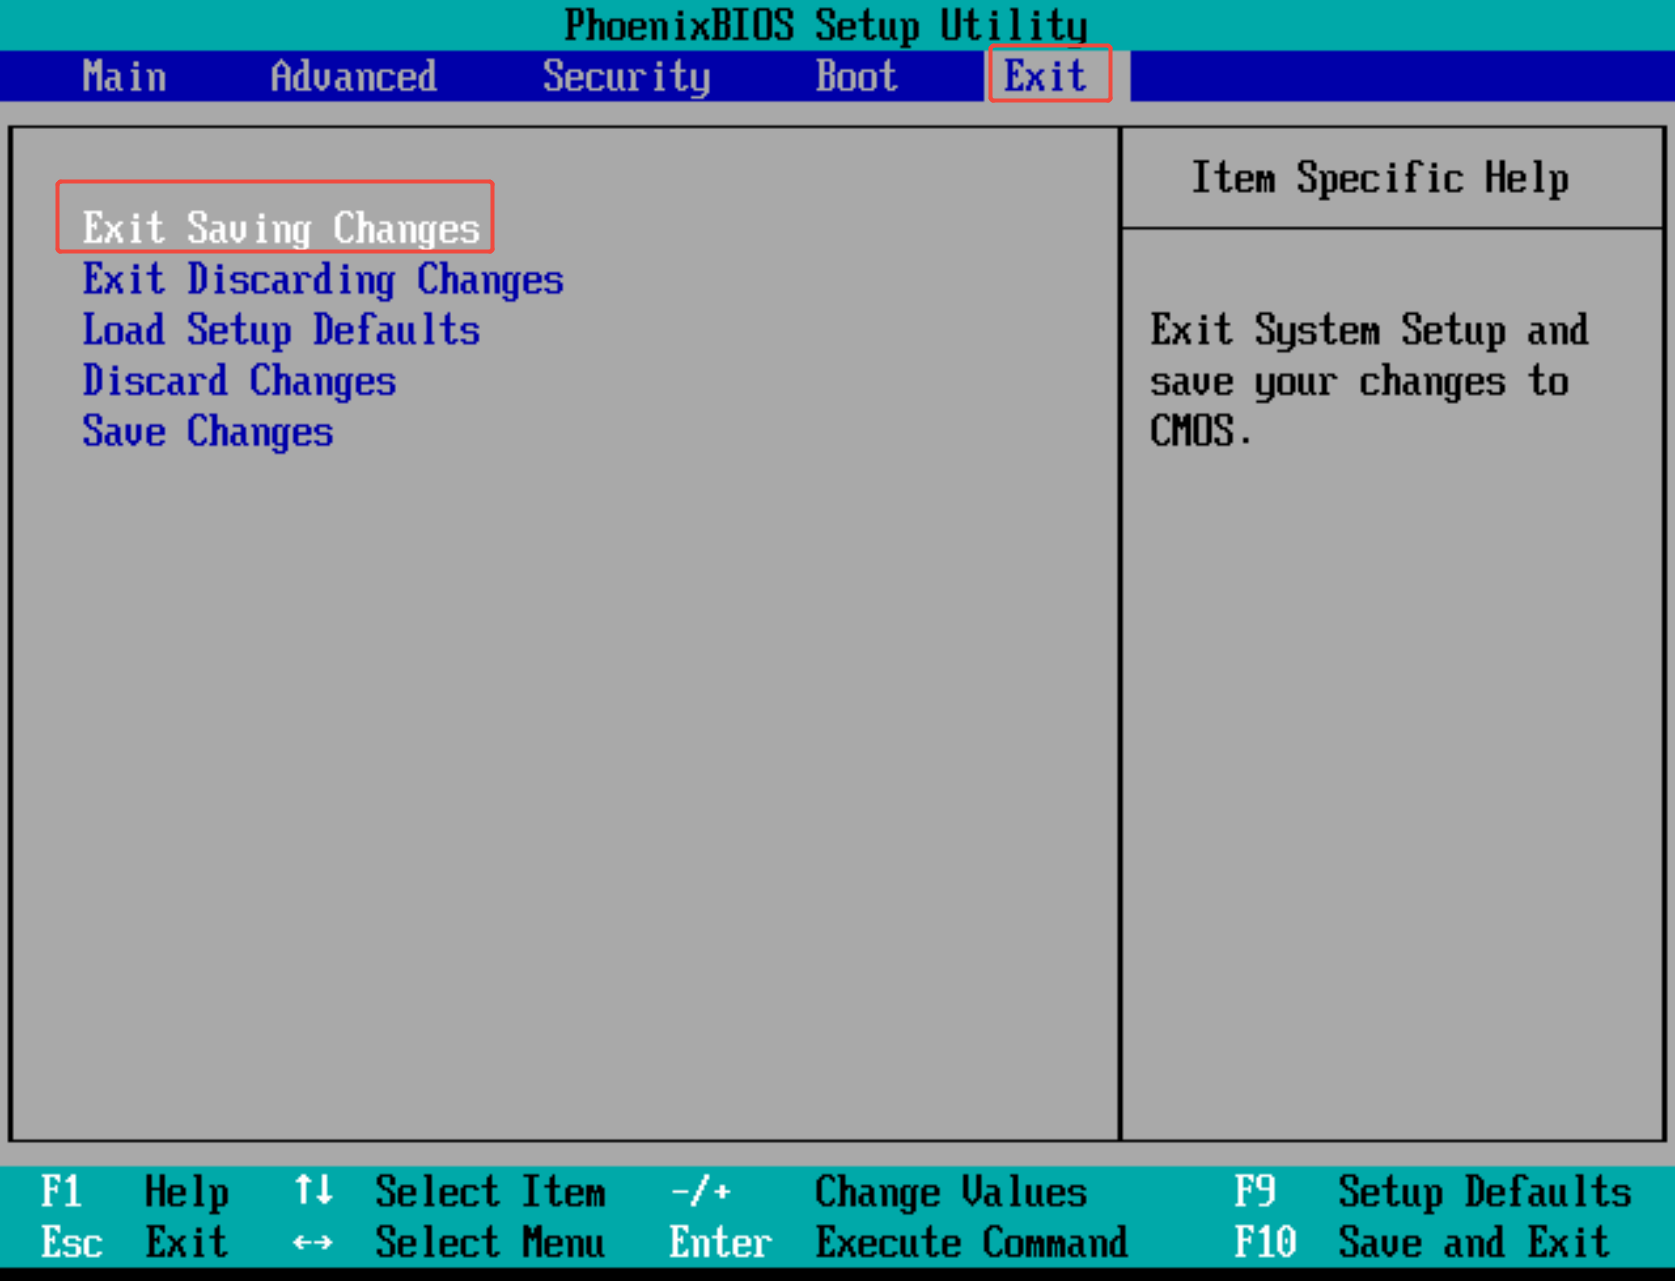
2.插入可安装系统的设备(光驱,U盘...)
3.从此设备启动

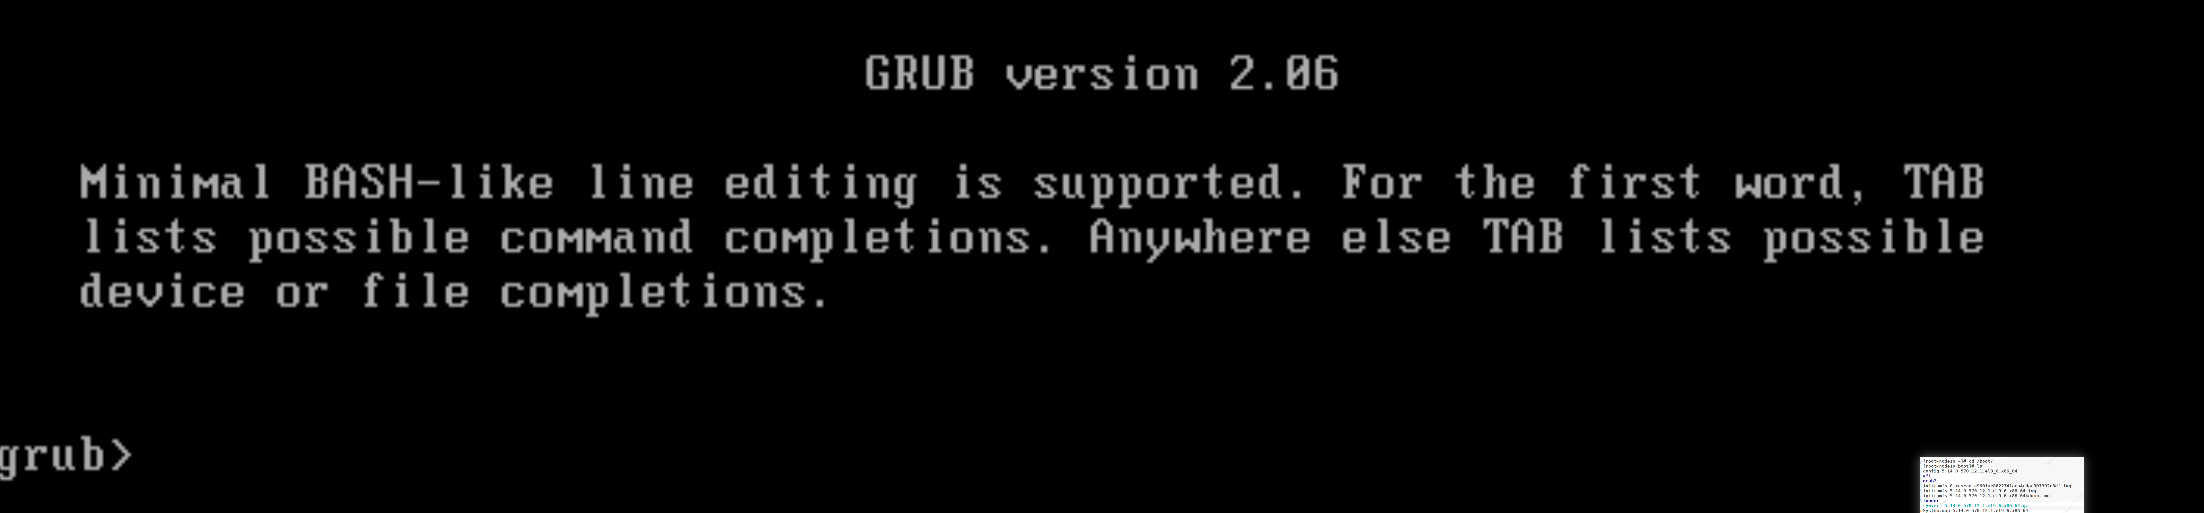
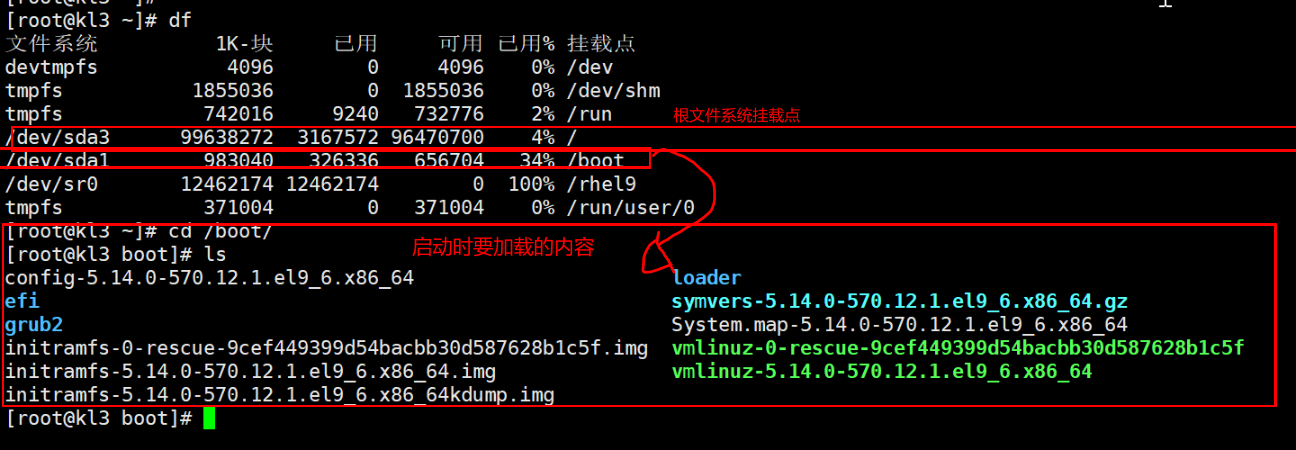
2.文件引导阶段
bash
[root@node10 ~]# ll /boot/grub2/grub.cfg     #主引导文件
[root@node10 ~]# ll /boot/loader/entries/	 #子引导文件存放目录
总用量 8
-rw-r--r--. 1 root root 484  1月 12 11:04 e9601ae8622741aca4cdac907392c8df-0-rescue.conf
-rw-r--r--. 1 root root 460  1月 14 10:23 e9601ae8622741aca4cdac907392c8df-5.14.0-570.12.1.el9_6.x86_64.conf
问题复现之主引导文件修复
bash
[root@node10 ~]# rm -rf /boot/grub2/grub.cfg

#系统并未重启
[root@node10 ~]# grub2-mkconfig  > /boot/grub2/grub.cfg    #修复完成
当文件丢失后系统重新启动
报错
修复过程


当手动引导启动系统后,需要修复自动引导文件,否则系统重启后仍然要手动引导
修复自动引导文件
bash
[root@node10 ~]# grub2-mkconfig > /boot/grub2/grub.cfg #修复完成子引导文件修复
引导文件如果被误删除
bash
[root@node10 ~]# rm -fr /boot/loader/entries/*报错效果
修复方法


当修复子启动文件后网卡的名称设定参数就丢失了需要重新设定,此参数和系统修复本身无关
bash
[rootenode18 ~]# grubby --update-kernel ALL --args net.ifnames=0
bash
grub> linux16 /vmlinuz-5.14.0-427.13.1.el9_4.x86_64 ro root=/dev/nvme0n1p3 net.ifnames=0
这样就不用多重启一步了
修复内核文件
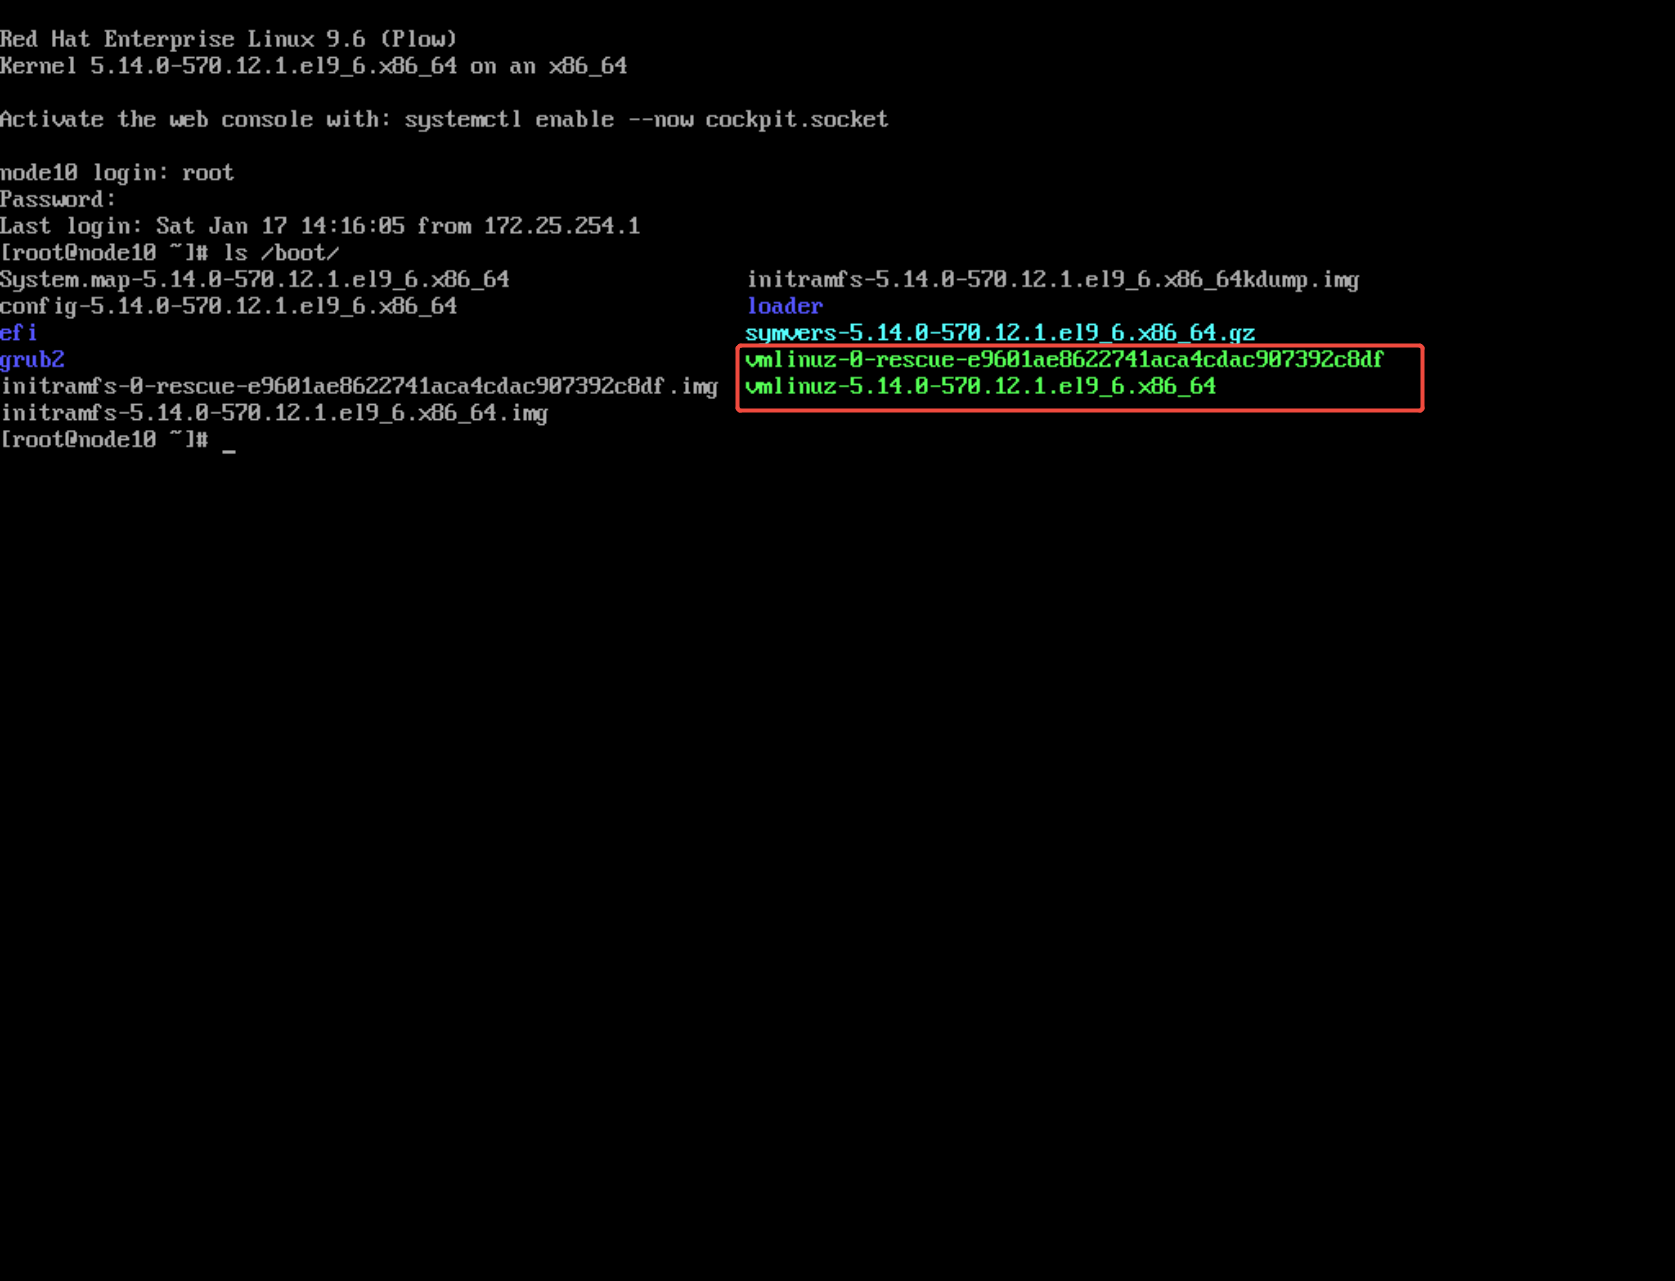
内核文件丢失
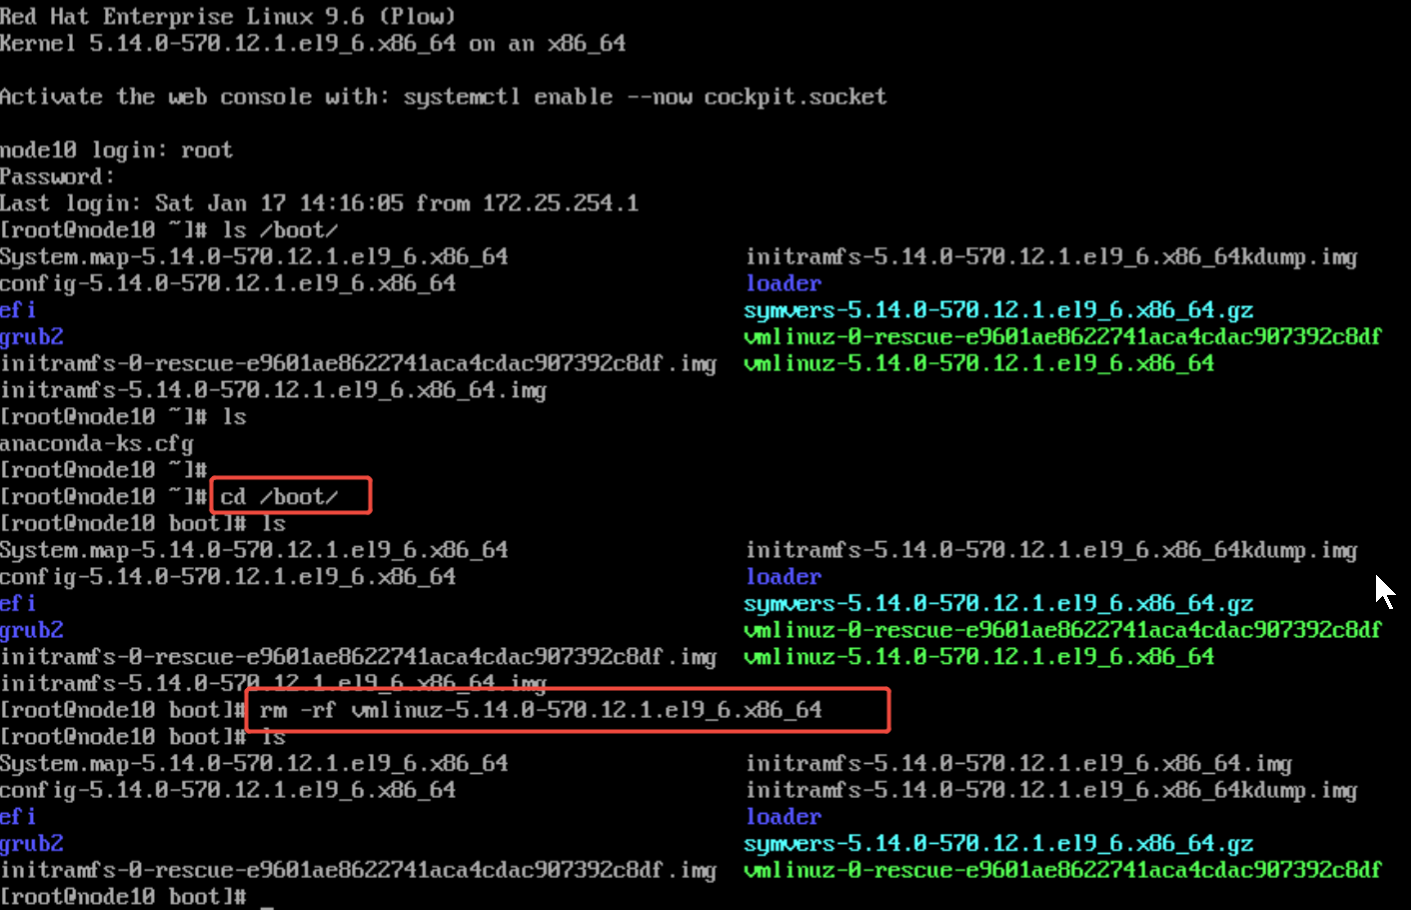
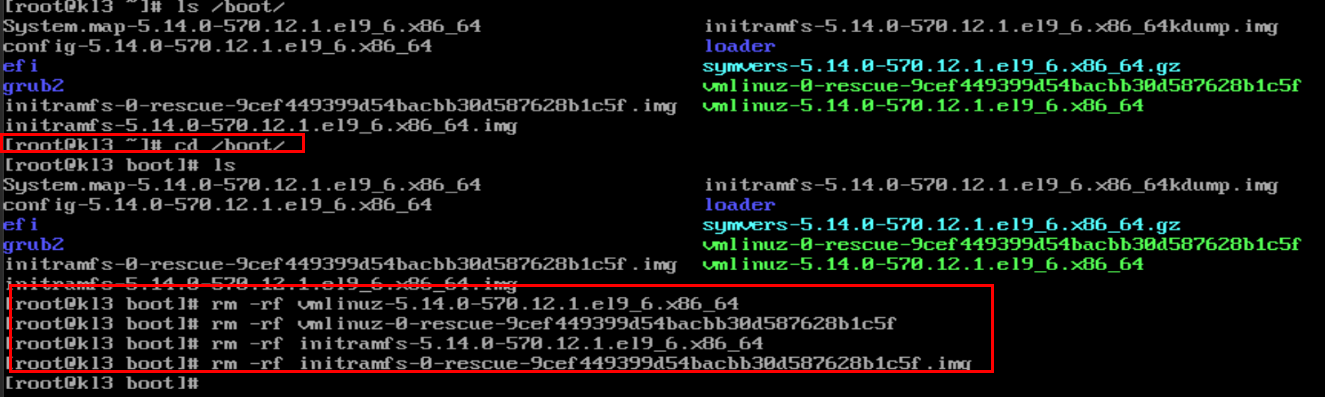
内核丢失报错
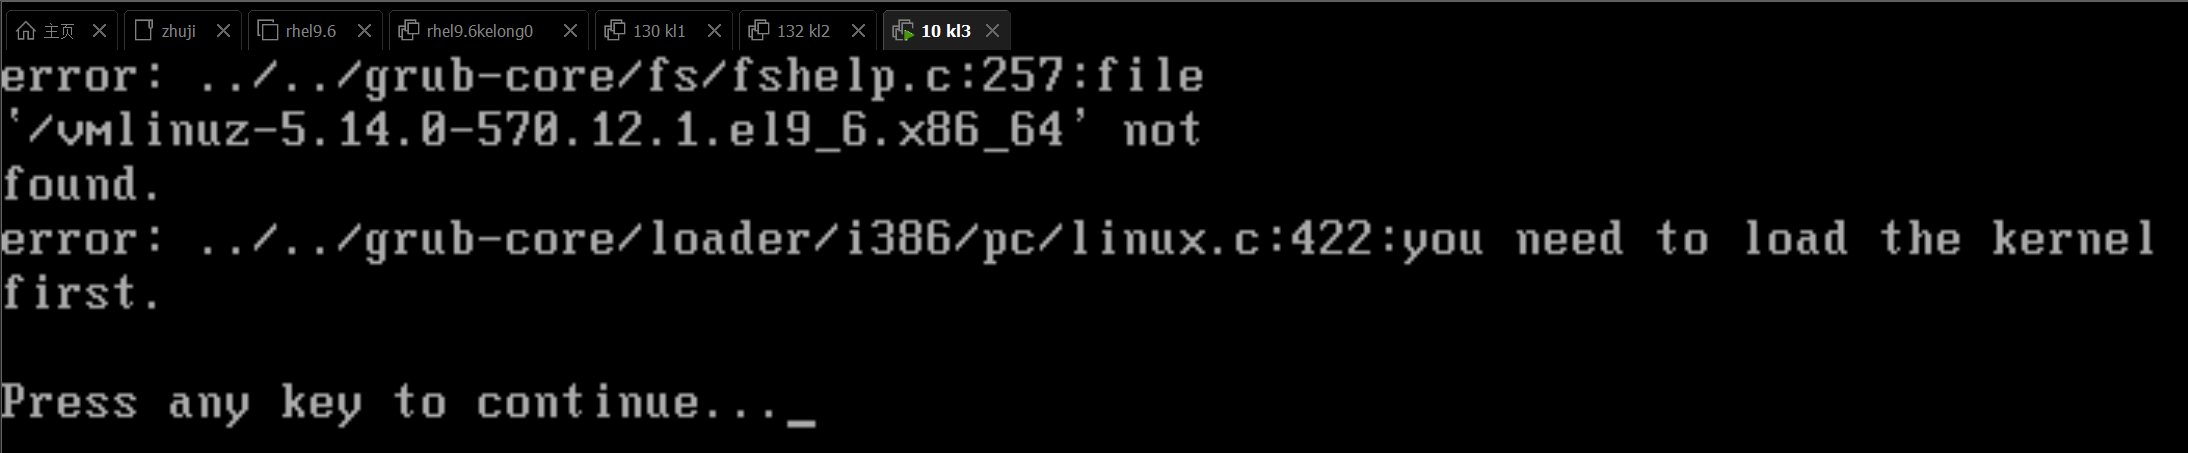
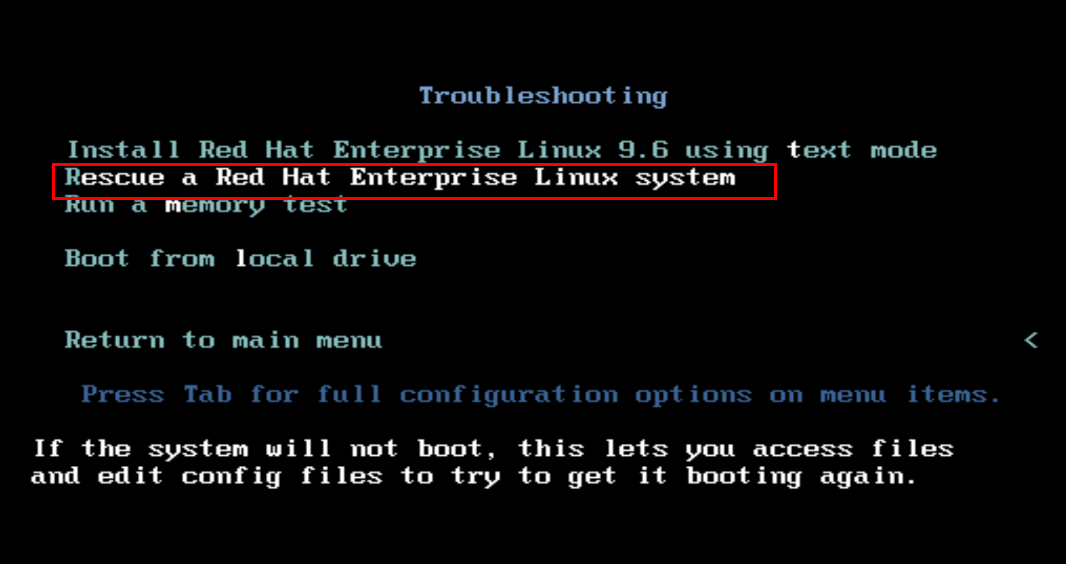
解决方式
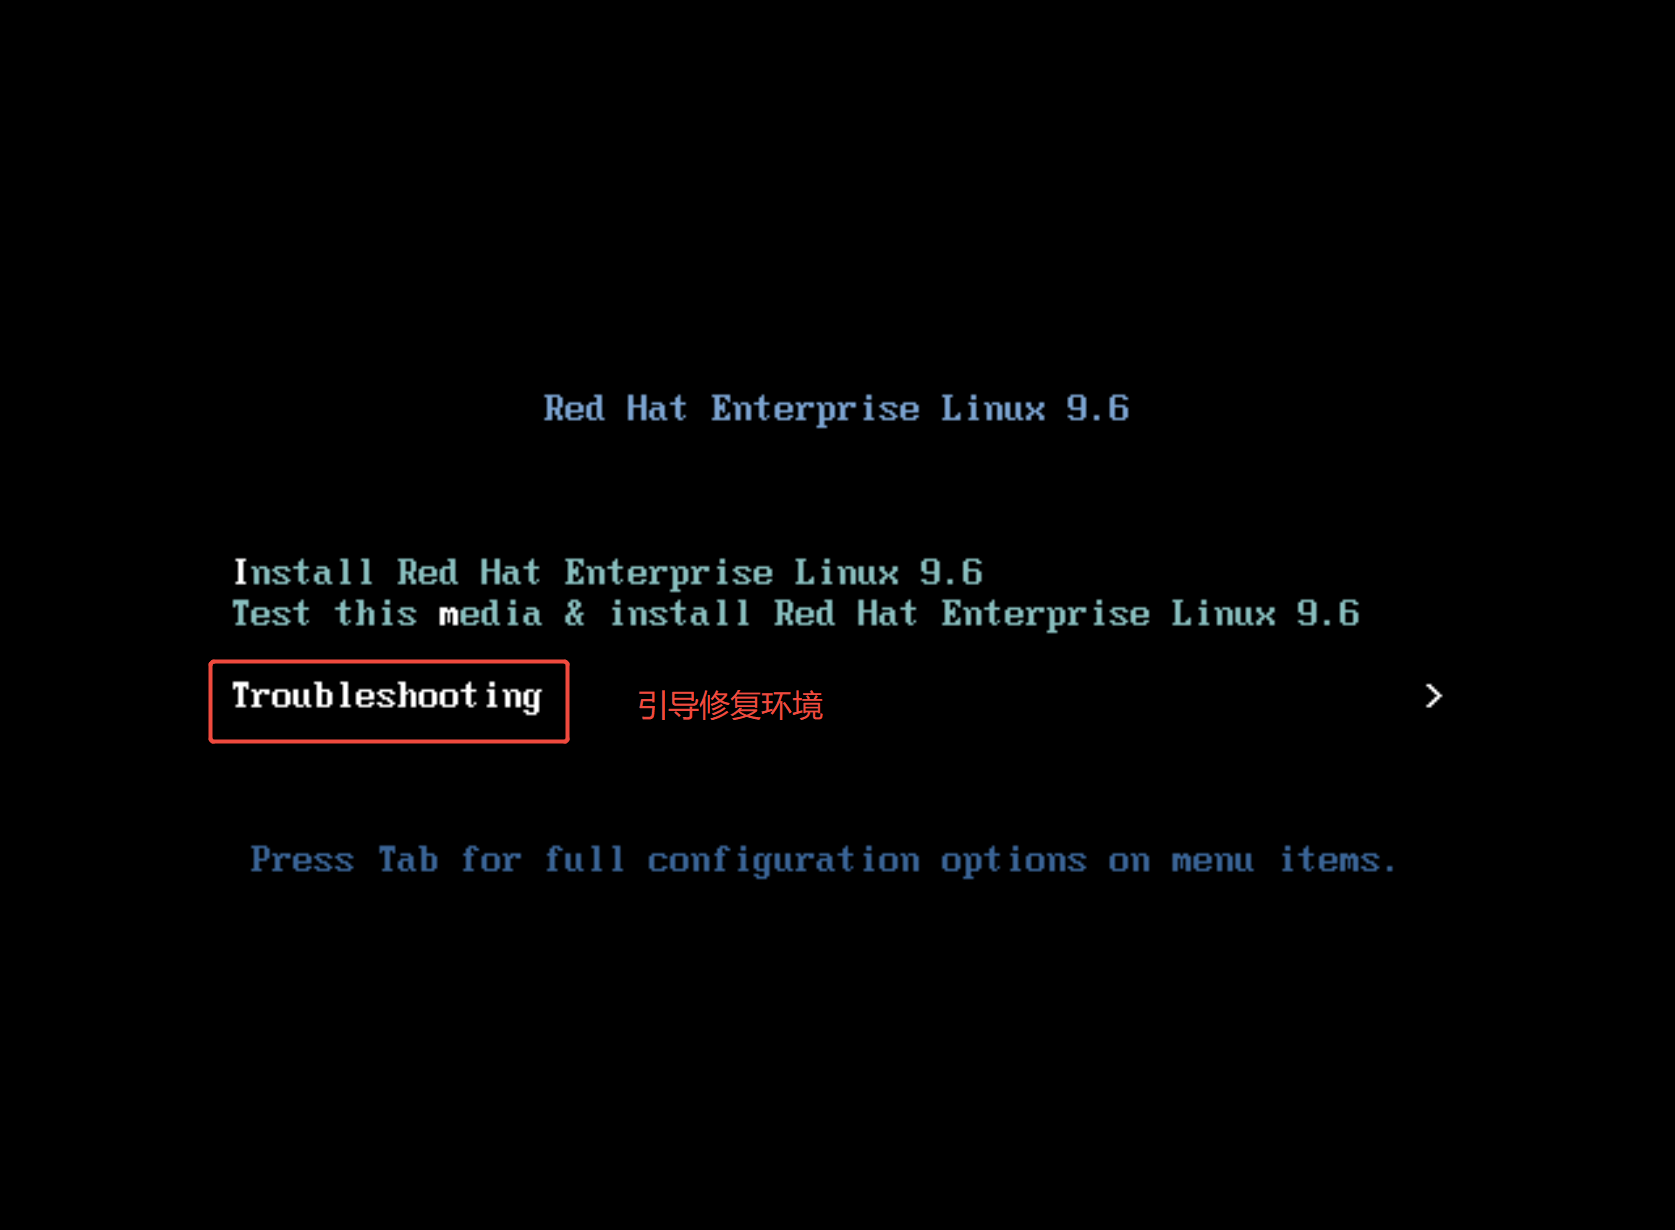
1.用系统安装设备进入挽救模式
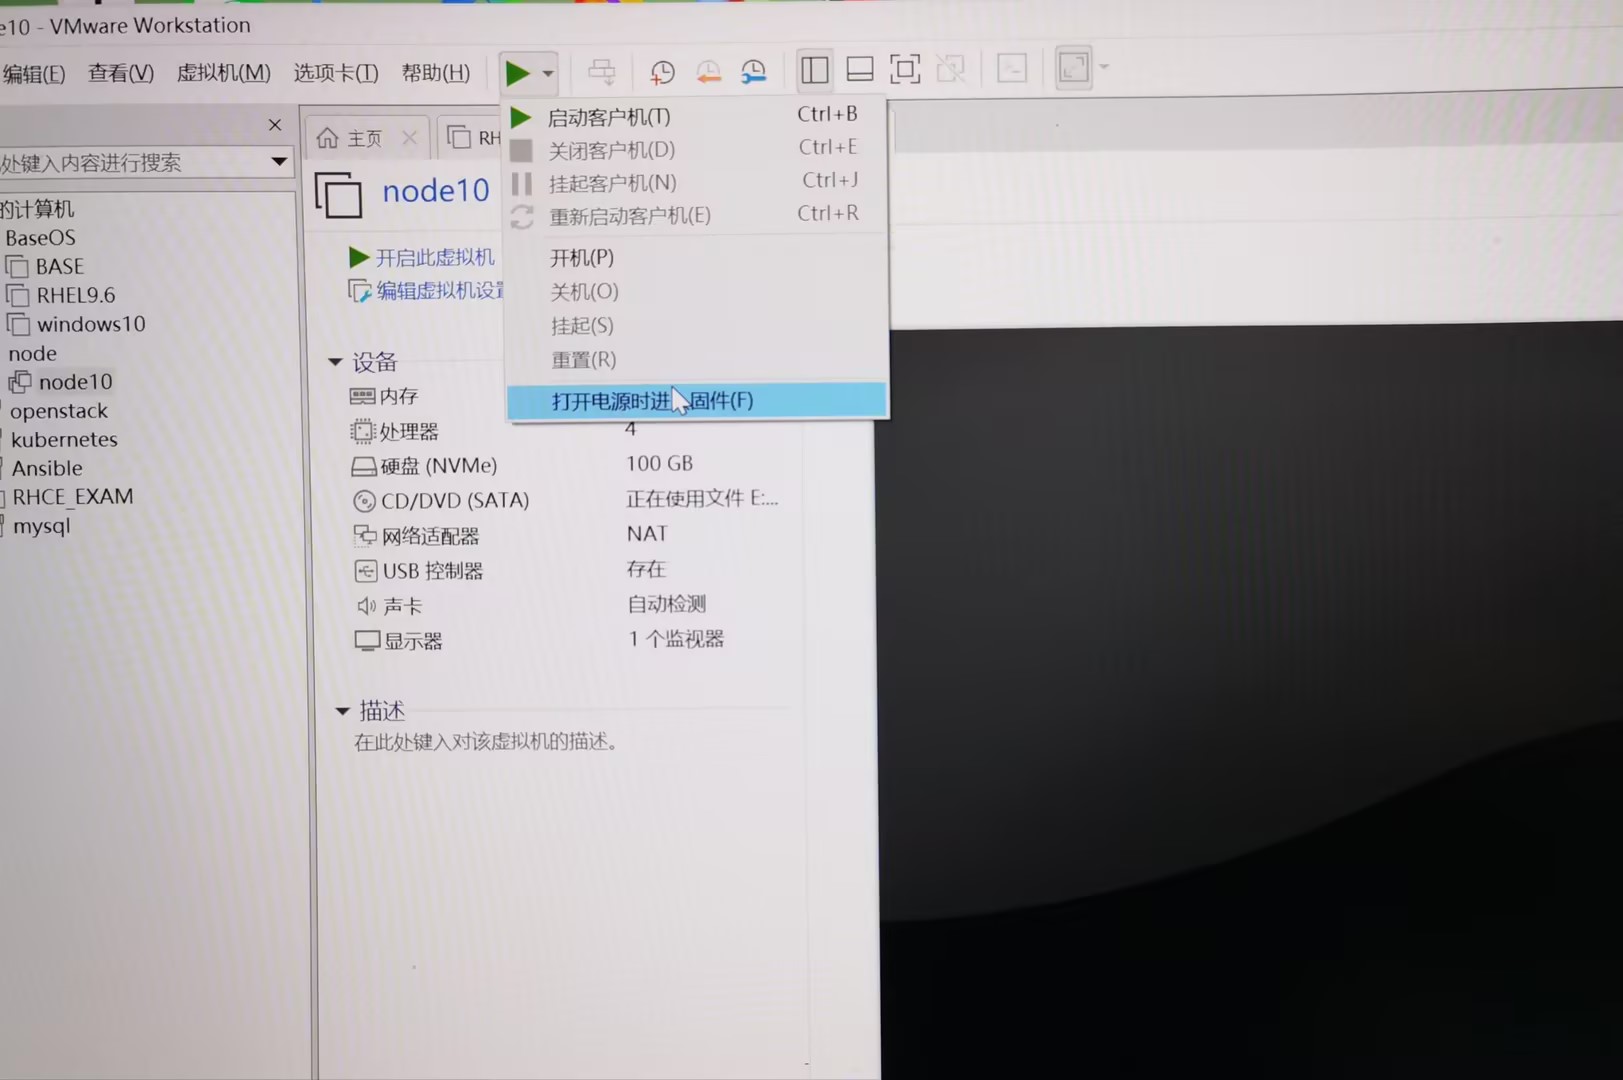
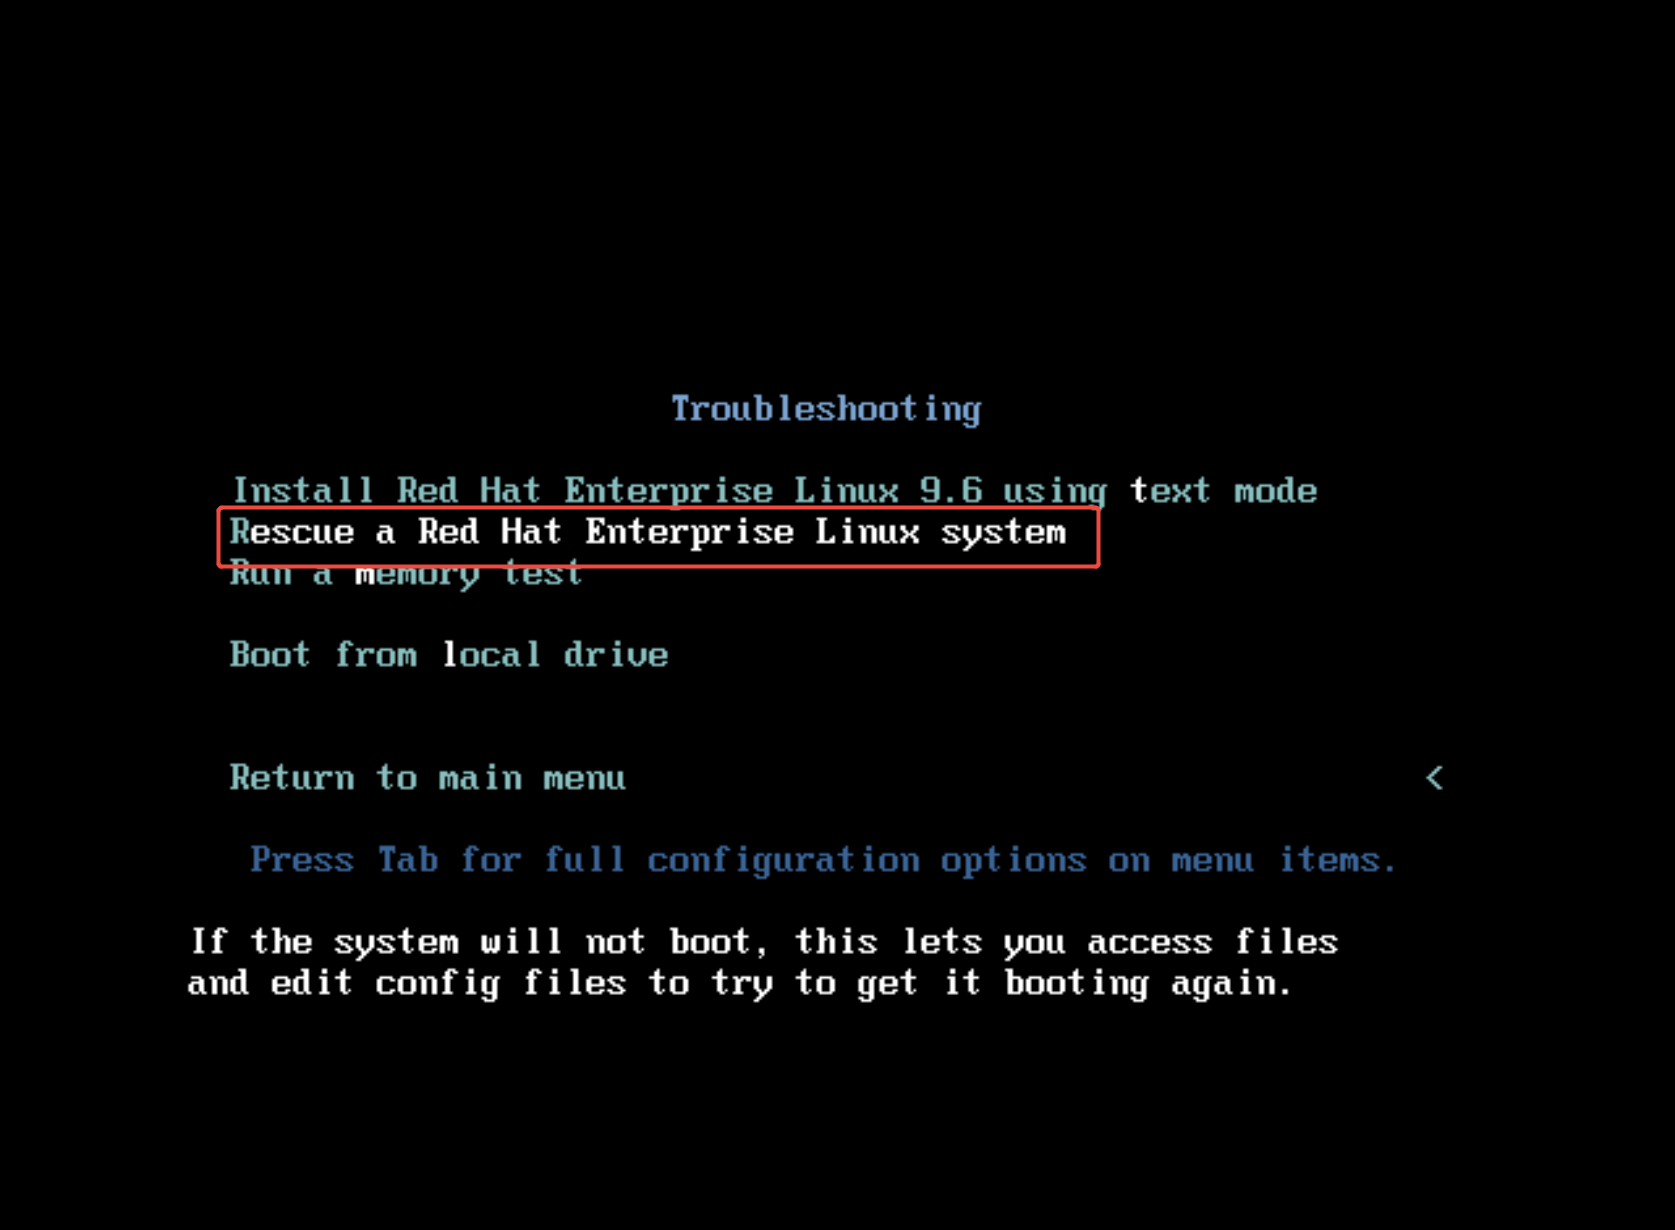
从光驱启动后选择进入挽救环境,此处参看磁盘进到修复的进入过程
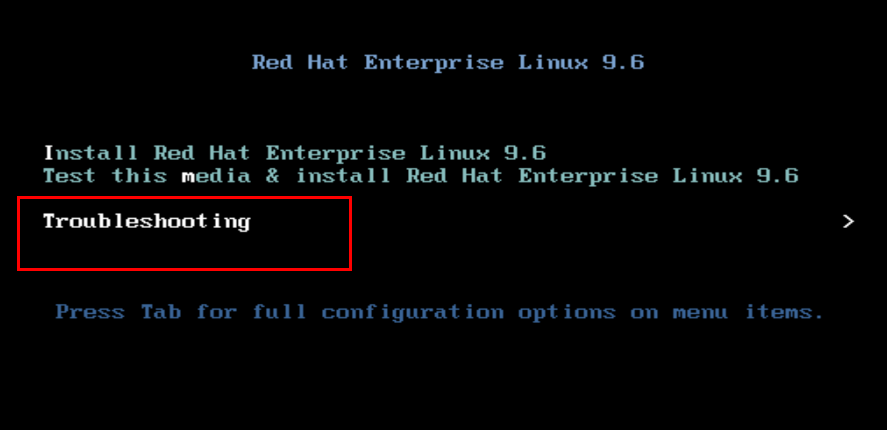
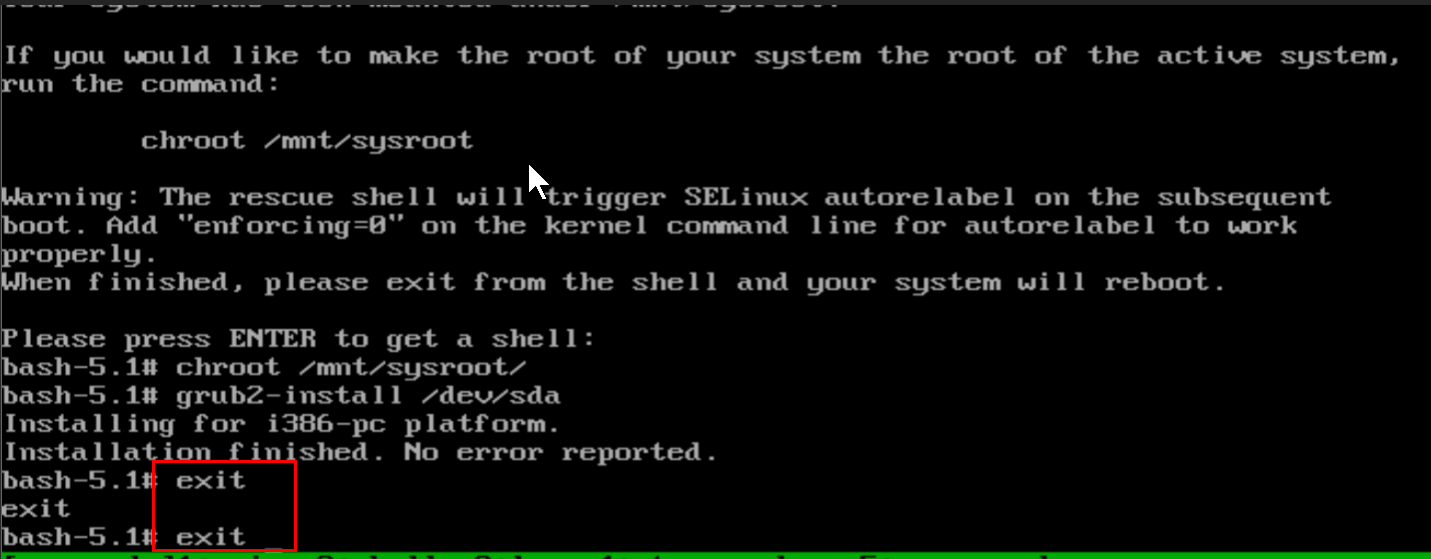
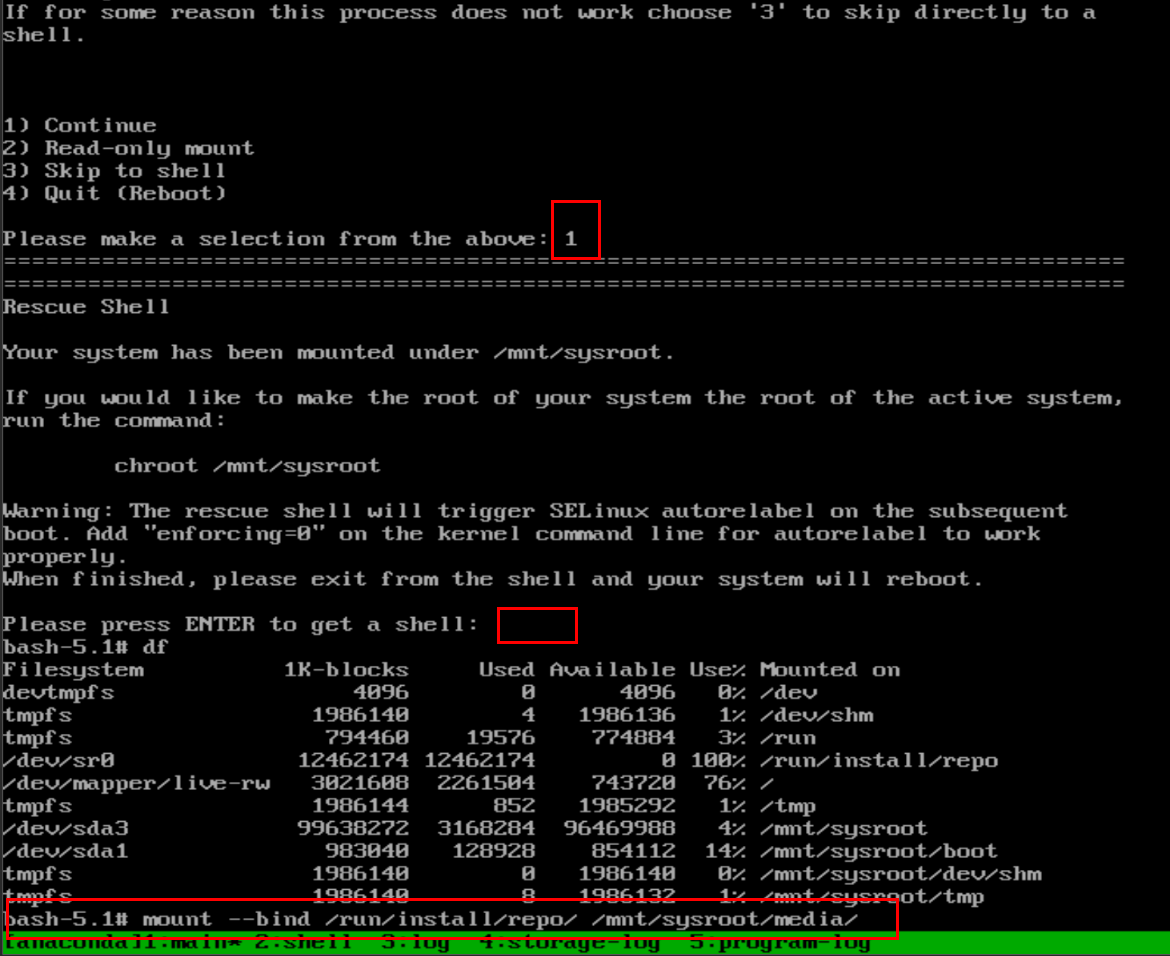
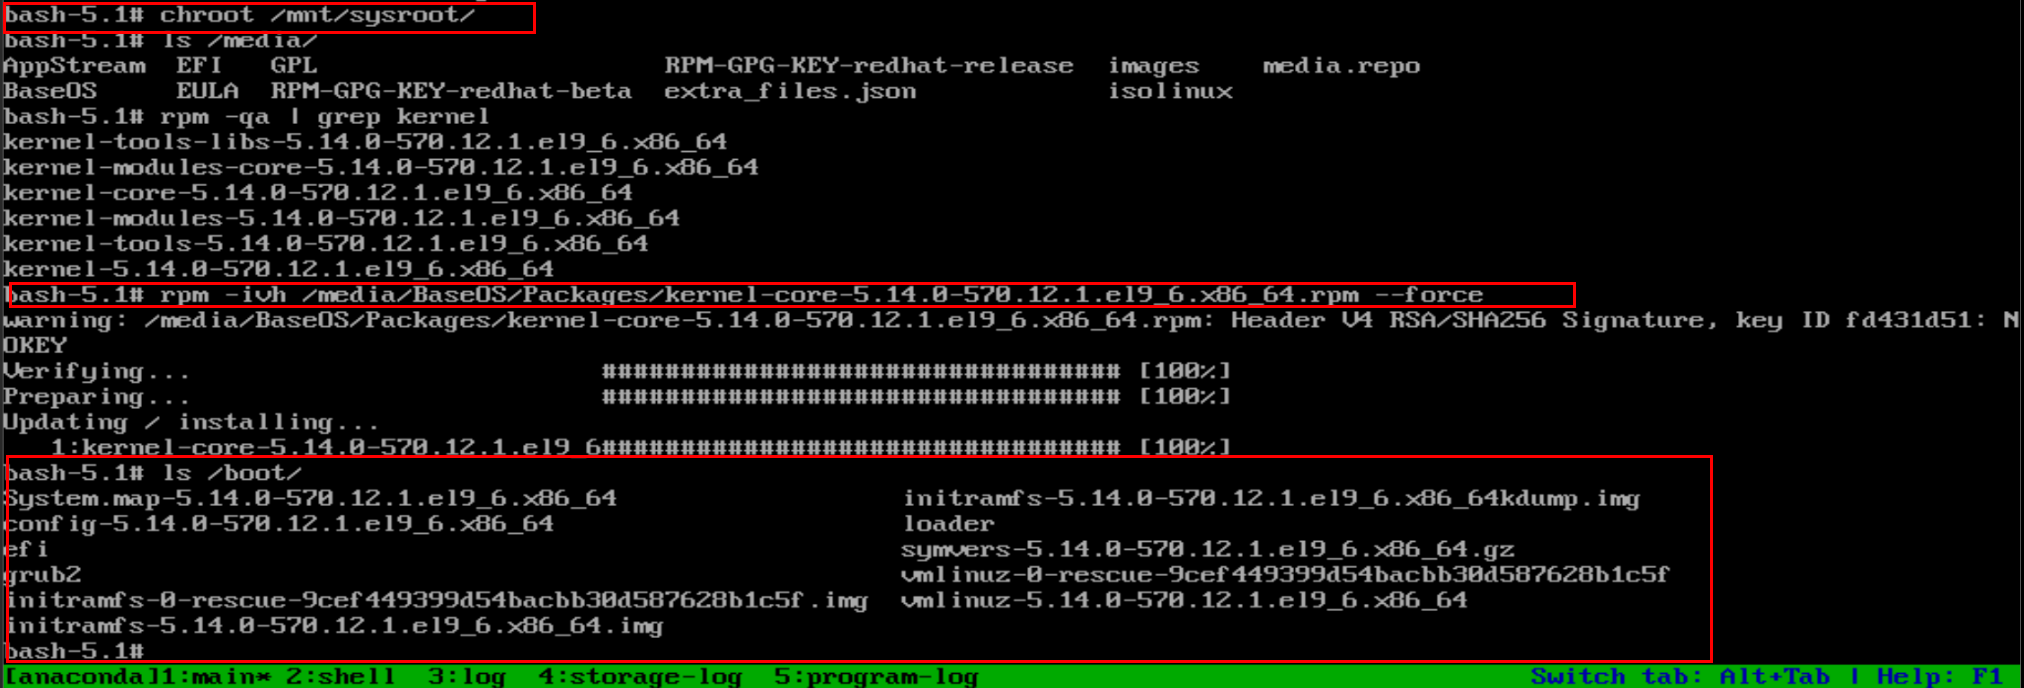
进入挽救模式后
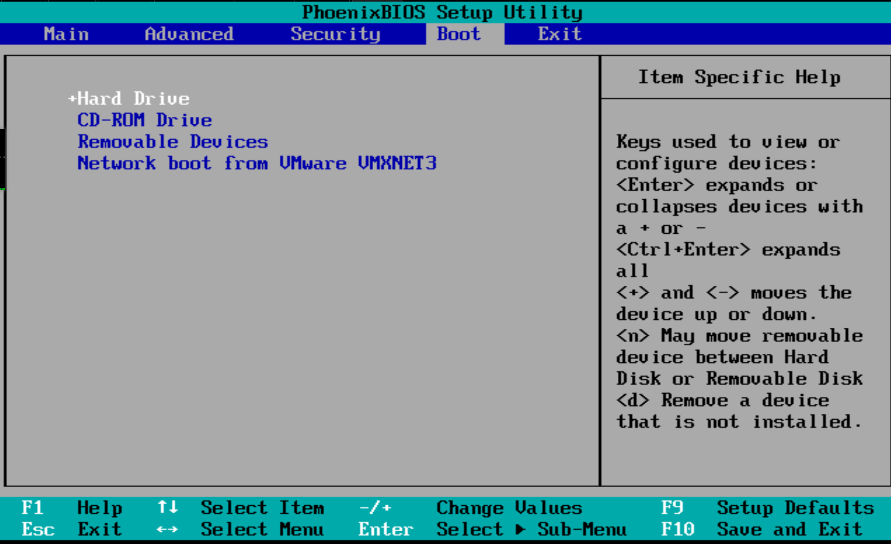
在修复完成后需要按照最开始调整启动设备的方式把硬盘设备设定为第一启动项
以上方法同样适用与系统初始化文件丢失
附加内容二:日志管理
在系统中日志管理的方法通常使用rsyslog,
rsyslog并不能生成程序日志,他是用来采集程序日志并存到到系统相应位置的工具
默认rsyslog在系统中的日志:
bash
/var/log/messages 	#系统服务日志,常规信息,服务报错
/var/log/secure 	#系统认证信息日志
/var/log/maillog 	#系统邮件日志信息
/var/log/cron 		#系统定时任务信息
/var/log/boot.log 	#系统启动日志信息
自定义日志采集路径
bash
/etc/rsyslog.conf		#日志采集服务的配置文件
日志类型.日志级别 				日志存放路径
bash
日志类型
auth 		#用户认证
authpriv 	#服务认证
cron 		#时间任务
kern 		#内核类型
mail 		#邮件
news 		#系统更新信息
user 		#用户
bash
日志级别
none #不采集
debug #程序排错信息
info #程序常规运行信息
notice #重要信息的普通日志
waring #程序警告
err #程序报错
crit #严重级别会导致系统软件不能正常工作
alert #系统中立即要更改的信息
emerg #系统的严重问题日志
bash
#示例
#把用户认证类型的常规运行信息存放到/var/log/auth_test.log文件中
auth.info					/var/log/auth_test.log


#所有日类型日志的所有级别日志存放到/var/log/all.log
*.*						   /var/log/all.log


#除了用户认证的信息日志外的所有日志
*.*;auth.none-
实验,把系统中所有日志存放到/var/log/lee.log中,但是此日志不包含服务类型的认证日志
-
把服务类型的认证日志存放到/var/log/server_auto.log 中
bash
[root@node10 ~]# vim /etc/rsyslog.conf
#### RULES ####

# Log all kernel messages to the console.
# Logging much else clutters up the screen.
#kern.*                                                 /dev/console

# Log anything (except mail) of level info or higher.
# Don't log private authentication messages!
*.info;mail.none;authpriv.none;cron.none                /var/log/messages

#在文件中写入一下信息
*.*;authpriv.none                                       /var/log/lee.log
authpriv.*                                              /var/log/server_auto.log


[root@node10 ~]# systemctl restart rsyslog.service

#验证
[root@node10 ~]# ll /var/log/lee.log
-rw------- 1 root root 0  1月 17 16:49 /var/log/lee.log

[root@node10 ~]# >/var/log/lee.log

[root@node10 ~]#  ssh -l root 172.25.254.10

[root@node10 ~]# cat  /var/log/lee.log
Jan 17 16:50:23 node10 systemd[1]: session-6.scope: Deactivated successfully.
Jan 17 16:50:23 node10 systemd-logind[786]: Session 6 logged out. Waiting for processes to exit.
Jan 17 16:50:23 node10 systemd-logind[786]: Removed session 6.
Jan 17 16:50:26 node10 systemd[1]: Starting SSSD Kerberos Cache Manager...
Jan 17 16:50:26 node10 systemd[1]: Started SSSD Kerberos Cache Manager.
Jan 17 16:50:26 node10 sssd_kcm[2031]: Starting up
Jan 17 16:50:27 node10 systemd-logind[786]: New session 7 of user root.
Jan 17 16:50:27 node10 systemd[1]: Started Session 7 of User root.
Jan 17 16:50:27 node10 systemd[1]: Starting Hostname Service...
Jan 17 16:50:27 node10 systemd[1]: Started Hostname Service.
[root@node10 ~]# cat /var/log/server_auto.log
Jan 17 16:50:23 node10 sshd[1811]: Received disconnect from 172.25.254.10 port 37832:11: disconnected by user
Jan 17 16:50:23 node10 sshd[1811]: Disconnected from user root 172.25.254.10 port 37832
Jan 17 16:50:23 node10 sshd[1805]: pam_unix(sshd:session): session closed for user root
Jan 17 16:50:27 node10 sshd[2028]: Accepted password for root from 172.25.254.10 port 34804 ssh2
Jan 17 16:50:27 node10 sshd[2028]: pam_unix(sshd:session): session opened for user root(uid=0) by root(uid=0)