懒加载瀑布流组件
- 〇、前言
- 一、新增节点类
-
- [1、UI 组成](#1、UI 组成)
- 2、ArkUIWaterflowNode
- 3、ArkUIFlowItemNode
- 4、WaterflowSection
- 二、FlowItemAdapter
- 三、实现懒加载瀑布流
- 四、总结
〇、前言
俗话说,业精于勤,想要自己熟练掌握滚动类容器的懒加载功能的开发方式,唯有勤加实践,所以,这一篇将带领屏幕前的你,学习如何为瀑布流(waterflow)组件实现懒加载功能,并结合上一篇的列表组件的懒加载功能,分析不同滚动容器组件实现懒加载功能的区别,从而总结出一个通用的诀窍。
一、新增节点类
1、UI 组成
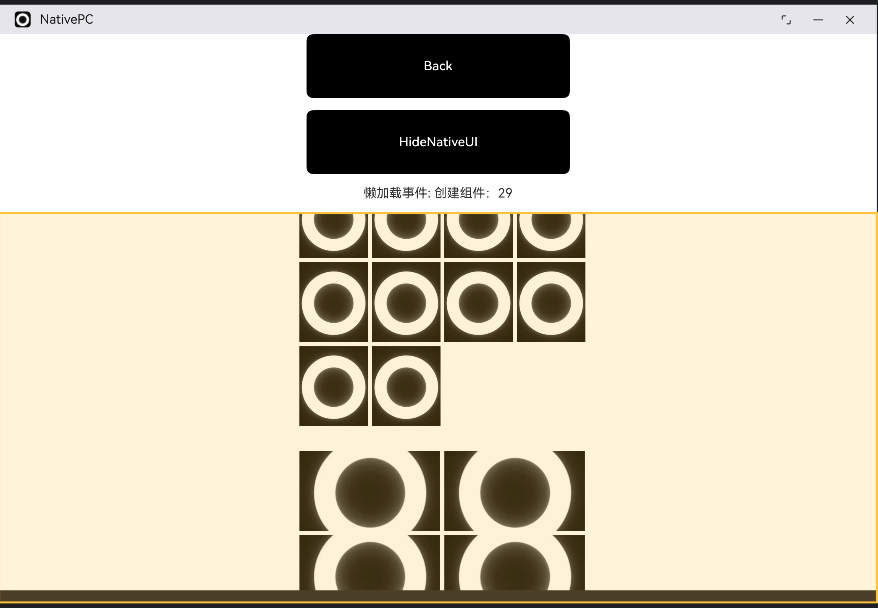
图中透明黄色所覆盖的区域,就是用 C++ 代码实现,是一个由ARKUI_NODE_WATER_FLOW 和ARKUI_NODE_FLOW_ITEM组成的。列表组件的每一项由专门的列表项组件去描述,同样的,瀑布流的每一项也由专门的子组件去描述,类似的 Grid 组件的专门子组件为GridItem,Swiper 例外。
言归正传,要实现如图的应用页面,就需要根据它的UI组成,准备好两种新的UI节点类 ArkUIWaterflowNode 和 ArkUIFlowItemNode。
2、ArkUIWaterflowNode
遵循从大到小的原则,我们先将瀑布流组件本身定义好:
cpp
/*
* Copyright (c) 2026 彭友聪
* nativePC is licensed under Mulan PSL v2.
* You can use this software according to the terms and conditions of the Mulan PSL v2.
* You may obtain a copy of Mulan PSL v2 at:
http://license.coscl.org.cn/MulanPSL2
* THIS SOFTWARE IS PROVIDED ON AN "AS IS" BASIS, WITHOUT WARRANTIES OF ANY KIND,
* EITHER EXPRESS OR IMPLIED, INCLUDING BUT NOT LIMITED TO NON-INFRINGEMENT,
* MERCHANTABILITY OR FIT FOR A PARTICULAR PURPOSE.
* See the Mulan PSL v2 for more details.
*
* Author: 彭友聪
* email:2923616405@qq.com
* date: 2026/1/18 09:22
* file: ${FILE_NAME}
* product: DevEco Studio
* LICENSE: MulanPSL-2.0
* */
//
// Created on 2026/1/18.
//
// Node APIs are not fully supported. To solve the compilation error of the interface cannot be found,
// please include "napi/native_api.h".
#ifndef NATIVEPC_ARKUIWATERFLOWNODE_H
#define NATIVEPC_ARKUIWATERFLOWNODE_H
#include "FlowItemAdapter.h"
#include "WaterflowSection.h"
#include "ArkUINode.h"
namespace NativeModule {
class ArkUIWaterflowNode : public ArkUINode {
public:
ArkUIWaterflowNode()
: ArkUINode(NativeModuleInstance::GetInstance()->GetNativeNodeAPI()->createNode(ARKUI_NODE_WATER_FLOW)){}
~ArkUIWaterflowNode() override
{
// 先卸载 adapter
if (adapter_ && nativeModule_) {
nativeModule_->resetAttribute(handle_, NODE_WATER_FLOW_NODE_ADAPTER);
adapter_.reset();
}
// 销毁分段
section_.reset();
// 基类会自动 dispose handle_
}
void SetLazyAdapter(const std::shared_ptr<FlowItemAdapter> &adapter)
{
ArkUI_AttributeItem item{nullptr, 0, nullptr, adapter->GetAdapter()};
nativeModule_->setAttribute(handle_, NODE_WATER_FLOW_NODE_ADAPTER, &item);
adapter_ = adapter;
}
void SetSection(const std::shared_ptr<WaterflowSection> §ion)
{
if (!section->GetSectionOptions()) {
return;
}
ArkUI_NumberValue start[] = {{.i32 = 0}};
ArkUI_AttributeItem optionsItem = {start, 1, nullptr, section->GetSectionOptions()};
nativeModule_->setAttribute(handle_, NODE_WATER_FLOW_SECTION_OPTION, &optionsItem);
section_ = section;
}
std::shared_ptr<WaterflowSection> GetWaterflowSection() { return section_; }
private:
std::shared_ptr<WaterflowSection> section_ = nullptr;
std::shared_ptr<FlowItemAdapter> adapter_;
};
} // namespace NativeModule
#endif //NATIVEPC_ARKUIWATERFLOWNODE_H因为是需要实现具有懒加载能力的瀑布流组件,所以,必要的懒加载适配器设置方法随同一起实现,也就是 SetLazyAdapter 方法,而 SetSection 是为了让子组件尺寸形成大小不一效果准备的。
3、ArkUIFlowItemNode
ArkUIFlowItemNode 的代码很简单,就一个构造函数的定义:
cpp
#ifndef NATIVEPC_ARKUIFLOWITEMNODE_H
#define NATIVEPC_ARKUIFLOWITEMNODE_H
#include "ArkUINode.h"
namespace NativeModule {
class ArkUIFlowItemNode : public ArkUINode {
public:
    ArkUIFlowItemNode() : ArkUINode(NativeModuleInstance::GetInstance()->GetNativeNodeAPI()->createNode(ARKUI_NODE_FLOW_ITEM)){}

};
}

#endif //NATIVEPC_ARKUIFLOWITEMNODE_H
4、WaterflowSection
在上面的图片中,其实可以看到瀑布流组件不同区域的子组件大小是不一样的,而这个效果就是通过 WaterflowSection 类去实现的:
cpp
#ifndef NATIVEPC_WATERFLOWSECTION_H
#define NATIVEPC_WATERFLOWSECTION_H
#include <arkui/native_node.h>
#include <hilog/log.h>

namespace NativeModule {

struct SectionOption {
    int32_t itemsCount = 0;
    int32_t crossCount;
    float columnsGap;
    float rowsGap;
    // {上外边距,右外边距,下外边距,左外边距}
    ArkUI_Margin margin{0, 0, 0, 0};
    float (*onGetItemMainSizeByIndex)(int32_t itemIndex);
    void *userData;
};

class WaterflowSection {
public:
    WaterflowSection() : sectionOptions_(OH_ArkUI_WaterFlowSectionOption_Create()){};

    ~WaterflowSection()
    {
        OH_ArkUI_WaterFlowSectionOption_Dispose(sectionOptions_);
    }

    void SetSection(ArkUI_WaterFlowSectionOption *sectionOptions, int32_t index, SectionOption section)
    {
        OH_ArkUI_WaterFlowSectionOption_SetItemCount(sectionOptions, index, section.itemsCount);
        OH_ArkUI_WaterFlowSectionOption_SetCrossCount(sectionOptions, index, section.crossCount);
        OH_ArkUI_WaterFlowSectionOption_SetColumnGap(sectionOptions, index, section.columnsGap);
        OH_ArkUI_WaterFlowSectionOption_SetRowGap(sectionOptions, index, section.rowsGap);
        OH_ArkUI_WaterFlowSectionOption_SetMargin(sectionOptions, index, section.margin.top, section.margin.right,
                                                  section.margin.bottom, section.margin.left);
        OH_ArkUI_WaterFlowSectionOption_RegisterGetItemMainSizeCallbackByIndex(sectionOptions, index,
                                                                               section.onGetItemMainSizeByIndex);
    }

    ArkUI_WaterFlowSectionOption *GetSectionOptions() const
    {
        return sectionOptions_;
    }

    void PrintSectionOptions()
    {
        int32_t sectionCnt = OH_ArkUI_WaterFlowSectionOption_GetSize(sectionOptions_);
        for (int32_t i = 0; i < sectionCnt; i++) {
            ArkUI_Margin margin = OH_ArkUI_WaterFlowSectionOption_GetMargin(sectionOptions_, i);
            OH_LOG_Print(LOG_APP, LOG_INFO, LOG_DOMAIN, "CreateWaterflowExample",
                         "Section[%{public}d].margin:{%{public}f, %{public}f, %{public}f, %{public}f}", i, margin.top,
                         margin.right, margin.bottom, margin.left);
        }
    }

private:
    ArkUI_WaterFlowSectionOption *sectionOptions_ = nullptr;
};
} // namespace NativeModule

#endif //NATIVEPC_WATERFLOWSECTION_H- OH_ArkUI_WaterFlowSectionOption_SetItemCount:设置分组中 FlowItem 的数量
- OH_ArkUI_WaterFlowSectionOption_SetCrossCount:设置布局栅格,纵向布局时为列数,横向布局时为行数。
- OH_ArkUI_WaterFlowSectionOption_SetColumnGap:设置分组的列间距。
- OH_ArkUI_WaterFlowSectionOption_SetRowGap:设置分组的行间距。
- OH_ArkUI_WaterFlowSectionOption_SetMargin:设置分组的外边距。
- OH_ArkUI_WaterFlowSectionOption_RegisterGetItemMainSizeCallbackByIndex:通过FlowItem分组配置信息根据flowItemIndex获取指定Item的主轴大小。
这一组 API 配合起来,就实现了组件尺寸大小随着区域的不同而不同的效果。
二、FlowItemAdapter
1、全部代码
首先,给出 FlowItemAdapter 类的全部代码:
cpp
#ifndef NATIVEPC_FLOWITEMADAPTER_H
#define NATIVEPC_FLOWITEMADAPTER_H
#include "ArkUIFlowItemNode.h"
#include "ArkUIImageNode.h"
#include "NativeEntry.h"
#include <arkui/native_node.h>
#include <stack>
#include <string>
#include <unordered_set>
#include <arkui/native_interface.h>

namespace NativeModule {
const int NUM = 100;
class FlowItemAdapter {
public:
    FlowItemAdapter()
    {
        // 初始化函数指针结构体
        OH_ArkUI_GetModuleInterface(ARKUI_NATIVE_NODE, ArkUI_NativeNodeAPI_1, nodeApi_);
        // 创建Adapter对象
        adapter_ = OH_ArkUI_NodeAdapter_Create();

        // 初始化懒加载数据。
        for (int32_t i = 0; i < NUM; i++) {
            std::string imagePath = "resource:///logo.png";
            data_.emplace_back(imagePath);
        }
        // 设置懒加载数据。
        OH_ArkUI_NodeAdapter_SetTotalNodeCount(adapter_, data_.size());
        // 设置事件监听器。
        OH_ArkUI_NodeAdapter_RegisterEventReceiver(adapter_, this, OnStaticAdapterEvent);
    }

    ~FlowItemAdapter()
    {
        // 释放创建的组件。
        while (!cachedItems_.empty()) {
            cachedItems_.pop();
        }
        // 释放Adapter相关资源。
        OH_ArkUI_NodeAdapter_UnregisterEventReceiver(adapter_);
        OH_ArkUI_NodeAdapter_Dispose(adapter_);
    }

    ArkUI_NodeAdapterHandle GetAdapter() const { return adapter_; }

    void RemoveItem(int32_t index)
    {
        // 删除第index个数据。
        data_.erase(data_.begin() + index);
        // 如果index会导致可视区域元素发生可见性变化,则会回调NODE_ADAPTER_EVENT_ON_REMOVE_NODE_FROM_ADAPTER事件删除元素,
        // 根据是否有新增元素回调NODE_ADAPTER_EVENT_ON_GET_NODE_ID和NODE_ADAPTER_EVENT_ON_ADD_NODE_TO_ADAPTER事件。
        OH_ArkUI_NodeAdapter_RemoveItem(adapter_, index, 1);
        // 更新新的数量。
        OH_ArkUI_NodeAdapter_SetTotalNodeCount(adapter_, data_.size());
    }

    void InsertItem(int32_t index, const std::string &value)
    {
        data_.insert(data_.begin() + index, value);
        // 如果index会导致可视区域元素发生可见性变化,则会回调NODE_ADAPTER_EVENT_ON_GET_NODE_ID和NODE_ADAPTER_EVENT_ON_ADD_NODE_TO_ADAPTER事件,
        // 根据是否有删除元素回调NODE_ADAPTER_EVENT_ON_REMOVE_NODE_FROM_ADAPTER事件。
        OH_ArkUI_NodeAdapter_InsertItem(adapter_, index, 1);
        // 更新新的数量。
        OH_ArkUI_NodeAdapter_SetTotalNodeCount(adapter_, data_.size());
    }

    void MoveItem(int32_t oldIndex, int32_t newIndex)
    {
        auto temp = data_[oldIndex];
        data_.insert(data_.begin() + newIndex, temp);
        data_.erase(data_.begin() + oldIndex);
        // 移到位置如果未发生可视区域内元素的可见性变化,则不回调事件,反之根据新增和删除场景回调对应的事件。
        OH_ArkUI_NodeAdapter_MoveItem(adapter_, oldIndex, newIndex);
    }

    void ReloadItem(int32_t index, const std::string &value)
    {
        data_[index] = value;
        // 如果index位于可视区域内,先回调NODE_ADAPTER_EVENT_ON_REMOVE_NODE_FROM_ADAPTER删除老元素,
        // 再回调NODE_ADAPTER_EVENT_ON_GET_NODE_ID和NODE_ADAPTER_EVENT_ON_ADD_NODE_TO_ADAPTER事件。
        OH_ArkUI_NodeAdapter_ReloadItem(adapter_, index, 1);
    }

    void ReloadAllItem()
    {
        std::reverse(data_.begin(), data_.end());
        // 全部重新加载场景下,会回调NODE_ADAPTER_EVENT_ON_GET_NODE_ID接口获取新的组件ID,
        // 根据新的组件ID进行对比,ID不发生变化的进行复用,
        // 针对新增ID的元素,调用NODE_ADAPTER_EVENT_ON_ADD_NODE_TO_ADAPTER事件创建新的组件,
        // 然后判断老数据中遗留的未使用ID,调用NODE_ADAPTER_EVENT_ON_REMOVE_NODE_FROM_ADAPTER删除老元素。
        OH_ArkUI_NodeAdapter_ReloadAllItems(adapter_);
    }

private:
    static void OnStaticAdapterEvent(ArkUI_NodeAdapterEvent *event)
    {
        // 获取实例对象,回调实例事件。
        auto itemAdapter = reinterpret_cast<FlowItemAdapter *>(OH_ArkUI_NodeAdapterEvent_GetUserData(event));
        itemAdapter->OnAdapterEvent(event);
    }

    void OnAdapterEvent(ArkUI_NodeAdapterEvent *event)
    {
        auto type = OH_ArkUI_NodeAdapterEvent_GetType(event);
        switch (type) {
            case NODE_ADAPTER_EVENT_ON_GET_NODE_ID:
                OnGetChildId(event);
                break;
            case NODE_ADAPTER_EVENT_ON_ADD_NODE_TO_ADAPTER:
                OnCreateNewChild(event);
                break;
            case NODE_ADAPTER_EVENT_ON_REMOVE_NODE_FROM_ADAPTER:
                OnDisposeChild(event);
                break;
            default:
                break;
        }
    }

    void OnGetChildId(ArkUI_NodeAdapterEvent *event)
    {
        auto index = OH_ArkUI_NodeAdapterEvent_GetItemIndex(event);
        // 设置生成组件的唯一标识符。
        auto hash = std::hash<std::string>();
        OH_ArkUI_NodeAdapterEvent_SetNodeId(event, hash(data_[index]));
        showUITextCallback("懒加载事件", "为懒加载组件设置ID:" + std::to_string(index));
    }

    void OnCreateNewChild(ArkUI_NodeAdapterEvent *event)
    {
        auto index = OH_ArkUI_NodeAdapterEvent_GetItemIndex(event);
        ArkUI_NodeHandle handle = nullptr;
        if (!cachedItems_.empty()) {
            // 复用缓存
            auto recycledItem = cachedItems_.top();
            // 更新数据
            auto image = std::dynamic_pointer_cast<ArkUIImageNode>(recycledItem->GetChildren().back());
            image->SetImageSrc(data_[index].c_str());
            handle = recycledItem->GetHandle();
            showUITextCallback("懒加载事件", "复用组件:" + std::to_string(index));
            cachedItems_.pop();
        } else {
            // 重新创建。
            auto image = std::make_shared<ArkUIImageNode>();
            image->SetImageSrc();
            image->SetPercentWidth(1.0);
            image->SetPercentHeight(1.0);
            auto flowItem = std::make_shared<ArkUIFlowItemNode>();
            flowItem->SetHeight(100);
            flowItem->SetPercentWidth(1.0);
            flowItem->AddChild(image);
            showUITextCallback("懒加载事件", "创建组件:" + std::to_string(index));
            handle = flowItem->GetHandle();
            items_.emplace(handle, flowItem);
        }
        OH_ArkUI_NodeAdapterEvent_SetItem(event, handle);
    }

    void OnDisposeChild(ArkUI_NodeAdapterEvent *event)
    {
        auto item = OH_ArkUI_NodeAdapterEvent_GetRemovedNode(event);
        // 放置到缓存池中进行回收复用。
        cachedItems_.emplace(items_[item]);
        showUITextCallback("懒加载事件", "缓存组件:" + std::to_string(OH_ArkUI_NodeAdapterEvent_GetItemIndex(event)));
    }

    std::vector<std::string> data_;
    ArkUI_NativeNodeAPI_1 *nodeApi_ = nullptr;
    ArkUI_NodeAdapterHandle adapter_ = nullptr;
    // 管理NodeAdapter生成的元素。
    std::unordered_map<ArkUI_NodeHandle, std::shared_ptr<ArkUIFlowItemNode>> items_;
    // 管理回收复用组件池。
    std::stack<std::shared_ptr<ArkUIFlowItemNode>> cachedItems_;
};

} // namespace NativeModule
#endif //NATIVEPC_FLOWITEMADAPTER_H
2、自定义内容数据
瀑布流组件中子组件所显示的内容,是完全可以自定义的,通常,就是将一些数据可视化出来,我这里简单得将自定义内容数据,设置为同一张图片:
cpp
// 初始化懒加载数据。
for (int32_t i = 0; i < NUM; i++) {
    std::string imagePath = "resource:///logo.png";
    data_.emplace_back(imagePath);
}
实际上,这里完全可以改成从数据库、网络上读取数据,只不过,对应的 date_字段的类型,要随着变更。
3、子组件创建
而整个 FlowItemAdapter 类最为关键的代码,就是 OnCreateNewChild,它决定了整个瀑布流组件最终会展示什么内容。
cpp
void OnCreateNewChild(ArkUI_NodeAdapterEvent *event)
{
    auto index = OH_ArkUI_NodeAdapterEvent_GetItemIndex(event);
    ArkUI_NodeHandle handle = nullptr;
    if (!cachedItems_.empty()) {
        // 复用缓存
        auto recycledItem = cachedItems_.top();
        // 更新数据
        auto image = std::dynamic_pointer_cast<ArkUIImageNode>(recycledItem->GetChildren().back());
        image->SetImageSrc(data_[index].c_str());
        handle = recycledItem->GetHandle();
        showUITextCallback("懒加载事件", "复用组件:" + std::to_string(index));
        cachedItems_.pop();
    } else {
        // 重新创建。
        auto image = std::make_shared<ArkUIImageNode>();
        image->SetImageSrc();
        image->SetPercentWidth(1.0);
        image->SetPercentHeight(1.0);
        auto flowItem = std::make_shared<ArkUIFlowItemNode>();
        flowItem->SetHeight(100);
        flowItem->SetPercentWidth(1.0);
        flowItem->AddChild(image);
        showUITextCallback("懒加载事件", "创建组件:" + std::to_string(index));
        handle = flowItem->GetHandle();
        items_.emplace(handle, flowItem);
    }
    OH_ArkUI_NodeAdapterEvent_SetItem(event, handle);
}- 判断 cachedItems_ 是否为空,是则表面没有缓存的子组件引用,否则表面缓存池里面有可以复用的子组件
- cachedItems_ 为空时,全新创建一个 flowItem 组件,并将里面的内容设置为图片。如果不想使用图片,你可以根据自己的想法去组装内容。
- cachedItems_ 不为空时,将栈顶的组件引用取得,完成内容的更新后,进行弹栈操作。
三、实现懒加载瀑布流
下面,开始用上面那些准备好的基础代码,实现一个具备懒加载能力的瀑布流布局:
cpp
#ifndef NATIVEPC_CREATEWATERFLOWEXAMPLE_H
#define NATIVEPC_CREATEWATERFLOWEXAMPLE_H
#include "ArkUIWaterflowNode.h"
#include "NativeEntry.h"
namespace NativeModule {
const int UI_WIDTH = 400;
const int UI_HEIGHT = 600;
const int SECTION_COUNT = 10;
const int SECTION_2_ID = 2;

inline void SetupSections(std::shared_ptr<WaterflowSection> sections)
{
    SectionOption MARGIN_GAP_SECTION_1 = {10, 2, 10, 10, {20, 30, 40, 50}, nullptr, nullptr};
    SectionOption MARGIN_GAP_SECTION_2 = {10, 4, 10, 10, {20, 30, 40, 50}, nullptr, nullptr};
    for (int i = 0; i < SECTION_COUNT; i++) {
        sections->SetSection(sections->GetSectionOptions(), i,
                             i % SECTION_2_ID ? MARGIN_GAP_SECTION_1 : MARGIN_GAP_SECTION_2);
    }
}

std::shared_ptr<ArkUIBaseNode> CreateWaterflowExample()
{
    showUITextCallback("案例演示", "懒加载瀑布流");
    auto waterflow = std::make_shared<ArkUIWaterflowNode>();
    waterflow->SetPercentHeight(1.0);
    waterflow->SetWidth(UI_WIDTH);
    waterflow->SetLazyAdapter(std::make_shared<FlowItemAdapter>());
    auto sections = std::make_shared<WaterflowSection>();
    SetupSections(sections);
    waterflow->SetSection(sections);
    return waterflow;
}
} // namespace NativeModule

#endif //NATIVEPC_CREATEWATERFLOWEXAMPLE_H
四、总结
为滚动容器组件实现懒加载功能,最关键的代码,就是对应 Adapter 类里面负责子组件新建和复用的方法,在这个方法里面,可以根据自己预期中的UI样式进行自定义,如展示图片、文本乃至其他页面的入口项等等。