Gateway API路由、重定向、修饰符等关键操作
文章目录
- [Gateway API路由、重定向、修饰符等关键操作](#Gateway API路由、重定向、修饰符等关键操作)
一、HTTP路由
HTTPRoute资源可匹配HTTP流量并将其路由至Kubernetes后端,本指南将说明HTTPRoute如何基于主机、请求头和路径字段匹配流量,并将其转发到不同的Kubernetes服务。- 以下流程描述了三个不同服务之间的指定流量走向:
- 发送
foo.example.com/login的流量,转发至foo-svc - 发往
bar.example.com/*且带有env: canary请求头的流量,转发至bar-svc-canary - 发送
bar.example.com/*且无该请求头的流量,转发至bar-svc
- 发送
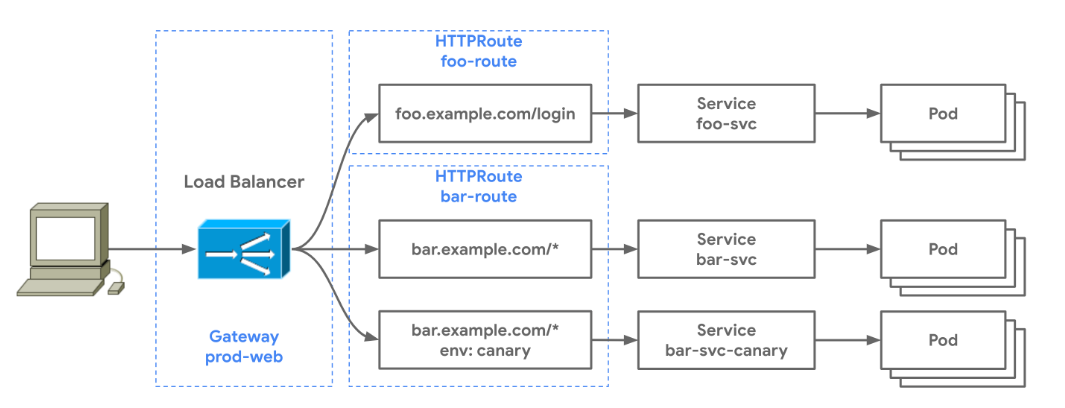
- 虚线代表用于配置此路由行为而部署的
Gateway资源。有两个HTTPRoute资源会在同一个prod-web网关之上创建按路由规则。这一示例体现了多个路由可以绑定到同一个网关的实现方式------只要这些路由之间不存在冲突,它们就能够在网关上完成规则合并。
1.1、环境配置Istio
- 之前我们采用的
GatewayClass用的是Envoy,不过Envoy无法满足我们学习Gateway的需求,比如在后续的学习中我们会学到重定向之类的技能,但是Envoy不支持307和308状态码,而只支持301之类的,所以我们要部署一个Istio服务网格。
bash
[root@master ~]# wget https://github.com/istio/istio/releases/download/1.18.1/istio-1.18.1-linux-amd64.tar.gz
[root@master ~]# tar -zxvf istio-1.18.1-linux-amd64.tar.gz
[root@master ~]# cd istio-1.18.1/
[root@master istio-1.18.1]# cp bin/istioctl /usr/local/bin/- 因为我们是本地学习并不是生产,所以部署
istio的demo版本就可以满足了。
bash
[root@master istio-1.18.1]# istioctl install --set profile=demo -y
✔ Istio core installed
✔ Istiod installed
✔ Egress gateways installed
✔ Ingress gateways installed
✔ Installation complete                                                                                                 Making this installation the default for injection and validation.


[root@master istio-1.18.1]# kubectl get pod -n istio-system
NAME                                    READY   STATUS    RESTARTS   AGE
istio-egressgateway-7f49c9d8b4-dcn48    1/1     Running   0          4m12s
istio-ingressgateway-54dc9548db-4pfhn   1/1     Running   0          4m12s
istiod-7694fbf654-8n8j7                 1/1     Running   0          4m32s
1.1.1、IstioClass
- 部署好
Istio之后,它会自动帮我们在default命名空间下创建一个IstioClass我们看一下。
bash
[root@master ~]# kubectl get gc
NAME    CONTROLLER                                      ACCEPTED   AGE
eg      gateway.envoyproxy.io/gatewayclass-controller   True       27m
istio istio.io/gateway-controller True 5m47s- 我们再看一下这个
Istio这个class怎么写的。
bash
[root@master ~]# kubectl get gc istio -o yaml
apiVersion: gateway.networking.k8s.io/v1
kind: GatewayClass
metadata:
  creationTimestamp: "2025-12-18T01:46:09Z"
  generation: 1
  name: istio
  resourceVersion: "9240"
  uid: df37e3a5-e6cf-4873-b8f2-e030a02b9df8
spec:
  controllerName: istio.io/gateway-controller
  description: The default Istio GatewayClass
status:
  conditions:
  - lastTransitionTime: "2025-12-18T01:46:09Z"
    message: Handled by Istio controller
    observedGeneration: 1
    reason: Accepted
    status: "True"
type: Accepted- 我们只需要关心
controllerName字段、status字段。
1.2、默认路由
-
若要从网关接收流量,必须为
HTTPRoute资源配置ParentRefs字段,该字段用于指定此HTTPRoute应关联的上级网关。 -
先创建一下这个
Gateway后端资源deployment、service。
bash
[root@master ~]# cat deployment_defaulthttp.yaml
apiVersion: "apps/v1"
kind: Deployment
metadata:
  name: default-http
  labels:
    app: default-http
spec:
  replicas: 1
  selector:
    matchLabels:
      app: default-http
  template:
    metadata:
      labels:
        app: default-http
    spec:
      containers:
      - name: test-default-http
        image: nginx:latest
        imagePullPolicy: IfNotPresent
        ports:
        - containerPort: 80

---

apiVersion: "v1"
kind: Service
metadata:
  name: example-svc
spec:
  selector:
    app: default-http
  type: ClusterIP
  ports:
  - port: 80
targetPort: 80 - 下面开始创建
Gateway、HTTPRoute - 下面的资源将会接收
example.com的流量,然后把流量转发到后端example-svc服务的80端口。
bash
[root@master ~]# cat defaulthttp.yaml
apiVersion: gateway.networking.k8s.io/v1
kind: Gateway
metadata:
  name: example-gateway
spec:
  gatewayClassName: istio  # 关联的 GatewayClass
  listeners:
  - name: http  # 监听器的名字
    protocol: HTTP   # 协议
    port: 80    # 端口
---
apiVersion: gateway.networking.k8s.io/v1
kind: HTTPRoute
metadata:
  name: example-route
spec:
  parentRefs:
  - name: example-gateway  # 关联的 Gateway
  hostnames:
  - "example.com"   # 使用域名提供服务
  rules:
  - backendRefs:    # 后端 Service
    - name: example-svc
port: 80- 部署一下
bash
[root@master ~]# kubectl apply -f defaulthttp.yaml
gateway.gateway.networking.k8s.io/example-gateway created
httproute.gateway.networking.k8s.io/example-route created- 查看一下创建的资源
- 通过查看的资源我们可以得知,
gateway给我们分配了一个lb地址,因为我们没有使用dns,所以要做一下hosts的域名解析。
bash
[root@master ~]# kubectl get gateway,httproute
NAME                                                CLASS   ADDRESS         PROGRAMMED   AGE
gateway.gateway.networking.k8s.io/example-gateway   istio   192.168.93.12   True         33s

NAME                                                HOSTNAMES         AGE
httproute.gateway.networking.k8s.io/example-route   ["example.com"]   33s
bash
[root@master ~]# echo "192.168.93.12 example.com" >> /etc/hosts- 访问一下
bash
[root@master ~]# curl example.com
<!DOCTYPE html>
<html>
<head>
<title>Welcome to nginx!</title>
<style>
html { color-scheme: light dark; }
body { width: 35em; margin: 0 auto;
font-family: Tahoma, Verdana, Arial, sans-serif; }
</style>
</head>
<body>
<h1>Welcome to nginx!</h1>
<p>If you see this page, the nginx web server is successfully installed and
working. Further configuration is required.</p>

<p>For online documentation and support please refer to
<a href="http://nginx.org/">nginx.org</a>.<br/>
Commercial support is available at
<a href="http://nginx.com/">nginx.com</a>.</p>

<p><em>Thank you for using nginx.</em></p>
</body>
</html>- 通过访问的回显可以看到拿到了我们预期的结果了。这就是一个很简单的使用案例了。
- 一个
HTTPRoute资源仅能匹配一组域名。在该HTTPRoute执行其他任何匹配规则之前,会优先对这些域名进行匹配校验。
1.3、路径匹配规则路由
-
下面的
foo-route路由会匹配发往foo.example.com的所有流量,并指定其路由规则,将其转发至对应的后端服务。 -
由于该路由仅配置了一条匹配规则,因此只有发往
foo.example.com/login/*的流量会被转发;所有发往非/login开头的路径的流量,都不会被此路由匹配。 -
先创建一下这个
Gateway后端资源deployment、service,如果嫌麻烦的话,直接用默认路由标题创建的deployment也是可以的。
bash
[root@master ~]# cat deployment_pathprefixhttp.yaml
apiVersion: v1
kind: ConfigMap
metadata:
  name: nginx-default-conf  # ConfigMap 名称,后续挂载到 Pod 中使用
  labels:
    app: pathprefix-http
data:
  default.conf: |
    server {
        listen       80;
        listen  [::]:80;
        server_name  localhost;

        location / {
            root   /usr/share/nginx/html;
            index  index.html index.htm;
        }

        # 新增 /login 路由规则:直接返回
        location /login {
            default_type text/plain;  # 指定返回内容类型为纯文本
            return 200 "foo-svc Service";       # 200 是HTTP状态码,"retue"是返回内容
        }

        error_page   500 502 503 504  /50x.html;
        location = /50x.html {
            root   /usr/share/nginx/html;
        }
    }
---
apiVersion: "apps/v1"
kind: Deployment
metadata:
  name: pathprefix-http
  labels:
    app: pathprefix-http
spec:
  replicas: 1
  selector:
    matchLabels:
      app: pathprefix-http
  template:
    metadata:
      labels:
        app: pathprefix-http
    spec:
      containers:
      - name: test-pathprefix-http
        image: nginx:latest
        imagePullPolicy: IfNotPresent
        ports:
        - containerPort: 80
        # 挂载 ConfigMap 到 Nginx 配置目录
        volumeMounts:
        - name: nginx-conf
          mountPath: /etc/nginx/conf.d/default.conf  # 直接覆盖默认配置文件
          subPath: default.conf  # 指定 ConfigMap 中的配置文件
      # 定义挂载的 ConfigMap 卷
      volumes:
      - name: nginx-conf
        configMap:
          name: nginx-default-conf  # 关联上面创建的 ConfigMap 名称
          items:
          - key: default.conf      # ConfigMap 中存储配置的 key
            path: default.conf

---

apiVersion: "v1"
kind: Service
metadata:
  name: foo-svc  # svc 的名字
spec:
  selector:
    app: pathprefix-http
  type: ClusterIP
  ports:
  - port: 80
targetPort: 80 - 部署一下资源
bash
[root@master ~]# kubectl apply -f deployment_pathprefixhttp.yaml
deployment.apps/pathprefix-http created
service/foo-svc created- 为了更好的区别我们的流量,我们在这次的控制器挂在了
configmapnignx的配置文件,访问login直接返回foo-svc Service。
bash
[root@master ~]# kubectl exec -it pathprefix-http-57c785c894-89prh -- sh -c 'echo "foo-svc" > /usr/share/nginx/html/index.html'

[root@master ~]# kubectl get svc | grep foo-svc
foo-svc                 ClusterIP      10.97.52.143     <none>          80/TCP                         4m39s
[root@master ~]# curl 10.97.52.143/login
foo-svc Service- 下面开始创建
HTTPRoute,直接使用刚开始创建的Gateway,因为Gateway可以被作为统一入口进行关联使用。
bash
[root@master ~]# cat pathprefixhttp.yaml
apiVersion: gateway.networking.k8s.io/v1
kind: HTTPRoute
metadata:
  name: foo-route
spec:
  parentRefs:
  - name: example-gateway   # Gateway 可以作为统一入口, 供 HTTPRoute 使用的
  hostnames:
  - "foo.example.com"   # 使用域名提供服务
  rules:
  - matches:   # 规则匹配
    - path:
        type: PathPrefix   # 根据路径前缀匹配
        value: /login    # 跟 nginx 一样匹配 /login 路由
    backendRefs:
    - name: foo-svc
port: 80- 部署一下
bash
[root@master ~]# kubectl apply -f pathprefixhttp.yaml
httproute.gateway.networking.k8s.io/foo-route created- 查看一下创建的资源
bash
[root@master ~]# kubectl get httproute foo-route
NAME        HOSTNAMES             AGE
foo-route ["foo.example.com"] 4m1s- 做一下域名解析,然后访问
bash
[root@master ~]# echo "192.168.93.12 foo.example.com" >> /etc/hosts
[root@master ~]# curl foo.example.com/login
foo-svc Service- 通过刚刚的访问可以看到,跟我们预期的期望是一样的,如果访问的是
HTTPRoute不存在的规则,那么将不会有任何回显。
bash
# 这个 404 是 istio 跑出来的, 并不是 nginx 的404
[root@master ~]# curl foo.example.com -I
HTTP/1.1 404 Not Found
date: Thu, 18 Dec 2025 02:46:03 GMT
server: istio-envoy
transfer-encoding: chunkedistio也会根据Gateway创建响应的pod,我们去看一下日志。
bash
[root@master ~]# kubectl logs --tail=1 example-gateway-istio-5bf75776f-j2xvx
[2025-12-18T02:46:03.971Z] "HEAD / HTTP/1.1" 404 NR route_not_found - "-" 0 0 0 - "10.244.219.64" "curl/7.79.1" "d474de01-acb3-9588-821e-9ada49dd8763" "foo.example.com" "-" - - 10.244.166.136:80 10.244.219.64:31409 - -
1.4、带有请求头的规则路由
-
下面的这个
HTTPRoute会匹配发往bar.example.com的流量。该域名下的所有流量都会依据路由规则进行匹配------最具体的匹配规则会优先生效 :即带有env: canary请求头的流量会被转发至bar-svc-canary;若请求头缺失,或者值不是canary,则流量会被转发至bar-svc。 -
这次为了简单一些,直接使用默认路由 充当无头部信息访问的
Service (example-svc),当有头部信息的被匹配到的时候访问Service (foo-svc)。 -
创建
HTTPRoute资源
bash
[root@master ~]# cat headerhttp.yaml
apiVersion: gateway.networking.k8s.io/v1
kind: HTTPRoute
metadata:
  name: bar-route
spec:
  parentRefs:
  - name: example-gateway
  hostnames:
  - "bar.example.com"  # 使用域名提供服务
  rules:
  - matches:
    - headers:  # 匹配规则
      - type: Exact  # 精确匹配
        name: env    # 请求头
        value: canary   # 请求头的值
    backendRefs: # 带有头部信息的 svc
    - name: foo-svc
      port: 80
  - backendRefs:  # 没有头部信息的 svc
    - name: example-svc
port: 80- 部署一下
bash
[root@master ~]# kubectl apply -f  headerhttp.yaml
httproute.gateway.networking.k8s.io/bar-route created- 查看一下创建的资源
bash
[root@master ~]# kubectl get httproute bar-route
NAME        HOSTNAMES             AGE
bar-route ["bar.example.com"] 82s- 做一下域名解析,然后访问
bash
[root@master ~]# echo "192.168.93.12 bar.example.com" > /etc/hosts 1.4.1、改动Deployment资源
- 只需要稍微改动一下我们就可以看到带有头部访问和不带头部范文的效果。
bash
# foo-svc Service
[root@master ~]# kubectl exec -it pathprefix-http-8c9dcb686-57qst -- sh -c "echo "head" > /usr/share/nginx/html/index.html"

# example-svc Service
[root@master ~]# kubectl exec -it default-http-78d4bd4ff8-nqfnc -- sh -c "echo ""no head"" > /usr/share/nginx/html/index.html"
1.4.2、带有头部访问
bash
[root@master ~]# curl -H "env: canary" bar.example.com
head- 跟我们预期的一样,带有规则的头部信息将会访问到
foo-svc
1.4.3、没有头部的访问
bash
[root@master ~]# curl bar.example.com
no head- 或者头部信息不匹配也都将访问
example-svc的业务
bash
[root@master ~]# curl -H "env: test" bar.example.com
no head
二、HTTP头部修饰符
HTTPRoute资源可修改客户端发起的HTTP请求头,以及服务器返回HTTP响应头。有两种过滤器可以满足此类需求:RequestHeaderModifier(请求头修饰器)和ResponseHeaderModifier(响应头修饰器)。
2.1、创建命名空间区分
- 以防止做的操作乱掉、所以创建一个新的命名空间。
bash
[root@master ~]# kubectl create ns modifiers
namespace/modifiers created
2.2、HTTP请求头修改器
-
HTTP头修改指的是再入站请求中添加、移除或者修改`HTTP头的过程。 -
如需要配置
HTTP头修改功能,需定义一个包含一个或多个HTTP过滤器的网关(Gateway)对象。每个过滤器都会指定对入站请求执行的具体修改操作,例如添加自定义请求头或者修改现有请求头。 -
若要为
HTTP请求添加请求头,可使用类型为RequestHeaderModifier的过滤器,配置工作类型为add,并同时指定待添加请求头的名称 和值。 -
先部署一个进行这次演示
Deployment和Service。
bash
[root@master ~]# cat modifier-deployment.yaml
# 1. ConfigMap:存储自定义NGINX配置
apiVersion: v1
kind: ConfigMap
metadata:
  name: modifier-nginx-config
  namespace: modifiers
data:
  default.conf: |
    server {
        listen       80;
        listen  [::]:80;
        server_name  localhost;

        # 新增/add-a-request-header路由,直接return返回(状态码200+自定义响应)
        location /add-a-request-header {
            # return指令:直接返回响应,无需转发
            # 格式:return 状态码 [响应内容/重定向地址];
            #return 200 '{"code":200,"msg":"Success","path":"/add-a-request-header"}';
          return 200 '{"code":200,"msg":"Gateway添加的请求头已生效","request_header": {"my-header-name":"$http_my_header_name"}}';
            # 设置响应Content-Type,避免浏览器解析异常
            add_header Content-Type application/json;
        }

        # 原有根路径配置
        location / {
            root   /usr/share/nginx/html;
            index  index.html index.htm;
        }

        error_page   500 502 503 504  /50x.html;
        location = /50x.html {
            root   /usr/share/nginx/html;
        }
    }

---

# 2. Deployment:部署NGINX容器,挂载ConfigMap覆盖默认配置
apiVersion: apps/v1
kind: Deployment
metadata:
  name: modifier-http
  namespace: modifiers
  labels:
    app: modifier-http
spec:
  replicas: 1
  selector:
    matchLabels:
      app: modifier-http
  template:
    metadata:
      labels:
        app: modifier-http
    spec:
      containers:
      - name: test-modifier-http
        image: nginx:latest
        imagePullPolicy: IfNotPresent
        ports:
        - containerPort: 80
        # 挂载ConfigMap到NGINX配置目录,覆盖默认的default.conf
        volumeMounts:
        - name: nginx-config-volume
          mountPath: /etc/nginx/conf.d/default.conf  # 直接覆盖默认配置文件
          subPath: default.conf  # 指定ConfigMap中的key
      # 定义卷:关联上面的ConfigMap
      volumes:
      - name: nginx-config-volume
        configMap:
          name: modifier-nginx-config  # 关联创建的ConfigMap名称
          items:
          - key: default.conf
            path: default.conf  # 卷内的路径,对应subPath

---

# 3. Service:暴露Deployment的80端口
apiVersion: v1
kind: Service
metadata:
  name: modifier-http
  namespace: modifiers
spec:
  selector:
    app: modifier-http
  type: ClusterIP
  ports:
  - port: 80
targetPort: 80- 部署一下,并且查看一下状态
bash
[root@master ~]# kubectl apply -f modifier-deployment.yaml
configmap/modifier-nginx-config created
deployment.apps/modifier-http created
service/modifier-http created
[root@master ~]# kubectl get pod,svc,cm -n modifiers
NAME                                 READY   STATUS    RESTARTS   AGE
pod/modifier-http-64fb45d67f-b6lrl   1/1     Running   0          12s

NAME                    TYPE        CLUSTER-IP      EXTERNAL-IP   PORT(S)   AGE
service/example-svc     ClusterIP   10.106.248.48   <none>        80/TCP    12m
service/modifier-http   ClusterIP   10.102.26.62    <none>        80/TCP    12s

NAME                              DATA   AGE
configmap/istio-ca-root-cert      1      34m
configmap/kube-root-ca.crt        1      34m
configmap/modifier-nginx-config 1 12s- 创建
Gateway和HTTPRoute
bash
[root@master ~]# cat add-modifier.yaml
apiVersion: gateway.networking.k8s.io/v1
kind: Gateway
metadata:
  name: acme-gw
  namespace: modifiers
spec:
  gatewayClassName: istio
  listeners:
  - name: http
    protocol: HTTP
    port: 80
---
apiVersion: gateway.networking.k8s.io/v1
kind: HTTPRoute
metadata:
  name: header-http-echo
  namespace: modifiers
spec:
  parentRefs:
    - name: acme-gw
  hostnames:
  - "modifier.example.com"
  rules:  # 规则
    - matches:   # 匹配条件: 满足条件的流量才会走该规则
        - path:
            type: PathPrefix  # 路径匹配类型: 前缀匹配(支持Exact/PathPrefix/RegularExpression)
            value: /add-a-request-header   # 匹配的前缀
      filters:  # 过滤链, 匹配后转发到后端的处理逻辑
        - type: RequestHeaderModifier  # 过滤器类型, 修改请求头
          requestHeaderModifier:
            add:   # 动作: 添加请求头
              - name: my-header-name     # 要添加的头名称
                value: my-header-value   # 头值
      backendRefs:
        - name: modifier-http  # 目标 Service
port: 80- 部署一下
bash
[root@master ~]# kubectl apply -f add-modifier.yaml
gateway.gateway.networking.k8s.io/acme-gw created
httproute.gateway.networking.k8s.io/header-http-echo created- 访问验证一下
bash
# 要做一下 hosts 解析
[root@master ~]# echo "192.168.93.12 modifier.example.com" >> /etc/hosts
bash
# 访问匹配的路径(/add-a-request-header)看看是否可以给我们添加一个头部信息
[root@master ~]# curl modifier.example.com/add-a-request-header
{"code":200,"msg":"Gateway添加的请求头已生效","request_header": {"my-header-name":"my-header-value"}}-
部署的
configmap里面添加了/add-a-request-header路由并且直接访问打印出来请求头的value值 -
接下来,我们使用
set动作修改请求头部中的key-value
bash
# 首先更改一下 configmap 的配置, 只需要更改 return  即可
[root@master ~]# kubectl edit configmaps -n modifiers modifier-nginx-config
            return 200 '{"client_send_accept":"$http_accept_original","backend_receive_accept":"$http_accept"}';


# 重启一下 pod
[root@master ~]# kubectl rollout restart deployment -n modifiers modifier-http
deployment.apps/modifier-http restarted- 我们去更改一下,只需要把
add工作更改为set动态即可,然后保存退出
bash
[root@master ~]# kubectl edit -n modifiers httproute header-http-echo
        set:
        - name: accept
value: application/xml # 默认值: "*/*"- 我们访问一下
bash
[root@master ~]# curl http://modifier.example.com/add-a-request-header
{"client_send_accept":"","backend_receive_accept":"application/xml"}- 也可以使用
remove关键字并指定待删和请求头名称列表,来移除请求头。
bash
[root@master ~]# kubectl edit -n modifiers httproute header-http-echo
    filters:
    - requestHeaderModifier:
        remove:
        - User-Agent
2.3、HTTP响应头修改器
HTTP响应头修改器与编辑请求头的实用价值同理,编译相应头也有着诸多用途。例如,它能让技术团队仅针对特定后端服务添加或者删除Cookie,这有助于识别哪些此前被重定向至该后端服务的特定用户。- 另一个潜在的应用场景是:当前端需要判断其对接的后端服务器的稳定版本还是测试版本时,就可以通过修改响应头来实现,进而渲染不同的用户界面,或者响应地调整自身的响应数据解析逻辑。
- 修改
HTTP响应头所使用的语法,与修改原始请求头的语法极为相似,二者的区别仅在于使用的过滤器不同而已, - 响应头支持添加、编辑和删除,也可以一次性添加多个响应头,示例如下:
bash
[root@master ~]# cat response-modifier.yaml
apiVersion: gateway.networking.k8s.io/v1
kind: HTTPRoute
metadata:
  name: response-http-echo
  namespace: modifiers
  # 可选:添加标签便于管理
  labels:
    app: response-modifier
    gateway: acme-gw
spec:
  # 关联的网关
  parentRefs:
    - name: acme-gw
  # 匹配的域名
  hostnames:
    - "response.example.com"
  # 路由规则
  rules:
    # 取消路径匹配,默认匹配所有路径(包括 /)
    - filters:
        # 响应头修改过滤器
        - type: ResponseHeaderModifier
          responseHeaderModifier:
            add:
              - name: X-Header-Add-1
                value: header-add-1
              - name: X-Header-Add-2
                value: header-add-2
              - name: X-Header-Add-3
                value: header-add-3
      # 后端服务关联
      backendRefs:
        - name: modifier-http
port: 80- 部署一下
bash
[root@master ~]# kubectl apply -f response-modifier.yaml
httproute.gateway.networking.k8s.io/response-http-echo created- 访问测试一下,访问前需要做
hosts解析
bash
[root@master ~]# echo "192.168.93.12 response.example.com" >> /etc/hosts
bash
[root@master ~]# curl response.example.com -v
*   Trying 192.168.93.12:80...
* Connected to response.example.com (192.168.93.12) port 80 (#0)
> GET / HTTP/1.1
> Host: response.example.com
> User-Agent: curl/7.79.1
> Accept: */*
>
* Mark bundle as not supporting multiuse
< HTTP/1.1 200 OK
< server: istio-envoy
< date: Thu, 18 Dec 2025 08:17:43 GMT
< content-type: text/html
< content-length: 615
< last-modified: Tue, 28 Dec 2021 15:28:38 GMT
< etag: "61cb2d26-267"
< accept-ranges: bytes
##############################################################
< x-envoy-upstream-service-time: 1
< x-header-add-1: header-add-1
< x-header-add-2: header-add-2
< x-header-add-3: header-add-3
##############################################################
<
<!DOCTYPE html>
<html>
<head>
<title>Welcome to nginx!</title>
<style>
html { color-scheme: light dark; }
body { width: 35em; margin: 0 auto;
font-family: Tahoma, Verdana, Arial, sans-serif; }
</style>
三、HTTP请求镜像
HTTPRoute资源可用于将请求镜像复制至多个后端服务。这一功能在利用生成流量测试新服务时十分实用。- 请求镜像功能在蓝绿部署场景下尤为适用。它可以在完全不影响客户端响应结果的前端下,评估新服务对应用性能的影响。
- 其实就是把请求复制多份,分别发送到别的
svc流量上,但不会影响到真正的svc去处理客户的请求。
3.1、创建命名空间区分
bash
[root@master ~]# kubectl create ns cp-image
namespace/cp-image created
3.2、创建Deployment、Svc资源
bash
[root@master ~]# cat cp-image-deployment.yaml
apiVersion: "apps/v1"
kind: Deployment
metadata:
  name: image-1-http
  namespace: cp-image
  labels:
    app: image-1-http
spec:
  replicas: 1
  selector:
    matchLabels:
      app: image-1-http
  template:
    metadata:
      labels:
        app: image-1-http
    spec:
      containers:
      - name: test-image-1-http
        image: nginx:latest
        imagePullPolicy: IfNotPresent
        ports:
        - containerPort: 80

---

apiVersion: "v1"
kind: Service
metadata:
  name: foo-v1
  namespace: cp-image
spec:
  selector:
    app: image-1-http
  type: ClusterIP
  ports:
  - port: 80
    targetPort: 80


---


apiVersion: "apps/v1"
kind: Deployment
metadata:
  name: image-2-http
  namespace: cp-image
  labels:
    app: image-2-http
spec:
  replicas: 1
  selector:
    matchLabels:
      app: image-2-http
  template:
    metadata:
      labels:
        app: image-2-http
    spec:
      containers:
      - name: test-image-2-http
        image: nginx:latest
        imagePullPolicy: IfNotPresent
        ports:
        - containerPort: 80

---

apiVersion: "v1"
kind: Service
metadata:
  name: foo-v2
  namespace: cp-image
spec:
  selector:
    app: image-2-http
  type: ClusterIP
  ports:
  - port: 80
targetPort: 80- 部署一下
bash
[root@master ~]# kubectl apply -f cp-image-deployment.yaml
deployment.apps/image-1-http created
service/foo-v1 created
deployment.apps/image-2-http created
service/foo-2 created- 修改一下
index内容
bash
# foo-v1
[root@master ~]# kubectl exec -it -n cp-image image-1-http-76bb4959b6-zd6s9 -- sh -c "echo "foo-v1" > /usr/share/nginx/html/index.html"


# foo-v2
[root@master ~]# kubectl exec -it -n cp-image image-2-http-6dcc98f4b-hsrts -- sh -c "echo "foo-v2" > /usr/share/nginx/html/index.html"
3.2、创建Gateway、HTTPRote
- 接下来我们将创建的
HTTPRoute,所有请求将会被转发到foo-v1服务上,同时也会被转发至foo-v2服务上,但仅由foo-v1服务生成响应并返回给客户端。
bash
[root@master ~]# cat request-image-httproute.yaml
apiVersion: gateway.networking.k8s.io/v1
kind: Gateway
metadata:
  name: mirror-gateway
  namespace: cp-image
spec:
  gatewayClassName: istio
  listeners:
  - name: http
    protocol: HTTP
    port: 80
---
apiVersion: gateway.networking.k8s.io/v1
kind: HTTPRoute
metadata:
  name: http-filter-mirror
  namespace: cp-image
  labels:
    gateway: mirror-gateway
spec:
  parentRefs:
  - name: mirror-gateway
  hostnames:
  - mirror.example
  rules:
  - backendRefs:
    - name: foo-v1
      port: 80
    filters:
    - type: RequestMirror # 规则类型: 请求复制
      requestMirror:
        backendRef:
          name: foo-v2
port: 80- 部署一下
bash
[root@master ~]# kubectl apply -f  request-image-httproute.yaml
gateway.gateway.networking.k8s.io/mirror-gateway created
httproute.gateway.networking.k8s.io/http-filter-mirror created- 查看一下资源
bash
[root@master ~]# kubectl get gateway,httproute -n cp-image
NAME                                               CLASS   ADDRESS         PROGRAMMED   AGE
gateway.gateway.networking.k8s.io/mirror-gateway   istio   192.168.93.13   True         60s

NAME                                                     HOSTNAMES            AGE
httproute.gateway.networking.k8s.io/http-filter-mirror ["mirror.example"] 60s- 做一下
hosts解析
bash
[root@master ~]# echo "192.168.93.13 mirror.example" >> /etc/hosts- 访问之前使用命令持续查看
image-1-http和image-2-http的pod日志(多开几个终端)
bash
# image-1-http
[root@master ~]# kubectl logs -n cp-image image-1-http-76bb4959b6-zd6s9 -f
bash
# image-2-http
[root@master ~]# kubectl logs -n cp-image image-2-http-6dcc98f4b-hsrts -f- 进行访问测试
bash
[root@master ~]# curl mirror.example
foo-v1- 回头查看日志
bash
# image-1-http
[root@master ~]# kubectl logs -n cp-image image-1-http-76bb4959b6-zd6s9 -f
10.244.166.150 - - [18/Dec/2025:08:49:23 +0000] "GET / HTTP/1.1" 200 7 "-" "curl/7.79.1" "10.244.219.64"
bash
# image-2-http
[root@master ~]# kubectl logs -n cp-image image-2-http-6dcc98f4b-hsrts -f
10.244.166.150 - - [18/Dec/2025:08:49:23 +0000] "GET / HTTP/1.1" 200 7 "-" "curl/7.79.1" "10.244.219.64,10.244.166.150"Gateway只给我们返回了foo-v1的响应,并且我们的请求也发送到了foo-v2