本文详细介绍了从MySQL到Elasticsearch的完整数据同步流程,通过Canal组件实现MySQL数据库变更的实时捕获和同步。文档涵盖了系统架构设计、各个组件功能说明、Zookeeper集群部署、Canal Admin和Deployer集群配置、Canal Adapter部署以及数据同步的全过程,提供了完整的配置示例和操作步骤。
一、整体流程
1.架构图
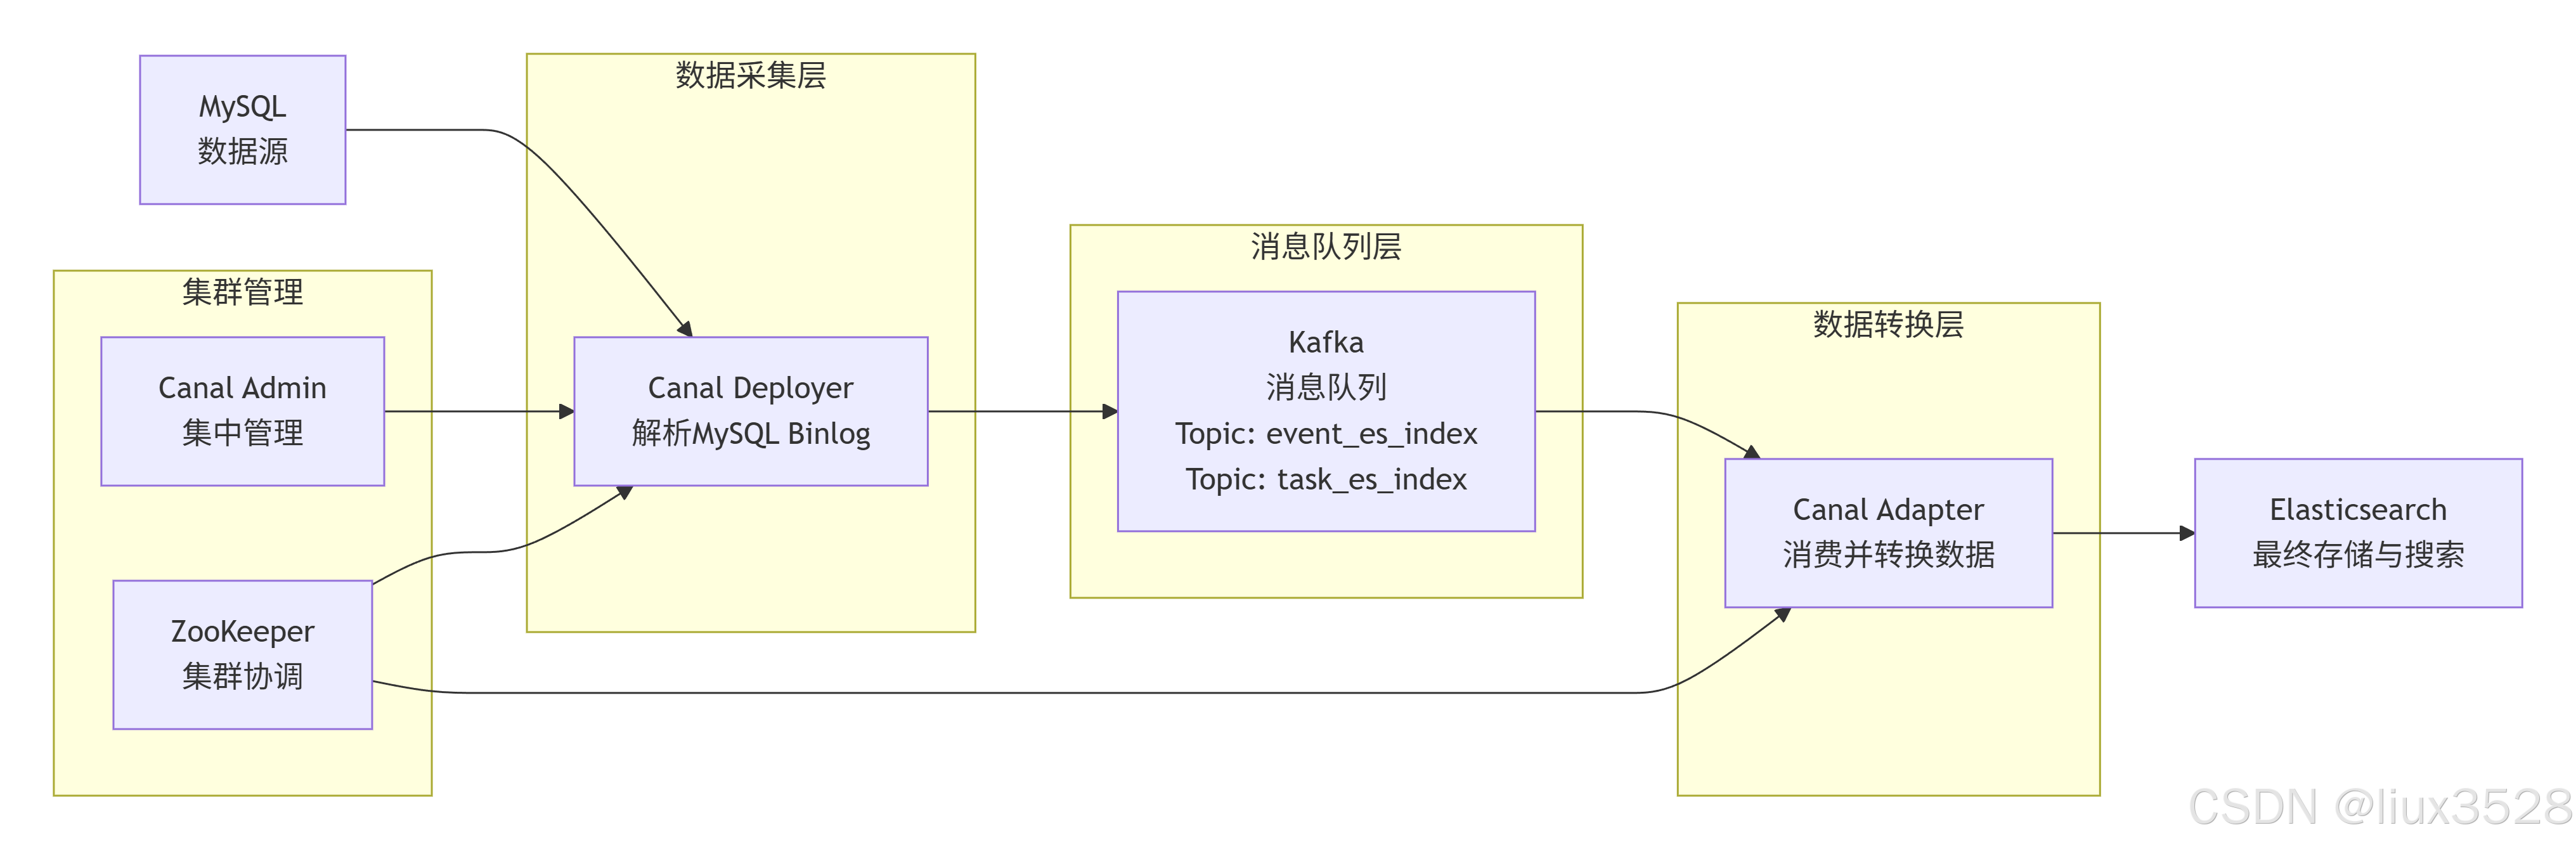
2.各个组件概述
2.1 MySQL
作用:
- 存储业务数据的源数据库
- 通过binlog(二进制日志)记录所有数据变更(INSERT/UPDATE/DELETE/DDL)
关键特性:
- binlog_format必须为ROW模式(才能记录行级变更)
- 需要开启binlog(log_bin=ON)
- 需要创建专门的Canal用户(REPLICATION权限)
sql
-- 查看binlog配置
SHOW VARIABLES LIKE 'log_bin';
SHOW VARIABLES LIKE 'binlog_format';
-- 必须显示:binlog_format = ROW

-- 检查Canal用户权限
SHOW GRANTS FOR 'canal'@'%';
-- 必须包含:REPLICATION SLAVE, REPLICATION CLIENT, SELECT

-- 查看当前binlog位置
SHOW MASTER STATUS;
-- 记录 File 和 Position

SHOW slave hosts;
2.2 Canal Admin + Zookeeper
Canal Admin:Canal集群管理平台(Web界面)
- 统一管理多个Canal实例
- 监控运行状态、配置管理、故障恢复
- 可视化界面操作
Zookeeper:分布式协调服务
- 存储Canal集群元数据、配置信息
- 实现Canal实例的高可用和故障转移
- 记录binlog消费位置(position)
2.3 Canal Deployer(Canal服务端,数据捕获与转换)
作用:
- 伪装成MySQL从库,向主库请求binlog
- 解析binlog二进制流为结构化消息
- 过滤数据(白名单/黑名单)
- 将数据变更消息发送到消息队列(Kafka)
核心组件:
- EventParser:解析binlog事件
- CanalServer:管理多个Canal实例
- CanalMQProducer:消息队列生产者
2.4 Kafka(消息队列/缓冲区)
作用:
- 解耦生产者和消费者
- 缓冲数据,应对流量高峰
- 保证消息顺序(分区级别)
- 提供数据持久化和消息回溯
核心概念:
- Topic:逻辑消息分类(如task_es_index)
- Partition:Topic的分区,保证顺序性
- Producer:Canal Deployer作为生产者
- Consumer:Canal Adapter作为消费者
2.5 Canal Adapter(数据转换与写入)
作用:
- 消费Kafka中的消息
- 将Canal格式消息转换为目标存储格式(ES文档)
- 批量写入Elasticsearch
- 处理数据转换映射关系
支持的目标存储:
- Elasticsearch
- MySQL
- HBase
- REST API
2.6 Elasticsearch(数据存储与搜索)
作用:
- 存储最终的业务数据
- 提供全文搜索和聚合分析
- 构建实时数据索引
- 提供REST API接口
二、安装部署zookeeper集群
本章节详细介绍Zookeeper集群的部署过程。Zookeeper作为分布式协调服务,为Canal集群提供元数据存储、配置管理和故障恢复支持,是构建高可用Canal集群的基础组件。内容包括软件下载、环境配置、集群搭建和管理脚本编写等。
1.下载安装
sh
(1)下载zookeeper
[worker@canal-12 ~]$ cd /data/software/
[worker@canal-12 software]$   wget https://dlcdn.apache.org/zookeeper/zookeeper-3.8.5/apache-zookeeper-3.8.5-bin.tar.gz

(2)解压软件包
[worker@canal-12 software]$  tar xf apache-zookeeper-3.8.5-bin.tar.gz
2.修改环境变量
sh
#配置环境变量
#如果没有root权限可以配置到当前用户下 ~/.bash_profile,root权限可以配置到/etc/profile.d/zk.sh
[worker@canal-12 software]$ cat ~/.bash_profile
# Source /root/.bashrc if user has one
[ -f ~/.bashrc ] && . ~/.bashrc
                                                                                       export ZK_HOME=/data/software/zookeeper-3.8.5
export PATH=$PATH:$ZK_HOME/bin
#使环境变量生效
[worker@canal-12 software]$  source  ~/.bash_profile
3.修改配置文件
sh
#创建配置文件
[worker@canal-12 conf]$ mkdir /data/software/zookeeper-3.8.5/{data,logs}
[worker@canal-12 conf]$  cat > /data/software/zookeeper-3.8.5/conf/zoo.cfg <<EOF
# 数据目录
dataDir=/data/software/zookeeper-3.8.5/data
# 日志目录
dataLogDir=/data/software/zookeeper-3.8.5/logs
# 客户端连接端口
clientPort=2181
# 心跳间隔(ms)
tickTime=2000
# 初始化同步超时时间(10*tickTime)
initLimit=10
# 同步通信超时时间(5*tickTime)
syncLimit=5
# 集群节点配置(server.${myid}=IP:通信端口:选举端口)
# server.ID=A:B:C[:D]
# ID:
#    zk的唯一编号。
# A:
#    zk的主机地址。
# B:
#    leader的选举端口,是谁leader角色,就会监听该端口。
# C:
#    数据通信端口。
# D:
#    可选配置,指定角色。
server.1=172.16.130.12:2888:3888
server.2=172.16.130.130:2888:3888
server.3=172.16.130.131:2888:3888
EOF
4.同步配置文件
sh
#1.同步zookeeper软件包到其他服务器 130/131
[worker@canal-12 software]$ scp -P55622 -r zookeeper-3.8.5 172.16.130.131:/data/software/
[worker@canal-12 software]$  scp -P55622 -r ~/.bash_profile 172.16.130.131:~/.bash_profile

#2.每个zookeeper节点创建唯一标识ID
#其他节点分别修改/data/software/zookeeper-3.8.5/data/myid中的myid为 server.id
[root@elk101 ~]# for ((host_id=101;host_id<=103;host_id++)) do ssh elk${host_id} "echo ${host_id} > /liux/data/zk/myid";done
[worker@canal-12 ~]$ echo '1' > /data/software/zookeeper-3.8.5/data/myid
[worker@canal-12 ~]$ echo '1' > /data/software/zookeeper-3.8.5/data/myid
[worker@canal-131 ~]$ echo '3' > /data/software/zookeeper-3.8.5/data/myid
5.编写zookeeper集群管理脚本
sh
#编写zookeeper集群管理脚本
[root@elk101 ~]# cat >/data/software/zookeeper-3.8.5/bin/manager_zk.sh<<EOF
#!/bin/bash

#判断用户是否传参
if [ $# -ne 1 ];then
    echo "无效参数,用法为: $0  {start|stop|restart|status}"
    exit
fi
#获取用户输入的命令
cmd=$1
#定义函数功能
function zookeeperManger(){
    case $cmd  in
    start)
        echo "启动服务"
        remoteExecution start
        ;;
    stop)
        echo "停止服务"
        remoteExecution stop
        ;;
    restart)
        echo "重启服务"
        remoteExecution restart
        ;;
    status)
        echo "查看状态"
        remoteExecution status
        ;;
    *)
        echo "无效参数,用法为: $0  {start|stop|restart|status}"
        ;;
    esac
}
#定义执行的命令
host_list=(172.16.130.12 172.16.130.130 172.16.130.131)
function remoteExecution(){
  for i in ${host_list[@]} ;do
       tput setaf 2
       echo ========== $i   zkServer.sh $1  ================
       tput setaf 9
       ssh $i   "source  ~/.bash_profile ; zkServer.sh $1  2>/dev/null"
    done
}
#调用函数
zookeeperManger
EOF
[worker@canal-12 ~]$ chmod +x /data/software/zookeeper-3.8.5/bin/manager_zk.sh
6.配置服务器免密码登录
sh
#设置免密码登录
[worker@canal-12 ~]$ ssh-keygen -t rsa -P "" -f /worker/.ssh/id_rsa -q
#发送到每台服务器
[worker@canal-12 ~]$ cat ~/.ssh/id_rsa.pub | ssh worker@172.16.130.12 " cat >> ~/.ssh/authorized_keys"
7.启动与验证
sh
# 启动zookeeper集群
[worker@canal-12 ~]$ manager_zk.sh start
 #查看集群状态
[root@elk101 ~]# manager_zk.sh status

#连接zookeeper
# 连接到ZooKeeper查看
zkCli.sh -server 172.16.130.12:2181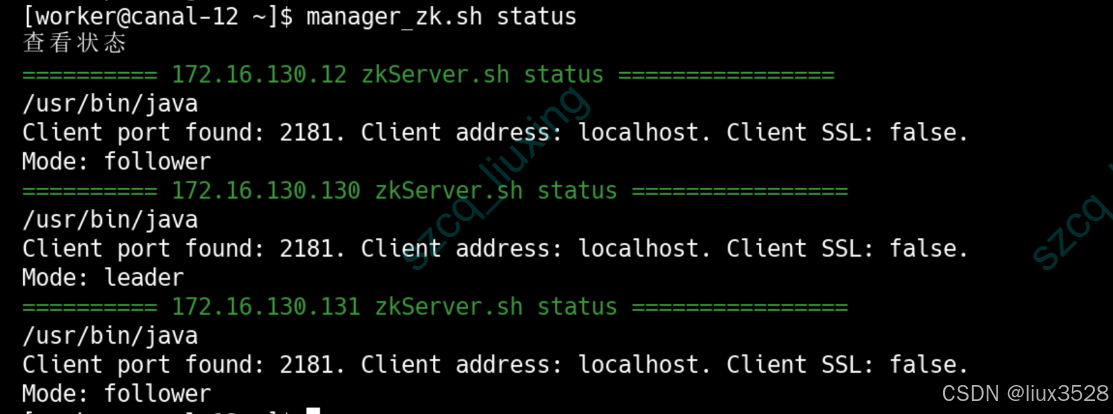
8.zookeeper简单使用命令
sh
# 连接到ZooKeeper查看
zkCli.sh -server 172.16.130.12:2181
[zk: 172.16.130.12:2181(CONNECTED) 0] ls /
[canal-adapter, otter, zookeeper]
[zk: 172.16.130.12:2181(CONNECTED) 1]
三、部署canal
本章节详细讲解Canal集群的部署,包括Canal Admin管理平台和Canal Deployer服务端的配置。Canal负责实时捕获MySQL的binlog变更,并将数据发送到Kafka消息队列。内容涵盖管理平台搭建、服务端配置、实例管理以及数据同步配置等。
1.部署canal admin
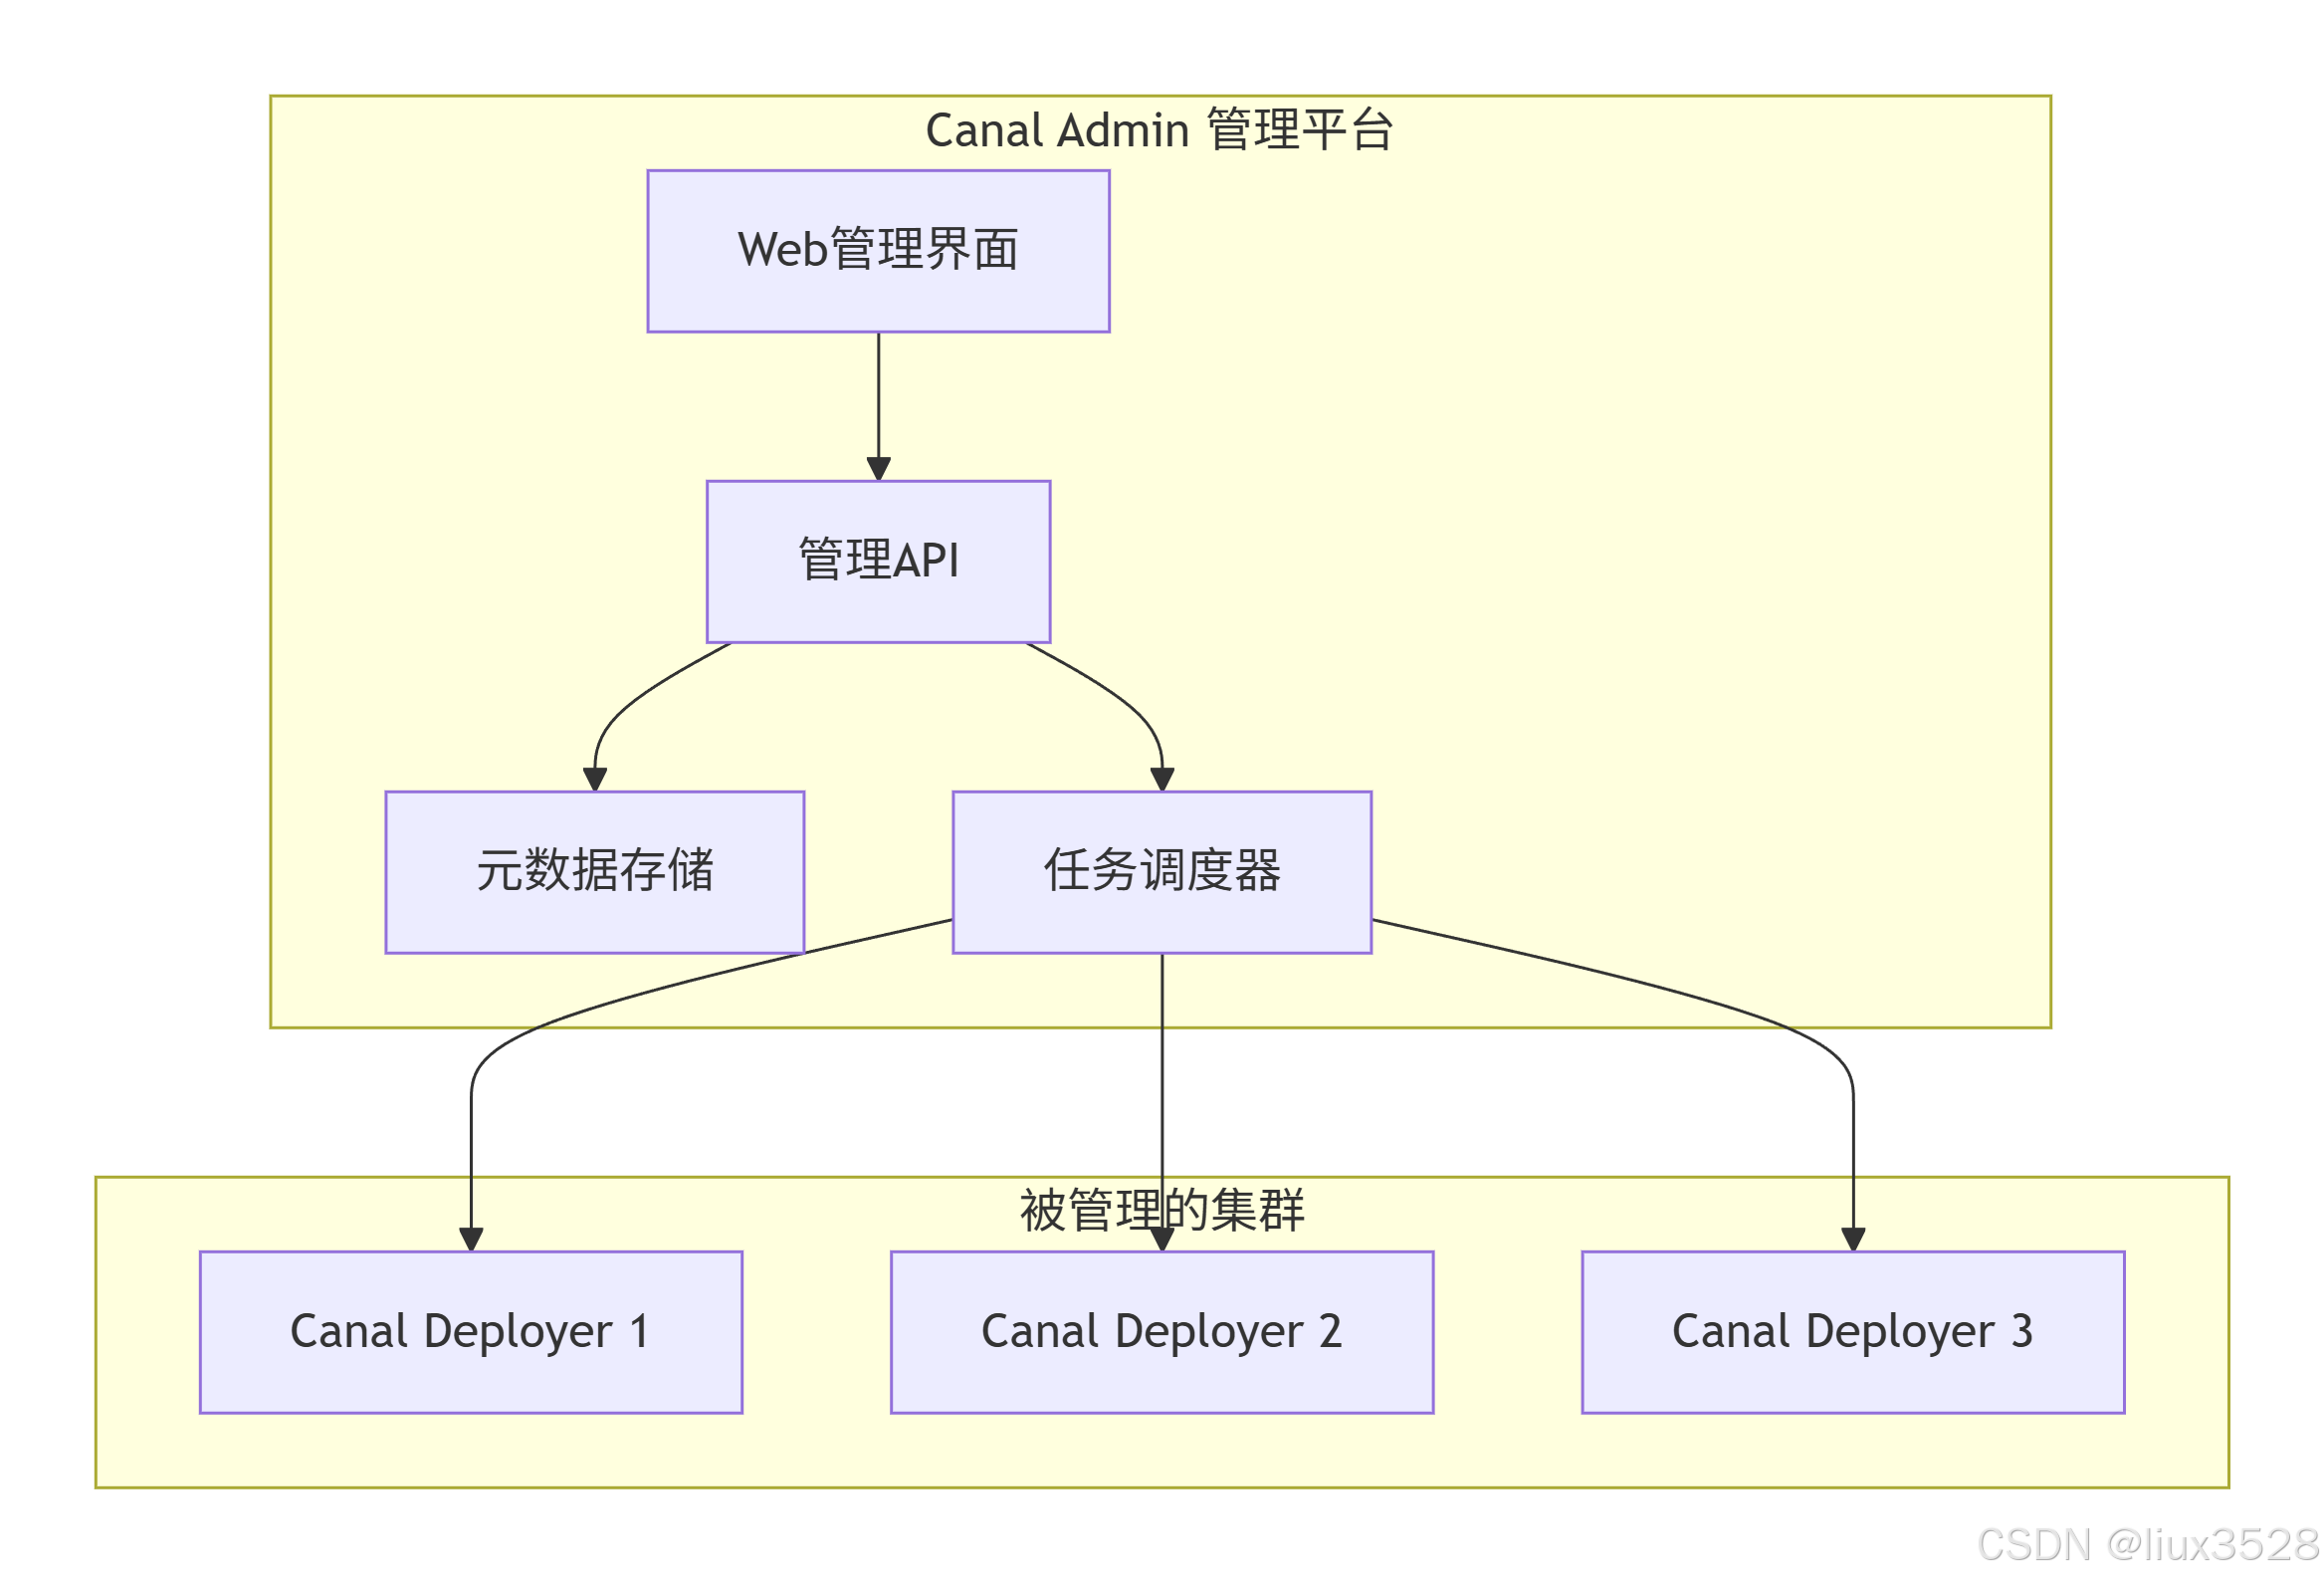
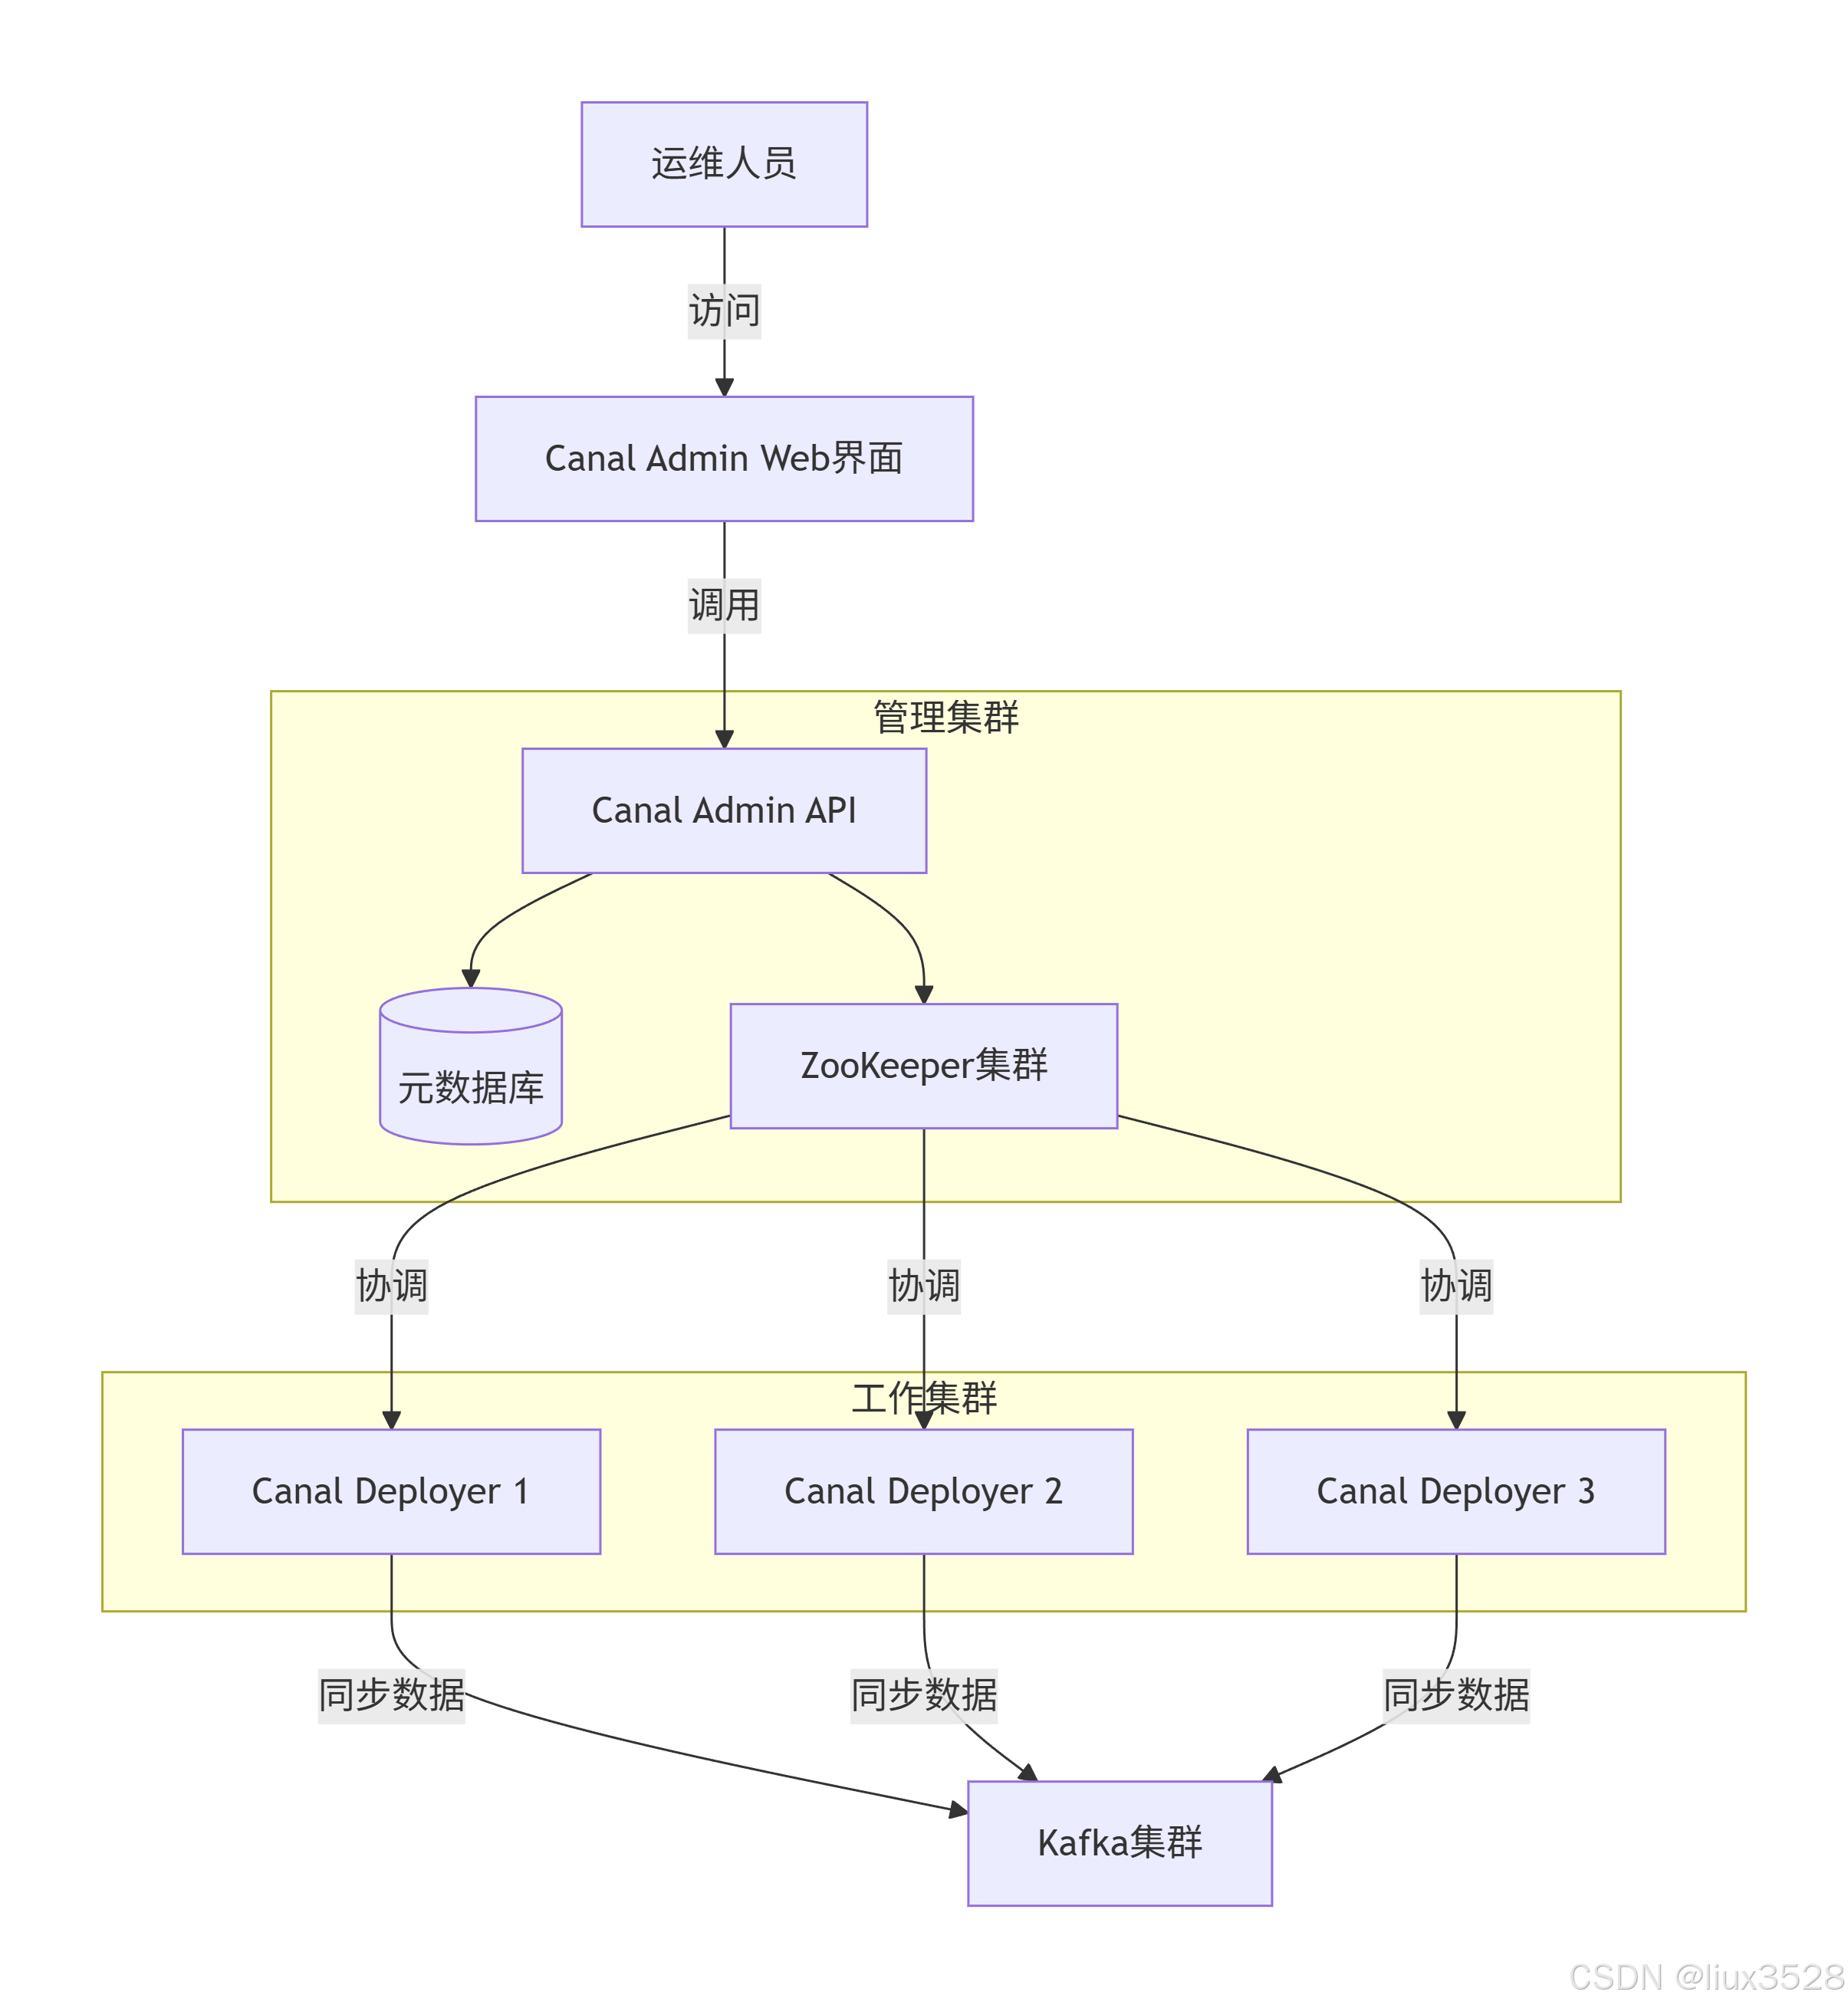
1.1 概述
Canal Admin 是 Canal Deployer 集群的集中管理平台,相当于 Canal 的"管控中心"或"指挥台"。
1.2 架构图
1.3 部署canal admin
01 下载安装
sh
# 1.下载
https://github.com/alibaba/canal/releases/download/canal-1.1.8/canal.admin-1.1.8.tar.gz
# 2.解压安装
[worker@canal-12 ~]$ mkdir /data/software/canal
[worker@canal-12 ~]$ cd /data/software/canal
[worker@canal-12 canal]$ mkdir canal_admin
[worker@canal-12 canal]$ tar xf canal.admin-1.1.8.tar.gz -C canal_admin
02 修改配置文件
sh
[worker@canal-12 canal]$ cd canal_admin/conf/
[worker@canal-12 conf]$ cat application.yml
server:
port: 8089
spring:
jackson:
date-format: yyyy-MM-dd HH:mm:ss
time-zone: GMT+8
spring.datasource:
address: 172.16.130.57:53306
database: canal_manager
url: jdbc:mysql://${spring.datasource.address}/${spring.datasource.database}?useUnicode=true&characterEncoding=UTF-8&useSSL=false&allowPublicKeyRetrieval=true&serverTimezone=Asia/Shanghai&autoReconnect=true&failOverReadOnly=false&maxReconnects=10
username: canal_admin
password: 345t3GmowVsMn!@V
driver-class-name: com.mysql.cj.jdbc.Driver
hikari:
maximum-pool-size: 30
minimum-idle: 1
#Canal Server 加入 Canal Admin 使用的密码
canal:
adminUser: admin
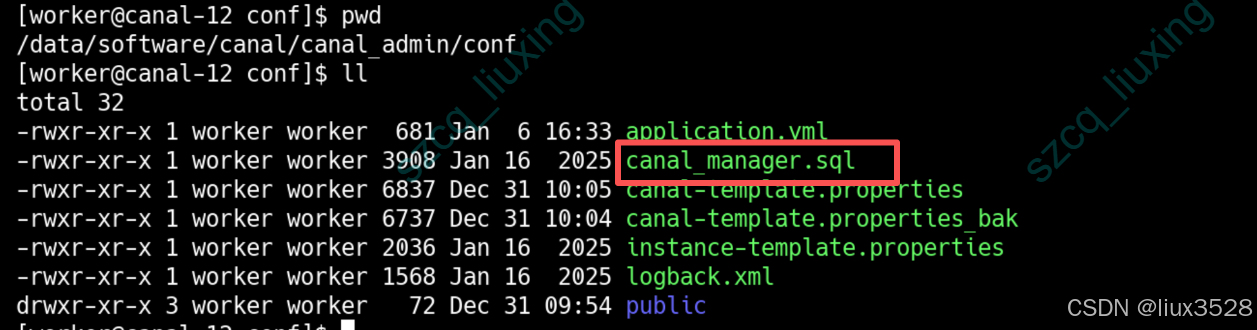
adminPasswd: b8hLqT%y#hJgz2Ea03 初始化数据库
下图目目录下有canal_manager.sql文件,是初始化数据库的脚本
sh
#登录MySQL数据库
mysql -h172.16.130.57 -P53306 -uroot -p
#执行脚本
source /data/software/canal/canal_admin/conf/canal_manager.sql

#创建连接用户
create user canal_admin@'%' identified by '345t3GmowVsMn!@V';
GRANT ALL PRIVILEGES ON `canal_manager`.* TO `canal_admin`@`%`;
04 启动服务
sh
[worker@canal-12 conf]$ cd /data/software/canal/canal_admin/
#启动服务
[worker@canal-12 canal_admin]$ ./bin/startup.sh
#登录
http://172.16.130.12:8081
#默认账户/密码
admin/123456
#登录账户后可以修改密码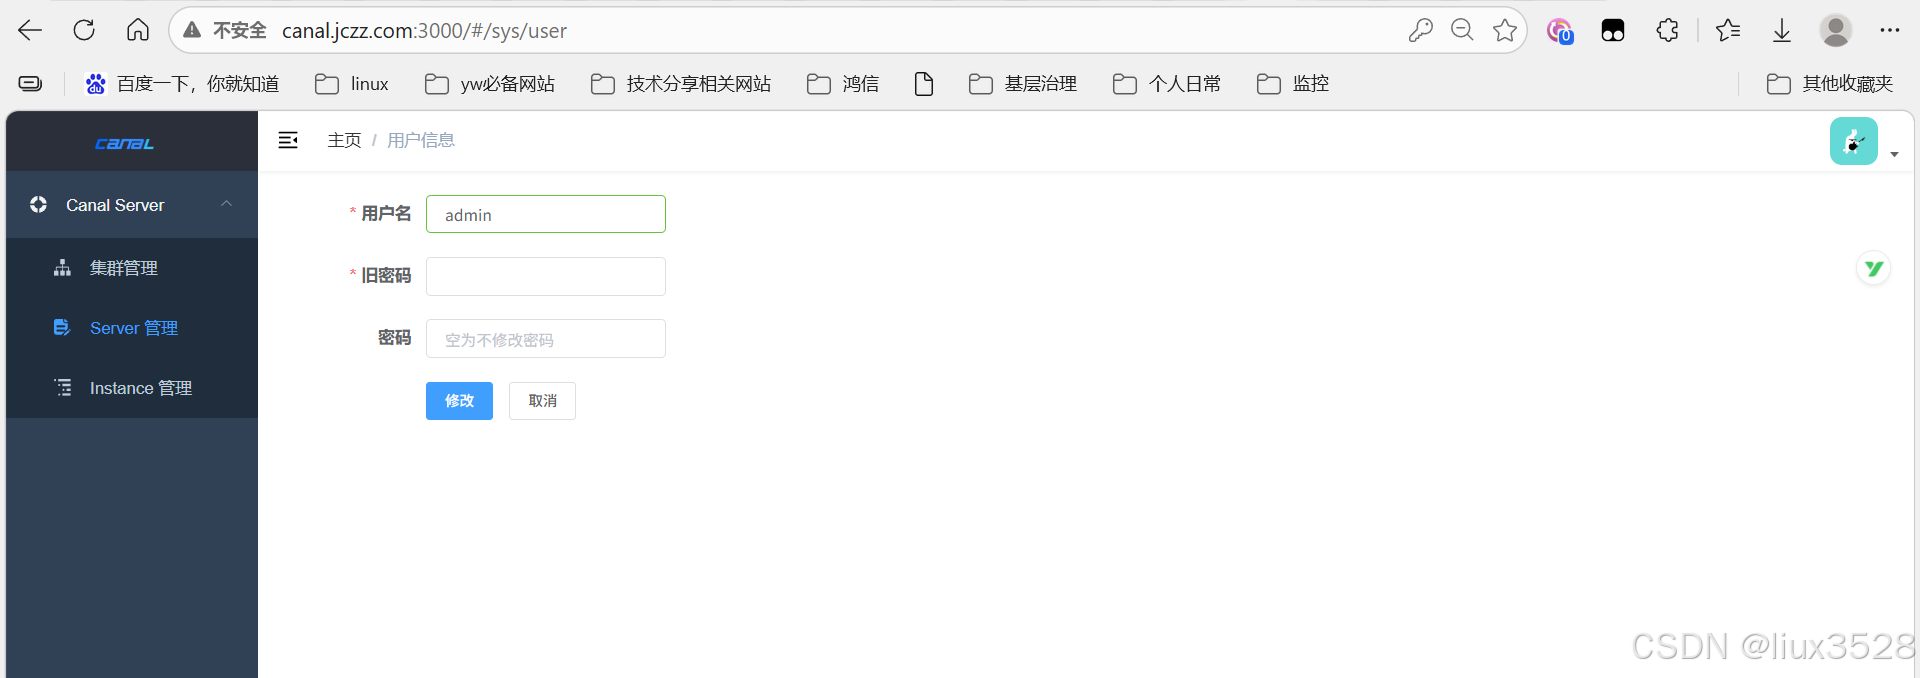
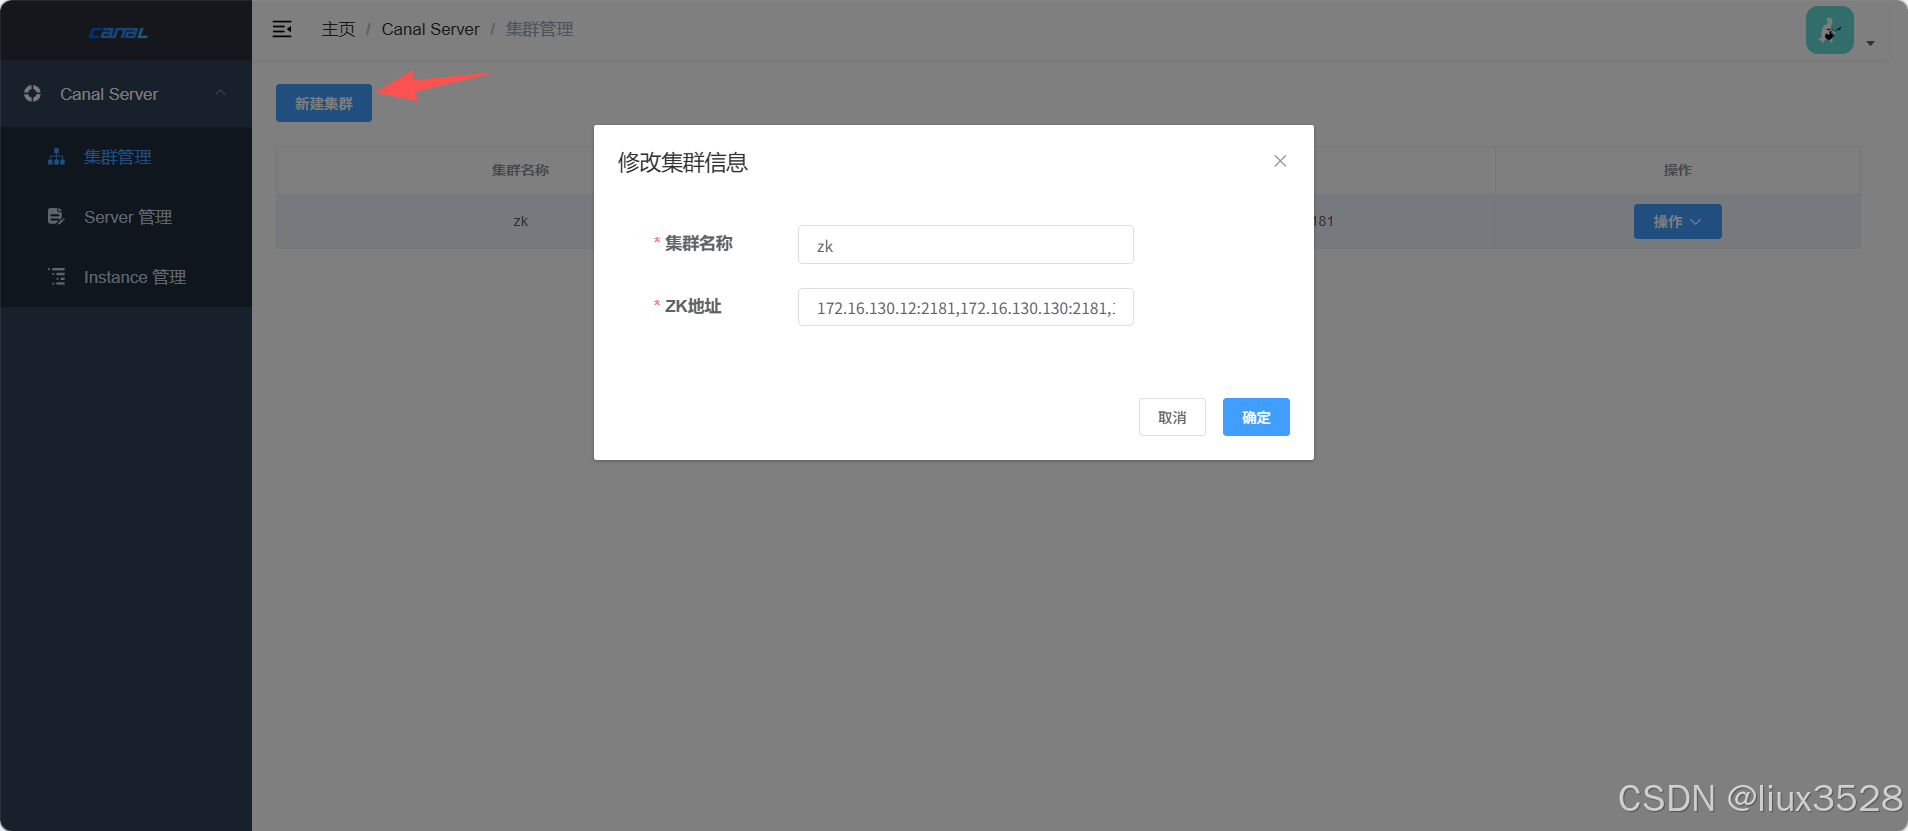
05 .使用canal admin管理集群
点击集群管理-->新建集群-->输入集群名称和zookeeper地址-->保存
2.部署canal deplyoper集群
服务器ip : 172.16.130.12/130/131
2.1 下载安装
**canal.deployer:**Canal 核心服务端(Server),负责连接 MySQL 主库,解析 Binlog 并转发给客户端
核心功能
- 伪装成 MySQL 从库,向主库拉取 Binlog。
- 解析 Binlog 事件(增删改操作)。
- 将解析结果投递给客户端(如
canal.adapter或其他自定义程序)
sh
# 1.下载
https://github.com/alibaba/canal/releases/download/canal-1.1.8/canal.deployer-1.1.8.tar.gz
# 2.解压安装
[worker@canal-12 ~]$ cd /data/software/canal
[worker@canal-12 canal]$ mkdir deployer
[worker@canal-12 canal]$ tar xf canal.deployer-1.1.8.tar.gz -C deployer
2.2 修改配置文件canal_local.properties
sh
#修改配置文件,使用admin管理只需要修改canal_local.properties,其他修改canal.properties
#每台都需要修改
[worker@canal-12 canal]$ cd deployer/conf
[worker@canal-12 conf]$ vim canal_local.properties
# register ip 每台服务器的ip
canal.register.ip = 172.16.130.12
canal.port = 11111
canal.metrics.pull.port = 11112
#################################################
###### Canal Admin 配置
#################################################
canal.admin.mode = manager
canal.admin.manager = 172.16.130.12:8089
# 当前节点的管理端口
canal.admin.port = 11110
#用户密码与admin中application.yml 配置文件一致
#注意密码需要加密,加密方式可以直接在mysql中执行以下语句
#select upper(sha1(unhex(sha1('b8hLqT%y#hJgz2Ea'))))
canal.admin.user = admin
canal.admin.passwd = B843914782989CD69C847EEBD01D250DC932C642
# 自动注册到Admin admin auto register
canal.admin.register.auto = true
#集群名称自定义,跟admin页面配置的集群名称一致
canal.admin.register.cluster = zk
#集群server名称,每台不一样,另外两台分别是node-130、node-131
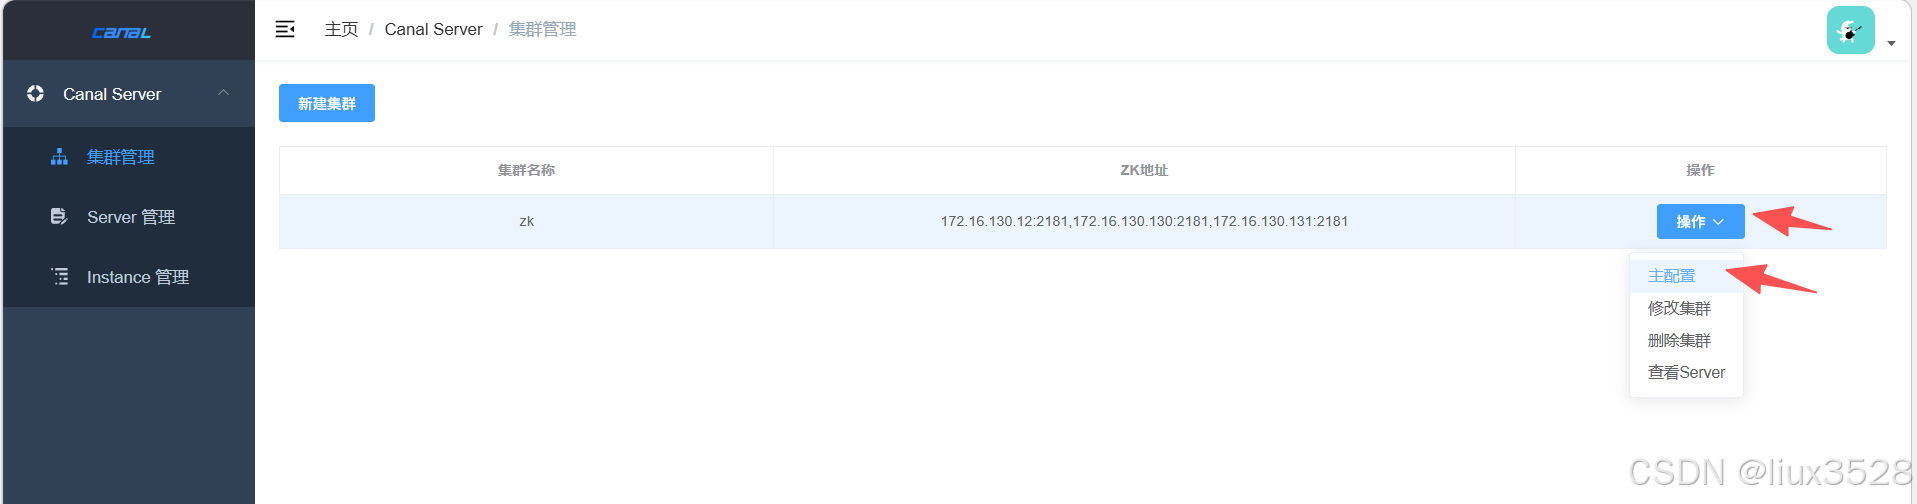
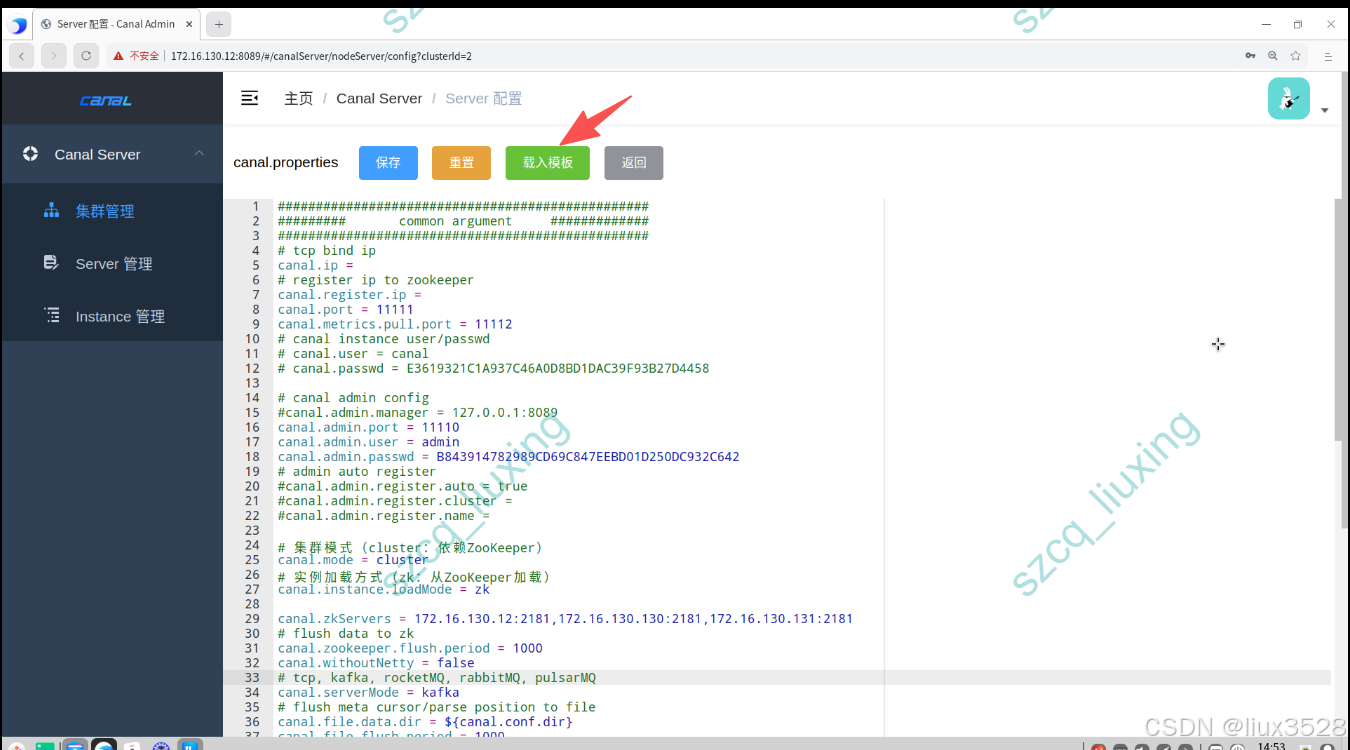
canal.admin.register.name = node-122.3 canal主配置文件 admin统一配置
admin 点击集群管理-->主配置-->载入模板 -->修改配置文件,修改完之后保存,admin会去自动获取server节点
涉及到kafka地址填写自己部署的,如果未部署请参考Kafka 4.1.1 生产集群部署完整指南(手把手教程)
sh
#################################################
######### common argument 基础配置   #############
#################################################
# tcp bind ip (为空表示绑定所有网卡,生产环境建议绑定内网IP)
canal.ip =
# register ip to zookeeper
canal.register.ip =
canal.port = 11111
canal.metrics.pull.port = 11112

#################################################
#此处需要修改
# 集群模式(cluster:依赖ZooKeeper)
canal.mode = cluster
# 实例加载方式(zk:从ZooKeeper加载)
canal.instance.loadMode = zk
canal.zkServers = 172.16.130.12:2181,172.16.130.130:2181,172.16.130.131:2181
#################################################

# flush data to zk
canal.zookeeper.flush.period = 1000
canal.withoutNetty = false
# tcp, kafka, rocketMQ, rabbitMQ, pulsarMQ  需要修改
canal.serverMode = kafka
# flush meta cursor/parse position to file
canal.file.data.dir = ${canal.conf.dir}
canal.file.flush.period = 1000
## memory store RingBuffer size, should be Math.pow(2,n)
canal.instance.memory.buffer.size = 16384
## memory store RingBuffer used memory unit size , default 1kb
canal.instance.memory.buffer.memunit = 1024
## meory store gets mode used MEMSIZE or ITEMSIZE
canal.instance.memory.batch.mode = MEMSIZE
canal.instance.memory.rawEntry = true

## detecing config
canal.instance.detecting.enable = false
#canal.instance.detecting.sql = insert into retl.xdual values(1,now()) on duplicate key update x=now()
canal.instance.detecting.sql = select 1
canal.instance.detecting.interval.time = 3
canal.instance.detecting.retry.threshold = 3
canal.instance.detecting.heartbeatHaEnable = false

# support maximum transaction size, more than the size of the transaction will be cut into multiple transactions delivery
canal.instance.transaction.size =  1024
# mysql fallback connected to new master should fallback times
canal.instance.fallbackIntervalInSeconds = 60

# network config
canal.instance.network.receiveBufferSize = 16384
canal.instance.network.sendBufferSize = 16384
canal.instance.network.soTimeout = 30

# binlog filter config
canal.instance.filter.druid.ddl = true
canal.instance.filter.query.dcl = false
canal.instance.filter.query.dml = false
canal.instance.filter.query.ddl = false
canal.instance.filter.table.error = false
canal.instance.filter.rows = false
canal.instance.filter.transaction.entry = false
canal.instance.filter.dml.insert = false
canal.instance.filter.dml.update = false
canal.instance.filter.dml.delete = false

# binlog format/image check
canal.instance.binlog.format = ROW,STATEMENT,MIXED
canal.instance.binlog.image = FULL,MINIMAL,NOBLOB

# binlog ddl isolation
canal.instance.get.ddl.isolation = false

# parallel parser config
canal.instance.parser.parallel = true
## concurrent thread number, default 60% available processors, suggest not to exceed Runtime.getRuntime().availableProcessors()
#canal.instance.parser.parallelThreadSize = 16
## disruptor ringbuffer size, must be power of 2
canal.instance.parser.parallelBufferSize = 256

# table meta tsdb info
canal.instance.tsdb.enable = true
canal.instance.tsdb.dir = ${canal.file.data.dir:../conf}/${canal.instance.destination:}
canal.instance.tsdb.url = jdbc:h2:${canal.instance.tsdb.dir}/h2;CACHE_SIZE=1000;MODE=MYSQL;
canal.instance.tsdb.dbUsername = canal
canal.instance.tsdb.dbPassword = canal
# dump snapshot interval, default 24 hour
canal.instance.tsdb.snapshot.interval = 24
# purge snapshot expire , default 360 hour(15 days)
canal.instance.tsdb.snapshot.expire = 360

#################################################
######### 		destinations		#############
#################################################
# 实例列表(需要创建的实例名称)使用admin管理时可以不写
canal.destinations =  event_es_index,task_es_index
# conf root dir
canal.conf.dir = ../conf
# auto scan instance dir add/remove and start/stop instance
canal.auto.scan = true
canal.auto.scan.interval = 5
# set this value to 'true' means that when binlog pos not found, skip to latest.
# WARN: pls keep 'false' in production env, or if you know what you want.
canal.auto.reset.latest.pos.mode = false

canal.instance.tsdb.spring.xml = classpath:spring/tsdb/h2-tsdb.xml
#canal.instance.tsdb.spring.xml = classpath:spring/tsdb/mysql-tsdb.xml

canal.instance.global.mode = manager
canal.instance.global.lazy = false
canal.instance.global.manager.address = ${canal.admin.manager}
#canal.instance.global.spring.xml = classpath:spring/memory-instance.xml
#canal.instance.global.spring.xml = classpath:spring/file-instance.xml
canal.instance.global.spring.xml = classpath:spring/default-instance.xml

##################################################
######### 	      MQ Properties      #############
##################################################
canal.mq.flatMessage = true
canal.mq.canalBatchSize = 50
canal.mq.canalGetTimeout = 100
# Set this value to "cloud", if you want open message trace feature in aliyun.
canal.mq.accessChannel = local

canal.mq.database.hash = true
canal.mq.send.thread.size = 30
canal.mq.build.thread.size = 8

##################################################
######### 		     Kafka 		     #############
##################################################
#kafka地址需要修改
kafka.bootstrap.servers = 172.16.130.3:9092,172.16.130.13:9092,172.16.130.15:9092
kafka.acks = all
kafka.compression.type = none
kafka.batch.size = 16384
kafka.linger.ms = 1
kafka.max.request.size = 1048576
kafka.buffer.memory = 33554432
kafka.max.in.flight.requests.per.connection = 1
kafka.retries = 0

kafka.security.protocol=SASL_PLAINTEXT
kafka.sasl.mechanism=SCRAM-SHA-512
kafka.sasl.jaas.config = org.apache.kafka.common.security.scram.ScramLoginModule required username="kafka_canal" password="xxx";
2.4 启动canal服务
sh
#启动文件+ local表示启动用的是canal_local.properties 文件
# 172.16.130.12/130/131 都要启动
[worker@canal-12 deployer]$ ./bin/startup.sh local
#查看日志
[worker@canal-12 deployer]$ tail -f logs/canal/canal.log
#以下图示代表启动成功了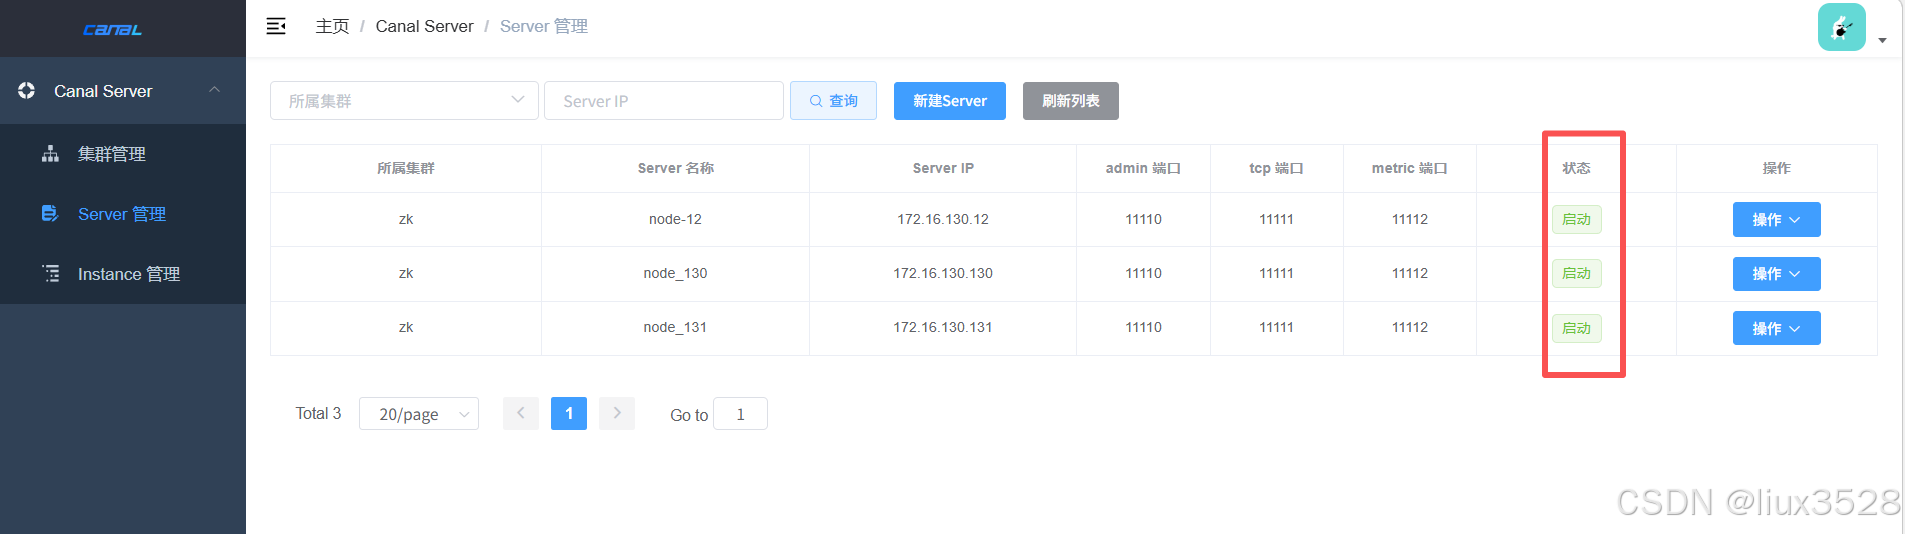
2.5 在kafka中创建需要用到的topic
sh
# event_es_index
kafka-topics.sh --create \
  --bootstrap-server 172.16.130.234:9092 \
  --topic event_es_index \
  --partitions 3 \
  --replication-factor 2

# task_es_index
kafka-topics.sh --create \
  --bootstrap-server 172.16.130.234:9092 \
  --topic task_es_index \
  --partitions 3 \
  --replication-factor 2

--partitions 3	设置该Topic的分区数为3
--replication-factor 2	设置副本因子为2(即每个分区有2个副本)
2.6.数据库添加账号
sql
mysql -uroot -h172.18.45.121 -P3306 -p'zT1U#cfjJ!WmkBN0'
CREATE USER 'canal'@'%' IDENTIFIED BY 'kV2cf!KqqjX82NHE';
GRANT SELECT, REPLICATION SLAVE, REPLICATION CLIENT ON *.* TO 'canal_user'@'%';
FLUSH PRIVILEGES;
2.7 添加instance实例
instance管理-->新建instance-->载入模板-->填写instance名称和所属集群
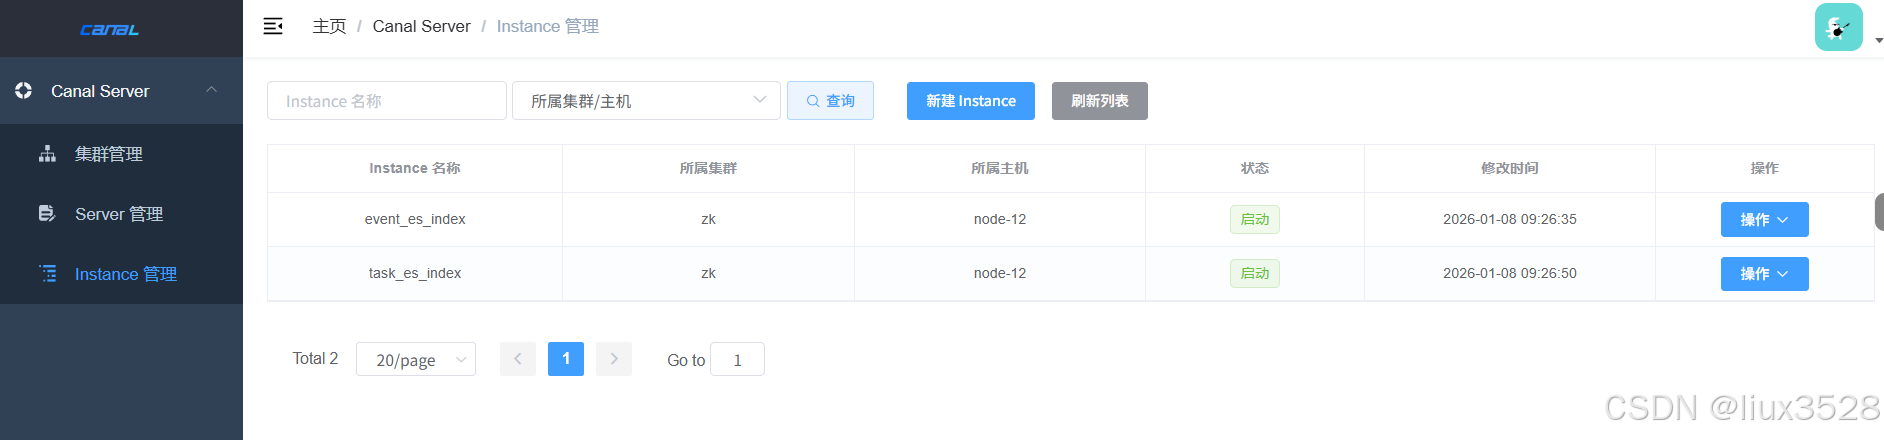
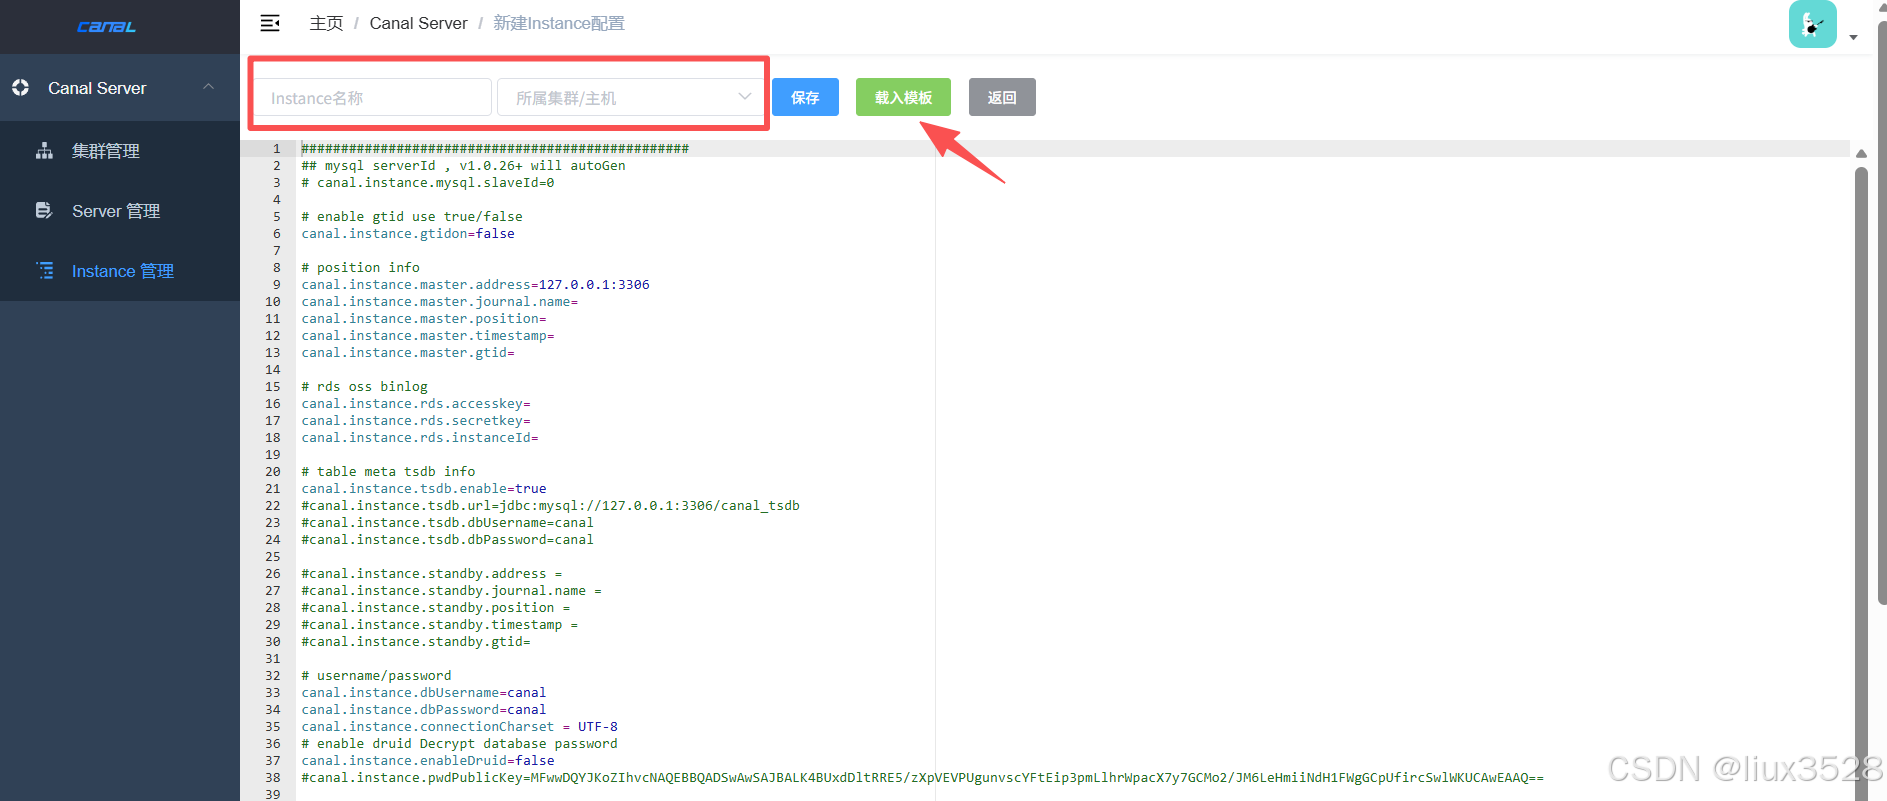
修改完配置保存即可
sh
#我这里配置了两个实例,一个事件、一个任务
01 事件实例 event_es_index/instance.properties
#需要修改的点
#数据库连接信息
canal.instance.master.address=172.16.130.121:3306
canal.instance.dbUsername = canal
canal.instance.dbPassword = kV2cf!KqqjX82NHE
#################################################
## 表过滤规则
#################################################
# 业务表
#canal.instance.filter.regex=.*\\..*
canal.instance.filter.regex = cqshzl.cscp_hx_dic_item,cqshzl.cscp_hx_dic,cqshzl.event_basic_info,cqshzl.t_data_burial_point,cqshzl.event_mhww_info,cqshzl.event_other_property,cqshzl.event_basic_info_extend,cqshzl.event_report_record,cqshzl.event_tag_link,cqshzl.t_ryjcxxb
# 黑名单过滤
canal.instance.filter.black.regex = mysql\\.slave_.*
# 默认topic 所有数据默认发送到event_es_index主题
canal.mq.topic = event_es_index

02 任务实例 task_es_index/instance.properties
#只需要修改表过滤规则和topic主题就行了
#################################################
## 表过滤规则 - 可以根据需要调整
#################################################
# 任务相关表(示例,根据实际调整)
canal.instance.filter.regex = cqshzl.task_period_statistics,cqshzl.personnel_manage_follow
# 黑名单过滤
canal.instance.filter.black.regex = mysql\\.slave_.*
# mq config
canal.mq.topic=task_es_index
3.部署 canal adapter
3.1 下载安装
sh
# 1.下载
https://github.com/alibaba/canal/releases/download/canal-1.1.8/canal.adapter-1.1.8.tar.gz
# 2.解压安装
[worker@canal-12 ~]$ cd /data/software/canal
[worker@canal-12 canal]$ mkdir adapter
[worker@canal-12 canal]$ tar xf canal.adapter-1.1.8.tar.gz -C adapter
3.2 修改配置文件application.yml
配置文件会涉及到elasticsearch地址填写,未部署请参考Elasticsearch 8.13.2 集群部署详细指南(手把手教程)
sh
#每台都需要修改 canal.instance.cluster.id: canal_adapter_cluster_12参数需要修改,其他都一样
[worker@canal-12 canal]$ cd adapter/conf
[worker@canal-12 ~]$ cd /data/software/canal/
[worker@canal-12 conf]$ cat application.yml
server:
  port: 8081
spring:
  jackson:
    date-format: yyyy-MM-dd HH:mm:ss
    time-zone: GMT+8
    default-property-inclusion: non_null

canal.conf:
  # 消费模式:从Kafka消费消息(其他选项:tcp, rocketMQ, rabbitMQ)
  mode: kafka
  # 使用扁平化的消息格式
  flatMessage: true
   # 集群配置:通过Zookeeper实现负载均衡
  zookeeperHosts: 172.16.130.12:2181,172.16.130.130:2181,172.16.130.131:2181
  syncBatchSize: 1000
  retries: -1
  timeout:
  accessKey:
  secretKey:
  # 消费配置
  consumerProperties:
    # canal tcp consumer
    canal.tcp.server.host:
    canal.tcp.zookeeper.hosts:
    canal.tcp.batch.size: 500
    canal.tcp.username:
    canal.tcp.password:
    # kafka consumer
    kafka.bootstrap.servers: 172.16.130.3:9092,172.16.130.13:9092,172.16.130.15:9092
    # 安全协议:明文传输
    kafka.security.protocol: PLAINTEXT
    # 禁用自动提交offset
    kafka.enable.auto.commit: false
    # 自动提交间隔(但上面禁用)
    kafka.auto.commit.interval.ms: 100
    # 没有offset时从最新位置开始
    kafka.auto.offset.reset: latest
     # 最小拉取字节数,设置为1表示有数据立即拉取
    kafka.fetch.min.bytes: 1
    # 最大拉取等待时间,设置为10ms,有数据立即返回
    kafka.fetch.max.wait.ms: 10
    # 每次拉取最大记录数,减少批处理
    kafka.max.poll.records: 10
    # 心跳间隔,快速检测消费者健康
    kafka.heartbeat.interval.ms: 1000
    # 会话超时,快速重新平衡
    kafka.session.timeout.ms: 10000
    # 请求超时
    kafka.request.timeout.ms: 30000
    # 连接参数
    kafka.connections.max.idle.ms: 300000
    kafka.receive.buffer.bytes: 65536
    kafka.send.buffer.bytes: 131072
    # 只读取已提交的消息
    kafka.isolation.level: read_committed
    # 集群ID唯一,另外两台 canal_adapter_cluster_130、canal_adapter_cluster_131
    canal.instance.cluster.id: canal_adapter_cluster_12
     # 重试配置
    canal.instance.retry.count: 3
    # 重试间隔(毫秒)
    canal.instance.retry.interval: 1000

    #配置源数据源
  srcDataSources:
    defaultDS:   # 默认数据源(用于全量同步时读取MySQL数据)
      url: jdbc:mysql://172.16.130.121:3306/cqshzl?useUnicode=true&characterEncoding=UTF-8&autoReconnect=true&failOverReadOnly=false&maxReconnects=10&useSSL=false&connectTimeout=300000&socketTimeout=300000&connectionTimeout=300000
      driverClassName: com.mysql.cj.jdbc.Driver
      username: canal
      password: kV2cf!KqqjX82NHE
      # ========== 连接池优化:减少连接等待 ==========
      initialSize: 5  # 初始连接数
      minIdle: 5       # 最小空闲连接
      maxActive: 20    # 最大活跃连接
      maxWait: 1000   # 获取连接最大等待时间(1秒)
      timeBetweenEvictionRunsMillis: 60000   # 驱逐检查间隔
      minEvictableIdleTimeMillis: 300000      # 连接最小空闲时间(5分钟)
      validationQuery: SELECT 1               # 验证查询SQL
      testWhileIdle: true
      testOnBorrow: true
      testOnReturn: false
      removeAbandoned: true
      removeAbandonedTimeout: 18000
      logAbandoned: true
      keepAlive: true
      phyTimeoutMillis: 600000
      phyMaxUseCount: 0
  # Adapter实例配置,同步到es
  canalAdapters:
  # 对应Canal实例名称/Kafka Topic名称
  - instance: event_es_index
    groups:
       #为实例指定消费组
    - groupId: canal_event_group  #实例级别的消费者组,adapter集群依靠这个消费组给每个adapter分配分区
      outerAdapters:
      - name: es8
        key: canal-es-event  # 适配器标识
        hosts: http://172.16.130.27:19200,http://172.16.130.28:19200,http://172.16.130.41:19200
        properties:
          mode: rest # or rest
          security.auth: elastic:xxx #  only used for rest mode
          cluster.name: jczz-es-cluster

  - instance: task_es_index  # canal instance Name or mq topic name
    groups:
    - groupId: canal_task_group # 实例级别的消费者组
      outerAdapters:
      - name: es8
        key: canal-es-task
        hosts: http://172.16.130.27:19200,http://172.16.130.28:19200,http://172.16.130.41:19200
        properties:
          mode: rest # or rest
          security.auth: elastic:xxx #  only used for rest mode
          cluster.name: jczz-es-cluster
3.3 添加同步表配置文件
sh
#我们在这里用的是es8,就在es8/目录下添加
[worker@canal-12 conf]$ cat es8/ryjcxxb_index.yml
dataSourceKey: defaultDS
destination: event_es_index      # 与application.yml中实例名一致
outerAdapterKey: canal-es-event  #与application.yml中第一个实例的key一致
groupId: canal_event_group       #与application.yml中groupId一致
esMapping:
  _index: ryjcxxb_index
  _id: _id
  upsert: true
  #  pk: id
  sql: "select t.id as _id,t.id AS id,t.del_flag AS del_flag,t.xm AS xm,t.gmsfzh AS gmsfzh,t.csrq AS csrq,if((((t.yxzdgx = '01') and ((t.rhyzbsdm is null) or (t.rhyzbsdm = '') or (t.rhyzbsdm <> '02'))) or ((t.yxzdgx = '02') and ((t.zxlbdm is null) or (t.zxlbdm = '') or (t.zxlbdm not in ('2','7','9'))))),1,0) AS is_syrk from t_ryjcxxb t"
  # sql: "select '1' as _id from t_ryjcxxb t limit 1"
  # etlCondition: "limit 100"
  commitBatch: 100

[worker@canal-12 conf]$ cat es8/personnel_manage_follow_index.yml
dataSourceKey: defaultDS
destination: task_es_index  #任务的实例
outerAdapterKey: canal-es-task
groupId: canal_task_group
esMapping:
  _index: personnel_manage_follow_index
  _id: _id
  upsert: true
  #  pk: id
  sql: "SELECT t.id as _id,t.id as id,t.created_date as created_date,t.creator_id as creator_id,t.del_flag as del_flag,t.updated_date as updated_date,t.updater_id as updater_id,t.rylxdm as rylxdm,t.level as level,t.zdry_id as zdry_id,t.ryid as ryid,t.wgbm as wgbm,LEFT(t.wgbm,6) as wgbm_district,LEFT(t.wgbm,9) as wgbm_town,t.follow_start_time as follow_start_time,t.follow_end_time as follow_end_time,t.is_follow as is_follow,t.add_time as add_time FROM personnel_manage_follow t"
  # objFields:
  #   data_burial_points: object;
  #   prop_codes: array:;
  #   third_event_nums: array:;
  #   system_sources: array:;
  #   tag_ids: array:;
  etlCondition: "where id <{}"
  commitBatch: 1000
3.4 es中创建索引
sh
# 创建索引
curl  -u elastic:xxx -X PUT "http://172.16.130.27:19200/ryjcxxb_index" -H 'Content-Type: application/json' -d'
{
  "settings": {
    "number_of_shards": 5,
    "number_of_replicas": 1,
    "index.routing.allocation.total_shards_per_node": 2
  },
  "mappings": {
    "properties": {
      "csrq": {
        "type": "date",
        "format": "yyyy-MM-dd HH:mm:ss||yyyy-MM-dd||epoch_millis||strict_date_time||date_time"
      },
      "del_flag": { "type": "keyword" },
      "gmsfzh": { "type": "keyword" },
      "id": { "type": "keyword" },
      "is_syrk": { "type": "keyword" },
      "xm": { "type": "keyword" }
    }
  }
}
'
curl  -u elastic:xxx -X PUT "http://172.16.130.27:19200/personnel_manage_follow_index" -H 'Content-Type: application/json' -d'
{
  "settings": {
    "number_of_shards": 5,
    "number_of_replicas": 1,
    "index.routing.allocation.total_shards_per_node": 2
  },
  "mappings" : {
      "properties" : {
        "add_time" : {
          "type" : "date",
          "format" : "yyyy-MM-dd HH:mm:ss||yyyy-MM-dd||epoch_millis||strict_date_time||date_time"
        },
        "created_date" : {
          "type" : "date",
          "format" : "yyyy-MM-dd HH:mm:ss||yyyy-MM-dd||epoch_millis||strict_date_time||date_time"
        },
        "creator_id" : {
          "type" : "long"
        },
        "del_flag" : {
          "type" : "integer"
        },
        "follow_end_time" : {
          "type" : "date",
          "format" : "yyyy-MM-dd HH:mm:ss||yyyy-MM-dd||epoch_millis||strict_date_time||date_time"
        },
        "follow_start_time" : {
          "type" : "date",
          "format" : "yyyy-MM-dd HH:mm:ss||yyyy-MM-dd||epoch_millis||strict_date_time||date_time"
        },
        "id" : {
          "type" : "long"
        },
        "is_follow" : {
          "type" : "keyword",
          "ignore_above" : 1
        },
        "level" : {
          "type" : "keyword",
          "ignore_above" : 10
        },
        "ryid" : {
          "type" : "long"
        },
        "rylxdm" : {
          "type" : "keyword",
          "ignore_above" : 30
        },
        "updated_date" : {
          "type" : "date",
          "format" : "yyyy-MM-dd HH:mm:ss||yyyy-MM-dd||epoch_millis||strict_date_time||date_time"
        },
        "updater_id" : {
          "type" : "long"
        },
        "wgbm" : {
          "type" : "keyword",
          "ignore_above" : 30
        },
        "wgbm_district" : {
          "type" : "keyword",
          "ignore_above" : 6
        },
        "wgbm_town" : {
          "type" : "keyword",
          "ignore_above" : 9
        },
        "zdry_id" : {
          "type" : "long"
        }
      }
    }
}
'

# 查看索引
curl  -u elastic:xxx -X GET "http://172.16.130.172.16.130.27:19200/_cat/indices?v&s=index"
#查看单个索引的配置
curl  -u elastic:xxx -X GET "http://172.16.130.172.16.130.27:19200/personnel_manage_follow_index/_settings?pretty"
curl  -u elastic:xxx -X GET "http://172.16.130.27:19200/personnel_manage_follow_index/_mapping?pretty"
3.5 启动adapter服务
sh
[worker@canal-12 adapter]$ ./bin/startup.sh
[worker@canal-12 adapter]$ tail -f logs/adapter/adapter.log
3.6 手动同步全量数据到es
sh
#第一次需要手动同步全量数据到es
curl -X POST http://172.16.130.12:8081/etl/es8/personnel_manage_follow_index.yml
curl -X POST http://172.16.130.12:8081/etl/es8/ryjcxxb_index.yml
curl -X POST http://172.16.130.130:8081/etl/es8/video_point_manage_index.yml

#查看es中是否有数据
watch -n 1 curl -XGET 'http://172.16.130.234:24100/ryjcxxb_index/_count?pretty'
四、总结
本文档详细介绍了从MySQL到Elasticsearch的完整数据同步流程。通过Canal组件实现MySQL数据库变更的实时捕获和同步,构建了基于Zookeeper的高可用集群架构。整个流程包括:
- 数据采集层:Canal Deployer集群伪装成MySQL从库,实时解析binlog数据变更
- 消息缓冲层:Kafka作为消息中间件,解耦生产者和消费者,提供数据缓冲和顺序保证
- 数据转换层:Canal Adapter集群消费Kafka消息,进行数据格式转换和映射
- 数据存储层:Elasticsearch接收转换后的数据,构建实时搜索索引
- 管理监控层:Canal Admin提供可视化集群管理界面,Zookeeper提供分布式协调服务
关键优势:
- 实时性:基于MySQL binlog的实时数据变更捕获
- 高可用:Zookeeper协调下的多节点集群部署
- 可扩展:各组件均可水平扩展,应对不同数据量级
- 灵活性:支持多种目标存储(ES、MySQL、HBase等)
- 易管理:提供Web管理界面,简化集群运维
适用场景:
- 实时搜索索引构建
- 数据仓库ETL流程
- 业务系统数据同步
- 实时数据分析平台
通过本文的配置指导,读者可以快速搭建完整的数据同步管道,实现MySQL到Elasticsearch的实时数据同步。