本期内容为自己总结归档,共分十一章,本人遇到过的面试问题会重点标记。
(若有任何疑问,可在评论区告诉我,看到就回复)
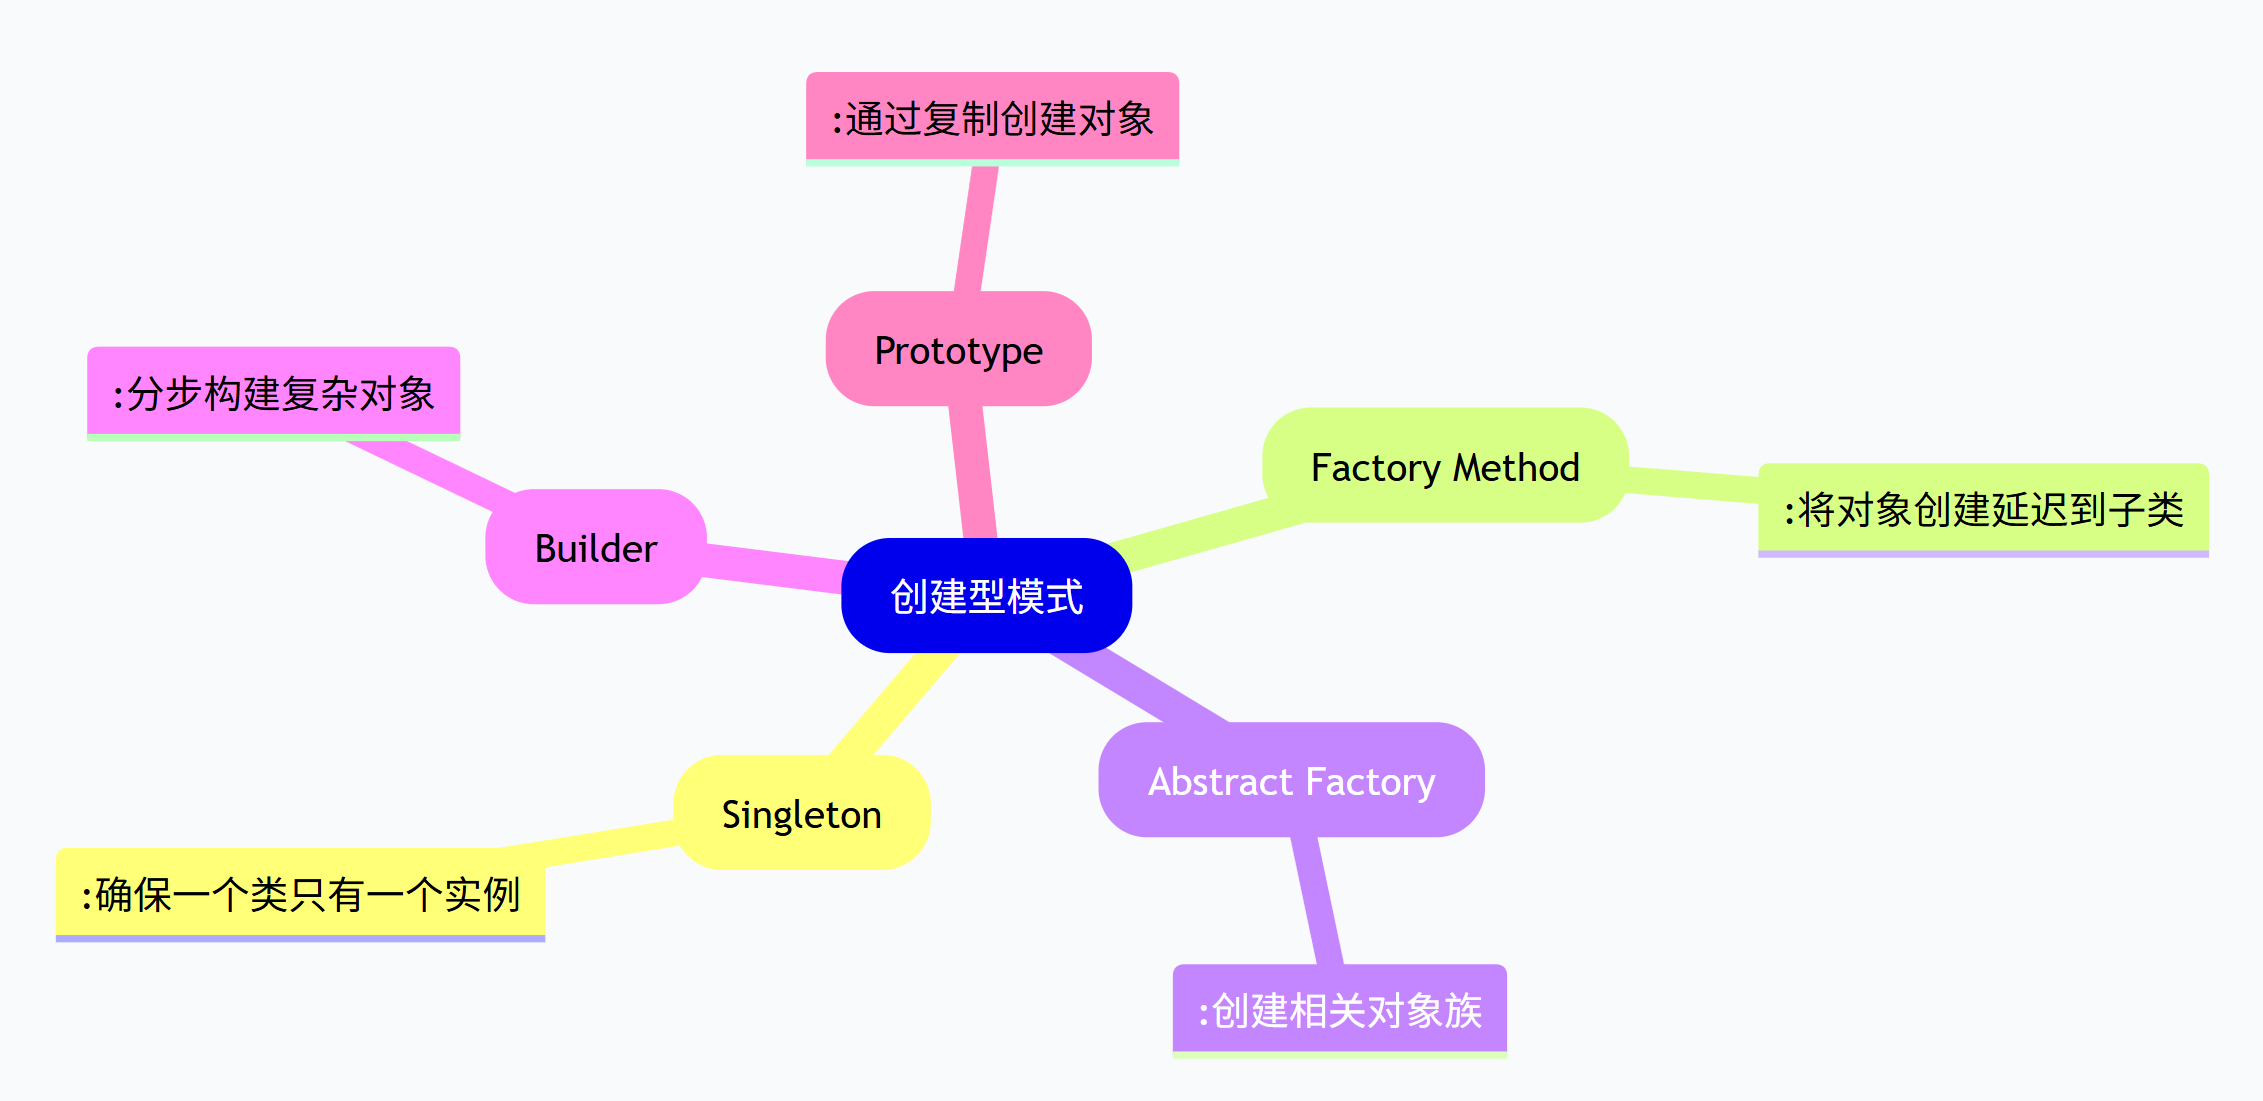
一、创建型模式全景
1.1 什么是创建型模式?
创建型模式关注对象的创建机制,旨在以适当的方式创建对象,从而降低系统耦合度,提高代码的灵活性和可复用性。
创建型模式的核心思想:将对象的创建与使用分离。客户端不需要知道对象的具体创建细节,只需要知道如何使用对象。
1.2 创建型模式的分类
GoF(四人帮)在《设计模式:可复用面向对象软件的基础》中定义了5种创建型模式:
1.3 创建型模式的共同特点
所有创建型模式都遵循以下几个基本原则:
-
封装创建逻辑:将复杂的创建过程隐藏起来
-
支持变化:能够灵活应对创建需求的变化
-
降低耦合:减少客户端与具体类的依赖
-
提高复用:创建逻辑可以在不同场景中复用
二、单例模式回顾
2.1 核心思想
确保一个类只有一个实例,并提供全局访问点。
2.2 关键实现
java
// 双重检查锁定实现
public class Singleton {
    private static volatile Singleton instance;

    private Singleton() {}

    public static Singleton getInstance() {
        if (instance == null) {
            synchronized (Singleton.class) {
                if (instance == null) {
                    instance = new Singleton();
                }
            }
        }
        return instance;
    }
}
2.3 适用场景
- 配置管理器、数据库连接池、日志记录器、线程池
第三部分:工厂模式家族回顾
3.1 简单工厂模式
核心思想:通过一个工厂类,根据传入的参数决定创建哪种产品。
java
public class ProductFactory {
    public static Product createProduct(String type) {
        switch (type) {
            case "A": return new ConcreteProductA();
            case "B": return new ConcreteProductB();
            default: throw new IllegalArgumentException("未知产品类型");
        }
    }
}
优点 :简单直接
缺点:违反开闭原则,新增产品需要修改工厂类
3.2 工厂方法模式
核心思想:定义一个创建对象的接口,让子类决定实例化哪个类。
java
public abstract class Creator {
    public abstract Product factoryMethod();

    public void someOperation() {
        Product product = factoryMethod();
        product.doSomething();
    }
}

public class ConcreteCreatorA extends Creator {
    @Override
    public Product factoryMethod() {
        return new ConcreteProductA();
    }
}
优点 :符合开闭原则,支持扩展
缺点:每个产品都需要对应的工厂类
3.3 抽象工厂模式
核心思想:提供一个创建一系列相关或相互依赖对象的接口,而无需指定它们具体的类。
java
public interface GUIFactory {
    Button createButton();
    Checkbox createCheckbox();
}

public class WindowsFactory implements GUIFactory {
    public Button createButton() {
        return new WindowsButton();
    }

    public Checkbox createCheckbox() {
        return new WindowsCheckbox();
    }
}
优点 :确保产品族兼容性
缺点:添加新产品种类困难
四、建造者模式详解
4.1 建造者模式的定义
建造者模式将一个复杂对象的构建与其表示分离,使得同样的构建过程可以创建不同的表示。
4.2 建造者模式的适用场景
-
创建复杂对象:对象有很多组成部分,创建过程复杂
-
构造过程需要不同的表示:同一个构建过程需要创建不同的结果
-
避免构造函数参数过多:避免使用庞大的构造函数参数列表
4.3 建造者模式的结构
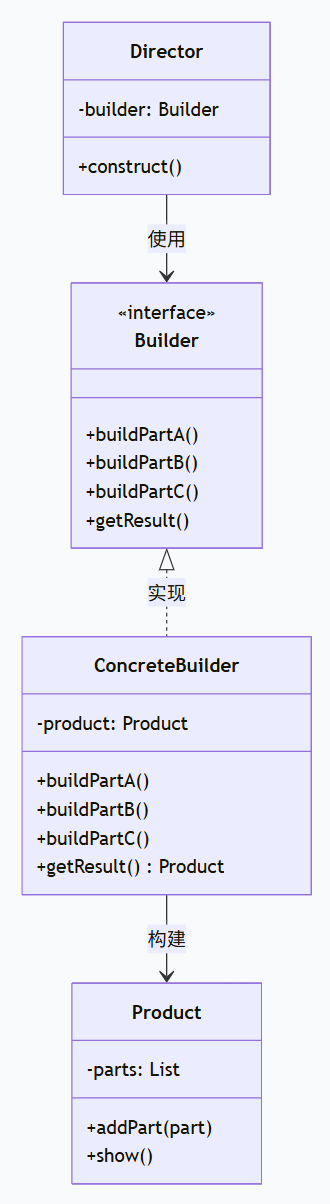
4.4 建造者模式示例:计算机配置
java
// 产品:计算机
public class Computer {
    private String CPU;
    private String RAM;
    private String storage;
    private String GPU;

    public void setCPU(String CPU) { this.CPU = CPU; }
    public void setRAM(String RAM) { this.RAM = RAM; }
    public void setStorage(String storage) { this.storage = storage; }
    public void setGPU(String GPU) { this.GPU = GPU; }

    @Override
    public String toString() {
        return String.format("计算机配置:CPU=%s, RAM=%s, 存储=%s, GPU=%s",
            CPU, RAM, storage, GPU);
    }
}

// 抽象建造者
public interface ComputerBuilder {
    void buildCPU();
    void buildRAM();
    void buildStorage();
    void buildGPU();
    Computer getResult();
}

// 具体建造者:游戏电脑
public class GamingComputerBuilder implements ComputerBuilder {
    private Computer computer;

    public GamingComputerBuilder() {
        this.computer = new Computer();
    }

    @Override
    public void buildCPU() {
        computer.setCPU("Intel i9-13900K");
    }

    @Override
    public void buildRAM() {
        computer.setRAM("32GB DDR5");
    }

    @Override
    public void buildStorage() {
        computer.setStorage("2TB NVMe SSD");
    }

    @Override
    public void buildGPU() {
        computer.setGPU("NVIDIA RTX 4090");
    }

    @Override
    public Computer getResult() {
        return computer;
    }
}

// 具体建造者:办公电脑
public class OfficeComputerBuilder implements ComputerBuilder {
    private Computer computer;

    public OfficeComputerBuilder() {
        this.computer = new Computer();
    }

    @Override
    public void buildCPU() {
        computer.setCPU("Intel i5-13400");
    }

    @Override
    public void buildRAM() {
        computer.setRAM("16GB DDR4");
    }

    @Override
    public void buildStorage() {
        computer.setStorage("512GB SSD");
    }

    @Override
    public void buildGPU() {
        computer.setGPU("Intel UHD Graphics");
    }

    @Override
    public Computer getResult() {
        return computer;
    }
}

// 指挥者
public class ComputerDirector {
    private ComputerBuilder builder;

    public ComputerDirector(ComputerBuilder builder) {
        this.builder = builder;
    }

    public void construct() {
        builder.buildCPU();
        builder.buildRAM();
        builder.buildStorage();
        builder.buildGPU();
    }

    public Computer getComputer() {
        return builder.getResult();
    }
}

// 客户端使用
public class BuilderPatternDemo {
    public static void main(String[] args) {
        System.out.println("=== 建造者模式示例 ===");

        // 创建游戏电脑
        ComputerBuilder gamingBuilder = new GamingComputerBuilder();
        ComputerDirector gamingDirector = new ComputerDirector(gamingBuilder);
        gamingDirector.construct();
        Computer gamingComputer = gamingDirector.getComputer();
        System.out.println("游戏电脑: " + gamingComputer);

        // 创建办公电脑
        ComputerBuilder officeBuilder = new OfficeComputerBuilder();
        ComputerDirector officeDirector = new ComputerDirector(officeBuilder);
        officeDirector.construct();
        Computer officeComputer = officeDirector.getComputer();
        System.out.println("办公电脑: " + officeComputer);

        // 灵活构建:只构建部分组件
        System.out.println("\n=== 自定义构建 ===");
        ComputerBuilder customBuilder = new GamingComputerBuilder();
        // 只构建CPU和RAM
        customBuilder.buildCPU();
        customBuilder.buildRAM();
        Computer customComputer = customBuilder.getResult();
        System.out.println("自定义电脑: " + customComputer);
    }
}
4.5 建造者模式的变体:链式调用
现代Java开发中常使用链式调用的建造者模式:

java

// 链式建造者模式
public class Computer {
    private String CPU;
    private String RAM;
    private String storage;
    private String GPU;

    // 私有构造器
    private Computer(Builder builder) {
        this.CPU = builder.CPU;
        this.RAM = builder.RAM;
        this.storage = builder.storage;
        this.GPU = builder.GPU;
    }

    public static class Builder {
        private String CPU;
        private String RAM;
        private String storage;
        private String GPU;

        public Builder setCPU(String CPU) {
            this.CPU = CPU;
            return this;
        }

        public Builder setRAM(String RAM) {
            this.RAM = RAM;
            return this;
        }

        public Builder setStorage(String storage) {
            this.storage = storage;
            return this;
        }

        public Builder setGPU(String GPU) {
            this.GPU = GPU;
            return this;
        }

        public Computer build() {
            // 可以在这里添加校验逻辑
            if (CPU == null) {
                throw new IllegalStateException("必须设置CPU");
            }
            return new Computer(this);
        }
    }

    @Override
    public String toString() {
        return String.format("计算机配置:CPU=%s, RAM=%s, 存储=%s, GPU=%s",
            CPU, RAM, storage, GPU);
    }
}

// 使用链式建造者
public class ChainBuilderDemo {
    public static void main(String[] args) {
        Computer computer = new Computer.Builder()
            .setCPU("Intel i7-13700K")
            .setRAM("32GB DDR5")
            .setStorage("1TB NVMe SSD")
            .setGPU("NVIDIA RTX 4080")
            .build();

        System.out.println("链式建造者创建的电脑: " + computer);
    }
}
4.5 建造者模式的变体:链式调用
java
// 链式建造者模式
public class Computer {
    private String CPU;
    private String RAM;
    private String storage;
    private String GPU;

    // 私有构造器
    private Computer(Builder builder) {
        this.CPU = builder.CPU;
        this.RAM = builder.RAM;
        this.storage = builder.storage;
        this.GPU = builder.GPU;
    }

    public static class Builder {
        private String CPU;
        private String RAM;
        private String storage;
        private String GPU;

        public Builder setCPU(String CPU) {
            this.CPU = CPU;
            return this;
        }

        public Builder setRAM(String RAM) {
            this.RAM = RAM;
            return this;
        }

        public Builder setStorage(String storage) {
            this.storage = storage;
            return this;
        }

        public Builder setGPU(String GPU) {
            this.GPU = GPU;
            return this;
        }

        public Computer build() {
            // 可以在这里添加校验逻辑
            if (CPU == null) {
                throw new IllegalStateException("必须设置CPU");
            }
            return new Computer(this);
        }
    }

    @Override
    public String toString() {
        return String.format("计算机配置:CPU=%s, RAM=%s, 存储=%s, GPU=%s",
            CPU, RAM, storage, GPU);
    }
}

// 使用链式建造者
public class ChainBuilderDemo {
    public static void main(String[] args) {
        Computer computer = new Computer.Builder()
            .setCPU("Intel i7-13700K")
            .setRAM("32GB DDR5")
            .setStorage("1TB NVMe SSD")
            .setGPU("NVIDIA RTX 4080")
            .build();

        System.out.println("链式建造者创建的电脑: " + computer);
    }
}
4.6 建造者模式的优缺点
优点:
-
封装性好:客户端不需要知道产品内部细节
-
构建过程可控:可以精细控制构建过程
-
扩展性好:增加新的具体建造者很方便
-
避免构造函数参数过多:解决"伸缩构造函数"问题
缺点:
-
增加系统复杂度:需要多个类协同工作
-
产品必须有共同点:产品之间差异不能太大
-
需要额外的建造者对象:增加内存开销
五、原型模式详解
5.1 原型模式的定义
原型模式用原型实例指定创建对象的种类,并且通过拷贝这些原型创建新的对象。
5.2 原型模式的核心思想
通过复制(克隆)现有对象来创建新对象,而不是通过new关键字。
5.3 原型模式的适用场景
-
创建成本高的对象:对象创建过程复杂或耗时
-
需要大量相似对象:系统中需要大量相似对象
-
需要动态配置的对象:对象状态需要频繁变化
-
保护性拷贝:需要隔离客户端和实际对象
5.4 原型模式的结构
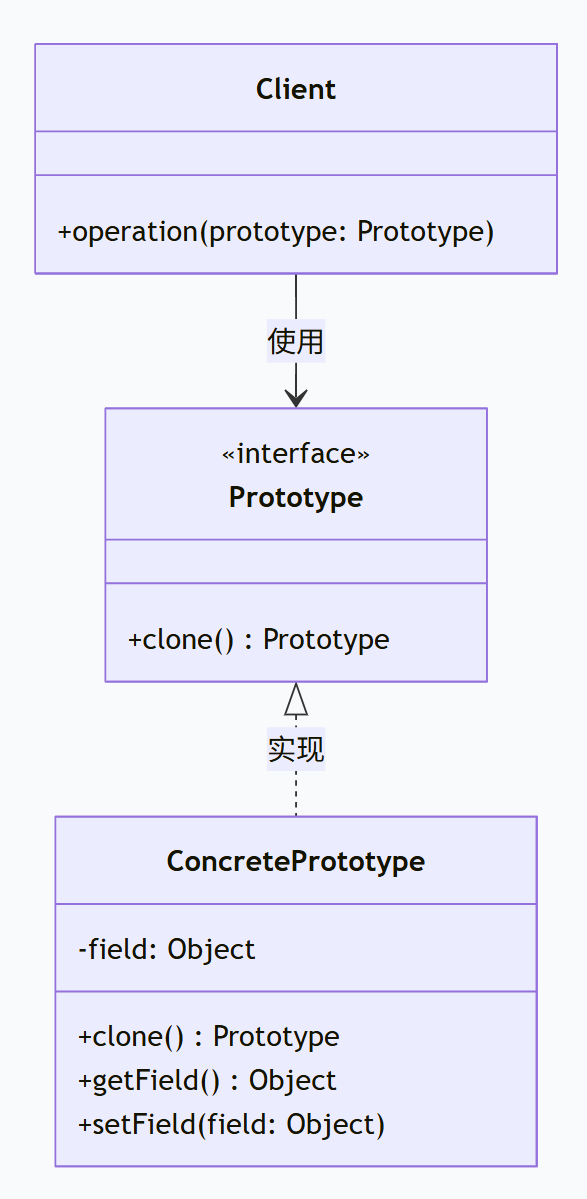
5.5 原型模式实现:图形编辑器
java
// 原型接口
public interface Shape extends Cloneable {
    void draw();
    Shape clone();
}

// 具体原型:圆形
public class Circle implements Shape {
    private String color;
    private int radius;
    private int x;
    private int y;

    public Circle(String color, int radius) {
        this.color = color;
        this.radius = radius;
        System.out.println("创建圆形对象,成本较高...");
        // 模拟创建成本高的操作
        try {
            Thread.sleep(1000);
        } catch (InterruptedException e) {
            e.printStackTrace();
        }
    }

    public void setPosition(int x, int y) {
        this.x = x;
        this.y = y;
    }

    @Override
    public void draw() {
        System.out.printf("绘制圆形: 颜色=%s, 半径=%d, 位置=(%d,%d)%n",
            color, radius, x, y);
    }

    @Override
    public Shape clone() {
        try {
            Circle clone = (Circle) super.clone();
            // 深拷贝处理(如果必要)
            return clone;
        } catch (CloneNotSupportedException e) {
            throw new RuntimeException("克隆失败", e);
        }
    }

    // 原型注册表模式
    public static class Registry {
        private static Map<String, Circle> prototypes = new HashMap<>();

        static {
            // 预创建一些原型
            prototypes.put("red", new Circle("红色", 10));
            prototypes.put("blue", new Circle("蓝色", 15));
            prototypes.put("green", new Circle("绿色", 20));
        }

        public static Circle getPrototype(String color) {
            Circle prototype = prototypes.get(color);
            if (prototype == null) {
                throw new IllegalArgumentException("未知的原型: " + color);
            }
            return prototype.clone();
        }
    }
}

// 具体原型:矩形
public class Rectangle implements Shape {
    private String color;
    private int width;
    private int height;
    private int x;
    private int y;

    public Rectangle(String color, int width, int height) {
        this.color = color;
        this.width = width;
        this.height = height;
    }

    @Override
    public void draw() {
        System.out.printf("绘制矩形: 颜色=%s, 宽=%d, 高=%d, 位置=(%d,%d)%n",
            color, width, height, x, y);
    }

    @Override
    public Shape clone() {
        try {
            return (Rectangle) super.clone();
        } catch (CloneNotSupportedException e) {
            throw new RuntimeException("克隆失败", e);
        }
    }

    public void setPosition(int x, int y) {
        this.x = x;
        this.y = y;
    }
}

// 图形编辑器
public class GraphicEditor {
    private List<Shape> shapes = new ArrayList<>();

    public void addShape(Shape shape) {
        shapes.add(shape);
    }

    public void drawAll() {
        for (Shape shape : shapes) {
            shape.draw();
        }
    }

    // 使用原型模式批量创建相似图形
    public void createPattern(Shape prototype, int count, int spacing) {
        for (int i = 0; i < count; i++) {
            Shape cloned = prototype.clone();
            if (cloned instanceof Circle) {
                ((Circle) cloned).setPosition(i * spacing, 0);
            } else if (cloned instanceof Rectangle) {
                ((Rectangle) cloned).setPosition(i * spacing, 0);
            }
            addShape(cloned);
        }
    }
}

// 客户端使用
public class PrototypePatternDemo {
    public static void main(String[] args) {
        System.out.println("=== 原型模式示例 ===");

        GraphicEditor editor = new GraphicEditor();

        // 创建原型
        System.out.println("\n1. 直接创建原型对象:");
        Circle circlePrototype = new Circle("红色", 10);
        circlePrototype.setPosition(0, 0);

        // 通过克隆创建新对象(成本低)
        System.out.println("\n2. 通过克隆创建新对象:");
        Circle clonedCircle = (Circle) circlePrototype.clone();
        clonedCircle.setPosition(50, 0);

        editor.addShape(circlePrototype);
        editor.addShape(clonedCircle);

        // 使用原型注册表
        System.out.println("\n3. 使用原型注册表:");
        Circle redCircle = Circle.Registry.getPrototype("red");
        redCircle.setPosition(100, 0);
        editor.addShape(redCircle);

        // 批量创建模式
        System.out.println("\n4. 批量创建相似图形:");
        Rectangle rectPrototype = new Rectangle("蓝色", 20, 10);
        editor.createPattern(rectPrototype, 5, 30);

        // 绘制所有图形
        System.out.println("\n5. 绘制所有图形:");
        editor.drawAll();
    }
}
5.6 原型模式的优缺点
优点:
-
性能高:克隆比直接创建对象更高效
-
简化对象创建:隐藏创建细节,客户端代码简单
-
动态配置对象:可以在运行时动态改变对象状态
-
减少子类数量:避免为每种对象创建子类
缺点:
-
深拷贝实现复杂:对于包含循环引用的对象,深拷贝实现复杂
-
需要clone方法支持:每个类都需要正确实现clone方法
-
可能破坏封装:如果对象有私有状态,克隆可能破坏封装
六、创建型模式在Spring框架中的应用
6.1 Spring Bean的作用域与创建型模式
Spring框架通过Bean作用域实现了多种创建型模式:
java
@Configuration
public class AppConfig {

    // 单例模式(默认)
    @Bean
    @Scope("singleton")
    public UserService userService() {
        return new UserServiceImpl();
    }

    // 原型模式
    @Bean
    @Scope("prototype")
    public Task task() {
        return new Task();
    }

    // 工厂方法模式
    @Bean
    public DataSource dataSource() {
        return DataSourceBuilder.create()
            .url("jdbc:mysql://localhost:3306/test")
            .username("root")
            .password("password")
            .build();
    }
}
7.2 Spring中的建造者模式
Spring框架大量使用建造者模式:
java
// Spring Security配置建造者
@Configuration
@EnableWebSecurity
public class SecurityConfig {

    @Bean
    public SecurityFilterChain securityFilterChain(HttpSecurity http) throws Exception {
        http
            .authorizeHttpRequests(authorize -> authorize
                .requestMatchers("/public/**").permitAll()
                .anyRequest().authenticated()
            )
            .formLogin(form -> form
                .loginPage("/login")
                .permitAll()
            )
            .logout(logout -> logout
                .permitAll()
            );

        return http.build();
    }
}

// RestTemplate建造者
RestTemplate restTemplate = new RestTemplateBuilder()
    .setConnectTimeout(Duration.ofSeconds(5))
    .setReadTimeout(Duration.ofSeconds(10))
    .additionalInterceptors(new LoggingInterceptor())
    .build();
7.3 Spring中的原型模式
Spring的原型作用域Bean就是原型模式的实现:
java
@Component
@Scope("prototype")
public class ShoppingCart {
    private List<Item> items = new ArrayList<>();

    public void addItem(Item item) {
        items.add(item);
    }
}

@Service
public class OrderService {

    @Autowired
    private ApplicationContext context;

    public ShoppingCart createCart() {
        // 每次获取都是新的实例
        return context.getBean(ShoppingCart.class);
    }
}
七、总结
7.1 模式对比矩阵
| 模式 | 主要目的 | 适用场景 | 复杂度 | 灵活性 |
|---|---|---|---|---|
| 单例模式 | 控制实例数量 | 全局唯一对象 | 低 | 低 |
| 工厂方法 | 延迟对象创建 | 创建单个产品 | 中 | 高 |
| 抽象工厂 | 创建产品族 | 相关产品集合 | 高 | 中 |
| 建造者模式 | 分步构建复杂对象 | 复杂对象创建 | 中 | 高 |
| 原型模式 | 通过克隆创建对象 | 相似对象创建 | 中 | 中 |
7.2 设计原则体现
所有创建型模式都体现了以下设计原则:
-
单一职责原则:创建逻辑与业务逻辑分离
-
开闭原则:支持扩展,对修改封闭
-
依赖倒置原则:依赖抽象而非具体实现
-
迪米特法则:减少对象间的耦合