目录
前置条件
Hadoop 集群高可用搭建: Yarn资源调度器-CSDN博客
HBase集群搭建: HBase搭建-CSDN博客
需求分析
一共模拟10个用户一年的通话记录,每个用户产生1000条通话记录。
数据关键字段:用户手机号,通话时长,对方手机号,日期,通话类型(主叫,被叫)
需求:
1.根据上述关键字段,设计数据库,并在HBase上生成相应数据
2.实现某用户某月份的通话记录的查询
3.实现按照用户电话号码和主被叫类型查询通话记录
字段设计
通话类型的设计: 用0和1表示。0表示主叫,1表示被叫。
rowkey的设计 :用户手机号码+反向时间戳+i+j。
好处:按手机号水平分区,提升按手机号查询的效率;反向时间戳:Long.MAX_VALUE-simpleDateFormat.parse(date).getTime())。用最大值减去当前时间戳,时间越晚,计算结果越小;实现了同手机号下,最新的数据排在最前面
环境准备
1.创建Maven项目CallLogDemo
2.添加依赖
    <dependency>
      <groupId>org.apache.hbase</groupId>
      <artifactId>hbase-server</artifactId>
      <version>2.0.5</version>
    </dependency>
    <dependency>
      <groupId>org.apache.hbase</groupId>
      <artifactId>hbase-client</artifactId>
      <version>2.0.5</version>
    </dependency>
    <dependency>
      <groupId>junit</groupId>
      <artifactId>junit</artifactId>
      <version>RELEASE</version>
      <scope>compile</scope>
</dependency>3.启动Hadoop集群:startha.sh(之前编写的启动脚本)
实战代码
before和after****代码实现
@Before和@After是JUnit 4单元测试的核心注释。被@Before注释的方法会在每个 @Test 执行前执行,用于初始化轻量级资源;被@After注释的方法则会在每个 @Test 执行后执行,用于清理轻量级资源(必执行)。
注意:方法必须是 public void,无参数;无论 @Test 方法是否执行成功(甚至抛异常),@After 都会执行,保证资源必释放。
java
public class CallLogDemo {
    //命名空间的定义
    private String namespace = "wusen";
    //表名称
    private String tableName = "phone_log";
    //表名称对应的TableName对象
    private TableName tableNameObj;
    //表DDL对象
    private Admin admin;
    //表数据的DML对象
    private Table table;
    //连接对象
    private Connection connection;
    // JUnit 4单元测试注释,每个 @Test 执行前执行,初始化轻量级资源;
    @Before
    public void before(){
        Configuration configuration = HBaseConfiguration.create();
        configuration.set("hbase.zookeeper.quorum","node2,node3,node4");
        try{
           connection = ConnectionFactory.createConnection(configuration);
           admin = connection.getAdmin();
           tableNameObj = TableName.valueOf(namespace+":"+tableName);
           table = connection.getTable(tableNameObj);
        } catch (IOException e) {
            e.printStackTrace();
        }
    }
    // JUnit 4单元测试注释,每个 @Test 执行后执行,清理轻量级资源(必执行);
    @After
    public void after() throws IOException {
        if(table!=null){
            table.close();
        }
        if (admin!=null){
            admin.close();
        }
        if (connection!=null){
            connection.close();
        }
    }
}
创建表代码实现
java
//定义列族名
private String family="info";
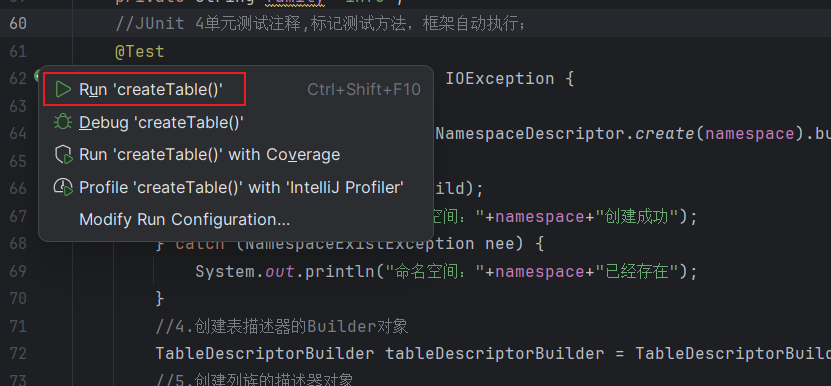
//JUnit 4单元测试注释,标记测试方法,框架自动执行;
@Test
public void createTable() throws IOException {
//1.定义命名空间描述器
NamespaceDescriptor build = NamespaceDescriptor.create(namespace).build();
try{
//2.创建命名空间
admin.createNamespace(build);
System.out.println("命名空间:"+namespace+"创建成功");
} catch (NamespaceExistException nee) {
//3.如果命名空间存在则抛出异常
System.out.println("命名空间:"+namespace+"已经存在");
}
//4.创建表描述器的Builder对象
TableDescriptorBuilder tableDescriptorBuilder = TableDescriptorBuilder.newBuilder(tableNameObj);
//5.创建列族的描述器对象
ColumnFamilyDescriptor familyDescriptor = ColumnFamilyDescriptorBuilder.newBuilder(Bytes.toBytes(family)).build();
//6.将列族描述器添加到表表描述器的Builder对象中
tableDescriptorBuilder.setColumnFamily(familyDescriptor);
//7.将表描述器的Builder对象转化为表描述器对象
TableDescriptor tableDescriptor = tableDescriptorBuilder.build();
//8.判断表是否存在
if (admin.tableExists(tableNameObj)){
//9.如果存在先禁用后删除
admin.disableTable(tableNameObj);
admin.deleteTable(tableNameObj);
}
//10.创建表
admin.createTable(tableDescriptor);
}运行并查看结果
点击下面按钮进行运行
结果
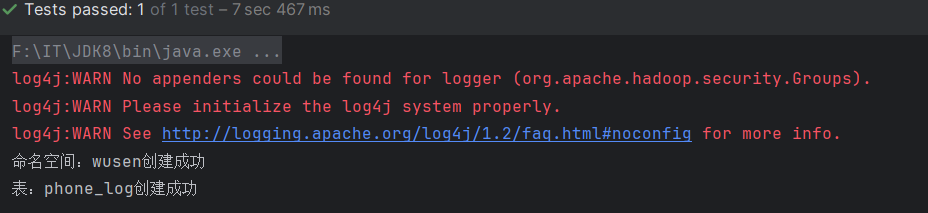
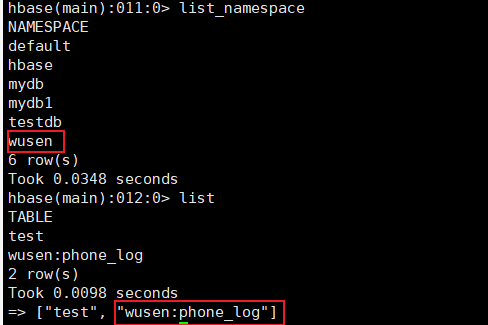
查看HBase数据库,也生成了对应的命名空间和表
添加数据代码实现
我们需要模拟用户通话记录,这里的代码用于生成10个用户的在某一年内的通话记录,每个用户产生1000条通话记录。
首先实现手机号随机生成的方法getPhoneNumber()
java
    private Random random = new Random();

    /**
     * 生成一个手机号码
     * @param prefix:手机号码的前三位
     * @return 生成的手机号码
     */
    private String getPhoneNumber(String prefix){
        //nextInt(int n) 方法的规则:生成大于等于 0、小于 n的整数(左闭右开);
        //"%08d",把整数转成 8 位字符串,不够 8 位左边补 0,够 8 位直接保留。其中%是占位符的起始标记,d表示类型限定:表示要格式化的参数是整数类型
        //%-08d则是左对齐
        return prefix+String.format("%08d",random.nextInt(99999999));
    }
其次实现随机生成日期时间的方法getDate()
这两个方法在接下来生成随机通话记录的时候会调用
java
    private SimpleDateFormat simpleDateFormat = new SimpleDateFormat("yyyy-MM-dd HH:mm:ss");
    //2050-01-01 0:0:0 - 2050-12-31 23:59:59
    private String getDate(int year){
        Calendar calendar = Calendar.getInstance();
        //设置时间,将 Calendar 对象的时间设置为指定年份的 1 月 1 日 00:00:00
        calendar.set(year,0,1);
        //随机月份
        calendar.add(Calendar.MONTH,random.nextInt(12));
        //随机日
        calendar.add(Calendar.DAY_OF_MONTH,random.nextInt(31));
        //小时随机数
        calendar.add(Calendar.HOUR_OF_DAY,random.nextInt(12));
        //获取时间对象
        Date time = calendar.getTime();
        //将时间转化为格式化的字符串并返回
        return simpleDateFormat.format(time);

    }
接下来实现生成用户数据并将其添加到HBase中的方法insert()
java
    /**
     * 生成10个用户的在某一年内的通话记录,每个用户产生1000条通话记录
     *dnum:对方手机号码 type:呼叫类型 0主叫 1表示被叫;length:通话时长;date:时间
     */
    @Test
    public void insert() throws IOException, ParseException {
        //定义一个List<Put>
        List<Put> putList = new ArrayList<Put>();
        //循环10次,模拟10个用户
        for (int i = 0;i < 10;i++){
            //清空putList,防止上次操作的影响
            putList.clear();
            //生成当前用户的手机号码
            String phoneNumber = getPhoneNumber("137");
            System.out.println(phoneNumber);
            //模拟每个用户的1000条数据
            for (int j = 0;j < 1000;j++){
                //cf:length=,cf:dnum=,cf:date=,cf:type= 0表示主叫 1表示被叫
                //生成每一行通话记录的数据
                String dnum  = getPhoneNumber("169");
                int length = random.nextInt(200)+1;
                int type = random.nextInt(2);
                String date = getDate(2050);
                //rowKey设计。现按手机号水平分区,提升按手机号查询的效率;
                //Long.MAX_VALUE-simpleDateFormat.parse(date).getTime()):反向时间戳,。用最大值减去当前时间戳,时间越晚,计算结果越小;实现了同手机号下,最新的数据排在最前面
                String rowKey = phoneNumber+"-"+(Long.MAX_VALUE-simpleDateFormat.parse(date).getTime())+i+j;
                //创建put对象
                Put put = new Put(Bytes.toBytes(rowKey));
                put.addColumn(Bytes.toBytes(family),Bytes.toBytes("dnum"),Bytes.toBytes(dnum));
                put.addColumn(Bytes.toBytes(family),Bytes.toBytes("length"),Bytes.toBytes(length));
                put.addColumn(Bytes.toBytes(family),Bytes.toBytes("type"),Bytes.toBytes(type));
                put.addColumn(Bytes.toBytes(family),Bytes.toBytes("date"),Bytes.toBytes(date));
                //将put对象添加到putList
                putList.add(put);
            }
            //将当前用户的1000条通话记录提交
            table.put(putList);
        }
    }
运行并查看结果
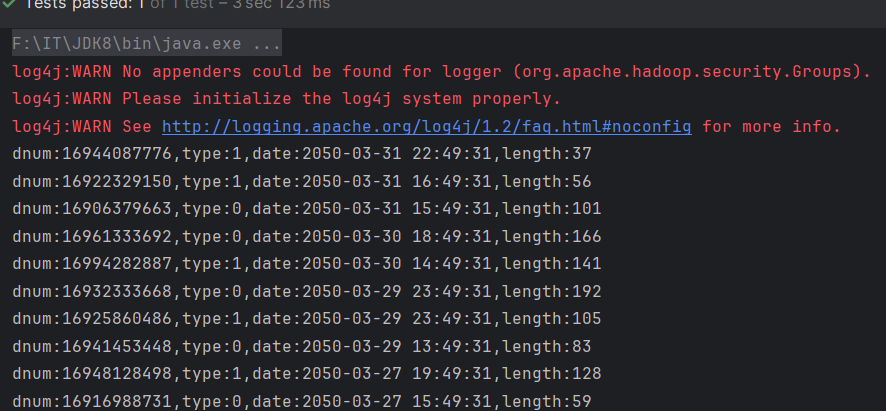
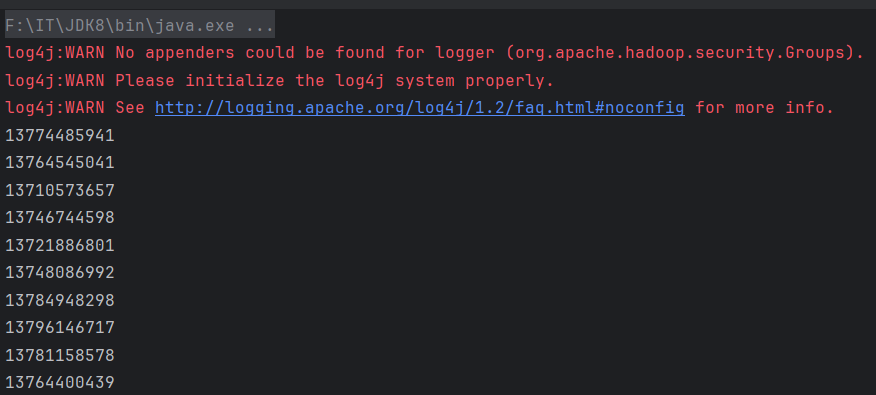
运行insert()方法,控制台输出10个随机生成的手机号码
查看HBase,输出两条数据

**思考:**为什么代码中getDate(2050),实际数据库中却出现了2051年的数据呢?
**答案:**代码中用了calendar.add(),导致可能出现边界值越界
java
// 问题1:随机月份时,可能让月份从12(Calendar.DECEMBER)再加N,导致年份+1
calendar.add(Calendar.MONTH, random.nextInt(12));
// 问题2:随机日期时,可能让日期超当月最大天数,进一步触发月份/年份进位
calendar.add(Calendar.DAY_OF_MONTH, random.nextInt(31));
以year=2050为例,代码执行步骤:
-
calendar.set(2050, 0, 1) → 初始时间是2050 年 1 月 1 日(Calendar 的月份是 0 基:0=1 月,11=12 月);
-
random.nextInt(12)生成11 → calendar.add(Calendar.MONTH, 11) → 时间变成2050 年 12 月 1 日;
-
random.nextInt(31)生成30 → calendar.add(Calendar.DAY_OF_MONTH, 30) → 12 月只有 31 天,1+30=31 天,刚好是 12 月 31 日(暂时没问题);但如果random.nextInt(12)生成11,且random.nextInt(31)生成31 → 12 月 1 日 + 31 天 = 12 月 32 日 → Calendar自动进位:12 月 32 日 = 2051 年 1 月 1 日;
-
最终格式化后,日期就变成了2051 年,和查询到的结果一致。
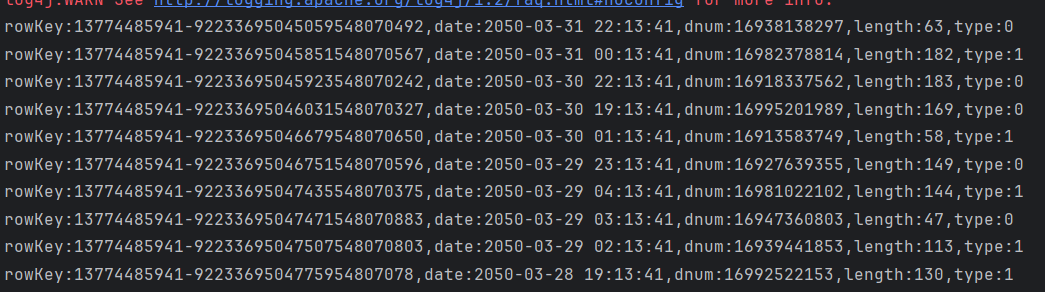
查询某用户3月份的通话记录
这里使用insert()方法调用后随机生成的第一个手机号码(13774485941)3月份的通话记录。
java
    //查询某用户3月份的通话记录
    @Test
    public void scanData() throws ParseException, IOException {
        //1.定义某用户的手机号码,这里的手机号要用insert()方法中生成的
        String phoneNumber = "13774485941";
        //2.定义startRow 包含
        String startRow = phoneNumber+'-'+(Long.MAX_VALUE-simpleDateFormat.parse("2050-04-01 00:00:00").getTime());
        //3.定义stopRow 包含
        String stopRow = phoneNumber+'-'+(Long.MAX_VALUE-simpleDateFormat.parse("2050-03-01 00:00:00").getTime());
        //4.创建Scan对象
        Scan scan = new Scan();
        //5.设置起始和结束行
        scan.withStartRow(Bytes.toBytes(startRow));
        scan.withStopRow(Bytes.toBytes(stopRow),true);
        //6.执行查询
        ResultScanner resultScanner = table.getScanner(scan);
        //7.解析resultScanner
        for (Result result:resultScanner){
            //8.解析result
            Cell[] cells = result.rawCells();
            String rowInfo = "rowKey:"+Bytes.toString(CellUtil.cloneRow(cells[0]));
            rowInfo += ","+Bytes.toString(CellUtil.cloneQualifier(cells[0]))+":"+Bytes.toString(CellUtil.cloneValue(cells[0]));
            rowInfo += ","+Bytes.toString(CellUtil.cloneQualifier(cells[1]))+":"+Bytes.toString(CellUtil.cloneValue(cells[1]));
            rowInfo += ","+Bytes.toString(CellUtil.cloneQualifier(cells[2]))+":"+Bytes.toInt(CellUtil.cloneValue(cells[2]));
            rowInfo += ","+Bytes.toString(CellUtil.cloneQualifier(cells[3]))+":"+Bytes.toInt(CellUtil.cloneValue(cells[3]));
            //输出
            System.out.println(rowInfo);

        }
    }
运行并查看结果
删除指定rowkey的某单元格数据
删除前

实现代码
java
    @Test
    public void deleteCell() throws IOException {
        Delete delete = new Delete(Bytes.toBytes("13774485941-92233695045059548070492"));
        //指定具体的列
        delete.addColumn(Bytes.toBytes(family), Bytes.toBytes("length"));
        //执行删除操作
        table.delete(delete);
    }
删除后

添加单元格数据
java
    @Test
    public void insertCell() throws IOException {
        Put put = new Put(Bytes.toBytes("13774485941-92233695045059548070492"));
        put.addColumn(Bytes.toBytes(family), Bytes.toBytes("length"), Bytes.toBytes(99));
        table.put(put);
    }
结果:数据添加成功

删除行操作
java
    @Test
    public void deleteRow() throws IOException {
        Delete delete = new Delete(Bytes.toBytes("13774485941-92233695045059548070492"));
        //执行删除操作
        table.delete(delete);
    }
查找某用户拨出去的通话记录
客户端请求过滤器
结构化过滤器 包含其他的过滤器
sql
select dnum,type,length,date from xxx
where rowkey like "13774485941%" and type = 0
rowkey以13774485941开头并且 type=0 (主叫)
FilterList两个条件
- FilterList.Operator.MUST_PASS_ALL 交集(and操作)
select * from tb_user where date='' and type='0- FilterList.Operator.MUST_PASS_ONE 并集( or 操作)
select * from tb_user where date='' or type='0'
- FilterList.Operator.MUST_PASS_ONE 并集( or 操作)
java
/**用于组织两个或多个查询条件之间的关系,参数有如下两个:
* MUST_PASS_ALL:表示and的关系,交集,同时成立
* MUST_PASS_ONE:表示or的关系,并集,有一个成立即可
*/
FilterList filterList = new FilterList(FilterList.Operator.MUST_PASS_ALL);
列值过滤器 type=0
SingleColumnValueFilter:用于判断列值的关系:
- 相等 CompareFilter.CompareOp.EQUAL , CompareOperator.EQUAL(2.0.0+)
- 不相等( CompareOp.NOT_EQUAL ),范围(比如: CompareOp.GREATER )
java
        /**basic:type=0
         *LESS:小于
         *LESS_OR_EQUAL;小于等于
         *EQUAL 等于
         *NOT_EQUAL:不等于
         *  GREATER_OR_EQUAL大于登录
         * GREATER:大于
         *  NO_OP:no operation
         */
        SingleColumnValueFilter valueFilter = new SingleColumnValueFilter(Bytes.toBytes("basic"), Bytes.toBytes("type"),
                //指定列族和列描述符
                CompareOperator.EQUAL,
                //比较条件hbase2.0.0 开始使用
                Bytes.toBytes(0)//value
        );
        //将列值过滤器添加到filterList中
        filterList.addFilter(valueFilter);
列值比较器
嵌套在其他过滤器中,比如 SingleColumnValueFilter
- RegexStringComparator:使用正则表达式进行比较
- SubstringComparator:判断子串是否包含在值中
- BinaryPrefixComparator:二进制前缀比较器
- BinaryComparator :二进制比较器
KeyValue Metadata
- FamilyFilter :过滤列族的,当然最好在 scan 中指定而不是使用该过滤器
- QualifierFilter :过滤列标识符的过滤器。
- ColumnPrefixFilter:
1.ColumnPrefixFilter可用于基于Column(又名Qualifier)名称的前导部分进行过滤。
2.同一列限定符可用于不同的列族。该过滤器返回所有匹配的列。
java
        //列族过滤器,这种处理方式比较麻烦,一般不用
        ByteArrayComparable bytecom = new ByteArrayComparable(Bytes.toBytes("basic")) {
            @Override
            public byte[] toByteArray() {
                return new byte[0];
            }

            @Override
            public int compareTo(byte[] value, int offset, int length) {
                return 0;
            }
        };
        FamilyFilter familyFilter = new FamilyFilter(CompareOperator.EQUAL, bytecom);
        //列族过滤直接使用如下方法,简捷高效
        scan.addFamily(Bytes.toBytes("info"));
        //指定需要的列
        scan.addColumn(Bytes.toBytes("info"), Bytes.toBytes("dnum"));
rowkey****过滤器
- RowFilter:最好在scan中使用startRow和stopRow,当然也可以使用此过滤器
- PrefixFilter :匹配具有相同 rowkey 前缀的记录。
java
        //rowkey的前缀过滤器
        PrefixFilter prefixFilter = new PrefixFilter(Bytes.toBytes("13774485941"));
        //将prefixFilter添加到过滤器的集合中
        filterList.addFilter(prefixFilter);
实际代码
java
    /**
     * 查找某用户(rowkey以13774485941为前缀),并且type= 0所有通话记录
     * 列族:basic
     * 列:dnum,type,date,length
     */
    public void findByFilter(String prefix, int type) throws IOException {
        Scan scan = new Scan();
        //指定查询的列族 select info:* from wusenn:phone_log
        scan.addFamily(Bytes.toBytes(family));
        //指定查询的列
        // select info:dnum,info:type,info:date,info:length from wusen:phone_log
        scan.addColumn(Bytes.toBytes(family), Bytes.toBytes("dnum"));
        scan.addColumn(Bytes.toBytes(family), Bytes.toBytes("type"));
        scan.addColumn(Bytes.toBytes(family), Bytes.toBytes("date"));
        scan.addColumn(Bytes.toBytes(family), Bytes.toBytes("length"));
        //两个查询条件之间的关系 and,必须同时满足才能查询出来
        FilterList filterList = new FilterList(FilterList.Operator.MUST_PASS_ALL);
        //rowkey前缀过滤器
        PrefixFilter prefixFilter = new PrefixFilter(Bytes.toBytes(prefix));
        filterList.addFilter(prefixFilter);
        //列值过滤器
        SingleColumnValueFilter valueFilter = new SingleColumnValueFilter(
                Bytes.toBytes(family), Bytes.toBytes("type"),
                CompareOperator.EQUAL, Bytes.toBytes(type)
        );
        filterList.addFilter(valueFilter);
        //为scan设置filterList
        scan.setFilter(filterList);
        //执行查询,并返回结果集
        ResultScanner resultScanner = table.getScanner(scan);
        //解析resultScanner
        for (Result result : resultScanner) {
            printMsg(result);
        }
    }

    private void printMsg(Result result) {
        //1.解析result
        Cell[] cells = result.rawCells();
        String rowInfo = "rowkey:" + Bytes.toString(CellUtil.cloneRow(cells[0]));
        rowInfo += "," + Bytes.toString(CellUtil.cloneQualifier(cells[0])) + ":" + Bytes.toString(CellUtil.cloneValue(cells[0]));
        rowInfo += "," + Bytes.toString(CellUtil.cloneQualifier(cells[1])) + ":" + Bytes.toString(CellUtil.cloneValue(cells[1]));
        rowInfo += "," + Bytes.toString(CellUtil.cloneQualifier(cells[2])) + ":" + Bytes.toInt(CellUtil.cloneValue(cells[2]));
        rowInfo += "," + Bytes.toString(CellUtil.cloneQualifier(cells[3])) + ":" + Bytes.toInt(CellUtil.cloneValue(cells[3]));
        //2输出
        System.out.println(rowInfo);
    }

    public static void main(String[] args) throws IOException {
        CallLogDemo callLogDemo = new CallLogDemo();
        callLogDemo.before();
        callLogDemo.findByFilter("13774485941",0);
        callLogDemo.after();
    }
运行并查看结果
运行main方法,得到如下结果
Protocol Bufffer 压缩
问题引入
对HBase存储在HDFS上的文件做解析
在浏览器HDFS文件系统查看文件的存储路径
如果没有文件的话,需要hbase客户端执行命令:flush 'wusen:phone_log'
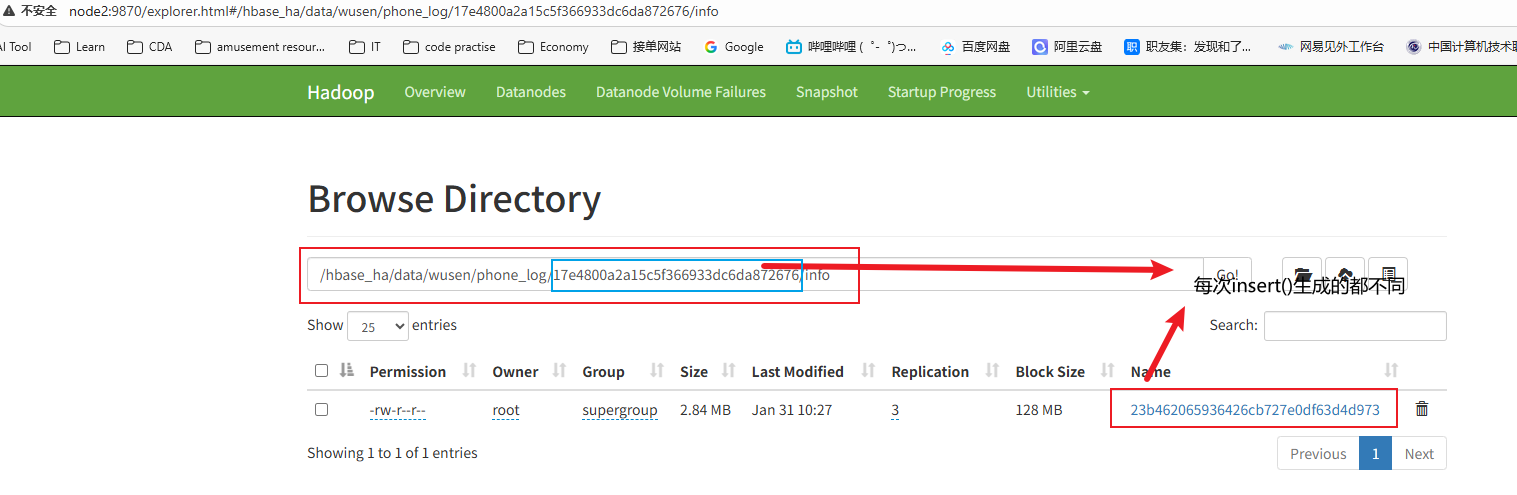
然后查看该文件,查看命令:hbase hfile -p -f HDFS_PATH(hbase数据文件的hdfs路径)
[root@node1 ~]# hbase hfile -p -f /hbase_ha/data/wusen/phone_log/17e4800a2a15c5f366933dc6da872676/info/23b462065936426cb727e0df63d4d973结果如下:

可以发现相同的 rowkey 、列族名称被重复保存了多次,如何解决呢?
解决办法:Protocol Buffer
Protocol Buffers 是一种轻便高效的结构化数据存储格式,可以用于结构化数据串行化,或者说序列化。它很适合做数据存储或RPC 数据交换格式。可用于通讯协议、数据存储等领域的语言无关、平台无关、可扩展的序列化结构数据格式。
这里我们可以利用Protocol Buffer将原本的数据转化为仅info:phone_info 一个列,值是MyPhone 对象的 Protobuf 序列化字节(可选压缩)。
安装Google Protocol Buffer
在网站Releases · protocolbuffers/protobuf上可以下载源代码,然后解压编译安装便可以使用。
我这里使用的是protobuf-java-3.19.1.tar.gzhttps://download.csdn.net/download/m0_62491477/92611135
安装步骤如下:
首先查看自己的环境是英文还是中文:yum grouplist
# 如果显示中文,则执行下面命令
[root@node1 ~]# yum groupinstall '开发工具'
# 如果是英文,则执行下面命令
[root@node1 ~]# yum groupinstall 'Development tools'
然后将安装包上传到/opt/apps,并解压到/opt

解压后进入到目录执行下述操作
[root@node1	apps]# cd /opt/protobuf-3.19.1
[root@node1	protobuf-3.19.1]# ./configure
[root@node1	protobuf-3.19.1]# make
[root@node1	protobuf-3.19.1]# make install
编写 . proto 文件生成 MyPhone . java 工具类
vim myPhone.proto
syntax = "proto3";
package com.wusen.hbase.util;
message Phone {
int32 length=1;
string dnum=2;
int32  type=3;
string  date=4;
}
然后执行下面命令
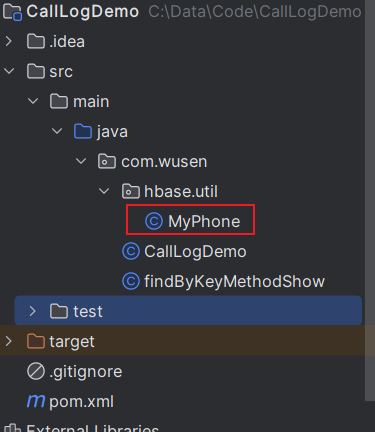
[root@node1 ~]# protoc myPhone.proto --java_out=./会生成一个java文件

将文件下载到本地桌面,然后添加进原项目里
Maven项目中使用
首先在pom.xml中添加依赖,并刷新Maven,导入依赖
XML
       <dependency>
            <groupId>com.google.protobuf</groupId>
            <artifactId>protobuf-java</artifactId>
            <version>3.19.1</version>
        </dependency>
插入数据
拷贝CallLogDemo下的insert()方法为insertProtocBuf(),其他代码保持不变,只修改以下代码
java
                //创建put对象
                Put put = new Put(Bytes.toBytes(rowKey));
//                put.addColumn(Bytes.toBytes(family), Bytes.toBytes("dnum"), Bytes.toBytes(dnum));
//                put.addColumn(Bytes.toBytes(family), Bytes.toBytes("length"), Bytes.toBytes(length));
//                put.addColumn(Bytes.toBytes(family), Bytes.toBytes("type"), Bytes.toBytes(type));
//                put.addColumn(Bytes.toBytes(family), Bytes.toBytes("date"), Bytes.toBytes(date));
                MyPhone.Phone.Builder builder = MyPhone.Phone.newBuilder();
                builder.setDnum(dnum);
                builder.setLength(length);
                builder.setType(type);
                builder.setDate(date);
                MyPhone.Phone phone = builder.build();
                //由原来的四个字段存储通话记录,改为1个字段存储
                put.addColumn(Bytes.toBytes(family),Bytes.toBytes("detail"),phone.toByteArray());
在HBase客户端上清空原来表的数据

执行insertProtocBuf()方法,然后刷新下表:flush 'wusen:phone_log',查看hdfs上的数据文件
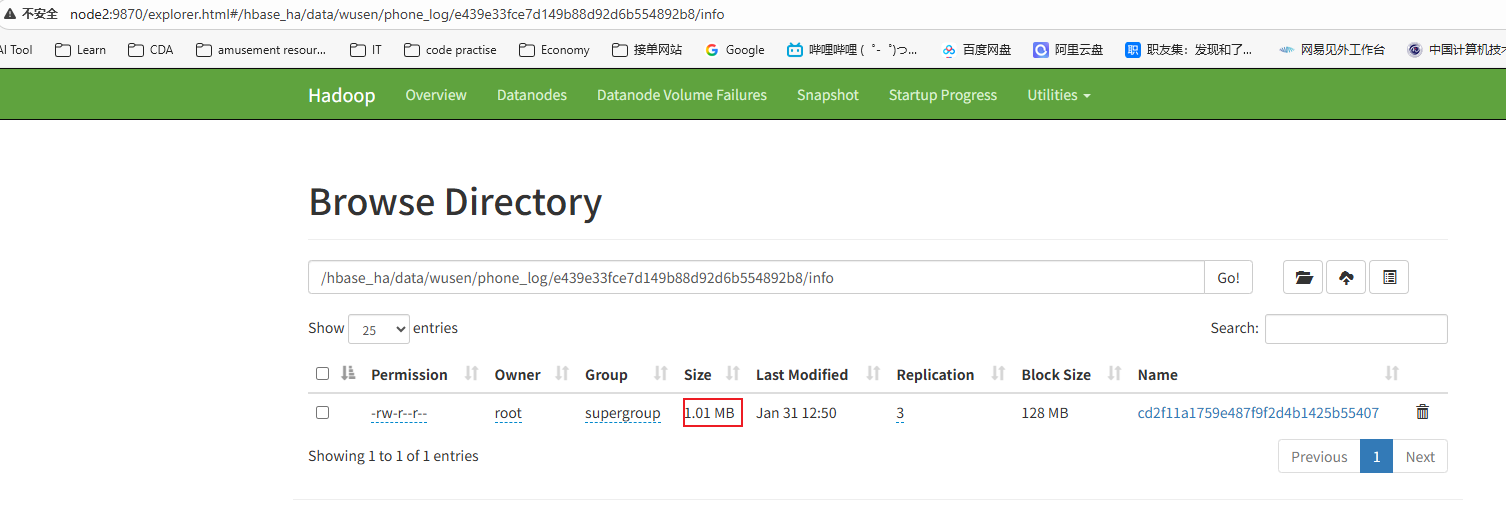
可以发现大小只有1.01MB了,之前有2.84MB
查询数据
拷贝scanData()方法为scanProtocBuf()方法,修改下面其中代码,测试时候的手机号码也需要替换成数据库中存在的手机号码
java
 //7.解析resultScanner
        for (Result result : resultScanner) {
            //8.解析result
            Cell[] cells = result.rawCells();
//            String rowInfo = "rowKey:" + Bytes.toString(CellUtil.cloneRow(cells[0]));
//            rowInfo += "," + Bytes.toString(CellUtil.cloneQualifier(cells[0])) + ":" + Bytes.toString(CellUtil.cloneValue(cells[0]));
//            rowInfo += "," + Bytes.toString(CellUtil.cloneQualifier(cells[1])) + ":" + Bytes.toString(CellUtil.cloneValue(cells[1]));
//            rowInfo += "," + Bytes.toString(CellUtil.cloneQualifier(cells[2])) + ":" + Bytes.toInt(CellUtil.cloneValue(cells[2]));
//            rowInfo += "," + Bytes.toString(CellUtil.cloneQualifier(cells[3])) + ":" + Bytes.toInt(CellUtil.cloneValue(cells[3]));
//            System.out.println(rowInfo);
            //获取值
            byte[] phoneInfoBytes = CellUtil.cloneValue(cells[0]);
            //将字节数据中的数据反序列化为MyPhone.Phone对象
            MyPhone.Phone phone = MyPhone.Phone.parseFrom(phoneInfoBytes);
            String rowInfo = "dnum:" + phone.getDnum();
            rowInfo += ",type:" + phone.getType();
            rowInfo += ",date:" + phone.getDate();
            rowInfo += ",length:" + phone.getLength();
            System.out.println(rowInfo);

        }
结果如下