引言
在人工智能潮中,计算机视觉让机器学会"看懂"世界。从人脸表情的微妙变化到疲劳状态的精准判断,再到年龄性别的智能预测,计算机视觉技术正悄然融入我们的生活。本篇文章将介绍OpenCV的案例实战,通过两个完整的代码案例,一步步实现表情识别、疲劳检测,为后续最终实现一个多功能的简单的综合检测系统打下基础。
一、表情识别:读懂你的微笑与大笑
1、实现原理
表情识别项目通过分析人脸关键点的几何关系,特别是嘴部区域的变化,来判断当前面部表情状态。基于dlib的68点人脸关键点检测模型,通过计算嘴部的宽高比和相对比例,将表情分为三类:"正常"、"微笑"和"大笑"。
2、核心技术解析
1、人脸关键点检测
首先定义表情识别项目的两个核心组件:detector 和 predictor。detector 使用 dlib 内置的基于 HOG(方向梯度直方图)特征和线性分类器的人脸检测算法,其功能是在图像中定位人脸的位置。predictor 则用于加载一个预训练的68点人脸关键点模型,该模型能够精准定位已检测出的人脸区域内的眉毛、眼睛、鼻子、嘴巴等部位的轮廓关键点。detector 首先找到人脸,随后 predictor 在每个人脸框内进行详细的关键点定位。
detector = dlib.get_frontal_face_detector()
predictor = dlib.shape_predictor("shape_predictor_68_face_landmarks.dat")
2、关键计算函数
1、MAR函数(嘴部纵横比)
MAR 函数是表情识别项目中用于量化嘴部张合程度的核心算法。该函数基于 predictor 获取的68个人脸关键点坐标,通过计算嘴部纵横比来判断表情状态。其具体原理是:首先分别计算嘴唇上三个垂直方向的距离(点50到58、51到57、52到56),取其平均值以代表嘴部的平均垂直张开度,接着计算两个嘴角(点48到54)之间的水平宽度,最后将平均垂直张开度除以水平宽度,得到最终的嘴部纵横比值。这个比值能够有效表征嘴部的几何形状变化------比值越高,通常表明嘴部张得越开。
def MAR(shape):
    A = euclidean_distances(shape[50].reshape(1, 2), shape[58].reshape(1, 2))
    B = euclidean_distances(shape[51].reshape(1, 2), shape[57].reshape(1, 2))
    C = euclidean_distances(shape[52].reshape(1, 2), shape[56].reshape(1, 2))
    D = euclidean_distances(shape[48].reshape(1, 2), shape[54].reshape(1, 2))
return ((A + B + C) / 3) / D2、MJR函数(嘴部与下颌宽度比)
MJR函数是该表情识别项目中的另一个重要特征提取方法,用于计算嘴部与下颌宽度比。其计算逻辑是:首先,通过 euclidean_distances 函数计算两个嘴角(关键点48和54)之间的距离,作为嘴部宽度(M),然后,计算下颌左右两个角点(关键点3和13)之间的距离,作为下颌宽度(J),最终返回二者的比值(M/J)。这个比值的核心作用在于量化嘴角向两侧拉伸的程度------当微笑或大笑时,嘴角会向两侧延展,导致嘴部宽度相对于固定的下颌宽度增加,因此 MJR 的比值会升高。
def MJR(shape):
    M = euclidean_distances(shape[48].reshape(1, 2), shape[54].reshape(1, 2))
    J = euclidean_distances(shape[3].reshape(1, 2), shape[13].reshape(1, 2))
    return M / J
3、表情判断逻辑
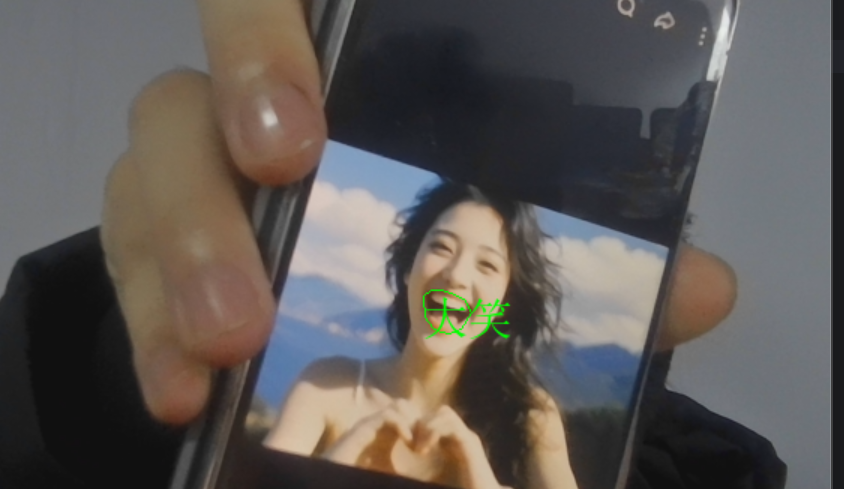
整个表情判断逻辑基如下:通过分析嘴部张开幅度(mar)和嘴角拉伸程度(mjr)两个关键指标来识别表情状态。默认情况下,系统将表情判定为"正常",当嘴部张开幅度超过0.5的阈值时,由于嘴部明显张开,符合大笑特征,表情被判定为"大笑",若未达到大笑标准但嘴角拉伸程度超过0.45的阈值,则因嘴角明显拉伸符合微笑特征,表情被判定为"微笑"。其中,mar阈值设定为0.5主要针对嘴部大幅张开的典型大笑场景,而mjr阈值设定为0.45则用于捕捉嘴角拉伸形成的微笑状态。
result = "正常"
if mar > 0.5:
    result = "大笑"      # 嘴部张开幅度大
elif mjr > 0.45:
    result = "微笑"      # 嘴角拉伸明显
3、实现流程
1、视频流获取
这里使用OpenCV的VideoCapture打开摄像头(0代表默认摄像头),循环读取每一帧图像,实现实时处理。
2、人脸检测与关键点提取:
使用人脸检测器(detector)对输入图像帧(frame)进行人脸检测,返回人脸位置信息的列表。随后,对于检测到的每一个人脸区域,通过形状预测器(predictor)进一步定位该人脸上的68个关键点,并将这些关键点的坐标从原始数据结构转换为一个二维NumPy数组。
faces = detector(frame, 0)  # 检测人脸
for face in faces:
    shape = predictor(frame, face)  # 获取68个关键点
shape = np.array([[p.x, p.y] for p in shape.parts()]) # 转换为NumPy数组3、可视化处理
这里使用凸包(convexHull)绘制嘴部轮廓,同时调用cv2AddChineseText函数在嘴部上方显示识别结果。
4、中文文本显示函数
这里使用代码实现显示中文文本
def cv2AddChineseText(image, text, positton, textColor=(0, 255, 0), textSize=30):
    # 核心:使用PIL处理中文字体,解决OpenCV不支持中文的问题
    img_pil = Image.fromarray(cv2.cvtColor(image, cv2.COLOR_BGR2RGB))
    draw = ImageDraw.Draw(img_pil)
    font = ImageFont.truetype("simsun.ttc", textSize, encoding="utf-8")
    draw.text(positton, text, font=font, fill=textColor)
    return cv2.cvtColor(np.array(img_pil), cv2.COLOR_RGB2BGR)
5、完整代码以及结果展示
import numpy as np
import dlib
import cv2
from sklearn.metrics.pairwise import euclidean_distances
from PIL import Image, ImageDraw, ImageFont


def MAR(shape):
    A = euclidean_distances(shape[50].reshape(1, 2), shape[58].reshape(1, 2))
    B = euclidean_distances(shape[51].reshape(1, 2), shape[57].reshape(1, 2))
    C = euclidean_distances(shape[52].reshape(1, 2), shape[56].reshape(1, 2))
    D = euclidean_distances(shape[48].reshape(1, 2), shape[54].reshape(1, 2))

    return ((A + B + C) / 3) / D


def MJR(sahpe):
    M = euclidean_distances(sahpe[48].reshape(1, 2), sahpe[54].reshape(1, 2))
    J = euclidean_distances(sahpe[3].reshape(1, 2), sahpe[13].reshape(1, 2))
    return M / J


def cv2AddChineseText(image, text, positton, textColor=(0, 255, 0), textSize=30):
    # 将OpenCV图像转换为PIL图像
    img_pil = Image.fromarray(cv2.cvtColor(image, cv2.COLOR_BGR2RGB))
    draw = ImageDraw.Draw(img_pil)

    # 使用默认字体,或指定中文字体路径
    try:
        font = ImageFont.truetype("simsun.ttc", textSize, encoding="utf-8")
    except:
        font = ImageFont.load_default()

    # 绘制文本
    draw.text(positton, text, font=font, fill=textColor)

    # 将PIL图像转换回OpenCV格式
    return cv2.cvtColor(np.array(img_pil), cv2.COLOR_RGB2BGR)


detector = dlib.get_frontal_face_detector()
predictor = dlib.shape_predictor("shape_predictor_68_face_landmarks.dat")
cap = cv2.VideoCapture(0)
while True:
    ret, frame = cap.read()

    faces = detector(frame, 0)
    for face in faces:
        shape = predictor(frame, face)
        shape = np.array([[p.x, p.y] for p in shape.parts()])
        mar = MAR(shape)
        mjr = MJR(shape)
        result = "正常"
        print('mar', mar, "\tmjr", mjr)
        if mar > 0.5:
            result = "大笑"
        elif mjr > 0.45:
            result = "微笑"

        mouthHull = cv2.convexHull(shape[48:61])
        frame = cv2AddChineseText(frame, result, tuple(mouthHull[0, 0]))
        cv2.drawContours(frame, [mouthHull], -1, (0, 255, 0), 1)
    cv2.imshow('frame', frame)
    if cv2.waitKey(1) == 27:
        break
cap.release()
cv2.destroyAllWindows()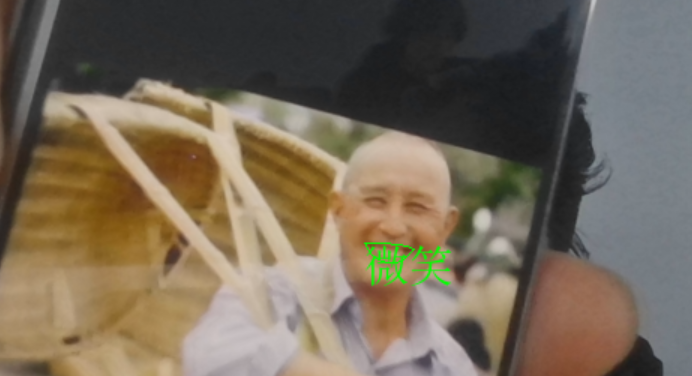
二、疲劳检测
1、实现原理
疲劳检测项目专注于监测人眼状态,通过计算眼睛的纵横比(Eye Aspect Ratio, EAR)来判断眼睛的闭合程度。当EAR值持续低于阈值时,系统判定为疲劳状态,发出警告。
2、核心技术解析
1、EAR计算函数详解
此函数通过分析眼部关键点的几何关系量化眼睛的睁开程度。函数接收一个包含单眼六个关键点坐标的数组,首先计算上眼睑与下眼睑之间的垂直距离:分别计算上眼睑左侧点(索引1)与下眼睑底部点(索引5)的欧氏距离(A),以及上眼睑顶部点(索引2)与下眼睑右侧点(索引4)的欧氏距离(B),以此表征眼睑的垂直分离程度,随后计算左右眼角(索引0与索引3)的水平距离(C),代表眼睛的基本宽度。最终,EAR值通过公式`(A + B) / (2.0 × C)`计算得出,即两个垂直方向距离的平均值与水平距离的比值。当眼睛完全睁开时,垂直距离较大,EAR值保持较高水平,当眼睛逐渐闭合时,垂直距离显著减小,导致EAR值迅速下降并趋近于零。
def eye_aspect_ratio(eye):
    A = euclidean_distances(eye[1].reshape(1,2), eye[5].reshape(1,2))
    B = euclidean_distances(eye[2].reshape(1,2), eye[4].reshape(1,2))
    C = euclidean_distances(eye[0].reshape(1,2), eye[3].reshape(1,2))
    ear = ((A+B)/2.0)/C
    return ear
2、疲劳判断逻辑
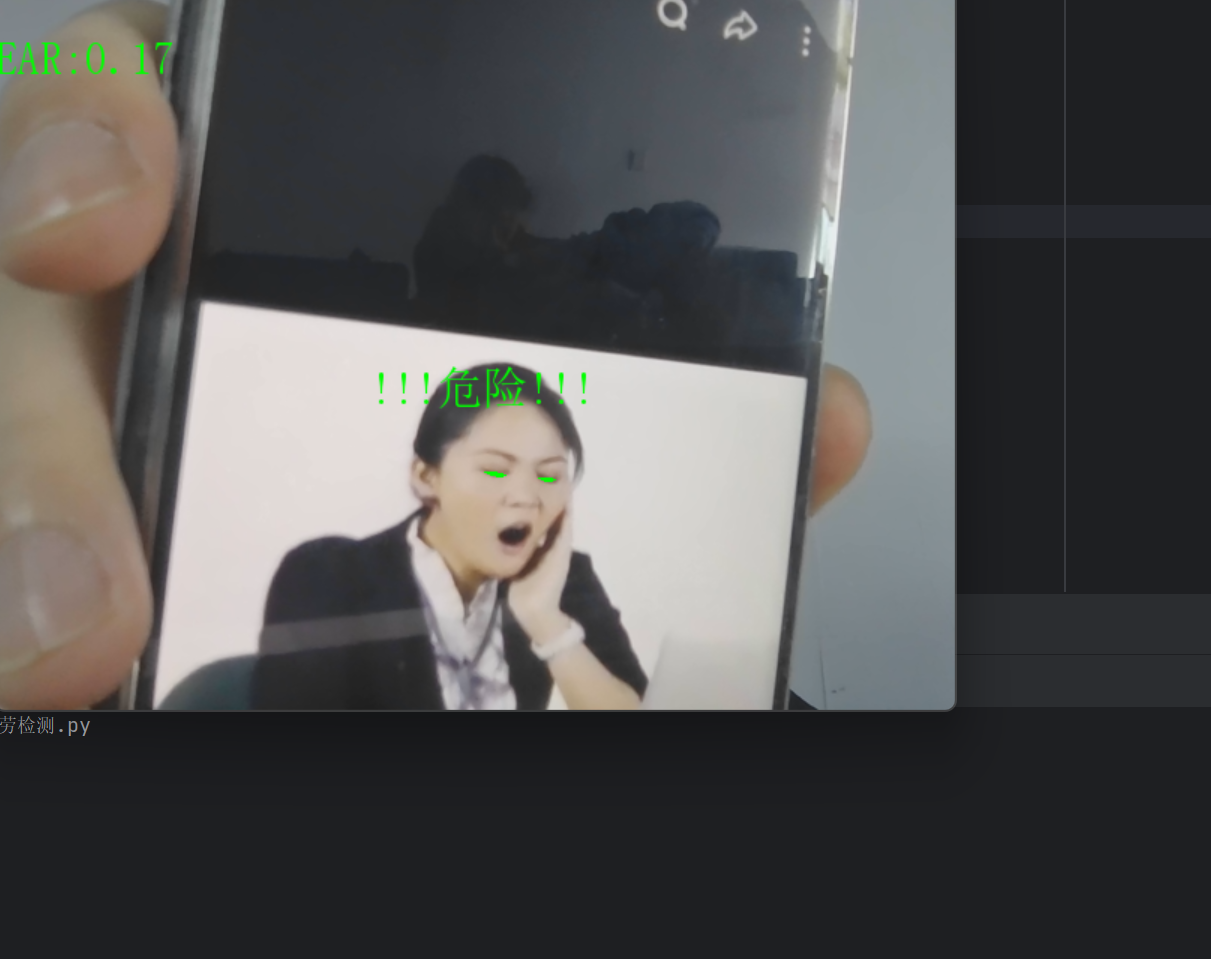
检测逻辑:设定EAR阈值为0.3(可调整),当检测到EAR低于该阈值时,则判定眼睛处于闭合状态,并递增一个连续低EAR帧计数器。如果计数器累计达到或超过50帧(通常对应约1.5左右的持续时间),则判定为疲劳状态,并在视频帧的指定位置(250,250)叠加"!!!危险!!!"的中文警告文字。若中途EAR值恢复至阈值以上,计数器会立即重置为零。通过累加连续帧数触发警报的机制,有效过滤了正常眨眼等短暂动作,从而防止了误判,确保警报仅在持续、长时间的闭眼事件发生时被触发。
COUNTER = 0  # 连续低EAR帧数计数器

if ear < 0.3:
    COUNTER += 1
    if COUNTER >= 50:
        frame = cv2AddChineseText(frame,"!!!危险!!!",(250,250))
else:
    COUNTER = 0
3、实现流程
1、双眼关键点提取
基于标准的面部标志点检测模型(68点模型),通过索引切片的方式分别获取右眼和左眼的特征点坐标:shape36:42 对应右眼的6个关键点(索引36至41),shape42:48 对应左眼的6个关键点(索引42至47)。
rightEyePoints = shape[36:42]  # 右眼关键点(索引36-41)
leftEyePoints = shape[42:48] # 左眼关键点(索引42-47)2、EAR值计算与融合
计算并融合双眼的眼睛纵横比)值。首先,通过 eye_aspect_ratio 函数分别计算提取出的右眼和左眼关键点所对应的 right_ear 与 left_ear 值。随后,将左右眼的EAR值相加并除以2.0,得到二者的算术平均值 ear。
right_ear = eye_aspect_ratio(rightEyePoints)
left_ear = eye_aspect_ratio(leftEyePoints)
ear = (left_ear + right_ear)/2.0  # 取双眼平均值
3、可视化增强
使用凸包填充眼部区域,增强视觉反馈,实时显示EAR数值,便于监控和调试。
def drawEye(eye):
    eyeHull = cv2.convexHull(eye)
cv2.drawContours(frame, [eyeHull], -1, (0, 255, 0), -1) # 填充眼部区域4、信息显示
info = "EAR:{:.2f}".format(ear[0][0])  # 格式化显示EAR值,保留两位小数
frame = cv2AddChineseText(frame, info, (0,30))  # 在画面左上角显示
5、完整代码以及结果展示
import numpy as np
import dlib
import cv2
from sklearn.metrics.pairwise import euclidean_distances
from PIL import Image, ImageDraw, ImageFont

def eye_aspect_ratio(eye):
    A = euclidean_distances(eye[1].reshape(1,2), eye[5].reshape(1,2))
    B = euclidean_distances(eye[2].reshape(1,2), eye[4].reshape(1,2))
    C = euclidean_distances(eye[0].reshape(1,2), eye[3].reshape(1,2))
    ear = ((A+B)/2.0)/C
    return ear

def cv2AddChineseText(image, text, positton, textColor=(0, 255, 0), textSize=30):
    img_pil = Image.fromarray(cv2.cvtColor(image, cv2.COLOR_BGR2RGB))
    draw = ImageDraw.Draw(img_pil)
    try:
        font = ImageFont.truetype("simsun.ttc", textSize, encoding="utf-8")
    except:
        font = ImageFont.load_default()
    draw.text(positton, text, font=font, fill=textColor)
    return cv2.cvtColor(np.array(img_pil), cv2.COLOR_RGB2BGR)

def drawEye(eye):
    eyeHull = cv2.convexHull(eye)
    cv2.drawContours(frame, [eyeHull], -1, (0, 255, 0), -1)

COUNTER = 0
detector = dlib.get_frontal_face_detector()
predictor = dlib.shape_predictor("shape_predictor_68_face_landmarks.dat")
cap = cv2.VideoCapture(0)
while True:
    ret, frame = cap.read()
    faces = detector(frame, 0)
    for face in faces:
        shape = predictor(frame, face)
        shape = np.array([[p.x,p.y]for p in shape.parts()])
        rightEyePoints = shape[36:42]
        leftEyePoints = shape[42:48]
        right_ear = eye_aspect_ratio(rightEyePoints)
        left_ear = eye_aspect_ratio(leftEyePoints)
        ear = (left_ear + right_ear)/2.0

        if ear < 0.3:
            COUNTER += 1
            if COUNTER >= 50:
                frame = cv2AddChineseText(frame,"!!!危险!!!",(250,250))
        else:
            COUNTER = 0
        drawEye(rightEyePoints)
        drawEye(leftEyePoints)
        info = "EAR:{:.2f}".format(ear[0][0])  # ear是2D数组
        frame = cv2AddChineseText(frame,info,(0,30))
    cv2.imshow('frame',frame)
    if cv2.waitKey(1)==27:
        break
cap.release()
cv2.destroyAllWindows()