文件上传大小超过服务器限制 的问题。错误信息显示请求大小超过了配置的最大值(20MB)。
配置推荐值
根据不同的使用场景,建议的配置:
|------|---------------|------------------|----------|
| 场景 | max-file-size | max-request-size | 说明 |
| 普通表单 | 10MB | 20MB | 普通用户上传 |
| 图片分享 | 20MB | 50MB | 图片、头像上传 |
| 文档系统 | 100MB | 200MB | PDF、文档上传 |
| 视频上传 | 500MB | 1GB | 小视频上传 |
完整的文件上传大小限制解决方案
问题诊断
从图片中的错误信息可以看到:
Failed to parse multipart servlet request; nested exception is java.lang.IllegalStateException: io.undertow.server.RequestTooBigException:
UT000020: Connection terminated as request was larger than 20971520
关键信息分析:
- 错误类型 :
RequestTooBigException(请求过大异常) - 实际限制:20971520字节 = 20MB
- 服务器类型:Undertow(Spring Boot 默认内嵌服务器之一)
- 问题位置:请求在到达应用代码之前就被服务器拦截了
完整解决方案
第一部分:后端Spring Boot应用配置
1. 修改Spring Boot配置文件
application.properties(推荐)
# ========== 文件上传配置 ==========
# 单个文件的最大大小(默认1MB)
spring.servlet.multipart.max-file-size=50MB

# 整个请求的最大大小(默认10MB)
spring.servlet.multipart.max-request-size=100MB

# ========== Undertow服务器专用配置 ==========
# 这是解决图中错误的关键配置!
server.undertow.max-http-post-size=100MB

# ========== 其他可选优化配置 ==========
# 设置临时文件存储位置(可选)
spring.servlet.multipart.location=/tmp

# 是否延迟解析(大文件建议设为true)
spring.servlet.multipart.resolve-lazily=false
application.yml
spring:
  servlet:
    multipart:
      max-file-size: 50MB
      max-request-size: 100MB
      location: /tmp
      resolve-lazily: false

server:
  undertow:
    max-http-post-size: 100MB
2. 创建配置验证接口(可选但推荐)
import org.springframework.beans.factory.annotation.Value;
import org.springframework.web.bind.annotation.GetMapping;
import org.springframework.web.bind.annotation.RestController;

@RestController
public class ConfigInfoController {

    @Value("${spring.servlet.multipart.max-file-size}")
    private String maxFileSize;

    @Value("${spring.servlet.multipart.max-request-size}")
    private String maxRequestSize;

    @Value("${server.undertow.max-http-post-size}")
    private String undertowMaxPostSize;

    @GetMapping("/config/info")
    public String getConfigInfo() {
        return String.format(
            "当前文件上传配置:<br>" +
            "• Spring Multipart 单个文件最大:%s<br>" +
            "• Spring Multipart 请求最大:%s<br>" +
            "• Undertow POST请求最大:%s<br><br>" +
            "配置验证:%s",
            maxFileSize,
            maxRequestSize,
            undertowMaxPostSize,
            verifyConfig() ? "✅ 配置合理" : "⚠️ 配置可能有冲突"
        );
    }

    private boolean verifyConfig() {
        // 验证Undertow配置是否足够大
        long undertowSize = parseSize(undertowMaxPostSize);
        long requestSize = parseSize(maxRequestSize);
        return undertowSize >= requestSize;
    }

    private long parseSize(String sizeStr) {
        // 简单解析大小字符串,实际可使用更完整的方法
        if (sizeStr.endsWith("MB")) {
            return Long.parseLong(sizeStr.replace("MB", "")) * 1024 * 1024;
        }
        return Long.parseLong(sizeStr);
    }
}
3. 添加全局异常处理器
import org.slf4j.Logger;
import org.slf4j.LoggerFactory;
import org.springframework.http.HttpStatus;
import org.springframework.http.ResponseEntity;
import org.springframework.web.bind.annotation.ControllerAdvice;
import org.springframework.web.bind.annotation.ExceptionHandler;
import org.springframework.web.multipart.MaxUploadSizeExceededException;
import io.undertow.server.RequestTooBigException;
@ControllerAdvice
public class FileUploadExceptionHandler {
private static final Logger logger = LoggerFactory.getLogger(FileUploadExceptionHandler.class);
@ExceptionHandler({
MaxUploadSizeExceededException.class,
RequestTooBigException.class,
IllegalStateException.class
})
public ResponseEntity<ApiResponse> handleFileSizeException(Exception ex) {
// 记录详细错误日志
logger.error("========== 文件上传大小异常 ==========");
logger.error("异常类型: " + ex.getClass().getName());
logger.error("异常信息: " + ex.getMessage());
logger.error("堆栈跟踪:", ex);
logger.error("======================================");
// 根据异常类型提供更具体的错误信息
String userMessage;
String techMessage = ex.getMessage();
if (ex instanceof RequestTooBigException) {
userMessage = "上传失败:文件大小超过服务器限制(当前最大20MB)";
} else if (ex instanceof MaxUploadSizeExceededException) {
userMessage = "上传失败:文件大小超过应用限制";
} else if (ex.getMessage() != null && ex.getMessage().contains("was larger than")) {
userMessage = "上传失败:请求体大小超出限制";
} else {
userMessage = "上传失败:文件处理异常";
}
// 返回标准化错误响应
ApiResponse response = ApiResponse.error(
HttpStatus.PAYLOAD_TOO_LARGE.value(),
userMessage,
techMessage
);
return ResponseEntity
.status(HttpStatus.PAYLOAD_TOO_LARGE)
.body(response);
}
// 统一响应格式
public static class ApiResponse {
private int code;
private String message;
private String detail;
private Object data;
// 构造方法、getter/setter 省略
public static ApiResponse error(int code, String message, String detail) {
ApiResponse response = new ApiResponse();
response.setCode(code);
response.setMessage(message);
response.setDetail(detail);
return response;
}
}
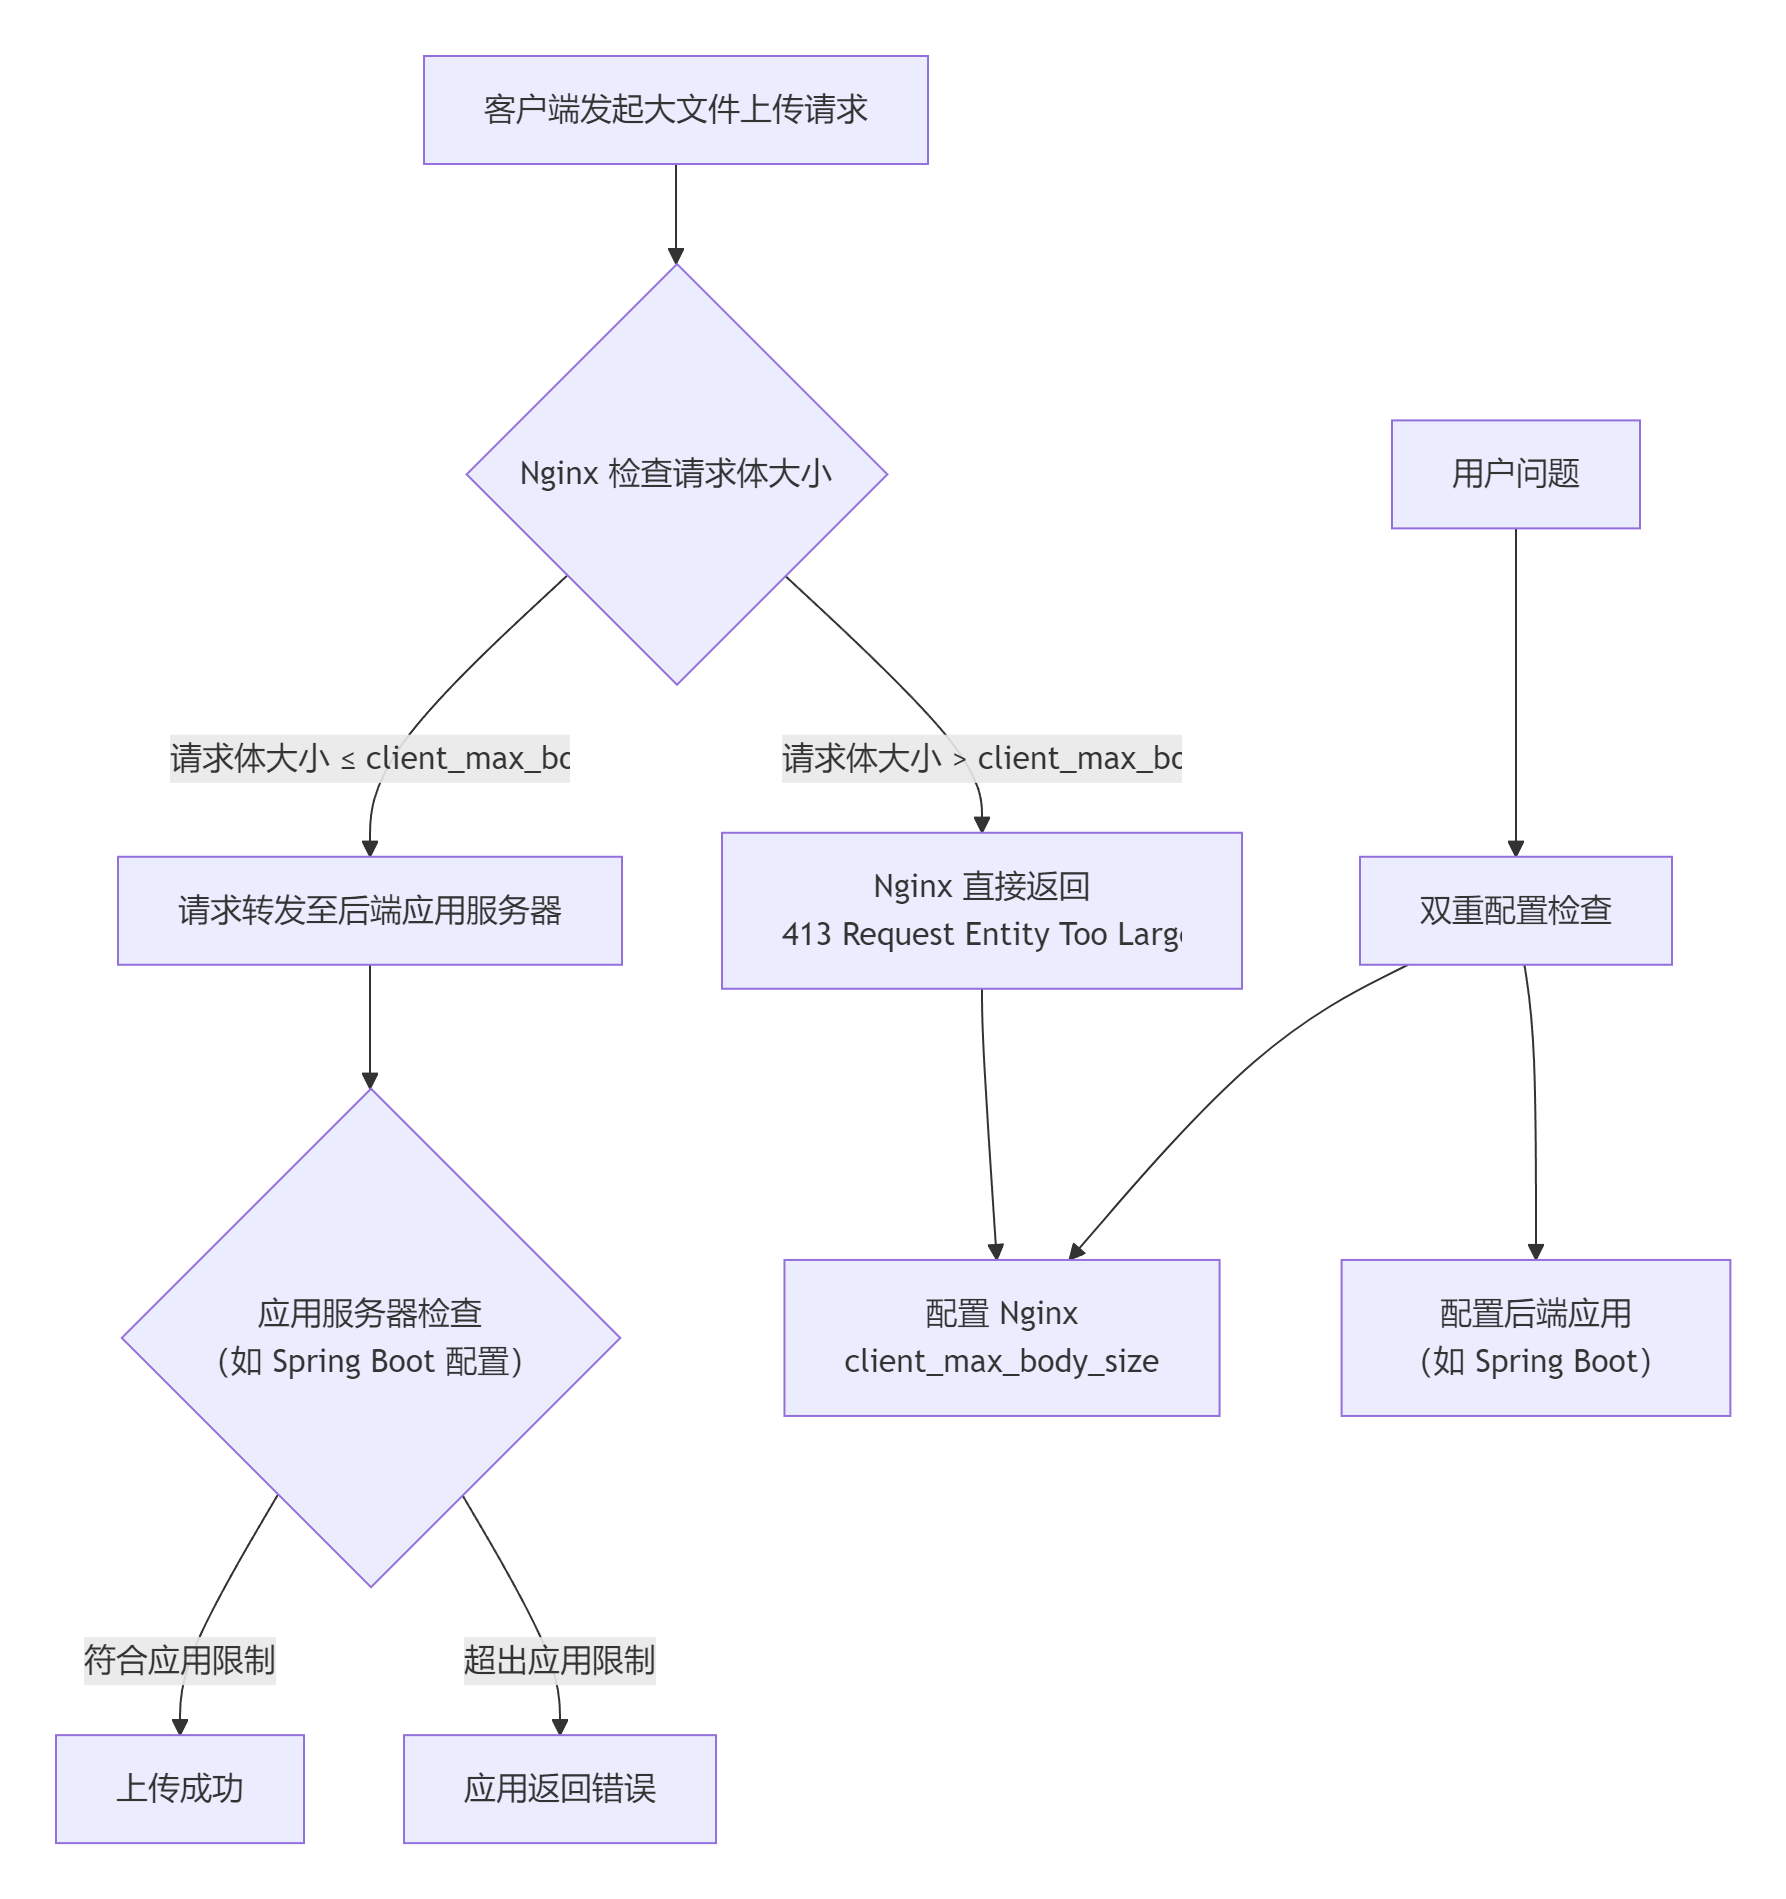
}第二部分:Nginx代理配置(如果使用)
如果您的应用前面有Nginx代理,必须同时配置Nginx:
1. 修改Nginx配置文件
# /etc/nginx/nginx.conf 或站点配置文件
http {
    # 默认的客户端请求体大小限制(默认1MB)
    client_max_body_size 100M;

    # 其他http配置...
}

server {
    listen 80;
    server_name your-domain.com;

    # 针对当前server的配置(会覆盖http块中的设置)
    client_max_body_size 100M;

    # 上传接口的特殊配置(如果上传路径固定)
    location /api/upload {
        # 可以单独为上传接口设置更大的限制
        client_max_body_size 200M;

        # 增加超时时间(大文件上传需要)
        proxy_connect_timeout 300s;
        proxy_send_timeout 300s;
        proxy_read_timeout 300s;

        # 代理到后端应用
        proxy_pass http://localhost:8080;
        proxy_set_header Host $host;
        proxy_set_header X-Real-IP $remote_addr;
        proxy_set_header X-Forwarded-For $proxy_add_x_forwarded_for;
        proxy_set_header X-Forwarded-Proto $scheme;
    }

    # 其他location配置...
    location / {
        proxy_pass http://localhost:8080;
        # 其他代理设置...
    }
}
2. 验证并重启Nginx
# 1. 检查配置文件语法
sudo nginx -t

# 2. 如果语法正确,重新加载配置
sudo nginx -s reload

# 或重启Nginx服务
sudo systemctl restart nginx

# 3. 查看Nginx错误日志(如果仍有问题)
sudo tail -f /var/log/nginx/error.log
第三部分:前端优化配置
1. HTML前端验证
<!DOCTYPE html>
<html>
<head>
    <title>文件上传</title>
    <style>
        .file-input {
            padding: 10px;
            border: 2px dashed #ccc;
            border-radius: 5px;
            margin: 20px 0;
        }
        .error {
            color: #f00;
            margin-top: 5px;
        }
        .file-info {
            color: #666;
            font-size: 0.9em;
        }
    </style>
</head>
<body>
    <h2>文件上传</h2>

    <form id="uploadForm" method="post" enctype="multipart/form-data" action="/api/upload">
        <div>
            <label for="file">选择文件:</label>
            <input type="file" id="file" name="file" class="file-input"
                   accept=".jpg,.jpeg,.png,.pdf,.doc,.docx,.xls,.xlsx">
        </div>

        <div id="fileInfo" class="file-info"></div>
        <div id="errorMsg" class="error"></div>

        <button type="submit" id="submitBtn">上传文件</button>
    </form>

    <script>
        const MAX_FILE_SIZE = 20 * 1024 * 1024; // 20MB

        document.getElementById('file').addEventListener('change', function(e) {
            const file = e.target.files[0];
            const errorDiv = document.getElementById('errorMsg');
            const infoDiv = document.getElementById('fileInfo');

            // 清空之前的提示
            errorDiv.textContent = '';
            infoDiv.textContent = '';

            if (!file) return;

            // 显示文件信息
            const fileSizeMB = (file.size / (1024 * 1024)).toFixed(2);
            infoDiv.textContent = `文件: ${file.name} (${fileSizeMB} MB)`;

            // 检查文件大小
            if (file.size > MAX_FILE_SIZE) {
                const maxSizeMB = (MAX_FILE_SIZE / (1024 * 1024)).toFixed(0);
                errorDiv.textContent = `错误:文件大小不能超过 ${maxSizeMB}MB`;
                e.target.value = ''; // 清空选择
                infoDiv.textContent = '';
            }
        });

        // 表单提交前再次验证
        document.getElementById('uploadForm').addEventListener('submit', function(e) {
            const fileInput = document.getElementById('file');
            const errorDiv = document.getElementById('errorMsg');

            if (!fileInput.files[0]) {
                errorDiv.textContent = '请选择要上传的文件';
                e.preventDefault();
                return false;
            }

            if (fileInput.files[0].size > MAX_FILE_SIZE) {
                errorDiv.textContent = '文件大小超过限制,请重新选择';
                e.preventDefault();
                return false;
            }

            // 显示上传中状态
            const submitBtn = document.getElementById('submitBtn');
            submitBtn.disabled = true;
            submitBtn.textContent = '上传中...';

            return true;
        });
    </script>
</body>
</html>
2. React组件示例(如果使用React)
import React, { useState } from 'react';
import axios from 'axios';

const FileUploadComponent = () => {
    const [file, setFile] = useState(null);
    const [error, setError] = useState('');
    const [uploading, setUploading] = useState(false);
    const [progress, setProgress] = useState(0);

    const MAX_SIZE = 20 * 1024 * 1024; // 20MB

    const handleFileChange = (e) => {
        const selectedFile = e.target.files[0];
        setError('');

        if (!selectedFile) return;

        // 检查文件大小
        if (selectedFile.size > MAX_SIZE) {
            setError(`文件大小不能超过 ${MAX_SIZE / (1024 * 1024)}MB`);
            setFile(null);
            e.target.value = '';
            return;
        }

        setFile(selectedFile);
    };

    const handleUpload = async () => {
        if (!file) {
            setError('请先选择文件');
            return;
        }

        const formData = new FormData();
        formData.append('file', file);

        try {
            setUploading(true);
            setProgress(0);

            const response = await axios.post('/api/upload', formData, {
                headers: {
                    'Content-Type': 'multipart/form-data'
                },
                onUploadProgress: (progressEvent) => {
                    const percent = Math.round(
                        (progressEvent.loaded * 100) / progressEvent.total
                    );
                    setProgress(percent);
                }
            });

            alert('上传成功!');
            setFile(null);
            setProgress(0);

        } catch (err) {
            if (err.response && err.response.status === 413) {
                setError('文件太大,请压缩后重新上传');
            } else {
                setError('上传失败: ' + (err.response?.data?.message || err.message));
            }
        } finally {
            setUploading(false);
        }
    };

    return (
        <div>
            <input type="file" onChange={handleFileChange} disabled={uploading} />
            {file && (
                <div>
                    <p>已选择: {file.name} ({(file.size / (1024 * 1024)).toFixed(2)} MB)</p>
                </div>
            )}
            {error && <div style={{color: 'red'}}>{error}</div>}
            {uploading && (
                <div>
                    <progress value={progress} max="100" />
                    <span>{progress}%</span>
                </div>
            )}
            <button onClick={handleUpload} disabled={uploading || !file}>
                {uploading ? '上传中...' : '上传文件'}
            </button>
        </div>
    );
};
第四部分:验证和测试
1. 创建测试接口
import org.springframework.web.bind.annotation.*;
import org.springframework.web.multipart.MultipartFile;
import java.io.IOException;

@RestController
@RequestMapping("/api/test")
public class UploadTestController {

    @PostMapping("/upload")
    public String testUpload(
            @RequestParam("file") MultipartFile file,
            @RequestParam(value = "chunk", required = false) Integer chunk,
            @RequestParam(value = "chunks", required = false) Integer chunks) {

        System.out.println("=== 文件上传测试 ===");
        System.out.println("文件名: " + file.getOriginalFilename());
        System.out.println("文件大小: " + file.getSize() + " 字节");
        System.out.println("文件类型: " + file.getContentType());

        if (chunk != null && chunks != null) {
            System.out.println("分片上传: " + (chunk + 1) + "/" + chunks);
        }

        // 返回上传信息
        return String.format(
            "上传成功!\n" +
            "文件名: %s\n" +
            "大小: %.2f MB\n" +
            "类型: %s",
            file.getOriginalFilename(),
            file.getSize() / (1024.0 * 1024.0),
            file.getContentType()
        );
    }

    @GetMapping("/limits")
    public String getLimits() {
        return "当前测试接口可用,请使用Postman或前端页面上传文件进行测试";
    }
}
2. 使用Postman测试
- 创建请求:
-
- Method: POST
- URL: http://localhost:8080/api/test/upload
- 设置Body:
-
- 选择
form-data - Key:
file(类型选择File) - Value: 选择一个大文件(如30MB的测试文件)
- 选择
- 观察结果:
-
- 如果配置正确,应该能成功上传
- 如果还有问题,查看控制台日志
第五部分:生产环境注意事项
1. 安全考虑
# 限制上传文件类型
spring.servlet.multipart.allowed-file-extensions=.jpg,.jpeg,.png,.pdf,.doc,.docx

# 设置文件存储安全策略
# 避免上传可执行文件等危险类型
2. 大文件上传优化
// 对于超大文件,建议使用分片上传
// 1. 前端将文件分成多个小块
// 2. 后端按顺序接收并合并
// 3. 提供断点续传功能

@RestController
@RequestMapping("/api/chunk-upload")
public class ChunkUploadController {

    @PostMapping("/chunk")
    public ResponseEntity<?> uploadChunk(
            @RequestParam("file") MultipartFile chunk,
            @RequestParam("chunkNumber") int chunkNumber,
            @RequestParam("totalChunks") int totalChunks,
            @RequestParam("identifier") String identifier) {
        // 实现分片上传逻辑
        return ResponseEntity.ok().body("分片上传成功");
    }
}
3. 监控和告警
// 添加文件上传监控
@Component
public class UploadMetrics {

    private final MeterRegistry meterRegistry;

    public UploadMetrics(MeterRegistry meterRegistry) {
        this.meterRegistry = meterRegistry;
    }

    public void recordUpload(String filename, long size, boolean success) {
        // 记录上传指标
        meterRegistry.counter("file.upload.count").increment();
        meterRegistry.summary("file.upload.size").record(size);

        if (!success) {
            meterRegistry.counter("file.upload.error").increment();
        }

        // 记录到日志
        LoggerFactory.getLogger(UploadMetrics.class).info(
            "文件上传: 文件名={}, 大小={}MB, 结果={}",
            filename, size / (1024.0 * 1024.0), success ? "成功" : "失败"
        );
    }
}
配置总结表
|-------------|---------------------------------------------|-----------|-----------------------|
| 配置位置 | 配置项 | 推荐值 | 作用 |
| Spring Boot | server.undertow.max-http-post-size | 100MB | 关键配置,解决Undertow限制 |
| Spring Boot | spring.servlet.multipart.max-file-size | 50MB | 单个文件大小限制 |
| Spring Boot | spring.servlet.multipart.max-request-size | 100MB | 整个请求大小限制 |
| Nginx | client_max_body_size | 100-200MB | Nginx代理层限制 |
| 前端JS | 文件大小检查 | 20MB | 用户体验优化 |
快速修复步骤
如果时间紧迫,按以下步骤快速修复:
-
立即修改
application.properties:spring.servlet.multipart.max-file-size=100MB
spring.servlet.multipart.max-request-size=100MB
server.undertow.max-http-post-size=100MB -
如果有Nginx,修改Nginx配置:
client_max_body_size 100M;
-
重启服务:
重启Spring Boot应用
./mvnw spring-boot:run
或
java -jar your-app.jar
重启Nginx
sudo systemctl restart nginx
-
验证:上传一个略大于20MB的文件测试。
如果问题仍然存在
如果按照上述步骤配置后问题依旧,请检查:
- 配置是否生效 :访问
/config/info接口查看配置 - 配置文件位置:确保修改的是运行时的配置文件
- 多个配置文件 :检查是否有
application-dev.properties等环境特定配置 - 服务器重启:确认应用已完全重启
- 查看完整日志:检查Spring Boot启动日志中关于Multipart的配置信息