文章目录
- [Ⅰ. RestTemplate存在的问题](#Ⅰ. RestTemplate存在的问题)
- [Ⅱ. OpenFeign介绍](#Ⅱ. OpenFeign介绍)
- [Ⅲ. 快速上手](#Ⅲ. 快速上手)
- [Ⅳ. OpenFeign参数传递](#Ⅳ. OpenFeign参数传递)
- [Ⅴ. 最佳实践](#Ⅴ. 最佳实践)
-
- 一、Feign继承方式
-
- [① 创建一个Module](#① 创建一个Module)
- [② 引入依赖](#② 引入依赖)
- [③ 编写接口](#③ 编写接口)
- [④ 打 Jar 包](#④ 打 Jar 包)
- [⑤ 服务提供方 实现 接口](#⑤ 服务提供方 实现 接口)
- [⑥ 服务消费方 继承 接口](#⑥ 服务消费方 继承 接口)
- [⑦ 测试](#⑦ 测试)
- 二、Feign抽取方式
-
- [① 创建一个module](#① 创建一个module)
- [② 引入依赖](#② 引入依赖)
- [③ 编写API](#③ 编写API)
- [④ 打Jar包](#④ 打Jar包)
- [⑤ 服务消费方直接使用 product-api 模块](#⑤ 服务消费方直接使用 product-api 模块)
- [⑥ 测试](#⑥ 测试)
- [Ⅵ. 服务部署](#Ⅵ. 服务部署)
Ⅰ. RestTemplate存在的问题
观察之前写的远程调用代码:
java
public OrderInfo selectOrderById(Integer orderId) {
    OrderInfo orderInfo = orderMapper.selectOrderById(orderId);
    String url = "http://product-service/product/"+ orderInfo.getProductId();
    ProductInfo productInfo = restTemplate.getForObject(url, ProductInfo.class);
    orderInfo.setProductInfo(productInfo);
    return orderInfo;
}
虽说 RestTemplate 对 HTTP 封装后,已经比直接使用 HTTPClient 简单方便很多,但是还存在一些问题:
- 需要拼接 URL,灵活性高,但是封装臃肿,当 URL 复杂时容易出错。
- 代码可读性差,风格不统一。
微服务之间的通信方式,通常有两种:RPC 和 HTTP。
在 SpringCloud 中,默认是使用 HTTP 来进行微服务的通信,最常用的实现形式有两种:
RestTemplateOpenFeign
RPC(RemoteProcedureCall)远程过程调用,是一种通过网络从远程计算机上请求服务,而不需要了解底层网络通信细节。RPC 可以使用多种网络协议进行通信,如 HTTP、TCP、UDP 等,并且在 TCP/IP 网络四层模型中跨越了传输层和应用层。简言之 RPC 就是像调用本地方法一样调用远程方法。
常见的 RPC 框架有:
- Dubbo:ApacheDubbo中文
- Thrift:ApacheThrift-Home
- gRPC:gRPC
Ⅱ. OpenFeign介绍
OpenFeign 是一个声明式的 WebService 客户端,它让微服务之间的调用变得更简单,类似 controller 调用 service,只需要创建一个接口,然后添加注解即可使用 OpenFeign。
一、OpenFeign的前身
Feign 是 Netflix 公司开源的一个组件:
- 2013年6月,Netflix 发布 Feign 的第一个版本
1.0.0 - 2016年7月,Netflix 发布 Feign 的最后一个版本
8.18.0
2016年,Netflix 将 Feign 捐献给社区
- 2016年7月 OpenFeign 的首个版本
9.0.0发布,之后一直持续发布到现在.
可以简单理解为 Netflix Feign 是 OpenFeign 的祖先,或者说 OpenFeign 是 Netflix Feign 的升级版。即 OpenFeign 是 Feign 的一个更强大更灵活的实现.
二、SpringCloudFeign
SpringCloudFeign 是 Spring 对 Feign 的封装,将 Feign 项目集成到 SpringCloud 生态系统中 。受 Feign 更名影响,SpringCloudFeign 也有两个 starter:
spring-cloud-starter-feignspring-cloud-starter-openfeign
由于 Feign 的停更维护,对应的我们使用的依赖是 spring-cloud-starter-openfeign。
OpenFeign 官方文档:GitHub-OpenFeign/feign:Feignmakeswritingjavahttpclientseasier
SpringCloudFeign 文档:SpringCloudOpenFeign
Ⅲ. 快速上手
一、引入依赖
在调用处以及提供接口模块中引入依赖:
xml
<dependency>
    <groupId>org.springframework.cloud</groupId>
    <artifactId>spring-cloud-starter-openfeign</artifactId>
</dependency>
二、添加注解
在调用方 order-service 的启动类添加注解 @EnableFeignClients,开启 OpenFeign 的功能。
java
@EnableFeignClients
@SpringBootApplication
public class OrderServiceApplication {
    public static void main(String[] args) {
        SpringApplication.run(OrderServiceApplication.class, args);
    }
}
三、编写OpenFeign的客户端(后面会单独抽出来作为一个独立模块)
为了让 order-service 能像类似调用 mapper 一样调用 openfeign 实现远程调用,我们需要单独创建一个 ProductApi 接口,统一放在 /api 目录下管理,然后基于 SpringMVC 的注解来声明远程调用的信息:
java
package com.liren.api;
import com.liren.model.ProductInfo;
import org.springframework.cloud.openfeign.FeignClient;
import org.springframework.web.bind.annotation.PathVariable;
import org.springframework.web.bind.annotation.RequestMapping;

@FeignClient(name = "product-service", path = "/product")
public interface ProductApi {
    @RequestMapping("/{productId}")
    ProductInfo getProductById(@PathVariable("productId") Integer productId);
}
@FeignClient 注解作用在接口上,参数说明:
name:指定要调用的微服务名称。- 上面代码中让 Feign 去调用 Nacos 注册中心中名为
product-service的应用实例,然后做负载均衡调用。
- 上面代码中让 Feign 去调用 Nacos 注册中心中名为
path:定义当前 FeignClient 的全局接口前缀。ProductApi里的所有方法,最终请求路径 = path + 方法路径, 即最后拼接成http://<某个product-service实例地址>/product/{productId}。
四、远程调用
修改之前远程调用的方法:
java
@Slf4j
@Service
public class OrderService {
    @Autowired
    private OrderMapper orderMapper;

    @Autowired
    private ProductApi productApi;

    public OrderInfo selectOrderById(Integer orderId) {
        OrderInfo orderInfo = orderMapper.selectOrderById(orderId);

        ProductInfo productInfo = productApi.getProductById(orderInfo.getProductId());

        orderInfo.setProductInfo(productInfo);
        return orderInfo;
    }
}
五、测试
启动服务,访问接口,测试远程调用:http://127.0.0.1:8080/order/1
可以看出来,使用 Feign 也可以实现远程调用。
Feign 简化了与 HTTP 服务交互的过程,把 REST 客户端的定义转换为 Java 接口,并通过注解的方式来声明请求参数,请求方式等信息,使远程调用更加方便和间接。
Ⅳ. OpenFeign参数传递
通过观察可以发现,Feign 的客户端和服务提供者的接口声明非常相似。上面例子中演示了 Feign 从 URL 中获取参数,接下来演示下 Feign 参数传递的其他方式:
- 传递单个参数
- 传递多个参数
- 传递对象
- 传递 json 对象
首先把最原生的调用接口,也就是 ProductController 的测试接口写上去:
java
@RestController
@RequestMapping("/product")
public class ProductController {
    // 传递一个参数
    @RequestMapping("/p1")
    public String p1(@RequestParam("id")Integer id) {
        return "p1接收到参数:" + id;
    }

    // 传递多个参数
    @RequestMapping("/p2")
    public String p2(@RequestParam("id")Integer id, @RequestParam("name")String name) {
        return "p2接收到参数:id=" + id + ",name=" + name;
    }

    // 传递对象
    @RequestMapping("/p3")
    public String p3(ProductInfo productInfo) {
        return "p3接收到参数:productInfo=" + productInfo;
    }

    // 传递json对象
    @RequestMapping("/p4")
    public String p4(@RequestBody ProductInfo productInfo) {
        return "p4接收到参数:productInfo=" + productInfo;
    }
}
然后完善对应的 Feign 客户端接口:(和上面基本差不多)
java
@FeignClient(name = "product-service", path = "/product")
public interface ProductApi {
    // 传递一个参数
    @RequestMapping("/p1")
    String p1(@RequestParam("id")Integer id);

    // 传递多个参数
    @RequestMapping("/p2")
    String p2(@RequestParam("id")Integer id, @RequestParam("name")String name);

    // 传递对象
    @RequestMapping("/p3")
    String p3(@SpringQueryMap ProductInfo productInfo);

    // 传递json对象
    @RequestMapping("/p4")
    String p4(@RequestBody ProductInfo productInfo);
}💥注意事项:Feign 客户端中传递普通对象 作为参数时,要用 @SpringQueryMap 进行接受,而其它的参数则和 springmvc 是一致的。
然后写一个 FeginController 来进行测试:
java
@RestController
@RequestMapping("/feign")
public class FeginController {
    @Autowired
    private ProductApi productApi;

    @RequestMapping("/t1")
    public String test1() {
        return productApi.p1(1);
    }

    @RequestMapping("/t2")
    public String test2() {
        return productApi.p2(2, "name");
    }

    @RequestMapping("/t3")
    public String test3() {
        ProductInfo productInfo = new ProductInfo();
        productInfo.setId(3);
        productInfo.setProductName("name");
        return productApi.p3(productInfo);
    }

    @RequestMapping("/t4")
    public String test4() {
        ProductInfo productInfo = new ProductInfo();
        productInfo.setId(4);
        productInfo.setProductName("name");
        return productApi.p4(productInfo);
    }
}
测试时候访问 localhost:8080/feign/t1 等几个测试接口即可!

Ⅴ. 最佳实践
最佳实践是经过历史的迭代,在项目中的实践过程中,总结出来的最好的使用方式。通过观察,可以看出 Feign 的客户端与服务提供者的 controller 代码非常相似。
下面有两种方式可以优化。
一、Feign继承方式
Feign 支持继承的方式,我们可以把一些常见的操作封装到接口里。
步骤:创建一个新模块,定义好一些接口,让服务提供方实现 这些接口,当服务消费方编写 Feign 接口的时候,直接继承这个接口即可实现复用。
简单的说,就是把原来 order-service/api/ProductApi 抽出来,放到一个新模块中,然后直接去继承这个新模块即可。
具体参考:SpringCloudOpenFeignFeatures::SpringCloudOpenfeign
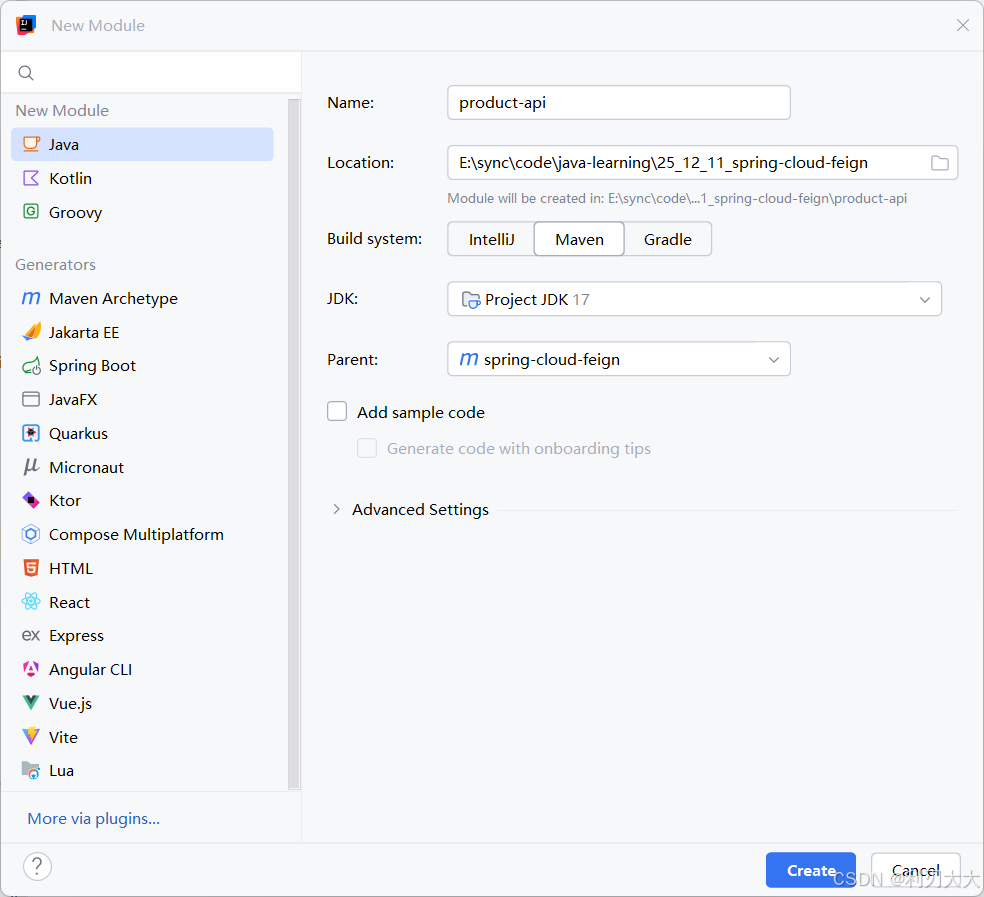
① 创建一个Module
创建一个新模块 product-api,这样子接口可以放在一个公共的 Jar 包里,供服务提供方和服务消费方使用:
② 引入依赖
在 product-api 模块中添加以下依赖:
xml
<dependencies>
    <dependency>
        <groupId>org.springframework.boot</groupId>
        <artifactId>spring-boot-starter-web</artifactId>
    </dependency>
    <dependency>
        <groupId>org.springframework.cloud</groupId>
        <artifactId>spring-cloud-starter-openfeign</artifactId>
    </dependency>
</dependencies>
③ 编写接口
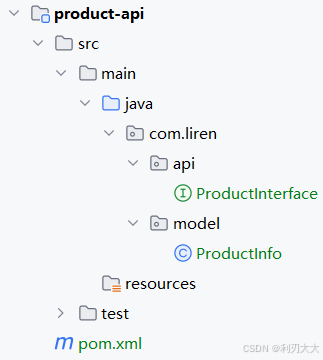
复制之前的 ProductApi、ProductInfo(公共对象抽取出来)到 product-api 模块中。
目录结构如下:
java
package com.liren.api;
import com.liren.model.ProductInfo;
import org.springframework.cloud.openfeign.SpringQueryMap;
import org.springframework.web.bind.annotation.RequestBody;
import org.springframework.web.bind.annotation.RequestMapping;
import org.springframework.web.bind.annotation.RequestParam;
public interface ProductInterface {
@RequestMapping("/{productId}")
ProductInfo getProductById(@RequestParam("productId") Integer productId);
// 传递一个参数
@RequestMapping("/p1")
String p1(@RequestParam("id")Integer id);
// 传递多个参数
@RequestMapping("/p2")
String p2(@RequestParam("id")Integer id, @RequestParam("name")String name);
// 传递对象
@RequestMapping("/p3")
String p3(@SpringQueryMap ProductInfo productInfo);
// 传递json对象
@RequestMapping("/p4")
String p4(@RequestBody ProductInfo productInfo);
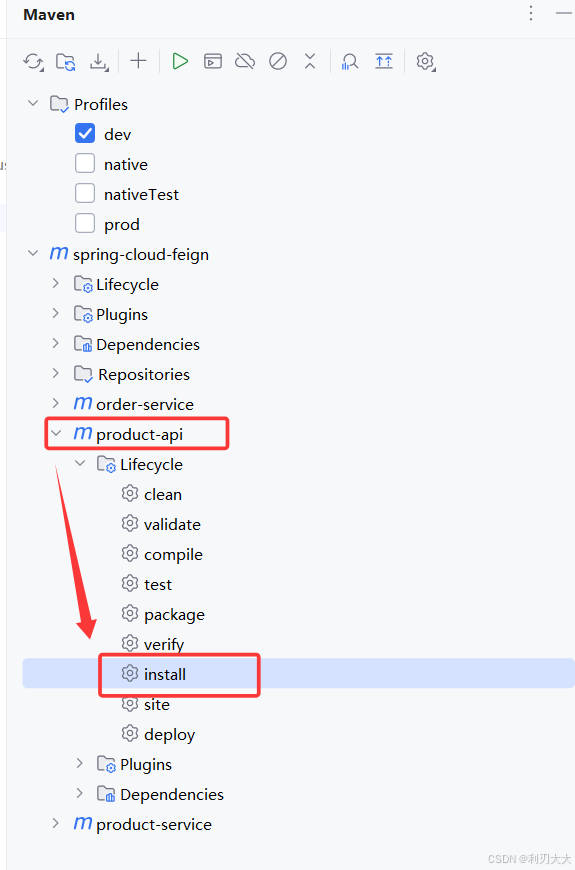
}④ 打 Jar 包
将 product-api 模块打包成 jar 包,这样其它模块就能通过 maven 导入它并且进行使用:
⑤ 服务提供方 实现 接口
让服务提供方 product-service 中对应 controller 实现接口 ProductInterface:
java
package com.liren.controller;
import com.liren.api.ProductInterface;
import com.liren.model.ProductInfo;
import com.liren.service.ProductService;
import lombok.extern.slf4j.Slf4j;
import org.springframework.beans.factory.annotation.Autowired;
import org.springframework.web.bind.annotation.*;

@Slf4j
@RestController
@RequestMapping("/product")
public class ProductController implements ProductInterface {
    @Autowired
    private ProductService productService;

    @RequestMapping("/{productId}")
    public ProductInfo getProductById(@RequestParam("productId") Integer productId) {
        return productService.selectProductById(productId);
    }

    // 传递一个参数
    @RequestMapping("/p1")
    public String p1(@RequestParam("id")Integer id) {
        return "p1接收到参数:" + id;
    }

    // 传递多个参数
    @RequestMapping("/p2")
    public String p2(@RequestParam("id")Integer id, @RequestParam("name")String name) {
        return "p2接收到参数:id=" + id + ",name=" + name;
    }

    // 传递对象
    @RequestMapping("/p3")
    public String p3(ProductInfo productInfo) {
        return "p3接收到参数:productInfo=" + productInfo;
    }

    // 传递json对象
    @RequestMapping("/p4")
    public String p4(@RequestBody ProductInfo productInfo) {
        return "p4接收到参数:productInfo=" + productInfo;
    }
}
⑥ 服务消费方 继承 接口
在服务消费方 order-service 中,让 ProductApi 继承 ProductInterface:
java
package com.liren.api;
import org.springframework.cloud.openfeign.FeignClient;

@FeignClient(name = "product-service", path = "/product")
public interface ProductApi extends ProductInterface {
}
⑦ 测试
远程调用:http://127.0.0.1:8080/order/1
二、Feign抽取方式
虽然官方推荐 Feign 的使用方式为继承方式,但是企业开发中,更多是把 Feign 接口完全抽取为一个独立的模块(做法和继承相似,但理念不同)
🐔操作方法:
将 Feign 的 Client 抽取为一个独立的模块,并把涉及到的实体类等都放在这个模块中(继承方式只是将接口给抽出来放到一个独立模块中而已,在消费端仍然得写一个 Feign 的 Client 来继承这个独立模块),打成一个 Jar 包,服务消费方只需要依赖该 Jar 包即可。
这种方式在企业中比较常见,Jar 包通常由服务提供方来实现。
注意事项:
- 服务提供方 比如
product-service中的ProductController仍然需要显式implements实现product-api抽出来的接口,这是为了保持接口一致的安全性! - 服务消费方 的启动类最好扫描一下
product-api模块的路径,即@EnableFeignClients(clients = {ProductApi.class}),因为很可能在其它项目中出现祖先包路径不同导致找不到启动类的情况。
① 创建一个module
② 引入依赖
在 product-api 模块中添加以下依赖:
xml
<dependencies>
    <dependency>
        <groupId>org.springframework.boot</groupId>
        <artifactId>spring-boot-starter-web</artifactId>
    </dependency>
    <dependency>
        <groupId>org.springframework.cloud</groupId>
        <artifactId>spring-cloud-starter-openfeign</artifactId>
    </dependency>
</dependencies>
③ 编写API
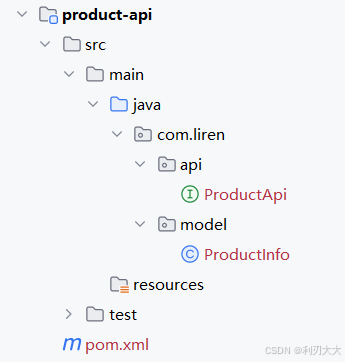
完善 product-api 模块中的 ProductApi(直接 copy 之前 order-service 中的即可,然后删掉 order-service 那个):
java
@FeignClient(name = "product-service", path = "/product")
public interface ProductApi {
    @RequestMapping("/{productId}")
    ProductInfo getProductById(@RequestParam("productId") Integer productId);

    // 传递一个参数
    @RequestMapping("/p1")
    String p1(@RequestParam("id")Integer id);

    // 传递多个参数
    @RequestMapping("/p2")
    String p2(@RequestParam("id")Integer id, @RequestParam("name")String name);

    // 传递对象
    @RequestMapping("/p3")
    String p3(@SpringQueryMap ProductInfo productInfo);

    // 传递json对象
    @RequestMapping("/p4")
    String p4(@RequestBody ProductInfo productInfo);
}
④ 打Jar包
将 product-api 模块打包成 jar 包,这样其它模块就能通过 maven 导入它并且进行使用:

⑤ 服务消费方直接使用 product-api 模块
-
删除之前
order-service中的 ProductApi、ProductInfo -
引入
product-api模块xml<dependency> <groupId>org.example</groupId> <artifactId>product-api</artifactId> <version>1.0-SNAPSHOT</version> </dependency> -
在启动类添加扫描路径
java@EnableFeignClients(basePackages = {"com.liren.api"}) @SpringBootApplication public class OrderServiceApplication { public static void main(String[] args) { SpringApplication.run(OrderServiceApplication.class, args); } }
也可以指定需要加载的 Feign 客户端:
java
@EnableFeignClients(clients = {ProductApi.class})⑥ 测试
测试远程调用:http://127.0.0.1:8080/order/1
Ⅵ. 服务部署
- 修改数据库,Nacos 等相关配置
- 对两个服务进行打包
- Maven 打包默认是从远程仓库下载的,但是
product-api这个包在本地。解决方案:- 上传到 Maven 中央仓库 【比较麻烦,不推荐】
- 搭建 Maven 私服,上传 Jar 包到私服 【企业推荐】
- 从本地读取 Jar 包 【个人学习阶段推荐,也是这里使用的方式】
- 修改
pom.xml文件,修改 jar 包的生命周期为system,然后将product-api进行install之后的路径放到systemPath中:
- Maven 打包默认是从远程仓库下载的,但是
xml
<dependency>
    <groupId>com.liren</groupId>
    <artifactId>product-api</artifactId>
    <version>1.0-SNAPSHOT</version>
    <scope>system</scope> <!-- scope 为system. 此时必须提供systemPath即本地依赖路径. 表示maven不会去中央仓库查找依赖 不推荐使用-->
    <systemPath>D:/maven/.m2/repository/com/liren/product-api/1.0-SNAPSHOT/product-api-1.0-SNAPSHOT.jar</systemPath>
</dependency>

//....
<build>
    <plugins>
        <plugin>
            <groupId>org.springframework.boot</groupId>
            <artifactId>spring-boot-maven-plugin</artifactId>
            <configuration>
                <includeSystemScope>true</includeSystemScope>
            </configuration>
        </plugin>
    </plugins>
</build>-
上传 jar 到 Linux 服务器
-
启动 Nacos
-
启动服务
bash#后台启动order-service, 并设置输出日志到logs/order.log nohup java -jar order-service.jar >logs/order.log & #后台启动product-service, 并设置输出日志到logs/order.log nohup java -jar product-service.jar >logs/product.log &