目录
- [1. 将ground truth trajectory 进行tokenization](#1. 将ground truth trajectory 进行tokenization)
-
- [1.1. transform_to_local](#1.1. transform_to_local)
- [1.2. 计算每段轨迹末尾车的状态](#1.2. 计算每段轨迹末尾车的状态)
- [1.3. 聚类生成codebook](#1.3. 聚类生成codebook)
- [2. 模型训练](#2. 模型训练)
-
- [2.1. SFT训练](#2.1. SFT训练)
- [2.2 RFT训练](#2.2 RFT训练)
-
- [2.2.1 Step1:生成 trajectory](#2.2.1 Step1:生成 trajectory)
- [2.2.2. Step2:计算 reward](#2.2.2. Step2:计算 reward)
- [2.2.3 CoT penalty](#2.2.3 CoT penalty)
- [2.2.4, reward计算](#2.2.4, reward计算)
- [2.2.5 rl_pdm_score函数](#2.2.5 rl_pdm_score函数)
- [2.2.6 加载场景缓存](#2.2.6 加载场景缓存)
- [2.2.7 长江问题](#2.2.7 长江问题)
模型总体架构:
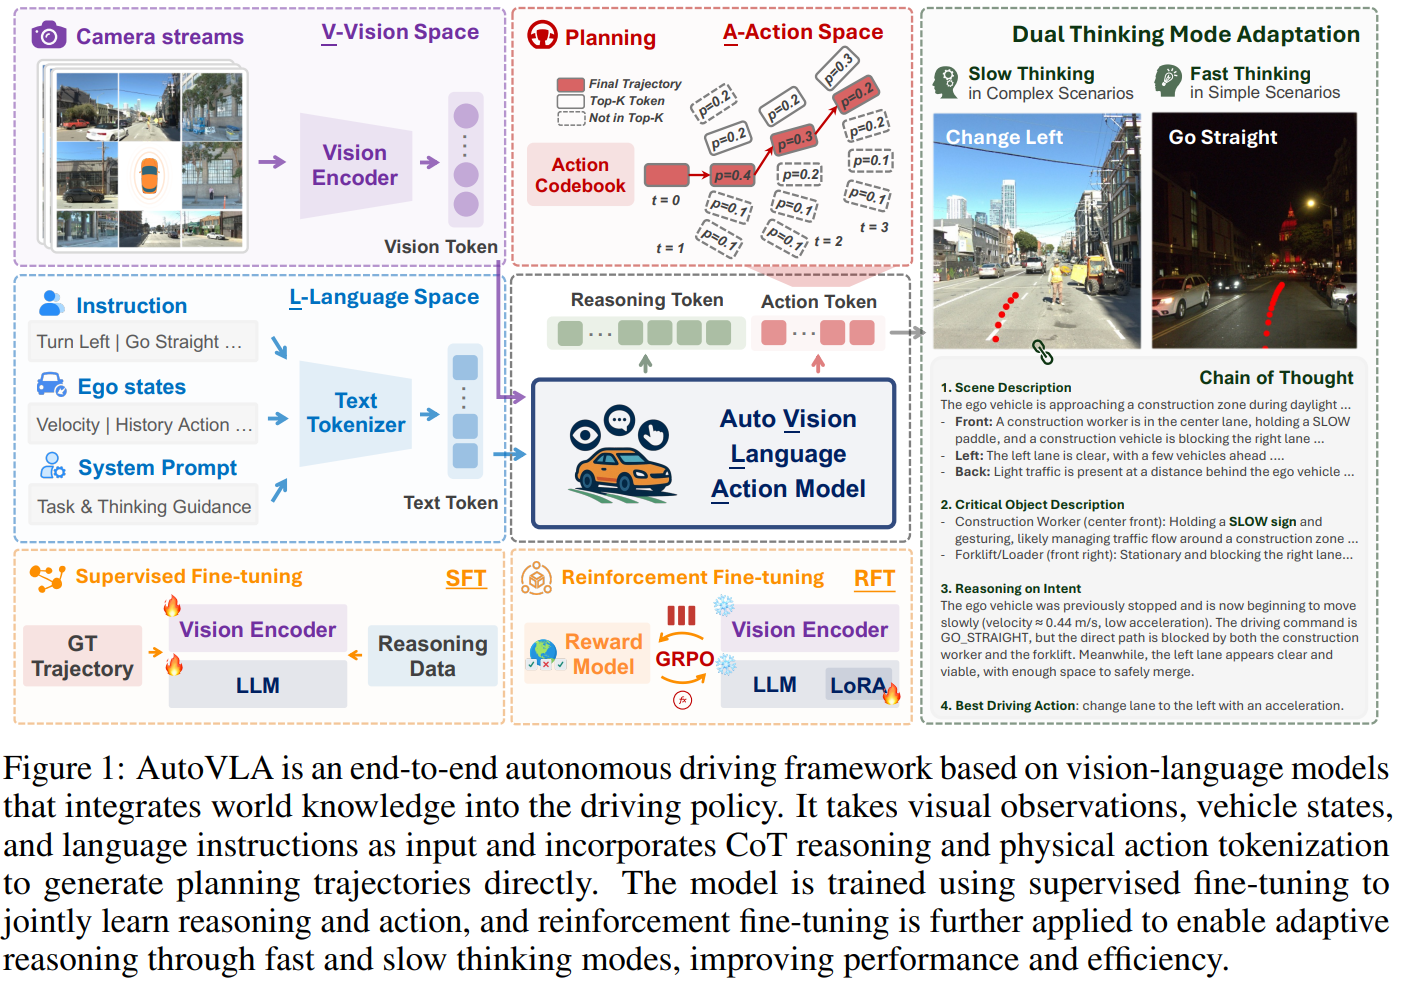
训练步骤:
1. 将ground truth trajectory 进行tokenization
trajectory是模型的预测目标. 我们把trajectory分成一小段一线段的segments, 每个segments有6个采样点, 分别是在地图坐标系标出的6个时刻的点:
python
{
  "gt_trajectory": [
    [0.0, 0.0, 0.0],
    [1.0, 0.1, 0.02],
    [2.1, 0.2, 0.03],
    [3.2, 0.5, 0.10],
    [4.0, 1.0, 0.20]
  ]
}
含义:
python
[x, y, heading] -> 位置, 车头朝向位置和朝向是世界坐标, 是以地图中心为原点.
1.1. transform_to_local
转换到 ego local frame, 也就是每个位置现在的状态都是以前一个时刻的状态为(0, 0, 0)的, 然后去
因为原始输入的(x, y, heading), 位置和朝向是世界坐标, 是以地图中心为原点.
现在转为local之后, 是以ego为center, 也就是车辆t=0时刻为原点, heading为0
然后后面每个时刻都以前一个时刻为(0, 0, 0)
也就是说transform_to_local的输入,是以地图某个位置和方向为(0, 0, 0),
输出是以t-1时刻的车辆位置和方向为(0, 0, 0), 其实就是一个
(delta_x, delta_y, delta_heading)。
1.2. 计算每段轨迹末尾车的状态
有了step 1的车辆每个时刻相对前一时刻ego的车辆位置和朝向之后, 就可以得到每个轨迹(6个点)的最后时刻的车辆位置和朝向. (0, 0, 0)为t=0时刻车状态。例如
例如:
| t | x | y | heading |
|---|---|---|---|
| 0 | 0.0 | 0.0 | 0.00 |
| 1 | 1.0 | 0.1 | 0.02 |
| 2 | 2.1 | 0.2 | 0.03 |
| 3 | 3.2 | 0.5 | 0.10 |
| 4 | 4.0 | 1.0 | 0.20 |
变成
| step | Δx | Δy | Δheading |
|---|---|---|---|
| 1 | 1.0 | 0.1 | 0.02 |
| 2 | 1.1 | 0.1 | 0.01 |
| 3 | 1.1 | 0.3 | 0.07 |
| 4 | 0.8 | 0.5 | 0.10 |
根据以下信息得到车辆最后一个时刻车辆的4个端点 cal_polygon_contour():
- 位置和朝向(x, y, heading)
- 车辆大小计算最后一个时刻
python
[
 [5.55, 0.92],
 [5.74,-1.02],
 [0.82,-1.50],
 [0.63, 0.44]
]
车辆的4个端点位置(8, ), 用这4个端点位置代表轨迹.
1.3. 聚类生成codebook
对n个轨迹(n, 8)做聚类, 聚成2048个类, 这2048个聚类中心构成codebook. 距离用L2 norm
聚类方法: 对(n, 8)个点做类似k-means的操作, 得到2048个聚类中心之后, 以后对每条轨迹, 看跟这2048个中心哪个距离近就用哪个token来表示
1.5. 对每个新的轨迹, 计算最后时刻车辆的4个端点位置, 然后看属于哪一类
通过以上步骤, 把车辆的trajectory进行了token化, 方便后面统一进入VLA模型来训练。每个token的意义类似于:
| token id | trajectory pattern |
|---|---|
| 0 | 直行 |
| 1 | 轻微左转 |
| 2 | 轻微右转 |
| 3 | 急左转 |
| 4 | 急刹 |
| ... | ... |
为什么需要2048个cluster? 轨迹空间非常大, 你不能只有几个 token,否则无法表达复杂动作. 2048 是经验值:
| token 数量 | 意义 |
|---|---|
| 128 | 太少,只能表示几种方向,精度差 |
| 512 | 可以表示弯道/直行/刹车等组合 |
| 2048 | 足够覆盖绝大多数驾驶轨迹模式,同时模型仍可训练 |
| 8192+ | 更精细,但训练难度增大,显存/计算量大 |
简单理解:每个 token 是 一类车辆未来动作的模板。token 越多 → 描述越精细 → 模型预测越精确
2. 模型训练
首先模型的输入batch为:
python
{
  'input_ids': torch.tensor([
      [101, 3001, 3055, 151644, 77091, 2003, ...],  # 第1条样本 tokenized 文本
      [101, 4010, 4022, 151644, 77091, 2050, ...],  # 第2条样本 tokenized 文本
  ]),  # shape [2, seq_len]

  'attention_mask': torch.tensor([
      [1,1,1,1,...],  # 第1条
      [1,1,1,1,...],  # 第2条
  ]),

  'labels': torch.tensor([
      [-100, -100, -100, 151644, 77091, 2003, ...],  # 只计算 assistant 消息 loss
      [-100, -100, -100, 151644, 77091, 2050, ...],
  ]),

  'image_inputs': torch.stack([...]),  # shape [2, n_images, C, H, W] 或者 pixel values
  'video_inputs': torch.stack([...]),  # shape [2, n_videos, frames, C, H, W]

  'gt_trajectory': torch.stack([
      [[0.0,0.0,0.0],[0.5,0,0.01], ... ],  # 第1条
      [[1.0,0.0,0.0],[1.5,0,0.01], ... ]   # 第2条
  ]),  # shape [batch, 6, 3]

  'gt_action': torch.tensor([ [42], [128] ]),  # shape [batch, 1]
  'has_cot': torch.tensor([False, False])
}
2.1. SFT训练
将真实场景的数据送到VLM模型进行next token prediction的训练, 输入信息有:
- 车载摄像头的图像数据
- vehicle_velocity: 车辆的速度, 会放到prompt里
- vehicle_velocity: 车辆的加速度, 会放到prompt里
- driving_command: 当前驾驶指令 string,例如 "turn left", 来自于车载导航软件
一个batch数据类似:
python
{
  'text': "<system> ... </system> <user> ... </user> <assistant> ... </assistant>",
  'image_inputs': [
      'front_camera_1.png', 'front_camera_2.png', 'front_camera_3.png', 'front_camera_4.png',
      'front_left_camera_1.png', ...
  ],
  'video_inputs': [
      ['front_camera_1.mp4', 'front_camera_2.mp4', 'front_camera_3.mp4', 'front_camera_4.mp4'],
      ['front_left_camera_1.mp4', ...],
      ['front_right_camera_1.mp4', ...]
  ],
  'gt_trajectory': torch.tensor([
      [0.0, 0.0, 0.0],
      [0.5, 0.0, 0.01],
      [1.0, 0.0, 0.02],
      [1.5, 0.0, 0.03],
      [2.0, 0.0, 0.03],
      [2.5, 0.0, 0.04],
  ]),  # shape [6, 3]
  'gt_action': torch.tensor([42]),  # action token index
  'has_cot': False,
  'data_path': "scene001.json"
}
模型生成action序列, 然后做next token prediction, 计算CE loss.
python
shift_logits = logits[..., :-1, :].contiguous()
shift_labels = labels[..., 1:].contiguous()
loss = F.cross_entropy(shift_logits.view(-1, V), shift_labels.view(-1))
动作 token 单独 loss
action_mask = (labels_flat >= self.autovla.action_start_id)
ce_loss_all = F.cross_entropy(logits_flat, labels_flat, reduction='none')
action_loss = ce_loss_all[action_mask].mean()
找出 动作token(>= action_start_id), 对这些 token 的 CE loss 单独计算并平均, 可以用 加权 合并到总 loss 中(尤其是 CoT 样本):
if hascot[0] == True:
    loss = loss * 40 + action_loss
总结:
- 普通 token → cross-entropy
- 动作 token → 单独 CE loss + 可加权
- CoT 样本 → 总 loss 放大
总结 Loss 流程图:
batch → get_prompt → input_ids, attention_mask, pixel_values_videos
    ↓
vlm.forward(inputs) → logits (B, L, V)
    ↓
cross-entropy(logits, labels) → LM loss
    ↓
选出动作 token → action_loss
    ↓
根据 CoT flag → 放大 LM loss + 加入 action_loss
    ↓
log("train_loss", loss)
输入:多路视频 + 车辆状态 + 指令文本 → tokenized prompt
输出:每个 token 的预测 logits + loss
Loss:
- 基础:所有 token 的 cross-entropy
- 加强:动作 token CE loss
- CoT 样本:loss 放大(例如 ×40)
prompt:
python
instruction = input_features["driving_command"].lower()
...
user_content = [
    ...
    {
        "type": "text",
        "text": (
            f"The current velocity of the vehicle is {velocity:.3f} m/s, and the current acceleration is {acceleration:.3f} m/s². "
            f"The driving instruction is: {instruction}. Based on this information, plan the action trajectory for the autonomous vehicle over the next five seconds."
        )
    },
]来源:input_features"driving_command", 这是数据集 JSON 文件里提供的高层驾驶指令,例如 "turn left"、"keep lane"、"stop" 等。
格式化:把指令 + 当前速度 + 加速度组合成一段文本。
文本示例:The current velocity of the vehicle is 5.20 m/s, and the current acceleration is 0.30 m/s². The driving instruction is: turn left. Based on this information, plan the action trajectory for the autonomous vehicle over the next five seconds.
作用:这个文本作为 user content 的一部分,会在 tokenized prompt 中被编码成 input_ids,供模型理解"当前车辆状态 + 高层指令",然后生成动作 token。
注意这里的CoT是每次只预测1个token来计算loss的.
2.2 RFT训练
reinforcement finetuning训练的输入数据:
python
{
  input_features: {
       images,
       velocity,
       acceleration
  },

  target_trajectory: {
       gt_pos_raw,
       gt_idx
  },

  token: "scene_03492"
}
这里面的scent是类似
The
- Front: A construction worker is in the center lane, holding a SLOW
paddle, and a construction vehicle is blocking the right lane ...
- Left: The left lane is clear, with a few vehicles ahead ....
- Back: Light traAic is present at a distance behind the ego vehicle ...
整体思路:
python
环境 (video + state + instruction)
        ↓
模型生成 trajectory
        ↓
reward function 评分
        ↓
policy gradient 更新模型
训练流程: LLM + 自动驾驶 reward → RL 优化
python
训练流程:

prompt (视频+状态)
      ↓
model.generate()
      ↓
生成 action tokens
      ↓
decode → trajectory
      ↓
reward_function()
      ↓
policy gradient 更新模型
2.2.1 Step1:生成 trajectory
sample = self.generate_sample(...), 里面做的是:prompt → model.generate(), 生成:completion tokens 然后提取:action tokens
action token处理: actions_tokens = completion_ids[0][completion_ids[0] >= self.action_start_id], 只保留:trajectory tokens
然后 decode:token → trajectory, trajectory = decode_token_ids_to_trajectory(...), 得到:(x,y) trajectory
2.2.2. Step2:计算 reward
reward = self.reward_function(sample), 核心:reward = PDM score, PDM 是 nuPlan 的 driving metric。评价指标:
- collision
- lane keeping
- progress
- comfort
也就是常见的安全性+舒适性
2.2.3 CoT penalty
如果生成文本包含:"complex scenario", 就会有 penalty:reasoning太长 → reward减少, 代码:
python
sigmoid((len(text)-center)*coef)目的:限制CoT长度
generate_sample 细节, 这里其实是整个 RL pipeline 的核心。流程:
feature → prompt
       ↓
generate text
       ↓
extract action tokens
       ↓
decode trajectory
trajectory token处理
如果 token 数量不对:
- > num_poses → truncate
- < num_poses → padding
保证:固定 trajectory 长度
完整 pipeline:
Dataset
   ↓
input_features
   ↓
prompt
   ↓
LLM generate
   ↓
action tokens
   ↓
decode trajectory
   ↓
reward function
   ↓
advantage
   ↓
policy gradient
   ↓
update AutoVLA
2.2.4, reward计算
class PDM_Reward, 作用:
输入
- trajectory:模型生成的轨迹(AutoVLA 输出)
- token:当前场景 ID
输出
- reward:一个数值,表示这条轨迹的驾驶质量
本质是:
生成轨迹
     ↓
仿真器模拟执行
     ↓
计算驾驶指标
     ↓
综合评分
     ↓
作为 RL reward
也就是:
trajectory → simulator → metrics → score → rewardPDMSimulator
self.simulator = PDMSimulator(self.future_sampling)
作用:仿真 ego 车沿着 trajectory 行驶, 比如:模型输出:ego trajectory, 仿真器会模拟:
- ego 行驶
- 其他车辆反应
- 交通灯
- lane
- 碰撞
得到:
simulation result
4 PDMScorer
self.scorer = PDMScorer(self.future_sampling)
作用:计算 自动驾驶评价指标, 例如:
- metric 含义
- collision 是否撞车
- offroad 是否出车道
- progress 是否向目标前进
- lane adherence 是否在车道
- jerk 是否舒适
最后综合成:PDM score
2.2.5 rl_pdm_score函数
核心函数:def rl_pdm_score(self, trajectory, token):
输入:
- trajectory -> 模型生成
- token -> 场景ID
2.2.6 加载场景缓存
metric_cache_path = self.metric_cache_loader.metric_cache_paths[token]
根据 token 找到场景缓存文件。例如:
python
token = 8f34ab...
path = metric_cache/8f34ab.xz

# 读取缓存
with lzma.open(metric_cache_path, "rb") as f:
    metric_cache = pickle.load(f)
说明缓存是:
- lzma压缩
- pickle序列化
加载后得到metric_cache, 里面包含:
- map
- agents
- ego history
- route
- traffic lights
- lane graph
然后调用pdm_score, 核心:
python
result = pdm_score(
    metric_cache=metric_cache,
    model_trajectory=trajectory,
    future_sampling=self.future_sampling,
    simulator=self.simulator,
    scorer=self.scorer,
)
这里做了完整流程:
-
Step1 轨迹仿真
- simulator 执行:
- ego 按 trajectory 行驶
- 同时模拟:
- 其他车辆
- 交通灯
- lane
-
Step2 计算 metrics, scorer 计算, 例如:
- collision
- offroad
- progress
- speed limit
- comfort
-
Step3 汇总 score, 得到
result.score, 范围一般:0 ~ 1, 例如:
| score | 含义 |
|---|---|
| 0.95 | 很好 |
| 0.7 | 一般 |
| 0.2 | 很差 |
| 0 | crash |
reward返回
python
final_reward = result.score
return final_reward
所以reward = PDM score
整个reward pipeline
完整流程:
model
   ↓
生成 trajectory
   ↓
PDM_Reward.rl_pdm_score
   ↓
加载场景 metric_cache
   ↓
simulator 仿真 ego 行驶
   ↓
scorer 计算驾驶指标
   ↓
汇总 PDM score
   ↓
return reward
2.2.7 长江问题
- 为什么要用 PDM score 做 reward
因为自动驾驶评价标准不能只看, L2 trajectory error, 而要看:
- 安全性
- 交通规则
- 舒适度
- 导航进度
所以 RL reward 用Driving metrics而不是trajectory regression loss
- 为什么需要 token
token -> scene id, 用来找:metric_cachetoken, 例如:token: 98af23, cache:
- map
- agents
- traffic lights
- route
否则 无法仿真这个场景。
- 这个 RL 实际优化的是什么
强化学习优化:maximize PDM score, 也就是让模型学会生成:
- 安全
- 合法
- 舒适
- 进度合理
注意: reward 完全不依赖 GT trajectory, 因为:RL 不需要 GT。只要:trajectory → simulator → score即可。总结一句话
PDM_Reward 的本质:把自动驾驶仿真评估指标变成 RL reward, 流程:
trajectory + scene token
        ↓
load scene
        ↓
simulate ego
        ↓
compute metrics
        ↓
PDM score
        ↓
reward