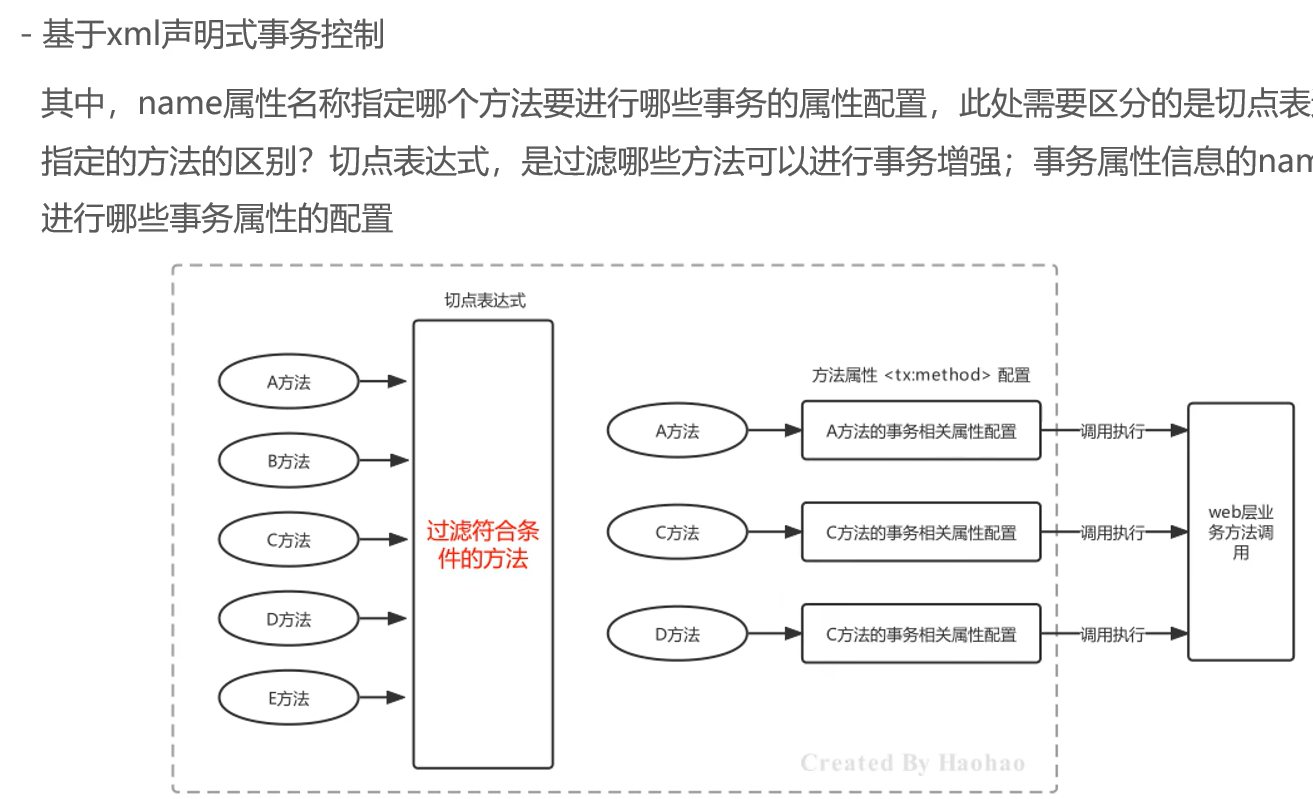
基于注解方式配置声明式事务
一、注解+xml的形式
xml:
java
<?xml version="1.0" encoding="UTF-8"?>
<beans xmlns="http://www.springframework.org/schema/beans"
       xmlns:xsi="http://www.w3.org/2001/XMLSchema-instance"
       xmlns:context="http://www.springframework.org/schema/context"
       xmlns:aop="http://www.springframework.org/schema/aop"
       xmlns:tx="http://www.springframework.org/schema/tx"
       xsi:schemaLocation="
       http://www.springframework.org/schema/beans
       http://www.springframework.org/schema/beans/spring-beans.xsd
       http://www.springframework.org/schema/context
       http://www.springframework.org/schema/context/spring-context.xsd
       http://www.springframework.org/schema/aop
       http://www.springframework.org/schema/aop/spring-aop.xsd
       http://www.springframework.org/schema/tx
       http://www.springframework.org/schema/tx/spring-tx.xsd
       ">
    <!--组件扫描-->
    <context:component-scan base-package="com.itheima"/>

    <!--加载properties文件-->
    <context:property-placeholder location="classpath:jdbc.properties"/>

    <!--配置数据源信息-->
    <bean id="dataSource" class="com.alibaba.druid.pool.DruidDataSource">
        <property name="driverClassName" value="${jdbc.driver}"></property>
        <property name="url" value="${jdbc.url}"></property>
        <property name="username" value="${jdbc.username}"></property>
        <property name="password" value="${jdbc.password}"></property>
    </bean>

    <!--配置SqlSessionFactoryBean,作用将SqlSessionFactory存储到spring容器-->
    <bean class="org.mybatis.spring.SqlSessionFactoryBean">
        <property name="dataSource" ref="dataSource"></property>
    </bean>

    <!--MapperScannerConfigurer,作用扫描指定的包,产生Mapper对象存储到Spring容器-->
    <bean class="org.mybatis.spring.mapper.MapperScannerConfigurer">
        <property name="basePackage" value="com.itheima.mapper"></property>
    </bean>

    <bean class="org.springframework.jdbc.datasource.DataSourceTransactionManager" id="transactionManager">
        <property name="dataSource" ref="dataSource"/>
    </bean>
<!--配置事务代理(实际上就是注解驱动)-->
    <tx:annotation-driven transaction-manager/>
</beans>
注解部分:
java
package com.itheima.service.impl;

import com.itheima.mapper.AccountMapper;
import com.itheima.service.AccountService;
import org.springframework.beans.factory.annotation.Autowired;
import org.springframework.stereotype.Service;
import org.springframework.transaction.annotation.Isolation;
import org.springframework.transaction.annotation.Propagation;
import org.springframework.transaction.annotation.Transactional;

@Service("accountService")
@Transactional(isolation = Isolation.READ_COMMITTED,propagation = Propagation.REQUIRED)
public class AccountServiceImpl2 implements AccountService {

    @Autowired
    private AccountMapper accountMapper;

    @Override
    @Transactional(isolation = Isolation.READ_COMMITTED,propagation = Propagation.REQUIRED)
    public void transferMoney(String outAccount, String inAccount, Integer money) {
//        如果是编程类事务的话:先开一个事务,然后try catch以下有异常就回滚
        accountMapper.decrMoney(outAccount,money);
        int i = 1/0;
        accountMapper.incrMoney(inAccount,money);
    }

    public void registAccount(){

    }
}
但是我们要是改配就会报错:
java
<bean class="org.springframework.jdbc.datasource.DataSourceTransactionManager" id="transactionManager222">
        <property name="dataSource" ref="dataSource"/>
    </bean>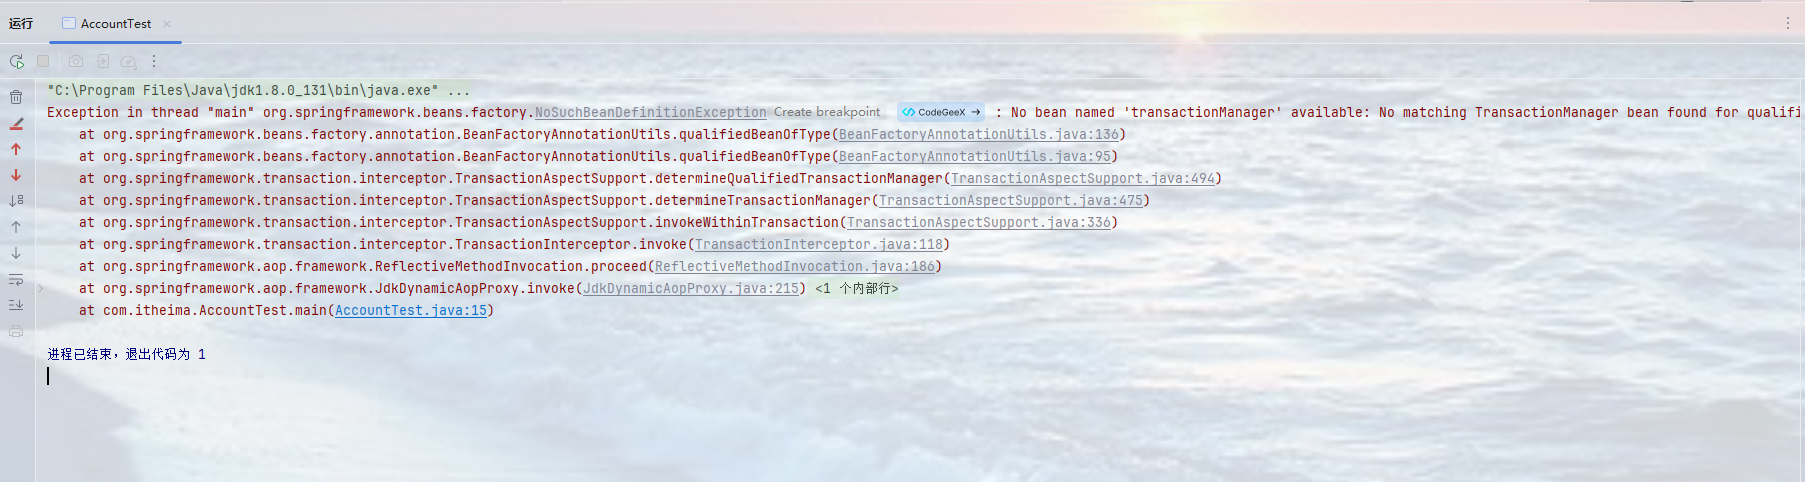
这是因为其底层在找一个名为"transactionManager"的事务管理器,这样配置指定好就不会报错了:
java
<tx:annotation-driven transaction-manager="transactionManager222"/>二、全注解方式
其实全注解方式就是使用核心配置类来进行操作,之前也是讲过,只不过这里是多了一个事务的注解:@EnableTransactionManagement,相关与xml中的:
java
<tx:annotation-driven transaction-manager/>
java
package com.itheima.config;

import com.alibaba.druid.pool.DruidDataSource;
import org.mybatis.spring.SqlSessionFactoryBean;
import org.mybatis.spring.annotation.MapperScan;
import org.springframework.beans.factory.annotation.Value;
import org.springframework.context.annotation.Bean;
import org.springframework.context.annotation.ComponentScan;
import org.springframework.context.annotation.Configuration;
import org.springframework.context.annotation.PropertySource;
import org.springframework.jdbc.datasource.DataSourceTransactionManager;
import org.springframework.transaction.annotation.EnableTransactionManagement;

import javax.sql.DataSource;

//使用核心配置类来实现全注解开发
//开启组件扫描
@ComponentScan("com.itheima")
//注册为核心配置类
@Configuration
//开启事务
@EnableTransactionManagement
//接口扫描
@MapperScan("com.itheima.mapper")
//开启资源加载
@PropertySource("classpath:jdbc.properties")
public class SpringConfig2 {
//    先是配置数据源:使用构造方法的形式
//    注册成为bean
    @Bean
    public DataSource dataSource(
//            使用注解的形式传参进行属性注入
            @Value("${jdbc.username}") String username,
            @Value("${jdbc.password}") String password,
            @Value("${jdbc.driver}") String driver,
            @Value("${jdbc.url}") String url
            ){
//        先创建一个指定数据源,然后再进行属性设置
       DruidDataSource dataSource = new DruidDataSource();
       dataSource.setUsername(username);
       dataSource.setDriverClassName(driver);
       dataSource.setPassword(password);
       dataSource.setUrl(url);
       return dataSource;
    }

//    再是配置SqlSessionFactoryBean
//    一样是先注册成为Bean
    @Bean
    public SqlSessionFactoryBean sqlSessionFactoryBean(DataSource dataSource){
        SqlSessionFactoryBean sqlSessionFactoryBean = new  SqlSessionFactoryBean();
        sqlSessionFactoryBean.setDataSource(dataSource);
        return sqlSessionFactoryBean;
    }

//    配置事物管理
    @Bean
    public DataSourceTransactionManager transactionManager(DataSource dataSource){
        DataSourceTransactionManager dataSourceTransactionManager  = new DataSourceTransactionManager();
        dataSourceTransactionManager.setDataSource(dataSource);
        return dataSourceTransactionManager;
    }
}
常见误区答疑: