在jetson设备上不可以直接用pip install torch来安装pytorch,必须要去nvidia官网下载编译好的whl文件进行pip install,这有更直接一点的地址来安装jetpack对应的whl,很可惜最高只支持jetpack6.1,这意味着超过6.1版本的必须自己从pytorch官网进行来下载源码编译,那么就开始正题。
首先获取源码:
bash
# 1. 克隆源码(带子模块)
git clone --recursive https://github.com/pytorch/pytorch.git
如果没有VPN会非常久。
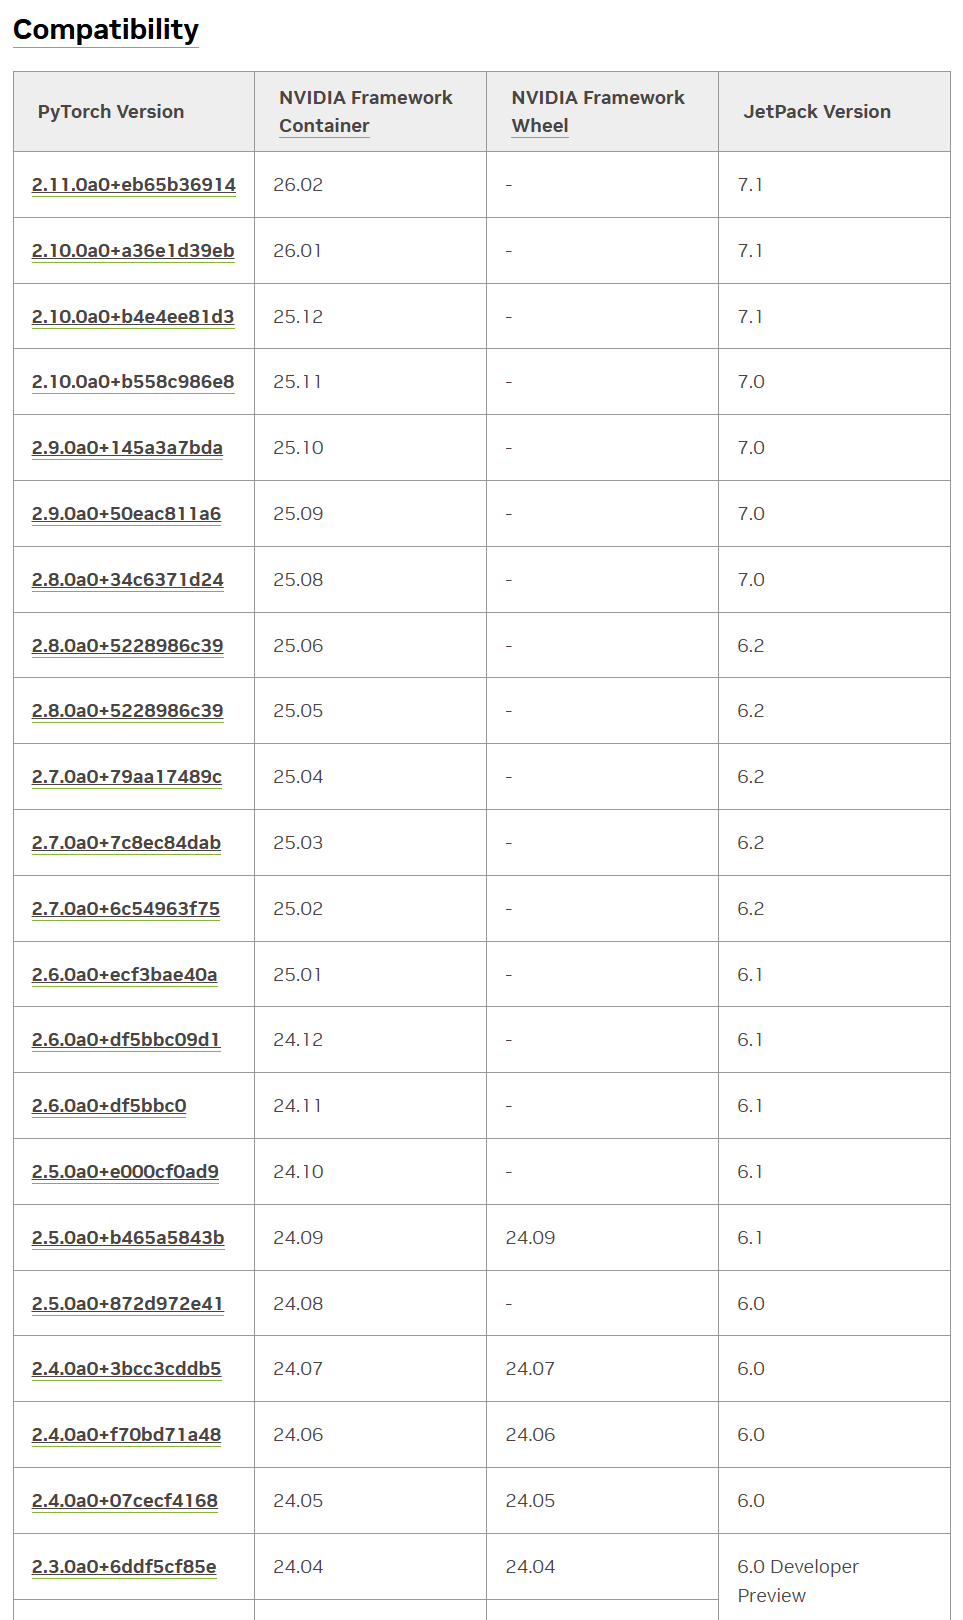
然后查看官网的兼容表,比如我6.2选择2.7.0a0+7c8ec84dab这个版本的torch:
bash
cd pytorch
# 2. 切到一个稳定版本(建议 v2.3.0 或 v2.4.0)
git checkout 7c8ec84dab
git submodule sync
git submodule update --init --recursive --jobs 0
然后安装系统依赖(apt):
bash
sudo apt update
sudo apt install -y \
    build-essential \
    cmake \
    ninja-build \
    git \
    libopenblas-dev \
    libjpeg-dev \
    libpng-dev \
    python3-dev \
    python3-pip \
    python3-setuptools \
    python3-wheel \
    libprotobuf-dev \
    protobuf-compiler \
    zlib1g-dev
安装Python 依赖(pip):
bash
pip install --upgrade pip
pip install -r requirements.txt
pip install typing_extensions sympy filelock networkx jinja2
清理旧版本torch:
bash
pip uninstall -y torch torchvision torchaudio设置环境变量:
bash
export CUDA_HOME=/usr/local/cuda
export PATH=$CUDA_HOME/bin:$PATH
export LD_LIBRARY_PATH=/usr/lib/aarch64-linux-gnu:$CUDA_HOME/lib64:$LD_LIBRARY_PATH

export USE_CUDA=1
export USE_CUDNN=1
export USE_MKLDNN=0
export USE_NCCL=0

export TORCH_CUDA_ARCH_LIST="8.7"
开始编译:
bash
python3 setup.py bdist_wheel不出意外报错:
bash
CMake Error at third_party/protobuf/cmake/CMakeLists.txt:2 (cmake_minimum_required):
  Compatibility with CMake < 3.5 has been removed from CMake.

  Update the VERSION argument <min> value.  Or, use the <min>...<max> syntax
  to tell CMake that the project requires at least <min> but has been updated
  to work with policies introduced by <max> or earlier.

  Or, add -DCMAKE_POLICY_VERSION_MINIMUM=3.5 to try configuring anyway.


-- Configuring incomplete, errors occurred!
cmake版本太低,安装新版本 CMake:
bash
pip install --upgrade cmake
# 查看版本 结果应该会是cmake version 3.28.x
cmake --version
然后先清理再重新编译:
bash
python3 setup.py clean
rm -rf build
python3 setup.py bdist_wheel
建议可以先看一下内存:
bash
free -h如果小于8G则需要扩容否则会OOM,编译过程可能4-6小时,非常吃RAM:
bash
sudo fallocate -l 16G /swapfile
sudo chmod 600 /swapfile
sudo mkswap /swapfile
sudo swapon /swapfile
重新编译后可能还是报错:
bash
-- Found Python: /usr/bin/python3 (found version "3.10.12") found components: Interpreter
CMake Warning at cmake/public/cuda.cmake:140 (message):
  Failed to compute shorthash for libnvrtc.so
Call Stack (most recent call first):
  cmake/Dependencies.cmake:44 (include)
  CMakeLists.txt:865 (include)


-- Found nvtx3: /home/baiyi/pytorch/third_party/NVTX/c/include
-- Could NOT find CUDNN (missing: CUDNN_LIBRARY_PATH CUDNN_INCLUDE_PATH)
CMake Warning at cmake/public/cuda.cmake:218 (message):
  Cannot find cuDNN library.  Turning the option off
Call Stack (most recent call first):
  cmake/Dependencies.cmake:44 (include)
  CMakeLists.txt:865 (include)


-- Could NOT find CUSPARSELT (missing: CUSPARSELT_LIBRARY_PATH CUSPARSELT_INCLUDE_PATH)
CMake Warning at cmake/public/cuda.cmake:243 (message):
  Cannot find cuSPARSELt library.  Turning the option off
Call Stack (most recent call first):
  cmake/Dependencies.cmake:44 (include)
  CMakeLists.txt:865 (include)


-- Could NOT find CUDSS (missing: CUDSS_LIBRARY_PATH CUDSS_INCLUDE_PATH)
CMake Warning at cmake/public/cuda.cmake:259 (message):
  Cannot find CUDSS library.  Turning the option off
Call Stack (most recent call first):
  cmake/Dependencies.cmake:44 (include)
  CMakeLists.txt:865 (include)


-- USE_CUFILE is set to 0. Compiling without cuFile support
-- Added CUDA NVCC flags for: -gencode;arch=compute_87,code=sm_87
CMake Warning at cmake/Dependencies.cmake:95 (message):
  Not compiling with XPU.  Could NOT find SYCL.Suppress this warning with
  -DUSE_XPU=OFF.
Call Stack (most recent call first):
  CMakeLists.txt:865 (include)


-- Building using own protobuf under third_party per request.
-- Use custom protobuf build.
CMake Error at third_party/protobuf/cmake/CMakeLists.txt:2 (cmake_minimum_required):
  Compatibility with CMake < 3.5 has been removed from CMake.

  Update the VERSION argument <min> value.  Or, use the <min>...<max> syntax
  to tell CMake that the project requires at least <min> but has been updated
  to work with policies introduced by <max> or earlier.

  Or, add -DCMAKE_POLICY_VERSION_MINIMUM=3.5 to try configuring anyway.


-- Configuring incomplete, errors occurred!
升级了 pip 的 cmake,但 PyTorch 编译时仍然在调用系统的旧 CMake(3.22)
因为这个cmake的调用折腾了非常非常非常久,省略中间过程,直接贴出最终的解决方案:
删除所有 CMake 可执行文件
bash
sudo rm -f /usr/local/bin/cmake
sudo rm -f /usr/local/bin/ctest
sudo rm -f /usr/local/bin/cpack
sudo rm -f /usr/local/bin/cmake-gui
sudo rm -f /usr/local/bin/cmake3
删除 pip CMake 的所有残留
bash
pip uninstall -y cmake
pip uninstall -y cmake
pip uninstall -y cmake
然后删除目录:
bash
rm -rf ~/.local/lib/python3.10/site-packages/cmake
rm -rf ~/.local/share/cmake*
rm -rf ~/.local/bin/cmake
rm -rf ~/.local/bin/ctest
rm -rf ~/.local/bin/cpack
删除所有 CMake 环境变量
bash
unset CMAKE_ROOT
unset CMAKE_COMMAND
unset CMAKE_PREFIX_PATH
unset CMAKE_MODULE_PATH
清理 PyTorch 构建缓存
bash
cd ~/pytorch  # 如果一直在pytorch目录里面则不用执行
python3 setup.py clean
rm -rf build
rm -rf CMakeCache.txt
rm -rf CMakeFiles
重新安装干净的 CMake 3.28.3
bash
pip install cmake==3.28.3
which cmake
cmake --version
结果必须是这样的:
bash
/home/xxx/.local/bin/cmake
cmake version 3.28.3
重新构建 PyTorch
bash
python3 setup.py bdist_wheel如果看到了以下log则说明真正开始进行编译:
bash
-- The C compiler identification is GNU 11.x
-- The CXX compiler identification is GNU 11.x
-- Found CUDA: /usr/local/cuda (found version "12.6")
-- Found cuDNN
-- Configuring done
-- Generating done
这个过程将非常之久,4-6小时都很正常,不要动到电脑且保证不断电,不然需要从头开始。
不出意外,几个小时后有了一个报错:
bash
FAILED: [code=137] caffe2/CMakeFiles/torch_cuda.dir/__/aten/src/ATen/native/transformers/cuda/flash_attn/kernels/flash_bwd_hdim128_bf16_sm80.cu.o
... ...
... ...
Killed
[2958/6210] Building CUDA object caffe2/CMakeFiles/torch_cu...rs/cuda/flash_attn/kernels/flash_bwd_hdim256_bf16_sm80.cu.o
ninja: build stopped: subcommand failed.
这是典型的 OOM(内存不足)导致的编译被系统杀掉(SIGKILL 137),Jetson AGX Orin 在编译 PyTorch 的 CUDA 内核时内存不够,被 Linux OOM Killer 杀掉了。
我在编译之前看了swap是14G以为够了,没想到还是OOM了,那只能继续扩大了,扩到24G。
先关闭旧 swap:
bash
sudo swapoff -a创建 24GB swap:
bash
sudo fallocate -l 24G /swapfile
sudo chmod 600 /swapfile
sudo mkswap /swapfile
sudo swapon /swapfile创建完用free -h可以查看swap大小 。
清理构建缓存(避免重复触发 OOM):
bash
python3 setup.py clean
rm -rf build
rm -rf CMakeCache.txt
限制 ninja 并行度后重新编译:
bash
export MAX_JOBS=4
python3 setup.py bdist_wheel
当最后几行输出如下时,代表编译成功了:
bash
... ...
... ...
adding 'torchgen/static_runtime/config.py'
adding 'torchgen/static_runtime/gen_static_runtime_ops.py'
adding 'torchgen/static_runtime/generator.py'
adding 'torch-2.7.0a0+git7c8ec84.dist-info/METADATA'
adding 'torch-2.7.0a0+git7c8ec84.dist-info/WHEEL'
adding 'torch-2.7.0a0+git7c8ec84.dist-info/entry_points.txt'
adding 'torch-2.7.0a0+git7c8ec84.dist-info/top_level.txt'
adding 'torch-2.7.0a0+git7c8ec84.dist-info/RECORD'
removing build/bdist.linux-aarch64/wheel在dist/目录底下则可以看到生成的whl文件,使用pip install安装即可。
安装完可以验证一下:
python
python3 - << 'EOF'
import torch
print("PyTorch version:", torch.__version__)
print("CUDA available:", torch.cuda.is_available())
print("CUDA version:", torch.version.cuda)
print("cuDNN version:", torch.backends.cudnn.version())
print("GPU:", torch.cuda.get_device_name(0) if torch.cuda.is_available() else "None")
EOF
接下来开始构建继续构建torchvision:
bash
git clone https://github.com/pytorch/vision.git  # 不在pytorch目录下,pytorch之外
cd vision
设置环境变量(与 PyTorch 一致):
bash
export CUDA_HOME=/usr/local/cuda
export TORCH_CUDA_ARCH_LIST="8.7"
export FORCE_CUDA=1
安装依赖(torchvision 需要 pillow、numpy 等):
bash
pip install numpy pillow scipy开始构建 torchvision:
bash
python3 setup.py bdist_wheel可能会报错:
bash
In file included from /home/baiyi/vision/torchvision/csrc/io/image/cpu/decode_gif.cpp:3:
/home/baiyi/vision/torchvision/csrc/io/image/cpu/../common.h:4:10: fatal error: torch/headeronly/util/Exception.h: No such file or directory
    4 | #include <torch/headeronly/util/Exception.h>
      |          ^~~~~~~~~~~~~~~~~~~~~~~~~~~~~~~~~~~
compilation terminated.
ninja: build stopped: subcommand failed.
... ...
... ...
RuntimeError: Error compiling objects for extension
是因为torchvision 版本太新,而编译的 PyTorch 是 nightly(2.7.0a0),两者 API 不匹配,PyTorch nightly 的 C++ API 还没同步到 torchvision main 的最新改动。
切换到兼容 PyTorch 2.7 nightly 的版本:
bash
git fetch --all
git checkout release/0.20
清理旧构建:
bash
python3 setup.py clean
rm -rf build
重新构建:
bash
python3 setup.py bdist_wheel构建完之后还是去dist/目录底下使用pip install安装即可。
最后验证 torchvision 是否成功启用 CUDA:
python
python3 - << 'EOF'
import torchvision
import torch
print("torchvision:", torchvision.__version__)
print("torch:", torch.__version__)
print("CUDA available:", torch.cuda.is_available())
EOF