在读取答题卡的场景中,答题卡自动阅卷是计算机视觉非常经典的应用!本文基于Python+OpenCV ,从零实现一套答题卡轮廓提取、透视变换、选项识别、自动评分的完整系统,无需机器学习,纯传统图像处理即可完成实战。
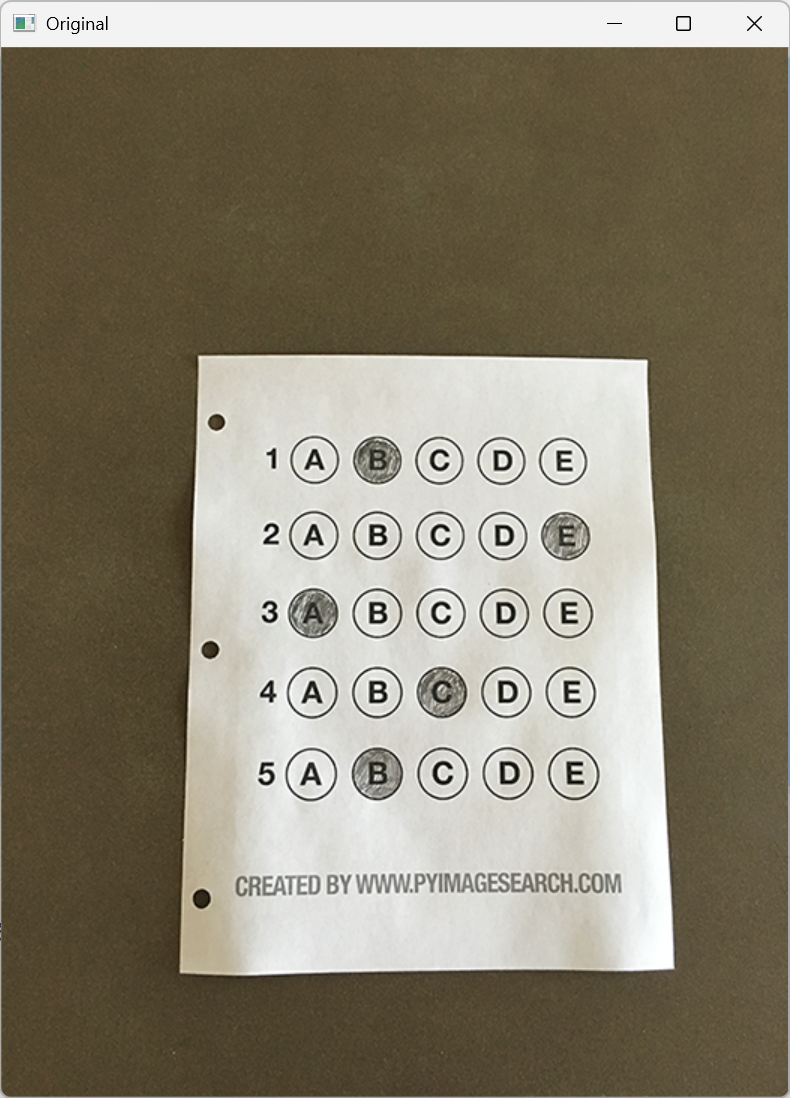
一、项目效果展示
输入一张答题卡原图 → 系统自动:
- 定位答题卡轮廓并做透视矫正
- 识别所有填涂选项
- 比对标准答案自动判分
- 输出得分并标注正确 / 错误选项
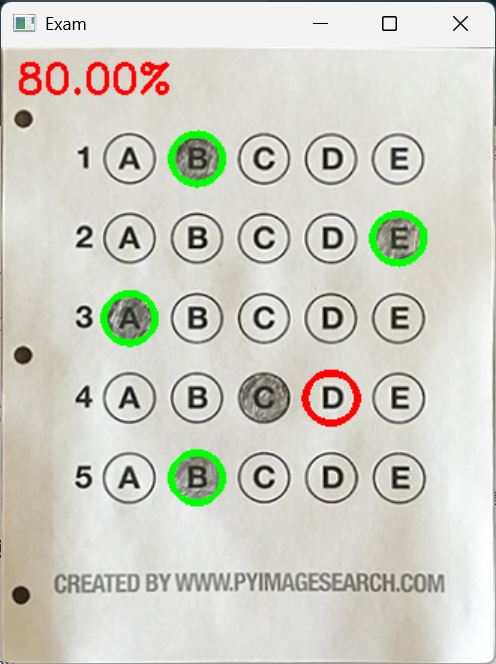
最终效果:自动计算得分、可视化标注结果。
二、完整代码
python
import numpy as np
import cv2

# 标准答案字典:题号:正确选项索引
ANSWER_KEY = {0: 1, 1: 4, 2: 0, 3: 3, 4: 1}

def order_points(pts):
    """对4个顶点排序:左上、右上、右下、左下"""
    rect = np.zeros((4, 2), dtype="float32")
    s = pts.sum(axis=1)
    rect[0] = pts[np.argmin(s)]   # 左上:x+y最小
    rect[2] = pts[np.argmax(s)]   # 右下:x+y最大
    diff = np.diff(pts, axis=1)
    rect[1] = pts[np.argmin(diff)]# 右上:x-y最小
    rect[3] = pts[np.argmax(diff)]# 左下:x-y最大
    return rect

def four_point_transform(image, pts):
    """四点透视变换,生成顶视图"""
    rect = order_points(pts)
    (tl, tr, br, bl) = rect

    # 计算变换后宽高
    widthA = np.sqrt(((br[0] - bl[0]) ** 2) + ((br[1] - bl[1]) ** 2))
    widthB = np.sqrt(((tr[0] - tl[0]) ** 2) + ((tr[1] - tl[1]) ** 2))
    maxWidth = max(int(widthA), int(widthB))

    heightA = np.sqrt(((tr[0] - br[0]) ** 2) + ((tr[1] - br[1]) ** 2))
    heightB = np.sqrt(((tl[0] - bl[0]) ** 2) + ((tl[1] - bl[1]) ** 2))
    maxHeight = max(int(heightA), int(heightB))

    # 目标坐标
    dst = np.array([[0, 0],
                    [maxWidth - 1, 0],
                    [maxWidth - 1, maxHeight - 1],
                    [0, maxHeight - 1]], dtype="float32")
    # 计算变换矩阵并执行变换
    M = cv2.getPerspectiveTransform(rect, dst)
    warped = cv2.warpPerspective(image, M, (maxWidth, maxHeight))
    return warped

def sort_contours(cnts, method="left-to-right"):
    """轮廓排序:支持上下/左右排序"""
    reverse = False
    i = 0
    if method == "right-to-left" or method == "bottom-to-top":
        reverse = True
    if method == "top-to-bottom" or method == "bottom-to-top":
        i = 1
    boundingBoxes = [cv2.boundingRect(c) for c in cnts]
    (cnts, boundingBoxes) = zip(*sorted(zip(cnts, boundingBoxes),
                                        key=lambda b: b[1][i], reverse=reverse))
    return (cnts, boundingBoxes)

# ===================== 主流程 =====================
# 1. 读取图像 + 预处理
image = cv2.imread(r'images/test_01.png')  # 替换为你的图片路径
gray = cv2.cvtColor(image, cv2.COLOR_BGR2GRAY)
blurred = cv2.GaussianBlur(gray, (5, 5), 0)
edged = cv2.Canny(blurred, 75, 200)

# 2. 轮廓检测,寻找答题卡最大外轮廓
cnts = cv2.findContours(edged.copy(), cv2.RETR_EXTERNAL, cv2.CHAIN_APPROX_SIMPLE)[-2]
cnts = sorted(cnts, key=cv2.contourArea, reverse=True)
docCnt = None

for c in cnts:
    peri = cv2.arcLength(c, True)
    approx = cv2.approxPolyDP(c, 0.02 * peri, True)
    # 找到四边形轮廓 → 即为答题卡
    if len(approx) == 4:
        docCnt = approx
        break

# 3. 透视变换 → 矫正为俯视视角
warped = four_point_transform(image, docCnt.reshape(4, 2))
warped_answer = warped.copy()

# 4. 二值化处理,突出填涂区域
warped_gray = cv2.cvtColor(warped, cv2.COLOR_BGR2GRAY)
thresh = cv2.threshold(warped_gray, 0, 255, cv2.THRESH_BINARY_INV | cv2.THRESH_OTSU)[1]

# 5. 检测所有选项圆圈轮廓
cnts = cv2.findContours(thresh.copy(), cv2.RETR_EXTERNAL, cv2.CHAIN_APPROX_SIMPLE)[-2]
questionCnts = []

# 过滤:只保留正方形/圆形选项
for c in cnts:
    (x, y, w, h) = cv2.boundingRect(c)
    ar = w / float(h)
    if w >= 20 and h >= 20 and 0.9 <= ar <= 1.1:
        questionCnts.append(c)

# 6. 从上到下排序题目
questionCnts = sort_contours(questionCnts, method="top-to-bottom")[0]
correct = 0

# 每题5个选项,循环判分
for (q, i) in enumerate(np.arange(0, len(questionCnts), 5)):
    # 同一题选项从左到右排序
    cnts = sort_contours(questionCnts[i:i+5])[0]
    bubbled = None

    # 遍历选项,统计非零像素(填涂最满的即为答案)
    for (j, c) in enumerate(cnts):
        mask = np.zeros(thresh.shape, dtype="uint8")
        cv2.drawContours(mask, [c], -1, 255, -1)
        total = cv2.countNonZero(cv2.bitwise_and(thresh, thresh, mask=mask))

        if bubbled is None or total > bubbled[0]:
            bubbled = (total, j)

    # 对比标准答案
    color = (0, 0, 255)  # 红色=错误
    k = ANSWER_KEY[q]
    if k == bubbled[1]:
        color = (0, 255, 0)  # 绿色=正确
        correct += 1

    # 绘制结果
    cv2.drawContours(warped_answer, [cnts[k]], -1, color, 3)

# 计算得分并显示
score = (correct / 5.0) * 100
print(f"[最终得分]:{score:.2f}%")
cv2.putText(warped_answer, f"{score:.2f}%", (10, 30),
            cv2.FONT_HERSHEY_SIMPLEX, 0.9, (0, 0, 255), 2)

# 展示结果
cv2.imshow("Original", image)
cv2.imshow("Result", warped_answer)
cv2.waitKey(0)
三、运行结果
四、代码详解
python
import numpy as np
import cv2

# 标准答案字典:题号:正确选项索引
ANSWER_KEY = {0: 1, 1: 4, 2: 0, 3: 3, 4: 1}numpy:做坐标计算、矩阵运算cv2:图像处理、轮廓、变换ANSWER_KEY:程序判分的依据
python
def order_points(pts):
    """对4个顶点排序:左上、右上、右下、左下"""
    rect = np.zeros((4, 2), dtype="float32")
    s = pts.sum(axis=1)
    rect[0] = pts[np.argmin(s)]  # 左上:x+y最小
    rect[2] = pts[np.argmax(s)]  # 右下:x+y最大
    diff = np.diff(pts, axis=1)
    rect[1] = pts[np.argmin(diff)]  # 右上:x-y最小
    rect[3] = pts[np.argmax(diff)]  # 左下:x-y最大
    return rect
对 4 个角点排序,保证透视变换方向正确。把检测到的 4 个角点,强制排成固定顺序:左上 → 右上 → 右下 → 左下只有顺序固定,透视变换才不会歪。
python
def four_point_transform(image, pts):
    """四点透视变换,生成顶视图"""
    rect = order_points(pts)
    (tl, tr, br, bl) = rect

    # 计算变换后宽高
    widthA = np.sqrt(((br[0] - bl[0]) ** 2) + ((br[1] - bl[1]) ** 2))
    widthB = np.sqrt(((tr[0] - tl[0]) ** 2) + ((tr[1] - tl[1]) ** 2))
    maxWidth = max(int(widthA), int(widthB))

    heightA = np.sqrt(((tr[0] - br[0]) ** 2) + ((tr[1] - br[1]) ** 2))
    heightB = np.sqrt(((tl[0] - bl[0]) ** 2) + ((tl[1] - bl[1]) ** 2))
    maxHeight = max(int(heightA), int(heightB))

    # 目标坐标
    dst = np.array([[0, 0],
                    [maxWidth - 1, 0],
                    [maxWidth - 1, maxHeight - 1],
                    [0, maxHeight - 1]], dtype="float32")
    # 计算变换矩阵并执行变换
    M = cv2.getPerspectiveTransform(rect, dst)
    warped = cv2.warpPerspective(image, M, (maxWidth, maxHeight))
    return warped
执行透视变换,把倾斜答题卡矫正为俯视视角。
把倾斜拍摄的答题卡 ,拉正成俯视标准图。
- 先算正确宽高
- 再算变换矩阵
- 最后输出矫正后的图
python
def sort_contours(cnts, method="left-to-right"):
    """轮廓排序:支持上下/左右排序"""
    reverse = False
    i = 0
    if method == "right-to-left" or method == "bottom-to-top":
        reverse = True
    if method == "top-to-bottom" or method == "bottom-to-top":
        i = 1
    boundingBoxes = [cv2.boundingRect(c) for c in cnts]
    (cnts, boundingBoxes) = zip(*sorted(zip(cnts, boundingBoxes),
                                        key=lambda b: b[1][i], reverse=reverse))
    return (cnts, boundingBoxes)
轮廓排序,保证题目从上到下、选项从左到右识别。
让识别顺序不乱:
- 题目:从上到下
- 选项:从左到右
主流程代码详解
步骤 1:图像预处理(灰度→模糊→边缘)
python
image = cv2.imread(r'images/test_01.png')
gray = cv2.cvtColor(image, cv2.COLOR_BGR2GRAY)
blurred = cv2.GaussianBlur(gray, (5, 5), 0)
edged = cv2.Canny(blurred, 75, 200)- 灰度图:减少干扰
- 高斯模糊:去噪
- Canny:提取边缘,方便找答题卡轮廓
步骤 2:找答题卡最大四边形
python
cnts = cv2.findContours(edged.copy(), cv2.RETR_EXTERNAL, cv2.CHAIN_APPROX_SIMPLE)[-2]
cnts = sorted(cnts, key=cv2.contourArea, reverse=True)
docCnt = None

for c in cnts:
    peri = cv2.arcLength(c, True)
    approx = cv2.approxPolyDP(c, 0.02 * peri, True)
    if len(approx) == 4:
        docCnt = approx
break逻辑:
- 找最外层轮廓
- 按面积从大到小排序
- 多边形逼近
- 找到 4 个点 → 判定为答题卡
步骤 3:透视变换,把答题卡拉正
python
warped = four_point_transform(image, docCnt.reshape(4, 2))
warped_answer = warped.copy()- 输出一张完全方正、俯视角度的标准答题卡
- 复制一份用于最后画结果
步骤 4:二值化(让填涂区域变白)
python
warped_gray = cv2.cvtColor(warped, cv2.COLOR_BGR2GRAY)
thresh = cv2.threshold(warped_gray, 0, 255, cv2.THRESH_BINARY_INV | cv2.THRESH_OTSU)[1]反二值化:填涂的地方变成白色,方便统计像素
步骤 5:提取所有选项圆圈
python
cnts = cv2.findContours(thresh.copy(), cv2.RETR_EXTERNAL, cv2.CHAIN_APPROX_SIMPLE)[-2]
questionCnts = []

for c in cnts:
    (x, y, w, h) = cv2.boundingRect(c)
    ar = w / float(h)
    if w >= 20 and h >= 20 and 0.9 <= ar <= 1.1:
questionCnts.append(c)过滤规则:
- 宽高 ≥20
- 宽高比接近 1(正方形 / 圆形)→ 只保留选项框,过滤其他杂轮廓
步骤 6:排序 + 逐题判分
python
questionCnts = sort_contours(questionCnts, method="top-to-bottom")[0]
correct = 0

for (q, i) in enumerate(np.arange(0, len(questionCnts), 5)):
    cnts = sort_contours(questionCnts[i:i + 5])[0]
    bubbled = None

    for (j, c) in enumerate(cnts):
        mask = np.zeros(thresh.shape, dtype="uint8")
        cv2.drawContours(mask, [c], -1, 255, -1)
        total = cv2.countNonZero(cv2.bitwise_and(thresh, thresh, mask=mask))

        if bubbled is None or total > bubbled[0]:
            bubbled = (total, j)

    color = (0, 0, 255)
    k = ANSWER_KEY[q]
    if k == bubbled[1]:
        color = (0, 255, 0)
        correct += 1

    cv2.drawContours(warped_answer, [cnts[k]], -1, color, 3)
逐句解释:
每5个轮廓一组= 1 道题mask:只看当前选项区域统计非零像素:白色越多 = 涂得越满 = 选中答案像素最多的那个= 学生答案- 对比标准答案:
- 正确 → 绿色
- 错误 → 红色
步骤 7:计算得分并显示
python
score = (correct / 5.0) * 100
print(f"[最终得分]:{score:.2f}%")
cv2.putText(warped_answer, f"{score:.2f}%", (10, 30),cv2.FONT_HERSHEY_SIMPLEX, 0.9, (0, 0, 255), 2)

cv2.imshow("Original", image)
cv2.imshow("Result", warped_answer)
cv2.waitKey(0)- 计算正确率
- 把分数写在图像上
- 显示原图 + 判分结果