FreeRTOS的一般移植步骤如下:
-
获取 源码:从官方下载 FreeRTOS 源码包
-
选择 portable 层 :根据目标芯片选择对应的 port 文件(如
portable/GCC/ARM_CM4),包含上下文切换的汇编代码 -
添加核心文件 :
tasks.c、queue.c、list.c、timers.c等添加到工程 -
配置
FreeRTOSConfig.h:设置时钟频率、Tick频率、最大优先级数、堆大小等 -
实现时钟节拍 :配置 SysTick 定时器,在
SysTick_Handler中调用xPortSysTickHandler() -
实现 PendSV 和 SVC 中断:port 层已提供,确保中断向量表正确指向
-
选择堆管理方案:添加 heap_1~heap_5 中的一个
-
测试:创建简单任务验证调度是否正常
这里的5和6通常在port文件已经移植完成,不用单独考虑,本次移植平台为vscode的pico插件。
1.首先在Github 上下载freertos 的内核文件;GitHub - FreeRTOS/FreeRTOS-Kernel: FreeRTOS kernel files only, submoduled into https://github.com/FreeRTOS/FreeRTOS and various other repos. · GitHub
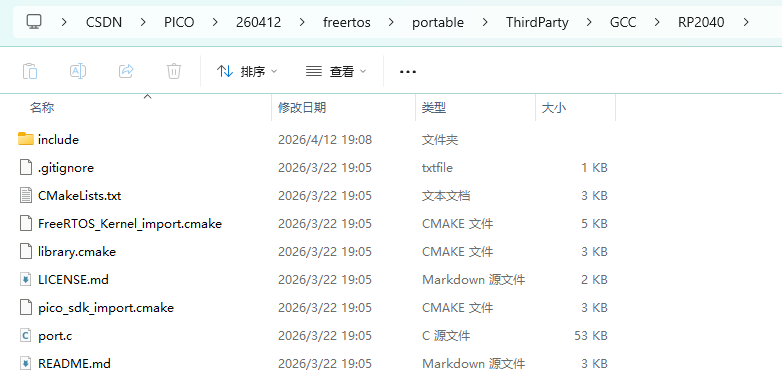
2.接着在项目工程中创建freertos 文件夹并把github中的文件放入并删除不必要的部分;portable 文件夹里只保留MemMang 和ThirdParty两个文件夹;

3.这里的port文件选择/portable/ThirdParty/GCC/RP2040路径下的,保留这个文件夹内容,其余第三方文件删除;
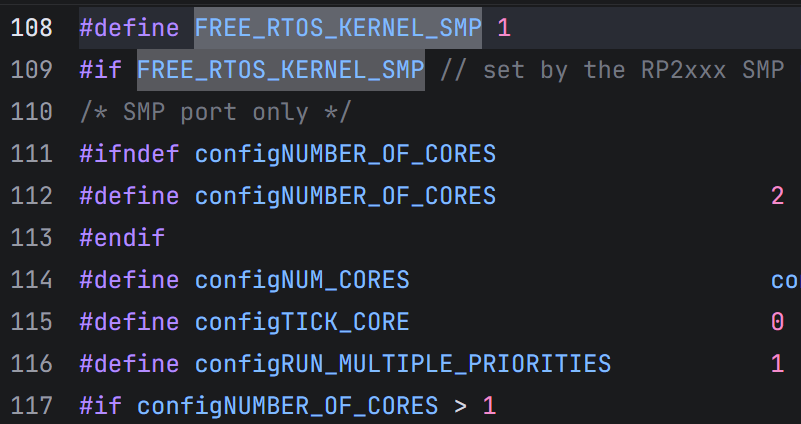
4.配置**FreeRTOSConfig.h** 文件,选择树莓派官方给的示例文件,并改名为**FreeRTOSConfig.h**放在最外层文件夹里,同时需要注意在108行左右使能SMP来启用多核;
5.修改Cmakelists,添加路径依赖和选择heap4堆管理方案
# Generated Cmake Pico project file

cmake_minimum_required(VERSION 3.13)

set(CMAKE_C_STANDARD 11)
set(CMAKE_CXX_STANDARD 17)
set(CMAKE_EXPORT_COMPILE_COMMANDS ON)

# Initialise pico_sdk from installed location
# (note this can come from environment, CMake cache etc)

# == DO NOT EDIT THE FOLLOWING LINES for the Raspberry Pi Pico VS Code Extension to work ==
if(WIN32)
    set(USERHOME $ENV{USERPROFILE})
else()
    set(USERHOME $ENV{HOME})
endif()
set(sdkVersion 2.2.0)
set(toolchainVersion 14_2_Rel1)
set(picotoolVersion 2.2.0-a4)
set(picoVscode ${USERHOME}/.pico-sdk/cmake/pico-vscode.cmake)
if (EXISTS ${picoVscode})
    include(${picoVscode})
endif()
# ====================================================================================
set(PICO_BOARD pico CACHE STRING "Board type")

# Pull in Raspberry Pi Pico SDK (must be before project)
include(pico_sdk_import.cmake)

include(freertos/portable/ThirdParty/GCC/RP2040/FreeRTOS_Kernel_import.cmake) # 导入 FreeRTOS 内核

project(260412 C CXX ASM)

# Initialise the Raspberry Pi Pico SDK
pico_sdk_init()

# Add executable. Default name is the project name, version 0.1

# ========== 第1步:先创建可执行文件 ==========
add_executable(260412
    260412.c
)

# ========== 第2步:生成 PIO 头文件(在 add_executable 之后!)==========
pico_generate_pio_header(260412 ${CMAKE_CURRENT_LIST_DIR}/ws2812.pio)

# ========== 第3步:设置程序属性 ==========
pico_set_program_name(260412 "260412")
pico_set_program_version(260412 "0.1")

pico_enable_stdio_uart(260412 0)
pico_enable_stdio_usb(260412 1)

# ========== 第4步:链接库(添加 hardware_pio!)==========
target_link_libraries(260412
    pico_stdlib
    hardware_pio          # PIO 硬件支持
    FreeRTOS-Kernel       # FreeRTOS 内核
    FreeRTOS-Kernel-Heap4 # FreeRTOS 内核堆4
)

# Add the standard include files to the build
target_include_directories(260412 PRIVATE
        ${CMAKE_CURRENT_LIST_DIR}
        ${CMAKE_CURRENT_LIST_DIR}/freertos/include
        ${CMAKE_CURRENT_LIST_DIR}/freertos/portable/ThirdParty/GCC/RP2040/include
)
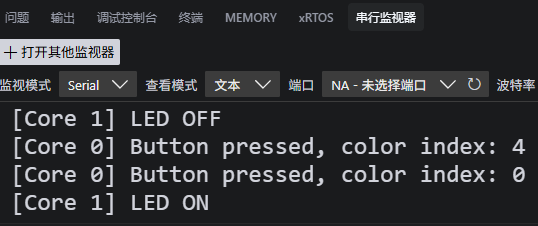
pico_add_extra_outputs(260412)6.最后编写简单的程序进行测试,Core 0跑WS2812+按钮 ,Core 1 跑板载LED闪烁(此处的PIO见上篇博客)
cpp
#include <stdio.h>
#include "FreeRTOS.h"
#include "task.h"
#include "pico/stdlib.h"
#include "hardware/uart.h"
#include "hardware/pio.h"
#include "hardware/gpio.h"
#include "ws2812.pio.h"  // 由 ws2812.pio 生成的头文件


// ========== 硬件配置 ==========
#define LED_PIN         25   // 板载 LED(GPIO25)
#define USR_BTN         24   // 用户按钮
#define WS2812_PIN      23   // WS2812 RGB LED
#define UART_ID         uart1
#define BAUD_RATE       115200
#define UART_TX_PIN     4
#define UART_RX_PIN     5

// ========== 全局变量 ==========
uint32_t ws2812Colors[] = {
    0x00800000,  // Red (0x00GGRRBB)
    0x80000000,  // Green
    0x00008000,  // Blue
    0x80808000,  // White
    0x00000000   // Off
};
volatile uint8_t ws2812ColorIndex = 0;
PIO ws2812pio = pio0;
int ws2812stateMachine = 0;
volatile uint32_t last_usrbtn_time = 0;

// ========== 函数声明 ==========
void ws2812_task(void *param);
void led_task(void *param);
void button_callback(uint gpio, uint32_t events);

// ========== 按钮中断回调(运行在 Core 0)==========
void button_callback(uint gpio, uint32_t events) {
    if (events & GPIO_IRQ_EDGE_FALL) {
        uint32_t current_time = to_ms_since_boot(get_absolute_time());

        // 简单消抖 200ms
        if (current_time - last_usrbtn_time > 200) {
            last_usrbtn_time = current_time;

            // 切换颜色
            ws2812ColorIndex++;
            if (ws2812ColorIndex >= sizeof(ws2812Colors) / sizeof(ws2812Colors[0])) {
                ws2812ColorIndex = 0;
            }

            uint32_t color = ws2812Colors[ws2812ColorIndex];
            pio_sm_put_blocking(ws2812pio, ws2812stateMachine, color);

            printf("[Core %d] Button pressed, color index: %d\n",
                   portGET_CORE_ID(), ws2812ColorIndex);
        }
    }
}

// ========== Core 0 任务:WS2812 + 按钮 ==========
void ws2812_task(void *param) {
    printf("[Core %d] WS2812 Task started\n", portGET_CORE_ID());

    // 初始化 UART(用于调试)
    uart_init(UART_ID, BAUD_RATE);
    gpio_set_function(UART_TX_PIN, GPIO_FUNC_UART);
    gpio_set_function(UART_RX_PIN, GPIO_FUNC_UART);

    // 初始化按钮
    gpio_init(USR_BTN);
    gpio_set_dir(USR_BTN, GPIO_IN);
    gpio_pull_up(USR_BTN);
    gpio_set_irq_enabled_with_callback(USR_BTN, GPIO_IRQ_EDGE_FALL, true, &button_callback);

    // 初始化 WS2812 PIO(800KHz,RGB 模式)
    uint offset = pio_add_program(ws2812pio, &ws2812_program);
    ws2812_program_init(ws2812pio, ws2812stateMachine, offset, WS2812_PIN, 800000, false);

    // 初始颜色
    pio_sm_put_blocking(ws2812pio, ws2812stateMachine, ws2812Colors[0]);

    // 任务循环:可以在这里添加自动变色效果
    while (1) {
        // 按钮通过中断处理,这里可以做其他低优先级工作
        // 例如:每 5 秒自动切换一次颜色
        vTaskDelay(pdMS_TO_TICKS(5000));
    }
}

// ========== Core 1 任务:板载 LED 闪烁 ==========
void led_task(void *param) {
    printf("[Core %d] LED Task started\n", portGET_CORE_ID());

    gpio_init(LED_PIN);
    gpio_set_dir(LED_PIN, GPIO_OUT);

    while (1) {
        gpio_put(LED_PIN, 1);
        printf("[Core %d] LED ON\n", portGET_CORE_ID());
        vTaskDelay(pdMS_TO_TICKS(500));  // 亮 500ms

        gpio_put(LED_PIN, 0);
        printf("[Core %d] LED OFF\n", portGET_CORE_ID());
        vTaskDelay(pdMS_TO_TICKS(500));  // 灭 500ms
    }
}

// ========== 主函数 ==========
int main() {
    stdio_init_all();  // 必须在创建任务前初始化
    printf("\n=== RP2040 FreeRTOS Dual Core Demo ===\n");

    TaskHandle_t ws2812_Handle = NULL;
    TaskHandle_t led_Handle = NULL;

    // 创建 WS2812 任务,绑定到 Core 0
    xTaskCreate(ws2812_task, "WS2812", 512, NULL, tskIDLE_PRIORITY + 1, &ws2812_Handle);
    if (ws2812_Handle) {
        vTaskCoreAffinitySet(ws2812_Handle, (1 << 0));  // 只允许在 Core 0 运行
    }

    // 创建 LED 任务,绑定到 Core 1
    xTaskCreate(led_task, "LED_Blink", 256, NULL, tskIDLE_PRIORITY + 1, &led_Handle);
    if (led_Handle) {
        vTaskCoreAffinitySet(led_Handle, (1 << 1));  // 只允许在 Core 1 运行
    }

    printf("Starting Scheduler...\n");
    vTaskStartScheduler();

    // 永远不会到达这里
    while (1) {
        tight_loop_contents();
    }
}
现象:
参考文章:
树莓派pico(RP2040)配置FreeRTOS_rp2040 freertos-CSDN博客