深入解析 _CameraOpaqueTexture 与 ScriptableRendererFeature, 从渲染管线原理到三种经典屏幕空间特效的完整实现路径。
1
为什么需要抓取屏幕?
许多视觉特效并非简单地叠加一张贴图,而是依赖当前帧已渲染完成的像素 作为输入。扭曲效果需要对背后场景的颜色进行偏移采样; 镜子反射需要读取来自另一视角的渲染结果; 全局模糊(如景深、玻璃磨砂)则需要对整块屏幕区域进行滤波。
这三类需求共同的关键词是:屏幕空间读取(Screen-Space Sampling) 。 在传统 Built-in 管线中,这通过 GrabPass 实现,每次调用都会阻塞 GPU 并 复制一次完整的帧缓冲,代价极高。URP 提供了更高效的替代方案------ 在不增加额外 DrawCall 的前提下将屏幕内容保留为可采样纹理。
🌊
热浪扭曲
利用法线贴图或噪声偏移 UV,对屏幕颜色纹理进行扭曲采样,模拟高温气流折射。
🪞
平面镜反射
通过第二台相机渲染翻转视角,将结果写入 RenderTexture,再在材质中投影采样。
🔮
全局模糊
使用 ScriptableRendererFeature 在不透明通道后进行多次 Blit 实现 Kawase / Gaussian 模糊。
2
URP 如何暴露屏幕纹理
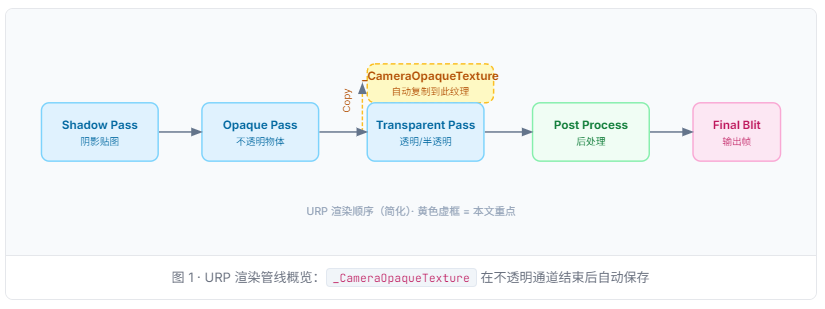
URP 为我们提供了两个内置的屏幕纹理,无需手动 GrabPass:
| 纹理名称 | 包含内容 | 何时可用 | 典型用途 |
|---|---|---|---|
_CameraOpaqueTexture |
不透明通道渲染结果(颜色) | Transparent Pass 期间 | 扭曲、折射、磨砂玻璃 |
_CameraDepthTexture |
场景深度值 | Transparent Pass 期间 | 软粒子、景深、边缘光 |
重要:需要在 URP Asset 中开启 路径:Project Settings → Graphics → URP Asset → Rendering → Opaque Texture , 勾选后 URP 才会在不透明通道后自动执行一次内部 CopyColor Pass, 将结果写入 _CameraOpaqueTexture。
在 Shader 中声明与采样
在任意使用 URP 的 HLSL Shader 里,通过以下方式声明并采样屏幕纹理:
cs
// 引入 URP 核心库(必须)
#include "Packages/com.unity.render-pipelines.universal/ShaderLibrary/Core.hlsl"
#include "Packages/com.unity.render-pipelines.universal/ShaderLibrary/DeclareOpaqueTexture.hlsl"
// 上面那个 include 已帮你声明了 _CameraOpaqueTexture 和 sampler
// 若手动声明:TEXTURE2D(_CameraOpaqueTexture); SAMPLER(sampler_CameraOpaqueTexture);
half4 frag(Varyings IN) : SV_Target
{
    // 将顶点齐次坐标转换为屏幕 UV (0~1)
    float2 screenUV = IN.positionHCS.xy / IN.positionHCS.w;
    screenUV = screenUV * 0.5 + 0.5; // NDC → [0,1]
    #if UNITY_UV_STARTS_AT_TOP
    screenUV.y = 1.0 - screenUV.y; // D3D 平台翻转 Y
    #endif
    half3 sceneColor = SampleSceneColor(screenUV);
    return half4(sceneColor, 1.0);
}
💡 推荐使用 SampleSceneColor() DeclareOpaqueTexture.hlsl 提供了封装函数 SampleSceneColor(uv), 它内部处理了平台差异(GL/DX UV 方向),推荐优先使用它而非手动 SAMPLE_TEXTURE2D。
3
项目基础配置
在开始任何效果之前,确认以下项目设置已就绪:
步骤 A:开启 Opaque Texture
cs
Edit → Project Settings → Graphics
  └─ Scriptable Render Pipeline Settings → [你的 URP Asset]
       └─ Rendering → Opaque Texture  ✓ 勾选
       └─ Depth Texture              ✓ 勾选(景深/软粒子可选)
步骤 B:透明材质 Queue 设置
使用屏幕抓取纹理的材质必须处于 Transparent 渲染队列(Queue ≥ 3000)。 若材质设为 Opaque,会在不透明通道中渲染,此时 _CameraOpaqueTexture 尚未生成,采样结果将为黑色。
cs
SubShader
{
    Tags
    {
        "RenderType" = "Transparent"
        "Queue" = "Transparent"    // 确保在 Opaque Texture 生成后渲染
        "RenderPipeline" = "UniversalPipeline"
    }
    ZWrite Off
    Blend SrcAlpha OneMinusSrcAlpha
}
效果一:热浪扭曲(Heatwave Distortion)
热浪效果的原理是:使用一张流动的法线贴图(Normal Map)或噪声纹理 计算出 UV 偏移量,再以偏移后的坐标采样 _CameraOpaqueTexture, 使背景画面产生动态的波浪折射感。
cs
Shader "Custom/URP/HeatwaveDistortion"
{
    Properties
    {
        _NoiseTex ("Distortion Noise", 2D) = "bump" {}
        _Strength ("Distortion Strength", Range(0,0.05)) = 0.01
        _Speed   ("Flow Speed", Range(0,2))    = 0.4
        _Tiling  ("Noise Tiling", Float)       = 3.0
    }
    SubShader
    {
        Tags { "RenderType"="Transparent" "Queue"="Transparent"
                "RenderPipeline"="UniversalPipeline" }
        ZWrite Off  Blend SrcAlpha OneMinusSrcAlpha
        Pass
        {
            Name "HeatwavePass"
            HLSLPROGRAM
            #pragma vertex vert
            #pragma fragment frag
            #include "Packages/com.unity.render-pipelines.universal/ShaderLibrary/Core.hlsl"
            #include "Packages/com.unity.render-pipelines.universal/ShaderLibrary/DeclareOpaqueTexture.hlsl"
            CBUFFER_START(UnityPerMaterial)
                TEXTURE2D(_NoiseTex);  SAMPLER(sampler_NoiseTex);
                float4 _NoiseTex_ST;
                float  _Strength, _Speed, _Tiling;
            CBUFFER_END
            struct Attributes { float4 positionOS : POSITION; float2 uv : TEXCOORD0; };
            struct Varyings   { float4 positionHCS : SV_POSITION; float4 screenPos : TEXCOORD0; float2 uv : TEXCOORD1; };
            Varyings vert(Attributes IN)
            {
                Varyings OUT;
                OUT.positionHCS = TransformObjectToHClip(IN.positionOS.xyz);
                OUT.screenPos   = ComputeScreenPos(OUT.positionHCS); // 关键:屏幕坐标
                OUT.uv          = IN.uv * _Tiling;
                return OUT;
            }
            half4 frag(Varyings IN) : SV_Target
            {
                // 1. 流动噪声 UV
                float2 noiseUV = IN.uv + float2(0, _Time.y * _Speed);
                half2  noise   = SAMPLE_TEXTURE2D(_NoiseTex, sampler_NoiseTex, noiseUV).rg;
                half2  offset  = (noise - 0.5) * 2.0 * _Strength;
                // 2. 计算屏幕 UV 并施加偏移
                float2 screenUV = IN.screenPos.xy / IN.screenPos.w + offset;
                // 3. 采样屏幕颜色
                half3 col = SampleSceneColor(screenUV);
                return half4(col, 1.0);
            }
            ENDHLSL
        }
    }
}
⚠️ ComputeScreenPos vs positionHCS 直接用 positionHCS.xy / positionHCS.w 在 OpenGL 和 Direct3D 上 Y 轴方向不同。ComputeScreenPos() 内部已处理该差异, 强烈建议使用它而非手算。
5
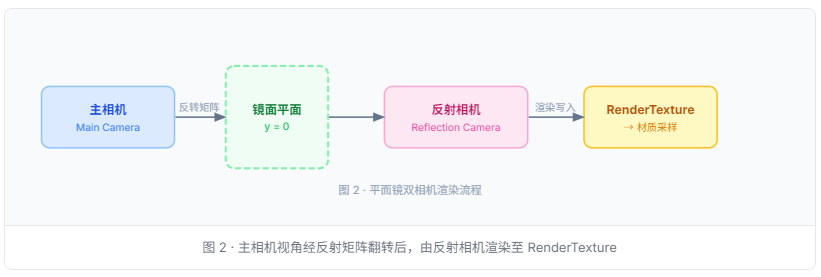
效果二:平面镜反射(Planar Mirror)
平面镜反射需要一个镜像视角 ------以反射平面(通常是 Y=0)为对称轴, 将主相机翻转后进行渲染,结果写入 RenderTexture, 再在镜面材质中以投影坐标采样该纹理。
cs
using UnityEngine;
using UnityEngine.Rendering.Universal;
public class PlanarMirror : MonoBehaviour
{
    public Camera        mainCamera;
    public Material      mirrorMaterial;   // 镜面使用的材质
    public int           rtSize = 512;      // RT 分辨率
    public LayerMask    reflectionLayers;
    RenderTexture  _rt;
    Camera         _reflCam;
    static readonly int ReflTex = Shader.PropertyToID("_ReflectionTex");
    void Awake()
    {
        _rt = new RenderTexture(rtSize, rtSize, 16, RenderTextureFormat.Default);
        _rt.antiAliasing = 2;
        // 创建隐藏的反射相机
        var go = new GameObject("[ReflectionCamera]");
        go.hideFlags = HideFlags.HideAndDontSave;
        _reflCam = go.AddComponent<Camera>();
        _reflCam.targetTexture  = _rt;
        _reflCam.cullingMask    = reflectionLayers;
        _reflCam.enabled        = false; // 手动控制渲染时机
        mirrorMaterial.SetTexture(ReflTex, _rt);
    }
    void OnWillRenderObject()
    {
        var reflMatrix = CalculateReflectionMatrix(transform.up, transform.position);
        _reflCam.worldToCameraMatrix = mainCamera.worldToCameraMatrix * reflMatrix;
        // 斜裁剪面:消除镜面以下的伪影
        var clipPlane = CameraSpacePlane(_reflCam, transform.position, transform.up, 1f);
        _reflCam.projectionMatrix = mainCamera.CalculateObliqueMatrix(clipPlane);
        _reflCam.Render();
    }
    static Matrix4x4 CalculateReflectionMatrix(Vector3 normal, Vector3 pos)
    {
        float d = -Vector3.Dot(normal, pos);
        var   m = Matrix4x4.identity;
        m.m00 = 1 - 2*normal.x*normal.x;  m.m01 = -2*normal.x*normal.y;
        m.m02 = -2*normal.x*normal.z;      m.m03 = -2*d*normal.x;
        m.m10 = -2*normal.x*normal.y;      m.m11 = 1 - 2*normal.y*normal.y;
        m.m12 = -2*normal.y*normal.z;      m.m13 = -2*d*normal.y;
        m.m20 = -2*normal.x*normal.z;      m.m21 = -2*normal.y*normal.z;
        m.m22 = 1 - 2*normal.z*normal.z;  m.m23 = -2*d*normal.z;
        return m;
    }
    static Vector4 CameraSpacePlane(Camera cam, Vector3 pos, Vector3 normal, float sideSign)
    {
        Matrix4x4 wtoc = cam.worldToCameraMatrix;
        Vector3   cpos = wtoc.MultiplyPoint(pos);
        Vector3   cnrm = wtoc.MultiplyVector(normal).normalized * sideSign;
        return new Vector4(cnrm.x, cnrm.y, cnrm.z, -Vector3.Dot(cpos, cnrm));
    }
    void OnDestroy()
    {
        if (_rt) _rt.Release();
        if (_reflCam) Destroy(_reflCam.gameObject);
    }
}
镜面 Shader(投影采样)
cs
 TEXTURE2D(_ReflectionTex); SAMPLER(sampler_ReflectionTex);
            float   _Roughness;   // 模糊程度(粗糙镜面)
            float   _Fresnel;    // 菲涅尔强度
            half4 frag(Varyings IN) : SV_Target
            {
                // 投影坐标:将齐次裁剪坐标转为 [0,1] UV
                float2 projUV = IN.screenPos.xy / IN.screenPos.w;
                // 粗糙度:用 mip 级别模拟反射模糊
                half3 refl = SAMPLE_TEXTURE2D_LOD(
                    _ReflectionTex, sampler_ReflectionTex, projUV, _Roughness * 5.0).rgb;
                // 菲涅尔:视线越平,反射越强
                half3 viewDir = normalize(IN.viewDirWS);
                half  fresnel = pow(1.0 - saturate(dot(viewDir, IN.normalWS)), _Fresnel);
                return half4(refl * fresnel, fresnel);
            }
6
效果三:全局模糊(Global Blur)
全局模糊(如磨砂玻璃、UI 背景虚化)需要对整个屏幕区域进行滤波, 单次采样附近像素代价高昂,通常用双通道分离高斯(Two-pass Gaussian) 或 Kawase 模糊(多次 Blit,每次偏移半像素)来达成高质量低代价的效果。
在 URP 中最佳实践是通过 ScriptableRendererFeature 注入自定义 Pass, 将模糊结果写入全局纹理供后续 Pass 或材质使用。
ScriptableRendererFeature 注册 Blur Pass
cs
using UnityEngine;
using UnityEngine.Rendering;
using UnityEngine.Rendering.Universal;
public class GlobalBlurFeature : ScriptableRendererFeature
{
    [System.Serializable]
    public class Settings
    {
        public RenderPassEvent renderPassEvent = RenderPassEvent.AfterRenderingTransparents;
        [Range(1, 8)] public int   iterations    = 4;    // Kawase 迭代次数
        [Range(1, 8)] public int   downSample    = 2;    // 降采样倍数(性能关键)
        public string               globalTexName = "_GlobalBlurTex";
    }
    public Settings  settings = new Settings();
    KawaseBlurPass _blurPass;
    public override void Create()
    {
        _blurPass = new KawaseBlurPass(settings);
        _blurPass.renderPassEvent = settings.renderPassEvent;
    }
    public override void AddRenderPasses(ScriptableRenderer renderer, ref RenderingData renderingData)
    {
        renderer.EnqueuePass(_blurPass);
    }
}
KawaseBlurPass 核心逻辑
cs
class KawaseBlurPass : ScriptableRenderPass
{
    readonly GlobalBlurFeature.Settings _settings;
    Material   _blurMat;
    RTHandle   _buf0, _buf1;   // 双缓冲 ping-pong
    static readonly int OffsetPID  = Shader.PropertyToID("_Offset");
    static readonly int GlobalBlur = Shader.PropertyToID("_GlobalBlurTex");
    public KawaseBlurPass(GlobalBlurFeature.Settings s) { _settings = s; }
    public override void OnCameraSetup(CommandBuffer cmd, ref RenderingData rd)
    {
        var desc = rd.cameraData.cameraTargetDescriptor;
        desc.width  /= _settings.downSample;
        desc.height /= _settings.downSample;
        desc.depthBufferBits = 0;
        RenderingUtils.ReAllocateIfNeeded(ref _buf0, desc, FilterMode.Bilinear, name: "_BlurBuf0");
        RenderingUtils.ReAllocateIfNeeded(ref _buf1, desc, FilterMode.Bilinear, name: "_BlurBuf1");
    }
    public override void Execute(ScriptableRenderContext ctx, ref RenderingData rd)
    {
        if (_blurMat == null)
            _blurMat = CoreUtils.CreateEngineMaterial("Hidden/KawaseBlur");
        CommandBuffer cmd = CommandBufferPool.Get("KawaseBlur");
        using (new ProfilingScope(cmd, new ProfilingSampler("KawaseBlur")))
        {
            // 第一步:降采样复制到 buf0
            Blitter.BlitCameraTexture(cmd, rd.cameraData.renderer.cameraColorTargetHandle, _buf0);
            // Kawase 多次 ping-pong blit
            RTHandle src = _buf0, dst = _buf1;
            for (int i = 0; i < _settings.iterations; i++)
            {
                _blurMat.SetFloat(OffsetPID, i + 0.5f); // Kawase 核心偏移
                Blitter.BlitCameraTexture(cmd, src, dst, _blurMat, 0);
                (src, dst) = (dst, src); // swap
            }
            // 将结果设为全局纹理,供场景中任意材质采样
            cmd.SetGlobalTexture(GlobalBlur, src);
        }
        ctx.ExecuteCommandBuffer(cmd);
        CommandBufferPool.Release(cmd);
    }
}
Kawase 模糊 Shader 核心
cs
float  _Offset;
float4 _BlitTexture_TexelSize;  // URP Blit 内置:(1/w, 1/h, w, h)
half4 frag(Varyings IN) : SV_Target
{
    float2 uv   = IN.texcoord;
    float2 ts   = _BlitTexture_TexelSize.xy * _Offset;
    // Kawase:对角四点采样取平均
    half4 col  = SAMPLE_TEXTURE2D(_BlitTexture, sampler_LinearClamp, uv + float2(-ts.x, -ts.y));
          col += SAMPLE_TEXTURE2D(_BlitTexture, sampler_LinearClamp, uv + float2( ts.x, -ts.y));
          col += SAMPLE_TEXTURE2D(_BlitTexture, sampler_LinearClamp, uv + float2(-ts.x,  ts.y));
          col += SAMPLE_TEXTURE2D(_BlitTexture, sampler_LinearClamp, uv + float2( ts.x,  ts.y));
    return col * 0.25;
}
7
性能注意事项
| 方案 | 额外 DrawCall | 带宽压力 | 移动端友好 | 推荐场景 |
|---|---|---|---|---|
_CameraOpaqueTexture(扭曲) |
+1 CopyColor Pass | 低 | ✓ | 实时扭曲、折射 |
| 平面镜(独立相机) | 整个场景 ×2 | 高 | ✗ 慎用 | PC/主机,镜面数量 ≤ 2 |
| Kawase Blur(降采样×2) | +iterations 次 Blit | 中 | ✓ | UI 磨砂、景深前景 |
💡 降采样是模糊性能的核心杠杆将 RT 缩小为 1/2(downSample=2)后,像素数量减少 75%, 配合 Bilinear 采样,视觉质量几乎无损但 Blit 耗时大幅下降。 移动端建议 downSample=4、iterations=3。
⚠️ 避免每帧 GrabPass 在 Built-in 管线中 GrabPass {} 会在该帧对应位置强制 Blit 整个帧缓冲, 多个材质使用时会触发多次,GPU stall 风险极高。迁移到 URP 后一律使用 _CameraOpaqueTexture 或自定义 RendererFeature。
8
总结
URP 通过 _CameraOpaqueTexture 和 ScriptableRendererFeature 提供了完整的屏幕内容访问机制,无需再依赖性能低下的 GrabPass。