Unity05_3D数学
- 一、Mathf相关
-
- [1.1 Mathf 的基础操作](#1.1 Mathf 的基础操作)
- [1.2 Mathf中的三角函数](#1.2 Mathf中的三角函数)
- [1.3 坐标系复习](#1.3 坐标系复习)
- [1.4 完整代码](#1.4 完整代码)
- 二、向量相关
-
- [2.1 向量的基础操作](#2.1 向量的基础操作)
- [2.2 向量基础运算](#2.2 向量基础运算)
- [2.3 向量点乘](#2.3 向量点乘)
- [2.4 向量叉乘](#2.4 向量叉乘)
- [2.5 向量的插值运算](#2.5 向量的插值运算)
- [2.6 完整代码](#2.6 完整代码)
- 三、四元数
-
- [3.1 四元数的基础操作](#3.1 四元数的基础操作)
- [3.2 四元数常用方法](#3.2 四元数常用方法)
- [3.3 四元数运算](#3.3 四元数运算)
- [3.4 完整代码](#3.4 完整代码)
一、Mathf相关
1.1 Mathf 的基础操作
(1)Math 和 Mathf 的区别
Math 是C# 封装的,用于进行数学计算的 类 ,位于System空间中
Mathf 是Unity 中封装好的,用于进行数学计算的 结构体 ,位于UnityEngine空间中
(2)Mathf中的常用属性和方法PI:Mathf.PI
绝对值:Mathf.Abs(num)
向上/向下取整:Mathf.CeilToInt(num) / Mathf.FloorToInt(num)
四舍五入:Mathf.RoundToInt(num)
钳制函数:Mathf.Clamp(num,minNum,maxNum)
当num大于maxNum时 return maxNum,当num<minNum时 return minNum,反之则 return num
可以用来让当前生命值 限制在一个合理的范围取最大值/最小值 Mathf.Max()/Mathf.Min()
一个数的n次方:Mathf.Pow(num,n)
一个数的平方根:Mathf.Sqrt(num)
判断正负数:Mathf.Sign(num)
num为正数时 return 1,为负数时 return -1
运行代码
运行结果
(3)Mathf 中的插值运算
- 作用:用来平滑数值,让他趋近于一个目标值,如可以用来平滑物体移动,或者跟随某个物体移动
- 语法:Mathf.Lerp(startNum, endNum,t)
t 是插值系数,在 0 到 1 之间当t 靠近0时,运算的结果将更加接近于 startNum
当t 靠近1时,运算的结果将更加接近于 endNum
========== 【演示:使用插值运算跟随物体移动】 ==========(a) 每帧改变startNun 实现先快后慢式的运动
该方法是让 挂载该脚本的对象 每次改变xyz,让其实现趋近于B对象,从而实现跟随
(b)每帧改变t 实现匀速运动(start不改变)
该方法通过每帧改变插值系数,来达到趋近,当插值系数大于等于1 的时候,对象即视为到达B对象,又因为该方法不会改变start,所以要记录初始的位置。
(补充)当当插值系数大于等于1 的时候,此时改变B对象的位置,可以观察到挂载对象直接瞬移过去了,解决方法为,当B对象的位置改变时,应该重新赋值终点位置,并重置各变量
1.2 Mathf中的三角函数
(1)弧度和角度的相互转化
- 角度转弧度:弧度 = 角度 * Mathf.Rad2Deg
- 弧度转角度:角度 = 弧度 * Mathf.Deg2Rad
Mathf.Rad2Deg 是常量 57.3 用于角度转弧度
Mathf.Deg2Rad 是常量 0.01745 用于弧度转角度
(2)三角函数:在Mathf中的三角函数,其传入的参数为 弧度所以要计算对应角度的三角函数值,要先算角度,然后计算值
Mathf.Sin( 弧度值 ) || Mathf.Cos( 弧度值 )
(3)反三角函数:即通过已知三角函数值,来得到对应的弧度Mathf.ASin( 三角函数值 )
========== 【演示:角度和弧度间的相互转换及三角函数值】 ==========运行代码
运行结果
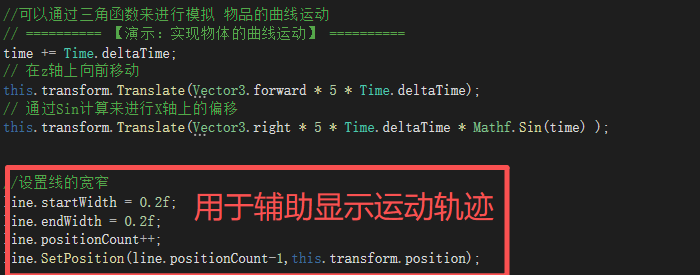
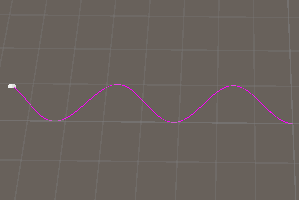
========== 【演示:通过三角函数来实现物体的曲线运动】 ==========
运行代码
运行结果


1.3 坐标系复习
(1)unity中的坐标系包含四种
- 世界坐标系:即unity中Scene的坐标系,他不受到其他条件的干扰,其原点坐标为Sence中心
- 物体坐标系:又称本地坐标系,受父对象的位置和缩放大小的干扰
- 屏幕坐标系:屏幕坐标系是指玩家的屏幕窗口,其坐标原点位于左下角
- 视口坐标系:与屏幕坐标系相似,其坐标原点是左下角,右上角为坐标轴(0,0)点
(屏幕坐标系和视口坐标系的z轴是到摄像机的距离)
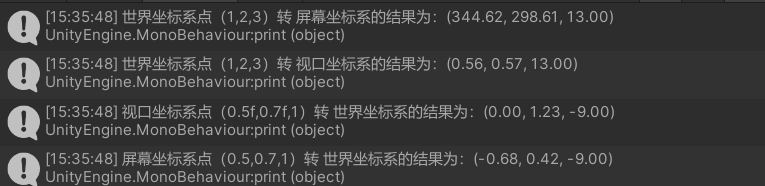
(1)坐标系间的相互转换,坐标系的转换一般是通过摄像机在两个空间中投影转换的,因此一般需要借助摄像机实例
- 世界坐标系转屏幕坐标系:Camera摄像机实例.WorldToScreenPoint()
- 世界坐标系转视口坐标系:Camera摄像机实例.WorldToViewportPoint()
- 屏幕坐标系转世界坐标系:Camera摄像机实例.ViewportToWorldPoint()
- 视口坐标系转屏幕坐标系:Camera摄像机实例.ScreenToWorldPoint();
- 世界坐标系 和 本地坐标系 是同与空间的不同坐标系,他们的相互转换不需要依赖Camera实例,依赖本地坐标轴的参照transform
世界坐标系转本地:transform.InverseTransformPoint(worldPos);
本地坐标系转世界:transform.TransformPoint(localPos);
========== 【演示:坐标系相互转化】 ==========运行代码
运行结果

1.4 完整代码
Mathf 的基础操作
csharp
using System.Collections;
using System.Collections.Generic;
using UnityEngine;
public class lesson1_script : MonoBehaviour
{
//Math 和 Mathf 的区别
//Math 是C#封装的,用于进行数学计算的 类,在System空间中
//Mathf 是Unity中封装好的用于数学计算的 结构体,在UnityEngine空间中
public GameObject B;
public Vector3 bNowPos;
public float time;
public Vector3 startPos;
// Start is called before the first frame update
void Start()
{
#region 1、常用的方法和属性
// - PI:Mathf.PI
// - 绝对值:Mathf.Abs(num)
// - 向上/向下取整:Mathf.CeilToInt(num) / Mathf.FloorToInt(num)
// num为float类型
// - 四舍五入:Mathf.RoundToInt(num)
// - 钳制函数:Mathf.Clamp(num,minNum,maxNum)
// 当num大于maxNum时 return maxNum,当num<minNum时 return minNum,反之则 return num
// - 取最大值/最小值 Mathf.Max()/Mathf.Min()
// - 一个数的n次方:Mathf.Pow(num,n)
// - 一个数的平方根:Mathf.Sqrt(num)
// - 判断正负数:Mathf.Sign(num)
// num为正数时 return 1,为负数时 return -1
// ========== 【演示:常用属性和方法】 ==========
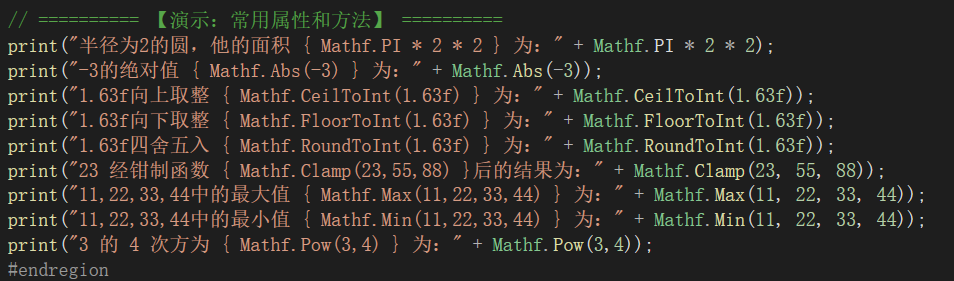
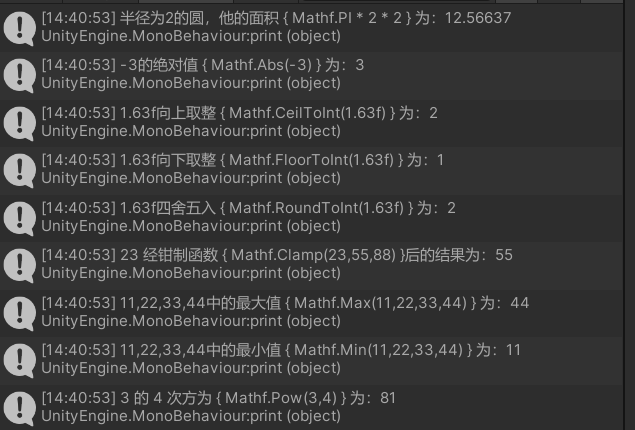
print("半径为2的圆,他的面积 { Mathf.PI * 2 * 2 } 为:" + Mathf.PI * 2 * 2);
print("-3的绝对值 { Mathf.Abs(-3) } 为:" + Mathf.Abs(-3));
print("1.63f向上取整 { Mathf.CeilToInt(1.63f) } 为:" + Mathf.CeilToInt(1.63f));
print("1.63f向下取整 { Mathf.FloorToInt(1.63f) } 为:" + Mathf.FloorToInt(1.63f));
print("1.63f四舍五入 { Mathf.RoundToInt(1.63f) } 为:" + Mathf.RoundToInt(1.63f));
print("23 经钳制函数 { Mathf.Clamp(23,55,88) }后的结果为:" + Mathf.Clamp(23, 55, 88));
print("11,22,33,44中的最大值 { Mathf.Max(11,22,33,44) } 为:" + Mathf.Max(11, 22, 33, 44));
print("11,22,33,44中的最小值 { Mathf.Min(11,22,33,44) } 为:" + Mathf.Min(11, 22, 33, 44));
print("3 的 4 次方为 { Mathf.Pow(3,4) } 为:" + Mathf.Pow(3,4));
#endregion
}
// Update is called once per frame
void Update()
{
#region 2、 常用方法
// 插值运算:Mathf.Lerp(startNum, endNum,t)
// t 是插值系数,在 0 到 1 之间
// 当t 靠近0时,运算的结果将更加接近于 startNum
// 当t 靠近1时,运算的结果将更加接近于 endNum
// 可以用来平滑物体移动,或者跟随某个物体
// ========== 【演示:使用插值运算跟随物体移动】 ==========
// 该脚本挂载于物体A,他将跟随物体B运动
// 获取到该脚本的位置信息
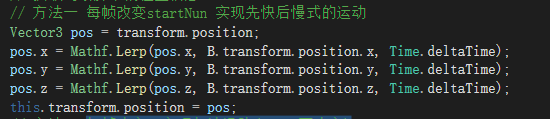
// 方法一 每帧改变startNun 实现先快后慢式的运动
//Vector3 pos = transform.position;
//pos.x = Mathf.Lerp(pos.x, B.transform.position.x, Time.deltaTime);
//pos.y = Mathf.Lerp(pos.y, B.transform.position.y, Time.deltaTime);
//pos.z = Mathf.Lerp(pos.z, B.transform.position.z, Time.deltaTime);
//this.transform.position = pos;
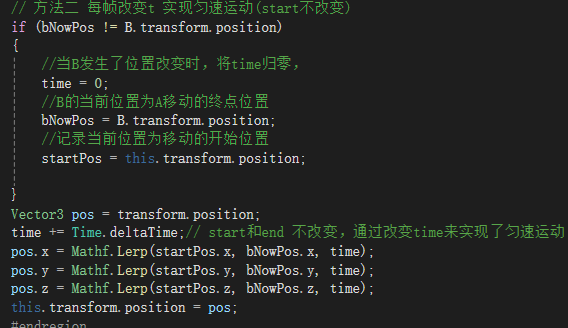
// 方法二 每帧改变t 实现匀速运动(start不改变)
if (bNowPos != B.transform.position)
{
//当B发生了位置改变时,将time归零,
time = 0;
//B的当前位置为A移动的终点位置
bNowPos = B.transform.position;
//记录当前位置为移动的开始位置
startPos = this.transform.position;
}
Vector3 pos = transform.position;
time += Time.deltaTime;// start和end 不改变,通过改变time来实现了匀速运动
pos.x = Mathf.Lerp(startPos.x, bNowPos.x, time);
pos.y = Mathf.Lerp(startPos.y, bNowPos.y, time);
pos.z = Mathf.Lerp(startPos.z, bNowPos.z, time);
this.transform.position = pos;
#endregion
}
}1.2 Mathf中的三角函数
csharp
using System.Collections;
using System.Collections.Generic;
using UnityEngine;

public class lesson2_script : MonoBehaviour
{
    // Start is called before the first frame update
    //移动方向,默认想前移动
    private Vector3 moveDir = Vector3.forward;
    private float time;

    GameObject obj;
    LineRenderer line;
    void Start()
    {
        //(1)弧度和角度的相互转化
        // - 角度转弧度:弧度 = 角度 * Mathf.Rad2Deg
        // - 弧度转角度:角度 = 弧度 * Mathf.Deg2Rad
        // Mathf.Rad2Deg 是常量 57.3 用于角度转弧度
        // Mathf.Deg2Rad 是常量 0.01745 用于弧度转角度


        //(2)三角函数:在Mathf中的三角函数,其传入的参数为 弧度
        // 所以要计算对应角度的三角函数值,要先算角度,然后计算值
        // Mathf.Sin( 弧度值 ) ||  Mathf.Cos( 弧度值 )

        //(3)反三角函数:即通过已知三角函数值,来得到对应的弧度
        // Mathf.ASin( 三角函数值 )
        // ========== 【演示:角度和弧度间的相互转换及三角函数值】 ==========
        print("将30度角转为弧度 { 30 *  Mathf.Rad2Deg } 的结果为:" + 30 * Mathf.Rad2Deg);
        print("30度的角,sin值 { Mathf.Sin(30 * Mathf.Deg2Rad) } 为:" + Mathf.Sin(30 * Mathf.Deg2Rad));
        print("sin值为0.5f 对应的弧度为 { Mathf.Asin(0.5f) } 为:" + Mathf.Asin(0.5f));
        print("其对应的角度 { Mathf.Asin(0.5f) * Mathf.Rad2Deg } 为:" + Mathf.Asin(0.5f) * Mathf.Rad2Deg);


        //为了方便观察,通过LineRenderer进行绘画运动轨迹
        obj = new GameObject();
        line = obj.AddComponent<LineRenderer>();
    }

    // Update is called once per frame
    void Update()
    {
        //可以通过三角函数来进行模拟 物品的曲线运动
        // ========== 【演示:实现物体的曲线运动】 ==========
        time += Time.deltaTime;
        // 在z轴上向前移动
        this.transform.Translate(Vector3.forward * 5 * Time.deltaTime);
        // 通过Sin计算来进行X轴上的偏移
        this.transform.Translate(Vector3.right * 5 * Time.deltaTime * Mathf.Sin(time) );


        //设置线的宽窄
        line.startWidth = 0.2f;
        line.endWidth = 0.2f;
        line.positionCount++;
        line.SetPosition(line.positionCount-1,this.transform.position);
    }
}
1.3 坐标系复习
csharp
using System.Collections;
using System.Collections.Generic;
using UnityEngine;

public class lesson3_script : MonoBehaviour
{
    // Start is called before the first frame update
    void Start()
    {
        // unity中的坐标系包含四种
        // 世界坐标系:即unity中Scene的坐标系,他不受到其他条件的干扰,其原点坐标为Sence中心
        // 物体坐标系:又称本地坐标系,受父对象的位置和缩放大小的干扰
        // 屏幕坐标系:屏幕坐标系是指玩家的屏幕窗口,其坐标原点位于左下角
        // 视口坐标系:与屏幕坐标系相似,其坐标原点是左下角,右上角为坐标轴(0,0)点
        //(屏幕坐标系和视口坐标系的z轴是到摄像机的距离)

        //(1)坐标系间的相互转换,坐标系的转换是通过摄像机在两个空间中投影转换
        // - 世界坐标系转屏幕坐标系:Camera摄像机实例.WorldToScreenPoint();
        // - 世界坐标系转视口坐标系:Camera摄像机实例.WorldToViewportPoint();

        // - 屏幕坐标系转世界坐标系:Camera摄像机实例.ViewportToWorldPoint();
        // - 视口坐标系转屏幕坐标系:Camera摄像机实例.ScreenToWorldPoint();
        //
        print("世界坐标系点(1,2,3)转 屏幕坐标系的结果为:" + Camera.main.WorldToScreenPoint(new Vector3(1, 2, 3)));
        print("世界坐标系点(1,2,3)转 视口坐标系的结果为:" + Camera.main.WorldToViewportPoint(new Vector3(1, 2, 3)));
        print("视口坐标系点(0.5f,0.7f,1)转 世界坐标系的结果为:" + Camera.main.ViewportToWorldPoint(new Vector3(0.5f,0.7f,1)));
        print("屏幕坐标系点(0.5,0.7,1)转 世界坐标系的结果为:" + Camera.main.ScreenToWorldPoint(new Vector3(0.5f, 0.7f, 1)));
        // - 世界坐标系 和 本地坐标系 的相互转换不需要依赖Camera
        // transform是指本地坐标轴的参照
        //世界坐标系转本地:transform.InverseTransformPoint(worldPos);
        //本地坐标系转世界:transform.TransformPoint(localPos);

    }

    // Update is called once per frame
    void Update()
    {

    }
}
二、向量相关
2.1 向量的基础操作
(1)向量的基础概念
- 向量和标量
向量:有方向,有大小
标量:无方向,没有大小- Vector3类型变量可以用来表示 向量 和 点 的坐标
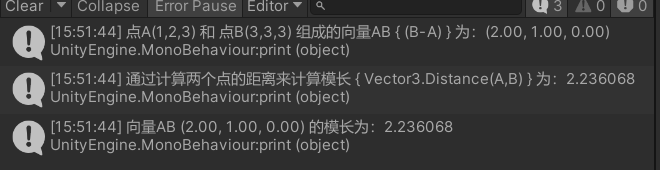
两个点可以确定一个向量========== 【演示:两个点可以确定一个向量】 ==========
该向量起点为A, 终点为B
(复习,Vector3类型可以进行运算的原因是进行了运算符重载)运算符重载的语法:public static 返回类型 operator 运算符(参数)
(2)向量的模长
- 计算两个点的距离 Vector3.Distance(Vector3点A,Vector3点B)
- 向量的模长 Vector3向量.magnitude
========== 【演示:向量的模长】 ==========
(3)单位向量
- 语法:Vector3向量.normalized
- 计算:单位向量 = Vector3向量/向量的模


2.2 向量基础运算
(1)向量相加
- 点 与 向量 相加/相减,会得到一个新点
意为:点朝着向量的方向/反方向 移动 对应的模长- 向量 与向量的相加/相减,会得到一个新向量
========== 【演示:让摄像机保持在物体的指定位置】 ==========
csharp
 void LateUpdate()
 {
     // 注意:摄像机的移动要放在LateUpdata中
     // 作业实现摄像机跟随物体移动
     // 物体的位置是一个点,我要将摄像机保持在一个方向上(向量),现在我可以用点+向量,不停的更新点的坐标来实现跟随,并保持距离
     this.transform.position = obj.position + new Vector3(-4, 0, 7);
     //这里实现了摄像机的跟随,但是没有一直看着物体
     this.transform.LookAt(obj);

 }
========== 【演示:让摄像机保持在物体的指定位置】 ==========
通过LineRenderer来描述移动轨迹
2.3 向量点乘
- 语法:Vector3.Dot(Vector3向量1, Vector3向量2)
两个向量的点乘 = 两个向量的模长积 * 向量夹角的Cos值- 作用:通过结果可以判断两个向量是 同向,垂直,还是反向
resout > 0 目标对象在我的 前方
resout < 0 目标对象在我的后方
resout = 0 目标对象在我的左侧或右侧
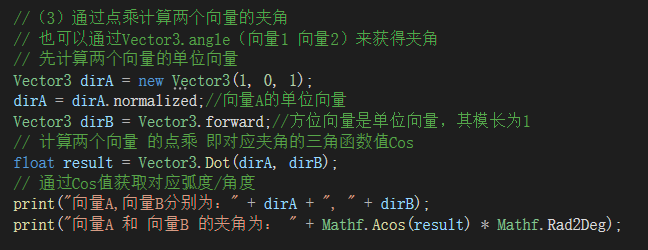
- 通过点乘计算两个向量的夹角
方法一:通过Vector3.angle(向量1 向量2)来获得夹角
方法二:先计算两个向量的单位向量, 然后计算两个向量 的点乘 即对应夹角的三角函数值Cos,最后反三角函数计算
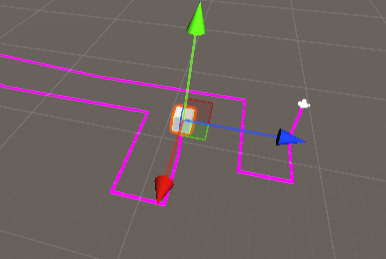
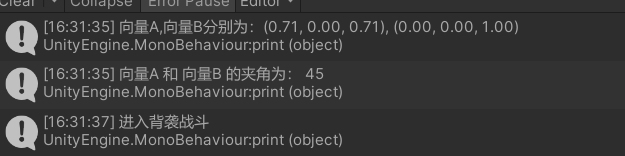
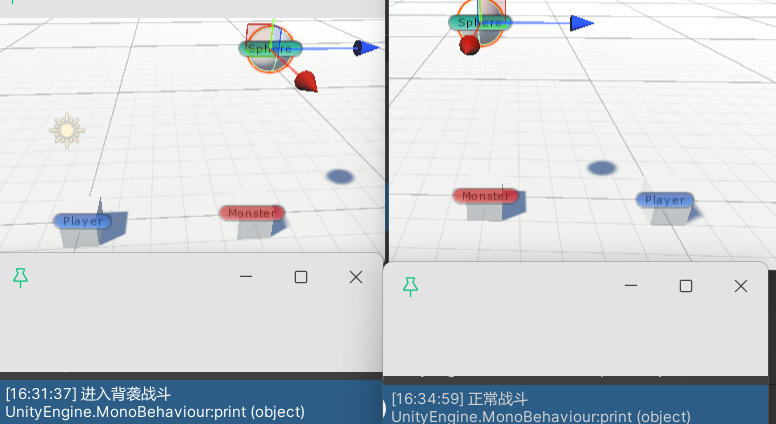
========== 【演示:使用向量点乘判断物体位置】 ==========
模拟游戏中的背袭,当怪物受到攻击时,检测玩家在精灵的方位,若为后方,则触发背袭
该小节运行结果
玩家在不同位置 扔球的效果 对比
2.4 向量叉乘
- 语法:Vector3.Cross(Vector3向量1, Vector3向量2)
- 作用:判断左右方向,计算旋转轴
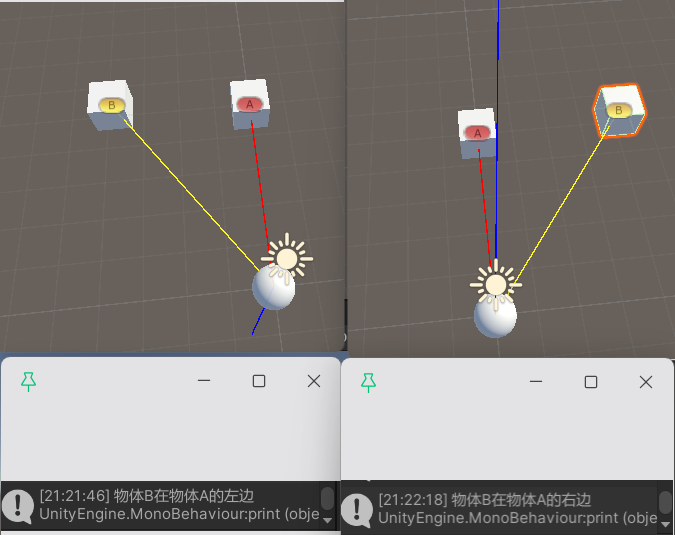
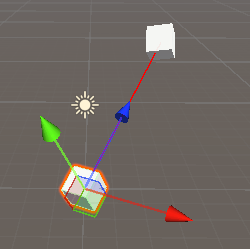
通过向量叉乘可以得到一个新向量,该向量为原两个向量组成的平面的法向量========== 【演示:使用向量叉乘判断物体位置】 ======
通过法向量的y值大小可以判断B物体再A物体的那一侧(左右)
运行结果,新向量为 蓝色的射线,当y>0时在物体的左侧,<0在物体的右侧
========== 【演示:使用向量叉乘计算旋转轴】 ======
运行前后对比图
2.5 向量的插值运算
(1)Mathf.Lerp 与 Vector3.Lerp的区别
作用不一样
Mathf作用于 float数值 其返回值类型也是float类型的值,用来进行平滑一些数值,如光照强度
Vector3作用于 Vector3坐标 其返回类型是Vector3类型的坐标,用来平滑物体的移动语法不一样
语法:Mathf.Lerp(起点值, 终点值, 插值系数 0-1)
语法:Vector3.Lerp(起点坐标, 终点坐标, 插值系数 0-1)Vector3.Lerp 的本质是 坐标的xyz各执行一遍 Mathf.Lerp
相同点 公式相同:result = start + (end - start) * t
当 t 趋近于0时,其结果会趋近于start
当 t 趋近于1时,其结果会趋近于end
(2)Vector3.Lerp 的使用先快后慢:每帧改变 start 的值
匀速变换:每帧改变 t 的值
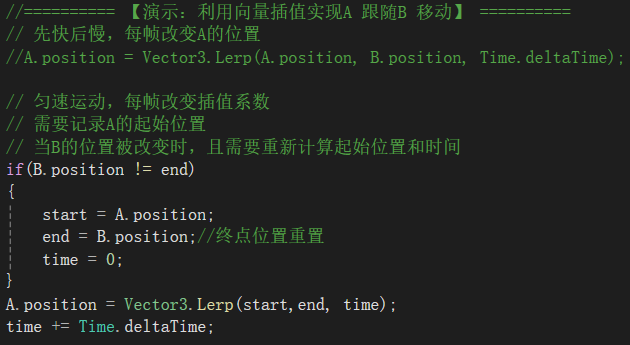
当 t 大于等于1时,改变 end 位置,物体会直接跟着走,原因是当t=1时会得到结果,不修改的话结果会一直保持end位置========== 【演示:利用向量插值实现A 跟随B 移动】 ==========
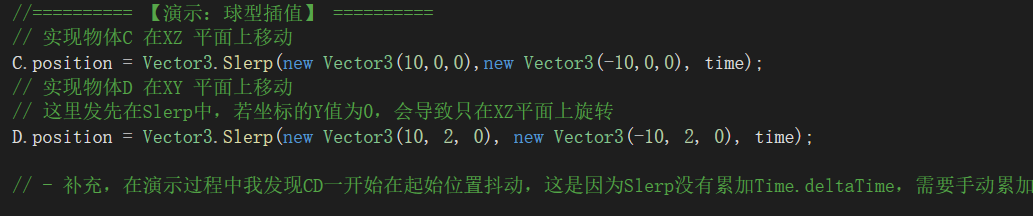
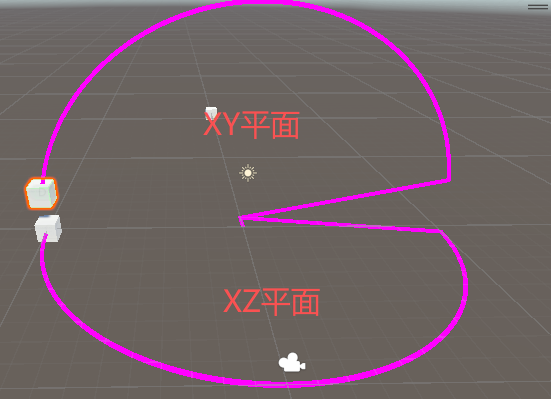
(3)球形插值
- 语法:Vector3.Slerp(起点,终点,插值系数)
物体的初始位置不影响,在执行该代码时会自动到达 start 位置========== 【演示:球型插值】 ==========
运行结果
要想在XY平面上移动,必须至少一个坐标存在y值
2.6 完整代码
2.1 向量的基础操作
csharp
using System.Collections;
using System.Collections.Generic;
using UnityEngine;

public class lesson4_script : MonoBehaviour
{
    // Start is called before the first frame update
    void Start()
    {
        //(1)基础知识点
        // - 向量和标量
        // 向量:有方向,有大小
        // 标量:无方向,没有大小
        // - Vector3可以用来表示 向量 和 点 的坐标
        //========== 【演示:两个点可以确定一个向量】 ==========
        Vector3 A = new Vector3(1, 2, 3);
        Vector3 B = new Vector3(3, 3, 3);
        print("点A(1,2,3) 和 点B(3,3,3) 组成的向量AB { (B-A) } 为:" + (B - A));
        // 这里可以进行Vector3 类型的运算,是因为进行了运算符重载
        // 补充:运算符重载的方法
        // public static 返回类型 operator 运算符(参数)
        // public static Vector3 operator - (Vector3 A, Vector3 B)
        // {
        //     return new Vector3(A.x - B.x, A.y - B.y, A.z - B.z);
        // }

        // - 向量的模长
        // 法一:计算两个点的距离 Vector3.Distance(Vector3点A,Vector3点B)
        // 法二:向量的模长 Vector3向量.magnitude
        //========== 【演示:向量的模长】 ==========
        print("通过计算两个点的距离来计算模长 { Vector3.Distance(A,B) } 为:" + Vector3.Distance(A,B));
        print($"向量AB { B-A } 的模长为:" + (B-A).magnitude);

        // - 常见的向量
        // 单位向量:
        //      Vector3向量.normalized
        //      Vector3向量/向量的模Vector3向量.magnitude
    }

}
2.2 向量的基础运算
csharp
using System.Collections;
using System.Collections.Generic;
using UnityEngine;

/// <summary>
/// 向量的基础运算
/// </summary>
public class lesson5_script : MonoBehaviour
{
    // Start is called before the first frame update
    public Transform obj;
    private Vector3 nowPos;
    public GameObject obj1;
    public GameObject obj2;
    public LineRenderer line1;//用来描述摄像机的轨迹
    public LineRenderer line2;//用来描述Cube的轨迹
    void Start()
    {
        obj1 = new GameObject();
        obj2 = new GameObject();
        line1 = obj1.gameObject.AddComponent<LineRenderer>();
        line2 = obj2.gameObject.AddComponent<LineRenderer>();
        nowPos = obj.position;
    }

    // Update is called once per frame
    void LateUpdate()
    {
        // 注意:摄像机的移动要放在LateUpdata中
        // 作业实现摄像机跟随物体移动
        // 物体的位置是一个点,我要将摄像机保持在一个方向上(向量),现在我可以用点+向量,不停的更新点的坐标来实现跟随,并保持距离
        this.transform.position = obj.position + new Vector3(-4, 0, 7);
        //绘制摄像机 与 Cube的 轨迹
        #region 绘制摄像机 与 Cube的 轨迹
        if (obj.position != nowPos)
        {
            line1.positionCount++;
            line2.positionCount++;
            line1.startWidth = 0.2f;
            line1.endWidth = 0.2f;
            line2.startWidth = 0.2f;
            line2.endWidth = 0.2f;
            line1.SetPosition(line1.positionCount - 1, this.transform.position);
            line2.SetPosition(line2.positionCount - 1, obj.position);
            nowPos = obj.position;
        }
        #endregion
        //这里实现了摄像机的跟随,但是没有一直看着物体
        this.transform.LookAt(obj);

    }
}
2.3 向量点乘
csharp
using System.Collections;
using System.Collections.Generic;
using UnityEngine;
/// <summary>
/// 向量的点乘
/// 该脚本也用来模拟背袭 扔球,挂载到球上
/// 正常情况下应该挂载到球的预设体上,然后通过克隆创建预设体的形式来抛球
/// </summary>
public class lesson6_script : MonoBehaviour
{
//
public Transform ownerPlayer;
// Start is called before the first frame update
void Start()
{
//(3)通过点乘计算两个向量的夹角
// 也可以通过Vector3.angle(向量1 向量2)来获得夹角
// 先计算两个向量的单位向量
Vector3 dirA = new Vector3(1, 0, 1);
dirA = dirA.normalized;//向量A的单位向量
Vector3 dirB = Vector3.forward;//方位向量是单位向量,其模长为1
// 计算两个向量 的点乘 即对应夹角的三角函数值Cos
float result = Vector3.Dot(dirA, dirB);
// 通过Cos值获取对应弧度/角度
print("向量A,向量B分别为:" + dirA + ", " + dirB);
print("向量A 和 向量B 的夹角为: " + Mathf.Acos(result) * Mathf.Rad2Deg);
}
// Update is called once per frame
void Update()
{
//(1)画线调试 我发现将代码写在stat中会一闪而过,所以为了直观要每帧更新
// - 画线段:Debug.DrawLine(Vector3 start, Vector3 end, color)
// - 画射线:Debug.DrawRaw(Vector3 start, Vector3 dir, color)
// 该射线并不会无线延长
//
// 从cube开始向世界坐标系(0,0,5)的位置画线段,颜色为 黄色
Debug.DrawLine(this.transform.position, Vector3.forward * 5, Color.yellow);
// 在cube的Y轴正反向画一条射线,颜色为 蓝色
Debug.DrawRay(this.transform.position, Vector3.up, Color.green);
//(2)向量点乘
// - 语法:Vector3.Dot(Vector3向量1, Vector3向量2)
// 两个向量的点乘 = 两个向量的模长积 * 向量夹角的Cos值
// - 作用:通过结果可以判断两个向量是 同向,垂直,还是反向
}
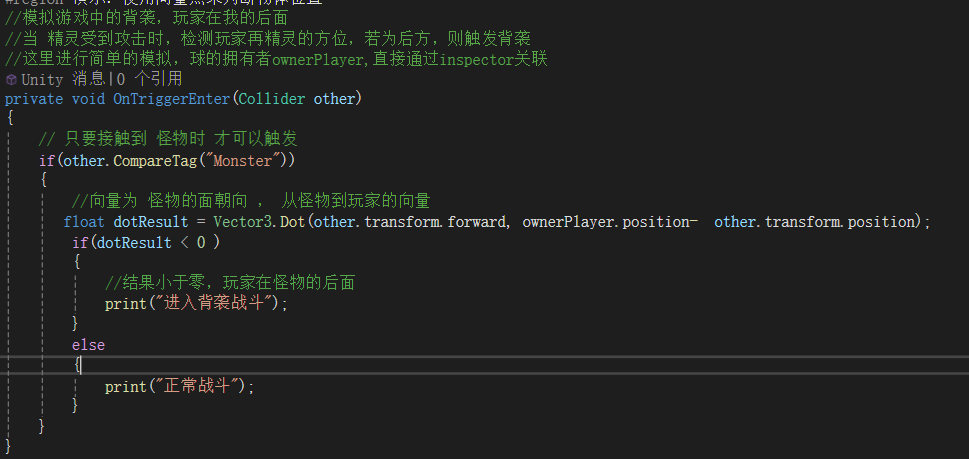
//========== 【演示:使用向量点乘判断物体位置】 ==========
#region 演示:使用向量点乘判断物体位置
//模拟游戏中的背袭,玩家在我的后面
//当 精灵受到攻击时,检测玩家再精灵的方位,若为后方,则触发背袭
//这里进行简单的模拟,球的拥有者ownerPlayer,直接通过inspector关联
private void OnTriggerEnter(Collider other)
{
// 只要接触到 怪物时 才可以触发
if(other.CompareTag("Monster"))
{
//向量为 怪物的面朝向 , 从怪物到玩家的向量
float dotResult = Vector3.Dot(other.transform.forward, ownerPlayer.position- other.transform.position);
if(dotResult < 0 )
{
//结果小于零,玩家在怪物的后面
print("进入背袭战斗");
}
else
{
print("正常战斗");
}
}
}
#endregion
}2.4 向量叉乘
csharp
using System.Collections;
using System.Collections.Generic;
using UnityEngine;
public class Lesson7_script : MonoBehaviour
{
public Transform A;
public Transform B;
//用于演示 计算旋转轴 的两个对象
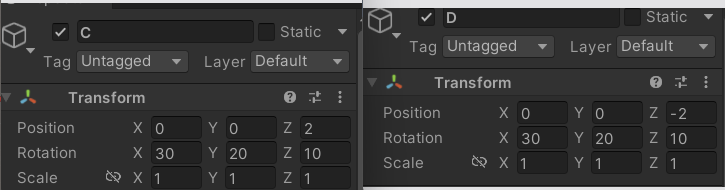
public Transform C;
public Transform D;//D为目标对象
// Start is called before the first frame update
void Start()
{
//()向量叉乘
// - 几何意义:通过向量叉乘 可以的到两个向量组成平面的法向量
// - 物理意义:通过法向量的方向可以判断两向量之间的位置关系
// - 语法:Vector3.Cross(Vector3 向量A, Vector3 向量B)
}
// Update is called once per frame
void Update()
{
//(2)向量叉乘的用途
// - 通过法向量的y值大小可以判断B物体在A物体的那一侧(左右)
//========== 【演示:使用向量插乘判断物体位置】 ==========
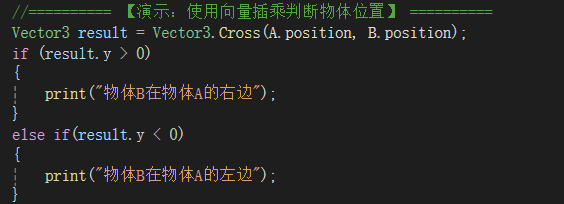
Vector3 result = Vector3.Cross(A.position, B.position);
if (result.y > 0)
{
print("物体B在物体A的右边");
}
else if(result.y < 0)
{
print("物体B在物体A的左边");
}
Debug.DrawRay(Vector3.zero, A.position, Color.red);
Debug.DrawRay(Vector3.zero, B.position, Color.yellow);
Debug.DrawRay(Vector3.zero, result, Color.blue);//这里将得到的法向量画出来(蓝色)
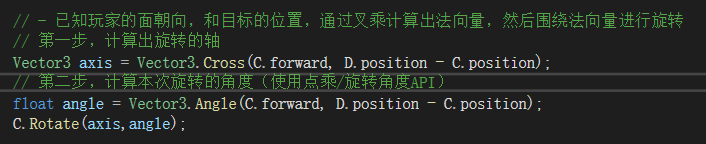
// - 已知玩家的面朝向,和目标的位置,通过叉乘计算出法向量,然后围绕法向量进行旋转
// 第一步,计算出旋转的轴
Vector3 axis = Vector3.Cross(C.forward, D.position - C.position);
// 第二步,计算本次旋转的角度(使用点乘/旋转角度API)
float angle = Vector3.Angle(C.forward, D.position - C.position);
C.Rotate(axis,angle);
}
}2.5 向量的插值运算
csharp
using System.Collections;
using System.Collections.Generic;
using UnityEngine;
/// <summary>
/// Lesson8_插值运算
/// </summary>
public class lesson8_script : MonoBehaviour
{
    //用来描述运动轨迹CD
    public GameObject obj1;
    public GameObject obj2;
    public LineRenderer line1;
    public LineRenderer line2;


    //用于演示的对象
    public Transform A;
    public Transform B;
    public Transform C;
    public Transform D;
    //用于演示 匀速运动时记录A 的起始位置
    private Vector3 start;
    private float time;
    private Vector3 end;

    // Start is called before the first frame update
    void Start()
    {
        //(1)Mathf.Lerp 与 Vector3.Lerp的区别
        // - 作用不一样
        //   Mathf作用于 float数值 其返回值类型也是float类型的值
        //   Vector3作用于 Vector3坐标 其返回类型是Vector3类型的坐标
        // - 语法不一样
        //   语法:Mathf.Lerp(起点值, 终点值, 插值系数 0-1)
        //   语法:Vector3.Lerp(起点坐标, 终点坐标, 插值系数 0-1)
        // - Vector3.Lerp 的本质是 坐标的xyz各执行一遍 Mathf.Lerp
        // - 数学公式相同:result = start + (end - start) * t
        //   当 t 趋近于0时,其结果会趋近于start
        //   当 t 趋近于1时,其结果会趋近于end


        //匀速运动初始化
        start = A.position;
        end = B.position;
        time = 0;

        //描述运动轨迹
        obj1 = new GameObject();
        obj2 = new GameObject();
        line1 = obj1.gameObject.AddComponent<LineRenderer>();
        line2 = obj2.gameObject.AddComponent<LineRenderer>();
    }

    // Update is called once per frame
    void Update()
    {
        //(2)Vector3.Lerp 的使用
        // - 先快后慢:每帧改变 start 的值
        // - 匀速变换:每帧改变 t 的值
        //   当 t 大于等于1时,改变 end 位置,物体会直接跟着走,原因是当t=1时会得到结果,不修改的话结果会一直保持end位置

        //========== 【演示:利用向量插值实现A 跟随B 移动】 ==========
        // 先快后慢,每帧改变A的位置
        //A.position = Vector3.Lerp(A.position, B.position, Time.deltaTime);

        // 匀速运动,每帧改变插值系数
        // 需要记录A的起始位置
        // 当B的位置被改变时,且需要重新计算起始位置和时间
        if(B.position != end)
        {
            start = A.position;
            end = B.position;//终点位置重置
            time = 0;
        }
        A.position = Vector3.Lerp(start,end, time);
        time += Time.deltaTime;

        //(3)球形插值
        // - 语法:Vector3.Slerp(起点,终点,插值系数)
        //   物体的初始位置不影响,在执行该代码时会自动到达 start 位置
        //========== 【演示:球型插值】 ==========
        // 实现物体C 在XZ 平面上移动
        C.position = Vector3.Slerp(new Vector3(10,0,0),new Vector3(-10,0,0), time);
        // 实现物体D 在XY 平面上移动
        // 这里发先在Slerp中,若坐标的Y值为0,会导致只在XZ平面上旋转
        D.position = Vector3.Slerp(new Vector3(10, 2, 0), new Vector3(-10, 2, 0), time);

        // - 补充,在演示过程中我发现CD一开始在起始位置抖动,这是因为Slerp没有累加Time.deltaTime,需要手动累加

        line1.positionCount++;
        line2.positionCount++;
        line1.startWidth = 0.2f;
        line1.endWidth = 0.2f;
        line2.startWidth = 0.2f;
        line2.endWidth = 0.2f;
        line1.SetPosition(line1.positionCount - 1, C.position);
        line2.SetPosition(line2.positionCount - 1, D.position);
    }
}
三、四元数
3.1 四元数的基础操作
(1)什么是四元数
- 概念:Quaternion 四元数,是封装好的结构体,由四个分量(X,Y,Z,W)组成,用来解决欧拉角中的万向死锁问题
X,Y,Z为 Vector3类型的欧拉角的各分量计算,W为标量如:绕轴 A(x,y,z)旋转60度
X = sin(60 / 2) * x , Y = sin(60/2) * y , Z = sin(60/2) * z
W = cos(60 /2)
(2)为什么使用四元数
解决了使用欧拉角旋转,同一旋转角度不唯一的情况
解决了万向节死锁
(3)四元数的使用语法四元数对应的欧拉角取值为 -180 到 180
四元数的创建
法一:通过公式创建(不推荐)
法二:通过API创建,其原理为通过某一个轴进行旋转指定角度得到
法三:通过欧拉角创建
欧拉角转四元数:Quaternion.Euler(x, y, z);四元数转欧拉角 q3.eulerAngles
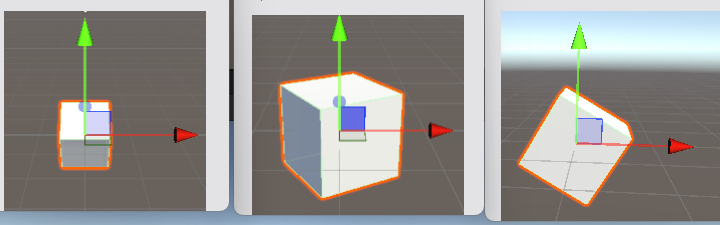
========== 【演示:四元数创建】 ==========
运行结果:依次为绕xyz轴旋转的(该代码对应前两个图)
========== 【演示:四元数转欧拉角】 ==========
运行结果


3.2 四元数常用方法
(1)单位四元数:Quaternion.indentity => (0,0,0,1)
- 单位四元数是 模长为 1 的四元数
- 作用:在Unity中代表无旋转状态,可用于将旋转角度未知的物体,进行角度的初始化
========== 【演示:单位四元数】 ==========
运行结果
(2)向量看向转四元数:Quaternion.LookRotation(Vector3向量)
- 作用:得到对应向量的四元数,通过重新赋值对象的rotation,实现对象看向 向量方向
(LookAt 内部就是封装调用的 Quaternion.LookRotation)========== 【演示:让 A 看向 B】 ==========
运行结果
(3)四元数的插值运算:Lerp 和 Slerp
- 作用:让物体对象 转向 某一个角度
- 区别:
Lerp在旋转时是线性的,他类似于割圆,只是尽可能的逼近于 旋转角度
Slerp在旋转时是弧度,可以正确的旋转,且速度较快,一般情况下推荐使用 Slerp
(使用逻辑与 Vector3 的逻辑一样,不会主动累加 Time.deltaTime)========== 【演示:插值运算】 ==========
运行结果


3.3 四元数运算
(1)四元数相乘
- 作用:两个四元数相乘会得到 一个新的四元数,其旋转角度 是两个四元数对应旋转角度的叠加
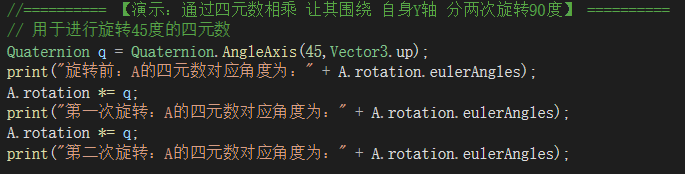
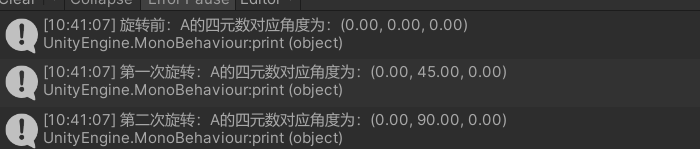
旋转相对的坐标系是物体自身的坐标系========== 【演示:通过四元数相乘 让其围绕 自身Y轴 分两次旋转90度】 ==========
运行结果
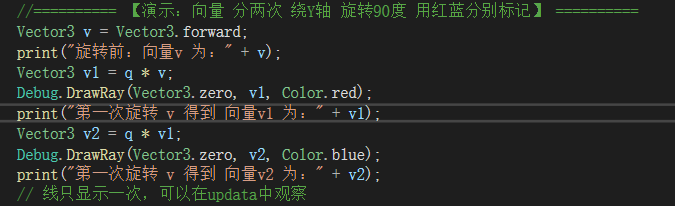
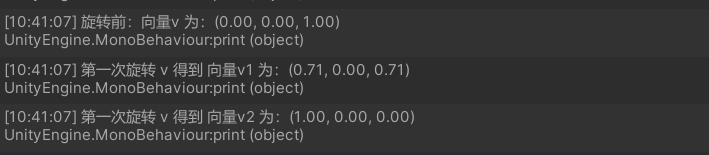
(2)四元数与向量相乘
- 作用:让向量进行 对应四元数旋转角度 的旋转
且只能是 四元数 * 向量,不能是 向量 * 四元数!!!========== 【演示:向量 分两次 绕Y轴 旋转90度 用红蓝分别标记】 ==========
运行结果
可以用来弹幕游戏向四周发射弹幕
这里就是实现的 环形发射 弹幕的逻辑
其实现原理为,利用 四元数与四元数相乘 每次改变子弹创建时的方向

3.4 完整代码
3.1 四元数的基础操作
csharp
using System.Collections;
using System.Collections.Generic;
using UnityEngine;

public class Lesson9_10_scripr : MonoBehaviour
{
    // Start is called before the first frame update
    void Start()
    {
        //(1)什么是四元数
        // - 概念:Quaternion 四元数,是封装好的结构体,由四个分量(X,Y,Z,W)组成,用来解决欧拉角中的万向死锁问题
        //   X,Y,Z为 Vector3类型的欧拉角的各分量计算,W为标量
        //   如:绕轴 A(x,y,z)旋转60度
        //   X = sin(60 / 2) * x , Y = sin(60/2) * y , Z = sin(60/2) * z
        //   W = cos(60 /2)


        //(2)为什么使用四元数
        // - 解决了使用欧拉角旋转,统一旋转角度不唯一的情况
        // - 解决了万向节死锁

        //(3)四元数的使用语法
        // - 四元数对应的欧拉角取值为 -180 到 180
        // - 四元数的创建
        //========== 【演示:四元数创建】 ==========
        //   X轴旋转60
        // 法一:通过公式创建:             X = sin(60 / 2) * x ,             Y = sin(60/2) * y ,                Z = sin(60/2) * z                 W = cos(60 /2)
        Quaternion q1 = new Quaternion(Mathf.Sin(60 * Mathf.Deg2Rad / 2) * 1, Mathf.Sin(60 * Mathf.Deg2Rad / 2) * 0, Mathf.Sin(60 * Mathf.Deg2Rad / 2) * 0,Mathf.Cos(60 * Mathf.Deg2Rad / 2));
        GameObject gameObject1 = GameObject.CreatePrimitive(PrimitiveType.Cube);
        gameObject1.transform.rotation = q1; //创建一个立方体,其绕x轴旋转了60度

        //法二:通过封装方法:Quaternion.AngleAxis(角度,旋转轴)
        Quaternion q2 = Quaternion.AngleAxis(60,Vector3.up);
        GameObject gameObject2 = GameObject.CreatePrimitive(PrimitiveType.Cube);
        gameObject2.transform.rotation = q2;
        gameObject2.transform.position += Vector3.right * 5;// 创建一个立方体,其绕y轴旋转了60度,并向世界坐标系X轴正方向移动 5单位
        // - 欧拉角转四元数
        //   通过欧拉角创建:Quaternion.Euler(x, y, z);
        Quaternion q3 =  Quaternion.Euler(0, 0, 60);
        GameObject cube3 = GameObject.CreatePrimitive(PrimitiveType.Cube);
        cube3.transform.rotation = q3;
        cube3.transform.position += Vector3.left * 5;// 创建一个立方体,其绕z轴旋转了60度,并向世界坐标系X轴正方向移动 5单位
        // - 四元数转欧拉角 q3.eulerAngles
        print("四元数q3  " + q3 + "  转成欧拉角{ q3.eulerAngles }为:" + q3.eulerAngles);


    }

    // Update is called once per frame
    void Update()
    {

    }
}
3.2 四元数常用方法
csharp
using System.Collections;
using System.Collections.Generic;
using UnityEngine;

public class lesson11_script : MonoBehaviour
{
    //用于演示的对象
    public Transform A;
    public Transform B;
    public Transform C;
    public Transform D;

    private float time;
    private Quaternion start;
    // Start is called before the first frame update
    void Start()
    {
        //(1)单位四元数:Quaternion.indentity => (0,0,0,1)
        // - 单位四元数是 模长为 1 的四元数
        // - 作用:将旋转角度未知的物体,进行角度的初始化
        //========== 【演示:单位四元数】 ==========
        print("重置前,A的四元数为:" + A.rotation);
        A.rotation = Quaternion.identity;
        print("重置后,A的四元数 { A.rotation = Quaternion.identity } 为:" +  A.rotation);

        start = D.rotation;
        time = 0;

    }

    // Update is called once per frame
    void Update()
    {
        //(2)向量看向转四元数:Quaternion.LookRotation(Vector3向量)
        // - 作用:得到对应向量的四元数,通过重新赋值对象的rotation,实现对象看向向量方向
        //========== 【演示:让 A 看向 B】 ==========
        A.rotation = Quaternion.LookRotation(B.position - A.position);
        Debug.DrawRay(A.position, B.position, Color.red);// 对象A的Z轴正方向看向B,用红线标记
        //LookAt 内部就是封装调用的 Quaternion.LookRotation


        //(3)四元数的插值运算:Lerp 和 Slerp
        // - 作用:让物体对象 转向 某一个角度
        // - 区别:
        //   Lerp在旋转时是线性的,他类似于割圆,只是尽可能的逼近于 旋转角度
        //   Slerp在旋转时是弧度,可以正确的旋转,且速度较快,一般情况下推荐使用 Slerp
        // - 使用:使用逻辑与 Vector3 的逻辑一样,不会主动累加 Time.deltaTime
        //========== 【演示:插值运算】 ==========
        //让 C 先快后慢的完成旋转 角度于B一样
        C.rotation = Quaternion.Slerp(C.rotation,B.rotation, Time.deltaTime);
        //让 D 保持匀速的完成旋转 角度于B一样
        D.rotation = Quaternion.Slerp(start,B.rotation,time);
        time += Time.deltaTime;
        //这里只简单演示,之后不改变B的旋转,若要实现,将对应值重置
    }
}
3.3 四元数运算
csharp
using System.Collections;
using System.Collections.Generic;
using UnityEngine;

public class lesson12_script : MonoBehaviour
{
    public Transform A;

    // Start is called before the first frame update
    void Start()
    {
        //(1)四元数相乘
        // - 作用:两个四元数相乘会得到 一个新的四元数,其旋转角度 是两个四元数对应旋转角度的叠加
        //   注 旋转相对的坐标系是物体自身的坐标系
        //========== 【演示:通过四元数相乘 让其围绕 自身Y轴 分两次旋转90度】 ==========
        // 用于进行旋转45度的四元数
        Quaternion q = Quaternion.AngleAxis(45,Vector3.up);
        print("旋转前:A的四元数对应角度为:" + A.rotation.eulerAngles);
        A.rotation *= q;
        print("第一次旋转:A的四元数对应角度为:" + A.rotation.eulerAngles);
        A.rotation *= q;
        print("第二次旋转:A的四元数对应角度为:" + A.rotation.eulerAngles);

        //(2)四元数与向量相乘
        // - 作用:让向量进行 对应四元数旋转角度 的旋转
        //   且只能是 四元数 * 向量,不能是 向量 * 四元数!!!
        //========== 【演示:向量 分两次 绕Y轴 旋转90度 用红蓝分别标记】 ==========
        Vector3 v = Vector3.forward;
        print("旋转前:向量v 为:" + v);
        Vector3 v1 = q * v;
        Debug.DrawRay(Vector3.zero, v1, Color.red);
        print("第一次旋转 v 得到 向量v1 为:" + v1);
        Vector3 v2 = q * v1;
        Debug.DrawRay(Vector3.zero, v2, Color.blue);
        print("第一次旋转 v 得到 向量v2 为:" + v2);
        // 线只显示一次,可以在updata中观察
    }

    // Update is called once per frame
    void Update()
    {

    }
}