使用springboot AI实现一个伪查询天气的MCP Server,协议是Stdio。
系统:win11
JDK:17
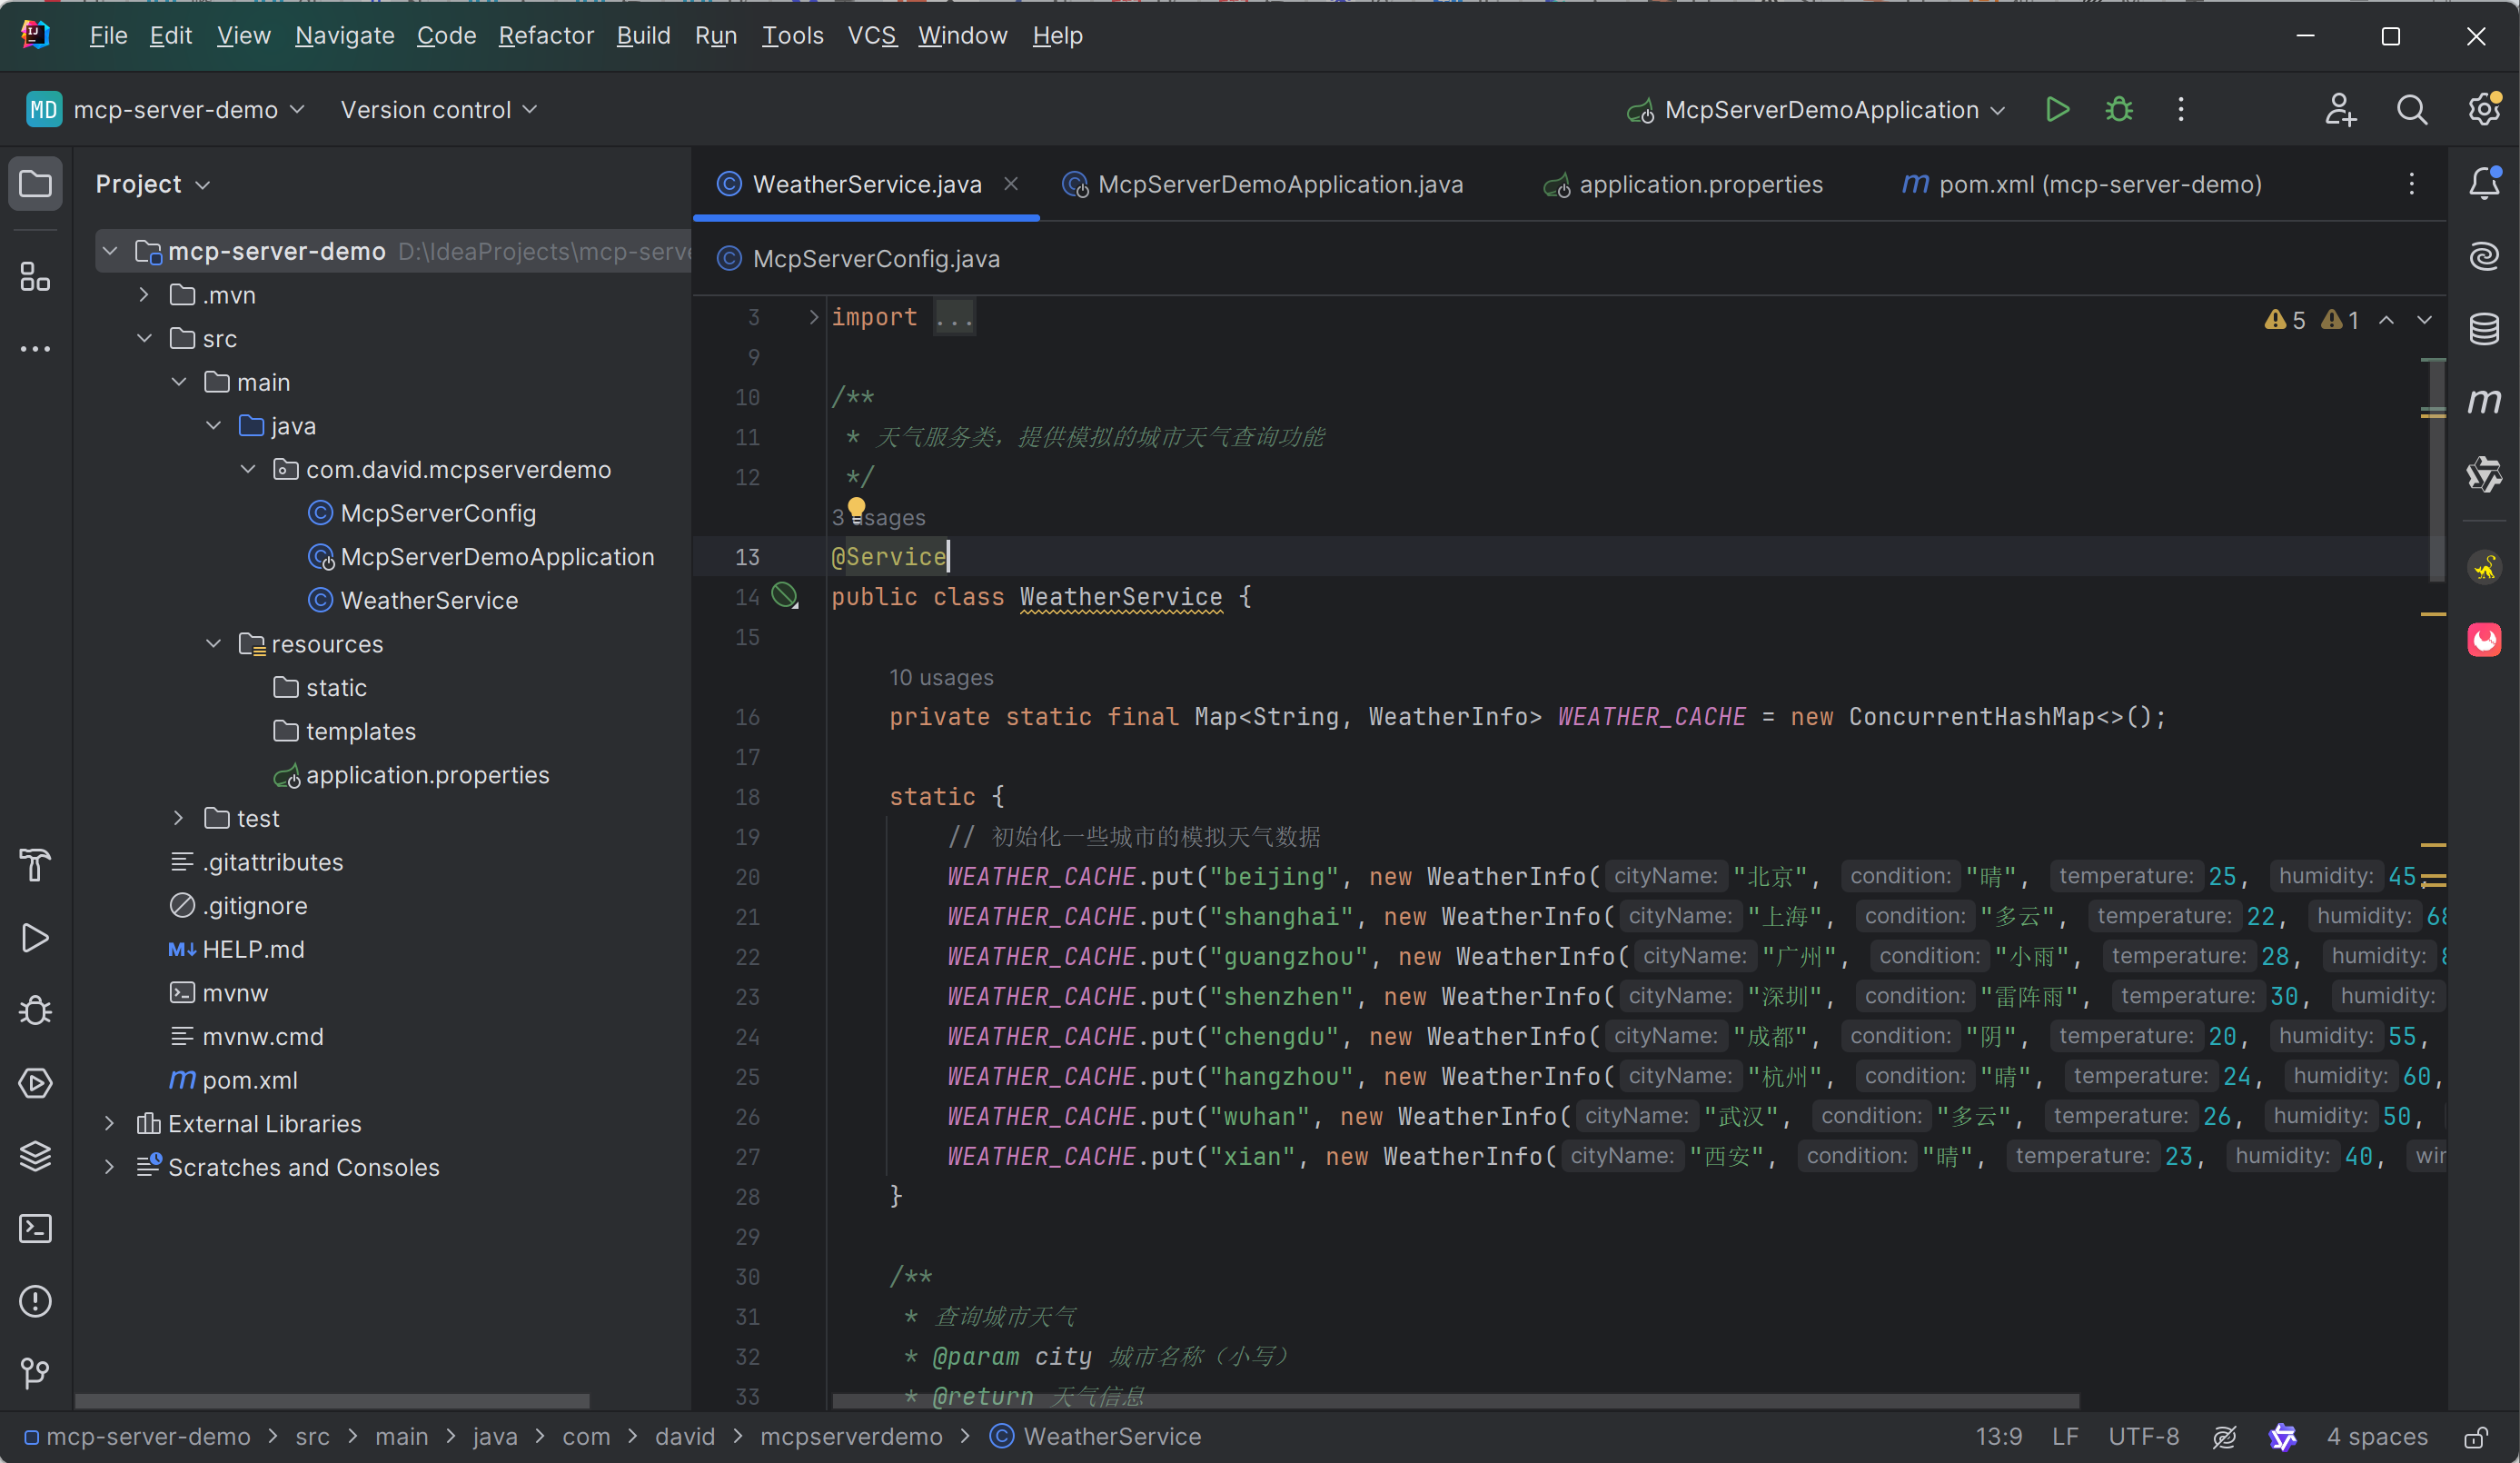
代码结构:
McpServerDemoApplication.java:
package com.david.mcpserverdemo;

import org.springframework.boot.SpringApplication;
import org.springframework.boot.autoconfigure.SpringBootApplication;

@SpringBootApplication
public class McpServerDemoApplication {

    public static void main(String[] args) {
        SpringApplication.run(McpServerDemoApplication.class, args);
    }

}
McpServerConfig.java:
package com.david.mcpserverdemo;

import org.springframework.ai.tool.ToolCallbackProvider;
import org.springframework.ai.tool.method.MethodToolCallbackProvider;
import org.springframework.context.annotation.Bean;
import org.springframework.context.annotation.Configuration;

/**
 * MCP Server 配置类
 */
@Configuration
public class McpServerConfig {

    /**
     * 注册 WeatherService 中的工具方法
     */
    @Bean
    public ToolCallbackProvider weatherToolProvider(WeatherService weatherService) {
        return MethodToolCallbackProvider.builder()
                .toolObjects(weatherService)
                .build();
    }
}
WeatherService.java:
package com.david.mcpserverdemo;

import org.springframework.ai.tool.annotation.Tool;
import org.springframework.ai.tool.annotation.ToolParam;
import org.springframework.stereotype.Service;

import java.util.Map;
import java.util.concurrent.ConcurrentHashMap;

/**
 * 天气服务类,提供模拟的城市天气查询功能
 */
@Service
public class WeatherService {

    private static final Map<String, WeatherInfo> WEATHER_CACHE = new ConcurrentHashMap<>();

    static {
        // 初始化一些城市的模拟天气数据
        WEATHER_CACHE.put("beijing", new WeatherInfo("北京", "晴", 25, 45, "西北风 2 级"));
        WEATHER_CACHE.put("shanghai", new WeatherInfo("上海", "多云", 22, 68, "东南风 3 级"));
        WEATHER_CACHE.put("guangzhou", new WeatherInfo("广州", "小雨", 28, 85, "南风 1 级"));
        WEATHER_CACHE.put("shenzhen", new WeatherInfo("深圳", "雷阵雨", 30, 90, "西南风 2 级"));
        WEATHER_CACHE.put("chengdu", new WeatherInfo("成都", "阴", 20, 55, "北风 1 级"));
        WEATHER_CACHE.put("hangzhou", new WeatherInfo("杭州", "晴", 24, 60, "东风 2 级"));
        WEATHER_CACHE.put("wuhan", new WeatherInfo("武汉", "多云", 26, 50, "南风 2 级"));
        WEATHER_CACHE.put("xian", new WeatherInfo("西安", "晴", 23, 40, "西北风 3 级"));
    }

    /**
     * 查询城市天气
     * @param city 城市名称(小写)
     * @return 天气信息
     */
    @Tool(description = "查询指定城市的天气情况,返回城市名称、天气状况、温度、湿度和风力信息")
    public String getWeather(@ToolParam(description = "城市名称,必须是小写英文,例如:beijing, shanghai") String city) {
        if (city == null || city.trim().isEmpty()) {
            return "错误:城市名称不能为空";
        }

        String cityKey = city.toLowerCase().trim();
        WeatherInfo weather = WEATHER_CACHE.get(cityKey);

        if (weather == null) {
            // 如果缓存中没有,生成一个模拟的随机天气
//            weather = generateRandomWeather(city);
            return "错误:未找到该城市的天气信息";
        }

        return String.format(
            "城市:%s\n天气:%s\n温度:%d°C\n湿度:%d%%\n风力:%s",
            weather.getCityName(),
            weather.getCondition(),
            weather.getTemperature(),
            weather.getHumidity(),
            weather.getWind()
        );
    }

    /**
     * 为未知城市生成模拟天气数据
     */
    private WeatherInfo generateRandomWeather(String city) {
        String[] conditions = {"晴", "多云", "阴", "小雨", "中雨", "大雨", "雷阵雨", "小雪", "大雪"};
        String[] windDirections = {"东", "南", "西", "北", "东南", "东北", "西南", "西北"};

        int temp = 15 + (int)(Math.random() * 20); // 15-35 度
        int humidity = 30 + (int)(Math.random() * 60); // 30-90%
        String condition = conditions[(int)(Math.random() * conditions.length)];
        String wind = windDirections[(int)(Math.random() * windDirections.length)] + "风 " + (1 + (int)(Math.random() * 5)) + "级";

        WeatherInfo weather = new WeatherInfo(
            city.substring(0, 1).toUpperCase() + city.substring(1),
            condition,
            temp,
            humidity,
            wind
        );

        // 缓存生成的天气数据
        WEATHER_CACHE.put(city.toLowerCase(), weather);

        return weather;
    }

    /**
     * 天气信息内部类
     */
    private static class WeatherInfo {
        private final String cityName;
        private final String condition;
        private final int temperature;
        private final int humidity;
        private final String wind;

        public WeatherInfo(String cityName, String condition, int temperature, int humidity, String wind) {
            this.cityName = cityName;
            this.condition = condition;
            this.temperature = temperature;
            this.humidity = humidity;
            this.wind = wind;
        }

        public String getCityName() {
            return cityName;
        }

        public String getCondition() {
            return condition;
        }

        public int getTemperature() {
            return temperature;
        }

        public int getHumidity() {
            return humidity;
        }

        public String getWind() {
            return wind;
        }
    }
}
application.properties:
spring.application.name=mcp-server-demo

# MCP Server 配置
spring.ai.mcp.server.name=weather-mcp-server
spring.ai.mcp.server.type=SYNC
pom.xml
<?xml version="1.0" encoding="UTF-8"?>
<project xmlns="http://maven.apache.org/POM/4.0.0" xmlns:xsi="http://www.w3.org/2001/XMLSchema-instance"
xsi:schemaLocation="http://maven.apache.org/POM/4.0.0 https://maven.apache.org/xsd/maven-4.0.0.xsd">
<modelVersion>4.0.0</modelVersion>
<parent>
<groupId>org.springframework.boot</groupId>
<artifactId>spring-boot-starter-parent</artifactId>
<version>4.0.5</version>
<relativePath/> <!-- lookup parent from repository -->
</parent>
<groupId>com.david</groupId>
<artifactId>mcp-server-demo</artifactId>
<version>0.0.1-SNAPSHOT</version>
<name>mcp-server-demo</name>
<description>mcp-server-demo</description>
<url/>
<licenses>
<license/>
</licenses>
<developers>
<developer/>
</developers>
<scm>
<connection/>
<developerConnection/>
<tag/>
<url/>
</scm>
<properties>
<java.version>17</java.version>
<spring-ai.version>1.0.0</spring-ai.version>
</properties>
<dependencies>
<dependency>
<groupId>org.springframework.boot</groupId>
<artifactId>spring-boot-starter-webmvc</artifactId>
</dependency>
<!-- Spring AI MCP Server -->
<dependency>
<groupId>org.springframework.ai</groupId>
<artifactId>spring-ai-starter-mcp-server</artifactId>
<version>${spring-ai.version}</version>
</dependency>
<dependency>
<groupId>org.springframework.boot</groupId>
<artifactId>spring-boot-starter-webmvc-test</artifactId>
<scope>test</scope>
</dependency>
</dependencies>
<build>
<plugins>
<plugin>
<groupId>org.springframework.boot</groupId>
<artifactId>spring-boot-maven-plugin</artifactId>
</plugin>
</plugins>
</build>
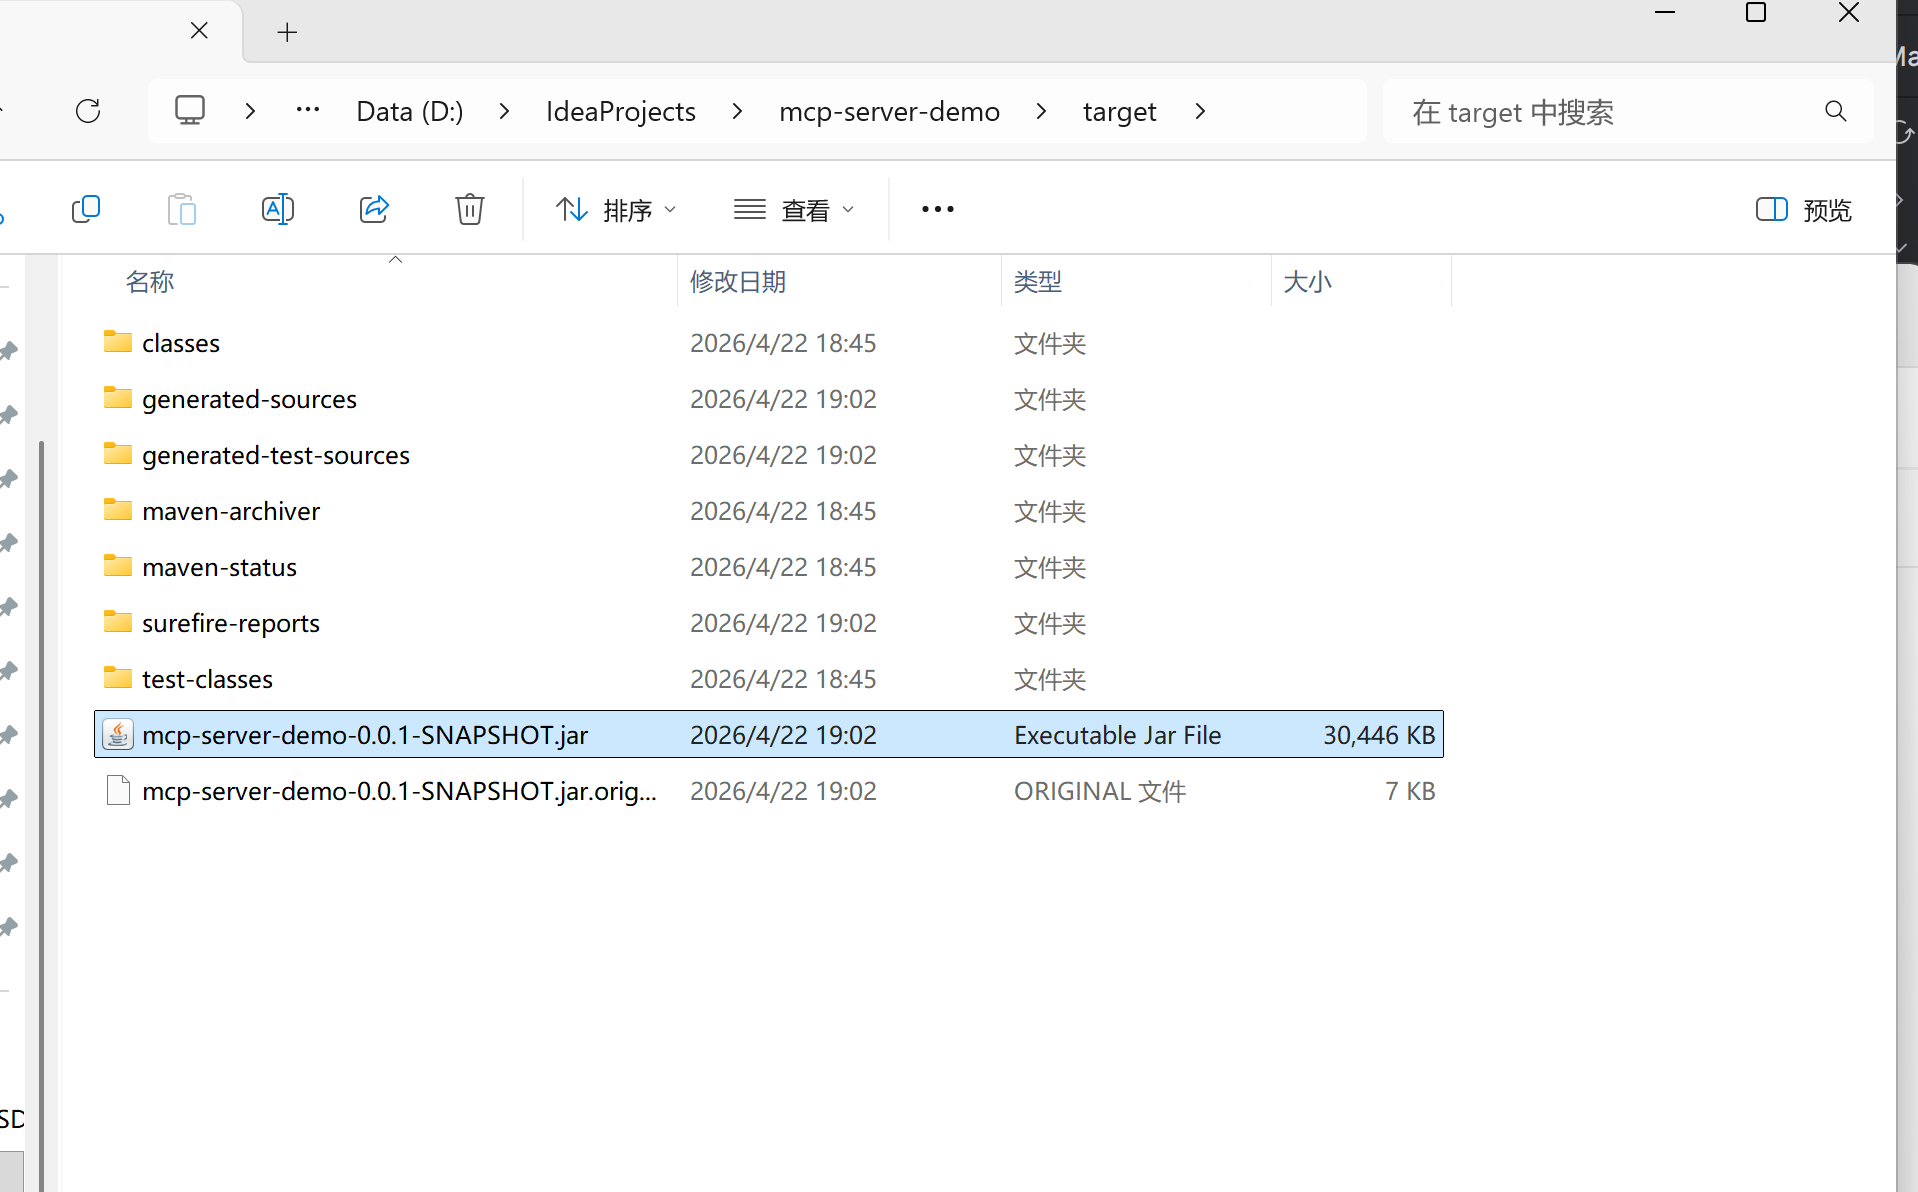
</project>1、编译打包出jar包
2、使用CherryStudio测试MCP服务
2.1、安装CherryStudio(https://www.cherry-ai.com/)
2.2、配置大模型(本地Ollama或者DeepseekApiKey都可以)
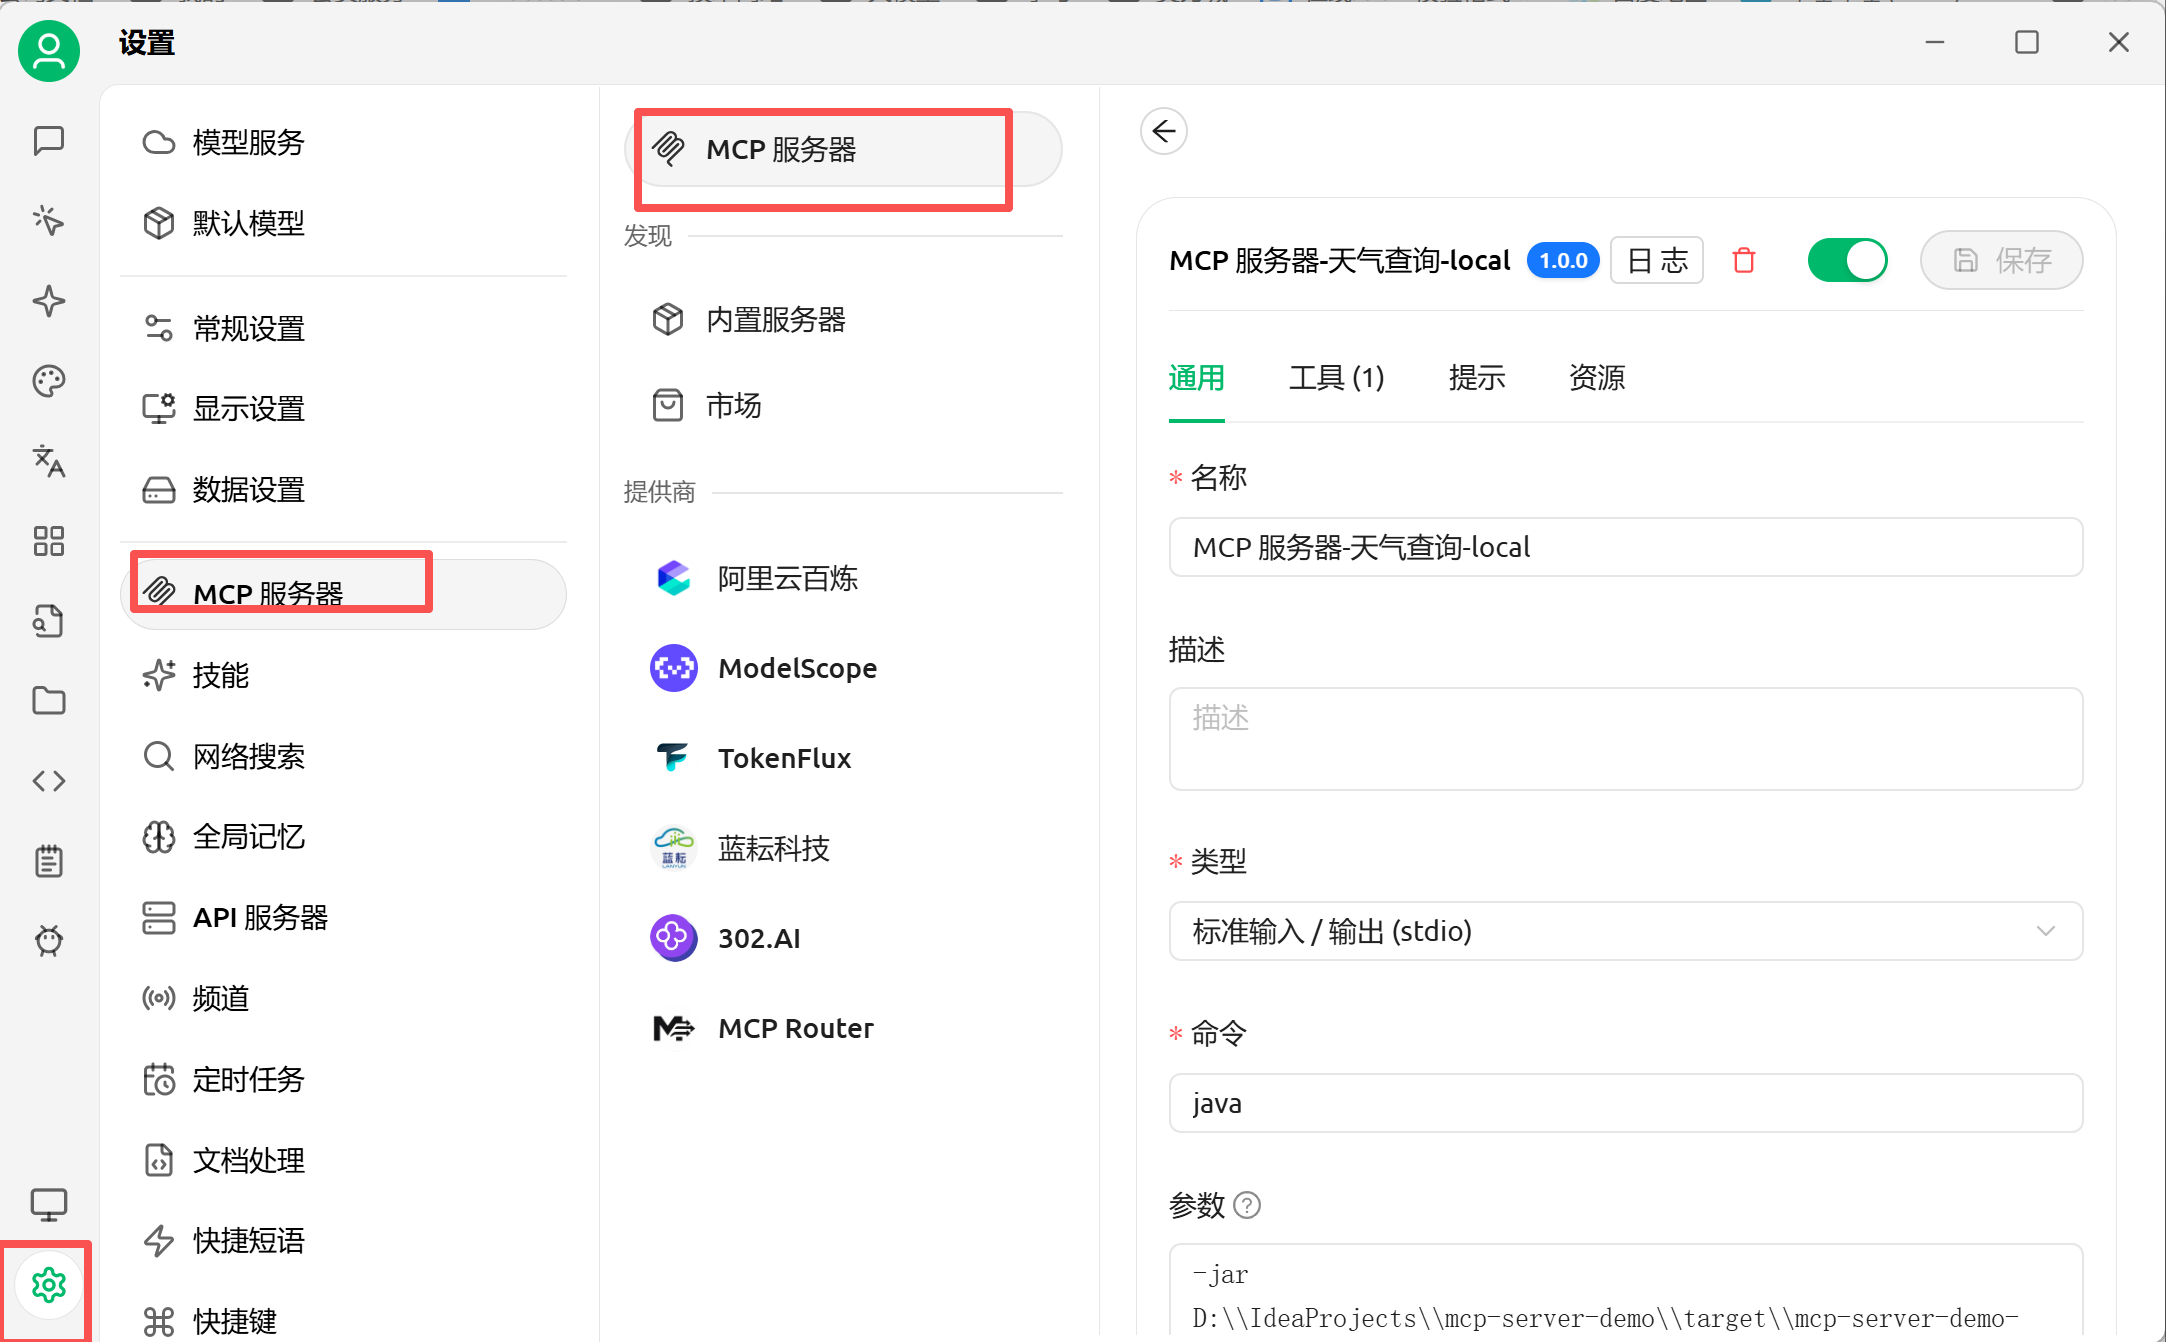
2.3、配置MCP服务
左下角设置-MCP服务-MCP服务-新增一个
命令:java
参数:参数有2个,需要换行,如下代码块
-jar
D:\\IdeaProjects\\mcp-server-demo\\target\\mcp-server-demo-0.0.1-SNAPSHOT.jar
点击保存后开启开关,如果失败了开关是无法开启的
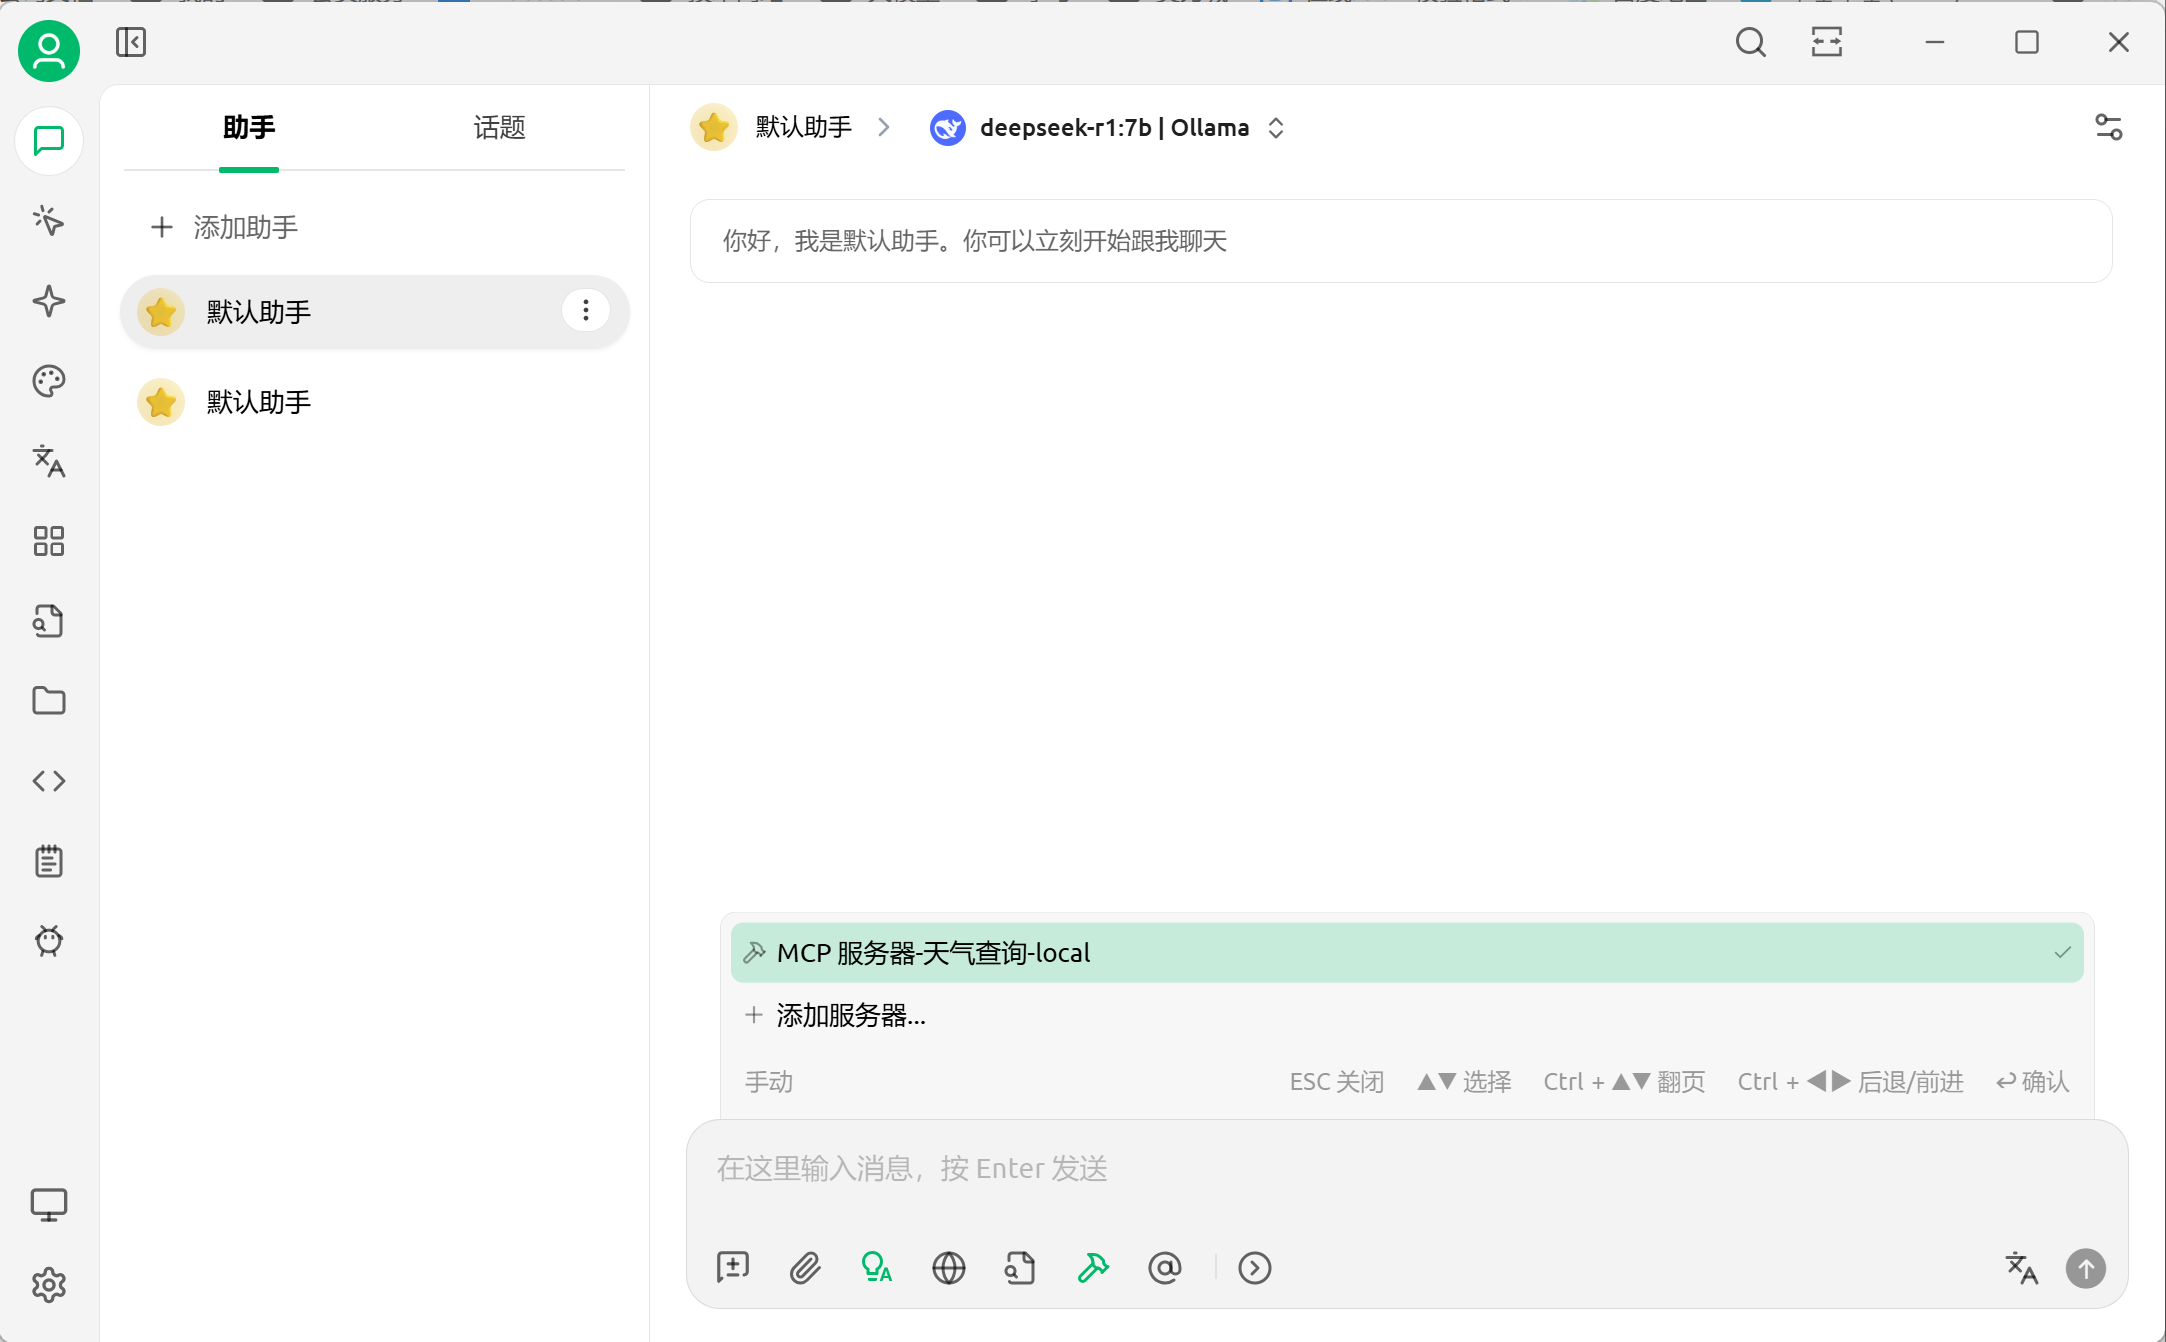
2.4、聊天选择使用MCP服务
点下面的"小锤子",不同版本之间图标可能会不同,鼠标悬浮可以看到说明,然后选择手动。
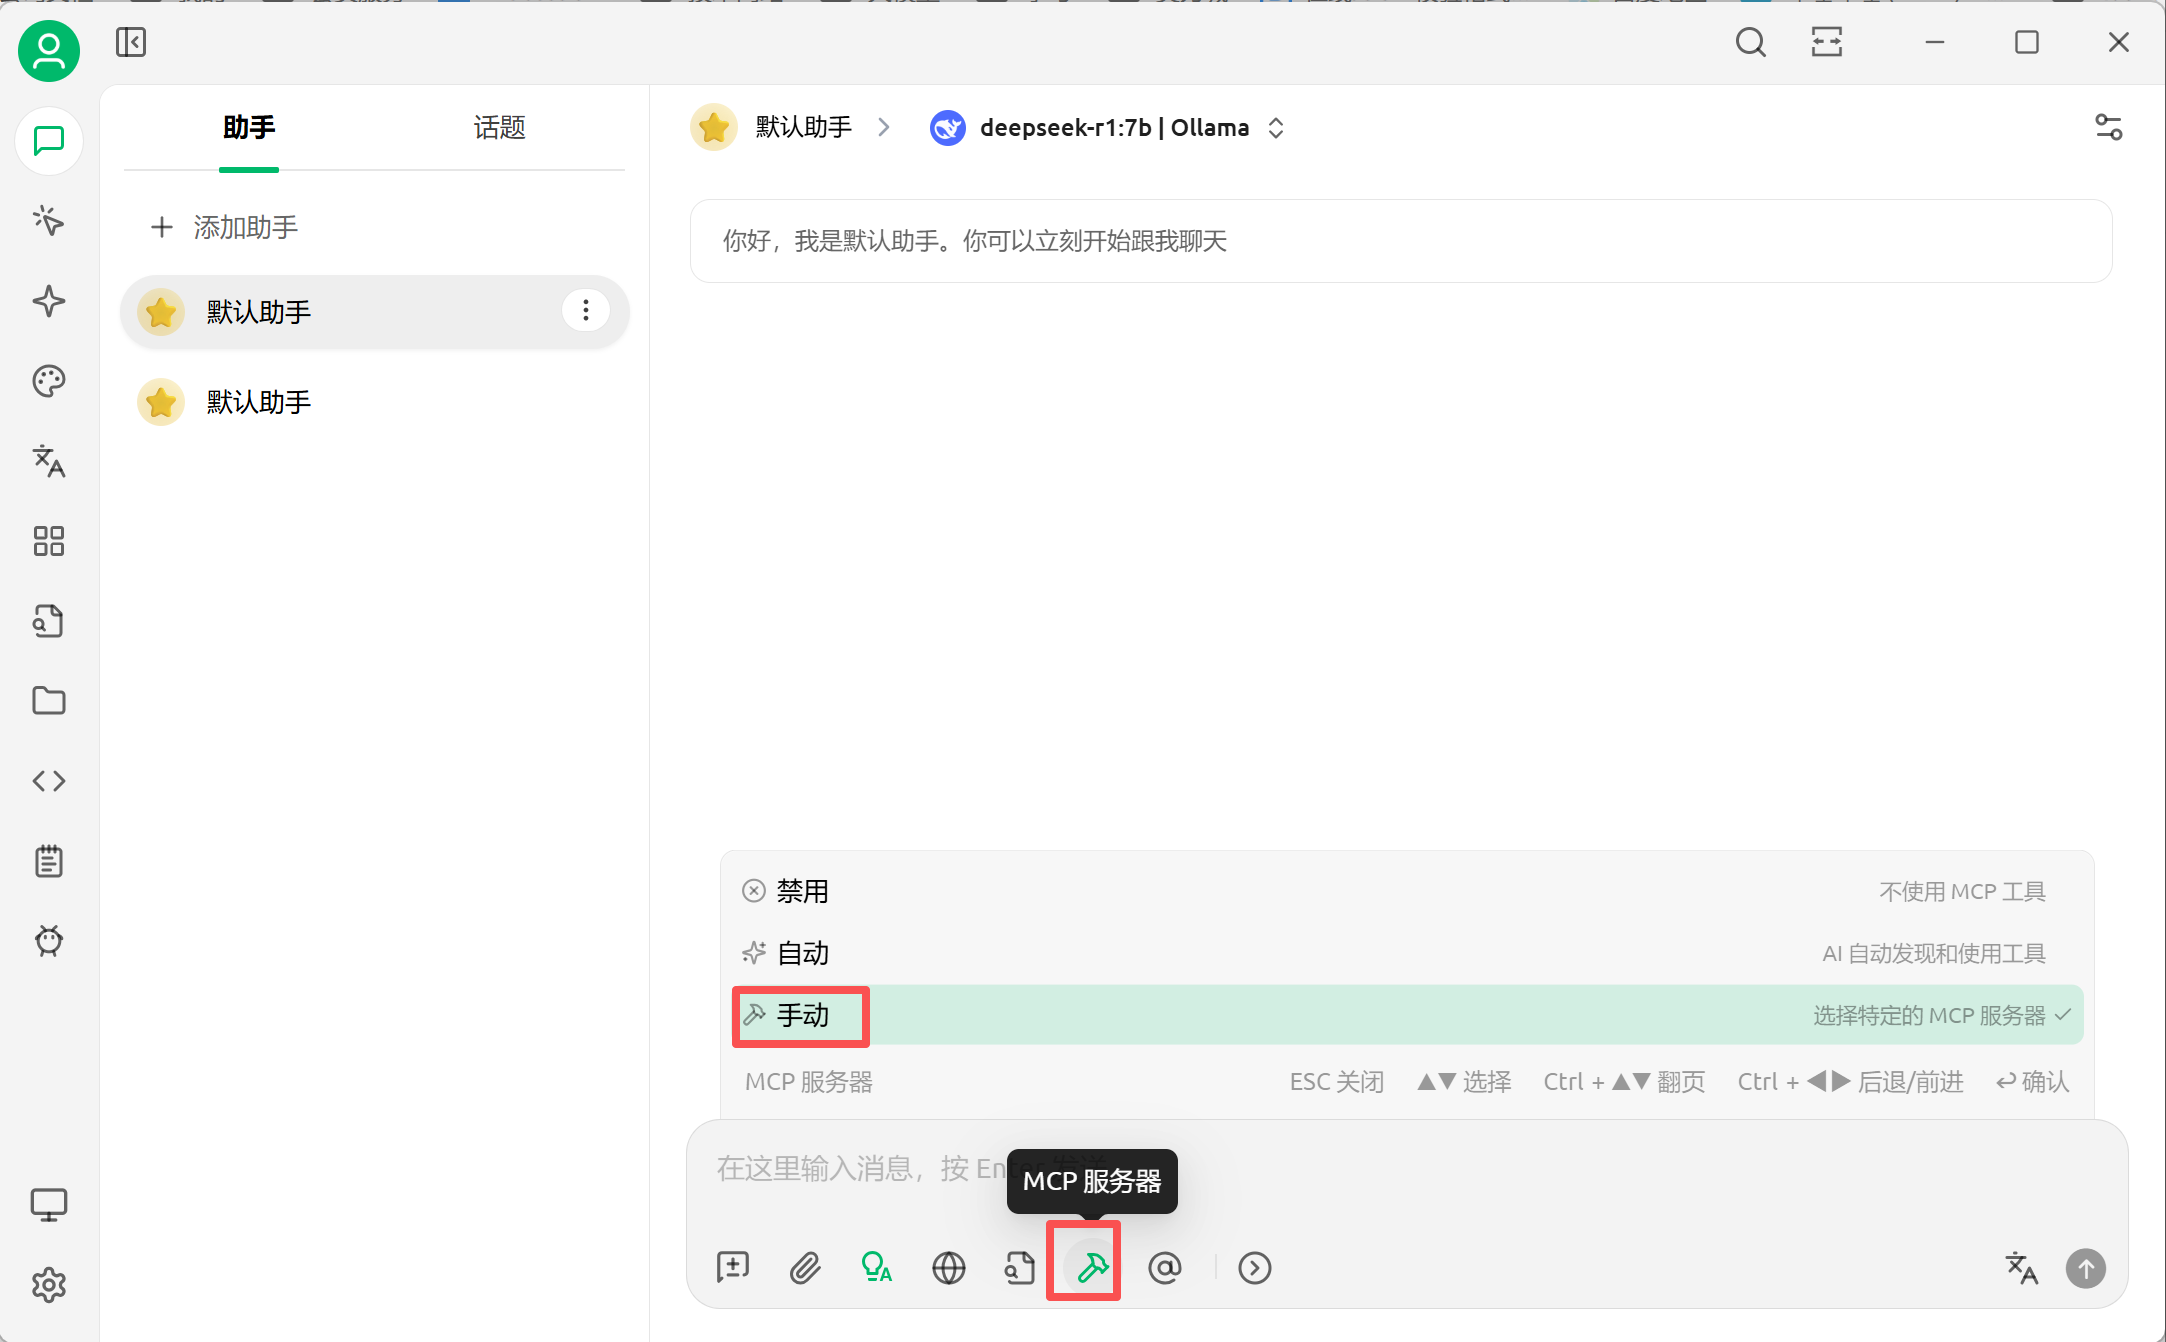
这里一定要看到后面打勾了才算是生效了。
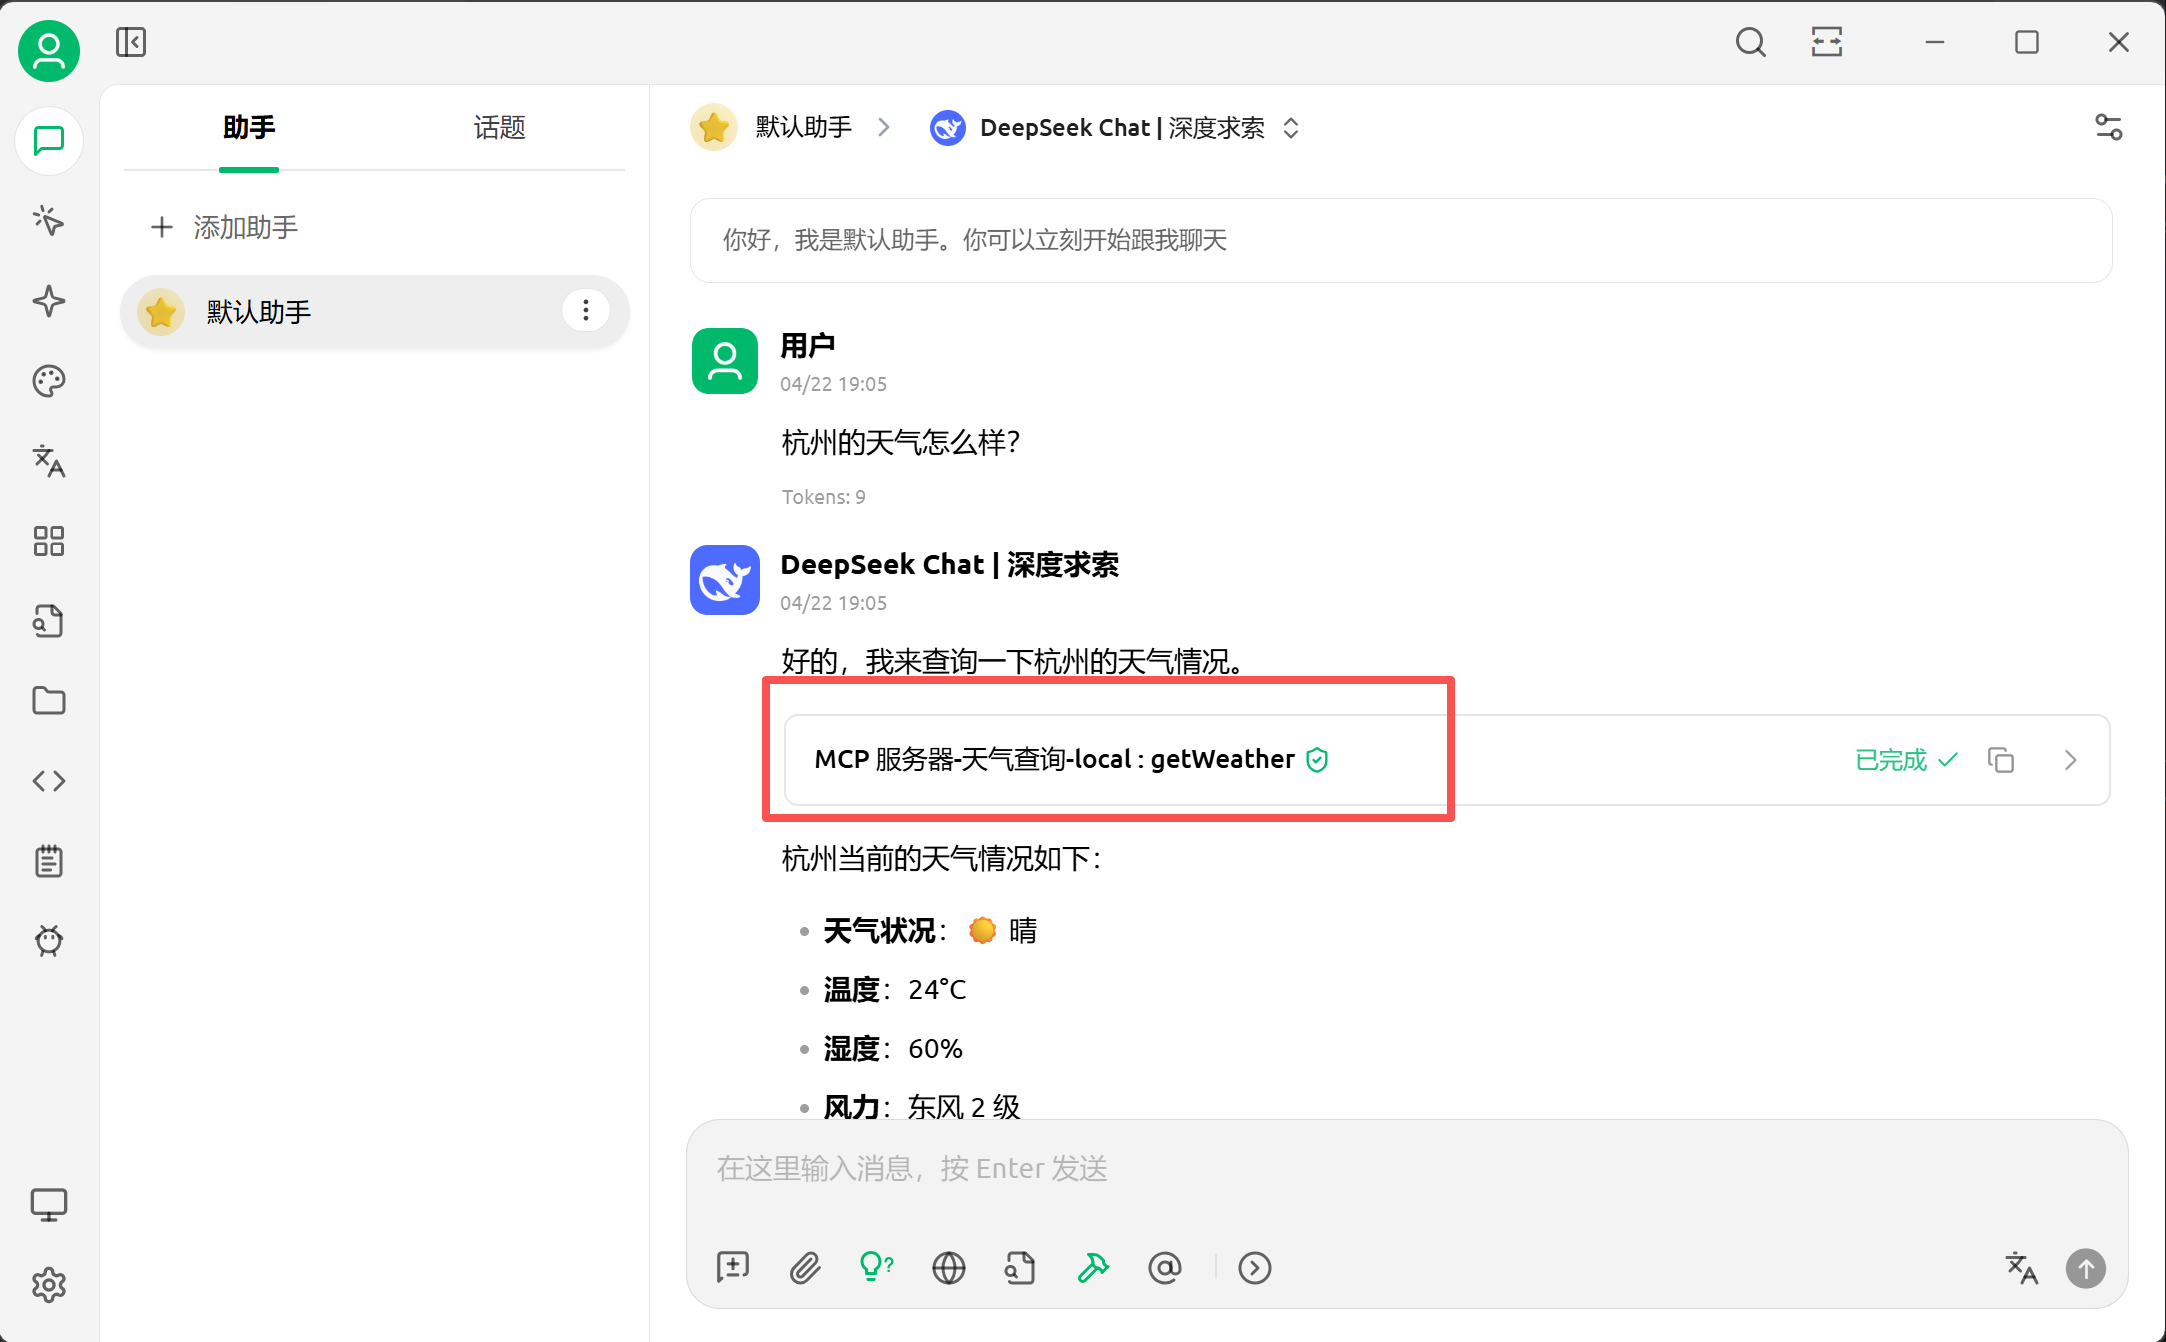
2.5、聊天促发MCP调用
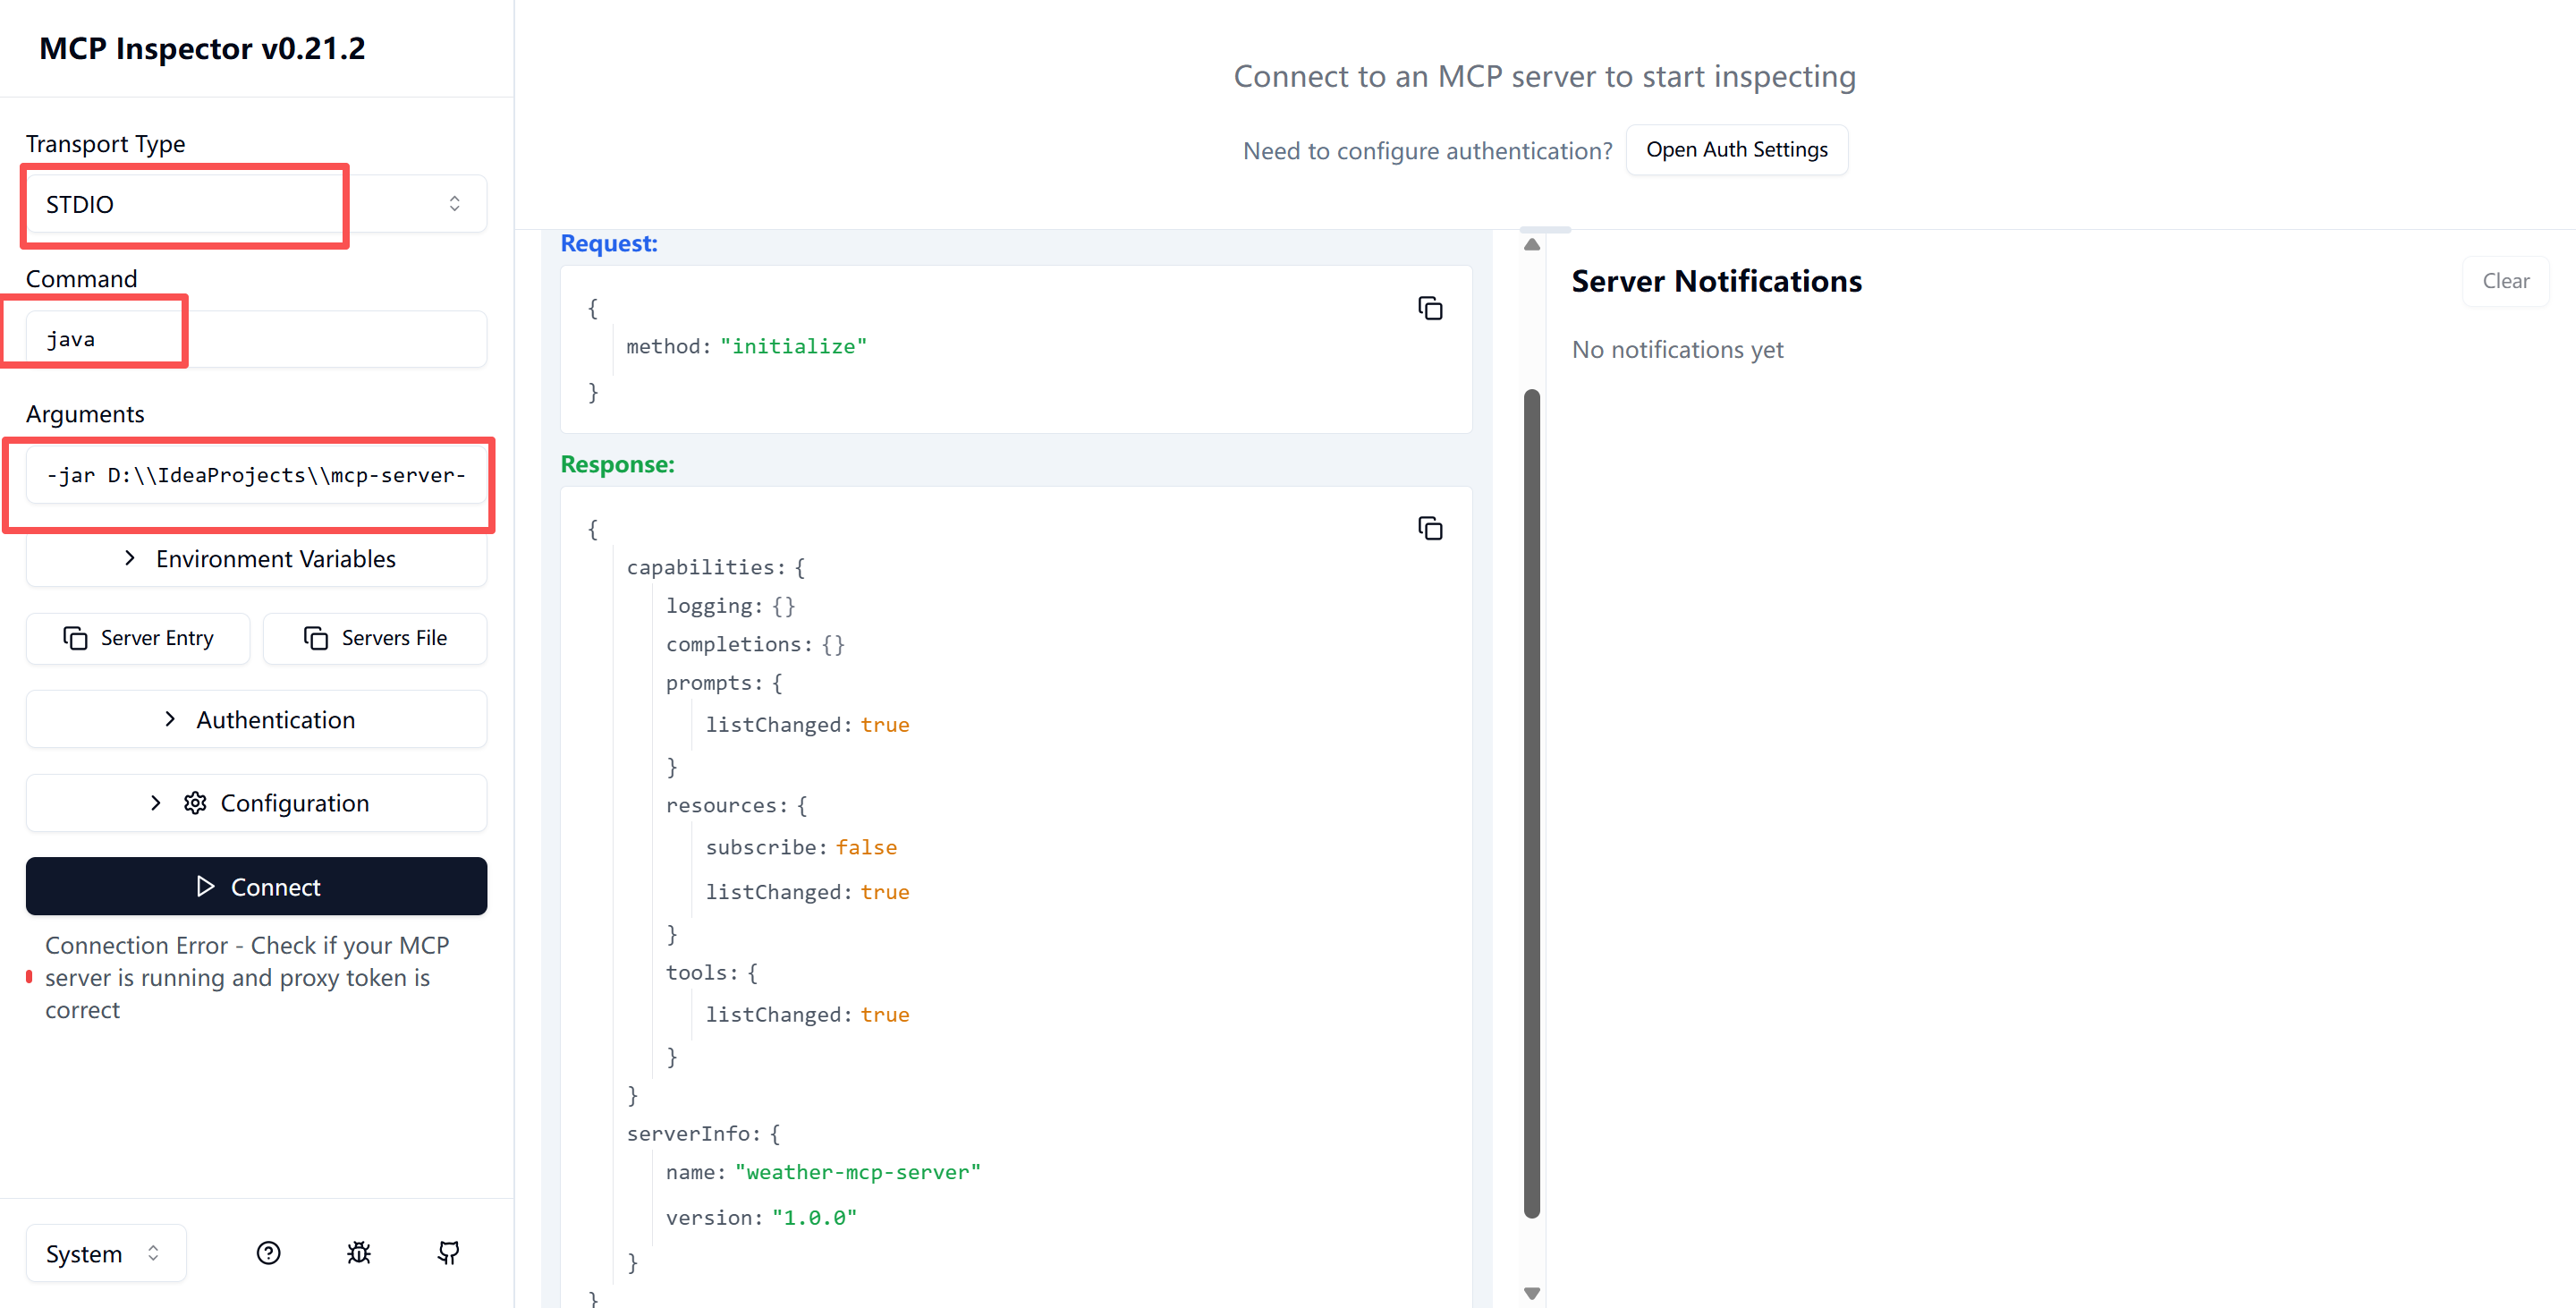
tip:还有另一种测试方式,使用 MCP Inspector 需要有node.js环境
npx @modelcontextprotocol/inspectorcmd运行,会自动打开一个网页(http://localhost:6274/)
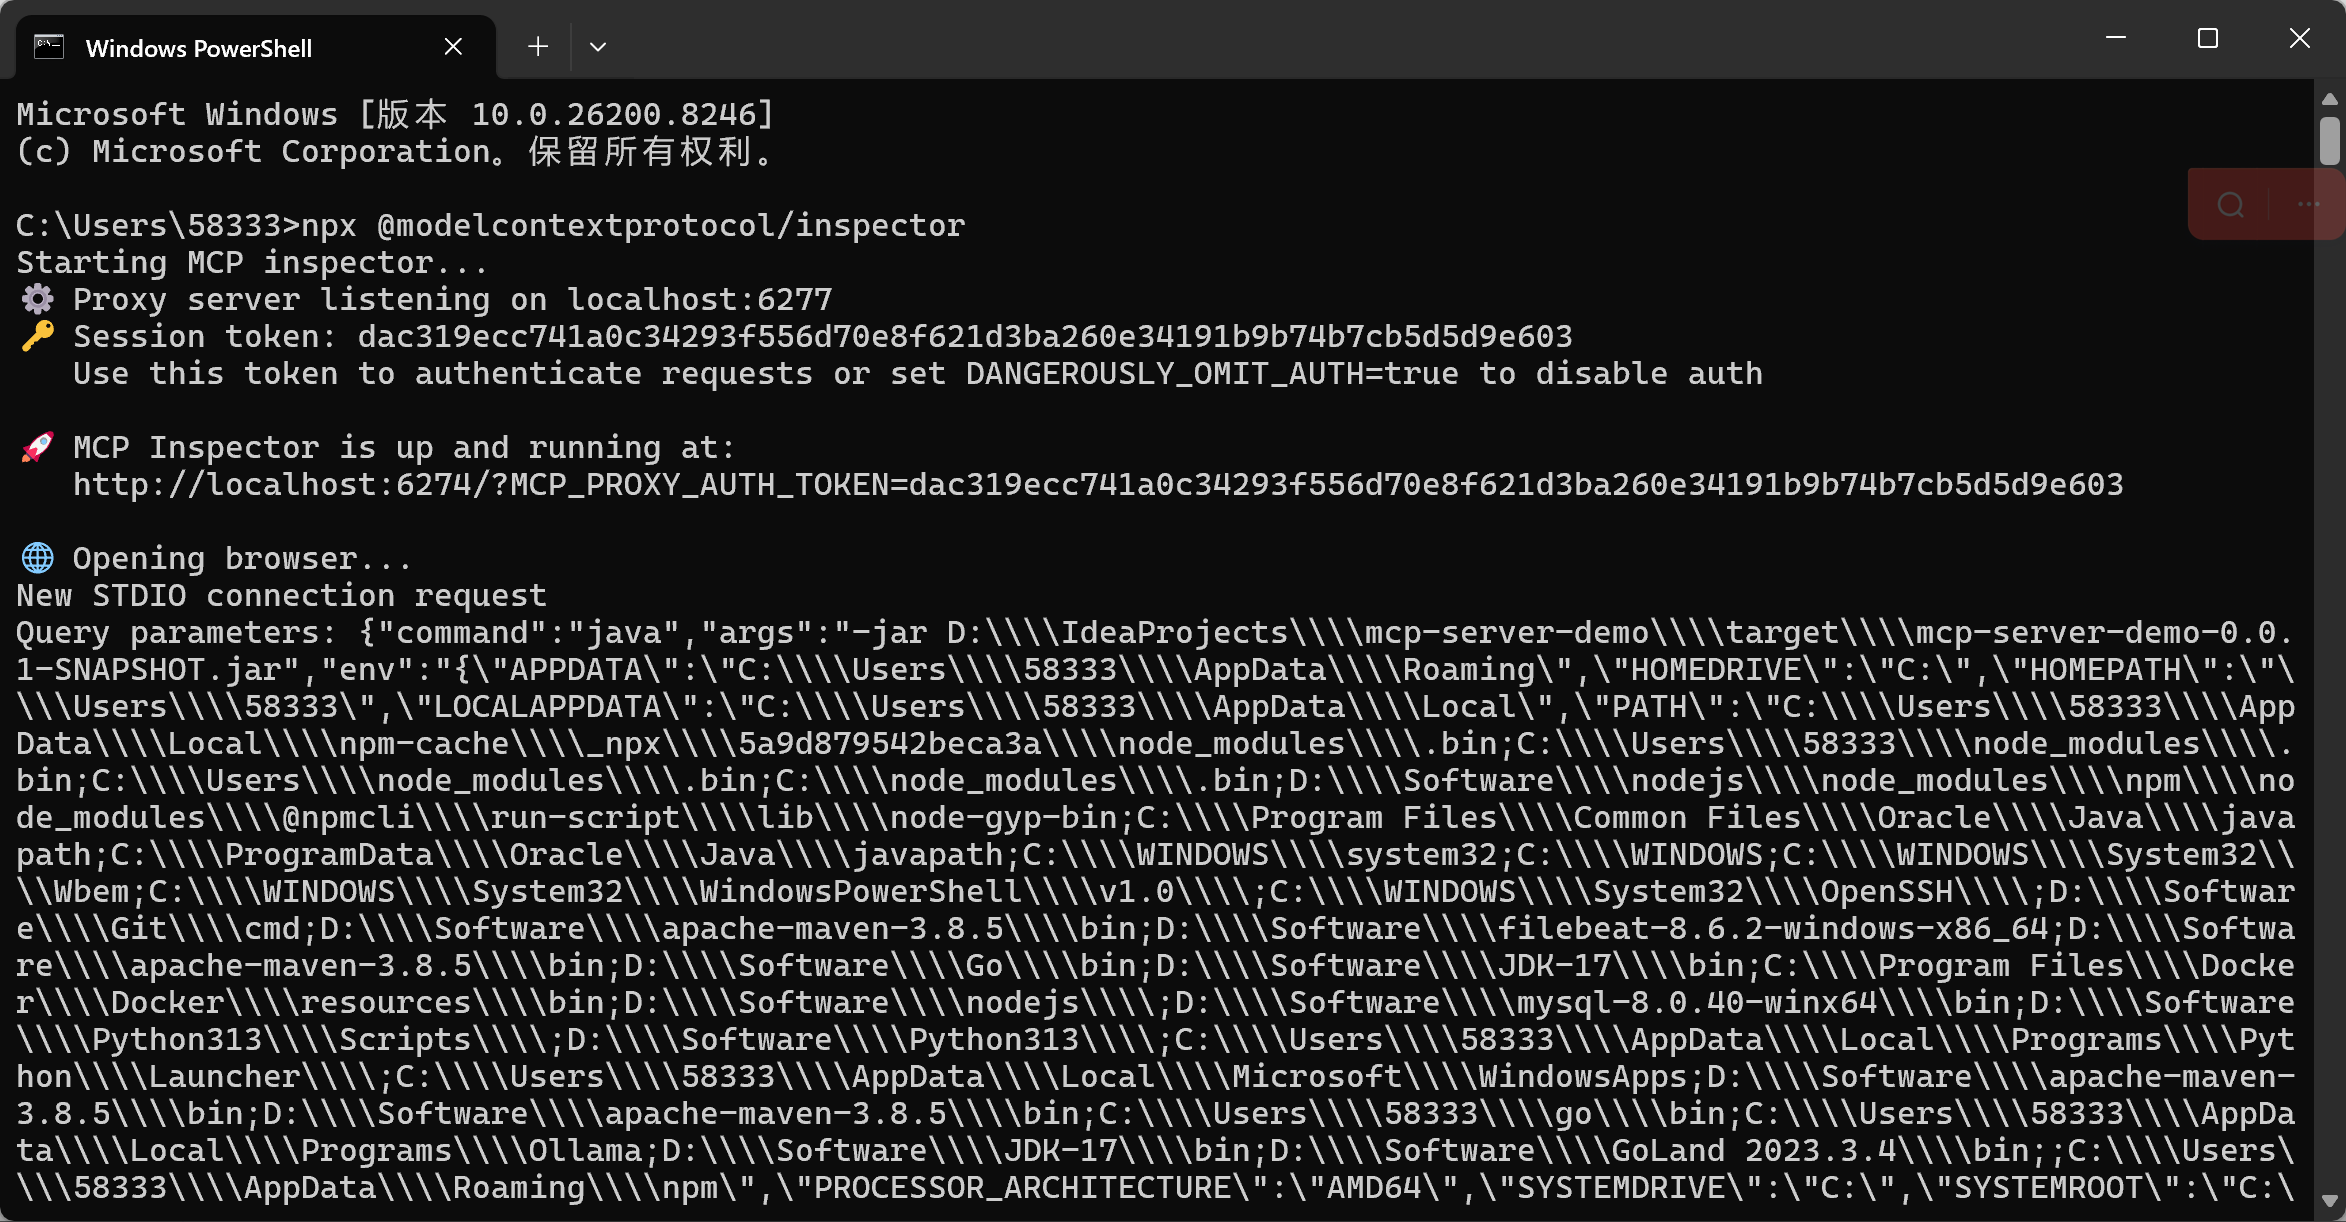
左边的参数都和CherryStudio一样