LightRAG 文档索引流程
结合代码分析lightrag索引流程,当前文档基于1.4.11版本分析
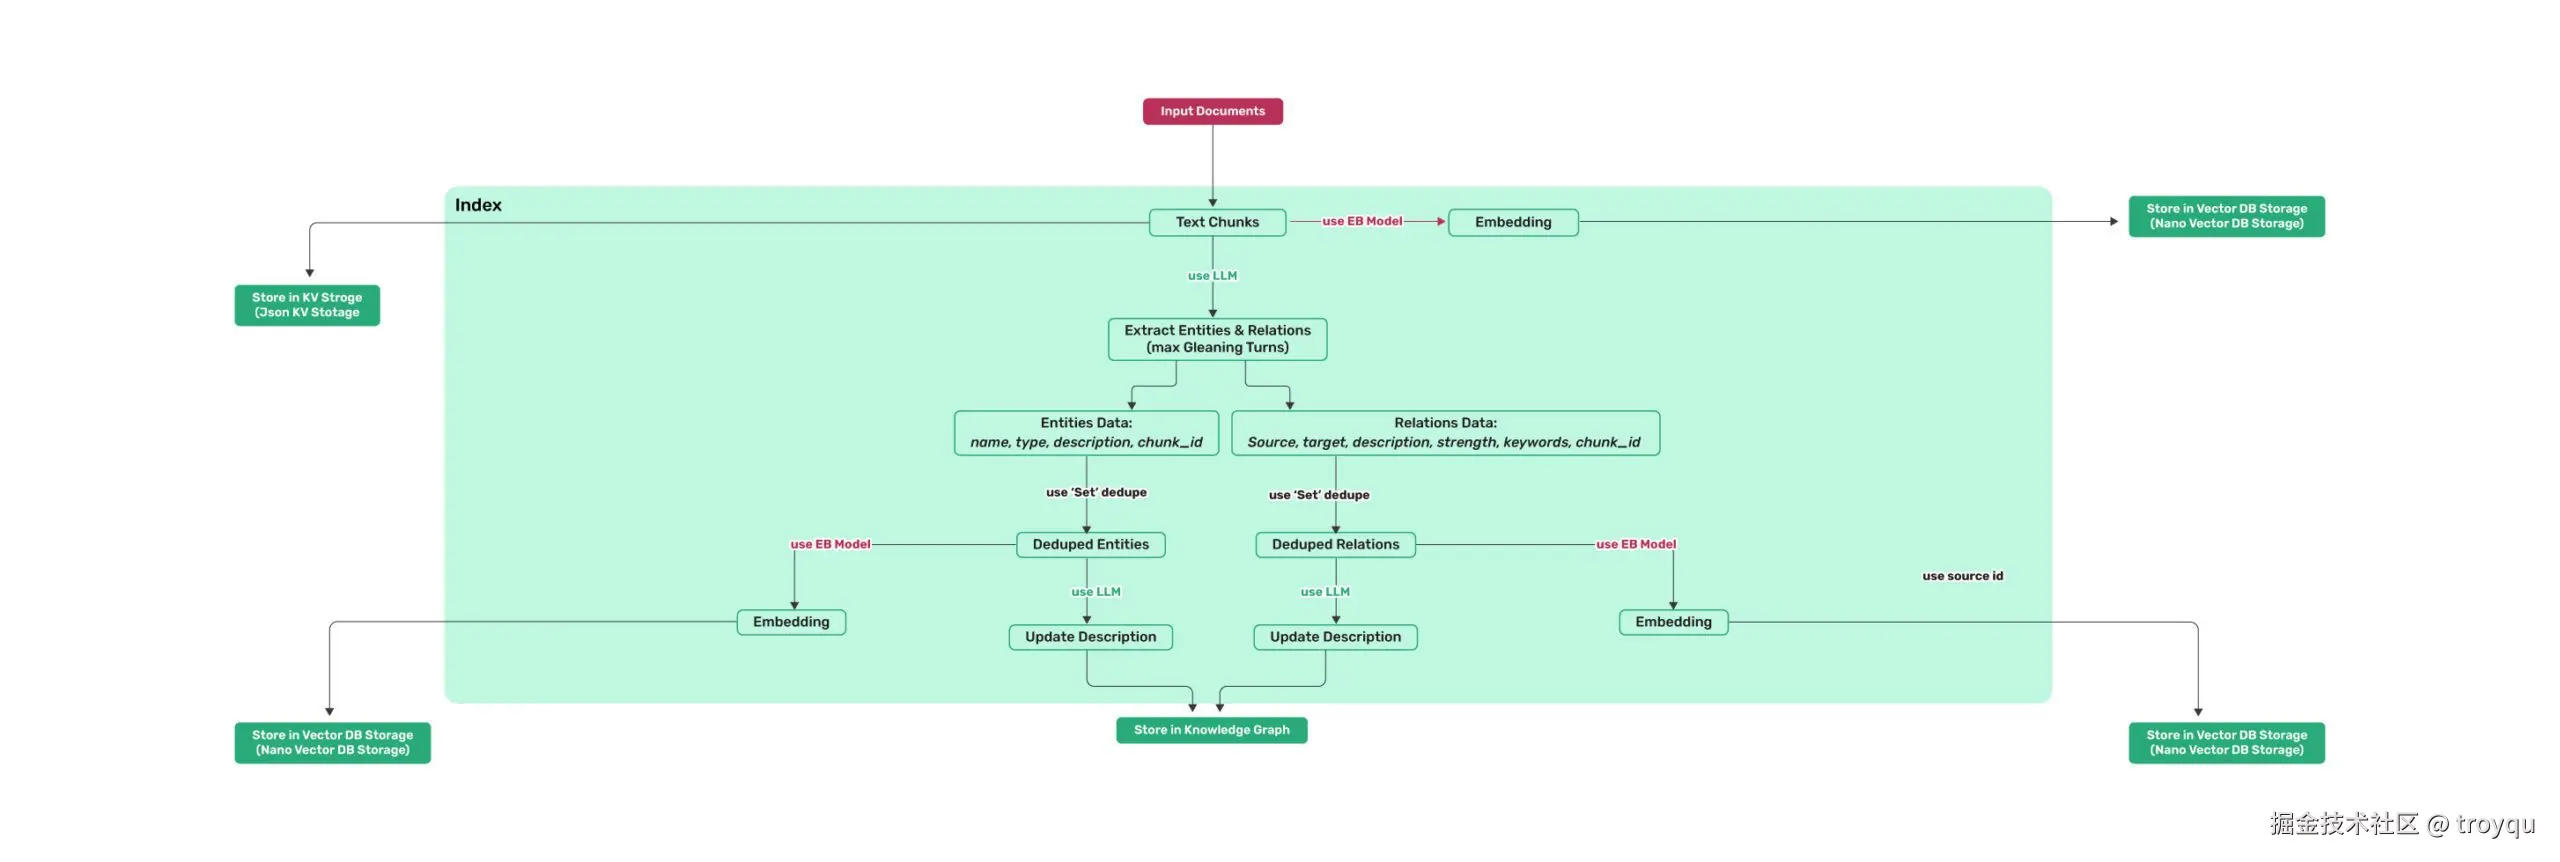
全流程汇总
scss
Input Documents
      │
      ▼
① 切片 chunking_by_token_size
      │
      ├──→ Milvus chunks_vdb        (chunk embedding,mix模式用)
      └──→ PG lightrag_doc_chunks   (chunk原文,查询时取回)
      │
      ▼
② LLM 抽取实体 + 关系(+ Gleaning 补充一轮)
      │
      ▼
③ Set 去重合并(同名实体/同对关系 → 合并 source_id)
      │
      ▼
④ LLM 合并描述(多段 description → 一段完整描述)
      │
      ├──→ Neo4j upsert_node / upsert_edge  (图拓扑)
      ├──→ Milvus entities_vdb              (实体向量)
      └──→ Milvus relationships_vdb         (关系向量)
      │
      ▼
  doc_status → PROCESSED(PG lightrag_doc_status 全程记录状态)
第 1 步:文档切片(Text Chunks)
文档进来后,先用 chunking_by_token_size 按 token 数量切片,每个 chunk 有固定的结构:
operate.pyLines 99-113
python
def chunking_by_token_size(
    tokenizer: Tokenizer,
    content: str,
    split_by_character: str | None = None,
    split_by_character_only: bool = False,
    chunk_overlap_token_size: int = 100,
    chunk_token_size: int = 1200,
) -> list[dict[str, Any]]:
切完后在 lightrag.py 里补充元数据,生成最终 chunk 字典:
lightrag.pyLines 1915-1924
python
chunks: dict[str, Any] = {
    compute_mdhash_id(dp["content"], prefix="chunk-"): {
        **dp,
        "full_doc_id": doc_id,
        "file_path": file_path,
        "llm_cache_list": [],
    }
    for dp in chunking_result
}
每个 chunk 的 key 是 chunk-{content的md5},包含:content、tokens、chunk_order_index、full_doc_id、file_path。
第 2 步:Chunk 并行写入两个存储
切片完成后,chunks_vdb(Milvus)和 text_chunks(PG)同时异步写入:
lightrag.pyLines 1963-1968
python
chunks_vdb_task = asyncio.create_task(
    self.chunks_vdb.upsert(chunks)
)
text_chunks_task = asyncio.create_task(
    self.text_chunks.upsert(chunks)
)- Milvus
chunks_vdb:对 chunk content 做 Embedding,存向量,用于 mix 模式下的纯向量检索 - PG
lightrag_doc_chunks:存原始文本、tokens、file_path,查询时按 chunk_id 取回原文
第 3 步:LLM 抽取实体和关系(含 Gleaning)
用 LLM 从每个 chunk 中抽取实体和关系,分两轮提问:
operate.pyLines 2881-2900
python
entity_extraction_system_prompt = PROMPTS[
    "entity_extraction_system_prompt"
].format(**context_base)
entity_extraction_user_prompt = PROMPTS["entity_extraction_user_prompt"].format(
    **{**context_base, "input_text": content}
)
entity_continue_extraction_user_prompt = PROMPTS[
    "entity_continue_extraction_user_prompt"
].format(**{**context_base, "input_text": content})
什么是 Gleaning(补充提取)?
第一轮 LLM 可能漏掉一些实体,Gleaning 是追问一次"你还遗漏了什么?",把对话历史带上,让 LLM 补充:
operate.pyLines 2916-2930
python
if entity_extract_max_gleaning > 0:
    ...
    else:
        glean_result, timestamp = await use_llm_func_with_cache(
            entity_continue_extraction_user_prompt,
            ...
        )
两轮结果合并时,保留描述更长的那个版本。
抽取出的字段:
实体:entity_name、entity_type、description、source_id(即 chunk_id)、file_path
operate.pyLines 445-452
python
return dict(
    entity_name=entity_name,
    entity_type=entity_type,
    description=entity_description,
    source_id=chunk_key,
    file_path=file_path,
    timestamp=timestamp,
)关系:src_id、tgt_id、weight、description、keywords、source_id(即 chunk_id)
operate.pyLines 530-539
python
return dict(
    src_id=source,
    tgt_id=target,
    weight=weight,
    description=edge_description,
    keywords=edge_keywords,
    source_id=edge_source_id,
    file_path=file_path,
    timestamp=timestamp,
)
第 4 步:去重合并(Set Dedupe)
多个 chunk 可能抽出同一个实体或同一条关系。merge_nodes_and_edges 把所有 chunk 的抽取结果汇总,按实体名/关系对做聚合:
- 边的 key 会对
(src, tgt)排序,确保(A,B)和(B,A)视为同一条关系 source_id字段会把所有来源chunk_id合并成一个列表,保留完整溯源链路
第 5 步:LLM 合并描述(Update Description)
同一个实体可能从不同 chunk 里抽出不同描述,需要用 LLM 把多段描述合并成一段完整的:
operate.pyLines 1779-1787
python
description, llm_was_used = await _handle_entity_relation_summary(
    "Entity",
    entity_name,
    description_list,
    GRAPH_FIELD_SEP,
    global_config,
    llm_response_cache,
)
关系也走同样的逻辑(传入 "Relation")。合并结果就是最终写入图数据库的 description 字段。
第 6 步:写入 Neo4j(Store in Knowledge Graph)
实体写成图的节点,关系写成图的边:
operate.pyLines 1881-1894
python
node_data = dict(
    entity_id=entity_name,
    entity_type=entity_type,
    description=description,
    source_id=source_id,
    file_path=file_path,
    created_at=int(time.time()),
)
await knowledge_graph_inst.upsert_node(
    entity_name,
    node_data=node_data,
)
operate.pyLines 2379-2392
python
await knowledge_graph_inst.upsert_edge(
    src_id,
    tgt_id,
    edge_data=dict(
        weight=weight,
        description=description,
        keywords=keywords,
        source_id=source_id,
        file_path=file_path,
    ),
)
Neo4j 里节点用 workspace 作为 label 隔离,entity_id 作为属性唯一标识。
第 7 步:实体和关系写入 Milvus(Store in Vector DB)
实体和关系的 content(描述文本)做 Embedding 后写入 Milvus,Milvus 内部完成向量化:
milvus_impl.pyLines 1477-1491
python
contents = [v["content"] for v in data.values()]
...
embedding_tasks = [self.embedding_func(batch) for batch in batches]
embeddings_list = await asyncio.gather(*embedding_tasks)
...
for i, d in enumerate(list_data):
    d["vector"] = embeddings[i]
results = self._client.upsert(
    collection_name=self.final_namespace, data=list_data
)**entities_vdb**(Collection:{workspace}_entities):存实体名 + 描述向量,查询时用低层关键词召回**relationships_vdb**(Collection:{workspace}_relationships):存关系描述向量,查询时用高层关键词召回
关系的 Embedding 内容是 keywords + src_id + tgt_id + description 的拼接,而不只是关系描述,这就是图里"use source_id"的含义------source/target 实体名参与了向量化,让语义更精准。