Podman Machine 虚拟硬盘迁移实战二:用 Junction 把 vhdx 从 C 盘搬到其他盘
环境: Windows 11 + Podman 5.8.2 + WSL2 (networkingMode=Mirrored)
硬件: RTX 3090, 驱动 595.02
验证日期: 2026年4月28日
最终效果:
podman machine init自动将 vhdx 创建到 I 盘,C 盘零占用,且以后重建 machine 无需再次迁移

一、问题
Podman 在 Windows 上通过 WSL2 运行容器。执行 podman machine init 时,它会在以下路径创建一个 ext4.vhdx 虚拟硬盘:
C:\Users\<用户名>\.local\share\containers\podman\machine\wsl\wsldist\podman-machine-default\ext4.vhdx这个文件会随着拉取镜像、创建容器不断膨胀。实测在拉取 PyTorch、Stable Diffusion 等大型镜像后,vhdx 轻松超过 100GB,严重挤占 C 盘空间。
更麻烦的是,每次 podman machine rm + podman machine init 重建后,vhdx 又会回到 C 盘,需要重复迁移。
在上一篇中,我们通过 wsl --export/import 的方式虽然也实现的无损迁移,但是总觉得似乎这种方案过于繁琐,于是我们再次探索了使用 符号链接 的方式进行快捷安全的迁移,在尝试了很多种 符号链接后,终于实践出了 针对Podman Machine 迁移的有效方案**。**
wsl --export/import 传统方案
同时也再次验证了 我们之前已发布过的 方案的可行性:
【安全有效新方案】WSL 默认路径迁移实战:通过 PowerShell 符号链接实现自动重定向
Docker 目录迁移脚本【Windows Junction 类型链接】
Windows 开发环境部署指南:WSL、Docker Desktop、Podman Desktop 部署顺序与存储路径迁移指南
【笔记●避免C盘爆满】Windows 系统开发环境存储路径迁移全规划参考清单
【打造 AI 开发环境系列】WSL 路径治理必做篇:先迁移,再开发,别让 C 盘爆满!
符号链接 SymbolicLink 全面教程:跨盘迁移的多能方案
Junction 目录联接教程:系统兼容性较强的迁移方案
第3篇:软链接 mklink /D 教程:轻量缓存目录迁移利器
二、方案选择:为什么用 Junction
在找到最终方案之前,我尝试了多种方式:
| 方案 | 结果 | 原因 |
|---|---|---|
| 手动移动 vhdx + 改注册表 | ❌ | Podman 自身的 SSH 端口配置、connection list 不会跟着更新,导致连接失败 |
| 对 vhdx 子目录做 Junction | ❌ | WSL 的 Hyper-V 层无法通过 Junction 挂载 vhdx,报"系统找不到指定的文件" |
| 对父目录做 SymbolicLink(目标目录不存在) | ❌ | Podman 的 mkdir 检测到 SymbolicLink 占用同名路径,报 Cannot create a file when that file already exists |
| 对父目录做 SymbolicLink(目标目录已存在) | ✅ | 目标目录已存在时,mkdir 正常通过,init/start/run 全部成功 |
wsl --export/import |
✅ 但繁琐 | 能用,但每次重建 machine 后还要再迁移一次,不是一劳永逸的方案 |
对父目录 wsldist 做 Junction |
✅ 推荐 | 无条件可用,一次设置永久生效,对 Podman 和 WSL 完全透明 |
关键结论:
- Junction 和 SymbolicLink 对父目录做链接都能成功 ,实测
podman machine init+start+run --rm hello-world全部通过 - 推荐 Junction,因为它无条件可用------不需要预先创建目标目录。SymbolicLink 需要目标目录已存在才行,多一个前置条件
- 链接必须做在
wsldist父目录上 ,不能做在podman-machine-default子目录上
原理是:当 Junction 在父目录时,Podman 的 mkdir 在 Junction 目录内部创建子目录,这个操作对 NTFS 来说完全正常。随后 WSL 导入分发版时,拿到的 vhdx 完整路径已经被 NTFS 解析为实际物理路径(I 盘),Hyper-V 挂载不会出问题。而当 Junction 直接在子目录上时,wsl --import 拿到的路径本身就是一个 Junction 入口,Hyper-V 不一定能正确解析。
三、完整操作步骤
3.1 前置条件
- 目标盘是 NTFS 格式的本地固定磁盘(不能是 exFAT、网络盘或 U 盘)
- 确认当前 Podman machine 里没有需要保留的重要容器或镜像(本方案需要删除并重建 machine)!!!重要提示!!!
- 如果 Podman Desktop 在运行,先关闭它
3.2 操作流程
步骤 1:关闭并删除现有 Podman machine
# 关闭 Podman Desktop(如果在运行)
Stop-Process -Name "Podman Desktop" -Force -ErrorAction SilentlyContinue
Start-Sleep -Seconds 2

# 停止 machine
podman machine stop

# 关闭所有 WSL
wsl --shutdown
Start-Sleep -Seconds 5

# 删除 machine(会同时注销 WSL 分发版并删除 vhdx)
podman machine rm podman-machine-default --force
验证删除成功:
podman machine list
# 预期输出:空列表,没有任何 machine

wsl -l -v
# 预期输出:列表中不应包含 podman-machine-default
步骤 2:确认 wsldist 目录状态
$wsldist = "$HOME\.local\share\containers\podman\machine\wsl\wsldist"

# 检查目录是否存在
Test-Path $wsldist

# 如果存在,检查是否为空
if (Test-Path $wsldist) {
    $items = Get-ChildItem $wsldist -Force
    if ($items.Count -gt 0) {
        Write-Host "目录不为空,请先确认并清理内容:" -ForegroundColor Yellow
        $items | Format-Table Name, LastWriteTime
    } else {
        Write-Host "目录为空,可以继续" -ForegroundColor Green
    }
}
执行
podman machine rm --force后,这个目录通常要么为空,要么已被删除。如果目录中还有残留文件,说明之前有多个 machine 或删除不干净,需要手动确认后清理。
步骤 3:创建目标目录并建立 Junction
# 设置目标路径(按你的实际情况修改)
$targetPath = "I:\WSL\podman-wsldist"

# 创建目标目录
New-Item -ItemType Directory -Path $targetPath -Force

# 删除 C 盘的 wsldist(空目录或不存在的情况都处理)
if (Test-Path $wsldist) {
    Remove-Item $wsldist -Recurse -Force
}

# 创建 Junction
New-Item -ItemType Junction -Path $wsldist -Target $targetPath
验证 Junction 创建成功:
$link = Get-Item $wsldist
Write-Host "路径: $($link.FullName)"
Write-Host "类型: $($link.LinkType)"
Write-Host "目标: $($link.Target)"

# 预期输出:
# 路径: C:\Users\love\.local\share\containers\podman\machine\wsl\wsldist
# 类型: Junction
# 目标: I:\WSL\podman-wsldist
步骤 4:重建 Podman machine
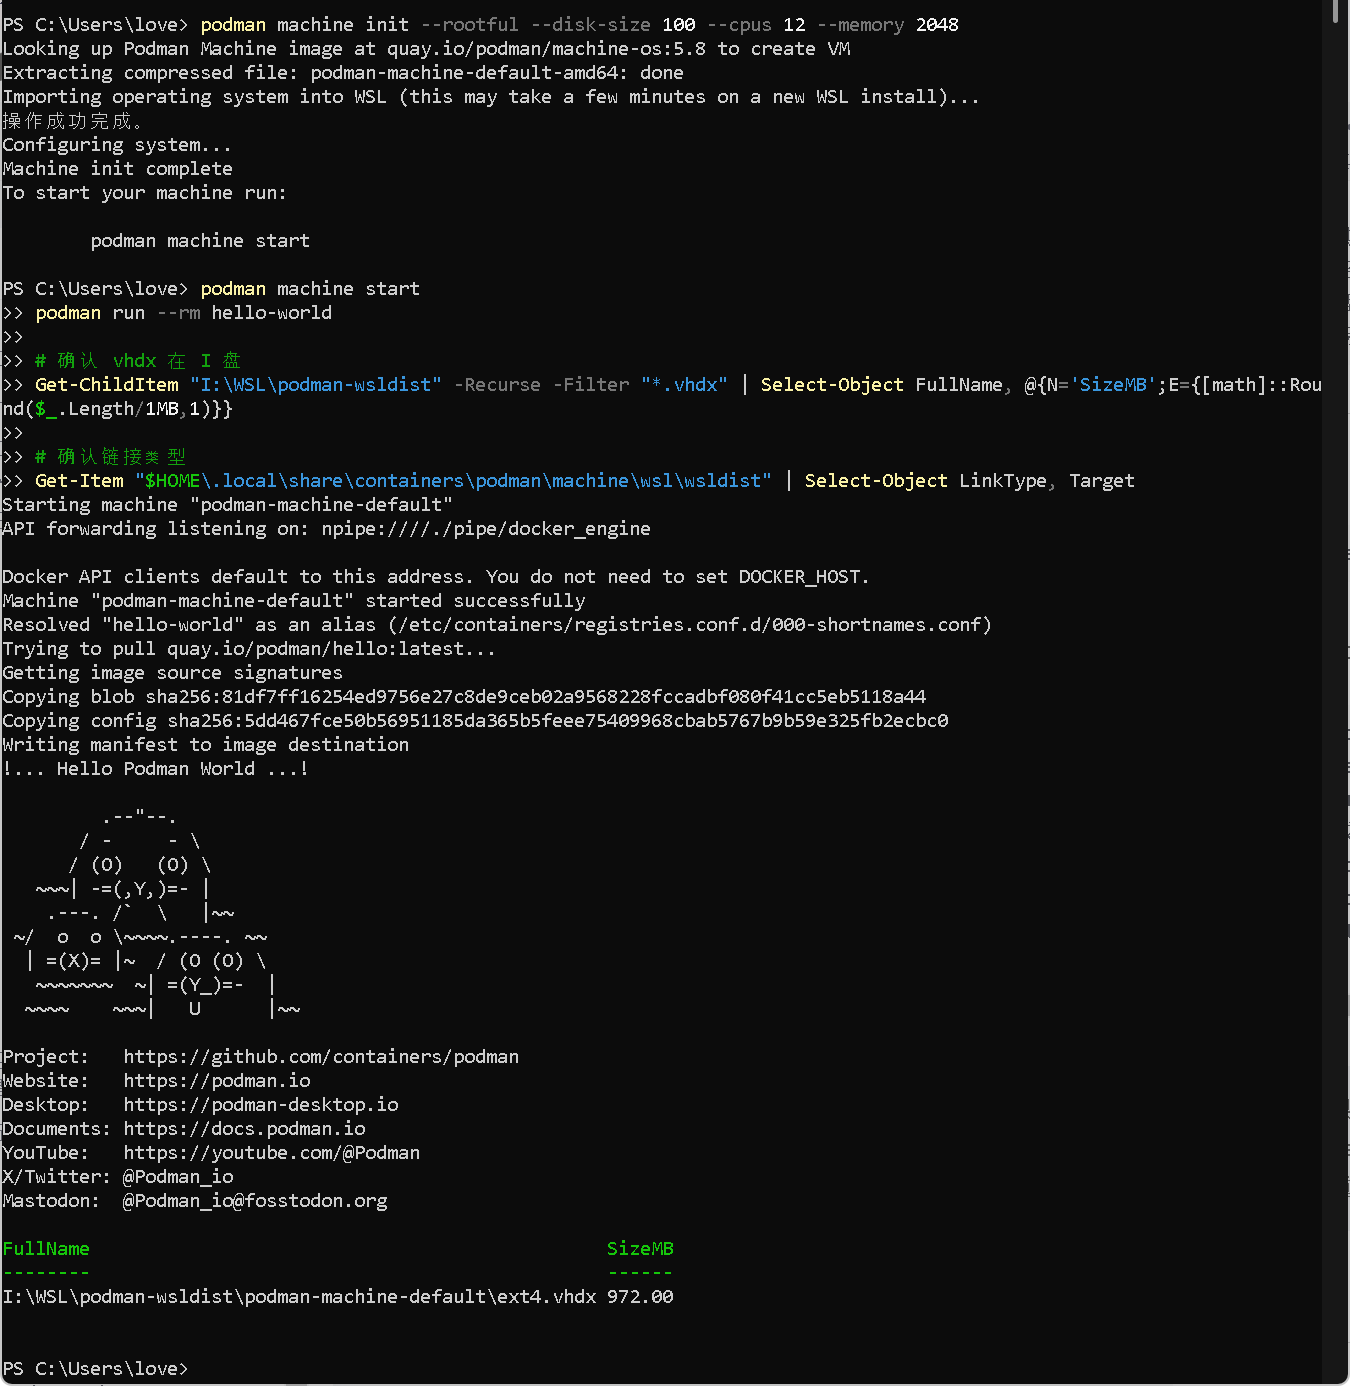
podman machine init --rootful --disk-size 100 --cpus 12 --memory 2048预期输出:
Looking up Podman Machine image at quay.io/podman/machine-os:5.8 to create VM
Extracting compressed file: podman-machine-default-amd64: done
Importing operating system into WSL (this may take a few minutes on a new WSL install)...
操作成功完成。
Configuring system...
Machine init complete
To start your machine run:
        podman machine start
如果这一步报错
could not create wsldist directory: mkdir ... Cannot create a file when that file already exists,说明你用了 SymbolicLink 而不是 Junction。删掉重新用New-Item -ItemType Junction创建。
步骤 5:启动并测试
podman machine start预期输出:
Starting machine "podman-machine-default"
API forwarding listening on: npipe:////./pipe/docker_engine
Docker API clients default to this address. You do not need to set DOCKER_HOST.
Machine "podman-machine-default" started successfully
功能测试:
podman run --rm hello-world预期输出包含 Hello Podman World 的 ASCII 艺术图。
步骤 6:确认 vhdx 在目标盘
# vhdx 应该在 I 盘
Get-ChildItem $targetPath -Recurse -Filter "*.vhdx" |
  Select-Object FullName, @{N='SizeGB';E={[math]::Round($_.Length/1GB,2)}}

# C 盘应该只有 Junction,不占实际空间
Get-Item $wsldist | Select-Object FullName, LinkType, Target
预期输出:
FullName                                                SizeGB
--------                                                ------
I:\WSL\podman-wsldist\podman-machine-default\ext4.vhdx    0.95

FullName                                                          LinkType Target
--------                                                          -------- ------
C:\Users\love\.local\share\containers\podman\machine\wsl\wsldist  Junction I:\WSL\podman-wsldist
四、验证:以后重建 machine 是否自动落到 I 盘
Junction 方案的最大优势是一劳永逸。验证一下:
# 模拟以后的重建场景
podman machine stop
wsl --shutdown
Start-Sleep -Seconds 5
podman machine rm podman-machine-default --force

# 重新 init
podman machine init --rootful --disk-size 100 --cpus 12 --memory 2048
podman machine start
podman run --rm hello-world

# 确认 vhdx 仍在 I 盘
Get-ChildItem "I:\WSL\podman-wsldist" -Recurse -Filter "*.vhdx" |
  Select-Object FullName, @{N='SizeGB';E={[math]::Round($_.Length/1GB,2)}}
无需任何额外操作,vhdx 自动落到 I 盘。
五、可能遇到的问题及解决
问题 1:podman machine start 报超时错误
Error: machine did not transition into running state: ssh error: machine not in running state原因: WSL2 systemd 冷启动到 sshd 就绪需要时间(某些机器上超过 20 秒),Podman 5.8.x 的等待超时可能不够。
解决: 等几秒,再执行一次 podman machine start。第二次它会检测到分发版已在运行,直接连上:
# 第一次可能超时
podman machine start

# 如果报错,等一会儿再试
Start-Sleep -Seconds 10
podman machine start

# 验证
podman run --rm hello-world
问题 2:could not start api proxy since expected pipe is not available
原因: Podman Desktop 在后台运行,占用了 named pipe。
解决:
Stop-Process -Name "Podman Desktop" -Force -ErrorAction SilentlyContinue
Stop-Process -Name "win-sshproxy" -Force -ErrorAction SilentlyContinue
Stop-Process -Name "gvproxy" -Force -ErrorAction SilentlyContinue
Start-Sleep -Seconds 2
podman machine start
问题 3:WSL 内部无法联网
原因: Windows 侧的代理环境变量被 Mirrored 模式传递到 WSL 内部,但代理工具未运行。Podman machine 还可能自动生成 /etc/profile.d/default-env.sh 写入错误的代理配置。
排查:
wsl -d podman-machine-default -- env | grep -i proxy解决:
wsl -d podman-machine-default -- sudo rm /etc/profile.d/default-env.sh问题 4:wsl.conf 警告 Unknown key
wsl: Unknown key 'network.hostAddressLoopback' in /etc/wsl.conf:9原因: hostAddressLoopback 和 mirrorNetwork 是分发版内部 wsl.conf 中 WSL 不认识的键。Mirrored 模式应在 Windows 侧的 %USERPROFILE%\.wslconfig 中配置。
解决:
wsl -d podman-machine-default -- sudo sed -i "/hostAddressLoopback/d" /etc/wsl.conf
wsl -d podman-machine-default -- sudo sed -i "/mirrorNetwork/d" /etc/wsl.conf
注意:PowerShell 中
sed的多个-i表达式不能用分号连接(PowerShell 会将分号解释为命令分隔符),必须分两条命令执行。
六、原理深入:Junction vs SymbolicLink,以及为什么对父目录有效
Junction 和 SymbolicLink 对父目录做链接都能成功
经过实际测试验证:
| 链接类型 | 对父目录 wsldist |
对子目录 podman-machine-default |
|---|---|---|
| Junction | ✅ 无条件成功 | ❌ WSL 无法挂载 vhdx |
| SymbolicLink | ✅ 目标目录已存在时成功 | 未测试 |
两者对父目录做链接时,podman machine init + start + run --rm hello-world 全部通过,vhdx 正确落到目标盘。
为什么推荐 Junction 而非 SymbolicLink
虽然两者都能用,但 Junction 有一个关键优势:无条件可用。
SymbolicLink 在目标目录不存在时,Podman 的 machine init 会报错:
Error: could not create wsldist directory: mkdir ...\wsldist: Cannot create a file when that file already exists.这是因为 Go 语言的 os.MkdirAll 对 SymbolicLink 的处理方式不同------它检测到路径已存在但目标不可达,就报错了。而 Junction 在 NTFS 文件系统层面表现为一个真正的目录,os.MkdirAll 会正常通过。
简单说:
# ✅ Junction:不需要关心目标目录是否存在
New-Item -ItemType Junction -Path "<原路径>" -Target "<目标路径>"

# ⚠️ SymbolicLink:必须先创建目标目录
New-Item -ItemType Directory -Path "<目标路径>" -Force    # 少了这一步就会失败
New-Item -ItemType SymbolicLink -Path "<原路径>" -Target "<目标路径>"
链接的工作层级
Junction 在 NTFS 文件系统层面生效。当一个路径中包含 Junction 节点时,NTFS 驱动在解析路径的过程中会透明地将 Junction 替换为目标路径,然后继续解析剩余部分。
访问路径:C:\...\wsldist\podman-machine-default\ext4.vhdx
                  ↑ Junction / SymbolicLink
NTFS 解析后:I:\WSL\podman-wsldist\podman-machine-default\ext4.vhdx
上层程序(包括 Podman、WSL、Hyper-V)拿到的是解析后的实际路径,完全感知不到链接的存在。
为什么对子目录做 Junction 会失败
访问路径:C:\...\wsldist\podman-machine-default\ext4.vhdx
                              ↑ Junction
NTFS 解析后:I:\WSL\podman-machine-default\ext4.vhdx这种情况下,podman-machine-default 目录本身就是 Junction 入口。WSL 在导入分发版时,会将 BasePath 记录为 C:\...\wsldist\podman-machine-default(Junction 入口路径),然后 Hyper-V 尝试挂载这个路径下的 vhdx。但 Hyper-V 的文件操作可能不经过标准的 NTFS 路径解析,导致无法跟随 Junction。
而当链接在父目录时,podman-machine-default 子目录是一个真实的目录(在 I 盘上),WSL 记录的 BasePath 要么是解析后的实际路径,要么即使记录了 C 盘路径,经过 NTFS 解析也能正确到达。
验证方式
# 查看 WSL 注册表中记录的路径
$key = Get-ChildItem "HKCU:\Software\Microsoft\Windows\CurrentVersion\Lxss" |
  Where-Object { $_.GetValue("DistributionName") -eq "podman-machine-default" }
$key.GetValue("BasePath")

# 对比目标盘实际文件
Get-ChildItem "I:\WSL\podman-wsldist\podman-machine-default" | Select-Object Name, Length
七、与其他方案的对比总结
| 对比维度 | Junction 父目录 | SymbolicLink 父目录 | wsl --export/import | 手动移动 + 改注册表 |
|---|---|---|---|---|
| 一次设置永久生效 | ✅ | ✅ | ❌ 每次重建需重做 | ❌ 每次重建需重做 |
| 对 Podman 透明 | ✅ | ✅ | ⚠️ 可能需修复配置 | ❌ 多处配置不同步 |
| 操作复杂度 | 低(3 条命令) | 低(4 条命令,多一步建目标目录) | 中(5+ 步骤) | 高(手改注册表) |
| 前置条件 | 无 | 目标目录必须已存在 | 无 | 无 |
| 数据安全风险 | 低(重建即可) | 低(重建即可) | 中(导出失败可能丢数据) | 中 |
| 需要管理员权限 | 否 | 视 Windows 版本 | 否 | 是(改注册表) |
| 支持保留现有数据 | ❌ 需重建 | ❌ 需重建 | ✅ 可导出导入 | ✅ |
结论: Junction 和 SymbolicLink 对父目录做链接都能成功,但 Junction 是最优解 ------无条件可用,不需要预创建目标目录,兼容性最好。如果必须保留现有数据,先用 wsl --export/import 迁移一次,然后再设置 Junction 防止未来重建时 vhdx 回到 C 盘。
八、完整操作速查
整个过程的核心命令(适合收藏后直接执行):
# === Podman Machine vhdx 迁移到 I 盘 ===

# 1. 清理
Stop-Process -Name "Podman Desktop" -Force -ErrorAction SilentlyContinue
podman machine stop
wsl --shutdown
Start-Sleep -Seconds 5
podman machine rm podman-machine-default --force

# 2. 创建 Junction(核心,一次设置永久生效)
$wsldist = "$HOME\.local\share\containers\podman\machine\wsl\wsldist"
$target  = "I:\WSL\podman-wsldist"              # ← 改成你的目标路径

New-Item -ItemType Directory -Path $target -Force
if (Test-Path $wsldist) { Remove-Item $wsldist -Recurse -Force }
New-Item -ItemType Junction -Path $wsldist -Target $target

# 3. 重建并验证
podman machine init --rootful --disk-size 100 --cpus 12 --memory 2048
podman machine start
podman run --rm hello-world

# 4. 确认 vhdx 在目标盘
Get-ChildItem $target -Recurse -Filter "*.vhdx" |
  Select-Object FullName, @{N='SizeGB';E={[math]::Round($_.Length/1GB,2)}}
以后无论怎么 podman machine rm + podman machine init,vhdx 都会自动落到 I 盘。C 盘从此解放。