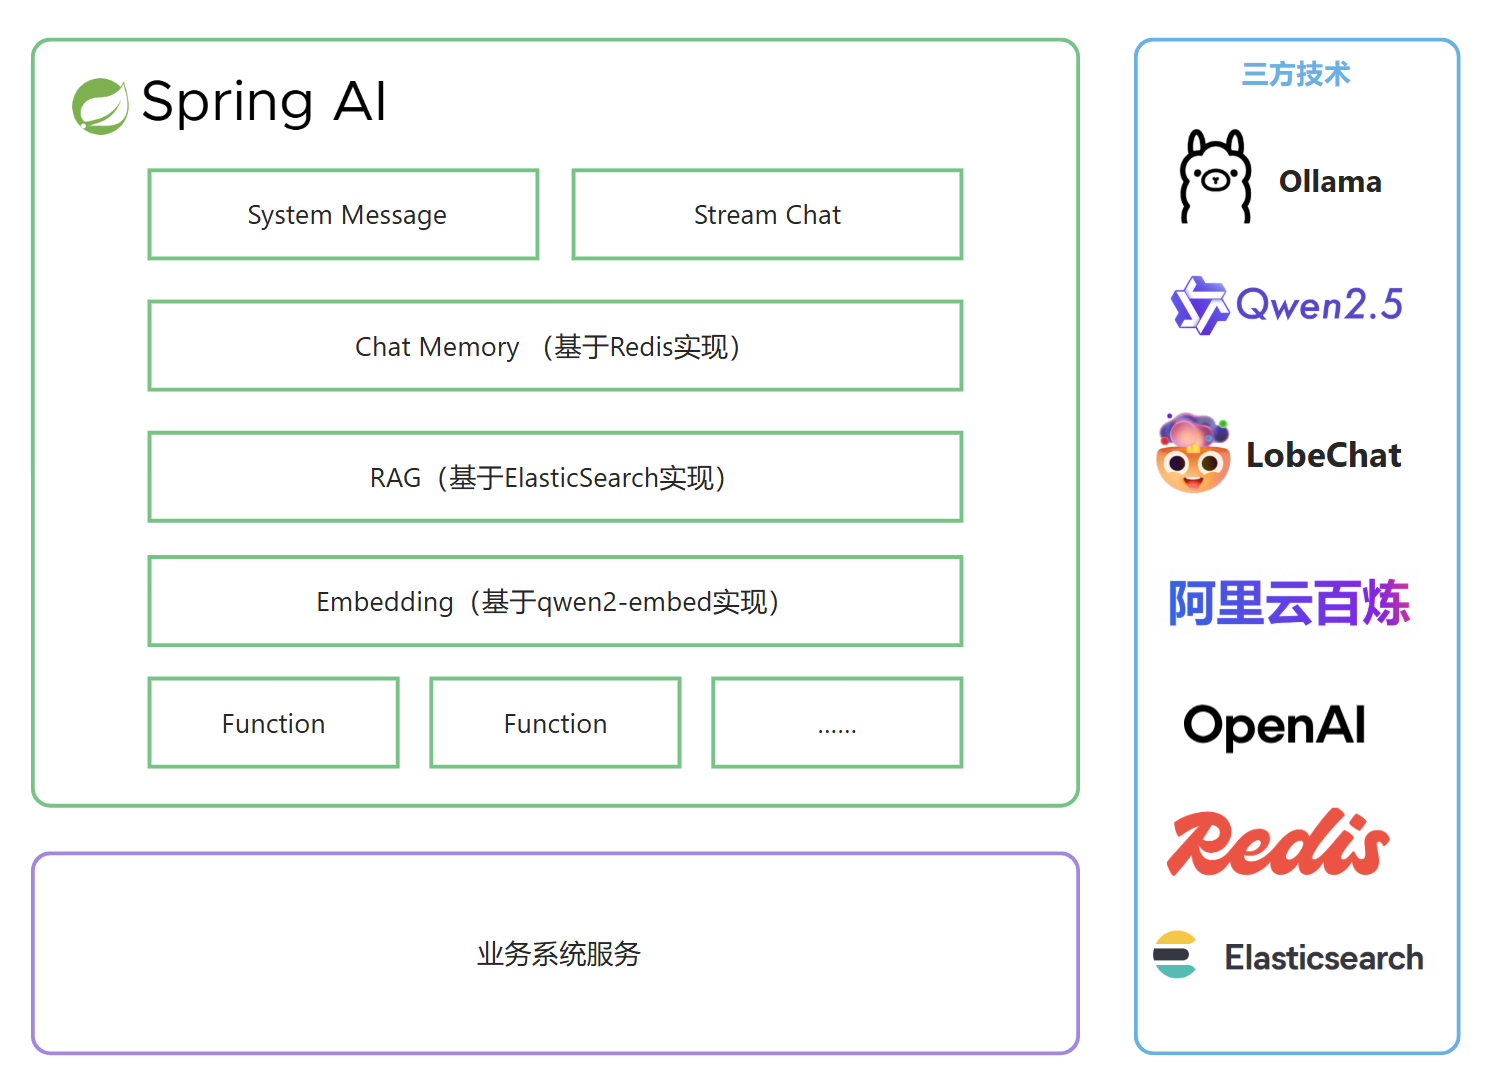
3.1. 整体架构
3.2. 实现流程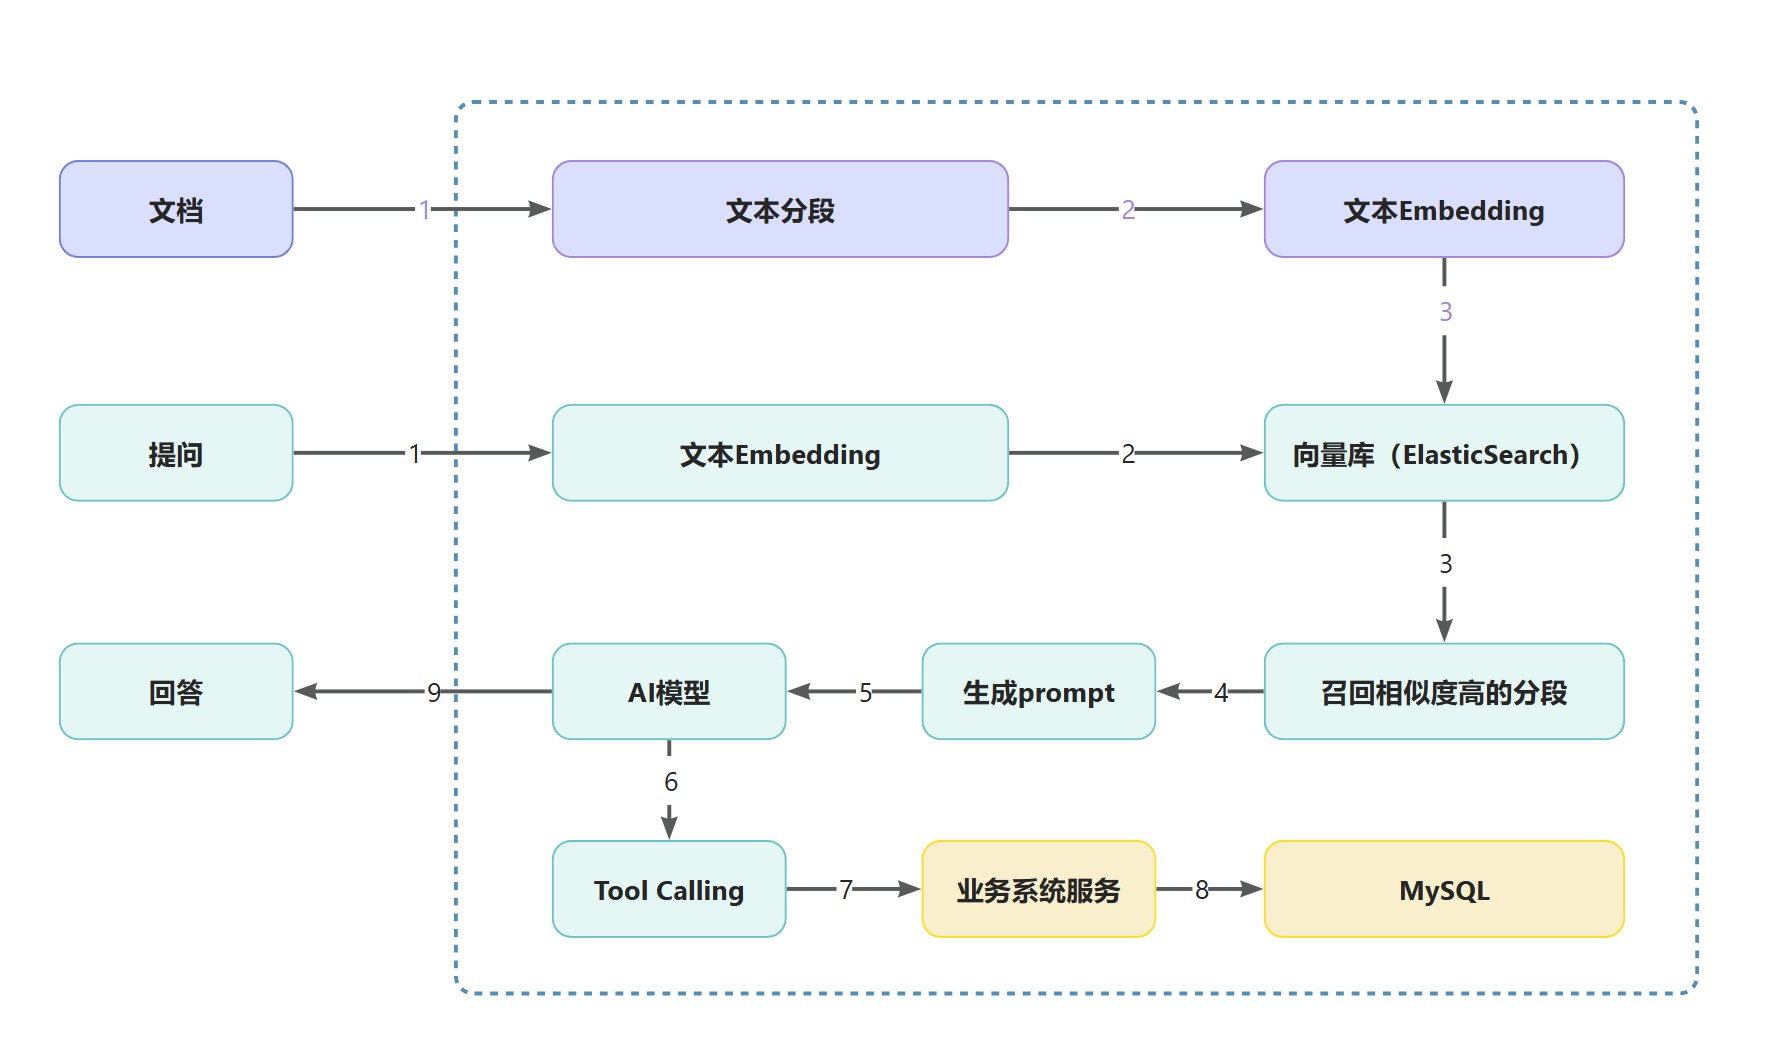
4. 项目集成SpringAI
4.1. 创建tj-aigc微服务
天机学堂项目采用的是微服务架构,我们要加入AI模块,是需要添加AI微服务,名为tj-aigc。
AIGC 是指人工智能生成内容(Artificial Intelligence Generated Content)
首先,代码不要在stu分支直接修改,创建自己的分支,比如叫作my分支。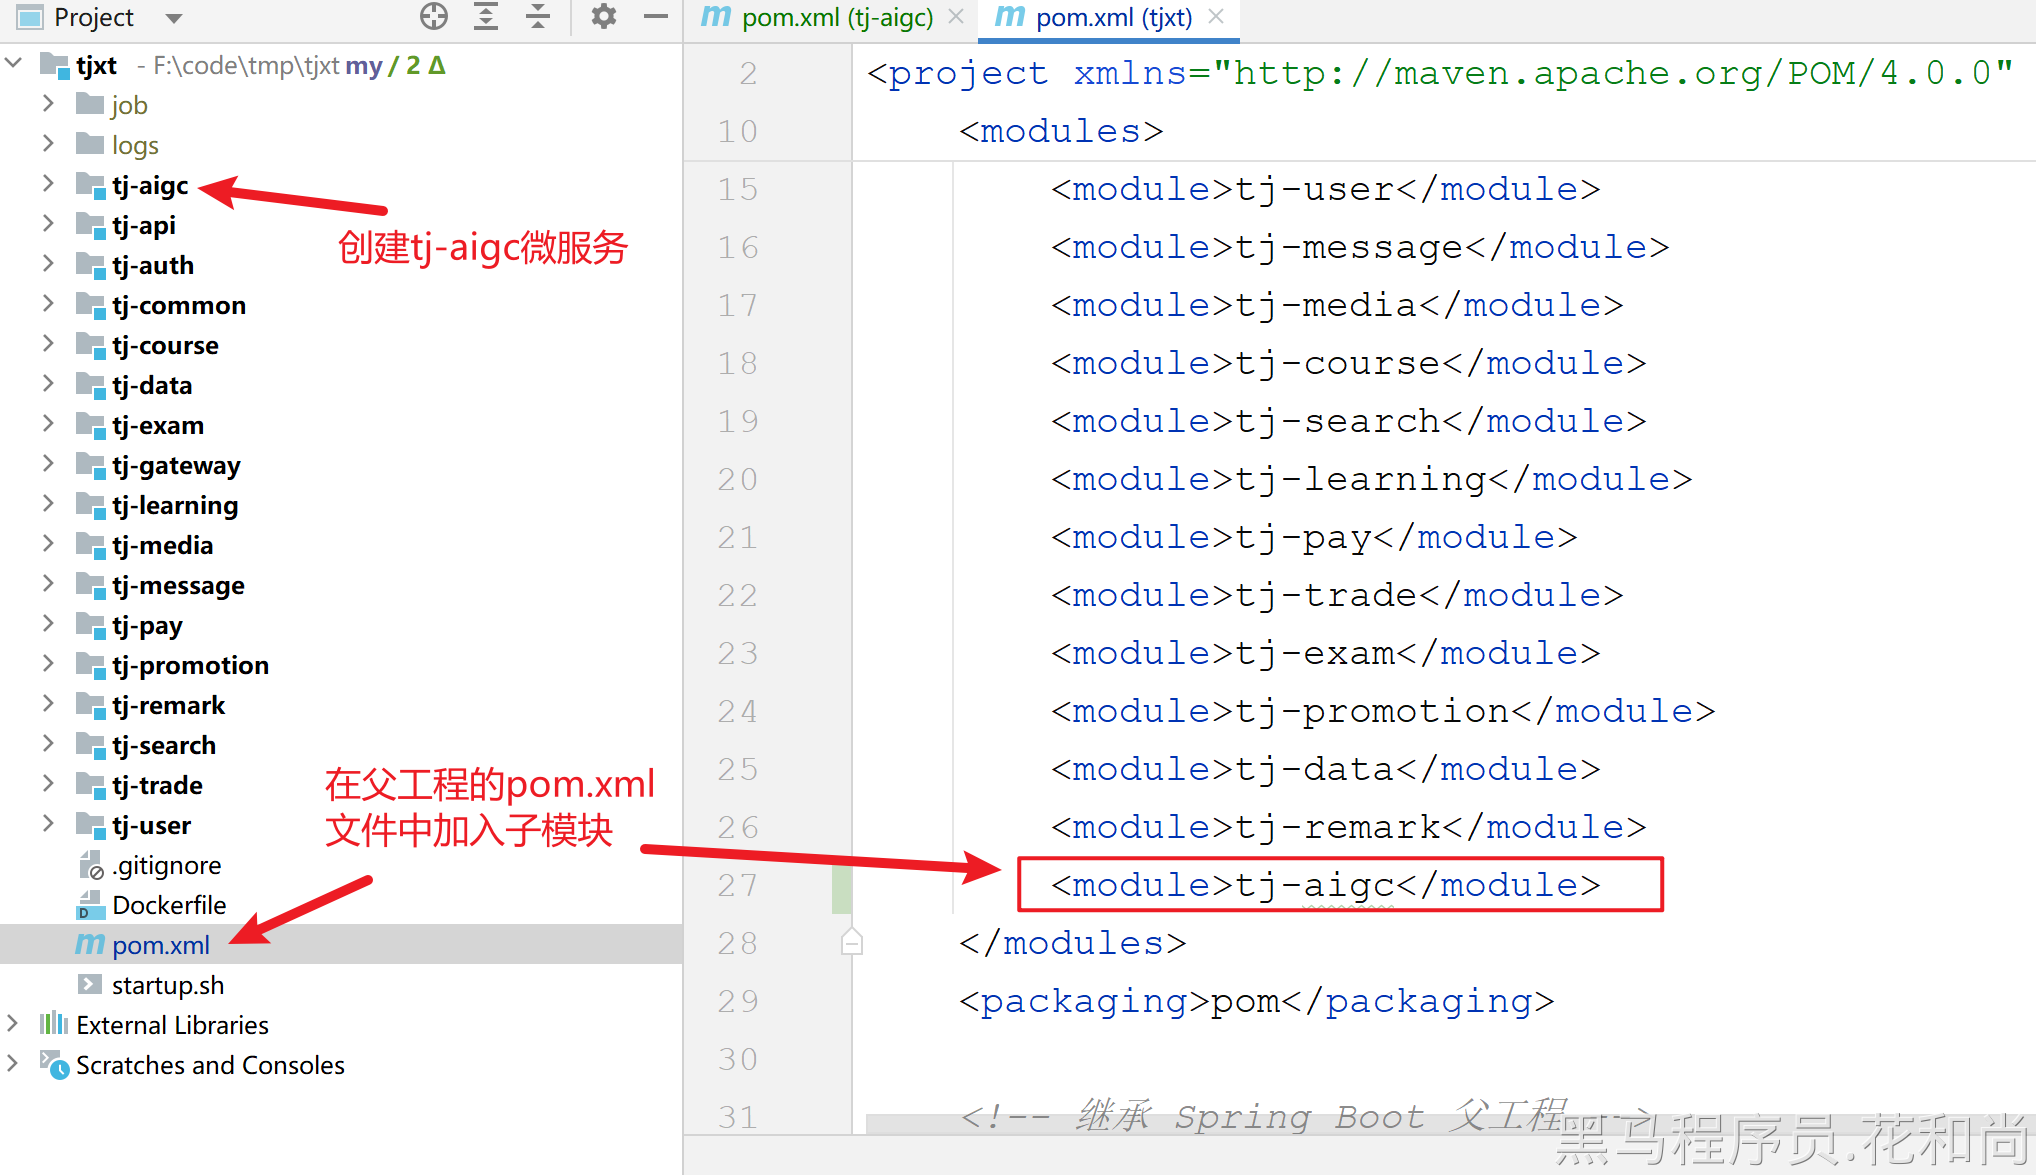
4.2. 导入依赖
<?xml version="1.0" encoding="UTF-8"?>
<project xmlns="http://maven.apache.org/POM/4.0.0"
         xmlns:xsi="http://www.w3.org/2001/XMLSchema-instance"
         xsi:schemaLocation="http://maven.apache.org/POM/4.0.0 http://maven.apache.org/xsd/maven-4.0.0.xsd">
    <modelVersion>4.0.0</modelVersion>
    <parent>
        <groupId>com.tianji</groupId>
        <artifactId>tjxt</artifactId>
        <version>1.0.0</version>
    </parent>

    <artifactId>tj-aigc</artifactId>

    <properties>
        <maven.compiler.source>17</maven.compiler.source>
        <maven.compiler.target>17</maven.compiler.target>
        <project.build.sourceEncoding>UTF-8</project.build.sourceEncoding>
    </properties>

    <dependencyManagement>
        <dependencies>
            <!-- Spring AI BOM -->
            <dependency>
                <groupId>org.springframework.ai</groupId>
                <artifactId>spring-ai-bom</artifactId>
                <version>${spring-ai.version}</version>
                <type>pom</type>
                <scope>import</scope>
            </dependency>
            <!-- Alibaba AI BOM -->
            <dependency>
                <groupId>com.alibaba.cloud.ai</groupId>
                <artifactId>spring-ai-alibaba-bom</artifactId>
                <version>1.0.0.2</version>
                <type>pom</type>
                <scope>import</scope>
            </dependency>
        </dependencies>
    </dependencyManagement>

    <dependencies>
        <!--api-->
        <dependency>
            <groupId>com.tianji</groupId>
            <artifactId>tj-api</artifactId>
            <version>1.0.0</version>
        </dependency>
        <!--auth-->
        <dependency>
            <groupId>com.tianji</groupId>
            <artifactId>tj-auth-resource-sdk</artifactId>
            <version>1.0.0</version>
        </dependency>
        <!--web-->
        <dependency>
            <groupId>org.springframework.boot</groupId>
            <artifactId>spring-boot-starter-web</artifactId>
        </dependency>
        <!--swagger依赖-->
        <dependency>
            <groupId>com.github.xiaoymin</groupId>
            <artifactId>knife4j-openapi3-jakarta-spring-boot-starter</artifactId>
        </dependency>
        <!--Redis-->
        <dependency>
            <groupId>org.springframework.boot</groupId>
            <artifactId>spring-boot-starter-data-redis</artifactId>
        </dependency>
        <!--discovery-->
        <dependency>
            <groupId>com.alibaba.cloud</groupId>
            <artifactId>spring-cloud-starter-alibaba-nacos-discovery</artifactId>
        </dependency>
        <!--config-->
        <dependency>
            <groupId>com.alibaba.cloud</groupId>
            <artifactId>spring-cloud-starter-alibaba-nacos-config</artifactId>
        </dependency>
        <!--loadbalancer-->
        <dependency>
            <groupId>org.springframework.cloud</groupId>
            <artifactId>spring-cloud-starter-loadbalancer</artifactId>
        </dependency>
        <!-- spring-ai-alibaba-->
        <dependency>
            <groupId>com.alibaba.cloud.ai</groupId>
            <artifactId>spring-ai-alibaba-starter-dashscope</artifactId>
        </dependency>

        <!--数据库相关-->
        <!-- mybatis plus 管理 -->
        <dependency>
            <groupId>com.baomidou</groupId>
            <artifactId>mybatis-plus-spring-boot3-starter</artifactId>
        </dependency>
        <dependency>
            <groupId>mysql</groupId>
            <artifactId>mysql-connector-java</artifactId>
        </dependency>

    </dependencies>

    <build>
        <finalName>${project.artifactId}</finalName>
        <plugins>
            <plugin>
                <groupId>org.springframework.boot</groupId>
                <artifactId>spring-boot-maven-plugin</artifactId>
                <executions>
                    <execution>
                        <goals>
                            <goal>build-info</goal>
                        </goals>
                    </execution>
                </executions>
                <configuration>
                    <mainClass>com.tianji.AIGCApplication</mainClass>
                </configuration>
            </plugin>
        </plugins>
    </build>
</project>
创建启动类:
package com.tianji; // 注意:包不要写错了

import lombok.extern.slf4j.Slf4j;
import org.springframework.boot.SpringApplication;
import org.springframework.boot.autoconfigure.SpringBootApplication;
import org.springframework.boot.builder.SpringApplicationBuilder;
import org.springframework.core.env.Environment;
import org.springframework.scheduling.annotation.EnableAsync;

import java.net.InetAddress;
import java.net.UnknownHostException;

@Slf4j
@EnableAsync
@SpringBootApplication
public class AIGCApplication {

    public static void main(String[] args) throws UnknownHostException {
        SpringApplication app = new SpringApplicationBuilder(AIGCApplication.class).build(args);
        Environment env = app.run(args).getEnvironment();
        String protocol = "http";
        if (env.getProperty("server.ssl.key-store") != null) {
            protocol = "https";
        }
        log.info("--/\n---------------------------------------------------------------------------------------\n\t" +
                        "Application '{}' is running! Access URLs:\n\t" +
                        "Local: \t\t{}://localhost:{}\n\t" +
                        "External: \t{}://{}:{}\n\t" +
                        "Profile(s): \t{}" +
                        "\n---------------------------------------------------------------------------------------",
                env.getProperty("spring.application.name"),
                protocol,
                env.getProperty("server.port"),
                protocol,
                InetAddress.getLocalHost().getHostAddress(),
                env.getProperty("server.port"),
                env.getActiveProfiles());
    }
}
4.3. 配置文件
每个微服务都会有4个配置文件: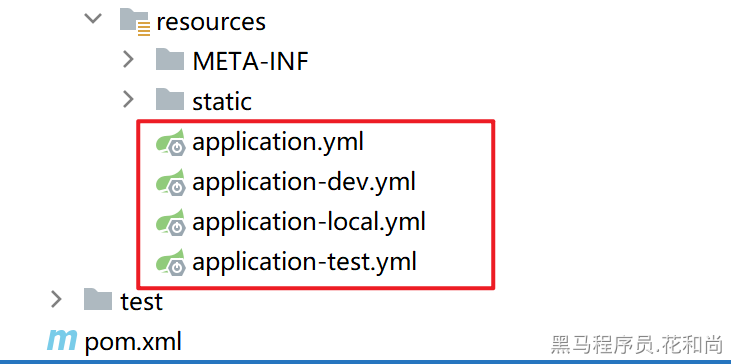
说明:
- application.yml 主配置文件,配置了端口号、服务名称、swagger接口等信息
- application-dev.yml 运行在虚拟机环境的配置文件,配置了nacos注册中心、配置中心、日志级别等信息
- application-local.yml 运行在本地环境的配置文件,配置了nacos注册中心、配置中心、日志级别等信息
- application-test.yml 运行在测试环境的配置文件,配置了nacos注册中心、配置中心、日志级别等信息
👉 我们只需要关注 application.yml 和 application-local.yml,这两个配置文件即可。
server:
  port: 8094  #端口
  tomcat:
    uri-encoding: UTF-8   #服务编码
spring:
  profiles:
    active: local
  application:
    name: aigc-service
  main:
    allow-circular-references: true # 允许循环引用
tj:
  swagger:
    enable: true
    package-path: com.tianji.aigc.controller
    title: 天机学堂 - AIGC接口文档
    description: 该服务包含AI相关功能
    contact-name: 传智教育·研究院
    contact-url: http://www.itcast.cn/
    contact-email: zhangzhijun@itcast.cn
    version: v1.0
    enableResponseWrap: true
  auth:
    resource:
      enable: true
  jdbc:
    database: tj_aigc #指定使用的数据库名

spring:
  cloud:
    nacos:
      server-addr: 192.168.150.101:8848 # nacos注册中心
      username: nacos
      password: nacos
      discovery:
        namespace: f923fb34-cb0a-4c06-8fca-ad61ea61a3f0
        group: DEFAULT_GROUP
        ip: 192.168.150.101
  config:
    import:
      - nacos:${spring.application.name}.yaml # 导入本服务的配置
      - nacos:shared-spring.yaml # 共享spring配置
      - nacos:shared-redis.yaml # 共享redis配置
      - nacos:shared-logs.yaml # 共享日志配置
      - nacos:shared-feign.yaml # 共享feign配置
      - nacos:shared-mybatis.yaml # 共享mybatis配置
#logging:
#  level:
##    com.tianji: debug
#    com:
#      alibaba: debug
#    org:
#      springframework:
#        ai:
#          chat:
#            client:
#              advisor: DEBUG
#      apache:
#        hc:
#          client5:
#            http:
# wire: debug在nacos中创建配置文件aigc-service.yaml:(微服务的名字,主要是Spring AI相关的配置项)
tj:
  ai:
    dashscope:
      key: ${ALIYUN_API_KEY}  #换成你自己的阿里百炼key 或 读取环境变量中的配置
spring:
  ai:
    dashscope:
      api-key: ${tj.ai.dashscope.key}
      chat:
        enabled: true
        options:
          model: qwen-plus
          # model: qwen2.5-1.5b-instruct  免费模型
      embedding:
        enabled: true
        options:
          model: text-embedding-v3 #向量模型
          dimensions: 1024 #向量维度维度
5.2. 实现分析
问题一:如何生成sessionId?
**解决:**生成sessionId的要求是字符串的,不重复的,所以,可以使用uuid来生成,确保唯一性。
**问题二:**sessionId是否需要保存到数据库?
解决: 是需要的,因为后续需要有查询历史对话的功能,如果不存储到数据库,是无法查询的。
**问题三:**热门问题,该怎么做?
解决: 热门问题一般都是固定的问题,所以在后台中存储,随机的返回3个即可,但是,要做成可配置的,不能硬编码到代码中。所以,我们会想到把他写到nacos的配置中心中,这样就会比较灵活一些。