本文分析的是 examples/pipelines/pipelines.cpppipelines.exe。这个示例的主题非常明确:在同一个 render pass 中使用不同的 graphics pipeline 绘制同一个场景。
它最终在一个窗口里把画面横向分成三份:
- 左侧:Phong 光照效果。
- 中间:Toon / cartoon 风格效果。
- 右侧:Wireframe 线框效果。
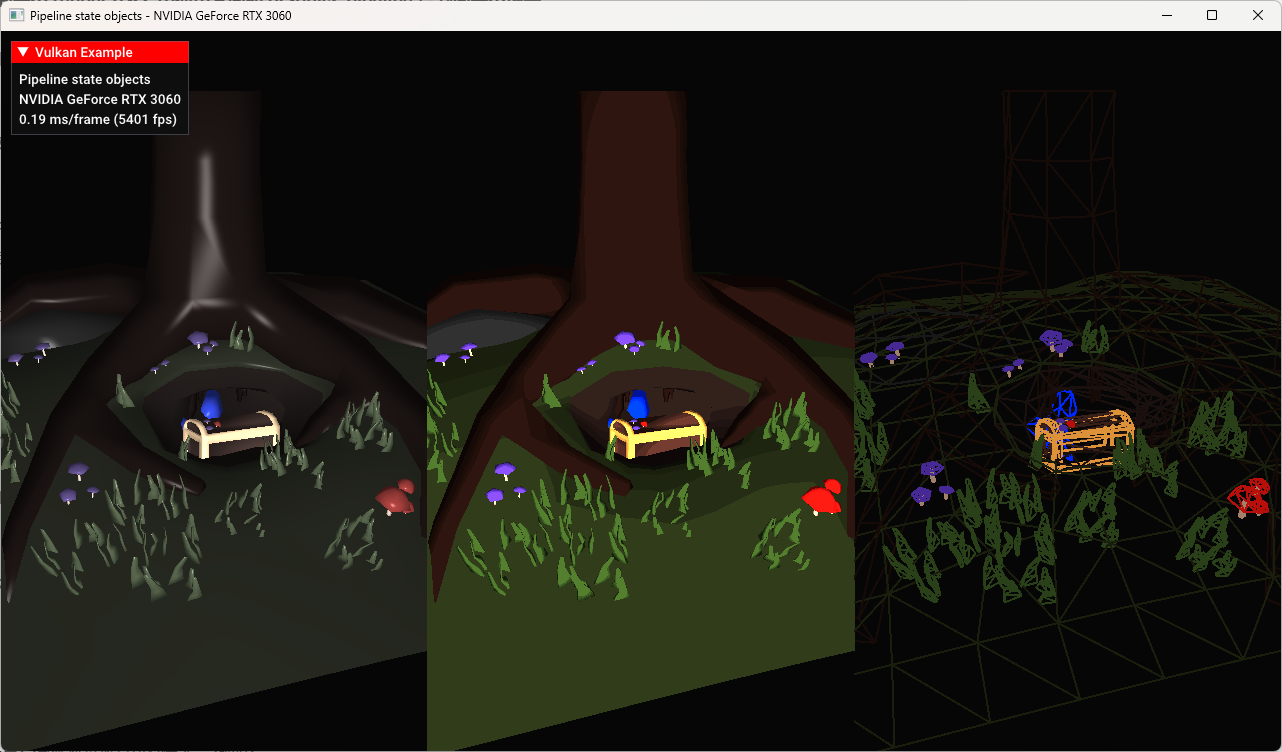
三份画面使用的是同一个 glTF 模型、同一套 uniform buffer、同一套 descriptor set、同一批 vertex/index buffer,也在同一个 render pass 里完成。真正变化的是:每次 draw 之前绑定了不同的 VkPipeline,并通过动态 viewport 把绘制结果限制到屏幕的不同区域。
这就是这个示例最值得学习的地方:它不是为了展示复杂模型加载,也不是为了展示高级光照,而是用非常短的代码把 Vulkan 的 Pipeline State Object 思想讲清楚。
1. 示例定位:为什么 Vulkan 需要这么多 pipeline
在 OpenGL 这类传统图形 API 中,很多渲染状态可以在绘制前通过零散的状态函数逐个修改。例如改 polygon mode、改 shader、改 blend、改 depth test、改 vertex layout 等。
Vulkan 的设计思路不同。Vulkan 更倾向于把一组图形管线状态提前打包成一个不可变或近似不可变的对象,也就是:
cpp
VkPipeline这个 VkPipeline 里面包含了大量会影响绘制结果的状态,例如:
- 使用哪一组 vertex/fragment shader。
- 顶点输入布局是什么。
- 图元装配方式是 triangle list 还是 line list。
- rasterizer 如何处理面片。
- 是否启用背面剔除。
- 深度测试和深度写入如何工作。
- 颜色混合如何工作。
- 多重采样如何工作。
- 当前 render pass 和 subpass 是什么。
因此,在 Vulkan 中,如果两个物体使用了不同的 shader,通常意味着它们需要不同的 graphics pipeline。如果两个物体使用了不同的 polygon mode,例如一个填充绘制、一个线框绘制,也通常意味着它们需要不同的 graphics pipeline。
pipelines.cpp 就是围绕这个概念写的。它创建了三条 pipeline:
cpp
struct {
    VkPipeline phong{ VK_NULL_HANDLE };
    VkPipeline wireframe{ VK_NULL_HANDLE };
    VkPipeline toon{ VK_NULL_HANDLE };
} pipelines;
这三条 pipeline 对应三个不同的视觉结果,但它们共享大部分状态。示例通过这种方式告诉我们:Vulkan 不是在 draw call 之间随意拼状态,而是提前准备好若干套完整的 pipeline,然后在命令缓冲里显式切换。
2. 程序整体结构
示例仍然继承自框架里的 VulkanExampleBase:
cpp
class VulkanExample : public VulkanExampleBaseVulkanExampleBase 已经封装了大量样板代码,包括:
- Vulkan instance / device / swapchain 初始化。
- render pass 和 framebuffer 创建。
- command buffer 分配。
- 同步对象管理。
- 每帧
prepareFrame()/submitFrame()流程。 - UI overlay 绘制。
- camera 输入和矩阵更新。
所以 pipelines.cpp 只需要关注这个示例自己的资源和绘制逻辑。
核心成员可以分成几类。
首先是场景模型:
cpp
vkglTF::Model scene;这里使用框架提供的 vkglTF::Model,直接加载 glTF 模型并管理 vertex buffer、index buffer、mesh、material 等资源。
其次是 uniform 数据:
cpp
struct UniformData {
    glm::mat4 projection;
    glm::mat4 modelView;
    glm::vec4 lightPos{ 0.0f, 2.0f, 1.0f, 0.0f };
} uniformData;

std::array<vks::Buffer, maxConcurrentFrames> uniformBuffers;
每个并发帧都有一个 uniform buffer。这样可以避免 CPU 在当前帧更新 uniform 时覆盖 GPU 仍在读取的上一帧数据。
然后是 descriptor 和 pipeline layout:
cpp
VkPipelineLayout pipelineLayout{ VK_NULL_HANDLE };
VkDescriptorSetLayout descriptorSetLayout{ VK_NULL_HANDLE };
std::array<VkDescriptorSet, maxConcurrentFrames> descriptorSets{};
最后是三条 pipeline:
cpp
struct {
    VkPipeline phong{ VK_NULL_HANDLE };
    VkPipeline wireframe{ VK_NULL_HANDLE };
    VkPipeline toon{ VK_NULL_HANDLE };
} pipelines;
整个程序的运行流程是:
cpp
prepare()
  -> VulkanExampleBase::prepare()
  -> loadAssets()
  -> prepareUniformBuffers()
  -> setupDescriptors()
  -> preparePipelines()
  -> prepared = true

render()
  -> prepareFrame()
  -> updateUniformBuffers()
  -> buildCommandBuffer()
  -> submitFrame()
这也是 Vulkan 示例中非常典型的组织方式:初始化阶段创建资源,渲染阶段只更新动态数据并录制/提交命令。
3. 加载模型:示例使用的是同一个 glTF 场景
模型加载在 loadAssets() 中完成:
cpp
const uint32_t glTFLoadingFlags =
    vkglTF::FileLoadingFlags::PreTransformVertices |
    vkglTF::FileLoadingFlags::PreMultiplyVertexColors |
    vkglTF::FileLoadingFlags::FlipY;

scene.loadFromFile(
    getAssetPath() + "models/treasure_smooth.gltf",
    vulkanDevice,
    queue,
    glTFLoadingFlags);
这里加载的是:
text
models/treasure_smooth.gltf三个 loading flag 也很关键。
PreTransformVertices 表示在加载阶段把 node transform 预先烘焙到顶点数据里。这样绘制时不需要再为每个 node 单独传 model matrix,示例可以把重点放在 pipeline 切换上。
PreMultiplyVertexColors 表示预乘顶点颜色,使模型颜色数据更适合后续 shader 使用。
FlipY 用来处理 Vulkan 坐标系和资源坐标之间的 Y 方向差异。
这个示例故意没有引入复杂 material descriptor,也没有引入纹理采样逻辑。它只需要模型的 position、normal、color 三类顶点数据:
cpp
vkglTF::VertexComponent::Position,
vkglTF::VertexComponent::Normal,
vkglTF::VertexComponent::Color
这让三条 pipeline 可以共享同一个 vertex input layout 和同一份模型 buffer。
4. Uniform Buffer:三种效果共享同一份相机和光源数据
Uniform 数据结构如下:
cpp
struct UniformData {
    glm::mat4 projection;
    glm::mat4 modelView;
    glm::vec4 lightPos{ 0.0f, 2.0f, 1.0f, 0.0f };
} uniformData;
它包含三类数据:
projection:投影矩阵。modelView:模型视图矩阵。lightPos:光源位置。
对应 GLSL 里是:
glsl
layout (binding = 0) uniform UBO
{
    mat4 projection;
    mat4 model;
    vec4 lightPos;
} ubo;
注意 C++ 里的字段名叫 modelView,shader 里叫 model。这并不冲突,因为 uniform buffer 按布局和偏移读取数据,字段名只是各自语言里的可读性标识。真正重要的是矩阵和向量的顺序、类型、对齐方式要匹配。
uniform buffer 创建在 prepareUniformBuffers() 中:
cpp
for (auto& buffer : uniformBuffers) {
    VK_CHECK_RESULT(vulkanDevice->createBuffer(
        VK_BUFFER_USAGE_UNIFORM_BUFFER_BIT,
        VK_MEMORY_PROPERTY_HOST_VISIBLE_BIT | VK_MEMORY_PROPERTY_HOST_COHERENT_BIT,
        &buffer,
        sizeof(UniformData)));
    VK_CHECK_RESULT(buffer.map());
}
这里的内存属性是:
cpp
VK_MEMORY_PROPERTY_HOST_VISIBLE_BIT |
VK_MEMORY_PROPERTY_HOST_COHERENT_BIT
含义是 CPU 可以直接写入,并且不需要手动 flush 就能让 GPU 看到更新后的数据。对于这种很小、每帧更新一次的 uniform buffer,这是示例中最简单直接的选择。
每帧更新在 updateUniformBuffers() 中完成:
cpp
camera.updateAspectRatio((float)width / 3.0f / (float)height);

uniformData.projection = camera.matrices.perspective;
uniformData.modelView = camera.matrices.view;

memcpy(
    uniformBuffers[currentFrame].mapped,
    &uniformData,
    sizeof(UniformData));
这里有一个非常容易忽略的细节:
cpp
camera.updateAspectRatio((float)width / 3.0f / (float)height);窗口虽然是完整宽度,但每个模型只绘制在三分之一宽度的 viewport 里。所以相机的 aspect ratio 不是:
cpp
width / height而是:
cpp
(width / 3) / height如果这里仍然使用完整窗口的宽高比,那么每个三分之一屏幕中的模型会被横向压缩或拉伸。这个示例在构造函数和每帧更新里都使用了三分之一宽度的 aspect ratio,保证三个 viewport 中的模型比例正确。
5. Descriptor:只有一个 binding,所有 pipeline 共用
setupDescriptors() 创建 descriptor pool、descriptor set layout 和每帧 descriptor set。
descriptor pool 只包含一种 descriptor:
cpp
VkDescriptorPoolSize poolSize =
    vks::initializers::descriptorPoolSize(
        VK_DESCRIPTOR_TYPE_UNIFORM_BUFFER,
        maxConcurrentFrames);
descriptor set layout 也只有一个 binding:
cpp
VkDescriptorSetLayoutBinding setLayoutBinding =
    vks::initializers::descriptorSetLayoutBinding(
        VK_DESCRIPTOR_TYPE_UNIFORM_BUFFER,
        VK_SHADER_STAGE_VERTEX_BIT,
        0);
也就是说,set 0 binding 0 是一个 vertex shader 使用的 uniform buffer。
然后为每个并发帧分配一个 descriptor set:
cpp
for (uint32_t i = 0; i < uniformBuffers.size(); i++) {
    VkDescriptorSetAllocateInfo allocInfo =
        vks::initializers::descriptorSetAllocateInfo(
            descriptorPool,
            &descriptorSetLayout,
            1);

    VK_CHECK_RESULT(vkAllocateDescriptorSets(device, &allocInfo, &descriptorSets[i]));

    VkWriteDescriptorSet writeDescriptorSet =
        vks::initializers::writeDescriptorSet(
            descriptorSets[i],
            VK_DESCRIPTOR_TYPE_UNIFORM_BUFFER,
            0,
            &uniformBuffers[i].descriptor);

    vkUpdateDescriptorSets(device, 1, &writeDescriptorSet, 0, nullptr);
}
这个设计非常干净:Phong、Toon、Wireframe 三条 pipeline 的 pipeline layout 是同一个,因此 command buffer 里只需要绑定一次 descriptor set。
cpp
vkCmdBindDescriptorSets(
    cmdBuffer,
    VK_PIPELINE_BIND_POINT_GRAPHICS,
    pipelineLayout,
    0,
    1,
    &descriptorSets[currentFrame],
    0,
    nullptr);
之后无论切换到哪条 pipeline,shader 都能从同一个 descriptor set 读取相机矩阵。
这也是 Vulkan 工程实践里很重要的一点:如果一批 pipeline 可以共享 descriptor set layout 和 pipeline layout,就可以显著降低绑定复杂度。
6. Pipeline Layout:descriptor set layout 和 shader 接口的桥梁
pipeline layout 创建在 preparePipelines() 开头:
cpp
VkPipelineLayoutCreateInfo pipelineLayoutCreateInfo =
    vks::initializers::pipelineLayoutCreateInfo(
        &descriptorSetLayout,
        1);

VK_CHECK_RESULT(vkCreatePipelineLayout(
    device,
    &pipelineLayoutCreateInfo,
    nullptr,
    &pipelineLayout));
VkPipelineLayout 描述了 pipeline 可以访问哪些 descriptor set,以及是否使用 push constants。
这个示例没有 push constants,只有一个 descriptor set layout。因此 pipeline layout 非常简单。
但它的位置非常关键:创建 graphics pipeline 时必须指定 pipeline layout。
cpp
pipelineCI.layout = pipelineLayout;后续命令缓冲里绑定 descriptor set 时,也必须使用同一个 pipeline layout:
cpp
vkCmdBindDescriptorSets(..., pipelineLayout, ...);可以把 VkPipelineLayout 理解成 CPU 侧 descriptor 绑定和 GPU 侧 shader 资源声明之间的契约。shader 里声明了 binding 0 的 UBO,C++ 侧 descriptor set layout 也声明了 binding 0 的 uniform buffer,而 pipeline layout 把这个接口固定下来。
7. 创建 Pipeline 的公共状态
preparePipelines() 是本文最核心的函数。它创建了三条 graphics pipeline。
在创建具体 pipeline 前,代码先准备了一批共享状态。
7.1 Input Assembly
cpp
VkPipelineInputAssemblyStateCreateInfo inputAssemblyState =
    vks::initializers::pipelineInputAssemblyStateCreateInfo(
        VK_PRIMITIVE_TOPOLOGY_TRIANGLE_LIST,
        0,
        VK_FALSE);
模型以三角形列表绘制:
cpp
VK_PRIMITIVE_TOPOLOGY_TRIANGLE_LIST即使最终的 wireframe 看起来是线框,它的输入图元仍然是三角形。线框效果不是通过 line list 输入实现的,而是通过 rasterizer 的 polygon mode 把三角形面片栅格化成线。
7.2 Rasterization
cpp
VkPipelineRasterizationStateCreateInfo rasterizationState =
    vks::initializers::pipelineRasterizationStateCreateInfo(
        VK_POLYGON_MODE_FILL,
        VK_CULL_MODE_BACK_BIT,
        VK_FRONT_FACE_COUNTER_CLOCKWISE,
        0);
默认 polygon mode 是:
cpp
VK_POLYGON_MODE_FILL这用于 Phong 和 Toon。它们都是常规实体渲染。
背面剔除是:
cpp
VK_CULL_MODE_BACK_BIT正面方向是:
cpp
VK_FRONT_FACE_COUNTER_CLOCKWISE也就是逆时针顶点顺序被认为是正面。
wireframe pipeline 会在创建前把这个状态改成:
cpp
rasterizationState.polygonMode = VK_POLYGON_MODE_LINE;这也是 wireframe 必须单独创建一条 pipeline 的原因之一。polygonMode 不是这个示例中的动态状态,它被固定在 pipeline 里。
7.3 Color Blend
cpp
VkPipelineColorBlendAttachmentState blendAttachmentState =
    vks::initializers::pipelineColorBlendAttachmentState(
        0xf,
        VK_FALSE);
这里的 0xf 表示 RGBA 四个通道都写入。VK_FALSE 表示不启用颜色混合。
也就是说,每个 fragment shader 输出的颜色会直接写入 color attachment,不做透明混合。
7.4 Depth / Stencil
cpp
VkPipelineDepthStencilStateCreateInfo depthStencilState =
    vks::initializers::pipelineDepthStencilStateCreateInfo(
        VK_TRUE,
        VK_TRUE,
        VK_COMPARE_OP_LESS_OR_EQUAL);
深度测试开启:
cpp
VK_TRUE深度写入开启:
cpp
VK_TRUE比较函数是:
cpp
VK_COMPARE_OP_LESS_OR_EQUAL这保证模型自身不同三角形之间能正确遮挡。因为三个视口在屏幕空间互不重叠,所以它们共享同一个 depth attachment 也不会互相干扰。
7.5 Viewport / Scissor
cpp
VkPipelineViewportStateCreateInfo viewportState =
    vks::initializers::pipelineViewportStateCreateInfo(
        1,
        1,
        0);
pipeline 声明它会使用一个 viewport 和一个 scissor。
但具体 viewport 和 scissor 的数值不写死在 pipeline 里,因为后面把它们设置成了动态状态。
7.6 Multisample
cpp
VkPipelineMultisampleStateCreateInfo multisampleState =
    vks::initializers::pipelineMultisampleStateCreateInfo(
        VK_SAMPLE_COUNT_1_BIT,
        0);
示例没有启用 MSAA。每个像素一个 sample。
7.7 Dynamic State
cpp
std::vector<VkDynamicState> dynamicStateEnables = {
    VK_DYNAMIC_STATE_VIEWPORT,
    VK_DYNAMIC_STATE_SCISSOR,
    VK_DYNAMIC_STATE_LINE_WIDTH
};
这个示例启用了三个动态状态:
VK_DYNAMIC_STATE_VIEWPORTVK_DYNAMIC_STATE_SCISSORVK_DYNAMIC_STATE_LINE_WIDTH
这非常重要。
如果 viewport 不是动态状态,那么每个不同 viewport 都需要不同 pipeline。示例要在左、中、右三个区域绘制同一个模型,如果 viewport 被烘焙进 pipeline,就会多出很多完全没必要的 pipeline 对象。
启用动态 viewport 后,命令缓冲里可以直接这样切换:
cpp
vkCmdSetViewport(cmdBuffer, 0, 1, &viewport);同理,line width 也可以在 command buffer 中设置:
cpp
vkCmdSetLineWidth(cmdBuffer, 2.0f);这说明 Vulkan 并不是所有状态都必须固定进 pipeline。它允许一部分状态保持动态。工程上要做的是判断哪些状态值得成为动态状态,哪些状态应该进入 pipeline。
8. Vertex Input:三条 pipeline 共享同一份顶点布局
顶点输入状态来自 vkglTF::Vertex 的辅助函数:
cpp
std::vector<vkglTF::VertexComponent> vertexComponents = {
    vkglTF::VertexComponent::Position,
    vkglTF::VertexComponent::Normal,
    vkglTF::VertexComponent::Color
};

VkPipelineVertexInputStateCreateInfo* vertexInputState =
    vkglTF::Vertex::getPipelineVertexInputState(vertexComponents);
它告诉 Vulkan:vertex buffer 里有哪些属性,每个属性在哪个 location,格式是什么,stride 和 offset 是多少。
对应 shader 输入是:
glsl
layout (location = 0) in vec3 inPos;
layout (location = 1) in vec3 inNormal;
layout (location = 2) in vec3 inColor;
Phong 和 Toon 都使用 position、normal、color。
Wireframe shader 只真正关心 position 和 color:
glsl
layout (location = 0) in vec4 inPos;
layout (location = 2) in vec3 inColor;
即便 vertex input state 里仍然提供了 normal,shader 不读取它也没有问题。这样三条 pipeline 可以共享同一份 vertex input state,代码更简单。
9. Pipeline Derivatives:从 Phong 派生 Toon 和 Wireframe
pipelines.cpp 还展示了一个 Vulkan 特性:pipeline derivatives。
创建第一条 pipeline 前,代码设置:
cpp
pipelineCI.flags = VK_PIPELINE_CREATE_ALLOW_DERIVATIVES_BIT;这表示这条 pipeline 允许成为其他 pipeline 的 base pipeline。
第一条创建的是 Phong:
cpp
pipelineCI.stageCount = static_cast<uint32_t>(shaderStages.size());
pipelineCI.pStages = shaderStages.data();
VK_CHECK_RESULT(vkCreateGraphicsPipelines(
    device,
    pipelineCache,
    1,
    &pipelineCI,
    nullptr,
    &pipelines.phong));
随后创建 Toon 和 Wireframe 前,代码改成:
cpp
pipelineCI.flags = VK_PIPELINE_CREATE_DERIVATIVE_BIT;
pipelineCI.basePipelineHandle = pipelines.phong;
pipelineCI.basePipelineIndex = -1;
这表示后续 pipeline 是从 pipelines.phong 派生出来的。
pipeline derivative 的设计意图是:如果两条 pipeline 大量状态相同,驱动可能复用 base pipeline 的一部分编译结果或内部状态,从而降低创建成本。
这里 Phong、Toon、Wireframe 的共同点非常多:
- render pass 相同。
- pipeline layout 相同。
- vertex input 相同。
- input assembly 相同。
- depth stencil 相同。
- color blend 相同。
- viewport/scissor 数量相同。
- dynamic state 列表相同。
差异主要是:
- shader stages 不同。
- wireframe 的 polygon mode 不同。
所以它们很适合作为 derivative pipeline 的教学案例。
不过在真实项目中要注意:pipeline derivative 的性能收益是实现相关的,不同驱动不一定都有明显收益。现代 Vulkan 项目更常见的优化手段还包括:
- 持久化 pipeline cache。
- 减少运行时 pipeline 创建。
- 离线编译和预热 pipeline。
- 使用更多动态状态扩展降低 pipeline 数量。
- 在合适平台上使用 graphics pipeline library 或 shader object。
这个示例的重点不是证明 derivative 一定更快,而是展示 Vulkan 如何表达"这些 pipeline 彼此相关"。
10. 第一条 Pipeline:Phong
Phong pipeline 使用:
cpp
pipelines/phong.vert.spv
pipelines/phong.frag.spv
顶点 shader 做了几件事:
glsl
outColor = inColor;
gl_Position = ubo.projection * ubo.model * vec4(inPos.xyz, 1.0);

vec4 pos = ubo.model * vec4(inPos, 1.0);
outNormal = mat3(ubo.model) * inNormal;
vec3 lPos = mat3(ubo.model) * ubo.lightPos.xyz;
outLightVec = lPos - pos.xyz;
outViewVec = -pos.xyz;
它输出:
- 变换后的 normal。
- 顶点颜色。
- view vector。
- light vector。
fragment shader 中计算了一个比较传统的 Blinn/Phong 风格光照:
glsl
vec3 ambient = color * vec3(1.0);
vec3 N = normalize(inNormal);
vec3 L = normalize(inLightVec);
vec3 V = normalize(inViewVec);
vec3 R = reflect(-L, N);
vec3 diffuse = max(dot(N, L), 0.0) * color;
vec3 specular = pow(max(dot(R, V), 0.0), 32.0) * vec3(0.35);

outFragColor = vec4(ambient + diffuse * 1.75 + specular, 1.0);
它包含三部分:
- ambient:基础环境光。
- diffuse:根据 normal 和 light direction 的夹角计算漫反射。
- specular:根据反射方向和视线方向计算高光。
示例还对顶点颜色做了去饱和处理:
glsl
vec3 color = vec3(mix(
    inColor,
    vec3(dot(vec3(0.2126,0.7152,0.0722), inColor)),
    0.65));
这样模型材质不会过于艳丽,更适合展示光照变化。
Phong pipeline 是 base pipeline,也是其他 pipeline derivative 的参照对象。
11. 第二条 Pipeline:Toon
Toon pipeline 使用:
cpp
pipelines/toon.vert.spv
pipelines/toon.frag.spv
它的 vertex shader 和 Phong 基本一致,同样输出 normal、color、view vector 和 light vector。
真正的差异在 fragment shader。
Toon shader 先计算光照强度:
glsl
float intensity = dot(N,L);
float shade = 1.0;
shade = intensity < 0.5 ? 0.75 : shade;
shade = intensity < 0.35 ? 0.6 : shade;
shade = intensity < 0.25 ? 0.5 : shade;
shade = intensity < 0.1 ? 0.25 : shade;
然后输出分段后的颜色:
glsl
outFragColor.rgb = inColor * 3.0 * shade;这就是 toon shading 的关键:它不是让亮度连续平滑变化,而是把光照强度切成几个离散档位。
普通 Phong 光照会得到连续渐变:
text
暗 -> 灰暗 -> 中间调 -> 亮 -> 高光Toon shader 则更接近:
text
阴影档 1 -> 阴影档 2 -> 中间档 -> 高亮档这种分段会让模型呈现卡通渲染、赛璐璐渲染的视觉效果。
从 Vulkan pipeline 角度看,Toon 和 Phong 的差异主要只是 shader 不同。它们的 rasterization、depth、blend、vertex input、descriptor layout 都相同。因此它非常适合作为从 Phong 派生出来的第二条 pipeline。
12. 第三条 Pipeline:Wireframe
Wireframe pipeline 使用:
cpp
pipelines/wireframe.vert.spv
pipelines/wireframe.frag.spv
它和前两条 pipeline 最大的不同不是 shader,而是 rasterization state:
cpp
rasterizationState.polygonMode = VK_POLYGON_MODE_LINE;这会让三角形不再以填充面片方式栅格化,而是以边线方式栅格化。
但是 Vulkan 中使用非填充 polygon mode 需要设备特性支持:
cpp
if (deviceFeatures.fillModeNonSolid) {
    enabledFeatures.fillModeNonSolid = VK_TRUE;
}
如果设备不支持:
cpp
fillModeNonSolid示例就不会创建 wireframe pipeline:
cpp
if (enabledFeatures.fillModeNonSolid) {
    rasterizationState.polygonMode = VK_POLYGON_MODE_LINE;
    ...
    vkCreateGraphicsPipelines(..., &pipelines.wireframe);
}
UI overlay 里还会提示:
cpp
if (!enabledFeatures.fillModeNonSolid) {
    overlay->text("Non solid fill modes not supported!");
}
这体现了 Vulkan 的一个重要特点:很多能力不是默认可用的,必须先查询物理设备特性,再在 logical device 创建时启用。
Wireframe vertex shader 更简单:
glsl
layout (location = 0) in vec4 inPos;
layout (location = 2) in vec3 inColor;

layout (binding = 0) uniform UBO
{
    mat4 projection;
    mat4 model;
} ubo;

layout (location = 0) out vec3 outColor;

void main()
{
    outColor = inColor;
    gl_Position = ubo.projection * ubo.model * inPos;
}
它不需要 normal,也不需要 light vector,因为线框渲染不做光照。
fragment shader 也很直接:
glsl
outFragColor.rgb = inColor * 1.5;所以 wireframe 效果来自两个层面:
- Vulkan rasterizer 使用
VK_POLYGON_MODE_LINE。 - shader 只做简单顶点颜色输出。
13. Device Feature:fillModeNonSolid 和 wideLines
这个示例启用了两个和线框相关的设备特性。
cpp
void getEnabledFeatures()
{
    if (deviceFeatures.fillModeNonSolid) {
        enabledFeatures.fillModeNonSolid = VK_TRUE;
    }

    if (deviceFeatures.wideLines) {
        enabledFeatures.wideLines = VK_TRUE;
    }
}
fillModeNonSolid 用于支持:
cpp
VK_POLYGON_MODE_LINE没有它,就不能使用 wireframe polygon mode。
wideLines 用于支持大于 1.0 的线宽:
cpp
if (enabledFeatures.wideLines) {
    vkCmdSetLineWidth(cmdBuffer, 2.0f);
}
如果设备不支持 wide lines,线宽就只能保持默认的 1.0。
这段代码非常适合说明 Vulkan 的 feature model:
- 物理设备暴露支持哪些 feature。
- 应用选择自己需要启用哪些 feature。
- logical device 创建时启用这些 feature。
- 后续 command buffer 和 pipeline 才能合法使用相关能力。
Vulkan 不会假设所有 GPU 都支持所有图形特性。应用必须显式处理能力差异。
14. buildCommandBuffer:同一个 render pass 里切换三条 pipeline
最关键的绘制逻辑在 buildCommandBuffer()。
函数首先开始 command buffer:
cpp
VkCommandBufferBeginInfo cmdBufInfo =
    vks::initializers::commandBufferBeginInfo();

VK_CHECK_RESULT(vkBeginCommandBuffer(cmdBuffer, &cmdBufInfo));
然后开始 render pass:
cpp
vkCmdBeginRenderPass(
    cmdBuffer,
    &renderPassBeginInfo,
    VK_SUBPASS_CONTENTS_INLINE);
这个 render pass 覆盖完整 framebuffer:
cpp
renderPassBeginInfo.renderArea.extent.width = width;
renderPassBeginInfo.renderArea.extent.height = height;
接着设置完整窗口的初始 viewport 和 scissor:
cpp
VkViewport viewport =
    vks::initializers::viewport(
        (float)width,
        (float)height,
        0.0f,
        1.0f);

vkCmdSetViewport(cmdBuffer, 0, 1, &viewport);

VkRect2D scissor =
    vks::initializers::rect2D(width, height, 0, 0);

vkCmdSetScissor(cmdBuffer, 0, 1, &scissor);
然后绑定 descriptor set:
cpp
vkCmdBindDescriptorSets(
    cmdBuffer,
    VK_PIPELINE_BIND_POINT_GRAPHICS,
    pipelineLayout,
    0,
    1,
    &descriptorSets[currentFrame],
    0,
    nullptr);
再绑定模型的 vertex/index buffer:
cpp
scene.bindBuffers(cmdBuffer);这一步非常重要:模型 buffer 只绑定一次,后面三次绘制都复用它。
14.1 左侧:Phong
左侧 viewport 宽度是窗口三分之一:
cpp
viewport.width = (float)width / 3.0f;
vkCmdSetViewport(cmdBuffer, 0, 1, &viewport);
然后绑定 Phong pipeline:
cpp
vkCmdBindPipeline(
    cmdBuffer,
    VK_PIPELINE_BIND_POINT_GRAPHICS,
    pipelines.phong);
设置线宽为 1.0:
cpp
vkCmdSetLineWidth(cmdBuffer, 1.0f);最后绘制模型:
cpp
scene.draw(cmdBuffer);14.2 中间:Toon
中间 viewport 的 x 偏移是三分之一窗口宽度:
cpp
viewport.x = (float)width / 3.0f;
vkCmdSetViewport(cmdBuffer, 0, 1, &viewport);
绑定 Toon pipeline:
cpp
vkCmdBindPipeline(
    cmdBuffer,
    VK_PIPELINE_BIND_POINT_GRAPHICS,
    pipelines.toon);
如果设备支持 wide lines,则设置线宽为 2.0:
cpp
if (enabledFeatures.wideLines) {
    vkCmdSetLineWidth(cmdBuffer, 2.0f);
}
然后再次绘制同一个模型:
cpp
scene.draw(cmdBuffer);这里的 scene.draw(cmdBuffer) 和左侧调用的是同一个函数、同一份 buffer、同一份 descriptor。只是当前绑定的 pipeline 变成了 Toon,因此 fragment shader 输出完全不同的视觉结果。
14.3 右侧:Wireframe
右侧 viewport 的 x 偏移是三分之二窗口宽度:
cpp
viewport.x = (float)width / 3.0f + (float)width / 3.0f;
vkCmdSetViewport(cmdBuffer, 0, 1, &viewport);
只有设备支持 fillModeNonSolid 时才绘制:
cpp
if (enabledFeatures.fillModeNonSolid) {
    vkCmdBindPipeline(
        cmdBuffer,
        VK_PIPELINE_BIND_POINT_GRAPHICS,
        pipelines.wireframe);

    scene.draw(cmdBuffer);
}
然后绘制 UI,结束 render pass,结束 command buffer:
cpp
drawUI(cmdBuffer);

vkCmdEndRenderPass(cmdBuffer);
VK_CHECK_RESULT(vkEndCommandBuffer(cmdBuffer));
把三段绘制合起来看,命令流本质上是:
text
Begin render pass
  Bind descriptor set
  Bind scene vertex/index buffers

  Set viewport: left third
  Bind pipeline: Phong
  Draw scene

  Set viewport: middle third
  Bind pipeline: Toon
  Draw scene

  Set viewport: right third
  Bind pipeline: Wireframe
  Draw scene

  Draw UI
End render pass
这就是"在一个 render pass 中使用多条 pipeline"的完整过程。
15. 为什么只改 viewport,不改 scissor
示例最开始把 scissor 设置成完整窗口:
cpp
VkRect2D scissor = vks::initializers::rect2D(width, height, 0, 0);
vkCmdSetScissor(cmdBuffer, 0, 1, &scissor);
后面只修改 viewport,不再修改 scissor。
这是因为 viewport 已经把 NDC 到 framebuffer 的映射限制在三分之一宽度内。每次 draw 的输出都会被映射到当前 viewport 区域。
scissor 仍然是整个窗口,表示不额外裁剪。
如果想更严格,也可以为每个三分之一屏幕设置对应的 scissor。但这个示例里没有必要,因为 viewport 已经完成了横向分屏。
16. 为什么 descriptor 和模型 buffer 可以只绑定一次
在 Vulkan 中,command buffer 维护一组当前绑定状态。绑定 descriptor set、绑定 vertex buffer、绑定 index buffer、绑定 pipeline 都会改变当前状态。
这个示例中:
- 三次绘制使用同一个 descriptor set。
- 三次绘制使用同一个 vertex/index buffer。
- 三次绘制使用同一个 pipeline layout。
- 三次绘制使用同一个 render pass。
所以这些共享状态只需要设置一次。
真正需要变化的是:
- viewport。
- pipeline。
- line width。
因此命令缓冲里只围绕这几个状态做切换。
这也反映了 Vulkan 性能优化中的一个基本原则:把对象按 pipeline、descriptor、buffer 等状态分组,减少不必要的状态切换。
当然,这个示例是教学代码,为了对比三种效果,它故意对同一个模型绘制三遍。真实 renderer 通常会把场景对象排序,尽量减少 pipeline bind 和 descriptor bind 的次数。
17. Render Loop:每帧更新 UBO,然后重新录制命令
每帧渲染函数很短:
cpp
void render()
{
    if (!prepared)
        return;

    prepareFrame();
    updateUniformBuffers();
    buildCommandBuffer();
    submitFrame();
}
prepareFrame() 从 swapchain 获取下一张 image,并准备当前帧上下文。
updateUniformBuffers() 更新当前帧的相机矩阵和光源数据。
buildCommandBuffer() 根据当前 swapchain image 对应的 framebuffer 录制绘制命令。
submitFrame() 提交 command buffer 并 present。
这里每帧都调用 buildCommandBuffer(),是因为示例框架采用了这种直观写法。对于复杂项目,是否每帧重录 command buffer 取决于场景动态程度、CPU 开销、二级命令缓冲组织方式等工程取舍。
这个示例的重点不是 command buffer 复用,而是展示 pipeline 切换和动态 viewport。
18. 资源销毁:pipeline 也是显式生命周期对象
析构函数里销毁了所有自己创建的 Vulkan 对象:
cpp
vkDestroyPipeline(device, pipelines.phong, nullptr);
vkDestroyPipeline(device, pipelines.toon, nullptr);

if (enabledFeatures.fillModeNonSolid) {
    vkDestroyPipeline(device, pipelines.wireframe, nullptr);
}

vkDestroyPipelineLayout(device, pipelineLayout, nullptr);
vkDestroyDescriptorSetLayout(device, descriptorSetLayout, nullptr);

for (auto& buffer : uniformBuffers) {
    buffer.destroy();
}
注意 wireframe pipeline 只有在创建过的情况下才销毁:
cpp
if (enabledFeatures.fillModeNonSolid)这是因为不支持 fillModeNonSolid 的设备上,pipelines.wireframe 不会被创建。
这体现了 Vulkan 对象管理的一贯特点:谁创建,谁销毁;创建条件和销毁条件要匹配。
19. 这个示例真正想教什么
pipelines.cpp 的代码量并不大,但它触及了 Vulkan renderer 的核心组织方式。
19.1 Pipeline 是渲染状态的组合对象
在 Vulkan 中,graphics pipeline 不只是 shader program。它同时包含 shader 和大量固定功能状态。
这个示例中,Phong 和 Toon 的区别主要是 shader;Wireframe 的区别则包括 shader 和 rasterizer polygon mode。三者都自然地表达为三条不同的 pipeline。
19.2 一批 pipeline 可以共享 layout 和 descriptor
三条 pipeline 都使用同一个 descriptor set layout 和 pipeline layout。这样命令缓冲里不需要为每次 pipeline 切换重新绑定 descriptor set。
真实项目中,如果不同材质或不同 pass 能共享资源绑定布局,会让渲染器结构更稳定,也更容易做批处理和排序。
19.3 动态状态可以减少 pipeline 数量
viewport、scissor、line width 被设置为 dynamic state,因此不需要为了三个屏幕区域创建三套 pipeline。
这说明 Vulkan 的 pipeline 设计不是"所有状态都写死",而是"高成本、强相关状态预编译,适合运行时变化的状态保持动态"。
19.4 Feature 查询决定可用渲染路径
Wireframe 不是无条件可用。应用必须检查并启用:
cpp
fillModeNonSolid宽线也不是无条件可用。应用必须检查并启用:
cpp
wideLines这和真实引擎中的 fallback 设计非常接近。高端路径、调试路径、可选视觉特性都应该根据设备能力决定是否启用。
19.5 Pipeline derivative 是一种表达相关性的机制
示例把 Phong 作为 base pipeline,然后从它派生 Toon 和 Wireframe。
这不是现代 Vulkan 项目里唯一的 pipeline 优化手段,但它很好地展示了 Vulkan 如何表达"这些 pipeline 有大量相同状态"。
20. 和真实引擎的关系
如果把这个示例放到真实 renderer 里,可以把它对应到以下概念。
pipelines.phong 类似一个普通 forward shading material pipeline。
pipelines.toon 类似一个风格化渲染材质 pipeline。
pipelines.wireframe 类似一个 editor/debug visualization pipeline。
descriptorSets[currentFrame] 类似全局 frame descriptor,里面放相机矩阵、光源、时间等 per-frame 数据。
scene.bindBuffers(cmdBuffer) 类似绑定 mesh geometry。
scene.draw(cmdBuffer) 类似提交 mesh draw。
三次绘制同一个模型,对应真实引擎里的多 pass 或多 view 绘制。区别在于真实引擎通常会有更多层级:
- frame graph / render graph。
- material system。
- pipeline cache。
- shader permutation 管理。
- descriptor allocator。
- bindless resource table。
- draw batching 和 sorting。
但底层仍然离不开这个示例展示的几个动作:
text
绑定资源
绑定 pipeline
设置动态状态
提交 draw
理解了 pipelines.cpp,再看更复杂的 Vulkan renderer,就会更容易分辨哪些代码是在管理资源,哪些代码是在管理 pipeline,哪些代码只是 draw call 组织。
21. 可以继续改进的地方
作为教学示例,pipelines.cpp 已经很清晰。但如果从工程角度继续扩展,可以考虑几个方向。
第一,加入持久化 pipeline cache。示例使用了框架中的 pipelineCache,但没有围绕磁盘缓存展开。真实项目中可以把 pipeline cache 保存到文件,下次启动时加载,减少 pipeline 创建成本。
第二,把 shader permutation 管理抽象出来。现在三组 shader 路径直接写在 C++ 中:
cpp
pipelines/phong.vert.spv
pipelines/phong.frag.spv
pipelines/toon.vert.spv
pipelines/toon.frag.spv
pipelines/wireframe.vert.spv
pipelines/wireframe.frag.spv
真实项目一般会有 shader registry 或 material description 来统一管理这些组合。
第三,引入更多动态状态扩展。现代 Vulkan 可以通过 VK_EXT_extended_dynamic_state 等扩展把更多状态变成动态状态,从而减少 pipeline permutation 数量。
第四,把 wireframe 作为 debug view 集成进 UI。这个示例只是固定三分屏。实际 editor 中通常会允许用户在 shaded、wireframe、normal、albedo、roughness、depth 等调试视图之间切换。
第五,比较 pipeline derivative 的实际收益。可以在不同 GPU 和驱动上记录 pipeline 创建时间,观察 derivative pipeline 和普通 pipeline 是否有可测量差异。
22. 总结
pipelines.cpp 是一个非常适合用来理解 Vulkan graphics pipeline 的示例。
它通过一个模型、三条 pipeline、三个 viewport,把 Vulkan 中几个核心概念串了起来:
VkPipeline是 shader 和固定功能状态的组合。- 不同视觉效果通常对应不同 graphics pipeline。
- 多条 pipeline 可以共享 descriptor set layout 和 pipeline layout。
- viewport、scissor、line width 可以作为动态状态在 command buffer 中修改。
- 同一个 render pass 中可以多次切换 pipeline 并提交 draw。
- wireframe 这类能力需要查询并启用设备 feature。
- pipeline derivative 可以表达 pipeline 之间的继承关系和共享状态。
从代码结构上看,它的核心绘制逻辑可以浓缩成一句话:
text
同一份场景资源绑定一次,然后在三个 viewport 中分别绑定 Phong、Toon、Wireframe pipeline 并绘制三遍。这正是 Vulkan 渲染器的基本工作方式:资源、状态和命令都被显式拆开,应用负责把它们组织成清晰、可预测、可优化的绘制流程。