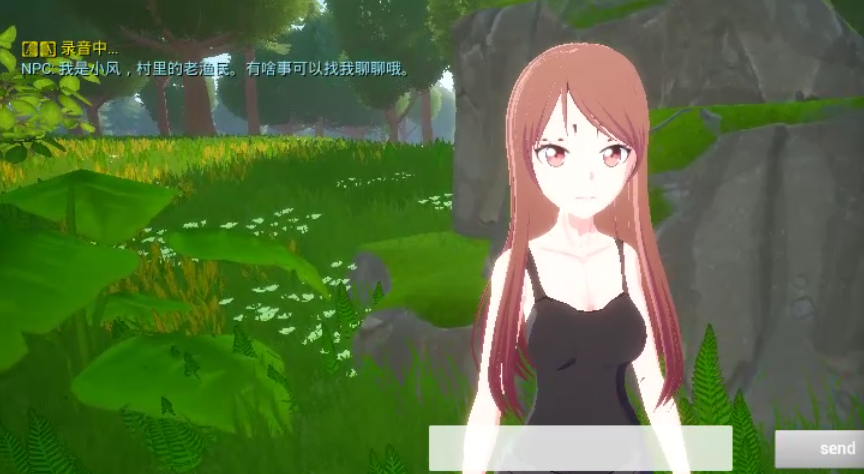
UE4 本地 LLM 语音对话 + 口型同步系统 2.0
系列文章:1.0 文字对话版
前言
上一篇文章介绍了如何在 UE4.27 中接入本地 LLM 实现 NPC 文字对话。本篇在此基础上,新增完整的语音链路:
玩家说话 → 离线识别文字 → LLM 生成回复 → TTS 合成语音 → 口型同步播放整套系统仍然完全本地运行,无需联网。新增模块:
| 模块 | 技术选型 | 特点 |
|---|---|---|
| 语音识别(ASR) | faster-whisper base | 离线,中文识别准确,CPU int8 推理 |
| 语音合成(TTS) | edge-tts + ffmpeg | 微软神经网络 TTS,音质接近真人 |
| 口型同步 | MorphTarget 时间线 | 音素映射关键帧,Lua Tick 驱动 |
系统架构
[玩家按住 V 键]
      │
      ▼
服务端麦克风采集(Python sounddevice)
      │
[松开 V 键]
      │
      ▼
Whisper 离线语音识别(faster-whisper base)
      │  {"text": "你好"}
      ▼
Ollama 本地 LLM(qwen2.5:7b)
      │  {"content": "你好!有什么可以帮你?"}
      ▼
edge-tts 语音合成 + 音素时间线生成
      │  {wav_base64, phonemes: [{time, morph}, ...]}
      ▼
UE4 播放音频 + ReceiveTick 驱动 MorphTarget
核心设计思路:录音不在 UE4 端做。
UE4 的 AudioCapture 模块在不同引擎版本间接口差异大(FAudioCapture::OpenCaptureStream 的 TFunction 重载 vs IAudioCaptureCallback 接口),链接错误难以解决。改为让 Python 服务端负责录音,UE4 只发 HTTP 信号(start/stop),彻底规避兼容问题。
服务端实现
1. 语音识别(ASR)
安装依赖:
bash
pip install faster-whisper numpy python-multipart sounddevice核心实现(asr_service.py):
python
from faster_whisper import WhisperModel
import numpy as np, struct

_model = None

def get_model():
    global _model
    if _model is None:
        print("[ASR] 加载 Whisper base 模型(首次约 150MB)...")
        _model = WhisperModel("base", device="cpu", compute_type="int8")
    return _model

def resample(audio, src_rate, dst_rate=16000):
    """线性插值重采样,不依赖 scipy"""
    if src_rate == dst_rate:
        return audio
    new_len = int(len(audio) * dst_rate / src_rate)
    idx = np.linspace(0, len(audio) - 1, new_len)
    left = np.floor(idx).astype(int)
    right = np.minimum(left + 1, len(audio) - 1)
    return audio[left] * (1 - idx + left) + audio[right] * (idx - left)

def transcribe_pcm(pcm_bytes: bytes, sample_rate: int = 16000) -> str:
    audio = np.frombuffer(pcm_bytes, dtype=np.int16).astype(np.float32) / 32768.0
    if sample_rate != 16000:
        audio = resample(audio, sample_rate)
    segs, _ = get_model().transcribe(
        audio, language="zh", beam_size=1, vad_filter=True,
        vad_parameters={"min_silence_duration_ms": 300}
    )
    return "".join(s.text for s in segs).strip()
FastAPI 端点(两步式,避免实时流的复杂性):
python
import threading, numpy as np

_asr_recording = False
_asr_frames = []
_ASR_SAMPLE_RATE = 16000

def _record_worker():
    import sounddevice as sd
    global _asr_frames
    _asr_frames = []
    def cb(indata, *_):
        if _asr_recording:
            _asr_frames.append(indata.copy())
    with sd.InputStream(samplerate=_ASR_SAMPLE_RATE, channels=1,
                        dtype='float32', callback=cb):
        while _asr_recording:
            import time; time.sleep(0.05)

@app.post("/v1/asr/start")
async def asr_start():
    global _asr_recording, _asr_thread
    _asr_recording = True
    _asr_thread = threading.Thread(target=_record_worker, daemon=True)
    _asr_thread.start()
    return {"status": "recording"}

@app.post("/v1/asr/stop")
async def asr_stop():
    global _asr_recording, _asr_frames
    _asr_recording = False
    _asr_thread.join(timeout=1.0)

    audio = np.concatenate(_asr_frames).flatten()
    pcm = (audio * 32767).astype(np.int16).tobytes()

    loop = asyncio.get_event_loop()
    text = await loop.run_in_executor(
        None, lambda: transcribe_pcm(pcm, _ASR_SAMPLE_RATE)
    )
    return {"text": text, "language": "zh"}
注意 :识别在线程池里执行(
run_in_executor),不阻塞事件循环,避免 UE4 端 HTTP 超时。
服务启动时预加载 Whisper 模型,避免第一次请求时 30 秒冷启动:
python
if __name__ == "__main__":
    from asr_service import get_model
    get_model()   # 预热,约 5-15 秒
    uvicorn.run(app, host="0.0.0.0", port=18080)
2. 语音合成 + 口型时间线(TTS)
安装:
bash
pip install edge-tts
# 还需要系统安装 ffmpeg(用于 mp3→wav 转换)
TTS 合成(edge-tts → ffmpeg → WAV):
python
async def _synthesize_edge_tts(text, voice="zh-CN-XiaoxiaoNeural") -> bytes:
    import edge_tts, tempfile, os, subprocess
    communicate = edge_tts.Communicate(text, voice)
    mp3_path = tempfile.mktemp(suffix=".mp3")
    wav_path = tempfile.mktemp(suffix=".wav")
    await communicate.save(mp3_path)
    subprocess.run(["ffmpeg", "-y", "-i", mp3_path,
                    "-ar", "24000", "-ac", "1", "-f", "wav", wav_path],
                   capture_output=True, timeout=15)
    data = open(wav_path, "rb").read()
    os.unlink(mp3_path); os.unlink(wav_path)
    return data
口型时间线生成(中文音节 → MorphTarget 权重):
python
# 音素 → MorphTarget 权重(适配动漫角色 Mouth_Wide / Narrow / Grimace / Smile)
_PHONEME_TABLE = {
    "a": {"Mouth_Wide": 1.0, "Mouth_Narrow": 0.0, "Mouth_Grimace": 0.0, "Mouth_Smile": 0.15},
    "o": {"Mouth_Wide": 0.3, "Mouth_Narrow": 1.0, "Mouth_Grimace": 0.0, "Mouth_Smile": 0.0 },
    "e": {"Mouth_Wide": 0.7, "Mouth_Narrow": 0.0, "Mouth_Grimace": 0.4, "Mouth_Smile": 0.2 },
    "i": {"Mouth_Wide": 0.15,"Mouth_Narrow": 0.0, "Mouth_Grimace": 1.0, "Mouth_Smile": 0.7 },
    "u": {"Mouth_Wide": 0.0, "Mouth_Narrow": 1.0, "Mouth_Grimace": 0.0, "Mouth_Smile": 0.0 },
    # b/p/m → 闭嘴,s/sh/n/l → 各自形态...
    "rest": {"Mouth_Wide": 0.0, "Mouth_Narrow": 0.0, "Mouth_Grimace": 0.0, "Mouth_Smile": 0.0},
}

def _build_timeline(text, cps=3.5):
    """字间不归零,只在句末归零,让嘴巴连续开合而非每字一闭"""
    timeline = []
    for i, ch in enumerate(text):
        ph = _char_to_phoneme(ch)
        timeline.append({"time": round(i / cps, 3),
                         "morph": _PHONEME_TABLE.get(ph, _PHONEME_TABLE["a"])})
    timeline.append({"time": round(len(text) / cps, 3), "morph": _PHONEME_TABLE["rest"]})
    return timeline
/v1/tts 端点返回格式:
json
{
  "wav_base64": "<base64 WAV>",
  "duration_ms": 3000,
  "phonemes": [
    {"time": 0.0, "morph": {"Mouth_Wide": 1.0, ...}},
    {"time": 0.286, "morph": {"Mouth_Wide": 0.3, ...}},
    ...
  ]
}
UE4 口型设置规范
在接入口型同步之前,角色模型本身需要满足一定的制作规范。本节介绍从骨骼/BlendShape 制作到 UE4 导入再到运行时驱动的完整流程。
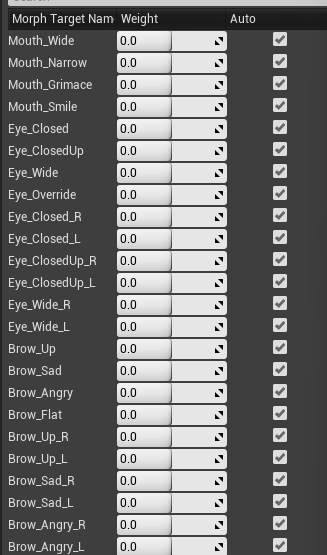
1. MorphTarget 命名规范
UE4 口型同步依赖 MorphTarget(BlendShape) 驱动嘴部变形,命名需要与代码约定一致。
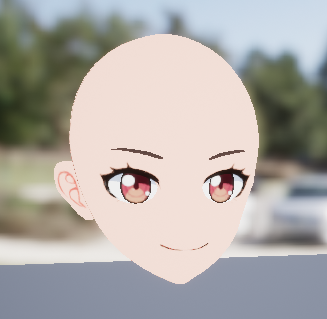
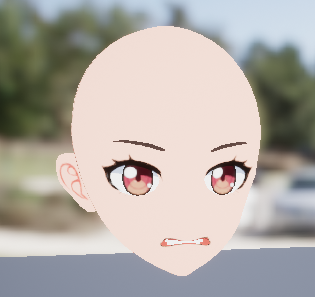
本项目使用的四个基础口型:
| MorphTarget 名称 | 对应口形 | 适用音素 |
|---|---|---|
Mouth_Wide |
嘴巴横向张开(啊) | a、e |
Mouth_Narrow |
嘴巴缩成圆形(哦/乌) | o、u |
Mouth_Grimace |
嘴角向后咧(一) | i、e |
Mouth_Smile |
嘴角上扬(微笑) | i 辅助 |
命名要求:
- 大小写严格匹配(UE4 的
FName区分大小写) - 名称中不能有空格,用下划线分隔
- 不同 LOD 的 MorphTarget 名称必须一致
提示 :如果你的角色来自其他来源(如 VRoid、ReadyPlayerMe),BlendShape 名称可能不同(如
viseme_aa、Fcl_MTH_A),需要在_PHONEME_TABLE里改名对应,或在 C++ 里做一层映射。
2. 骨骼与网格制作规范
最小可用方案(纯 MorphTarget,无骨骼驱动嘴部):
- 嘴部区域不绑定专用骨骼,完全由 MorphTarget 控制变形
- 优点:简单,AnimBP 不会干扰嘴部;缺点:无法做舌头、牙齿等精细表情
标准动画角色方案(骨骼 + MorphTarget 混合):
- 嘴部有
jaw(下颌)、lip_upper、lip_lower等骨骼 - MorphTarget 叠加在骨骼动画之上,控制嘴形细节
- UE4 中通过 AnimBP 的
Modify Bone节点配合 MorphTarget 权重使用
本项目角色(skl_AnimeM_Head_0)的结构:
Head
└── Jaw(下颌骨)
    └── Lip_lower
└── Lip_upper
MorphTargets: Mouth_Wide / Mouth_Narrow / Mouth_Grimace / Mouth_Smile
3. DCC 软件导出设置
Blender 导出 FBX(含 BlendShape):
导出设置:
✅ Armature → 勾选 "Add Leaf Bones" 关闭(避免多余骨骼)
✅ Mesh → 勾选 "Smoothing: Face"
✅ Geometry → 勾选 "Apply Modifiers"(但 ShapeKey 对象不能有 Armature modifier 被 Apply)
✅ Animation → 不需要时关闭,避免导入多余 clip
Shape Keys → FBX 会自动将其转为 BlendShape,UE4 识别为 MorphTarget
Maya / 3ds Max:
- Blend Shape / Morpher 修改器正常导出 FBX 即可
- 命名在 DCC 软件里改好,导入 UE4 后名称保持一致
4. UE4 导入设置
将带 BlendShape 的 FBX 拖入 UE4 内容浏览器,导入对话框关键选项:
| 选项 | 推荐设置 | 说明 |
|---|---|---|
| Import Morph Targets | ✅ 开启 | 必须勾选,否则 MorphTarget 不导入 |
| Import Animations | 按需 | 若只导角色网格可关闭 |
| Normal Import Method | Import Normals | 保留原始法线,避免变形时出现光照错误 |
| Create Physics Asset | 按需 | 口型组件不依赖物理 |
导入后在 SkeletalMesh 编辑器 里验证:
SkeletalMesh 编辑器 → 左侧面板 → Morph Target Preview
→ 拖动滑条,确认 Mouth_Wide / Mouth_Narrow / Mouth_Grimace / Mouth_Smile
  变形效果正确,且不影响其他部位(如眼睛、头发)
5. 确认 MorphTarget 挂载在正确的网格上
一个角色可能由多个 SkeletalMeshComponent 组成(头、身体、头发分开),MorphTarget 必须在同一个 Component 上 才能被 SetMorphTarget 驱动。
用以下 Lua 诊断代码确认:
lua
-- 放在 ReceiveBeginPlay 里运行一次,打印所有网格和其 MorphTarget
local meshClass = UE.UClass.Load("/Script/Engine.SkeletalMeshComponent")
local meshComps = self:K2_GetComponentsByClass(meshClass)
for i = 1, meshComps:Num() do
    local mesh = meshComps:Get(i)
    local sk = mesh.SkeletalMesh
    print(string.format("网格[%d] %s  资产=%s", i, mesh:GetName(),
          sk and sk:GetName() or "nil"))
    if sk and sk.MorphTargets then
        for j = 1, sk.MorphTargets:Num() do
            local mt = sk.MorphTargets:Get(j)
            if mt then print("  MorphTarget: " .. mt:GetName()) end
        end
    end
end
输出示例(本项目角色):
网格[1] CharacterMesh0  资产=skl_AnimeM_Head_0
  MorphTarget: Mouth_Wide
  MorphTarget: Mouth_Narrow
  MorphTarget: Mouth_Grimace
  MorphTarget: Mouth_Smile
网格[2] hair_mesh  资产=skl_AnimeHair_F2
  (无 MorphTarget)
找到后缓存该 Component,只对它调用 SetMorphTarget:
lua
-- 按名字找到目标网格
if mesh:GetName() == "CharacterMesh0" then
    self.HeadMesh = mesh
end
6. AnimBP 兼容性
AnimBP 每帧输出 Pose 时会重置所有 MorphTarget 到动画曲线值(默认为 0),导致代码设置的口型权重被覆盖。
处理方法一(推荐):Lua Tick 最后写入
Lua 的 ReceiveTick 执行时机晚于 AnimBP Pose 更新,在这里调用 SetMorphTarget 是"最后写入者",不会被覆盖:
lua
function M:ReceiveTick(DeltaTime)
    if self.HeadMesh and self.TTSComp then
        -- ApplyMorphsTo 内部遍历 CurrentMorphWeights 调用 SetMorphTarget
        pcall(self.TTSComp.ApplyMorphsTo, self.TTSComp, self.HeadMesh)
    end
end
处理方法二:AnimBP 里驱动 MorphTarget Curve
在 AnimBP 的 AnimGraph 中添加 Modify Curve 节点,把口型权重通过动画曲线变量驱动,AnimBP 输出时就包含了正确的 MorphTarget 权重,不存在覆盖问题。适合纯 C++ 或纯蓝图项目。
处理方法三:关闭 AnimBP 对嘴部的控制
在 AnimBP 的 AnimGraph 末尾加 Layered Blend Per Bone 节点,把嘴部骨骼链从动画混合中排除,让 MorphTarget 不受 Pose 影响。
本项目采用方法一,最简单,不需要改 AnimBP。
UE4 端实现
新增 LipSync 插件
插件结构:
Plugins/LipSync/
├── LipSync.uplugin
└── Source/LipSync/
    ├── Public/
    │   ├── ASRComponent.h         # 语音识别组件
    │   └── TTSLipSyncComponent.h  # TTS + 口型同步组件
    └── Private/
        ├── ASRComponent.cpp
        ├── TTSLipSyncComponent.cpp
└── LipSyncModule.cppLipSync.Build.cs(只依赖 Http/Json/AudioMixer,无 AudioCapture):
csharp
PublicDependencyModuleNames.AddRange(new string[] {
    "Core", "CoreUObject", "Engine",
    "Http", "Json", "JsonUtilities",
    "AudioMixer",
});
ASRComponent
设计极简:只发 HTTP 信号,不做任何音频处理。
cpp
// ASRComponent.h
DECLARE_DYNAMIC_MULTICAST_DELEGATE_OneParam(FOnSpeechRecognized, const FString&, RecognizedText);

UCLASS(ClassGroup=(Custom), Blueprintable, meta=(BlueprintSpawnableComponent))
class LIPSYNC_API UASRComponent : public UActorComponent
{
    GENERATED_BODY()
public:
    UPROPERTY(EditAnywhere, BlueprintReadWrite) FString ApiBaseUrl = "http://localhost:18080";

    UFUNCTION(BlueprintCallable) void StartRecording();   // POST /v1/asr/start
    UFUNCTION(BlueprintCallable) void StopAndRecognize(); // POST /v1/asr/stop → 触发 OnSpeechRecognized

    UPROPERTY(BlueprintAssignable) FOnSpeechRecognized OnSpeechRecognized;
};
TTSLipSyncComponent
负责 TTS 请求、音频播放、口型权重插值,但不直接调用 SetMorphTarget:
cpp
// TTSLipSyncComponent.h(关键接口)
UFUNCTION(BlueprintCallable) void Speak(const FString& Text);
UFUNCTION(BlueprintCallable) void ApplyMorphsTo(USkeletalMeshComponent* Mesh);
UFUNCTION(BlueprintPure)     bool IsSpeaking() const;

// 当前插值后的口型权重,每帧由 Lua 读取
UPROPERTY(BlueprintReadOnly) TMap<FName, float> CurrentMorphWeights;
ApplyMorphsTo 的设计是关键:
cpp
void UTTSLipSyncComponent::ApplyMorphsTo(USkeletalMeshComponent* Mesh)
{
    if (!Mesh) return;
    for (auto& Pair : CurrentMorphWeights)
        Mesh->SetMorphTarget(Pair.Key, Pair.Value, false);
}
为什么要从 Lua 调 ApplyMorphsTo?
这是本次实现中最重要的设计决策。
问题 :SetMorphTarget 在 C++ 组件的 TickGroup = TG_PostUpdateWork 里调用,理论上在 AnimBP 之后,但实际测试发现口型始终不动。
诊断 :从 Lua 的 ReceiveTick 直接对网格调用 SetMorphTarget("Mouth_Wide", 1.0),口型立刻响应。
结论 :Lua 的 ReceiveTick 执行时机晚于 C++ 组件的 PostUpdateWork,是真正的"最后写入者",不会被 AnimBP 覆盖。
解决方案 :C++ 组件只负责计算 CurrentMorphWeights,实际 SetMorphTarget 调用由 Lua ReceiveTick 发起:
lua
function M:ReceiveTick(DeltaTime)
    -- ... 按键检测 ...
    if self.HeadMesh and self.TTSComp then
        pcall(self.TTSComp.ApplyMorphsTo, self.TTSComp, self.HeadMesh)
    end
end
UnLua 串联整条链路
完整的 ThirdPersonCharacter.lua:
lua
---@type ACharacter
local M = UnLua.Class()

local VKey = UE.FKey()
VKey.KeyName = "V"   -- UE.FKey("V") 无法正确设置 KeyName,需手动赋字段

function M:ReceiveBeginPlay()
    -- 按模块路径加载类(插件类不会自动注册到 UE 全局表)
    self.ASRComp = self:GetComponentByClass(
        UE.UClass.Load("/Script/LipSync.ASRComponent"))
    self.LLMComp = self:GetComponentByClass(
        UE.UClass.Load("/Script/ProjectChat.LLMChatComponent"))
    self.TTSComp = self:GetComponentByClass(
        UE.UClass.Load("/Script/LipSync.TTSLipSyncComponent"))

    -- 缓存头部网格(含 MorphTarget 的那个)
    local meshClass = UE.UClass.Load("/Script/Engine.SkeletalMeshComponent")
    for i = 1, self:K2_GetComponentsByClass(meshClass):Num() do
        local m = self:K2_GetComponentsByClass(meshClass):Get(i)
        if m:GetName() == "CharacterMesh0" then
            self.HeadMesh = m; break
        end
    end

    -- 串联事件:ASR → LLM → TTS
    self.ASRComp.OnSpeechRecognized:Add(self, self.OnSpeechRecognized)
    self.LLMComp.OnResponseReceived:Add(self, self.OnLLMResponse)

    -- 播放待机动画
    local idle = UE.UAnimationAsset.Load(
        "/Game/AnimeCharacters/Animations/Locomotion/a_manM_idle")
    if self.HeadMesh and idle then
        self.HeadMesh:PlayAnimation(idle, true)
    end

    self.bVKeyDown = false
    print("[Voice] 初始化完成,按住 V 开始说话")
end

function M:ReceiveTick(DeltaTime)
    -- V 键检测
    local PC = self:GetController()
    if PC then
        local isDown = PC:IsInputKeyDown(VKey)
        if isDown and not self.bVKeyDown then
            self.bVKeyDown = true
            if not self.TTSComp:IsSpeaking() then
                self.ASRComp:StartRecording()
            end
        elseif not isDown and self.bVKeyDown then
            self.bVKeyDown = false
            self.ASRComp:StopAndRecognize()
        end
    end

    -- 每帧驱动口型(Lua Tick 晚于 AnimBP,不会被覆盖)
    if self.HeadMesh and self.TTSComp then
        pcall(self.TTSComp.ApplyMorphsTo, self.TTSComp, self.HeadMesh)
    end
end

function M:OnSpeechRecognized(Text)
    print("[Voice] 识别: " .. Text)
    self.LLMComp:SendMessage(Text)
end

function M:OnLLMResponse(ResponseText)
    print("[Voice] NPC: " .. ResponseText)
    self.TTSComp:Speak(ResponseText)
end

function M:OnSpeakFinished()
    -- 播音结束后口型归零
    if self.HeadMesh then
        for _, name in ipairs({"Mouth_Wide","Mouth_Narrow","Mouth_Grimace","Mouth_Smile"}) do
            self.HeadMesh:SetMorphTarget(name, 0.0, true)
        end
    end
end

return M
一次性 BP 设置 :打开角色 Blueprint → Class Settings → Implemented Interfaces → 添加
UnLuaInterface→ 实现GetModuleName返回"ThirdPersonCPP.ThirdPersonCharacter"。之后所有逻辑改 Lua 即可,不再动蓝图。
效果与性能参考
| 环节 | 典型耗时 |
|---|---|
| Whisper 识别(3秒语音) | 0.8s |
| qwen2.5:7b 生成(50字) | 2s |
| edge-tts 合成 + ffmpeg | 0.5s |
| 口型同步延迟 | < 1帧(16ms) |
首次调用需预热 Whisper 模型(约 10-20 秒),之后常驻内存,响应正常。
快速开始
bash
# 1. 克隆仓库
git clone https://github.com/zhangxuhan/UE4-LocalLLM-Chat.git

# 2. 安装依赖(含 Whisper 模型首次下载 ~150MB)
install_voice.bat

# 3. 启动服务
cd server && python main.py

# 4. UE4 集成
# - 将 ue4/ProjectChat/Plugins/LipSync/ 复制到项目 Plugins/
# - 添加 ASRComponent、LLMChatComponent、TTSLipSyncComponent 到角色
# - 绑定 UnLuaInterface,GetModuleName 返回 "ThirdPersonCPP.ThirdPersonCharacter"
# - 编译,Play,按住 V 说话
总结
v2.0 在 v1.0 的文字对话基础上完整实现了语音交互链路,核心技术要点:
- 服务端录音:规避 UE4 AudioCapture 跨版本兼容问题
- Lua Tick 驱动口型:解决 AnimBP 覆盖 SetMorphTarget 的时序问题
- 音素时间线:简单查表实现中文口型同步,无需复杂 G2P 工具
- 全 Lua 业务逻辑:热重载,无需反复编译蓝图
项目地址:github.com/zhangxuhan/UE4-LocalLLM-Chat
如有问题欢迎在评论区交流或提 Issue。