一、线程基础
1、线程的理解
- 每个用户进程有自己的地址空间
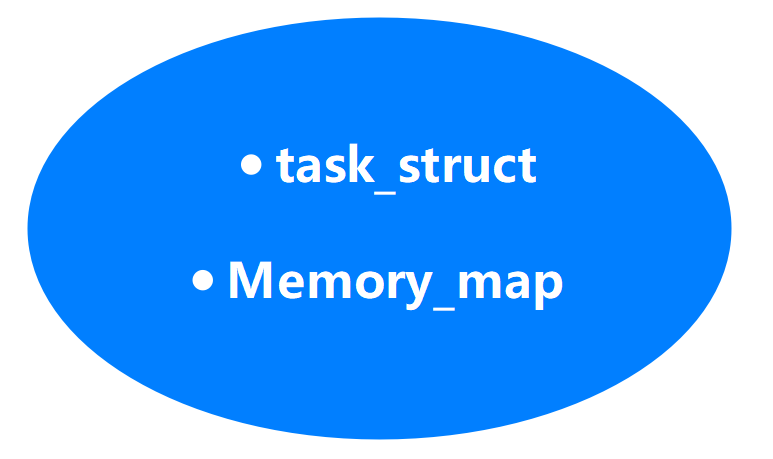
- 系统为每个用户进程创建一个 task_struct来描述该进程
- 该结构体中包含了一个指针指向该进程的虚拟地址空间映射表
- 实际上task_struct 和地址空间映射表一起用来表示一个进程
- 在32位系统当中每一个进程可以访问 0-4G 的地址空间,如果这个地址在物理不存在则用mmu去虚拟一个地址。
- 由于进程的地址空间是私有的,因此在进程间切换时,系统开销比较大。
- 为了提高系统的性能,许多操作系统规范里引入了轻量级进程的概念,也被称为线程
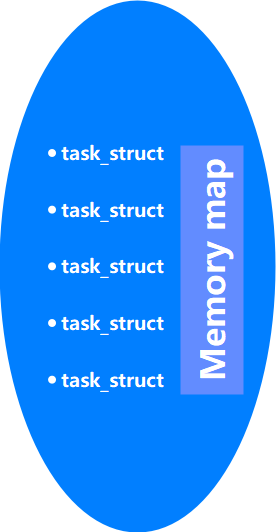
- 在同一个进程中创建的线程共享该进程的地址空间
- Linux里同样用task_struct来描述一个线程。线程和进程都参与统一的调度
- 通常线程指的是共享相同地址空间的多个任务
2、进程与线程的对比
- 进程就相当于5个人占用5个房间
- 线程就相当于5个人占用1个房间
- 线程的优点: 更加节省内存 ,大大提高了任务切换的效率 ,线程间可以使用全局变量进行通信。
- 线程的缺点: 安全性与稳定性不如进程,有一个线程崩溃后, 可能就会造成整个进程崩溃。
- 进程的优点: 安全性与稳定性比线程高,1个进程崩溃不会对别的进程照成影响。
- 进程的缺点: 任务切换效率低,进程间通信机制比较比较繁琐,占用内存比线程高。
3、线程库 NPTL
多线程通过第三方的线程库来实现
New POSIX Thread Library (NPTL),是早期Linux Threads的改进,采用1:1的线程模型,显著的提高了运行效率,信号处理效率更高
一个进程中的多个线程共享以下资源:可执行的指令,静态数据,进程中打开的文件描述符,信号处理函数,当前工作目录,用户ID,用户组ID
每个线程私有的资源如下:线程ID (TID),PC(程序计数器)和相关寄存器,堆栈,局部变量,返回地址,错误号 (errno),信号掩码和优先级,执行状态和属性
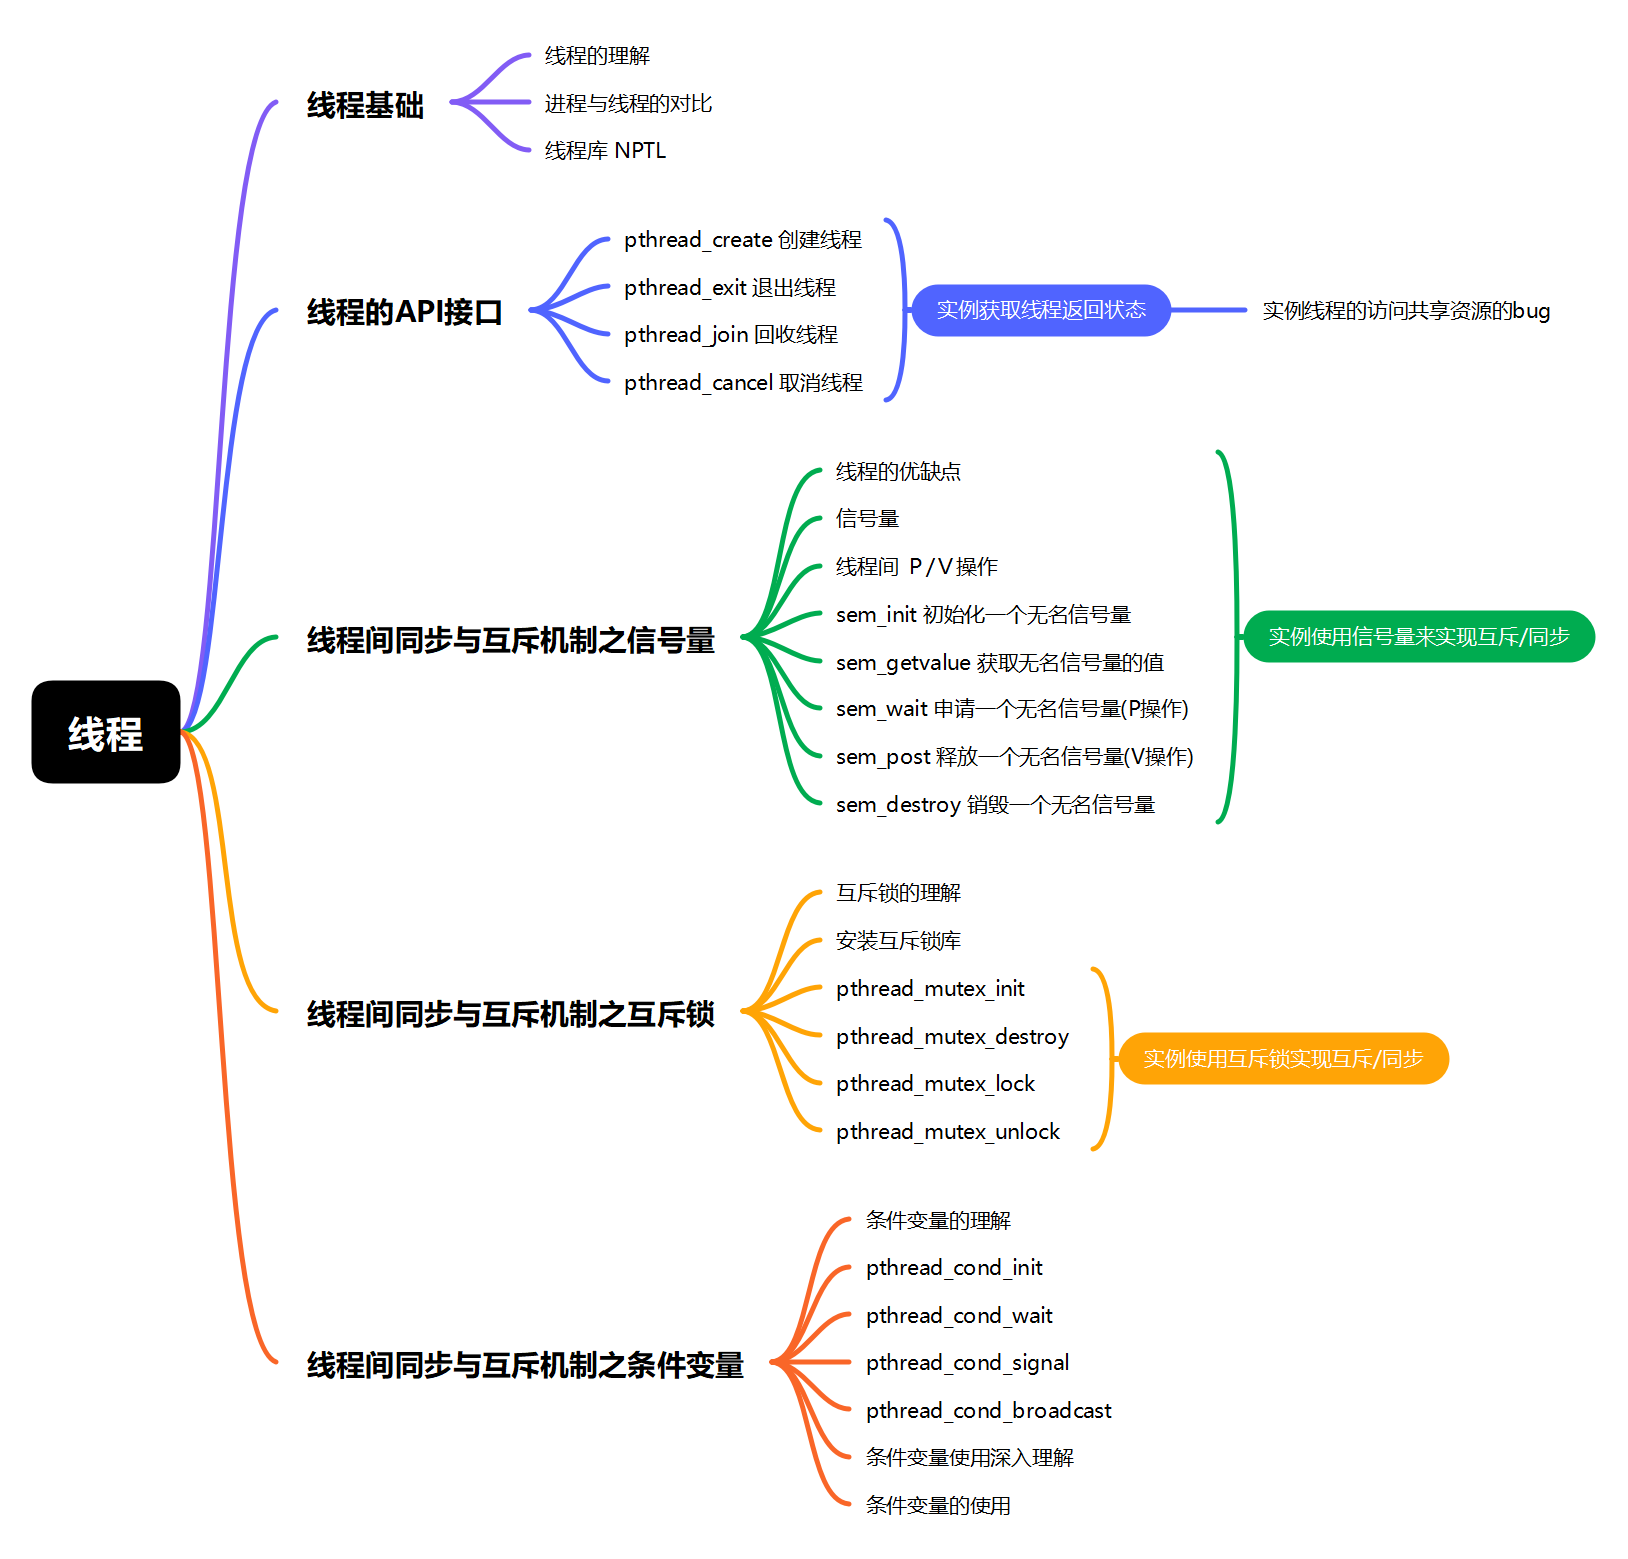
NPTL线程库中提供了如下基本操作:创建线程 pthread_create,回收线程 pthread_join,退出线程 pthread_exit,取消线程 pthread_cancel
线程间同步和互斥机制:信号量、互斥锁、条件变量
二、线程的API接口
1、pthread_create 创建线程
cpp
int pthread_create(pthread_t *thread, const pthread_attr_t *attr, void *(*start_routine) (void *),void* arg);函数功能:创建一个新的线程
函数参数:【thread】,创建线程的线程号 , 和进程号一致 。【attr】,线程的属性 , 一般设置位NULL。【start_routine】,void *(*start_routine) (void *) 从语法的角度上去看, start_routine是一个指针, 一个函数类型的指针, 一个形参为void * 返回值也是void * 类型的函数指针,要创建线程调用的函数,这个函数会在线程创建后自动被调用并运行。【arg】,给线程函数传递的参数
函数返回值:成功返回0,失败返回错误号
cpp
#include <stdio.h>
#include <stdlib.h>
#include <string.h>
#include <unistd.h>
#include <pthread.h>

// 线程函数
void *thread1_func(void *arg)
{
    printf("线程1:arg= %d\n", *((int *)arg)); // 线程1的参数
    while (1)
    {
        printf("thread1_func is running\n");
        sleep(1);
    }
    return NULL;
}

// 线程函数2
void *thread2_func(void *arg)
{
    printf("线程2:arg= %d\n", *((int *)arg)); // 线程2的参数
    while (1)
    {
        printf("thread2_func is running\n");
        sleep(1);
    }
    return NULL;
}

// 线程函数3
void *thread3_func(void *arg)
{
    printf("线程3:arg= %d\n", *((int *)arg)); // 线程3的参数
    while (1)
    {
        printf("thread3_func is running\n");
        sleep(1);
    }
    return NULL;
}

int main(int argc, char const *argv[])
{
    pthread_t tid1; // 线程id1
    pthread_t tid2; // 线程id2
    pthread_t tid3; // 线程id3
    int data1 = 100, data2 = 200, data3 = 300;

    int ret = pthread_create(&tid1, NULL, thread1_func, &data1);
    if (ret != 0)
    {
        perror("pthread_create");
        return -1;
    }
    printf("线程1:tid1= %d\n", (int)tid1); // 线程1的id

    // 创建线程2
    ret = pthread_create(&tid2, NULL, thread2_func, &data2);
    if (ret != 0)
    {
        perror("pthread_create");
        return -1;
    }
    printf("线程2:tid2= %d\n", (int)tid2); // 线程2的id

    // 创建线程3
    ret = pthread_create(&tid3, NULL, thread3_func, &data3);
    if (ret != 0)
    {
        perror("pthread_create");
        return -1;
    }
    printf("线程3:tid3= %d\n", (int)tid3); // 线程3的id

    while (1)
    {
        printf("main thread is running\n");
        sleep(1);
    }

    return 0;
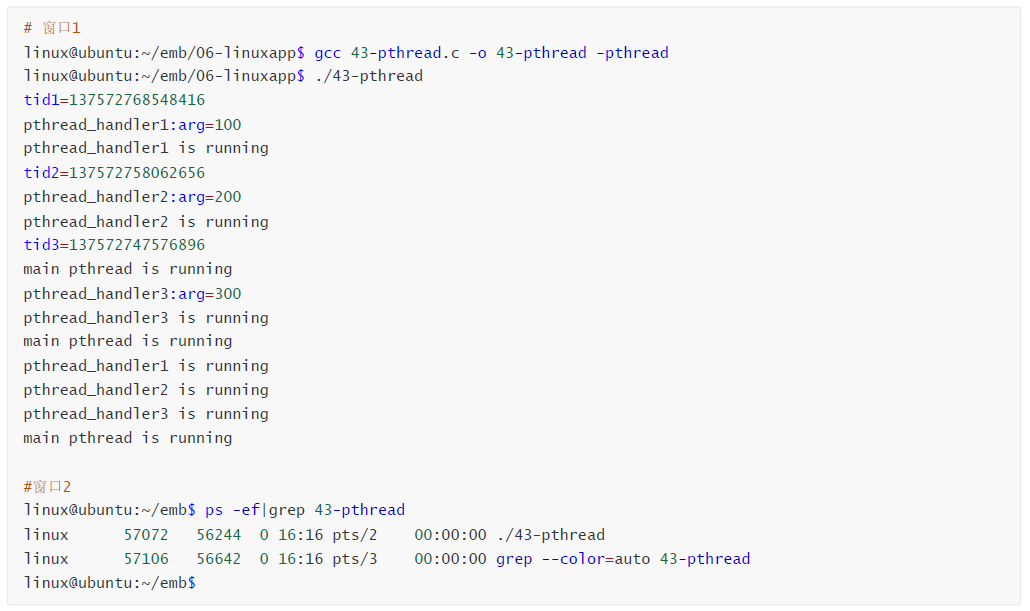
}
2、pthread_exit 退出线程
cpp
void pthread_exit(void *retval);函数功能:结束并返回线程的状态
函数参数:retval,线程要返回的内容
函数返回值:无返回值
3、pthread_join 回收线程
cpp
int pthread_join(pthread_t thread, void **retval);函数功能:回收一个线程
函数参数:thread,要等待线程的tid;retval,线程的返回值
函数返回值:成功返回0,失败返回错误号,On success, pthread_join() returns 0; on error, it returns an error number.
4、pthread_cancel 取消线程
cpp
int pthread_cancel(pthread_t thread);函数功能:取消一个线程
函数参数:thread,要取消的线程号
函数返回值:成功返回0,失败返回错误号,On success, pthread_cancel() returns 0; on error, it returns a nonzero error number.
5、实例获取线程返回状态
cpp
#include <stdio.h>
#include <stdlib.h>
#include <string.h>
#include <unistd.h>
#include <pthread.h>

// 线程函数
void *thread1_func(void *arg)
{
    static int retval = 0;                    // 线程1的返回值
    printf("线程1:arg= %d\n", *((int *)arg)); // 线程1的参数
    printf("thread1_func is running\n");
    sleep(10);
    pthread_exit(&retval);
}

// 线程函数2
void *thread2_func(void *arg)
{
    static int retval = -1;                   // 线程2的返回值
    printf("线程2:arg= %d\n", *((int *)arg)); // 线程2的参数
    printf("thread2_func is running\n");
    sleep(10);
    pthread_exit(&retval);
}

// 线程函数3
void *thread3_func(void *arg)
{
    printf("线程3:arg= %d\n", *((int *)arg)); // 线程3的参数
    while (1)
    {
        printf("thread3_func is running\n");
        sleep(1);
    }
    return NULL;
}

int main(int argc, char const *argv[])
{
    pthread_t tid1; // 线程id1
    pthread_t tid2; // 线程id2
    pthread_t tid3; // 线程id3
    int data1 = 100, data2 = 200, data3 = 300;

    int ret = pthread_create(&tid1, NULL, thread1_func, &data1);
    if (ret != 0)
    {
        perror("pthread_create");
        return -1;
    }

    // 创建线程2
    ret = pthread_create(&tid2, NULL, thread2_func, &data2);
    if (ret != 0)
    {
        perror("pthread_create");
        return -1;
    }

    // 创建线程3
    ret = pthread_create(&tid3, NULL, thread3_func, &data3);
    if (ret != 0)
    {
        perror("pthread_create");
        return -1;
    }
    printf("线程1:tid1= %ld\n", tid1); // 线程1的id
    printf("线程2:tid2= %ld\n", tid2); // 线程2的id
    printf("线程3:tid3= %ld\n", tid3); // 线程3的id

    sleep(5); // 等待5秒
    // 取消线程3
    printf("取消线程3:tid3= %d\n", (int)tid3); // 线程3的id
    ret = pthread_cancel(tid3);
    if (ret != 0)
    {
        perror("pthread_cancel");
        return -1;
    }

    // 回收线程1
    void *retval;
    ret = pthread_join(tid1, &retval);
    if (ret != 0)
    {
        perror("pthread_join");
        return -1;
    }
    printf("线程1的返回值 = %d\n", *((int *)retval)); // 线程1的返回值

    // 回收线程2
    ret = pthread_join(tid2, &retval);
    if (ret != 0)
    {
        perror("pthread_join");
        return -1;
    }
    printf("线程2的返回值 = %d\n", *((int *)retval)); // 线程2的返回值


    while (1)
    {
        printf("main thread is running\n");
        sleep(1);
    }

    return 0;
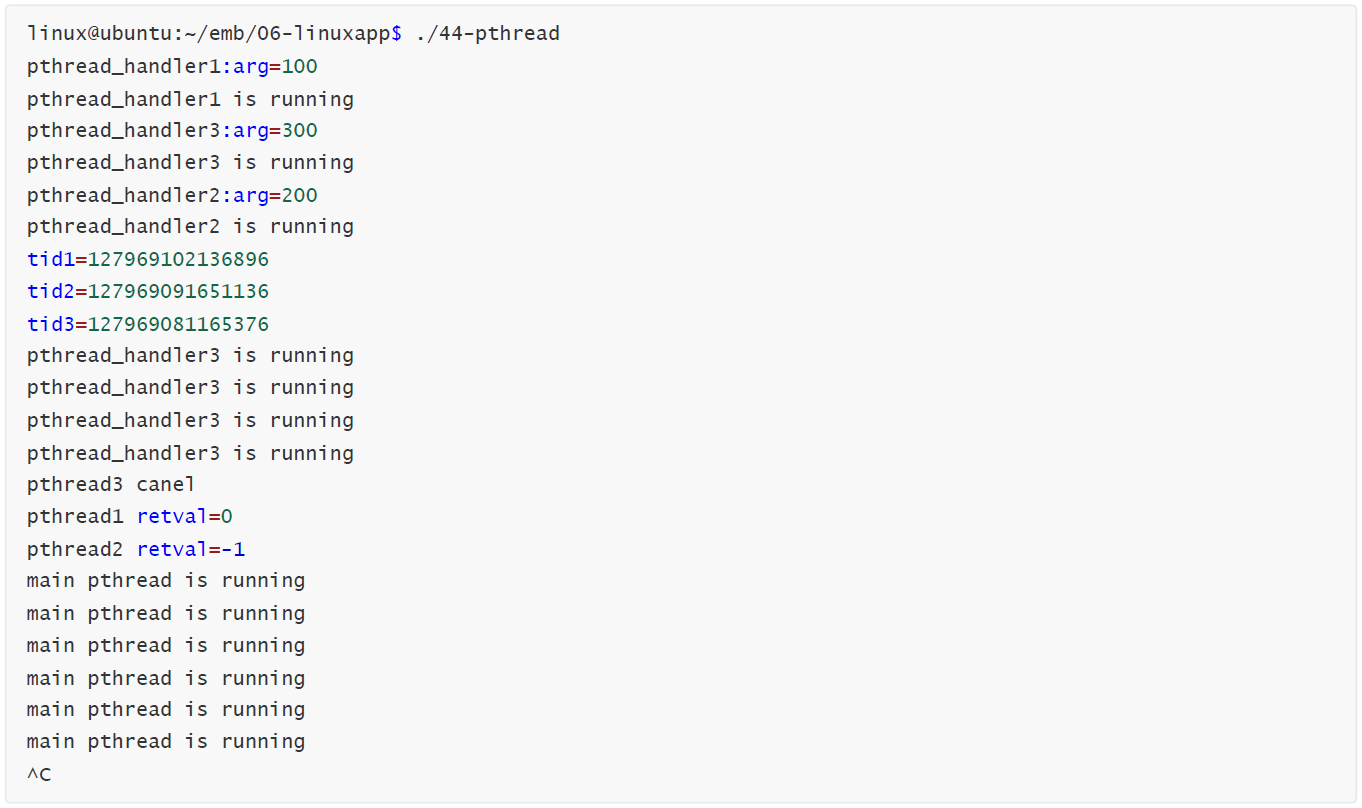
}
8、实例线程的访问共享资源的bug
cpp
#include <stdio.h>
#include <stdlib.h>
#include <string.h>
#include <unistd.h>
#include <pthread.h>

#define NSize   64

char buf[NSize+1]={0};

// 线程函数
void *thread1_func(void *arg)
{
    printf("线程1:arg= %d\n", *((int *)arg)); // 线程1的参数
    while (1)
    {
        memset(buf, 'O', 32);
        usleep(1000); // 1ms
        memset(buf+32, 'O', 32); // 保证最后1个元素为 '\0'
        usleep(1000); // 1ms
    }
    return NULL;
}

// 线程函数2
void *thread2_func(void *arg)
{
    printf("线程2:arg= %d\n", *((int *)arg)); // 线程2的参数
    while (1)
    {
        memset(buf, '-', 32);
        usleep(1000); // 1ms
        memset(buf+32, '-', 32); // 保证最后1个元素为 '\0'
        usleep(1000); // 1ms
    }
    return NULL;
}

// 线程函数3
void *thread3_func(void *arg)
{
    printf("线程3:arg= %d\n", *((int *)arg)); // 线程3的参数
    while (1)
    {
        printf("buf= %s\n", buf); // 线程3的参数
        sleep(1);
    }
    return NULL;
}

int main(int argc, char const *argv[])
{
    pthread_t tid1; // 线程id1
    pthread_t tid2; // 线程id2
    pthread_t tid3; // 线程id3
    int data1 = 100, data2 = 200, data3 = 300;

    int ret = pthread_create(&tid1, NULL, thread1_func, &data1);
    if (ret != 0)
    {
        perror("pthread_create");
        return -1;
    }
    printf("线程1:tid1= %d\n", (int)tid1); // 线程1的id

    // 创建线程2
    ret = pthread_create(&tid2, NULL, thread2_func, &data2);
    if (ret != 0)
    {
        perror("pthread_create");
        return -1;
    }
    printf("线程2:tid2= %d\n", (int)tid2); // 线程2的id

    // 创建线程3
    ret = pthread_create(&tid3, NULL, thread3_func, &data3);
    if (ret != 0)
    {
        perror("pthread_create");
        return -1;
    }
    printf("线程3:tid3= %d\n", (int)tid3); // 线程3的id

    while (1)
    {
        printf("buf= %s\n", buf); // 线程3的参数
        sleep(1);
    }

    return 0;
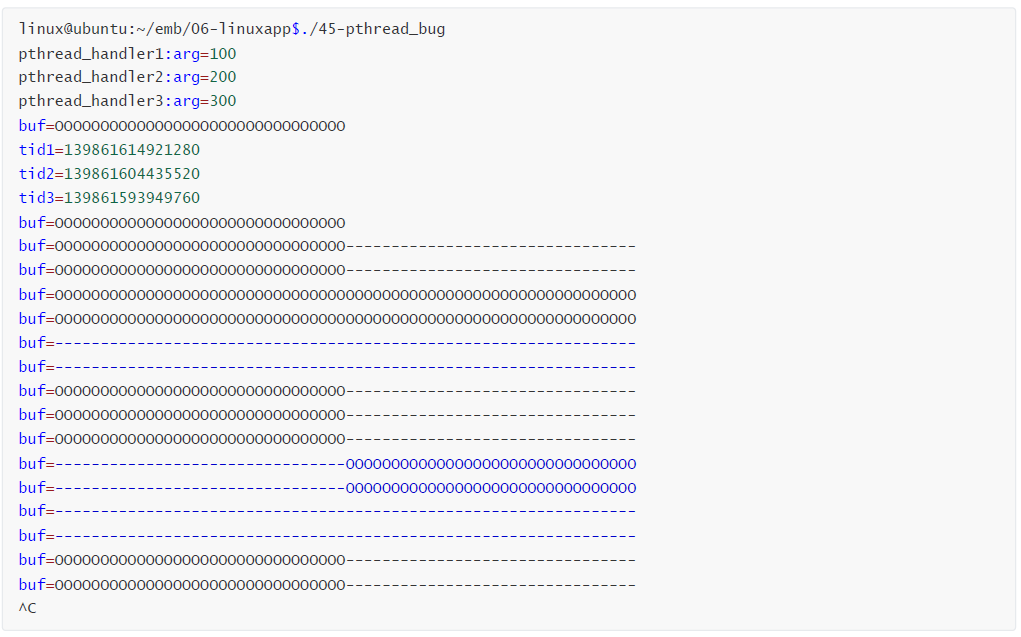
}
三、线程间同步与互斥机制之信号量
1、线程的优缺点
- 多线程共享同一个进程的地址空间
- 优点:线程间很容易进行通信 ,通过全局变量实现数据共享和交换
- 缺点:多个线程同时访问共享对象,时需要引入同步和互斥机制
2、信号量
- 同步(synchronization)指的是多个任务(线程) , 按照约定的顺序相互配合完成一件事情
- 1968年,Edsgar Dijkstra基于信号量的概念 , 提出了一种同步机制。
- 由信号量来决定线程是继续运行还是阻塞等待 。
3、线程间 P/V操作
- 信号量代表某一类资源,其值表示系统中该资源的数量
- 信号量是一个受保护的变量,只能通过三种操作来访问初始化、P操作(申请资源)、V操作(释放资源)
- 信号量的值为非负整数
P(S) 含义如下:
cpp
if (信号量的值大于0)
{
    申请资源的线程继续运行;
    信号量的值减一;
}
else
{
    申请资源的任务阻塞;
}
V(S) 含义如下:
cpp
if (没有任务在等待该资源)
{
    信号量的值加一;
}
else
{
    唤醒第一个等待的任务,让其继续运行
}
posix中定义了两类信号量:无名信号量(基于内存的信号量) ,主要用于线程间使用, 进程间很少使用;有名信号量(基于文件的信号量) , 主要用于进程间使用,线程间很少使用
4、sem_init 初始化一个无名信号量
cpp
#include <semaphore.h>

int sem_init(sem_t *sem, int pshared, unsigned int value);
函数功能:初始化一个无名的信号量
函数参数:【sem】,要初始化的信号量;【pshared】,0在线程间使用,非0在进程间使用;【value】, 信号量的值
函数返回值:成功返回0,失败返回-1 并设置errno,sem_init() returns 0 on success; on error, -1 is returned, and errno is set to indicate the error.
5、sem_getvalue 获取无名信号量的值
cpp
#include <semaphore.h>

int sem_getvalue(sem_t *sem, int *sval);
函数功能:获取一个无名信号量的值
函数参数:【sem】,要获取的信号量;【sval】,获取的信号量值
函数返回值:成功返回0,失败返回-1 并设置errno,sem_getvalue() returns 0 on success; on error, -1 is returned and errno is set to indicate the error.
6、sem_wait 申请一个无名信号量(P操作)
cpp
#include <semaphore.h>

int sem_wait(sem_t *sem);
函数功能:申请一个无名信号量,这个是P操作
函数参数:【sem】,要获取信号量
函数返回值:成功返回0,失败返回-1 并设置errno,All of these functions return 0 on success; on error, the value of the semaphore is left unchanged, -1 is returned, and errno is set to indicate the error.
7、sem_post 释放一个无名信号量(V操作)
cpp
#include <semaphore.h>

int sem_post(sem_t *sem);
函数功能:释放一个无名信号量,这个是V操作
函数参数:【sem】,要释放的信号量
函数返回值:成功返回0,失败返回-1 并设置errno,sem_post() returns 0 on success; on error, the value of the semaphore is left unchanged, -1 is returned, and errno is set to indicate the error.
8、sem_destroy 销毁一个无名信号量
cpp
#include <semaphore.h>

int sem_destroy(sem_t *sem);
函数功能:销毁一个无名信号量
函数参数:【sem】,要销毁信号量
函数返回值:成功返回0,失败返回-1 并设置errno,sem_destroy() returns 0 on success; on error, -1 is returned, and errno is set to indicate the error.
使用信号量来实现互斥
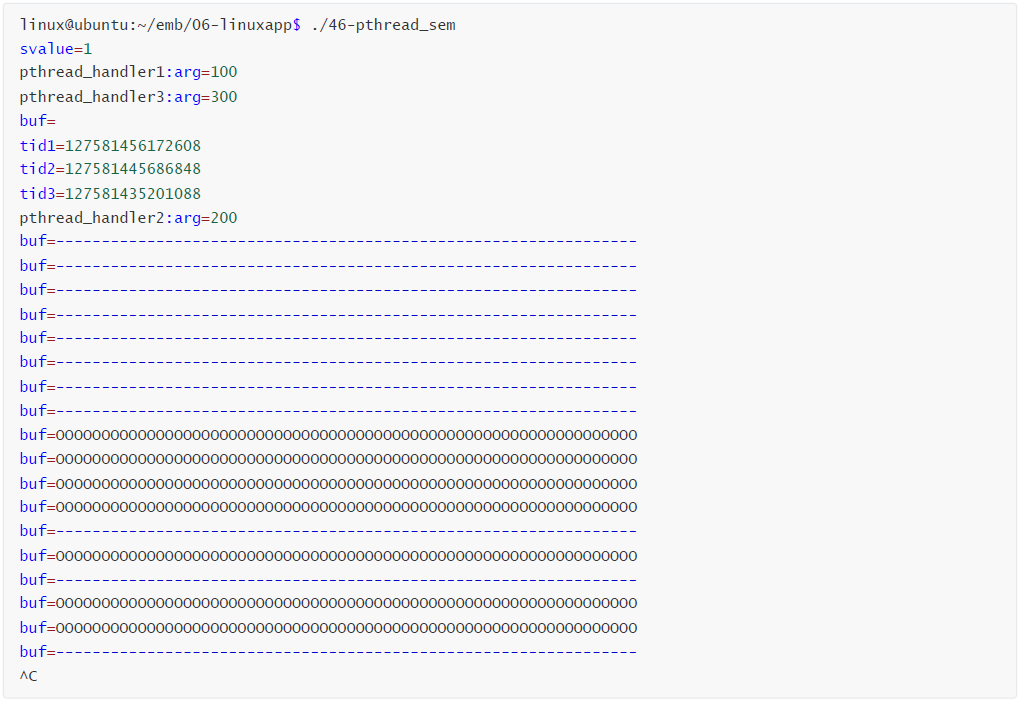
9、实例使用信号量来实现互斥
cpp
#include <stdio.h>
#include <stdlib.h>
#include <string.h>
#include <unistd.h>
#include <pthread.h>
#include <semaphore.h>

#define NSize   64

char buf[NSize+1]={0};
sem_t sem; // 信号量

// 线程函数
void *thread1_func(void *arg)
{
    printf("线程1:arg= %d\n", *((int *)arg)); // 线程1的参数
    while (1)
    {
        sem_wait(&sem); // 等待信号量 P操作 阻塞等待信号量为0
        memset(buf, 'O', 32);
        usleep(1000); // 1ms
        memset(buf+32, 'O', 32); // 保证最后1个元素为 '\0'
        usleep(1000); // 1ms
        sem_post(&sem); // 发送信号量 V操作 信号量加1
    }
    return NULL;
}

// 线程函数2
void *thread2_func(void *arg)
{
    printf("线程2:arg= %d\n", *((int *)arg)); // 线程2的参数
    while (1)
    {
        sem_wait(&sem); // 等待信号量 P操作 阻塞等待信号量为0
        memset(buf, '-', 32);
        usleep(1000); // 1ms
        memset(buf+32, '-', 32); // 保证最后1个元素为 '\0'
        usleep(1000); // 1ms
        sem_post(&sem); // 发送信号量 V操作 信号量加1
    }
    return NULL;
}

// 线程函数3
void *thread3_func(void *arg)
{
    printf("线程3:arg= %d\n", *((int *)arg)); // 线程3的参数
    while (1)
    {
        sem_wait(&sem); // 等待信号量 P操作 阻塞等待信号量为0
        printf("buf= %s\n", buf); // 线程3的参数
        sem_post(&sem); // 发送信号量 V操作 信号量加1
        sleep(1);
    }
    return NULL;
}

int main(int argc, char const *argv[])
{
    pthread_t tid1; // 线程id1
    pthread_t tid2; // 线程id2
    pthread_t tid3; // 线程id3
    int data1 = 100, data2 = 200, data3 = 300;

    // 初始化信号量
    sem_init(&sem, 0, 1); // 0表示线程间共享,初始值为0

    int ret = pthread_create(&tid1, NULL, thread1_func, &data1);
    if (ret != 0)
    {
        perror("pthread_create");
        return -1;
    }
    printf("线程1:tid1= %d\n", (int)tid1); // 线程1的id

    // 创建线程2
    ret = pthread_create(&tid2, NULL, thread2_func, &data2);
    if (ret != 0)
    {
        perror("pthread_create");
        return -1;
    }
    printf("线程2:tid2= %d\n", (int)tid2); // 线程2的id

    // 创建线程3
    ret = pthread_create(&tid3, NULL, thread3_func, &data3);
    if (ret != 0)
    {
        perror("pthread_create");
        return -1;
    }
    printf("线程3:tid3= %d\n", (int)tid3); // 线程3的id

    while (1)
    {
        sem_wait(&sem); // 等待信号量 P操作 阻塞等待信号量为0
        printf("buf= %s\n", buf); // 线程3的参数
        sem_post(&sem); // 发送信号量 V操作 信号量加1
        sleep(1);

    }

    return 0;
}
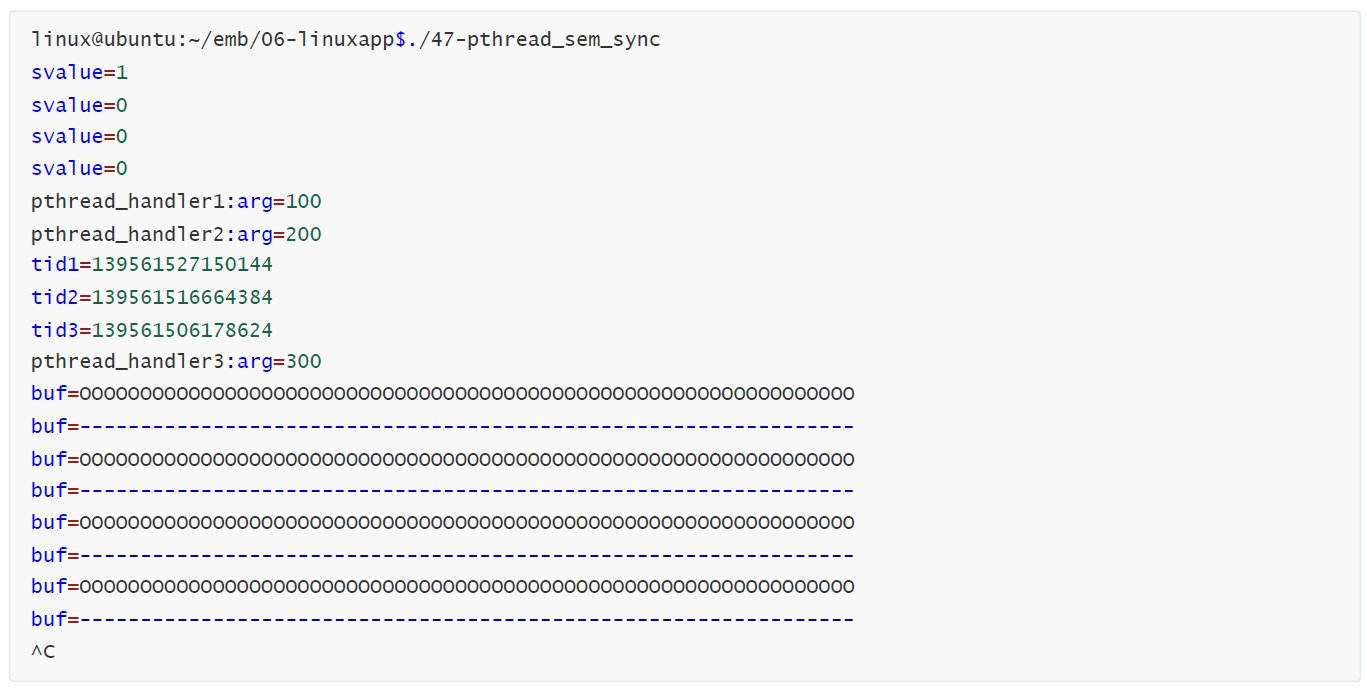
10、实例使用信号量来实现同步
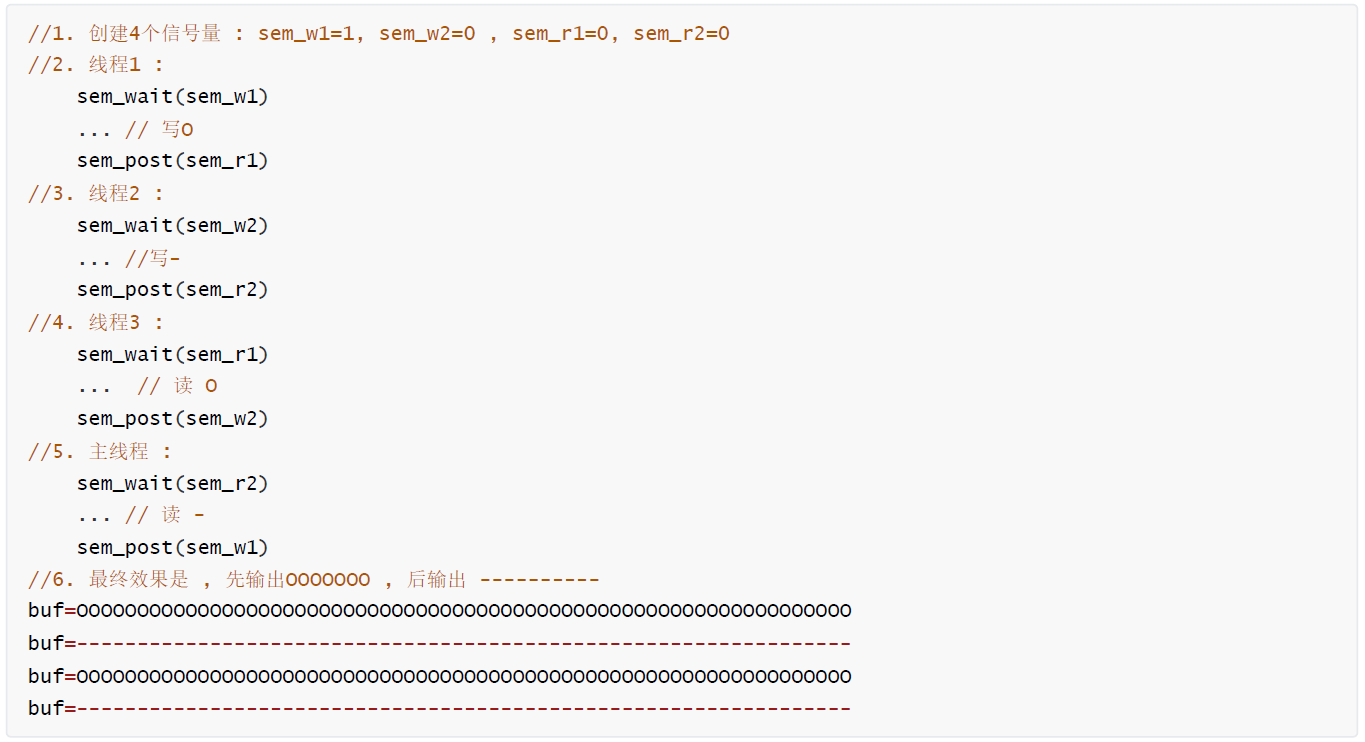
cpp
#include <stdio.h>
#include <stdlib.h>
#include <string.h>
#include <unistd.h>
#include <pthread.h>
#include <semaphore.h>

#define NSize   64

char buf[NSize+1]={0};
sem_t sem_w1; // 信号量 写锁
sem_t sem_w2; // 信号量 写锁
sem_t sem_r1; // 信号量 读锁
sem_t sem_r2; // 信号量 读锁


// 线程函数
void *thread1_func(void *arg)
{
    printf("线程1:arg= %d\n", *((int *)arg)); // 线程1的参数
    while (1)
    {
        sem_wait(&sem_w1); // 等待信号量 P操作 阻塞等待信号量为0
        memset(buf, 'O', 32);
        usleep(1000); // 1ms
        memset(buf+32, 'O', 32); // 保证最后1个元素为 '\0'
        usleep(1000); // 1ms
        sem_post(&sem_r1); // 发送信号量 V操作 信号量加1
    }
    return NULL;
}

// 线程函数2
void *thread2_func(void *arg)
{
    printf("线程2:arg= %d\n", *((int *)arg)); // 线程2的参数
    while (1)
    {
        sem_wait(&sem_w2); // 等待信号量 P操作 阻塞等待信号量为0
        memset(buf, '-', 32);
        usleep(1000); // 1ms
        memset(buf+32, '-', 32); // 保证最后1个元素为 '\0'
        usleep(1000); // 1ms
        sem_post(&sem_r2); // 发送信号量 V操作 信号量加1
    }
    return NULL;
}

// 线程函数3
void *thread3_func(void *arg)
{
    printf("线程3:arg= %d\n", *((int *)arg)); // 线程3的参数
    while (1)
    {
        sem_wait(&sem_r1); // 等待信号量 P操作 阻塞等待信号量为0
        printf("buf= %s\n", buf); // 线程3的参数
        sem_post(&sem_w2); // 发送信号量 V操作 信号量加1
        sleep(1);
    }
    return NULL;
}

int main(int argc, char const *argv[])
{
    pthread_t tid1; // 线程id1
    pthread_t tid2; // 线程id2
    pthread_t tid3; // 线程id3
    int data1 = 100, data2 = 200, data3 = 300;

    // 初始化信号量
    sem_init(&sem_w1, 0, 1); // 0表示线程间共享,初始值为1
    sem_init(&sem_w2, 0, 0); // 0表示线程间共享,初始值为0
    sem_init(&sem_r1, 0, 0); // 0表示线程间共享,初始值为0
    sem_init(&sem_r2, 0, 0); // 0表示线程间共享,初始值为0

    int ret = pthread_create(&tid1, NULL, thread1_func, &data1);
    if (ret != 0)
    {
        perror("pthread_create");
        return -1;
    }
    printf("线程1:tid1= %d\n", (int)tid1); // 线程1的id

    // 创建线程2
    ret = pthread_create(&tid2, NULL, thread2_func, &data2);
    if (ret != 0)
    {
        perror("pthread_create");
        return -1;
    }
    printf("线程2:tid2= %d\n", (int)tid2); // 线程2的id

    // 创建线程3
    ret = pthread_create(&tid3, NULL, thread3_func, &data3);
    if (ret != 0)
    {
        perror("pthread_create");
        return -1;
    }
    printf("线程3:tid3= %d\n", (int)tid3); // 线程3的id

    while (1)
    {
        sem_wait(&sem_r2); // 等待信号量 P操作 阻塞等待信号量为0
        printf("buf= %s\n", buf); // 线程3的参数
        sem_post(&sem_w1); // 发送信号量 V操作 信号量加1
        sleep(1);

    }

    return 0;
}
四、线程间同步与互斥机制之互斥锁
1、互斥锁的理解
- 引入互斥(mutual exclusion)锁的目的是用来保证共享数据操作的完整性。
- 互斥锁主要用来保护临界资源
- 每个临界资源都由一个互斥锁来保护,任何时刻最多只能有一个线程能访问该资源
- 线程必须先获得互斥锁才能访问临界资源,访问完资源后释放该锁。如果无法获得锁,线程会阻塞直到获得锁为止
2、安装互斥锁库
互斥锁不是ubuntu中的标准库,是一个第三方的库, 需要安装对应的库
cpp
sudo apt install manpages-posix manpages-posix-dev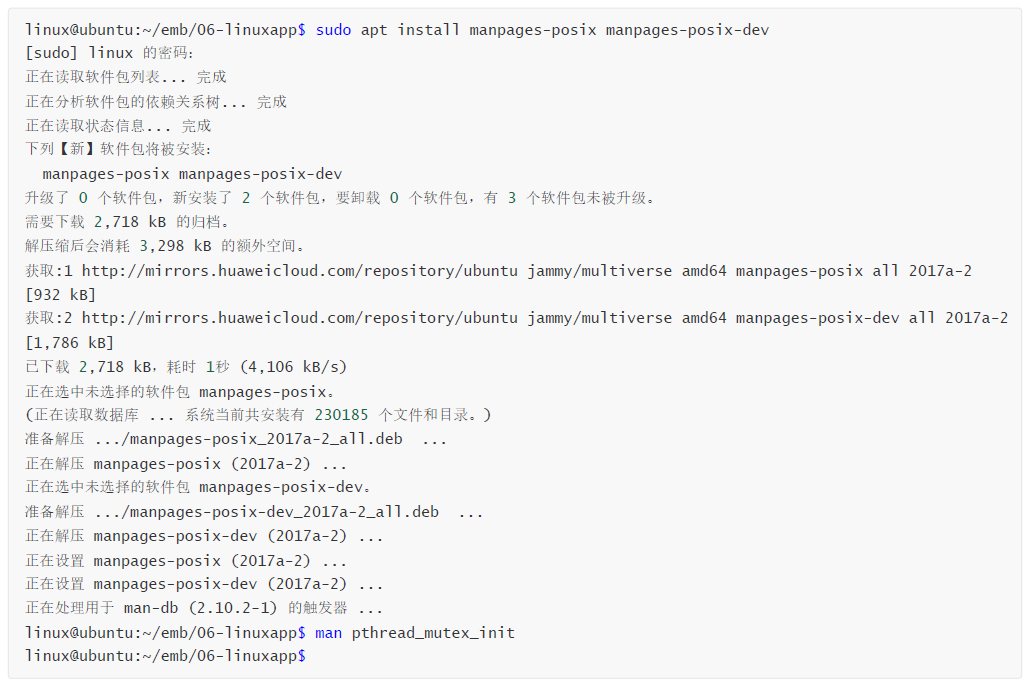
3、pthread_mutex_init
初始化一个互斥锁
cpp
#include <pthread.h>

int pthread_mutex_init(pthread_mutex_t *restrict mutex, const pthread_mutexattr_t *restrict attr);
pthread_mutex_t mutex = PTHREAD_MUTEX_INITIALIZER;
函数功能:初始化一个互斥锁
函数参数:【mutex】,要初始化的锁;【attr】,锁的属性, 默认为NULL
函数返回值:成功返回0,失败返回错误号,If successful, the pthread_mutex_destroy() and pthread_mutex_init() functions shall return zero; otherwise, an error number shall be returned to indicate the error.
4、pthread_mutex_destroy
销毁一个互斥锁
cpp
#include <pthread.h>

int pthread_mutex_destroy(pthread_mutex_t *mutex);
pthread_mutex_t mutex = PTHREAD_MUTEX_INITIALIZER;
函数功能:销毁一个互斥锁
函数参数:【mutex】,要销毁的锁
函数返回值:成功返回0,失败返回错误号,If successful, the pthread_mutex_destroy() and pthread_mutex_init() functions shall return zero; otherwise, an error number shall be returned to indicate the error.
5、pthread_mutex_lock
申请一个互斥锁(P操作)
cpp
#include <pthread.h>

int pthread_mutex_lock(pthread_mutex_t *mutex);
函数功能:申请一个互斥锁
函数参数:【mutex】,要申请的锁
函数返回值:成功返回0,失败返回错误号,If successful, the pthread_mutex_lock(), pthread_mutex_trylock(), and pthread_mutex_unlock() func‐tions shall return zero; otherwise, an error number shall be returned to indicate the error.
6、pthread_mutex_unlock
释放一个互斥锁(V操作)
cpp
#include <pthread.h>

int pthread_mutex_unlock(pthread_mutex_t *mutex);
函数功能:释放一个互斥锁
函数参数:【mutex】,要释放的锁
函数返回值:成功返回0,失败返回错误号,If successful, the pthread_mutex_lock(), pthread_mutex_trylock(), and pthread_mutex_unlock() func‐tions shall return zero; otherwise, an error number shall be returned to indicate the error.
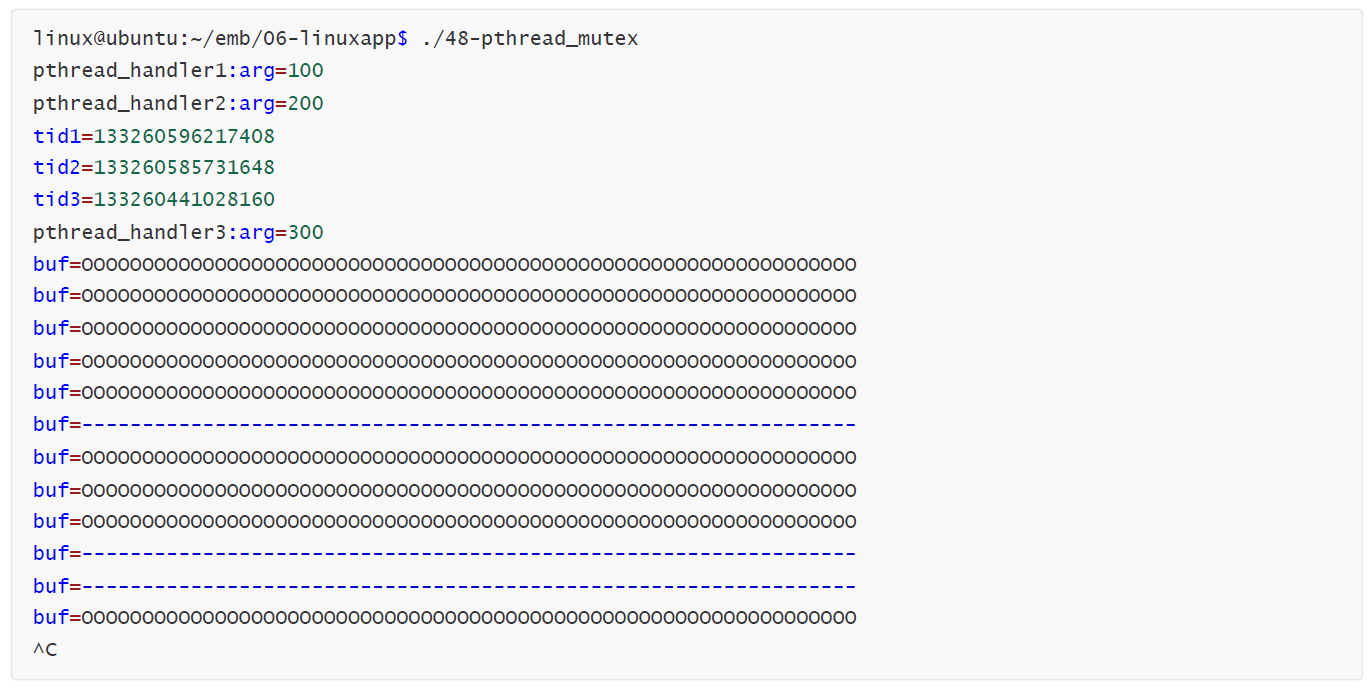
7、实例使用互斥锁实现互斥
cpp
#include <stdio.h>
#include <stdlib.h>
#include <string.h>
#include <unistd.h>
#include <pthread.h>

#define NSize   64

char buf[NSize+1]={0};
pthread_mutex_t mutex  ; // 互斥锁

// 线程函数
void *thread1_func(void *arg)
{
    printf("线程1:arg= %d\n", *((int *)arg)); // 线程1的参数
    while (1)
    {
        pthread_mutex_lock(&mutex); // 加锁
        memset(buf, 'O', 32);
        usleep(1000); // 1ms
        memset(buf+32, 'O', 32); // 保证最后1个元素为 '\0'
        usleep(1000); // 1ms
        pthread_mutex_unlock(&mutex); // 解锁
    }
    return NULL;
}

// 线程函数2
void *thread2_func(void *arg)
{
    printf("线程2:arg= %d\n", *((int *)arg)); // 线程2的参数
    while (1)
    {
        pthread_mutex_lock(&mutex); // 加锁
        memset(buf, '-', 32);
        usleep(1000); // 1ms
        memset(buf+32, '-', 32); // 保证最后1个元素为 '\0'
        usleep(1000); // 1ms
        pthread_mutex_unlock(&mutex); // 解锁
    }
    return NULL;
}

// 线程函数3
void *thread3_func(void *arg)
{
    printf("线程3:arg= %d\n", *((int *)arg)); // 线程3的参数
    while (1)
    {
        pthread_mutex_lock(&mutex); // 加锁
        printf("buf= %s\n", buf); // 线程3的参数
        pthread_mutex_unlock(&mutex); // 解锁
        sleep(1);
    }
    return NULL;
}

int main(int argc, char const *argv[])
{
    pthread_t tid1; // 线程id1
    pthread_t tid2; // 线程id2
    pthread_t tid3; // 线程id3
    int data1 = 100, data2 = 200, data3 = 300;

    // 初始化互斥锁
    // 锁被初始化后, 锁的状态是开的 , 可以被任意线程加锁
    // pthread_mutex_lock(&mutex); // 加锁
    // pthread_mutex_unlock(&mutex); // 解锁
    int ret = pthread_mutex_init(&mutex, NULL);
    if (ret != 0)
    {
        perror("pthread_mutex_init");
        return -1;
    }

    ret = pthread_create(&tid1, NULL, thread1_func, &data1);
    if (ret != 0)
    {
        perror("pthread_create");
        return -1;
    }
    printf("线程1:tid1= %d\n", (int)tid1); // 线程1的id

    // 创建线程2
    ret = pthread_create(&tid2, NULL, thread2_func, &data2);
    if (ret != 0)
    {
        perror("pthread_create");
        return -1;
    }
    printf("线程2:tid2= %d\n", (int)tid2); // 线程2的id

    // 创建线程3
    ret = pthread_create(&tid3, NULL, thread3_func, &data3);
    if (ret != 0)
    {
        perror("pthread_create");
        return -1;
    }
    printf("线程3:tid3= %d\n", (int)tid3); // 线程3的id

    while (1)
    {
        pthread_mutex_lock(&mutex); // 加锁
        printf("buf= %s\n", buf); // 线程3的参数
        pthread_mutex_unlock(&mutex); // 解锁
        sleep(1);
    }

    return 0;
}
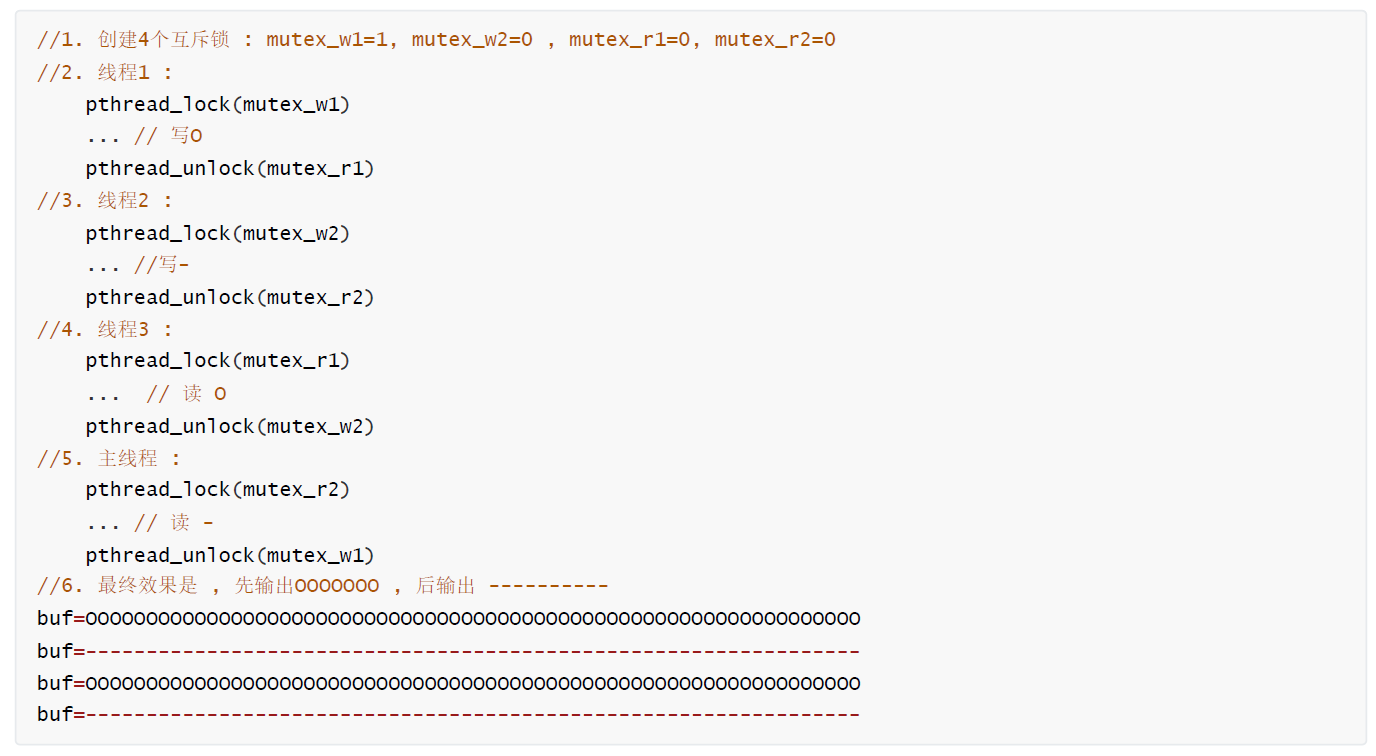
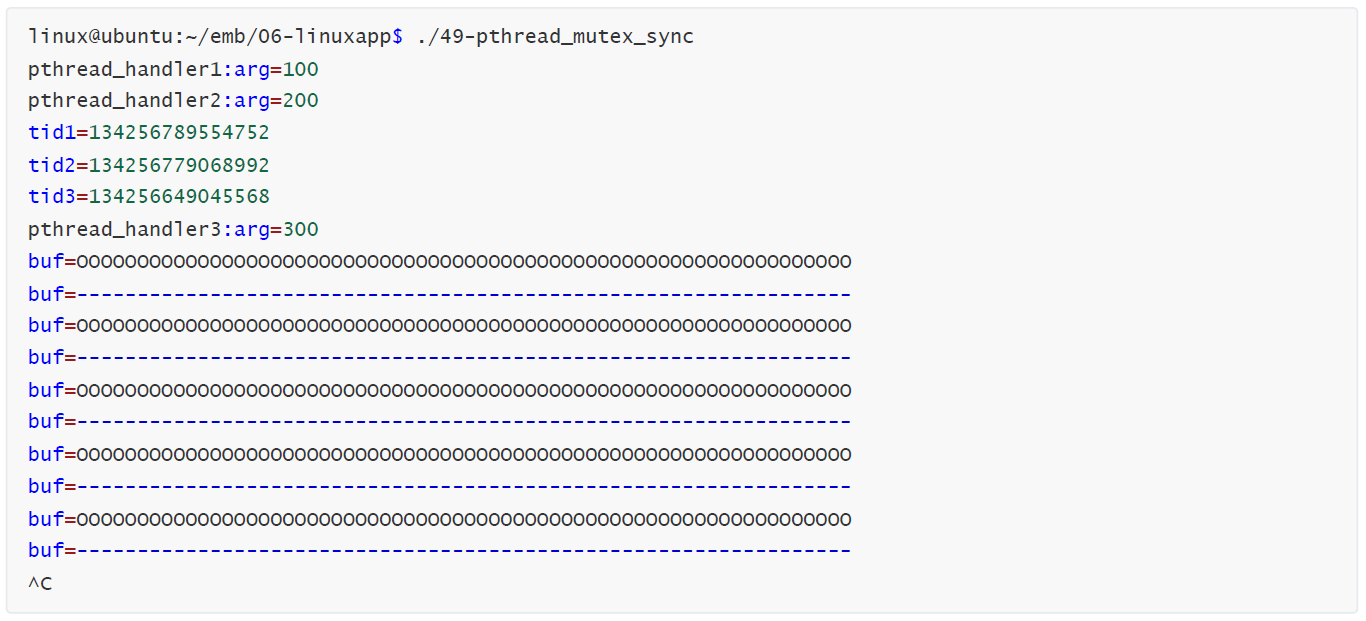
8、实例使用互斥锁实现同步
cpp
#include <stdio.h>
#include <stdlib.h>
#include <string.h>
#include <unistd.h>
#include <pthread.h>

#define NSize 64

char buf[NSize + 1] = {0};
pthread_mutex_t mutex_w1; // 互斥锁
pthread_mutex_t mutex_w2; // 互斥锁
pthread_mutex_t mutex_r1; // 互斥锁
pthread_mutex_t mutex_r2; // 互斥锁

// 线程函数
void *thread1_func(void *arg)
{
    printf("线程1:arg= %d\n", *((int *)arg)); // 线程1的参数
    while (1)
    {
        pthread_mutex_lock(&mutex_w1); // 加锁
        memset(buf, 'O', 32);
        usleep(1000);                    // 1ms
        memset(buf + 32, 'O', 32);       // 保证最后1个元素为 '\0'
        usleep(1000);                    // 1ms
        pthread_mutex_unlock(&mutex_r1); // 解锁
    }
    return NULL;
}

// 线程函数2
void *thread2_func(void *arg)
{
    printf("线程2:arg= %d\n", *((int *)arg)); // 线程2的参数
    while (1)
    {
        pthread_mutex_lock(&mutex_w2); // 加锁
        memset(buf, '-', 32);
        usleep(1000);                    // 1ms
        memset(buf + 32, '-', 32);       // 保证最后1个元素为 '\0'
        usleep(1000);                    // 1ms
        pthread_mutex_unlock(&mutex_r2); // 解锁
    }
    return NULL;
}

// 线程函数3
void *thread3_func(void *arg)
{
    printf("线程3:arg= %d\n", *((int *)arg)); // 线程3的参数
    while (1)
    {
        pthread_mutex_lock(&mutex_r1);   // 加锁
        printf("buf= %s\n", buf);        // 线程3的参数
        pthread_mutex_unlock(&mutex_w2); // 解锁
        sleep(1);
    }
    return NULL;
}

int main(int argc, char const *argv[])
{
    pthread_t tid1; // 线程id1
    pthread_t tid2; // 线程id2
    pthread_t tid3; // 线程id3
    int data1 = 100, data2 = 200, data3 = 300;
    int ret;

    // 初始化互斥锁
    // 锁被初始化后, 锁的状态是开的 , 可以被任意线程加锁
    // pthread_mutex_lock(&mutex); // 加锁
    // pthread_mutex_unlock(&mutex); // 解锁
    ret = pthread_mutex_init(&mutex_w1, NULL);
    if (ret != 0)
    {
        perror("pthread_mutex_init");
        return -1;
    }
    ret = pthread_mutex_init(&mutex_w2, NULL);
    if (ret != 0)
    {
        perror("pthread_mutex_init");
        return -1;
    }
    ret = pthread_mutex_init(&mutex_r1, NULL);
    if (ret != 0)
    {
        perror("pthread_mutex_init");
        return -1;
    }
    ret = pthread_mutex_init(&mutex_r2, NULL);
    if (ret != 0)
    {
        perror("pthread_mutex_init");
        return -1;
    }

    // 上锁 mutex_w2
    ret = pthread_mutex_lock(&mutex_w2);
    if (ret != 0)
    {
        perror("pthread_mutex_lock");
        return -1;
    }
    // 上锁 mutex_r1
    ret = pthread_mutex_lock(&mutex_r1);
    if (ret != 0)
    {
        perror("pthread_mutex_lock");
        return -1;
    }
    // 上锁 mutex_r2
    ret = pthread_mutex_lock(&mutex_r2);
    if (ret != 0)
    {
        perror("pthread_mutex_lock");
        return -1;
    }

    ret = pthread_create(&tid1, NULL, thread1_func, &data1);
    if (ret != 0)
    {
        perror("pthread_create");
        return -1;
    }
    printf("线程1:tid1= %ld\n", tid1); // 线程1的id

    // 创建线程2
    ret = pthread_create(&tid2, NULL, thread2_func, &data2);
    if (ret != 0)
    {
        perror("pthread_create");
        return -1;
    }
    printf("线程2:tid2= %ld\n", tid2); // 线程2的id

    // 创建线程3
    ret = pthread_create(&tid3, NULL, thread3_func, &data3);
    if (ret != 0)
    {
        perror("pthread_create");
        return -1;
    }
    printf("线程3:tid3= %ld\n", tid3); // 线程3的id

    while (1)
    {
        pthread_mutex_lock(&mutex_r2);   // 加锁
        printf("buf= %s\n", buf);        // 线程3的参数
        pthread_mutex_unlock(&mutex_w1); // 解锁
        sleep(1);
    }

    return 0;
}
五、线程间同步与互斥机制之条件变量
1、条件变量的理解
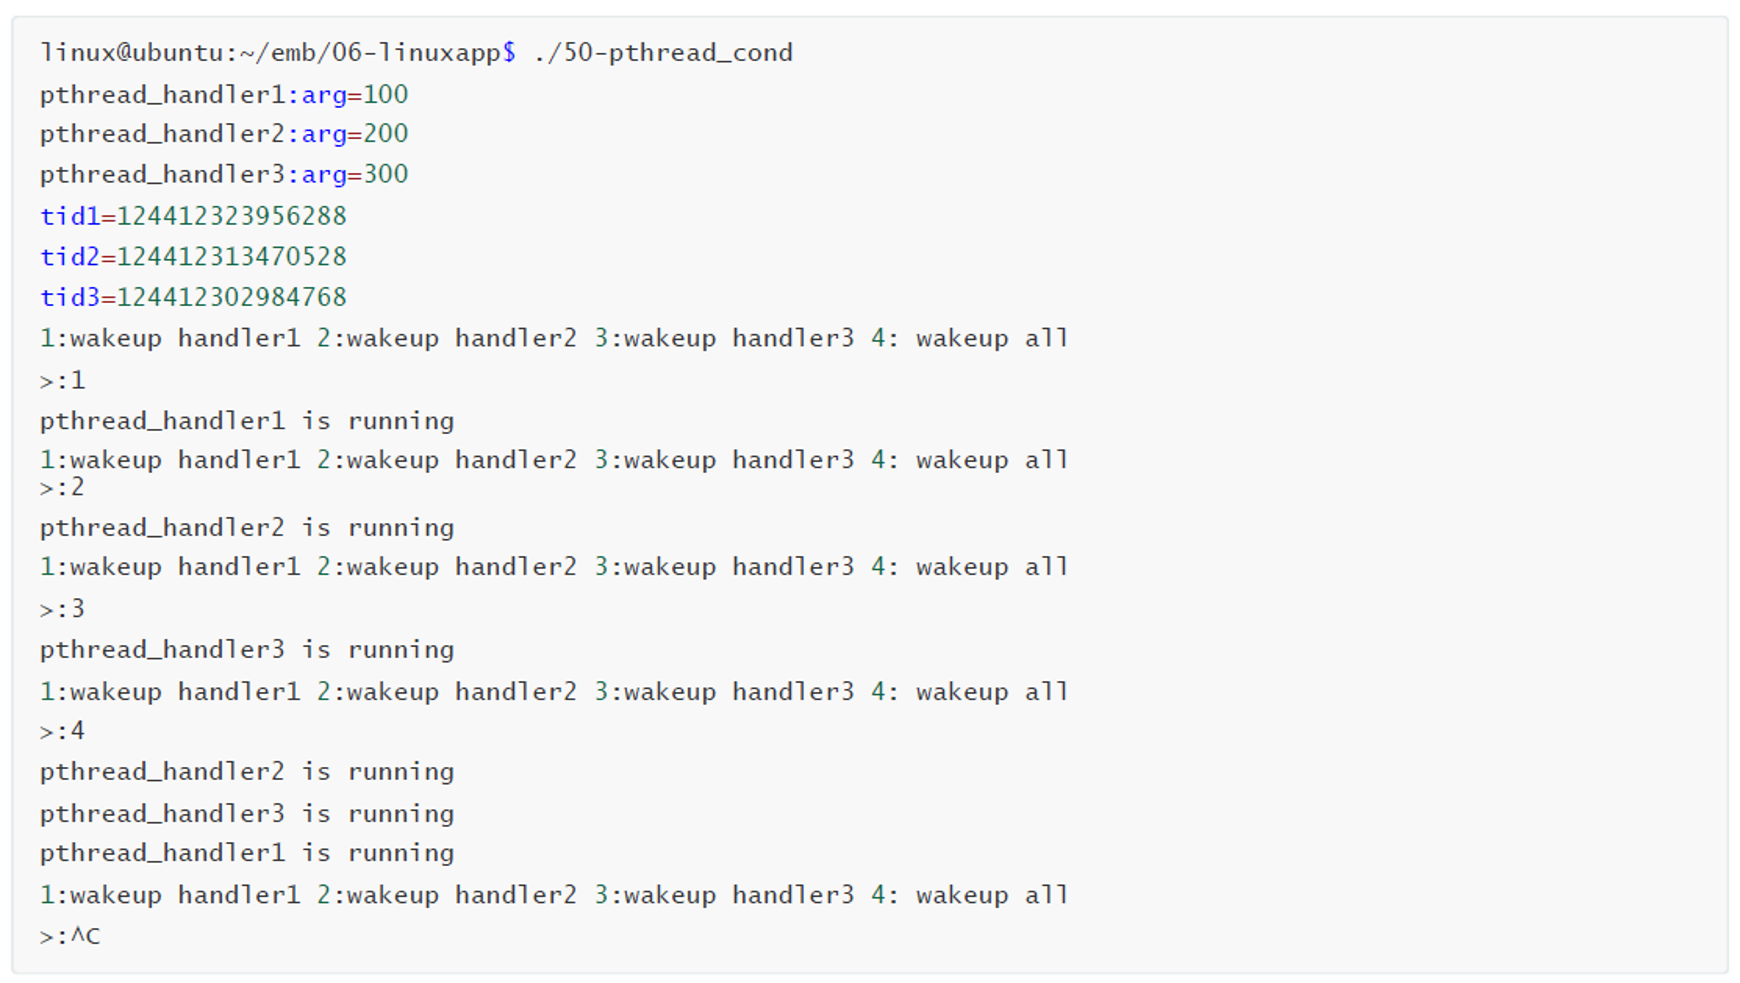
条件变量是利用线程间共享的全局变量进行同步的一种机制。**主要包括两个动作:**一个线程等待"条件变量的条件成立"而挂起,另一个线程使"条件成立"(给出条件成立信号)。为了防止竞争,条件变量的使用总是和一个互斥锁结合在一起。
2、pthread_cond_init
初始化一个条件变量
cpp
#include <pthread.h>

int pthread_cond_init(pthread_cond_t *restrict cond, const pthread_condattr_t *restrict attr);
函数功能:要初始化的一个条件变量,这个条件变量的初始是不成立的状态
函数参数:cond,要初始化的条件变量的地址;attr,条件变量的属性, 默认为NULL
函数返回值:成功返回0,失败返回错误号,If successful, the pthread_cond_destroy() and pthread_cond_init() functions shall return zero; otherwise, an error number shall be returned to indicate the error.
3、pthread_cond_wait
等待一个条件变量成立
cpp
#include <pthread.h>

int pthread_cond_wait(pthread_cond_t *restrict cond, pthread_mutex_t *restrict mutex);
函数功能:要等待的一个条件变量
函数参数:cond,要等待的条件变量;mutex,保护条件变量要用到的锁;函数返回值,成功返回0,失败返回错误号,Upon successful completion, a value of zero shall be returned; otherwise, an error number shall be returned to indicate the error.
4、pthread_cond_signal
激活条件变量
cpp
#include <pthread.h>

int pthread_cond_signal(pthread_cond_t *cond);
函数功能:只是激活一个线程的条件变量成立,要激活的条件变量
函数参数:cond,要释放的条件变量
函数返回值:成功返回0,失败返回错误号,Upon successful completion, a value of zero shall be returned; otherwise, an error number shall be returned to indicate the error.
5、pthread_cond_broadcast
激活所有的条件变量
cpp
#include <pthread.h>

int pthread_cond_broadcast(pthread_cond_t *cond);
函数功能:激活该条件变量上的所有等待线程,释放等待在这个条件变量上所有的线程,让所有等待的线程立即条件成立(立即可以获得)
函数参数:cond,要激活的条件变量
函数返回值:成功返回0,失败返回错误号,Upon successful completion, a value of zero shall be returned; otherwise, an error number shall be returned to indicate the error.
6、条件变量使用深入理解
在操作系统中不允许带着锁去进入等待态(阻塞,睡眠)。
cpp
pthread_mutex_lock(&mutex); // 条件变量需要用一个互斥锁去保护

/* 第1种情况: 条件变量(cond)成立, pthread_cond_wait 函数立即返回 */

/*
第2种情况: 条件变量(cond)不成立, pthread_cond_wait 函数等待, 在进入阻塞前释放mutex,
之后进入阻塞(睡眠, 等待), 函数不返回, 线程进入等待态, 锁的状态被恢复.
过了一段时间后, 在别的线程中使用了pthread_cond_signal 或者 pthread_cond_broadcast
去激活了该条件变量,线程被唤醒, 首先上锁条件变量, 条件变量成立, 函数返回
*/
pthread_cond_wait(&cond, &mutex);

pthread_mutex_unlock(&mutex); // 条件变量操作完成后, 释放这个锁
7、条件变量的使用
cpp
#include <stdio.h>
#include <stdlib.h>
#include <string.h>
#include <unistd.h>
#include <pthread.h>

#define NSize 64

char buf[NSize + 1] = {0};
pthread_mutex_t mutex;              // 互斥锁
pthread_cond_t cond1, cond2, cond3; // 条件变量

// 线程函数
void *thread1_func(void *arg)
{
    printf("线程1:arg= %d\n", *((int *)arg)); // 线程1的参数
    while (1)
    {
        // pthread_handler1 is running
        pthread_mutex_lock(&mutex);        // 加锁
        pthread_cond_wait(&cond1, &mutex); // 等待条件变量cond1
        printf("pthread_handler1 is running\n");
        pthread_mutex_unlock(&mutex); // 解锁
    }
    return NULL;
}

// 线程函数2
void *thread2_func(void *arg)
{
    printf("线程2:arg= %d\n", *((int *)arg)); // 线程2的参数
    while (1)
    {
        // pthread_handler2 is running
        pthread_mutex_lock(&mutex);        // 加锁
        pthread_cond_wait(&cond2, &mutex); // 等待条件变量cond2
        printf("pthread_handler2 is running\n");
        pthread_mutex_unlock(&mutex); // 解锁
    }
    return NULL;
}

// 线程函数3
void *thread3_func(void *arg)
{
    printf("线程3:arg= %d\n", *((int *)arg)); // 线程3的参数
    while (1)
    {
        // pthread_handler3 is running
        pthread_mutex_lock(&mutex);        // 加锁
        pthread_cond_wait(&cond3, &mutex); // 等待条件变量cond3
        printf("pthread_handler3 is running\n");
        pthread_mutex_unlock(&mutex); // 解锁
    }
    return NULL;
}

int main(int argc, char const *argv[])
{
    pthread_t tid1; // 线程id1
    pthread_t tid2; // 线程id2
    pthread_t tid3; // 线程id3
    int data1 = 100, data2 = 200, data3 = 300;
    int ret;

    // 初始化互斥锁
    // 锁被初始化后, 锁的状态是开的 , 可以被任意线程加锁
    // pthread_mutex_lock(&mutex); // 加锁
    // pthread_mutex_unlock(&mutex); // 解锁
    ret = pthread_mutex_init(&mutex, NULL);
    if (ret != 0)
    {
        perror("pthread_mutex_init");
        return -1;
    }

    // 初始化条件变量
    ret = pthread_cond_init(&cond1, NULL);
    if (ret != 0)
    {
        perror("pthread_cond_init");
        return -1;
    }
    ret = pthread_cond_init(&cond2, NULL);
    if (ret != 0)
    {
        perror("pthread_cond_init");
        return -1;
    }
    ret = pthread_cond_init(&cond3, NULL);
    if (ret != 0)
    {
        perror("pthread_cond_init");
        return -1;
    }

    ret = pthread_create(&tid1, NULL, thread1_func, &data1);
    if (ret != 0)
    {
        perror("pthread_create");
        return -1;
    }
    printf("线程1:tid1= %ld\n", tid1); // 线程1的id

    // 创建线程2
    ret = pthread_create(&tid2, NULL, thread2_func, &data2);
    if (ret != 0)
    {
        perror("pthread_create");
        return -1;
    }
    printf("线程2:tid2= %ld\n", tid2); // 线程2的id

    // 创建线程3
    ret = pthread_create(&tid3, NULL, thread3_func, &data3);
    if (ret != 0)
    {
        perror("pthread_create");
        return -1;
    }
    printf("线程3:tid3= %ld\n", tid3); // 线程3的id
    usleep(1000 * 10);                 // 10ms

    while (1)
    {
        // 1:wakeup handler1 2:wakeup handler2 3:wakeup handler3 4: wakeup all handlers
        printf("请输入要唤醒的线程(1-4):");
        int choice;
        scanf("%d", &choice);
        switch (choice)
        {
        case 1:
            pthread_cond_signal(&cond1);
            break;
        case 2:
            pthread_cond_signal(&cond2);
            break;
        case 3:
            pthread_cond_signal(&cond3);
            break;
        case 4:
            pthread_cond_broadcast(&cond1);
            pthread_cond_broadcast(&cond2);
            pthread_cond_broadcast(&cond3);
            break;
        default:
            printf("输入错误,请重新输入\n");
            break;
        }
        usleep(1000 * 100); // 100ms
    }

    return 0;
}