代码很简单,很容易读懂。
import kerasfrom keras import layersfrom keras.datasets import mnistimport numpy as npimport matplotlib.pyplot as pltimport pywtimport tensorflow as tfimport torch#加载经典的mnist手写数字图像(x_train, _), (x_test, _) = mnist.load_data()x_train.shape, x_test.shape
num_data = 1000frac_train = 0.7 #训练集划分比例frac_test = 0.3 #测试集划分比例x_train = x_train[0:int(frac_train*num_data)]x_test = x_test[0:int(frac_test*num_data)]
dimension = x_train.shape[1]norm_factor = 255. #归一化因子#数据归一化,便于训练x_train = x_train.astype('float32')/norm_factorx_test = x_test.astype('float32')/norm_factorx_train = np.reshape(x_train, (len(x_train), dimension, dimension, 1))x_test = np.reshape(x_test, (len(x_test), dimension, dimension, 1))#加入相关噪声noise_factor = 0.5 #噪声因子x_train_noisy = x_train + noise_factor * np.random.normal(loc = 0.0, scale = 1.0, size = x_train.shape) x_test_noisy = x_test + noise_factor * np.random.normal(loc = 0.0, scale = 1.0, size = x_test.shape)
x_train_noisy = np.clip(x_train_noisy, 0., 1.)x_test_noisy = np.clip(x_test_noisy, 0., 1.)#绘制原始图像与加噪图像n = 3for i in range(n): fig, axes = plt.subplots(1, 2) fig.set_size_inches(5, 5) axes[0].set_title('True image') im0 = axes[0].imshow(x_test[i].reshape(dimension, dimension), cmap = 'Reds') axes[1].set_title('Noisy image') im1 = axes[1].imshow(x_test_noisy[i].reshape(dimension, dimension), cmap = 'Reds') #离散小波变换下采样class DWT_downsampling(tf.keras.layers.Layer): def __init__(self, **kwargs): super().__init__(**kwargs) def call(self, x): x1 = x[:, 0::2, 0::2, :] #x(2i−1, 2j−1) x2 = x[:, 1::2, 0::2, :] #x(2i, 2j-1) x3 = x[:, 0::2, 1::2, :] #x(2i−1, 2j) x4 = x[:, 1::2, 1::2, :] #x(2i, 2j)
x_LL = x1 + x2 + x3 + x4 x_LH = -x1 - x3 + x2 + x4 x_HL = -x1 + x3 - x2 + x4 x_HH = x1 - x3 - x2 + x4
return keras.layers.Concatenate(axis=-1)([x_LL, x_LH, x_HL, x_HH]) import keras.backend as K #定于逆小波变换上采样模块class IWT_upsampling(tf.keras.layers.Layer): def __init__(self, **kwargs): super().__init__(**kwargs) def call(self, x): x_LL = x[:, :, :, 0:x.shape[3]//4] x_LH = x[:, :, :, x.shape[3]//4:x.shape[3]//4*2] x_HL = x[:, :, :, x.shape[3]//4*2:x.shape[3]//4*3] x_HH = x[:, :, :, x.shape[3]//4*3:]
x1 = (x_LL - x_LH - x_HL + x_HH)/4 x2 = (x_LL - x_LH + x_HL - x_HH)/4 x3 = (x_LL + x_LH - x_HL - x_HH)/4 x4 = (x_LL + x_LH + x_HL + x_HH)/4 y1 = K.stack([x1,x3], axis=2) y2 = K.stack([x2,x4], axis=2) shape = K.shape(x) return K.reshape(K.concatenate([y1,y2], axis=-1), K.stack([shape[0], shape[1]*2, shape[2]*2, shape[3]//4])) input_img = keras.Input(shape = (dimension, dimension, 1))print(input_img.shape)x = layers.Conv2D(filters = 32, kernel_size = (3, 3), activation = 'relu', padding = 'same')(input_img)print(x.shape)x = DWT_downsampling()(x)print(x.shape)#定于网络层x = layers.Conv2D(filters = 32, kernel_size = (3, 3), activation = 'relu', padding = 'same')(x)print(x.shape)encoded = DWT_downsampling()(x)print(encoded.shape)
x = layers.Conv2D(filters = 32, kernel_size = (3, 3), activation = 'relu', padding = 'same')(encoded)print(x.shape)x = IWT_upsampling()(x)print(x.shape)x = layers.Conv2D(filters = 32, kernel_size = (3, 3), activation = 'relu', padding = 'same')(x)print(x.shape)x = IWT_upsampling()(x)print(x.shape)decoded = layers.Conv2D(filters = 1, kernel_size = (3, 3), activation = 'sigmoid', padding = 'same')(x)print(decoded.shape)#编码autoencoder = keras.Model(input_img, decoded)autoencoder.summary()#编译autoencoder.compile(optimizer='adam', loss='binary_crossentropy')
validation_split = 0.8 #验证集划分比例#开始进行训练拟合history = autoencoder.fit(x_train_noisy, x_train, epochs = 40, batch_size = 20, shuffle = True, validation_split = validation_split)#关键字history.history.keys()
#绘制训练迭代图train_loss = history.history['loss']train_val_loss = history.history['val_loss']epochs = range(1, len(train_loss) + 1)
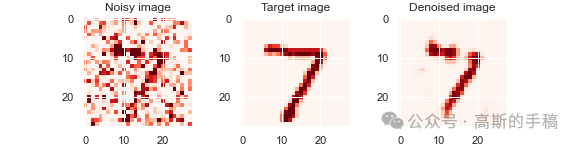
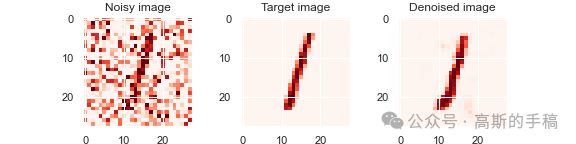
plt.figure(dpi = 100)plt.plot(epochs, train_loss, label = 'Loss')plt.plot(epochs, train_val_loss, 'o', label = 'Val loss')plt.title('Training and validation metrics')plt.legend()plt.savefig('history.png')#预测阶段all_denoised_images = autoencoder.predict(x_test_noisy)test_loss = autoencoder.evaluate(x_test_noisy, x_test, batch_size = 20)print(test_loss)#绘制降噪后的图像n = 3for i in range(n): fig, axes = plt.subplots(1, 3) fig.set_size_inches(8, 2) axes[0].set_title('Noisy image') im0 = axes[0].imshow(x_test_noisy[i].reshape(dimension, dimension), cmap = 'Reds') axes[1].set_title('Target image') im1 = axes[1].imshow(x_test[i].reshape(dimension, dimension), cmap = 'Reds') axes[2].set_title('Denoised image') im2 = axes[2].imshow(all_denoised_images[i].reshape(dimension, dimension), cmap = 'Reds') plt.savefig(f'comparison-{i}.png')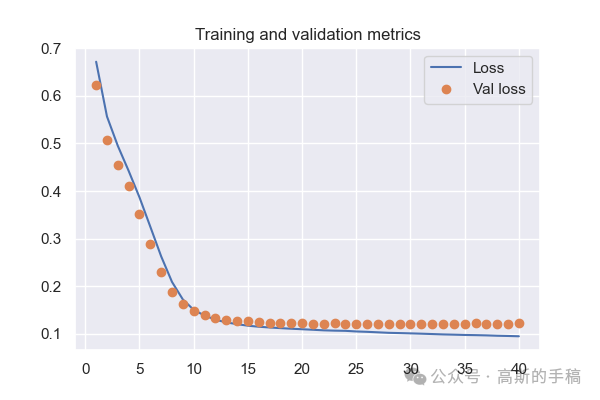

工学博士,担任《Mechanical System and Signal Processing》《中国电机工程学报》《控制与决策》等期刊审稿专家,擅长领域:现代信号处理,机器学习,深度学习,数字孪生,时间序列分析,设备缺陷检测、设备异常检测、设备智能故障诊断与健康管理PHM等。