人脸识别
- 准备
- 五、人脸提取页面
- 人脸提取页面完整代码
- 六、单人脸提取页面
-
- 1.导入所需的包
- 2.设置窗口
- 3.定义两个全局变量
- 4.定义选择图片函数
-
- 4.1定义函数和声明全局变量
- [4.2 打开文件对话框并获取文件路径](#4.2 打开文件对话框并获取文件路径)
- [4.3 处理图片并创建标签](#4.3 处理图片并创建标签)
- [4.4 显示图像](#4.4 显示图像)
- 5.检测人脸并提取
-
- 5.1函数定义和全局变量声明
- 5.2条件判断和图片加载
- [5.3 遍历人脸位置并提取人脸](#5.3 遍历人脸位置并提取人脸)
- [5.4 保存和显示提取的人脸](#5.4 保存和显示提取的人脸)
- [5.5 处理已有的图像标签](#5.5 处理已有的图像标签)
- [5.5 创建新的图像标签并显示人脸](#5.5 创建新的图像标签并显示人脸)
- 6.定义关闭窗口的函数
- 7.按钮设计
- 8.定义关键函数
- 9.单人脸提取页面运行结果图
- 10.单人脸提取页面功能展示图
- 单人脸提取页面完整代码
- 七、多人脸提取页面
-
- 1.导入所需的包
- 2.设置窗口
-
- 2.1定义窗口外观和大小
- [2.2 设置背景](#2.2 设置背景)
- 3.定义全局变量
- 4.定义选择图片函数
-
- 4.1定义函数和声明全局变量
- [4.2 打开文件对话框并获取文件路径](#4.2 打开文件对话框并获取文件路径)
- [4.3 处理图片并创建标签](#4.3 处理图片并创建标签)
- [4.4 显示图像](#4.4 显示图像)
- 5.检测人脸并提取
- 6.定义函数处理鼠标滚轮事件
- 7.定义关闭窗口的函数
- 8.按钮设计
- 9.定义关键函数
- [10. 多人脸提取页面运行结果图](#10. 多人脸提取页面运行结果图)
- 11.多人脸提取页面功能展示图
- 多人脸提取页面完整代码
准备
本篇将展示人脸提取页面,并与登录页面连接起来。人脸提取页面分为单人脸提取和多人脸提取两个分页面。
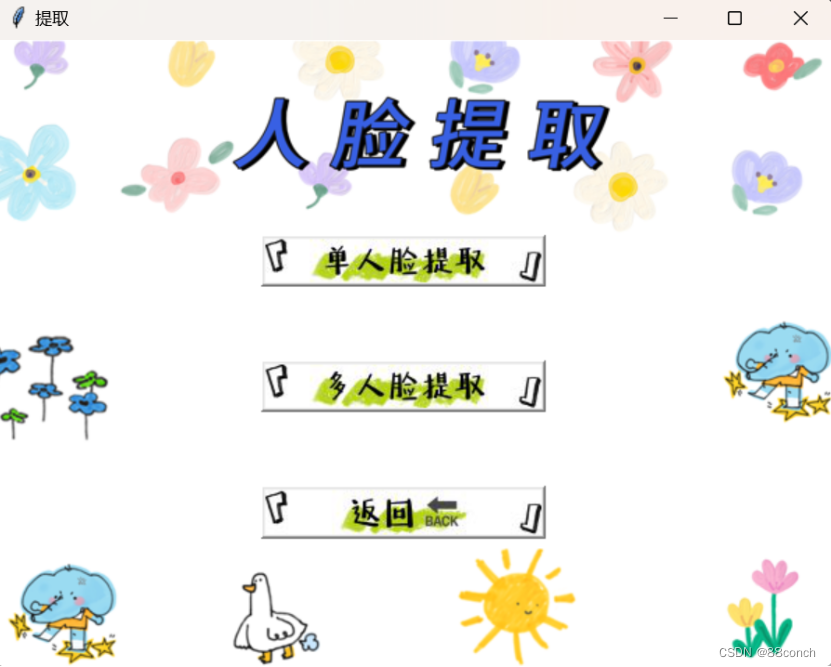
五、人脸提取页面
1.导入所需的包
tkinter:
Tkinter是Python的标准GUI(图形用户界面)库。它提供了一个快速和简单的方式来创建GUI应用程序。tkinter模块是Tkinter库的主模块,包含了创建窗口、按钮、文本框等基本GUI组件的类和函数。
messagebox:
这个模块是tkinter的一个扩展,提供了一个对话框,允许您显示消息框、警告框、错误框等。它是tkinter的一部分,通常与tkinter一起使用来与用户进行交互。
subprocess:
这个模块允许您启动新的进程,连接到它们的输入/输出/错误管道,并获取它们的返回码。通常用于执行系统命令或运行外部程序。
PIL (Python Imaging Library):
PIL是一个强大的图像处理库,它支持多种图像文件格式,并提供了一系列图像处理功能,如打开、修改、保存图像,以及图像处理操作(如缩放、裁剪、颜色转换等)。
ImageTk:
ImageTk是PIL库中用于与Tkinter一起使用的模块,它提供了在Tkinter中显示图像的功能。它通常与Tkinter的PhotoImage类一起使用,以在Tkinter应用程序中显示PIL的Image对象。
python
import tkinter as tk
from tkinter import messagebox
import subprocess
from PIL import ImageTk, Image
2.设置窗口
2.1定义窗口外观和大小
实例化窗口,设置窗口标题,尺寸。
python
#设置窗口
win=tk.Tk()
win.title('提取')
win.geometry('600x450')
2.2设置窗口背景
2.2.1设置背景图片
调用image对象的resize方法来调整图像的大小。将调整大小后的PIL Image对象转换为Tkinter兼容的PhotoImage对象。
python
#背景设计
image = Image.open("14.gif")
image = image.resize((600, 450))  # 调整背景图片大小
photo1 = ImageTk.PhotoImage(image)
canvas = tk.Label(win, image=photo1)
canvas.pack()
2.2.2创建label控件
Label控件可以用来显示文本、图像或其他内容。在这里,它被用来显示前面创建的PhotoImage对象,即背景图片。
python
canvas = tk.Label(win, image=photo1)
canvas.pack()
3.定义单人脸提取脚本
定义一个名为ONE的函数,在Python中运行另一个名为 "单人脸提取.py" 的脚本,并在成功执行后关闭当前的Tkinter窗口 win。如果在这个过程中出现任何异常,它会弹出一个错误消息框,显示具体的错误信息。
python
# 定义单人脸提取
def ONE():
    script_path = "单人脸提取.py"
    try:
        #运行文件
        subprocess.Popen(["python", script_path])
        win.destroy()
    except Exception as e:
        # 如果有错误,弹出消息框
        messagebox.showerror("Error", f"无法打开脚本:{e}")
4.定义多人脸提取脚本
定义一个名为TWO的函数,在Python中运行另一个名为 "多人脸提取.py" 的脚本,并在成功执行后关闭当前的Tkinter窗口 win。如果在这个过程中出现任何异常,它会弹出一个错误消息框,显示具体的错误信息。
python
# 定义多人脸提取
def TWO():
    script_path = "多人脸提取.py"
    try:
        #运行文件
        subprocess.Popen(["python", script_path])
        win.destroy()
    except Exception as e:
        # 如果有错误,弹出消息框
        messagebox.showerror("Error", f"无法打开脚本:{e}")
5.创建一个退出对话框
定义一个名为 close 的函数,该函数用于在Tkinter图形用户界面中创建一个确认退出对话框。当用户点击"确定"时,窗口 win 将被关闭;如果用户点击"取消",则不会发生任何操作。
python
# 定义退出
def close():
    if messagebox.askokcancel("退出", "确定要退出吗?"):
        win.destroy()
6.按钮设计
6.1单人脸提取按钮
设计一个按钮,用于在Tkinter图形用户界面中触发人脸识别功能。当用户点击这个按钮时,会调用之前定义的 ONE函数。
python
# 按钮设计
image = Image.open("F14.gif")  # 加载一张图片
photo2 = ImageTk.PhotoImage(image)
bt1 = tk.Button(win, image=photo2, width=198, height=31,command=ONE)
bt1.place(x=190, y=140)
6.2多人脸提取按钮
设计一个按钮,用于在Tkinter图形用户界面中触发人脸识别功能。当用户点击这个按钮时,会调用之前定义的 TWO函数。
python
image = Image.open("F15.gif")  # 加载一张图片
photo3 = ImageTk.PhotoImage(image)
bt2 = tk.Button(win, image=photo3, width=198, height=31,command=TWO)
bt2.place(x=190, y=230)
6.3返回按钮
定义一个名为 bt3的按钮,该按钮将显示一个前面导入的名为 "B.gif" 的 图像,并且当用户点击这个按钮时,会执行一个名为 sb 的函数。
python
image = Image.open("B.gif")  # 加载一张图片
photo4 = ImageTk.PhotoImage(image)
bt3 = tk.Button(win, image=photo4, width=198, height=32,command=close)
bt3.place(x=520, y=30)
用法:close函数通常这个函数用来关闭应用程序窗口。
7.定义关键函数
win.mainloop() 是 Tkinter GUI 应用程序中的一个关键函数,它启动了 Tkinter 的事件循环。
这个事件循环是 GUI 应用程序的核心,它负责处理用户输入(如鼠标点击、按键等),更新窗口内容,以及响应用户的操作。
python
win.mainloop()注:当你调用 win.mainloop() 时,以下几件事情会发生:
1.窗口 win 会显示在屏幕上。
2.应用程序会开始监听和响应事件,如按钮点击、输入框文字变化等。
3.当用户进行操作(如点击按钮),Tkinter 会触发相应的事件处理函数(例如,你设置的 command 参数对应的函数)。
4.如果没有事件发生,应用程序会保持空闲状态,不会占用太多CPU资源。
5.当你关闭窗口或者调用 win.destroy() 时,win.mainloop() 会退出,事件循环结束,应用程序终止。
8.人脸提取页面运行结果图
人脸提取页面完整代码
python
import tkinter as tk
from tkinter import messagebox
import subprocess
from PIL import ImageTk, Image


#设置窗口
win=tk.Tk()
win.title('提取')
win.geometry('600x450')


#背景设计
image = Image.open("14.gif")
image = image.resize((600, 450))  # 调整背景图片大小
photo1 = ImageTk.PhotoImage(image)
canvas = tk.Label(win, image=photo1)
canvas.pack()

#定义单人脸提取
def ONE():
    script_path = "单人脸提取.py"
    try:
        #运行文件
        subprocess.Popen(["python", script_path])
        win.destroy()
    except Exception as e:
        # 如果有错误,弹出消息框
        messagebox.showerror("Error", f"无法打开脚本:{e}")

#定义多人脸提取
def TWO():
    script_path = "多人脸提取.py"
    try:
        # 运行文件
        subprocess.Popen(["python", script_path])
        win.destroy()
    except Exception as e:
        # 如果有错误,弹出消息框
        messagebox.showerror("Error", f"无法打开脚本:{e}")

def close():
    subprocess.Popen(["python","登录页面.py"])
    win.destroy()

# 按钮设计
image = Image.open("F14.gif")  # 加载一张图片
photo2 = ImageTk.PhotoImage(image)
bt1 = tk.Button(win, image=photo2, width=198, height=31,command=ONE)
bt1.place(x=190, y=140)

image = Image.open("F15.gif")  # 加载一张图片
photo3 = ImageTk.PhotoImage(image)
bt2 = tk.Button(win, image=photo3, width=198, height=31,command=TWO)
bt2.place(x=190, y=230)

image = Image.open("B.gif")  # 加载一张图片
photo4 = ImageTk.PhotoImage(image)
bt3 = tk.Button(win, image=photo4, width=198, height=32,command=close)
bt3.place(x=190, y=320)


win.mainloop()
六、单人脸提取页面
1.导入所需的包
tkinter:
Tkinter是Python的标准GUI(图形用户界面)库。它提供了一个快速和简单的方式来创建GUI应用程序。tkinter模块是Tkinter库的主模块,包含了创建窗口、按钮、文本框等基本GUI组件的类和函数。
filedialog:
这个模块是tkinter的一个扩展,提供了一个文件对话框,允许用户选择文件或目录。它是tkinter的一部分,通常与tkinter一起使用来创建文件选择器。
face_recognition:
这个模块是一个Python库,用于对人脸进行识别和对图片中的人脸进行定位。它使用深度学习算法来识别人脸,并且可以处理实时视频或静态图片。
PIL (Python Imaging Library):
PIL是一个强大的图像处理库,它支持多种图像文件格式,并提供了一系列图像处理功能,如打开、修改、保存图像,以及图像处理操作(如缩放、裁剪、颜色转换等)。
ImageTk:
ImageTk是PIL库中用于与Tkinter一起使用的模块,它提供了在Tkinter中显示图像的功能。它通常与Tkinter的PhotoImage类一起使用,以在Tkinter应用程序中显示PIL的Image对象。
subprocess:
这个模块允许您启动新的进程,连接到它们的输入/输出/错误管道,并获取它们的返回码。通常用于执行系统命令或运行外部程序。
python
import tkinter as tk
from tkinter import filedialog
import face_recognition
from PIL import Image, ImageTk
import subprocess
2.设置窗口
2.1定义窗口外观和大小
实例化窗口,设置窗口标题,尺寸。
python
win = tk.Tk()
win.title('Welcome')
win.geometry('750x600')
2.2设置窗口背景
2.2.1设置背景图片
调用image对象的resize方法来调整图像的大小。将调整大小后的PIL Image对象转换为Tkinter兼容的PhotoImage对象。
python
#背景设计
image = Image.open("9.gif")
image = image.resize((750, 600))  # 调整背景图片大小
photo1 = ImageTk.PhotoImage(image)
2.2.2创建label控件
Label控件可以用来显示文本、图像或其他内容。在这里,它被用来显示前面创建的PhotoImage对象,即背景图片。
python
canvas = tk.Label(win, image=photo1)
canvas.pack()
3.定义两个全局变量
定义全局变量时,使用None来初始化它们,这意味着在程序开始时,它们不指向任何具体的图像路径或标签对象。在实际的应用程序中,将会通过用户的操作或程序的逻辑来更新这些变量,以便它们能够存储图像路径和显示图像。
python
file_path = None
face_image_label = None
用法:
file_path: 这个变量被用来保存用户选择的图片文件的路径。在图像处理或显示图像的应用
程序中,您可能需要存储用户选择的图像文件的路径,以便之后进行操作,如加
载、显示或处理图像
face_image_label: 这个变量通常用于在Tkinter应用程序中显示处理后的图像。在Tkinter中,Label组件可以用来显示文本或图像。face_image_label可能被用来引用一个Label组件,该组件被配置为显示一个图像。这个标签可以放置在窗口中,并且可以根据需要更新以显示不同的图像。
4.定义选择图片函数
4.1定义函数和声明全局变量
定义了一个名为 xz 的函数,并在函数内部声明了全局变量 file_path。
python
def xz():
    global file_path
4.2 打开文件对话框并获取文件路径
使用 tkinter 的 filedialog 模块来弹出一个文件选择对话框,让用户选择一个图片文件。如果用户选择了文件,file_path 将包含该文件的路径;如果用户取消了选择,file_path 将为 None。
python
file_path = filedialog.askopenfilename(title="选择图片",
                                   filetypes=(("图片文件", "*.png *.jpg *.jpeg *.bmp"),
                                            ("所有文件", "*.*")))
4.3 处理图片并创建标签
首先检查 file_path 是否有值,如果有,则打开这个路径对应的图片文件,并调整其大小到 370x450 像素。然后,它将调整后的图片转换为 Tkinter 可以显示的 PhotoImage 对象,并创建一个新的 Label 组件来显示这个图像。
python
if file_path:
      image = Image.open(file_path)
      image = image.resize((370, 450))
      photo = ImageTk.PhotoImage(image)
      image_label = tk.Label(win, image=photo)
      image_label.image = photo
4.4 显示图像
将图像标签放置在主窗口的 (10, 100) 位置。
python
image_label.place(x=10, y=100)5.检测人脸并提取
5.1函数定义和全局变量声明
定义了一个名为 tq 的函数,并在函数内部声明了两个全局变量 file_path 和 face_image_label。这意味着函数内部对这些变量的修改将会影响函数外部的同名变量。
python
def tq():
    global file_path, face_image_label
5.2条件判断和图片加载
首先检查 file_path 是否有值,如果有,则使用 face_recognition 库的 load_image_file 函数来加载这个路径对应的图片文件。然后,它使用 face_recognition 库的 face_locations 函数来检测图片中的人脸位置,这里使用了 hog 模型。
python
if file_path:
      img = face_recognition.load_image_file(file_path)
      face_locations = face_recognition.face_locations(img, model='hog')
5.3 遍历人脸位置并提取人脸
遍历 face_locations 列表中的每个元素,每个元素是一个元组,包含了一个人脸的边界框的坐标。它使用这些坐标来从原始图片中提取出对应的人脸区域。
python
for i, face_location in enumerate(face_locations):
      top, right, bottom, left = face_location
      face_img = img[top:bottom, left:right]
5.4 保存和显示提取的人脸
将提取的人脸保存为一个文件,并创建一个新的人脸图像对象。然后,它将这个图像对象调整到 100x100 像素的大小,并将其转换为 Tkinter 可以显示的 PhotoImage 对象。
python
face_name = f"face_{i}.jpg"
face_image = Image.fromarray(face_img)
face_image = face_image.resize((100, 100)
face_photo = ImageTk.PhotoImage(face_image)
5.5 处理已有的图像标签
检查是否存在一个名为 face_image_label 的图像标签。如果有,它将这个标签从窗口中移除。
python
if face_image_label:
      face_image_label.destroy()
5.5 创建新的图像标签并显示人脸
创建一个新的图像标签,用于显示处理后的人脸。它将 face_photo 设置为标签的图像,并将其放置在主窗口的 (430, 100) 位置。
python
face_image_label = tk.Label(win, image=face_photo)
face_image_label.image = face_photo
face_image_label.place(x=430, y=100)
6.定义关闭窗口的函数
当用户点击一个按钮或执行其他操作以触发 close 函数时,当前的 Tkinter 窗口将被关闭,并且一个新的 Python 进程将被启动来执行 登录页面.py 脚本。
python
def close():
    subprocess.Popen(["python","提取页面.py"])
    win.destroy()
用法:close函数可以用来在应用程序中创建一个简单的退出功能,或者在需要时启动新的应用程序或脚本。
7.按钮设计
7.1选择图片按钮
定义一个名为 bt1 的按钮,该按钮将显示一个前面导入的名为 "A.gif" 的 图像,并且当用户点击这个按钮时,会执行一个名为 xz 的函数。
python
image = Image.open("A.gif")  # 加载一张图片
photo2 = ImageTk.PhotoImage(image)
bt1 = tk.Button(win, image=photo2, width=198, height=32,command=xz)
bt1.place(x=30, y=30)
7.2开始提取按钮
定义一个名为 bt2 的按钮,该按钮将显示一个前面导入的名为 "F3.gif" 的 图像,并且当用户点击这个按钮时,会执行一个名为 tq的函数。
python
image = Image.open("F3.gif")  # 加载一张图片
photo3 = ImageTk.PhotoImage(image)
bt2 = tk.Button(win, image=photo3, width=198, height=32,command=tq)
bt2.place(x=275, y=30)
7.3返回按钮
定义一个名为 bt3的按钮,该按钮将显示一个前面导入的名为 "B.gif" 的 图像,并且当用户点击这个按钮时,会执行一个名为 sb 的函数。
python
image = Image.open("B.gif")  # 加载一张图片
photo4 = ImageTk.PhotoImage(image)
bt3 = tk.Button(win, image=photo4, width=198, height=32,command=close)
bt3.place(x=520, y=30)
用法:close函数通常这个函数用来关闭应用程序窗口。
8.定义关键函数
win.mainloop() 是 Tkinter GUI 应用程序中的一个关键函数,它启动了 Tkinter 的事件循环。
这个事件循环是 GUI 应用程序的核心,它负责处理用户输入(如鼠标点击、按键等),更新窗口内容,以及响应用户的操作。
python
win.mainloop()注:当你调用 win.mainloop() 时,以下几件事情会发生:
1.窗口 win 会显示在屏幕上。
2.应用程序会开始监听和响应事件,如按钮点击、输入框文字变化等。
3.当用户进行操作(如点击按钮),Tkinter 会触发相应的事件处理函数(例如,你设置的 command 参数对应的函数)。
4.如果没有事件发生,应用程序会保持空闲状态,不会占用太多CPU资源。
5.当你关闭窗口或者调用 win.destroy() 时,win.mainloop() 会退出,事件循环结束,应用程序终止。
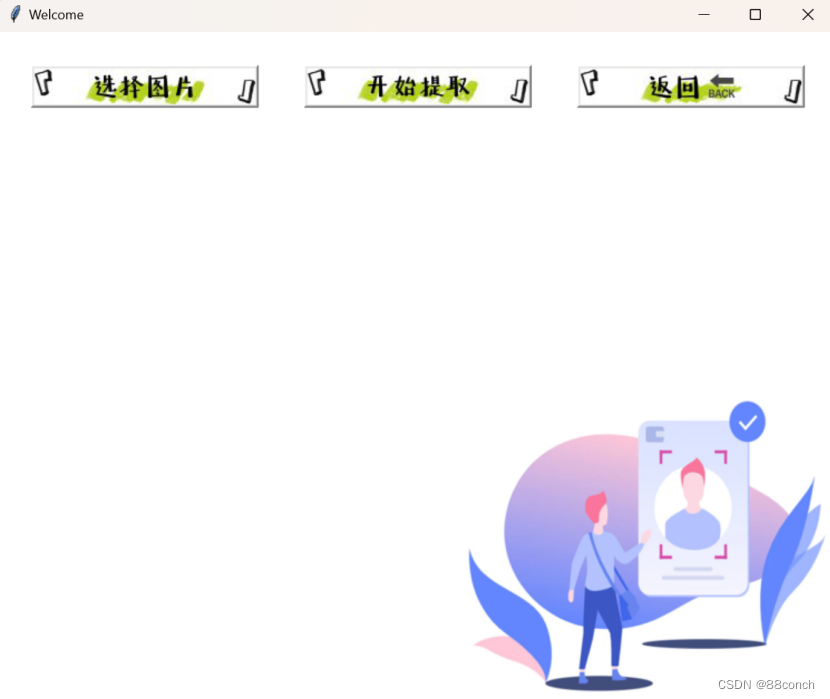
9.单人脸提取页面运行结果图
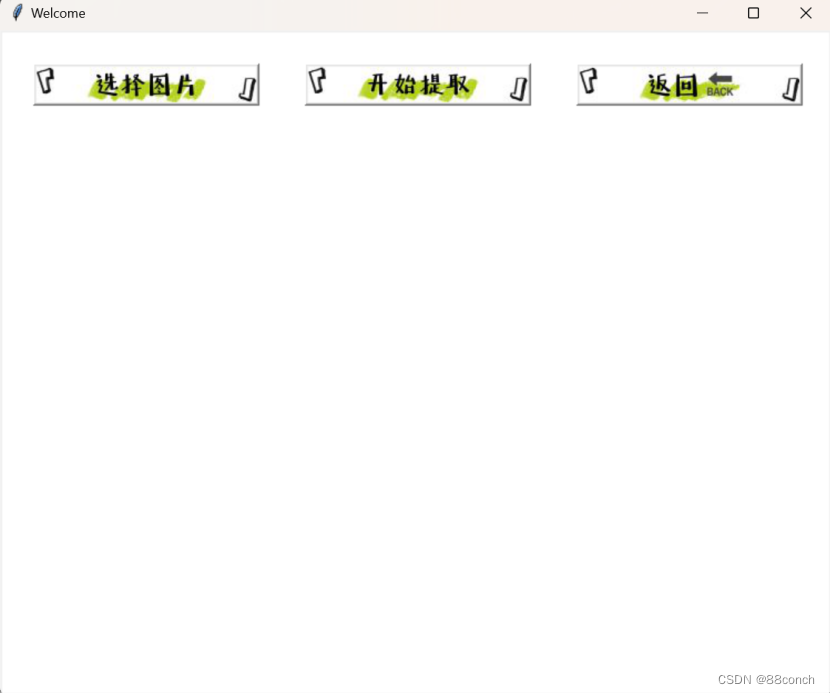
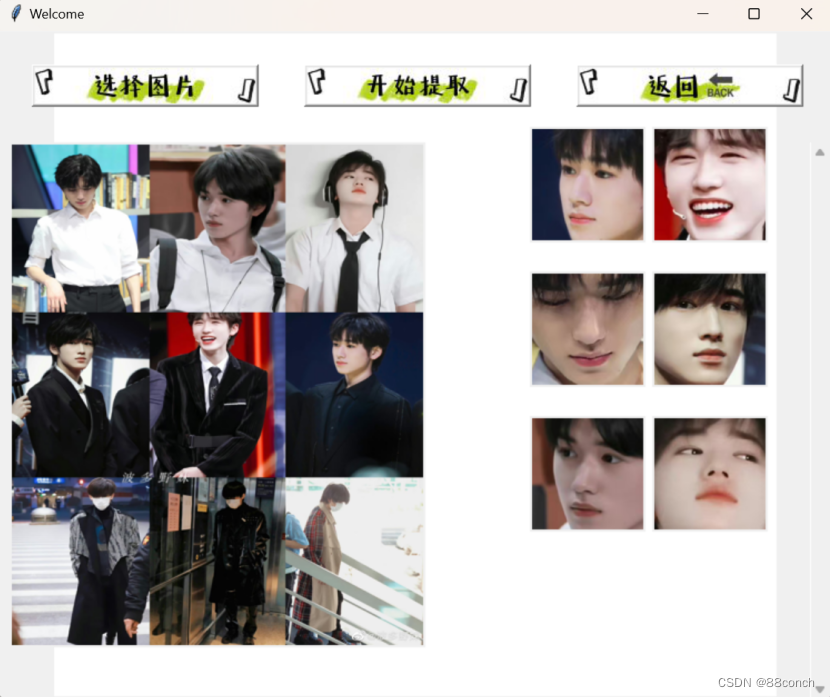
10.单人脸提取页面功能展示图

单人脸提取页面完整代码
python
import tkinter as tk
from tkinter import filedialog
import face_recognition
from PIL import Image, ImageTk
import subprocess

win = tk.Tk()
win.title('Welcome')
win.geometry('750x600')

#背景设计
image = Image.open("9.gif")
image = image.resize((750, 600))  # 调整背景图片大小
photo1 = ImageTk.PhotoImage(image)
canvas = tk.Label(win, image=photo1)
canvas.pack()


file_path = None
face_image_label = None

def xz():
    global file_path
    file_path = filedialog.askopenfilename(title="选择图片",
                                           filetypes=(("图片文件", "*.png *.jpg *.jpeg *.bmp"),
                                                      ("所有文件", "*.*")))
    if file_path:
        image = Image.open(file_path)
        image = image.resize((370, 450))
        photo = ImageTk.PhotoImage(image)
        image_label = tk.Label(win, image=photo)
        image_label.image = photo
        image_label.place(x=10, y=100)

def tq():
    global file_path, face_image_label
    if file_path:
        img = face_recognition.load_image_file(file_path)
        face_locations = face_recognition.face_locations(img, model='hog')

        for i, face_location in enumerate(face_locations):
            top, right, bottom, left = face_location
            face_img = img[top:bottom, left:right]

            face_name = f"face_{i}.jpg"
            face_image = Image.fromarray(face_img)
            face_image = face_image.resize((100, 100))
            face_photo = ImageTk.PhotoImage(face_image)

            if face_image_label:
                face_image_label.destroy()

            face_image_label = tk.Label(win, image=face_photo)
            face_image_label.image = face_photo
            face_image_label.place(x=430, y=100)

def close():
    win.destroy()  # 先关闭当前窗口
    subprocess.Popen(["python", "提取.py"])  # 再打开新的脚本

#按钮设计
image = Image.open("A.gif")  # 加载一张图片
photo2 = ImageTk.PhotoImage(image)
bt1 = tk.Button(win, image=photo2, width=198, height=32,command=xz)
bt1.place(x=30, y=30)

image = Image.open("F3.gif")  # 加载一张图片
photo3 = ImageTk.PhotoImage(image)
bt2 = tk.Button(win, image=photo3, width=198, height=32,command=tq)
bt2.place(x=275, y=30)

image = Image.open("B.gif")  # 加载一张图片
photo4 = ImageTk.PhotoImage(image)
bt3 = tk.Button(win, image=photo4, width=198, height=32,command=close)
bt3.place(x=520, y=30)

win.mainloop()
七、多人脸提取页面
1.导入所需的包
tkinter:
Tkinter是Python的标准GUI(图形用户界面)库。它提供了一个快速和简单的方式来创建GUI应用程序。tkinter模块是Tkinter库的主模块,包含了创建窗口、按钮、文本框等基本GUI组件的类和函数。
filedialog:
这个模块是tkinter的一个扩展,提供了一个文件对话框,允许用户选择文件或目录。它是tkinter的一部分,通常与tkinter一起使用来创建文件选择器。
face_recognition:
这个模块是一个Python库,用于对人脸进行识别和对图片中的人脸进行定位。它使用深度学习算法来识别人脸,并且可以处理实时视频或静态图片。
PIL (Python Imaging Library):
PIL是一个强大的图像处理库,它支持多种图像文件格式,并提供了一系列图像处理功能,如打开、修改、保存图像,以及图像处理操作(如缩放、裁剪、颜色转换等)。
ImageTk:
ImageTk是PIL库中用于与Tkinter一起使用的模块,它提供了在Tkinter中显示图像的功能。它通常与Tkinter的PhotoImage类一起使用,以在Tkinter应用程序中显示PIL的Image对象。
subprocess:
这个模块允许您启动新的进程,连接到它们的输入/输出/错误管道,并获取它们的返回码。通常用于执行系统命令或运行外部程序。
python
import tkinter as tk
from tkinter import filedialog
import face_recognition
from PIL import Image, ImageTk
import subprocess
2.设置窗口
2.1定义窗口外观和大小
实例化窗口,设置窗口标题,尺寸。
python
win = tk.Tk()
win.title('Welcome')
win.geometry('750x600')
2.2 设置背景
创建canvas组件,并将其放置在主窗口 win 中。设置组件宽度、高度以及背景颜色。
python
# 背景设计
canvas = tk.Canvas(win, width=750, height=600, bg="white")
canvas.pack()
3.定义全局变量
定义这些全局变量时,使用None来初始化它们,这意味着在程序开始时,它们不指向任何具体的文件路径或标签对象。在实际的应用程序中,您会通过用户的操作或程序的逻辑来更新这些变量,以便它们能够存储图片文件的路径和显示处理后的图像。
python
file_path = None
face_image_labels = []
用法:
file_path: 这个变量被用来保存用户选择的图片文件的路径。在图像处理或显示图像的应用程序中,您可能需要存储用户选择的图像文件的路径,以便之后进行操作,如加载、显示或处理图像。
face_image_labels: 这个变量是一个列表,用于存储 Tkinter 窗口中显示的人脸图像标签。当检测到图片中的人脸时,将创建一个新的 Label 组件来显示这个人脸图像,并将这个组件的引用添加到 face_image_labels 列表中。这样,您就可以在应用程序的其他部分访问和操作这些标签。
4.定义选择图片函数
4.1定义函数和声明全局变量
定义了一个名为 xz 的函数,并在函数内部声明了全局变量 file_path。
python
def xz():
    global file_path
4.2 打开文件对话框并获取文件路径
使用 tkinter 的 filedialog 模块来弹出一个文件选择对话框,让用户选择一个图片文件。如果用户选择了文件,file_path 将包含该文件的路径;如果用户取消了选择,file_path 将为 None。
python
file_path = filedialog.askopenfilename(title="选择图片",
                                   filetypes=(("图片文件", "*.png *.jpg *.jpeg *.bmp"),
                                            ("所有文件", "*.*")))
4.3 处理图片并创建标签
首先检查 file_path 是否有值,如果有,则打开这个路径对应的图片文件,并调整其大小到 370x450 像素。然后,它将调整后的图片转换为 Tkinter 可以显示的 PhotoImage 对象,并创建一个新的 Label 组件来显示这个图像。
python
if file_path:
      image = Image.open(file_path)
      image = image.resize((370, 450))
      photo = ImageTk.PhotoImage(image)
      image_label = tk.Label(win, image=photo)
      image_label.image = photo
4.4 显示图像
将图像标签放置在主窗口的 (10, 100) 位置。
python
image_label.place(x=10, y=100)5.检测人脸并提取
5.1定义函数和全局变量声明
定义一个名为 tq 的函数,并在函数内部声明了三个全局变量 file_path、face_image_labels 和 canvas。这意味着函数内部对这些变量的修改将会影响函数外部的同名变量。
python
def tq():
    global file_path, face_image_labels, canvas
5.2条件判断和图片加载
首先检查 file_path 是否有值,如果有,则使用 face_recognition 库的 load_image_file 函数来加载这个路径对应的图片文件。然后,它使用 face_recognition 库的 face_locations 函数来检测图片中的人脸位置,这里使用了 hog 模型。
python
if file_path:
      img = face_recognition.load_image_file(file_path)
      face_locations = face_recognition.face_locations(img, model='hog')
5.3清理旧的图像标签
遍历 face_image_labels 列表中的每个元素,并将其从窗口中移除。
python
for face_image_label in face_image_labels:
      face_image_label.destroy()
5.4设置Canvas组件的尺寸和滚动条
设置了Canvas组件的宽度和高度,以适应所有要显示的人脸图像。它还创建了一个垂直滚动条,以便用户可以滚动查看所有的人脸图像。
python
face_width = 100
spacing = 10
canvas_width = (face_width + spacing) * len(face_locations) - spacing
canvas_height = len(face_locations) * 100

canvas.config(width=canvas_width, height=canvas_height)

scrollbar = tk.Scrollbar(win, orient="vertical", command=canvas.yview)
scrollbar.place(x=730, y=100, height=500)

canvas.configure(yscrollcommand=scrollbar.set)
5.5创建新的图像标签并显示人脸
创建一个新的图像标签,用于显示处理后的人脸。它将 face_photo 设置为标签的图像,并将其放置在Canvas组件中的指定位置。它还设置了 count 变量,以便在放置每两张图片后增加垂直间距。
python
face_image_labels = []
x_p = 430
y_p = 90
count = 0
for i, face_location in enumerate(face_locations):
    top, right, bottom, left = face_location
    face_img = img[top:bottom, left:right]

    face_name = f"face_{i}.jpg"

    face_image = Image.fromarray(face_img)
    face_image = face_image.resize((100, 100))
    face_photo = ImageTk.PhotoImage(face_image)

    face_image_label = tk.Label(canvas, image=face_photo)
    face_image_label.image = face_photo
    canvas.create_window(x_p, y_p, anchor='nw', window=face_image_label)

    face_image_labels.append(face_image_label)


    count += 1
    if count == 2:  # 每放两张图片后增加间距
        x_p = 430  # 重置x_p
        y_p += 130  # 设置第一行和第二行之间的垂直间距为50像素

        count = 0
    else:
        x_p += 110
6.定义函数处理鼠标滚轮事件
定义了一个名为 on_mouse_wheel 的函数,用于处理鼠标滚轮事件,并在 canvas 组件上执行滚动操作。同时,您将这个函数绑定到 canvas 组件上,以便在用户滚动鼠标滚轮时触发该函数。
python
def on_mouse_wheel(event):
    canvas.yview_scroll(-1 * (event.delta // 120), "units")  # 根据鼠标滚轮事件滚动Canvas

canvas.bind_all("<MouseWheel>", on_mouse_wheel)  # 绑定鼠标滚轮事件
7.定义关闭窗口的函数
当用户点击一个按钮或执行其他操作以触发 close 函数时,当前的 Tkinter 窗口将被关闭,并且一个新的 Python 进程将被启动来执行 登录页面.py 脚本。
python
def close():
    subprocess.Popen(["python","提取页面.py"])
    win.destroy()
用法:close函数可以用来在应用程序中创建一个简单的退出功能,或者在需要时启动新的应用程序或脚本。
8.按钮设计
8.1选择图片按钮
定义一个名为 bt1 的按钮,该按钮将显示一个前面导入的名为 "A.gif" 的 图像,并且当用户点击这个按钮时,会执行一个名为 xz 的函数。
python
image = Image.open("A.gif")  # 加载一张图片
photo2 = ImageTk.PhotoImage(image)
bt1 = tk.Button(win, image=photo2, width=198, height=32,command=xz)
bt1.place(x=30, y=30)
8.2开始提取按钮
定义一个名为 bt2 的按钮,该按钮将显示一个前面导入的名为 "F3.gif" 的 图像,并且当用户点击这个按钮时,会执行一个名为 tq的函数。
python
image = Image.open("F3.gif")  # 加载一张图片
photo3 = ImageTk.PhotoImage(image)
bt2 = tk.Button(win, image=photo3, width=198, height=32,command=tq)
bt2.place(x=275, y=30)
8.3返回按钮
定义一个名为 bt3的按钮,该按钮将显示一个前面导入的名为 "B.gif" 的 图像,并且当用户点击这个按钮时,会执行一个名为 sb 的函数。
python
image = Image.open("B.gif")  # 加载一张图片
photo4 = ImageTk.PhotoImage(image)
bt3 = tk.Button(win, image=photo4, width=198, height=32,command=close)
bt3.place(x=520, y=30)
用法:close函数通常这个函数用来关闭应用程序窗口。
9.定义关键函数
win.mainloop() 是 Tkinter GUI 应用程序中的一个关键函数,它启动了 Tkinter 的事件循环。
这个事件循环是 GUI 应用程序的核心,它负责处理用户输入(如鼠标点击、按键等),更新窗口内容,以及响应用户的操作。
python
win.mainloop()注:当你调用 win.mainloop() 时,以下几件事情会发生:
1.窗口 win 会显示在屏幕上。
2.应用程序会开始监听和响应事件,如按钮点击、输入框文字变化等。
3.当用户进行操作(如点击按钮),Tkinter 会触发相应的事件处理函数(例如,你设置的 command 参数对应的函数)。
4.如果没有事件发生,应用程序会保持空闲状态,不会占用太多CPU资源。
5.当你关闭窗口或者调用 win.destroy() 时,win.mainloop() 会退出,事件循环结束,应用程序终止。
10. 多人脸提取页面运行结果图
11.多人脸提取页面功能展示图
多人脸提取页面完整代码
python
import tkinter as tk
from tkinter import filedialog
import face_recognition
from PIL import Image, ImageTk
import subprocess

win = tk.Tk()
win.title('Welcome')
win.geometry('750x600')

# 背景设计
canvas = tk.Canvas(win, width=750, height=600, bg="white")
canvas.pack()

file_path = None
face_image_labels = []

def xz():
    global file_path
    file_path = filedialog.askopenfilename(title="选择图片",
                                           filetypes=(("图片文件", "*.png *.jpg *.jpeg *.bmp"),
                                                      ("所有文件", "*.*")))
    if file_path:
        image = Image.open(file_path)
        image = image.resize((370, 450))
        photo = ImageTk.PhotoImage(image)
        image_label = tk.Label(win, image=photo)
        image_label.image = photo
        image_label.place(x=10, y=100)

def tq():
    global file_path, face_image_labels, canvas

    if file_path:
        img = face_recognition.load_image_file(file_path)
        face_locations = face_recognition.face_locations(img, model='hog')

        for face_image_label in face_image_labels:
            face_image_label.destroy()

        face_width = 100
        spacing = 10
        canvas_width = (face_width + spacing) * len(face_locations) - spacing
        canvas_height = len(face_locations) * 100

        canvas.config(width=canvas_width, height=canvas_height)

        scrollbar = tk.Scrollbar(win, orient="vertical", command=canvas.yview)
        scrollbar.place(x=730, y=100, height=500)

        canvas.configure(yscrollcommand=scrollbar.set)

        face_image_labels = []
        x_p = 430
        y_p = 90
        count = 0
        for i, face_location in enumerate(face_locations):
            top, right, bottom, left = face_location
            face_img = img[top:bottom, left:right]

            face_name = f"face_{i}.jpg"

            face_image = Image.fromarray(face_img)
            face_image = face_image.resize((100, 100))
            face_photo = ImageTk.PhotoImage(face_image)

            face_image_label = tk.Label(canvas, image=face_photo)
            face_image_label.image = face_photo
            canvas.create_window(x_p, y_p, anchor='nw', window=face_image_label)

            face_image_labels.append(face_image_label)


            count += 1
            if count == 2:  # 每放两张图片后增加间距
                x_p = 430  # 重置x_p
                y_p += 130  # 设置第一行和第二行之间的垂直间距为50像素

                count = 0
            else:
                x_p += 110

def on_mouse_wheel(event):
    canvas.yview_scroll(-1 * (event.delta // 120), "units")  # 根据鼠标滚轮事件滚动Canvas

canvas.bind_all("<MouseWheel>", on_mouse_wheel)  # 绑定鼠标滚轮事件

def close():
    win.destroy()  # 先关闭当前窗口
    subprocess.Popen(["python", "提取.py"])  # 再打开新的脚本

# 按钮设计
image = Image.open("A.gif")
photo2 = ImageTk.PhotoImage(image)
bt1 = tk.Button(win, image=photo2, width=198, height=32, command=xz)
bt1.place(x=30, y=30)

image = Image.open("F3.gif")
photo3 = ImageTk.PhotoImage(image)
bt2 = tk.Button(win, image=photo3, width=198, height=32, command=tq)
bt2.place(x=275, y=30)

image = Image.open("B.gif")
photo4 = ImageTk.PhotoImage(image)
bt3 = tk.Button(win, image=photo4, width=198, height=32, command=close)
bt3.place(x=520, y=30)

win.mainloop()