人脸匹配
导入所需的库
cv2:OpenCV库,用于图像处理。
dlib:一个机器学习库,用于人脸检测和特征点预测。
numpy:用于数值计算的库。
PIL和ImageTk:用于处理图像和创建Tkinter兼容的图像对象。
filedialog:Tkinter的一个模块,用于打开文件对话框。
Tk、Label、Button、Canvas:Tkinter库的组件,用于创建GUI。
python
import cv2
import dlib
import numpy as np
from PIL import Image, ImageTk
from tkinter import filedialog
from tkinter import Tk, Label, Button, Canvas
加载dlib的人脸识别模型和面部检测器
使用
dlib.get_frontal_face_detector()加载面部检测器。使用
dlib.shape_predictor()加载面部特征点预测模型。使用
dlib.face_recognition_model_v1()加载人脸识别模型。
python
detector = dlib.get_frontal_face_detector()
predictor = dlib.shape_predictor("shape_predictor_68_face_landmarks.dat")
face_rec = dlib.face_recognition_model_v1("dlib_face_recognition_resnet_model_v1.dat")
读取图片并转换为灰度图
读取图片并转换为灰度图。
使用面部检测器检测图像中的面部。
如果检测到多张或没有脸,则抛出异常。
提取面部特征点并计算人脸编码。
python
def get_face_encoding(image_path):
    img = cv2.imread(image_path)
    gray = cv2.cvtColor(img, cv2.COLOR_BGR2GRAY)
    faces = detector(gray)
    if len(faces) != 1:
        raise ValueError("图片中检测到多张或没有脸")
    face = faces[0]
    shape = predictor(gray, face)
    face_encoding = np.array(face_rec.compute_face_descriptor(img, shape))
    return face_encoding
比较两张人脸
比较两个人脸编码。
计算两个编码之间的欧氏距离。
如果距离小于0.6,则认为它们是同一个人脸。
python
def compare_faces(face1, face2):
    distance = np.linalg.norm(face1 - face2)
    if distance < 0.6:
        return "相同人脸"
    else:
        return "不同人脸"
选择图片并显示结果
定义select_image1、select_image2和select_image3函数。
打开文件对话框让用户选择图片。
将选择的图片显示在相应的画布上。
python
def select_image1():
    global image1_path, image1
    image1_path = filedialog.askopenfilename()
    image1 = Image.open(image1_path)
    image1 = image1.resize((300, 300), Image.LANCZOS)  # 使用Image.LANCZOS替换ANTIALIAS
    photo1 = ImageTk.PhotoImage(image1)
    canvas1.create_image(0, 0, anchor='nw', image=photo1)
    canvas1.image = photo1


def select_image2():
    global image2_path, image2
    image2_path = filedialog.askopenfilename()
    image2 = Image.open(image2_path)
    image2 = image2.resize((300, 300), Image.LANCZOS)  # 使用Image.LANCZOS替换ANTIALIAS
    photo2 = ImageTk.PhotoImage(image2)
    canvas2.create_image(0, 0, anchor='nw', image=photo2)
    canvas2.image = photo2


def select_image3():
    global image3_path, image3
    image3_path = filedialog.askopenfilename()
    image3 = Image.open(image3_path)
    image3 = image3.resize((300, 300), Image.LANCZOS)  # 使用Image.LANCZOS替换ANTIALIAS
    photo3 = ImageTk.PhotoImage(image3)
    canvas3.create_image(0, 0, anchor='nw', image=photo3)
    canvas3.image = photo3
比较图片
定义compare_images1和compare_images2函数:
获取两个人脸编码并进行对比。
显示对比结果。
python
def compare_images1():
    try:
        face1 = get_face_encoding(image1_path)
        face2 = get_face_encoding(image2_path)
        result1 = compare_faces(face1, face2)
        result_label1.config(text=result1)
    except Exception as e:
        result_label1.config(text="发生错误: " + str(e))

def compare_images2():
    try:
        face2 = get_face_encoding(image2_path)
        face3 = get_face_encoding(image3_path)
        result2 = compare_faces(face2, face3)
        result_label2.config(text=result2)
    except Exception as e:
        result_label2.config(text="发生错误: " + str(e))
创建GUI界面
设置窗口标题和大小。
创建画布来显示图片。
创建标签来显示对比结果。
创建按钮让用户选择图片和进行对比。
python
# 创建GUI
root = Tk()
root.title("人脸对比")
root.geometry("1000x620")

# 创建画布来显示图片
canvas1 = Canvas(root, width=300, height=300, bg='white')
canvas1.pack(side='left', padx=10, pady=10)
canvas2 = Canvas(root, width=300, height=300, bg='white')
canvas2.pack(side='left', padx=10, pady=10)
canvas3 = Canvas(root, width=300, height=300, bg='white')
canvas3.pack(side='left', padx=10, pady=10)

# 创建标签来显示结果
result_label1 = Label(root, text="")
result_label1.place(x=300, y=120)
result_label2 = Label(root, text="")
result_label2.place(x=640, y=120)

# 创建按钮来选择图片
button1 = Button(root, text="选择第一张图片", command=select_image1)
button1.place(x=100, y=50)
button2 = Button(root, text="选择第二张图片", command=select_image2)
button2.place(x=450, y=50)
button3 = Button(root, text="选择第三张图片", command=select_image3)
button3.place(x=800, y=50)

# 创建按钮来对比图片
compare_button1 = Button(root, text="对比图像12", command=compare_images1)
compare_button1.place(x=300, y=80)
compare_button2 = Button(root, text="对比图像23", command=compare_images2)
compare_button2.place(x=640, y=80)
运行GUI主循环
python
root.mainloop()运行显示
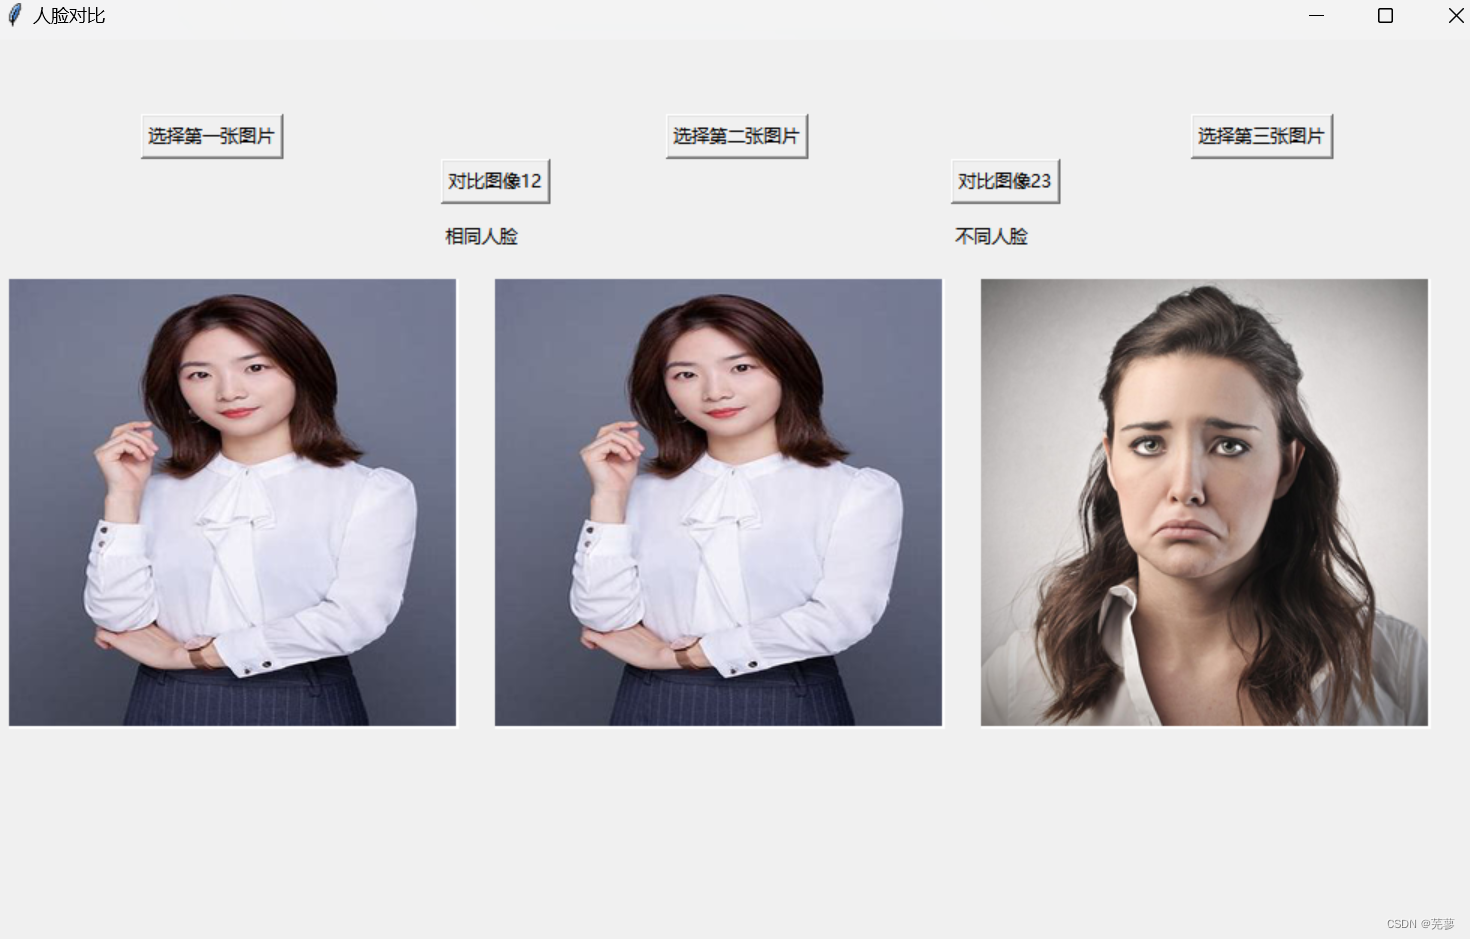
全部代码
python
import cv2
import dlib
import numpy as np
from PIL import Image, ImageTk
from tkinter import filedialog
from tkinter import Tk, Label, Button, Canvas

# 加载dlib的人脸识别模型和面部检测器
#使用dlib.get_frontal_face_detector()加载面部检测器,
# 使用dlib.shape_predictor()加载面部特征点预测模型,
# 使用dlib.face_recognition_model_v1()加载人脸识别模型
detector = dlib.get_frontal_face_detector()
predictor = dlib.shape_predictor("shape_predictor_68_face_landmarks.dat")
face_rec = dlib.face_recognition_model_v1("dlib_face_recognition_resnet_model_v1.dat")

# 读取图片并转换为灰度图
def get_face_encoding(image_path):
    img = cv2.imread(image_path)
    gray = cv2.cvtColor(img, cv2.COLOR_BGR2GRAY)
    faces = detector(gray)
    if len(faces) != 1:
        raise ValueError("图片中检测到多张或没有脸")
    face = faces[0]
    shape = predictor(gray, face)
    face_encoding = np.array(face_rec.compute_face_descriptor(img, shape))
    return face_encoding

# 比较两张人脸
def compare_faces(face1, face2):
    distance = np.linalg.norm(face1 - face2)
    if distance < 0.6:
        return "相同人脸"
    else:
        return "不同人脸"

# 选择图片并显示结果
def select_image1():
    global image1_path, image1
    image1_path = filedialog.askopenfilename()
    image1 = Image.open(image1_path)
    image1 = image1.resize((300, 300), Image.LANCZOS)  # 使用Image.LANCZOS替换ANTIALIAS
    photo1 = ImageTk.PhotoImage(image1)
    canvas1.create_image(0, 0, anchor='nw', image=photo1)
    canvas1.image = photo1


def select_image2():
    global image2_path, image2
    image2_path = filedialog.askopenfilename()
    image2 = Image.open(image2_path)
    image2 = image2.resize((300, 300), Image.LANCZOS)  # 使用Image.LANCZOS替换ANTIALIAS
    photo2 = ImageTk.PhotoImage(image2)
    canvas2.create_image(0, 0, anchor='nw', image=photo2)
    canvas2.image = photo2


def select_image3():
    global image3_path, image3
    image3_path = filedialog.askopenfilename()
    image3 = Image.open(image3_path)
    image3 = image3.resize((300, 300), Image.LANCZOS)  # 使用Image.LANCZOS替换ANTIALIAS
    photo3 = ImageTk.PhotoImage(image3)
    canvas3.create_image(0, 0, anchor='nw', image=photo3)
    canvas3.image = photo3


def compare_images1():
    try:
        face1 = get_face_encoding(image1_path)
        face2 = get_face_encoding(image2_path)
        result1 = compare_faces(face1, face2)
        result_label1.config(text=result1)
    except Exception as e:
        result_label1.config(text="发生错误: " + str(e))

def compare_images2():
    try:
        face2 = get_face_encoding(image2_path)
        face3 = get_face_encoding(image3_path)
        result2 = compare_faces(face2, face3)
        result_label2.config(text=result2)
    except Exception as e:
        result_label2.config(text="发生错误: " + str(e))

# 创建GUI
root = Tk()
root.title("人脸对比")
root.geometry("1000x620")

# 创建画布来显示图片
canvas1 = Canvas(root, width=300, height=300, bg='white')
canvas1.pack(side='left', padx=10, pady=10)
canvas2 = Canvas(root, width=300, height=300, bg='white')
canvas2.pack(side='left', padx=10, pady=10)
canvas3 = Canvas(root, width=300, height=300, bg='white')
canvas3.pack(side='left', padx=10, pady=10)

# 创建标签来显示结果
result_label1 = Label(root, text="")
result_label1.place(x=300, y=120)
result_label2 = Label(root, text="")
result_label2.place(x=640, y=120)

# 创建按钮来选择图片
button1 = Button(root, text="选择第一张图片", command=select_image1)
button1.place(x=100, y=50)
button2 = Button(root, text="选择第二张图片", command=select_image2)
button2.place(x=450, y=50)
button3 = Button(root, text="选择第三张图片", command=select_image3)
button3.place(x=800, y=50)

# 创建按钮来对比图片
compare_button1 = Button(root, text="对比图像12", command=compare_images1)
compare_button1.place(x=300, y=80)
compare_button2 = Button(root, text="对比图像23", command=compare_images2)
compare_button2.place(x=640, y=80)

root.mainloop()