目录
[1. 初始化网络:](#1. 初始化网络:)
[2. 训练判别器:](#2. 训练判别器:)
[3. 训练生成器:](#3. 训练生成器:)
[4. 重复步骤 2和步骤 3:](#4. 重复步骤 2和步骤 3:)
[1. 模型结构](#1. 模型结构)
[2. 代码](#2. 代码)
[3. 运行结果展示](#3. 运行结果展示)
[1. 生成器(Generator)模型理解](#1. 生成器(Generator)模型理解)
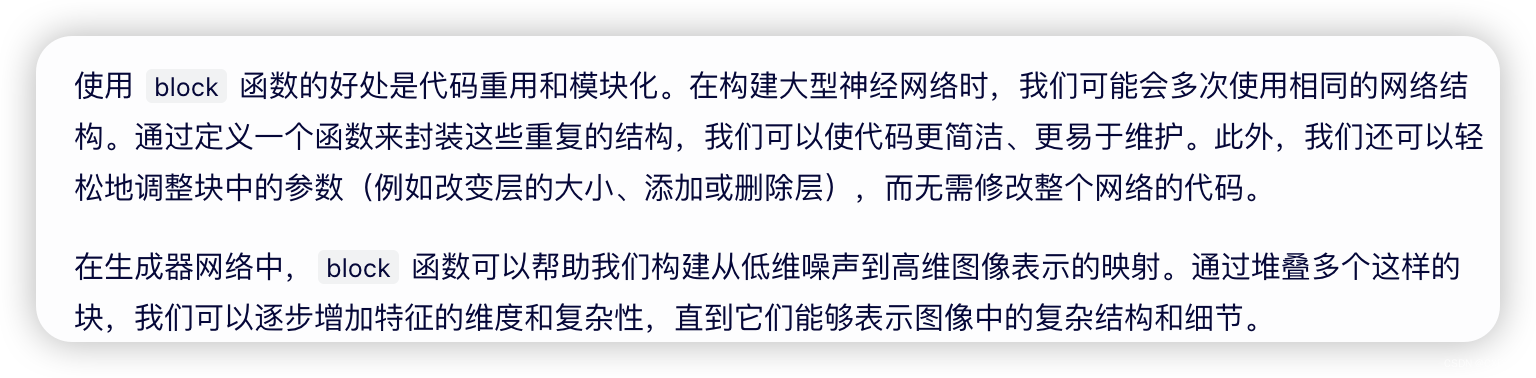
[2. 为什么要使用 block 函数?](#2. 为什么要使用 block 函数?)
[3. 函数解释](#3. 函数解释)
[4. 为什么要将像素值从0, 255缩放到0.0, 1.0 ?](#4. 为什么要将像素值从[0, 255]缩放到[0.0, 1.0] ?)
[5. 详细解释一下是怎样对Tensor进行标准化的,以及为什么要这么做?](#5. 详细解释一下是怎样对Tensor进行标准化的,以及为什么要这么做?)
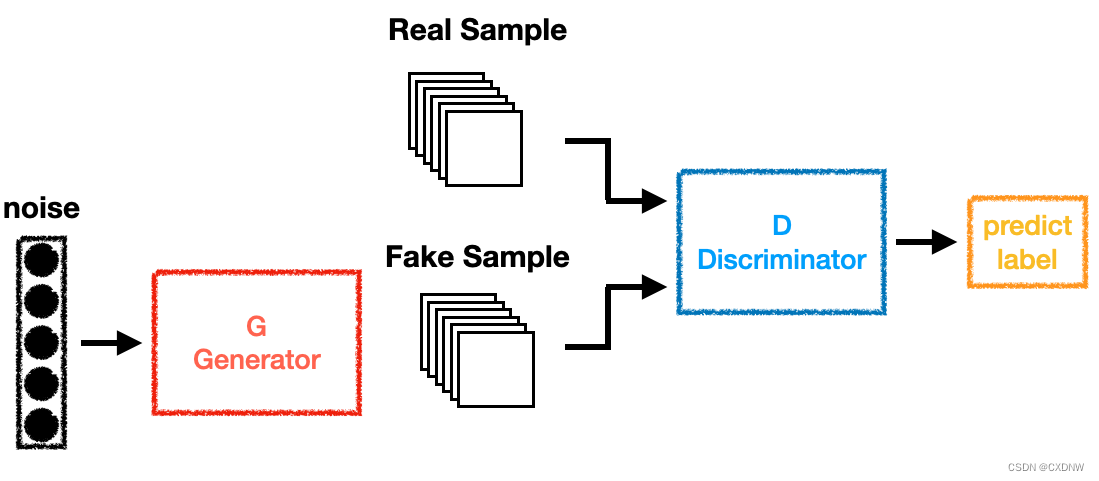
一、GAN模型介绍
GAN,全称 Generative Adversarial Network,即生成对抗网络,是一种基于 对抗学习的深度生成模型。该模型由Ian Goodfellow在 2014年 首次提出,并迅速成为 学术界研究的热点,推动了生成模型领域的发展。
GAN模型主要由两部分组成:生成器(Generator)和判别器(Discriminator)。
1. 生成器:**生成器模型**可以是 任意结构的神经网络**,其 输入是 随机噪声(torch.randn),输出则是 生成的样本。生成器的 目标是使生成的样本尽可能接近真实样本的分布,以欺骗判别器。
2. 判别器:判别器模型同样可以是任意结构的神经网络 ,其 输入是真实样本或生成器生成的样本,输出是一个 概率值,表示 输入样本是真实样本的概率。判别器的 目标是尽可能准确地判断输入样本是真实样本还是生成样本。
这两个网络 在训练过程中 相互对抗、相互优化,形成了一种 零和博弈。
二、GAN模型的训练过程
1. 初始化 网络 :
生成器(Generator)和判别器(Discriminator)的参数需要随机初始化。这两个网络都是神经网络,通常使用随机权重开始训练。
python
# 实例化
generator = Generator()
discriminator = Discriminator()
2. 训练判别器 :
(1)从真实数据集中 随机选择一批数据,将其输入到 判别器中进行训练。
python
for i, (img, _) in enumerate(dataloader): # 内层迭代次数为 10000 // 64 = 157次,每次 64个数据(2)同时,从生成器的当前状态生成一批假数据(也称为生成数据),也将这些数据输入到判别器中进行训练。
python
# 假数据的生成
fake_img = torch.randn(size, 100)
(3)在训练判别器时,需要固定生成器的参数(.detach函数),只更新判别器的参数。
python
output_fake = generator(fake_img)
fake_socre = discriminator(output_fake.detach()) (4)判别器的目标是将真实数据和假数据区分开来,因此其损失函数通常定义为二元交叉熵损失函数(.BCELoss函数)。
python
# 损失函数
criterion = torch.nn.BCELoss()    # 对应 Sigmoid,计算二元交叉墒损失
(5)使用反向传播算法更新判别器的参数,以最小化损失函数。
3. 训练生成器 :
(1)生成器的目标是生成与真实数据相似的假数据,使得判别器无法区分真实数据和假数据。
(2)生成器的 损失函数通常定义为 判别器对 假数据的 输出结果的 交叉熵损失函数的 相反数。换句话说,生成器希望判别器 对假数据的判断结果 尽可能接近真实数据。
python
fake_G_socre = discriminator(output_fake)
G_fake_loss = criterion(fake_G_socre, torch.ones_like(fake_G_socre))(3)同样使用反向传播算法更新生成器的参数,以最小化其损失函数。
4. 重复步骤 2和步骤 3 :
(1)在每一轮训练中,先 训练判别器,然后 训练生成器。这样可以确保两个网络都能得到足够的优化。
(2)重复这个过程,直到达到预设的迭代次数或满足某种收敛条件(如生成器生成的假数据与真实数据的差距达到一定程度,本案例没有设计)。
三、GAN实现
1. 模型结构
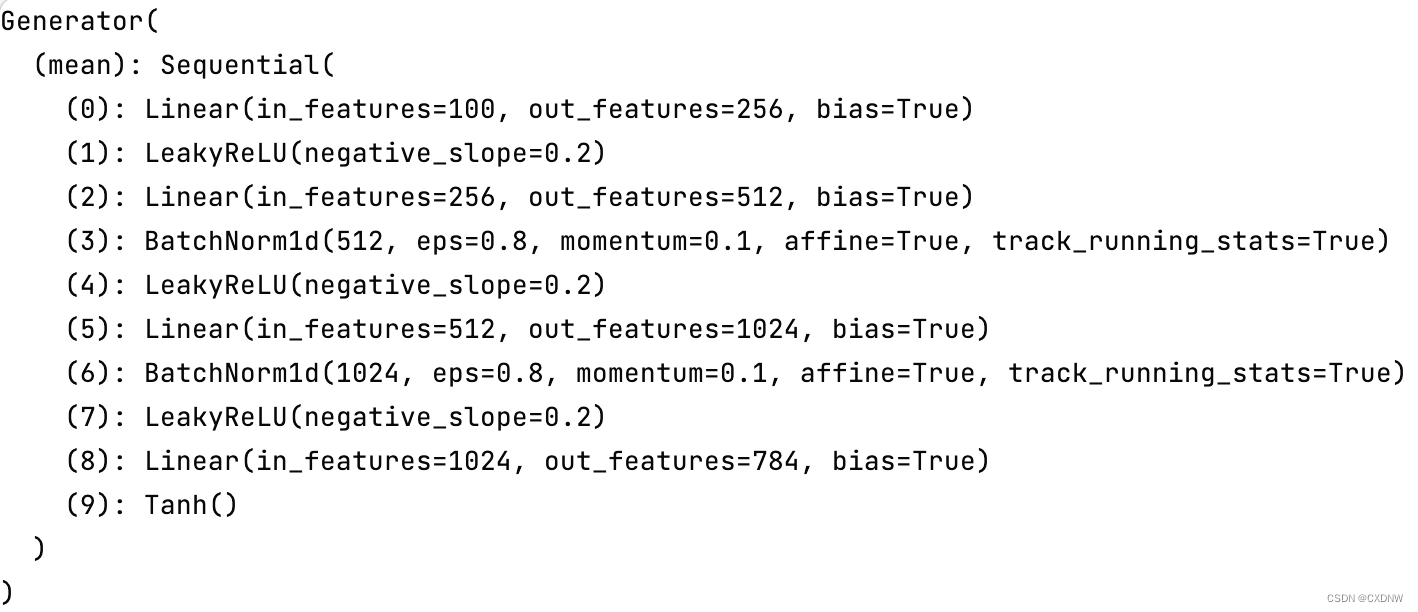
(1)生成器(Generator)
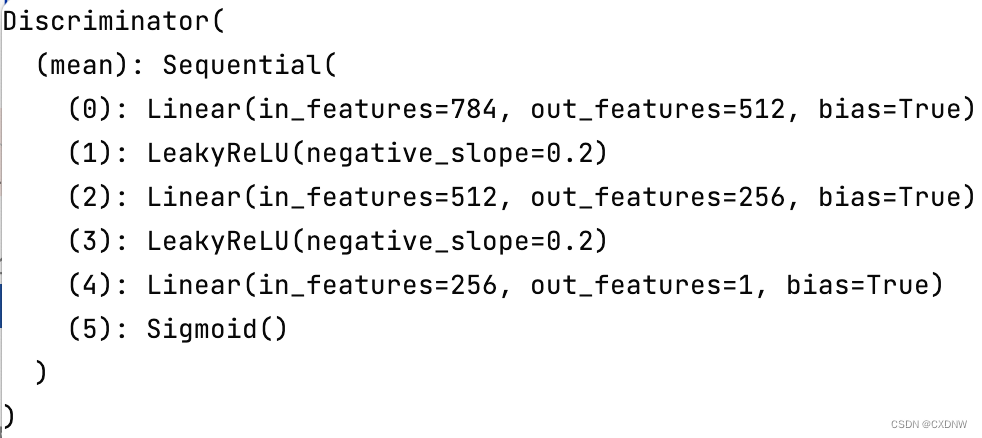
(2)判别器(Discriminator)
2. 代码
python
import torch
import torch.nn as nn
import torchvision.transforms as transforms
from torchvision import datasets
from torch.utils.data import DataLoader
import numpy as np
import matplotlib.pyplot as plt
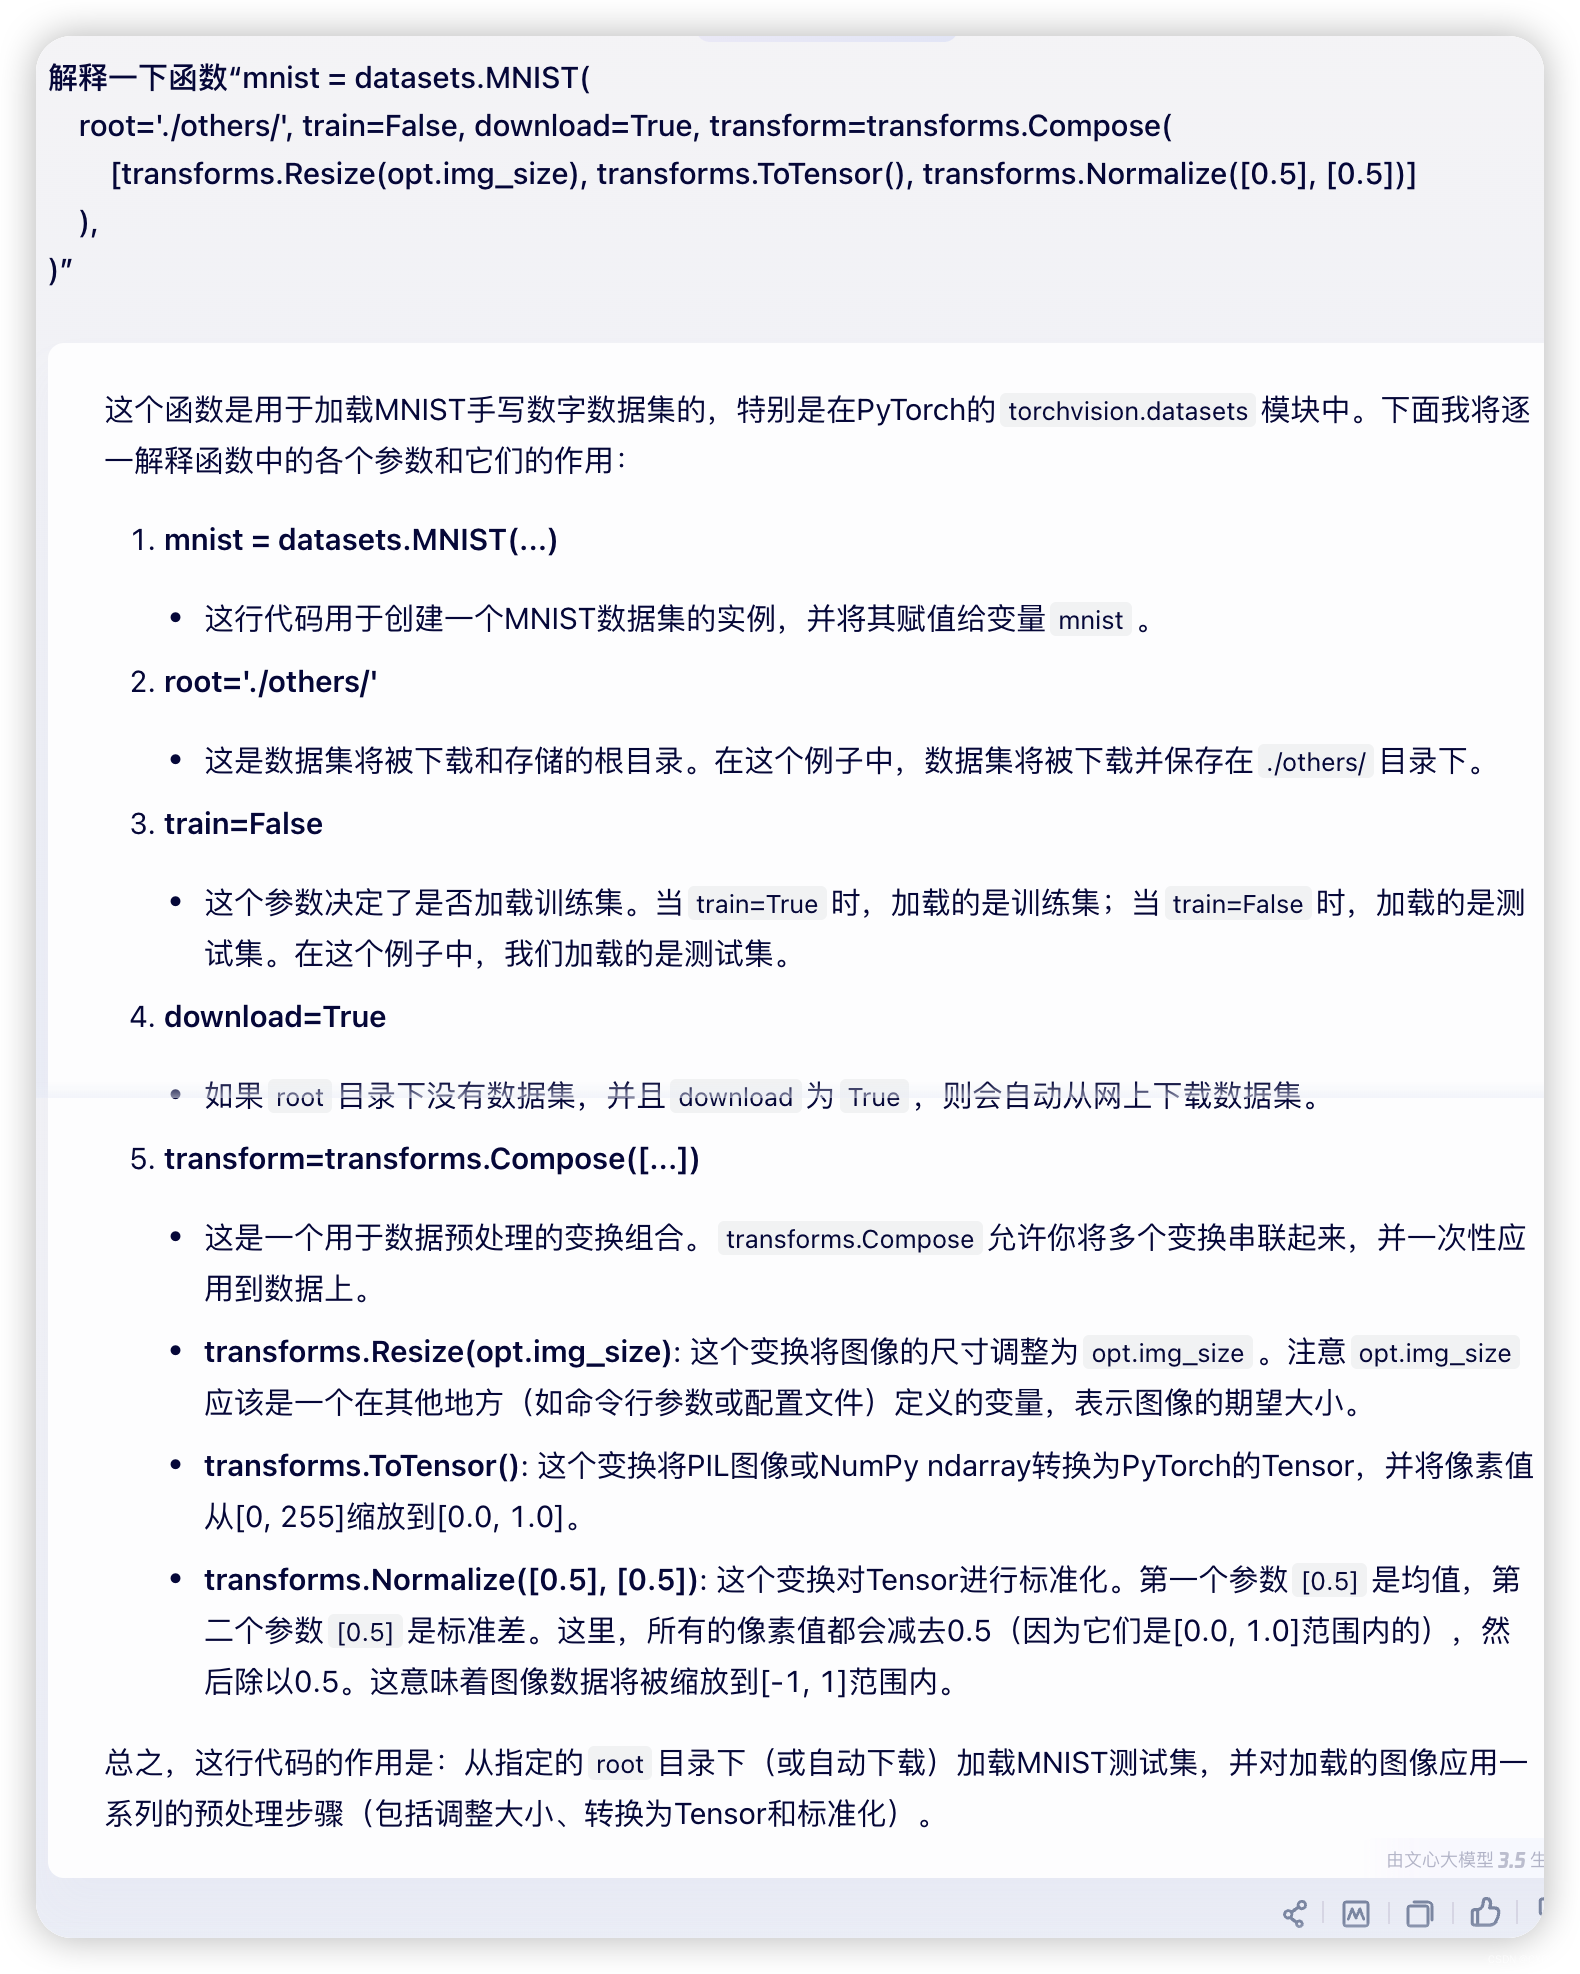
mnist = datasets.MNIST(
root='./others/',
train=False,
download=False,
transform=transforms.Compose([
transforms.Resize((28, 28)),
transforms.ToTensor(),
transforms.Normalize([0.5], [0.5])
])
)
dataloader = DataLoader(
dataset=mnist,
batch_size=64,
shuffle=True
)
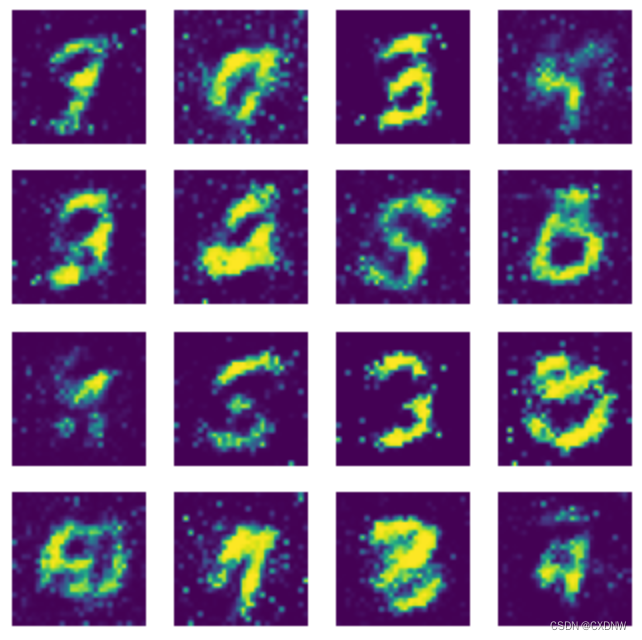
def gen_img_plot(model, epoch, text_input):
prediction = np.squeeze(model(text_input).detach().cpu().numpy()[:16])
plt.figure(figsize=(4, 4))
for i in range(16):
plt.subplot(4, 4, i + 1)
plt.imshow((prediction[i] + 1) / 2)
plt.axis('off')
plt.show()
# 生成器定义
class Generator(nn.Module):
def __init__(self):
super(Generator, self).__init__()
def block(in_feat, out_feat, normalize=True):
layers = [nn.Linear(in_feat, out_feat)]
if normalize:
layers.append(nn.BatchNorm1d(out_feat, 0.8))
layers.append(nn.LeakyReLU(0.2))
return layers
self.mean = nn.Sequential(
*block(100, 256, normalize=False),
*block(256, 512),
*block(512, 1024),
nn.Linear(1024, 28 * 28),
nn.Tanh()
)
def forward(self, x):
imgs = self.mean(x)
imgs = imgs.view(-1, 1, 28, 28)
return imgs
class Discriminator(nn.Module):
def __init__(self):
super(Discriminator, self).__init__()
self.mean = nn.Sequential(
nn.Linear(28 * 28, 512),
nn.LeakyReLU(0.2),
nn.Linear(512, 256),
nn.LeakyReLU(0.2),
nn.Linear(256, 1),
nn.Sigmoid()
)
def forward(self, x):
x = x.view(-1, 28 * 28)
img = self.mean(x) # 对 64条数据的每一条都进行模型运算
return img
# 实例化
generator = Generator()
discriminator = Discriminator()
# 定义优化器
G_Apim = torch.optim.Adam(generator.parameters(), lr=0.0001)
D_Apim = torch.optim.Adam(discriminator.parameters(), lr=0.0002)
# 损失函数
criterion = torch.nn.BCELoss() # 对应 Sigmoid,计算二元交叉墒损失
epoch_num = 100
G_loss_save = []
D_loss_save = []
for epoch in range(epoch_num): # 将 10000 条数据迭代了两遍
G_epoch_loss = 0
D_epoch_loss = 0
count = len(dataloader)
for i, (img, _) in enumerate(dataloader): # 内层迭代次数为 10000 // 64 = 157次,每次 64个数据
# 训练 Discriminator
# 判断出假的
size = img.size(0) # 0 维有多少个数据
fake_img = torch.randn(size, 100)
output_fake = generator(fake_img)
fake_socre = discriminator(output_fake.detach()) # .detach() 返回一个关闭梯度的 output_fake,这样前向传播不会修改 generater 的 grad
D_fake_loss = criterion(fake_socre, torch.zeros_like(fake_socre))
# 判断出真的
real_socre = discriminator(img)
D_real_loss = criterion(real_socre, torch.ones_like(real_socre))
D_loss = D_fake_loss + D_real_loss
D_Apim.zero_grad()
D_loss.backward()
D_Apim.step()
# 训练 Generater
# G_fake_img = torch.randn(size, 100)
# G_output_fake = generator(G_fake_img)
# fake_G_socre = discriminator(G_output_fake)
fake_G_socre = discriminator(output_fake)
G_fake_loss = criterion(fake_G_socre, torch.ones_like(fake_G_socre))
G_Apim.zero_grad()
G_fake_loss.backward()
G_Apim.step()
with torch.no_grad(): # 其中所有的 requires_grad 都被默认设置为 False
G_epoch_loss += G_fake_loss
D_epoch_loss += D_loss
with torch.no_grad():
G_epoch_loss /= count
D_epoch_loss /= count
G_loss_save.append(G_epoch_loss.item())
D_loss_save.append(D_epoch_loss.item())
print('Epoch: [%d/%d] | G_loss: %.3f | D_loss: %.3f'
% (epoch, epoch_num, G_epoch_loss, D_epoch_loss))
text_input = torch.randn(64, 100)
gen_img_plot(generator, epoch, text_input)
x = [epoch + 1 for epoch in range(epoch_num)]
plt.figure()
plt.plot(x, G_loss_save, 'r')
plt.plot(x, D_loss_save, 'b')
plt.ylabel('loss')
plt.xlabel('epoch')
plt.legend(['G_loss','D_loss'])
plt.show()3. 运行结果展示

四、GAN模型的应用领域
GAN模型 在图像生成、视频生成、文本生成等领域都有 广泛的应用。例如,在图像生成领域,GAN模型可以生成高质量的图像、进行图像修复 和 超分辨率重建 等任务;在视频生成领域,GAN模型可以生成连贯的视频序列;在文本生成领域,GAN模型可以生成逼真的文本内容等。此外,GAN模型还在 AI绘画领域 发挥着 重要作用,成为AI绘画工作流中的 关键辅助模型。
五、学习中产生的疑问,及文心一言回答
1. 生成器(Generator)模型理解

2. 为什么要使用 block 函数?
3. 函数解释
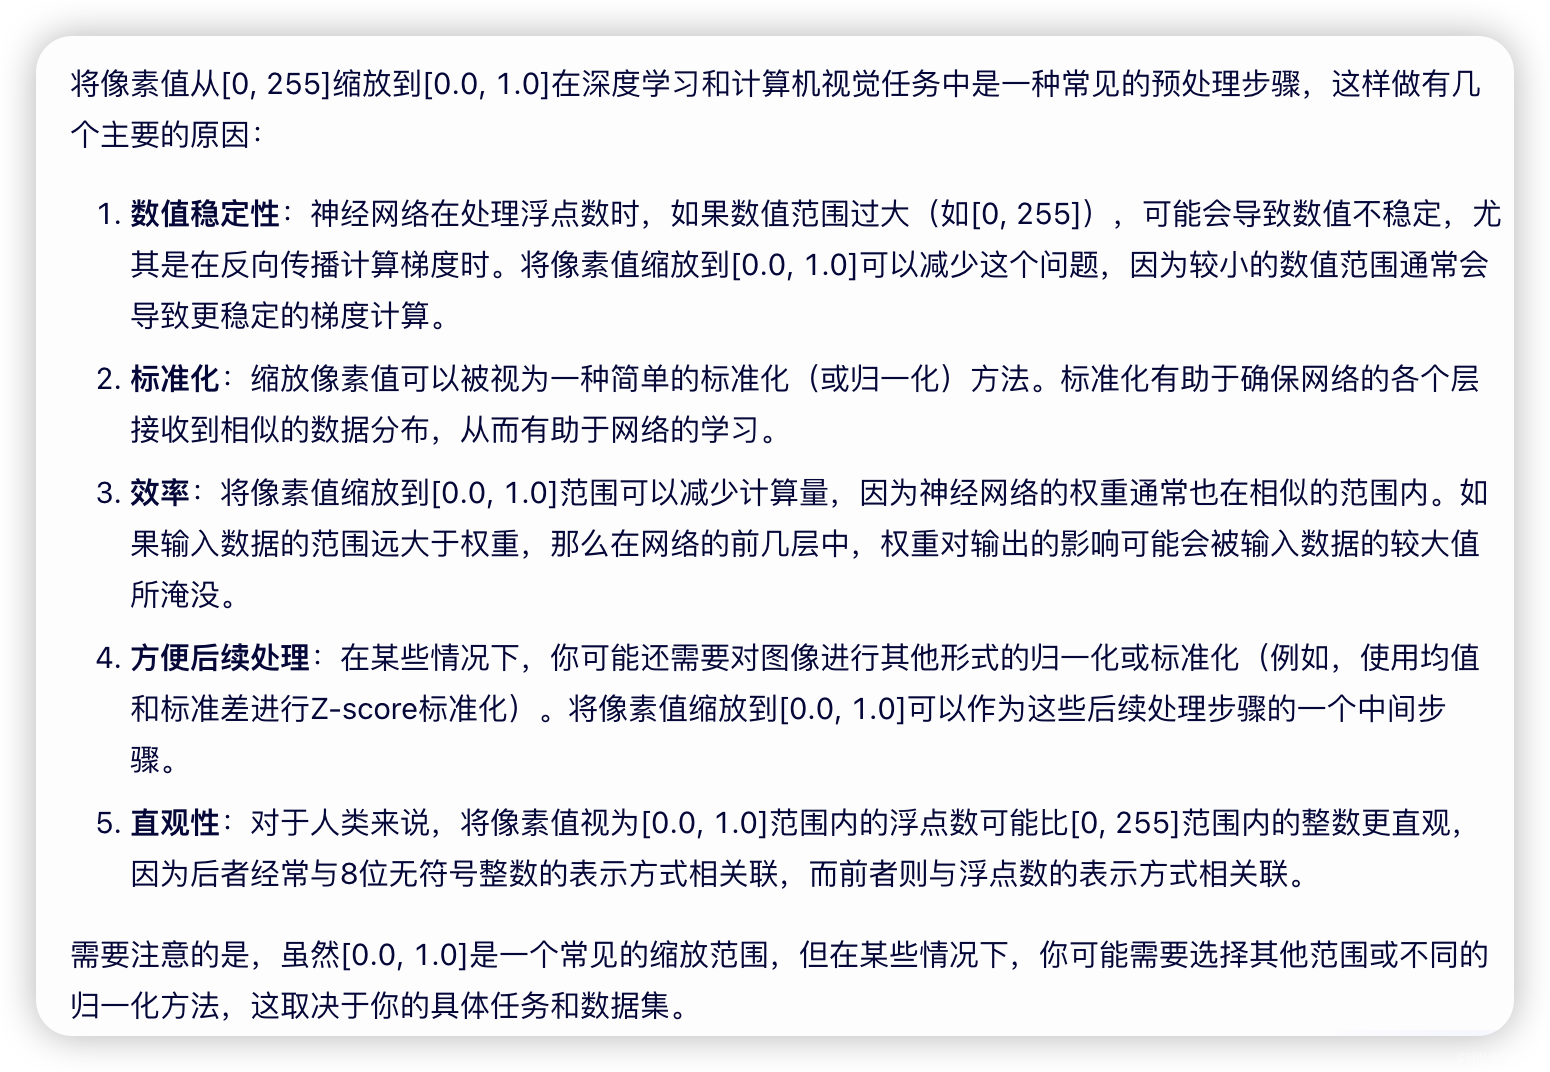
4. 为什么要将像素值从0, 255缩放到0.0, 1.0 ?
5. 详细解释一下是怎样对Tensor进行标准化的,以及为什么要这么做?

后续更新GAN的其他模型结构。