一,外观模式简介
外观模式是一种结构型设计模式, 又称为门面模式,也是一种基于创建对象来实现的模式,为子系统中的各组接口的使用提供了统一的访问入口。
外观模式对外提供了一个对象,让外部客户端(Client)对子系统的访问都是基于该对象来完成,这个对象被称为外观对象(Facade Object),外观对象为子系统的访问提供了一个简单而且统一的入口。
客户端只需要关注Facade提供的对外接口的用法,而不需要关注子系统之间的复杂交互等细节。
举个例子,用户在电话购物的时候,可以不需要知道货物的流动和仓库处理等细节,只需要拨电话然后下单。

二,外观模式的结构
**外观对象(Facade):**它的底层封装了系统的各个子模块,向用户屏蔽了底层的复杂结构,在内部调用各种子系统的函数,对外提供一些简化的接口。
**子系统对象(SubSystem):**是组成复杂系统的各个独立模块,它们各自实现特定的功能,然后被Facade统一调用。
对应UML类图:
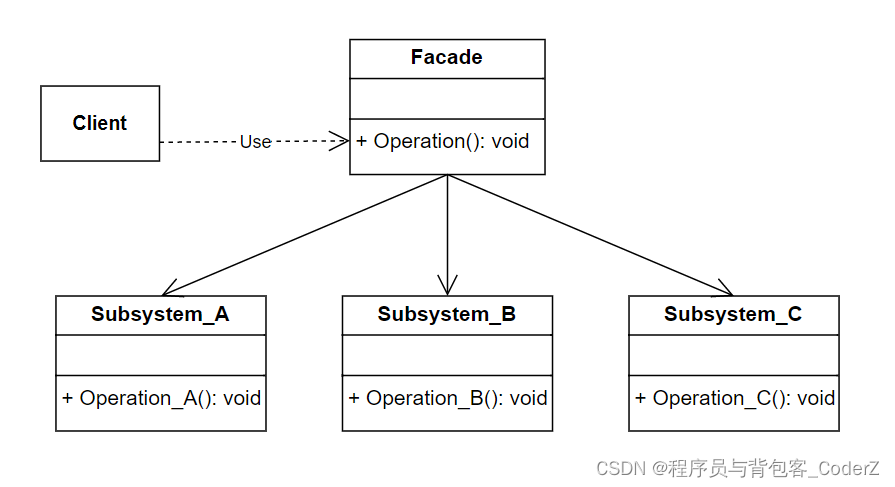
代码实现:
cpp
#include <iostream>
#include <vector>

using namespace std;

class SubSystem {
public:
    virtual void operation() = 0;
};

class SubSystem_A: public SubSystem{
public:
    void operation_A() {
        cout << "Exec operation_A from SubSystem_A" << endl;
    }
    void operation() override {
        operation_A();
    }
};

class SubSystem_B: public SubSystem{
public:
    void operation_B() {
        cout << "Exec operation_B from SubSystem_B" << endl;
    }
    void operation() override {
        operation_B();
    }
};

class SubSystem_C: public SubSystem{
public:
    void operation_C() {
        cout << "Exec operation_C from SubSystem_C" << endl;
    }
    void operation() override {
        operation_C();
    }
};

class Facade {
private:
    std::vector<SubSystem*> subsystems;
public:
    Facade() {
        subsystems.push_back(new SubSystem_A);
        subsystems.push_back(new SubSystem_B);
        subsystems.push_back(new SubSystem_C);
    }
    ~Facade() {
        for (auto* subsystem : subsystems) {
            delete subsystem;
        }
    }

    void executeOperations() {
        for (auto& subsystem : subsystems) {
            subsystem->operation();
        }
    }
};

int main() {
    Facade facade;
    facade.executeOperations();
    return 0;
}
运行结果:
cpp
Exec operation_A from SubSystem_A
Exec operation_B from SubSystem_B
Exec operation_C from SubSystem_C
三,外观模式的应用场景
系统集成:当多个组件或服务接口需要被统一管理和使用时,借助外观模式构建一个统一的入口。
API升级:当API升级时,为了兼容旧版本的API接口的使用,创建一个外观模式的对象,既可以对外提供新的API接口,又向后兼容旧的API接口。
开发第三方库或框架:针对大型的库或者框架的开发,为了简化用户的使用,隐藏底层实现,对外提供一个简单且统一的接口。
组件整合:为了让项目中兼容不同架构和使用方式的组件时,使用外观模式来规范化组件的调用方式。
四,外观模式的优缺点
外观模式的优点:
1.减少了需要客户端关注和处理的对象数,简化了接口的使用方式。
2.实现了子系统和客户端之间的解耦,使子系统的变更不会影响到客户端的调用方法。
3.降低了大型软件的编译难度,简化了大型软件在不同平台之间的移植过程。
4.对外提供接口的同时,可以针对单个子系统实现单独的优化和升级。
5.避免了客户端对内部底层逻辑的影响和破坏。
6.促进了子系统的模块化和可重用性。
外观模式的缺点:
1.对底层的过度包装会增加性能开销。
2.如果设计的不合理,会使重构变得有难度。
3.如果存在访问共享资源的情况,代码的编写不够严谨时,相同层次的子系统和子系统之间可能会互相影响。
4.子系统和子系统之间可能包含相同的功能,导致代码冗余。
五,代码实战
Demo1:模拟计算机的集成
cpp
#include <iostream>
#include <string>

//subSystem
class Monitor {
public:
    void turnOn() {
        std::cout << "Monitor turned on.\n";
    }
    void turnOff() {
        std::cout << "Monitor turned off.\n";
    }
};

//subSystem
class Keyboard {
public:
    void pressKey(int keyCode) {
        std::cout << "Pressed key: " << keyCode << ".\n";
    }
};

//subSystem
class CPU {
public:
    void start() {
        std::cout << "CPU started.\n";
    }
    void stop() {
        std::cout << "CPU stopped.\n";
    }
};

//Facade
class Computer {
private:
    Monitor monitor;
    Keyboard keyboard;
    CPU cpu;

public:
    Computer() {}

    void turnOnAndStart() {
        monitor.turnOn();
        keyboard.pressKey(13);
        cpu.start();
    }

    void shutDown() {
        cpu.stop();
        monitor.turnOff();
    }
};

int main() {
    Computer myComputer;
    myComputer.turnOnAndStart();
    myComputer.shutDown();

    return 0;
}
运行结果:
cpp
Monitor turned on.
Pressed key: 13.
CPU started.
CPU stopped.
Monitor turned off.
Demo1:模拟汽车的集成
cpp
#include <iostream>

// Subsystem 1
class Engine {
public:
       void Start()
       {
              std::cout << "Engine started" << std::endl;
       }
       void Stop()
       {
              std::cout << "Engine stopped" << std::endl;
       }
};

// Subsystem 2
class Lights {
public:
       void TurnOn() {
              std::cout << "Lights on" << std::endl;
       }
       void TurnOff(){
              std::cout << "Lights off" << std::endl;
       }
};

// Facade
class Car {
private:
       Engine engine;
       Lights lights;
public:
       void StartCar()
       {
              engine.Start();
              lights.TurnOn();
              std::cout << "Car is ready to drive" << std::endl;
       }
       void StopCar()
       {
              lights.TurnOff();
              engine.Stop();
              std::cout << "Car has stopped" << std::endl;
       }
};

int main()
{
       Car car;
       car.StartCar();
       car.StopCar();
       return 0;
}
运行结果:
cpp
Engine started
Lights on
Car is ready to drive
Lights off
Engine stopped
Car has stopped
六,参考阅读
https://www.geeksforgeeks.org/facade-method-c-design-patterns/