集群部署GitLab Runner
前言
题目如下:
部署GitLab Runner
将GitLab Runner部署到gitlab-ci命名空间下,Release名称为gitlab-runner,为GitLab Runner创建持久化构建缓存目录/home/gitlab-runner/ci-build-cache以加速构建速度,并将其注册到GitLab中。
GitLab Runner是GitLab CI/CD架构中的一个组件,用于运行作业(Jobs)并与 GitLab 交互。它可以在不同的操作系统上执行任务,并将结果反馈给 GitLab。
使用的环境是之前搭建的容器云平台:2024广东省职业技能大赛云计算赛项实战------容器云平台搭建-CSDN博客,只有master节点,使用的IP是192.168.200.15/24
并且根据这篇文章的操作部署了GitLab:2024广东省职业技能大赛云计算赛项实战------集群部署GitLab-CSDN博客
操作过程
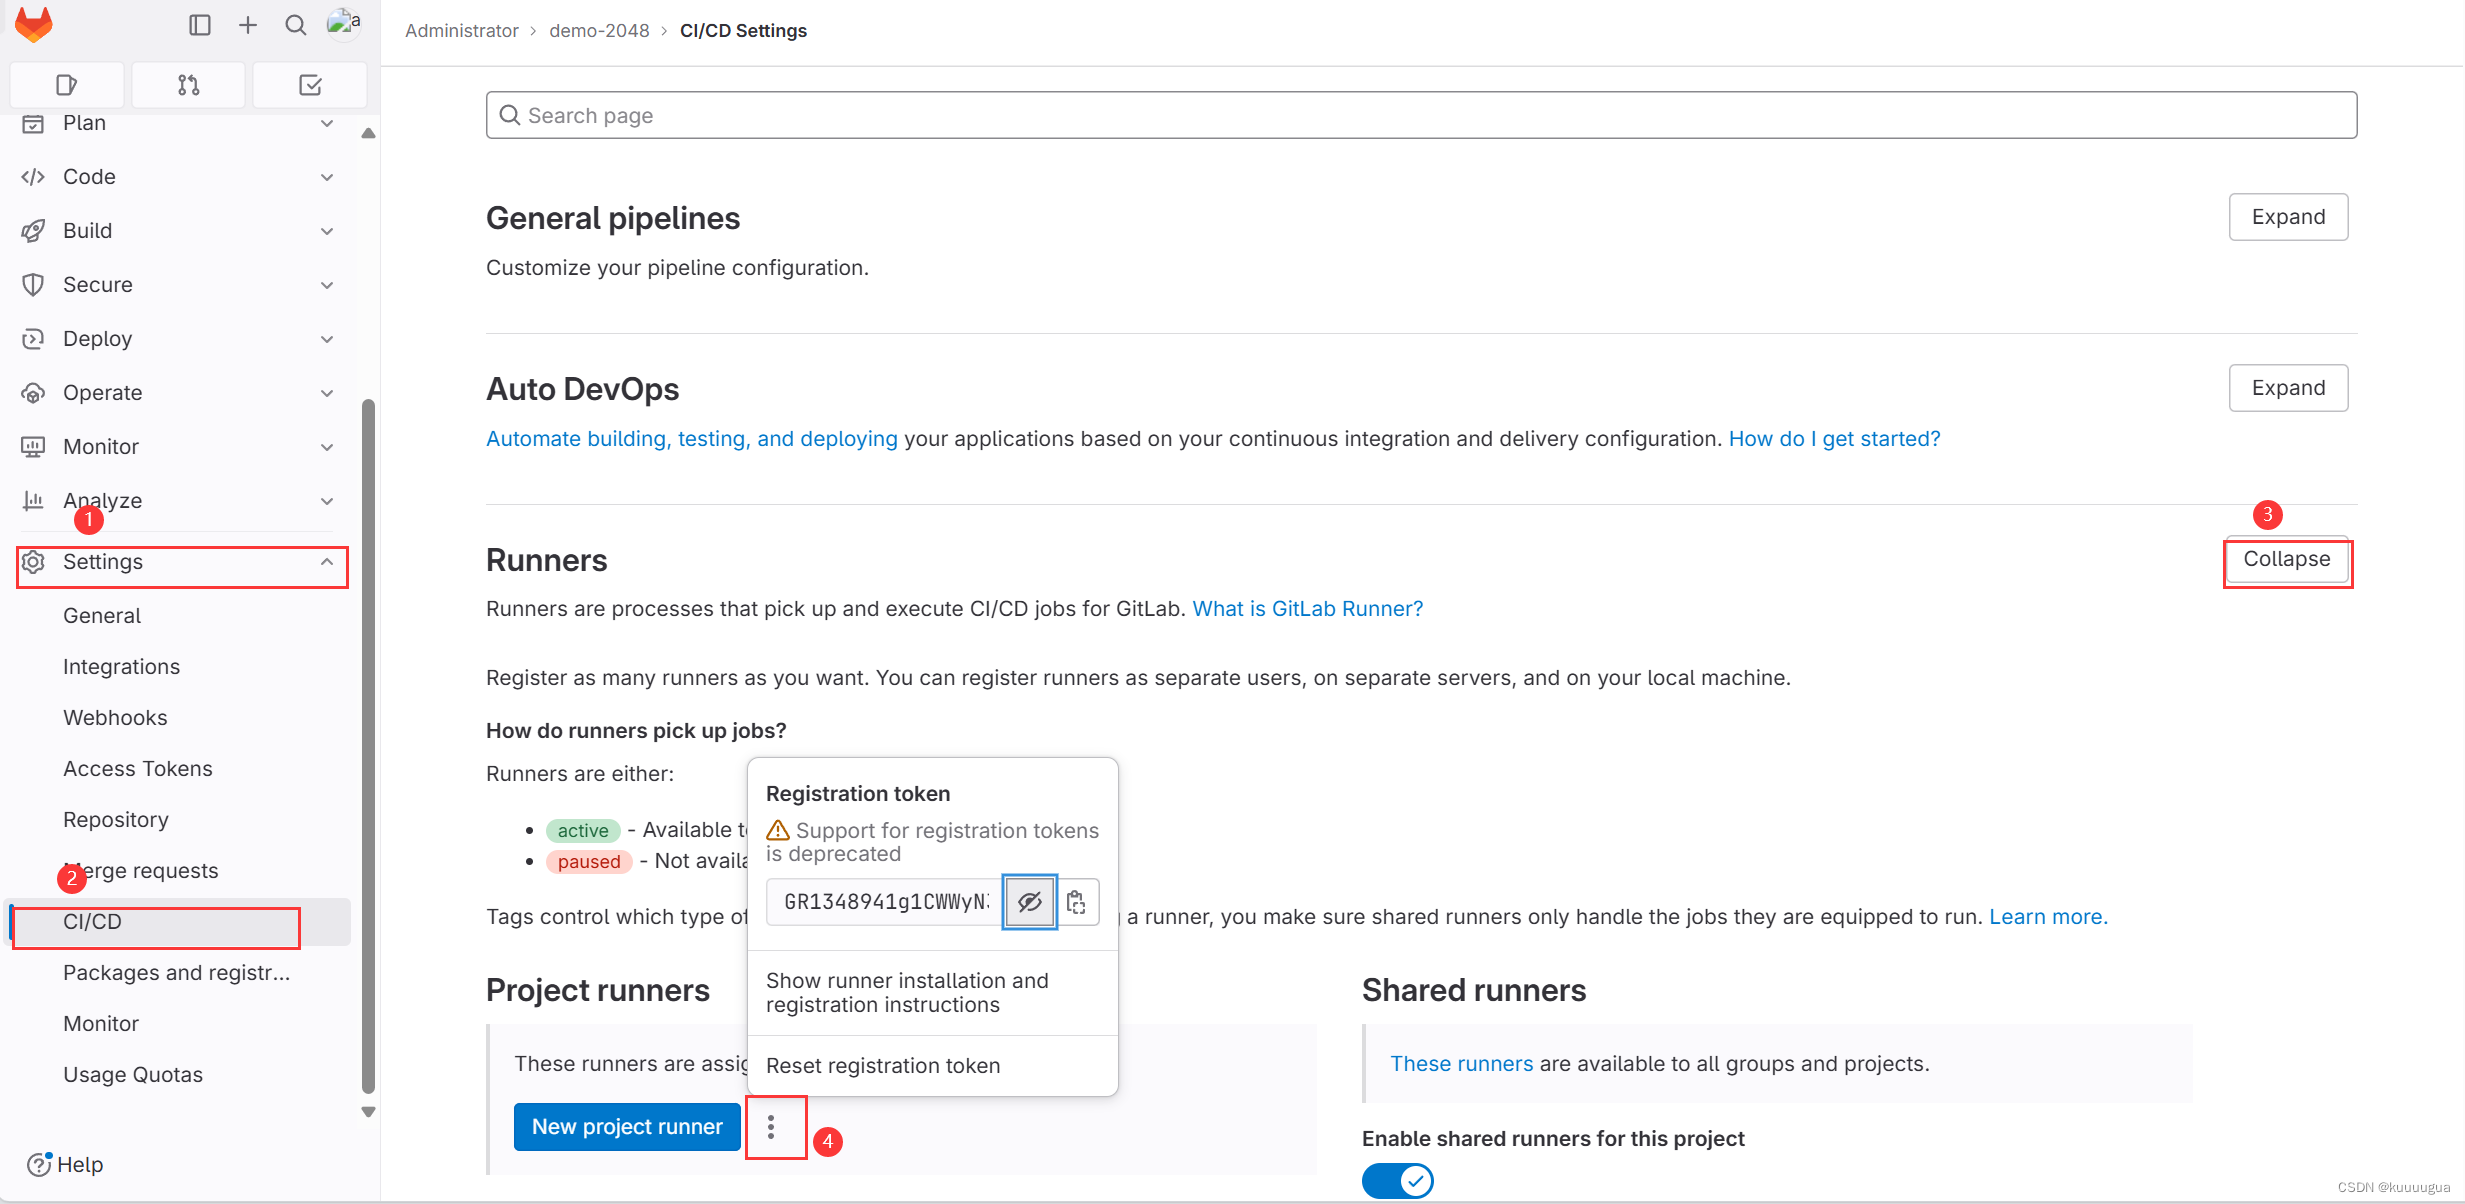
我们在gitlab的web界面里,点击"Settings"→"CI/CD",找到Runners,点击右边"Expend"展开,查看注册的Token并复制

回到宿主机
shell
#回到gitlab-ci目录
[root@k8s-master-node1 demo-2048]# cd ../
#解压gitlab-runner压缩包
[root@k8s-master-node1 gitlab-ci]# tar -zxf gitlab-runner-0.43.0.tgz
[root@k8s-master-node1 gitlab-ci]# ls gitlab-runner/
CHANGELOG.md  Chart.yaml  CONTRIBUTING.md  LICENSE  Makefile  NOTICE  README.md  templates  values.yaml
#修改values.yaml文件
[root@k8s-master-node1 gitlab-ci]# vi gitlab-runner/values.yaml
#修改前:
[root@k8s-master-node1 gitlab-cicd]# awk '!/^[[:space:]]*#/ && !/^([[:space:]]*)?$/' gitlab-runner/values.yaml
yaml
image:
  registry: registry.gitlab.com
  image: gitlab-org/gitlab-runner
imagePullPolicy: IfNotPresent
terminationGracePeriodSeconds: 3600
concurrent: 10
checkInterval: 30
sessionServer:
  enabled: false
rbac:
  create: false
  rules: []
  clusterWideAccess: false
  podSecurityPolicy:
    enabled: false
    resourceNames:
    - gitlab-runner
metrics:
  enabled: false
  portName: metrics
  port: 9252
  serviceMonitor:
    enabled: false
service:
  enabled: false
  type: ClusterIP
runners:
  config: |
    [[runners]]
      [runners.kubernetes]
        namespace = "{{.Release.Namespace}}"
        image = "ubuntu:16.04"
  cache: {}
  builds: {}
  services: {}
  helpers: {}
securityContext:
  allowPrivilegeEscalation: false
  readOnlyRootFilesystem: false
  runAsNonRoot: true
  privileged: false
  capabilities:
    drop: ["ALL"]
podSecurityContext:
  runAsUser: 100
  fsGroup: 65533
resources: {}
affinity: {}
nodeSelector: {}
tolerations: []
hostAliases: []
podAnnotations: {}
podLabels: {}
priorityClassName: ""
secrets: []
configMaps: {}
volumeMounts: []
volumes: []
yaml
#修改的配置项:
#添加gitlab的地址和注册的token
# gitlabUrl: http://gitlab.your-domain.com/		修改为:
gitlabUrl: "http://192.168.200.15:30880/"
# runnerRegistrationToken: ""	修改为:
runnerRegistrationToken: "GR1348941X_zjBBFn4JzPtDPwdR-8"
# unregisterRunners: true		修改为:
unregisterRunners: true
#启用RBAC,这样才有权限
rbac:
  create: false		#修改为:
  create: true
#启用metrics,监控GitLab Runner的性能
metrics:
  enabled: false	#修改为
  enabled: true
#根据题目要求,设置缓存目录
runners:		#添加配置:
  cachePath: "/home/gitlab-runner/ci-build-cache"
shell
#修改后:
[root@k8s-master-node1 gitlab-cicd]# awk '!/^[[:space:]]*#/ && !/^([[:space:]]*)?$/' gitlab-runner/values.yaml
yaml
image:
  registry: registry.gitlab.com
  image: gitlab-org/gitlab-runner
imagePullPolicy: IfNotPresent
gitlabUrl: "http://192.168.200.15:30880/"
runnerRegistrationToken: "GR1348941X_zjBBFn4JzPtDPwdR-8"
unregisterRunners: true
terminationGracePeriodSeconds: 3600
concurrent: 10
checkInterval: 30
sessionServer:
  enabled: false
rbac:
  create: true
  rules: []
  clusterWideAccess: false
  podSecurityPolicy:
    enabled: false
    resourceNames:
    - gitlab-runner
metrics:
  enabled: true
  portName: metrics
  port: 9252
  serviceMonitor:
    enabled: false
service:
  enabled: false
  type: ClusterIP
runners:
  config: |
    [[runners]]
      [runners.kubernetes]
        namespace = "{{.Release.Namespace}}"
        image = "ubuntu:16.04"
  cachePath: "/home/gitlab-runner/ci-build-cache"
  cache: {}
  builds: {}
  services: {}
  helpers: {}
securityContext:
  allowPrivilegeEscalation: false
  readOnlyRootFilesystem: false
  runAsNonRoot: true
  privileged: false
  capabilities:
    drop: ["ALL"]
podSecurityContext:
  runAsUser: 100
  fsGroup: 65533
resources: {}
affinity: {}
nodeSelector: {}
tolerations: []
hostAliases: []
podAnnotations: {}
podLabels: {}
priorityClassName: ""
secrets: []
configMaps: {}
volumeMounts: []
volumes: []
部署GitLab Runner
shell
#这里使用helm部署,需要安装docker-compose,在我们先前搭建容器云平台时,添加Harbor仓库的步骤中就有安装了
[root@k8s-master-node1 gitlab-cicd]# helm install gitlab-runner gitlab-runner/ -n gitlab-ci
#检查是否部署成功
[root@k8s-master-node1 gitlab-cicd]# helm ls -A
NAME            NAMESPACE       REVISION        UPDATED                                 STATUS          CHART                   APP VERSION
gitlab-runner   gitlab-ci       2               2024-06-25 16:32:45.061864768 +0800 CST deployed        gitlab-runner-0.1.37
#查看是否运行
[root@k8s-master-node1 gitlab-cicd]# kubectl get -n gitlab-ci all
NAME                                               READY   STATUS    RESTARTS      AGE
pod/gitlab-59dc9fc7b4-sl4vt                        1/1     Running   1 (55m ago)   77m
pod/gitlab-runner-gitlab-runner-6f846767bf-69rxc   1/1     Running   0             3m11s

NAME             TYPE       CLUSTER-IP      EXTERNAL-IP   PORT(S)        AGE
service/gitlab   NodePort   10.96.125.173   <none>        80:30880/TCP   76m

NAME                                          READY   UP-TO-DATE   AVAILABLE   AGE
deployment.apps/gitlab                        1/1     1            1           77m
deployment.apps/gitlab-runner-gitlab-runner   1/1     1            1           8m49s

NAME                                                     DESIRED   CURRENT   READY   AGE
replicaset.apps/gitlab-59dc9fc7b4                        1         1         1       77m
replicaset.apps/gitlab-runner-gitlab-runner-6f846767bf   1         1         1       3m11s
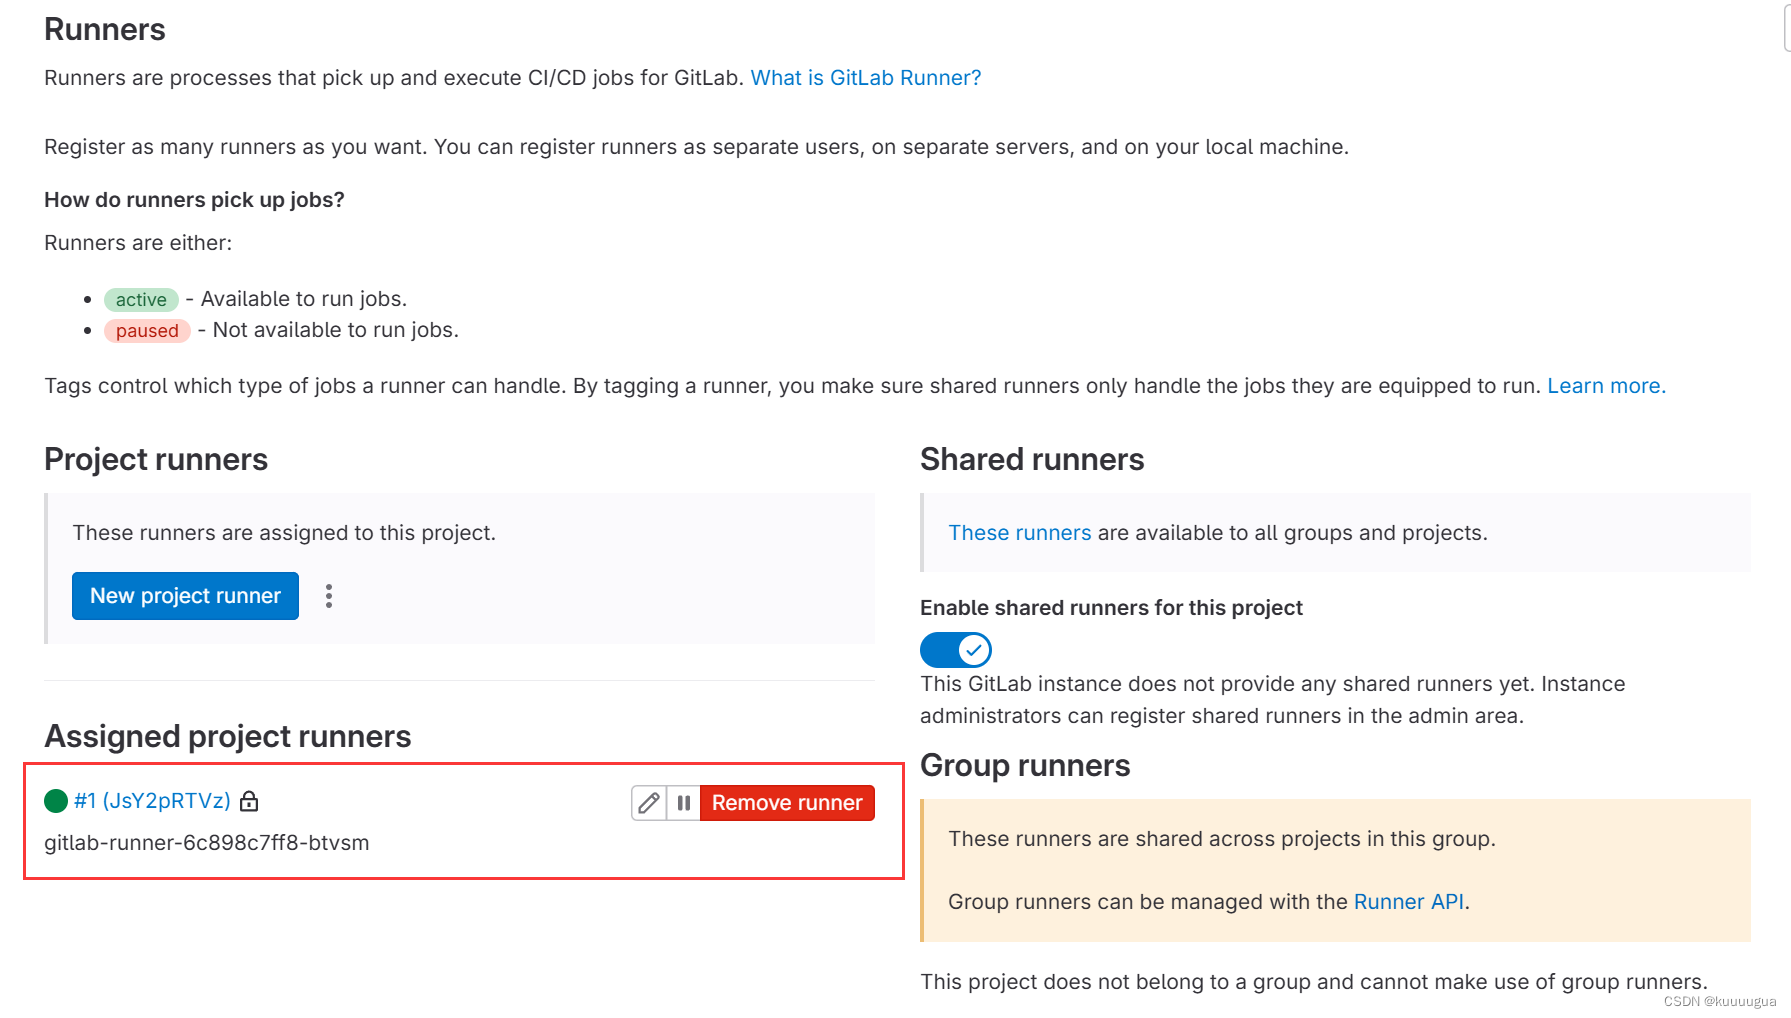
回到gitlab的web界面,刷新页面,可以看到成功注册了

后语
至此,这道题目的要求全部满足,可以做下道题------部署GitLab-Agent了。不过据我了解,Agent就是Runner,下道题的要求,实际上是将k8s集群连接到gitlab里。