WPF UI交互专题 平面图形 Path Drawing 绘图 渐变 Brush 矩阵 Transform 变形 阴影效果 模糊效果 自定义灰度去色效果 系列二-CSDN博客
1软件中的3D基本概念
WPF 中 3D 功能的设计初衷并非提供功能齐全的游戏开发平台。
WPF 中的 3D 图形内容封装在 Viewport3D 元素中,该元素可以参与二维元素结构。 该图形系统将 Viewport3D 视为一个二维视觉元素,就像 WPF 中的许多其他元素一样。 Viewport3D 充当三维场景中的窗口(即视区)。 更准确地说,它是 3D 场景所投影到的图面。
2模型3D场景 3D点线面组成
3D视口
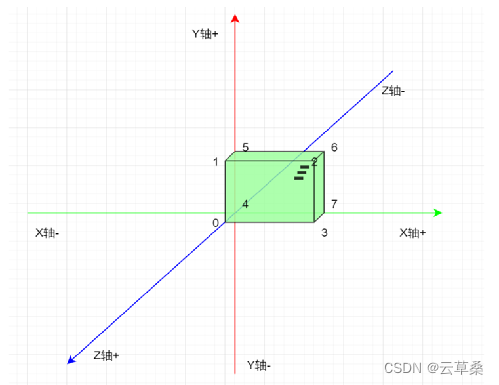
坐标系
点、线、面、三角顶点网格(3个点的方向 下标值 点集合 三角形 法向 正反面)
材质
光源
相机
cs
 <Viewport3D>


     <ModelUIElement3D>
         <ModelUIElement3D.Model>
             <GeometryModel3D>
                 <GeometryModel3D.Geometry>
                     <!--一个面4个点-->
                     <MeshGeometry3D Positions="0,0,0     3,0,0      3,2,0      0,2,0"
                                     TriangleIndices="0,3,2 0,1,2"/>
                 </GeometryModel3D.Geometry>
             </GeometryModel3D>
         </ModelUIElement3D.Model>
     </ModelUIElement3D>
 </Viewport3D>
3 3D场景相机对象
OrthographicCamera 正交
PerspectiveCamera 透视
基本属性:
Position:相机的空间坐标(X,Y,Z)
LookDirection:观察方向,向量,相机观察口朝向
FieldOfView(透视相机属性) / Width(正交相机属性):视野范围(焦距),一个值
UpDirection:相机上方方向,控制相机观察口旋转
FarPlaneDistance:远景距离,大于这个距离的场景不渲染
NearPlaneDistance:近景距离,小于这个距离的场景不渲染
cs
<Viewport3D.Camera>
    <!--透视-->
    <PerspectiveCamera Position="100,100,100"
                       LookDirection="-2,-2,-2"
                       FieldOfView="90"
                       UpDirection="0,1,0"
                       FarPlaneDistance="1000"
                       NearPlaneDistance="1">
    </PerspectiveCamera>
    <!--正交-->
    <!--<OrthographicCamera Position="100,100,100"
                        LookDirection="-2,-2,-2"
                        Width="50"
                        UpDirection="0,1,0"
                        FarPlaneDistance="1000"
                         NearPlaneDistance="1"/>-->
</Viewport3D.Camera>
4 3D对象材质对象与贴图
DiffuseMaterial:漫反射,反射场景光效果
EmissiveMaterial:自发光,类似于电灯
SpecularMaterial:全反射,可以映射场景
贴图(平面贴图、曲面贴图-地球)
背面材质
在加一个面
5 3D地球案例
cs
<ModelVisual3D>
<ModelVisual3D.Content>
<Model3DGroup>
<!--环境光 -->
<!--<AmbientLight Color="Gray"/>-->
<!--平行光-->
<!--<DirectionalLight Color="White" Direction="-1,-1,-1"/>-->
<!--<PointLight Color="White" Position="100,100,100" Range="200"/>-->
<SpotLight Color="Orange" InnerConeAngle="100"
OuterConeAngle="40"
Position="50,50,50"
Direction="-1,-1,-1"/>
</Model3DGroup>
</ModelVisual3D.Content>
</ModelVisual3D>
<ModelUIElement3D>
<ModelUIElement3D.Model>
<GeometryModel3D>
<GeometryModel3D.Material>
<MaterialGroup>
<!--环境光 -->
<AmbientLight Color="White"/>
<!--平行光-->
<!--<DirectionalLight Color="White" Direction="-1,-1,-1"/>-->
<!--点光源-->
<!--<PointLight Color="White" Position="100,100,100" Range="200"/>-->
<!--聚光灯-->
<!--<SpotLight Color="Orange" InnerConeAngle="100"
OuterConeAngle="40"
Position="50,50,50"
Direction="-1,-1,-1"/>-->
</MaterialGroup>
</GeometryModel3D.Material>
<GeometryModel3D.Geometry>
<!--一个面4个点-->
<MeshGeometry3D Positions="0,0,0 3,0,0 3,2,0 0,2,0"
TriangleIndices="0,2,3 0,1,2"
TextureCoordinates=" 0,1 1,1 1,0 0,0 "/>
</GeometryModel3D.Geometry>
</GeometryModel3D>
</ModelUIElement3D.Model>
</ModelUIElement3D>
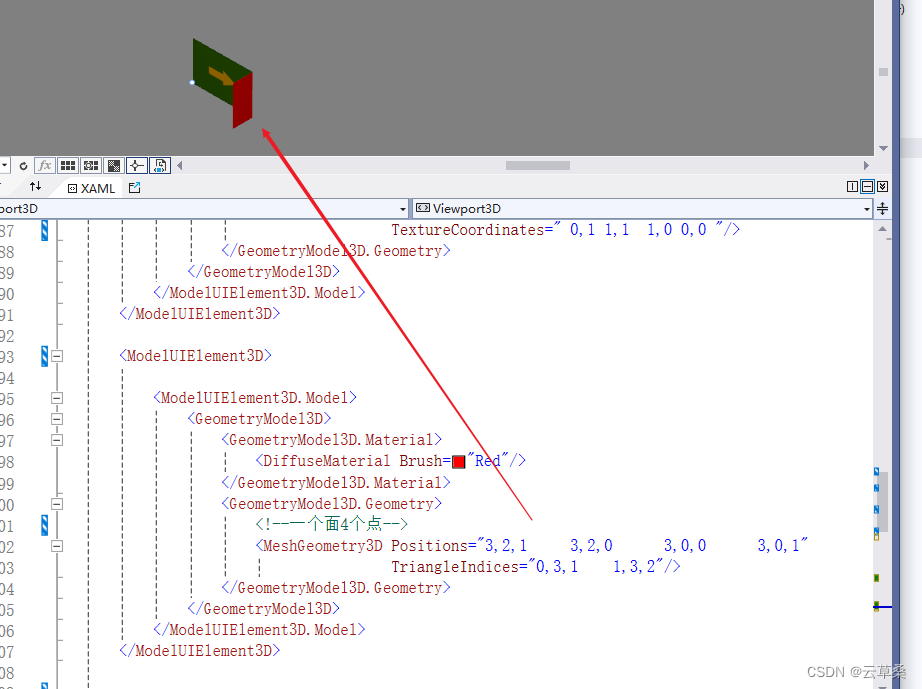
<ModelUIElement3D>
<ModelUIElement3D.Model>
<GeometryModel3D>
<GeometryModel3D.Material>
<DiffuseMaterial Brush="Red"/>
</GeometryModel3D.Material>
<GeometryModel3D.Geometry>
<!--一个面4个点-->
<MeshGeometry3D Positions="3,2,1 3,2,0 3,0,0 3,0,1"
TriangleIndices="0,3,1 1,3,2"/>
</GeometryModel3D.Geometry>
</GeometryModel3D>
</ModelUIElement3D.Model>
</ModelUIElement3D>
<ModelUIElement3D>
<ModelUIElement3D.Transform>
<Transform3DGroup>
<RotateTransform3D CenterX="0" CenterY="0" CenterZ="0">
<RotateTransform3D.Rotation>
<AxisAngleRotation3D Axis="1,0,0" Angle="-90"/>
</RotateTransform3D.Rotation>
</RotateTransform3D>
<RotateTransform3D CenterX="0" CenterY="0" CenterZ="0">
<RotateTransform3D.Rotation>
<AxisAngleRotation3D Axis="0,1,0" x:Name="aar"/>
</RotateTransform3D.Rotation>
</RotateTransform3D>
</Transform3DGroup>
</ModelUIElement3D.Transform>
<ModelUIElement3D.Model>
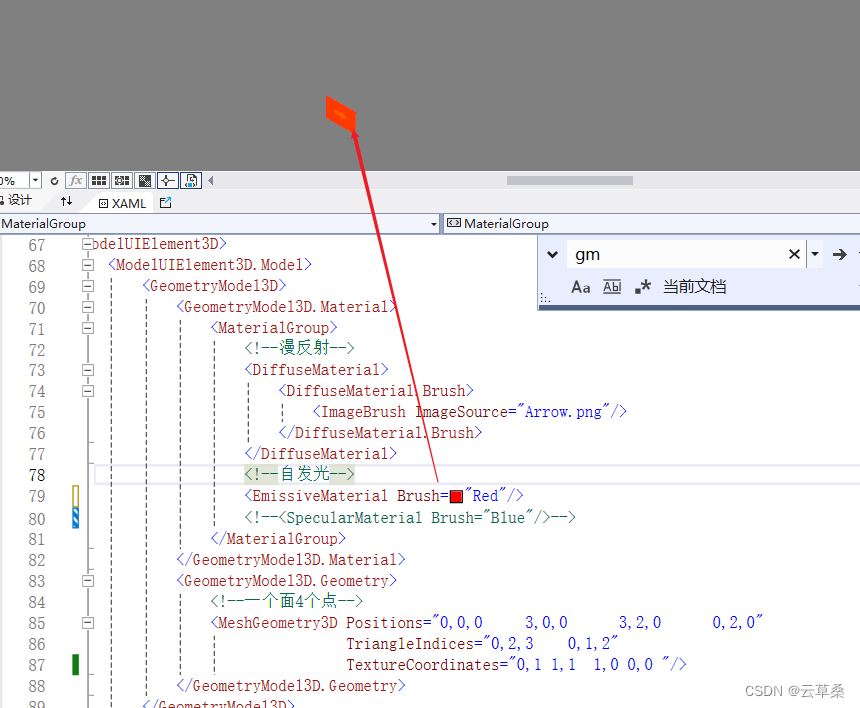
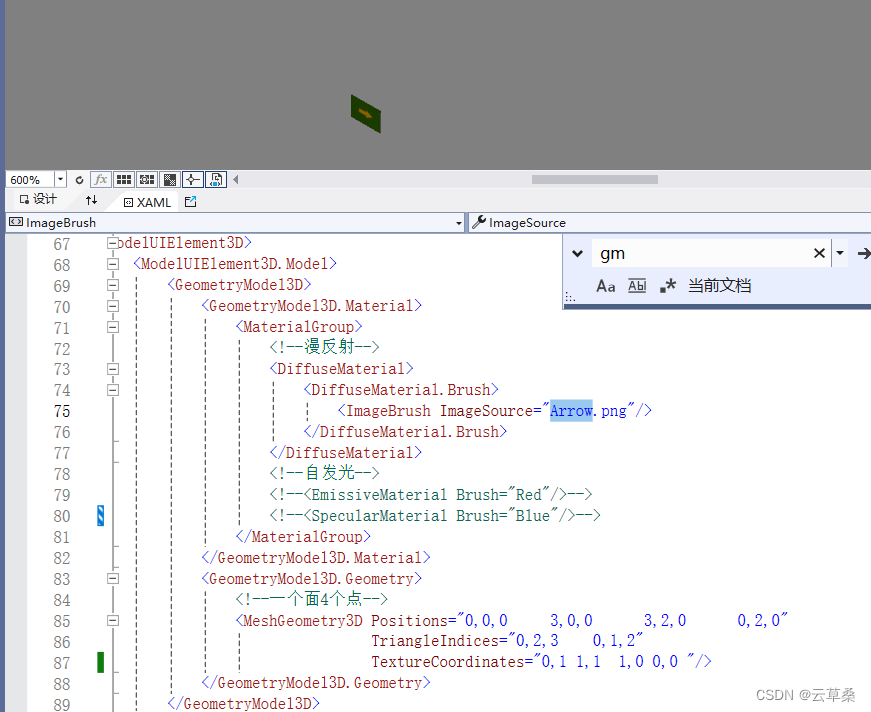
<GeometryModel3D x:Name="gm">
<GeometryModel3D.Material>
<DiffuseMaterial>
<DiffuseMaterial.Brush>
<ImageBrush ImageSource="Earth.jpg"/>
</DiffuseMaterial.Brush>
</DiffuseMaterial>
</GeometryModel3D.Material>
</GeometryModel3D>
</ModelUIElement3D.Model>
</ModelUIElement3D>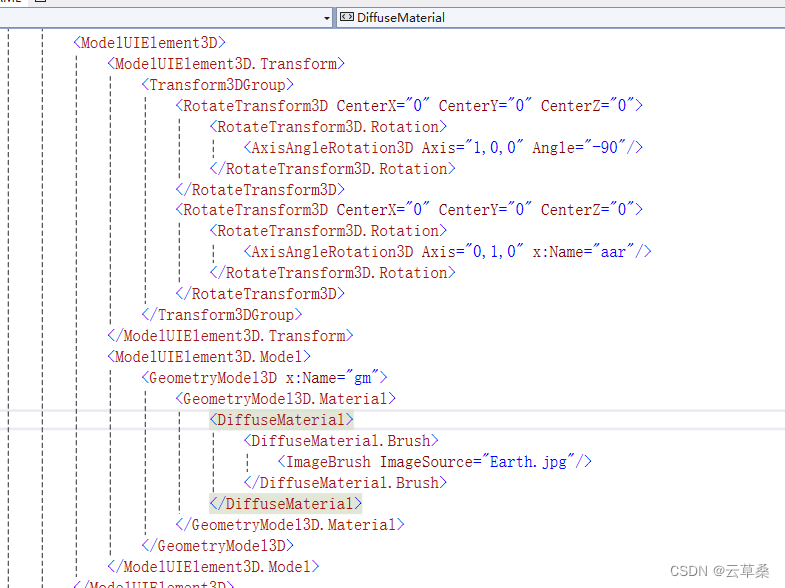
cs
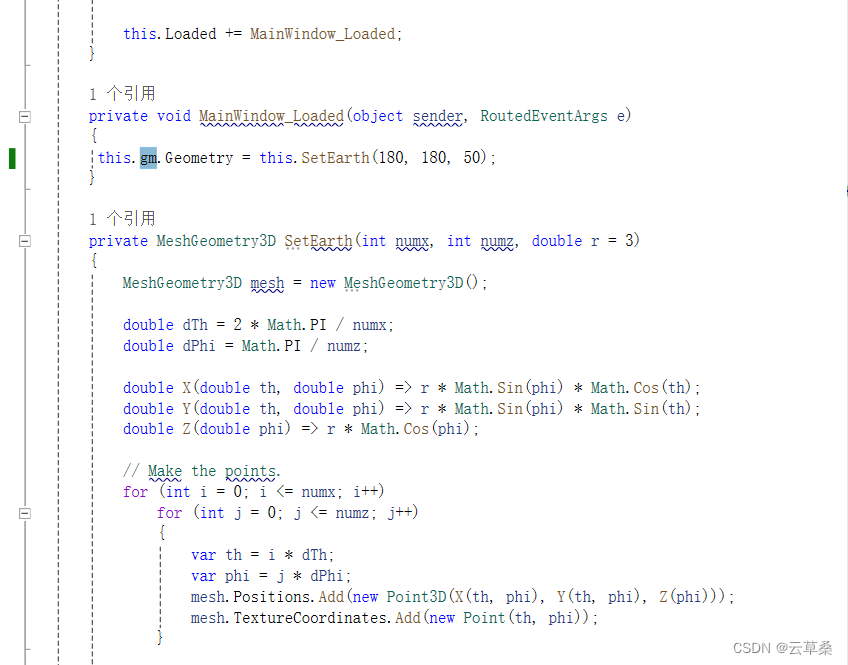
private void MainWindow_Loaded(object sender, RoutedEventArgs e)
{
 this.gm.Geometry = this.SetEarth(180, 180, 50);
}

private MeshGeometry3D SetEarth(int numx, int numz, double r = 3)
{
    MeshGeometry3D mesh = new MeshGeometry3D();

    double dTh = 2 * Math.PI / numx;
    double dPhi = Math.PI / numz;

    double X(double th, double phi) => r * Math.Sin(phi) * Math.Cos(th);
    double Y(double th, double phi) => r * Math.Sin(phi) * Math.Sin(th);
    double Z(double phi) => r * Math.Cos(phi);

    // Make the points.
    for (int i = 0; i <= numx; i++)
        for (int j = 0; j <= numz; j++)
        {
            var th = i * dTh;
            var phi = j * dPhi;
            mesh.Positions.Add(new Point3D(X(th, phi), Y(th, phi), Z(phi)));
            mesh.TextureCoordinates.Add(new Point(th, phi));
        }

    // 生成三角形
    for (int i = 0; i < numx; i++)
        for (int j = 0; j < numz; j++)
        {
            int i1 = i * (numz + 1) + j;
            int i2 = i1 + 1;
            int i3 = i2 + (numz + 1);
            int i4 = i3 - 1;

            mesh.TriangleIndices.Add(i1);
            mesh.TriangleIndices.Add(i2);
            mesh.TriangleIndices.Add(i3);

            mesh.TriangleIndices.Add(i1);
            mesh.TriangleIndices.Add(i3);
            mesh.TriangleIndices.Add(i4);
        }
    return mesh;
}
6 3D场景光源对象
AmbientLight:环境光
DirectionalLight:平行光
PointLight:点光源
SpotLight:聚光灯
相关属性
Color:灯光颜色
Direction:光线方向(平行光、聚光灯)
Position:光源坐标(点光源、聚光灯)
Range:灯光范围(点光源)
InnerConeAngle:内光柱照射角度(聚光灯)
OuterConeAngle:外光柱照射角度(聚光灯)
cs
 <ModelVisual3D>
     <ModelVisual3D.Content>
         <Model3DGroup>
             <!--环境光    -->
             <!--<AmbientLight Color="Gray"/>-->
             <!--平行光-->
             <!--<DirectionalLight Color="White" Direction="-1,-1,-1"/>-->
             <!--<PointLight Color="White" Position="100,100,100" Range="200"/>-->
             <SpotLight Color="Orange" InnerConeAngle="100"
                    OuterConeAngle="40"
                    Position="50,50,50"
                    Direction="-1,-1,-1"/>
         </Model3DGroup>
     </ModelVisual3D.Content>
 </ModelVisual3D>
7、3D对象 变形处理
TranslateTransform3D:平移 xyz
ScaleTransform3D:缩放
RotateTransform3D:旋转
MatrixTransform3D:矩阵
8、3D对象背面材质
9、3D对象动作交互
鼠标交互(没有强调场景的变换)
鼠标命中测试(HitTest 不推荐)
平面对象加载
数据绑定(数据与动作)
cs
 private void Slider_ValueChanged(object sender, RoutedPropertyChangedEventArgs<double> eventArgs)
 {
     aar.Angle = eventArgs.NewValue;
 }

 private void Slider_ValueChanged_2(object sender, RoutedPropertyChangedEventArgs<double> e)
 {
     tt.OffsetX = e.NewValue;
 }

 private void ModelUIElement3D_MouseLeftButtonDown(object sender, MouseButtonEventArgs e)
 {
     ModelUIElement3D model = sender as ModelUIElement3D;
     var geo = model.Model as GeometryModel3D;
     (geo.BackMaterial as DiffuseMaterial).Brush = Brushes.Black;
 }
10、辅助交互插件引用 关于3DTools 关于HelixToolkit
关于3DTools
一个开源3D控制工具,主要用来辅助WPF界面2D、3D呈现的交互处理,提供对交互的直观响应。最初是由微软创建的,目前项目已停止维护。 https://github.com/jerryjiang/3DTools Nuget安装
关于HelixToolkit
一个开源3D库,根据MIT许可证获得许可。MIT许可证非常宽松,允许在专有软件中使用。该库基于 .NET,目前专注于 WPF 平台。
https://github.com/helix-toolkit
Nuget安装
HelixToolkit HelixViewport3D
cs
<h:HelixViewport3D ShowViewCube="True"
                   ViewCubeWidth="200"
                   ViewCubeHeight="200"
                   ViewCubeHorizontalPosition="Left"
                   ViewCubeVerticalPosition="Top"
                   ViewCubeFrontText="前"
                   ViewCubeTopText="上"

                   ShowCoordinateSystem="True"
                   CoordinateSystemLabelForeground="#5000"
                   CoordinateSystemHorizontalPosition="Center"
                   CoordinateSystemVerticalPosition="Center"

                   >
    <!--相机-->
    <h:HelixViewport3D.Camera>
        <PerspectiveCamera Position="10,10,10"
                           LookDirection="-2,-2,-2"
                           FieldOfView="50"
                           UpDirection="0,1,0"
                           FarPlaneDistance="10000"
                           NearPlaneDistance="1"/>
    </h:HelixViewport3D.Camera>
    <h:HelixViewport3D.RotateGesture>
        <MouseGesture MouseAction="LeftClick"/>
    </h:HelixViewport3D.RotateGesture>
    <h:HelixViewport3D.PanGesture>
        <MouseGesture MouseAction="RightClick"/>
    </h:HelixViewport3D.PanGesture>

    <!--光源-->
    <ModelVisual3D>
        <ModelVisual3D.Content>
            <Model3DGroup>
                <AmbientLight Color="White"/>
            </Model3DGroup>
        </ModelVisual3D.Content>
    </ModelVisual3D>
    <!--<h:DefaultLights/>-->

    <!--模型-->
    <ModelVisual3D x:Name="model">
    </ModelVisual3D>
</h:HelixViewport3D>
cs
 public HelixToolkitWindow()
 {
     InitializeComponent();

     this.Loaded += HelixToolkitWindow_Loaded;
 }

 private void HelixToolkitWindow_Loaded(object sender, RoutedEventArgs e)
 {
     string[] model_files = System.IO.Directory.GetFiles($"{Environment.CurrentDirectory}/3D_Models");

     ModelImporter importer = new ModelImporter();

     Model3DGroup group = new Model3DGroup();
     foreach (var file in model_files)
     {
         // 关键的模型文件解析过程=》     GemotryModel3D
         var mg = importer.Load(file);

         group.Children.Add(mg.Children[0]);
     }

     this.model.Content = group;
 }
11、STL模型加载
WPF UI 3D 多轴 机械臂 stl 模型UI交互-CSDN博客
其他
WPF UI交互专题 平面图形 Path Drawing 绘图 渐变 Brush 矩阵 Transform 变形 阴影效果 模糊效果 自定义灰度去色效果 系列二-CSDN博客