Florence-2 是微软于 2024 年 6 月发布的一个基础视觉语言模型。该模型极具吸引力,因为它尺寸很小 (0.2B 及 0.7B) 且在各种计算机视觉和视觉语言任务上表现出色。
Florence 开箱即用支持多种类型的任务,包括: 看图说话、目标检测、OCR 等等。虽然覆盖面很广,但仍有可能你的任务或领域不在此列,也有可能你希望针对自己的任务更好地控制模型输出。此时,你就需要微调了!
本文,我们展示了一个在 DocVQA 上微调 Florence 的示例。尽管原文宣称 Florence 2 支持视觉问答 (VQA) 任务,但最终发布的模型并未包含 VQA 功能。因此,我们正好拿这个任务练练手,看看我们能做点什么!
预训练细节与模型架构

Florence-2 架构
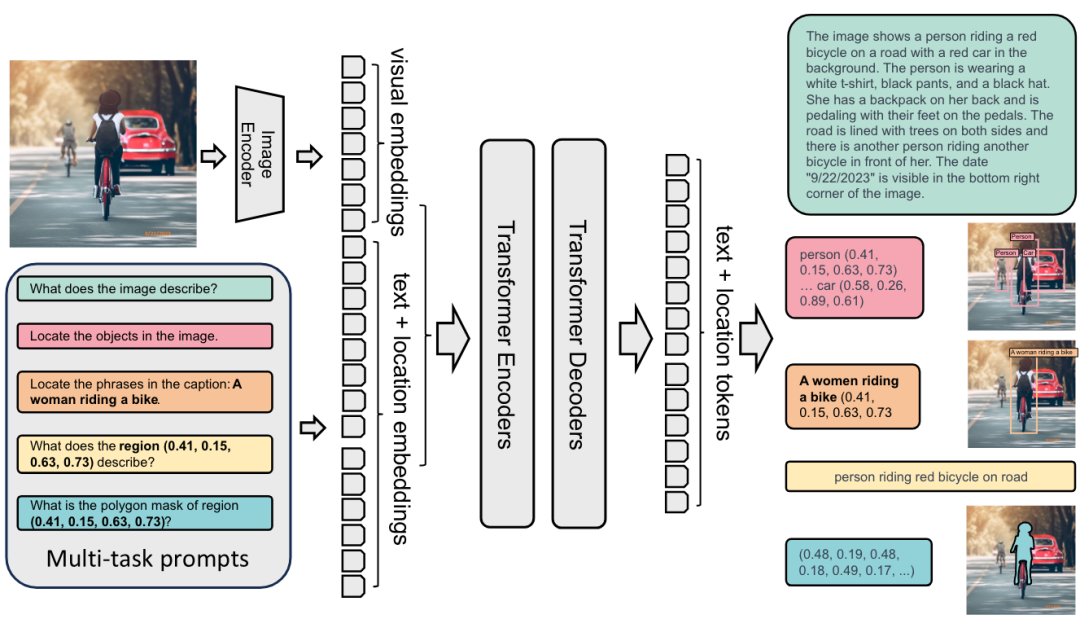
无论执行什么样的计算机视觉任务,Florence-2 都会将其建模为序列到序列的任务。Florence-2 以图像和文本作为输入,并输出文本。模型结构比较简单: 用 DaViT 视觉编码器将图像转换为视觉嵌入,并用 BERT 将文本提示转换为文本和位置嵌入; 然后,生成的嵌入由标准编码器 - 解码器 transformer 架构进行处理,最终生成文本和位置词元。Florence-2 的优势并非源自其架构,而是源自海量的预训练数据集。作者指出,市面上领先的计算机视觉数据集通常所含信息有限 - WIT 仅有图文对,SA-1B仅有图像及相关分割掩码。因此,他们决定构建一个新的 FLD-5B 数据集,其中的每个图像都包含最广泛的信息 - 目标框、掩码、描述文本及标签。在创建数据集时,很大程度采用了自动化的过程,作者使用现成的专门任务模型,并用一组启发式规则及质检过程来清理所获得的结果。最终生成的用于预训练 Florence-2 模型的新数据集中包含了 1.26 亿张图像、超过 50 亿个标注。
SA-1Bhttps://ai.meta.com/datasets/segment-anything/
VQA 上的原始性能
我们尝试了各种方法来微调模型以使其适配 VQA (视觉问答) 任务的响应方式。迄今为止,我们发现最有效方法将其建模为图像区域描述任务,尽管其并不完全等同于 VQA 任务。看图说话任务虽然可以输出图像的描述性信息,但其不允许直接输入问题。
我们还测试了几个"不支持"的提示,例如 "<VQA>"、"<vqa>" 以及 "<Visual question answering>"。不幸的是,这些尝试的产生的结果都不可用。
微调后在 DocVQA 上的性能
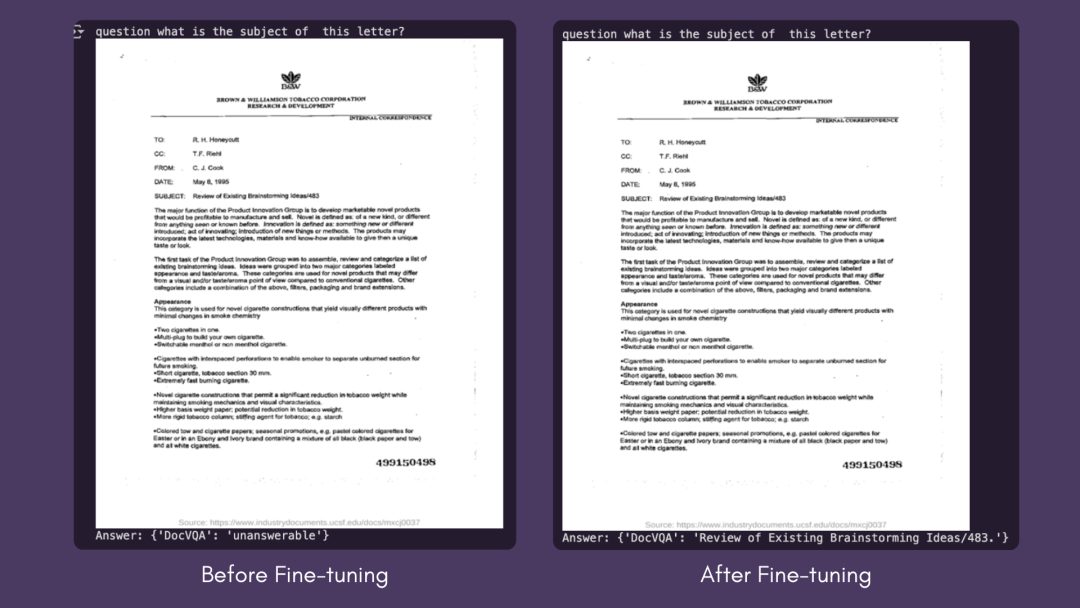
我们使用 DocVQA 数据集的标准指标Levenshtein 相似度来测量性能。微调前,模型在验证集上的输出与标注的相似度为 0,因为模型输出与标注差异不小。对训练集进行 7 个 epoch 的微调后,验证集上的相似度得分提高到了 57.0。
Levenshtein 相似度https://en.wikipedia.org/wiki/Levenshtein_distance
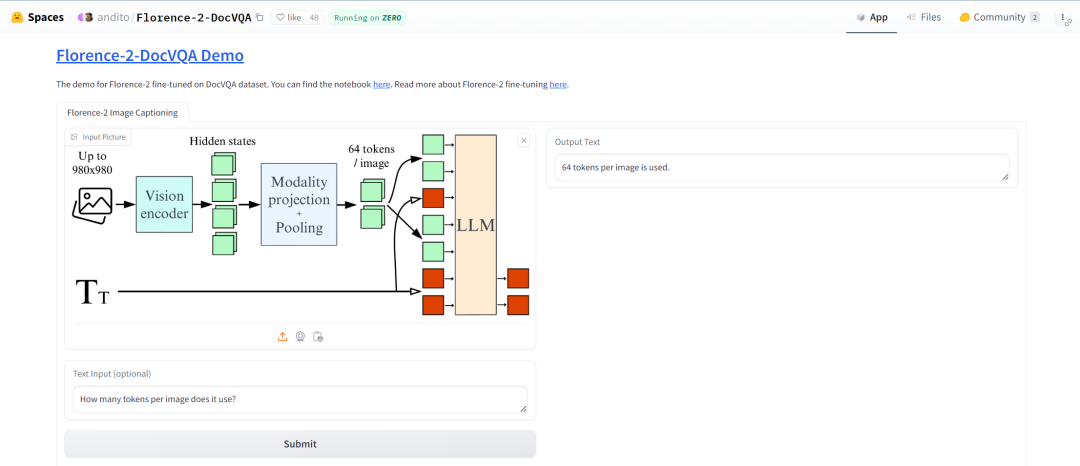
我们创建了一个🤗 空间以演示微调后的模型。虽然该模型在 DocVQA 上表现良好,但在一般文档理解方面还有改进的空间。但我们仍然认为,它成功地完成了任务,展示了 Florence-2 对下游任务进行微调的潜力。我们建议大家使用The Cauldron数据集对 Florence-2 进行微调,大家可以在我们的 GitHub 页面上找到必要的代码。
-
The Cauldronhttps://hf.co/datasets/HuggingFaceM4/the_cauldron
-
我们的 GitHub 页面https://github.com/andimarafioti/florence2-finetuning
下图给出了微调前后的推理结果对比。你还可以至此处亲自试用模型。
模型试用地址https://hf.co/spaces/andito/Florence-2-DocVQA

微调前后的结果
微调细节
由原文我们可以知道,基础模型在预训练时使用的 batch size 为 2048,大模型在预训练时使用的 batch size 为 3072。另外原文还说: 与冻结图像编码器相比,使用未冻结的图像编码器进行微调能带来性能改进。
我们在低资源的情况下进行了多组实验,以探索模型如何在更受限的条件下进行微调。我们冻结了视觉编码器,并在Colab的分别使用单张 A100 GPU (batch size 6) 、单张 T4 (batch size 1) 顺利完成微调。
Colab 链接https://colab.research.google.com/drive/1hKDrJ5AH_o7I95PtZ9__VlCTNAo1Gjpf?usp=sharing
与此同时,我们还对更多资源的情况进行了实验,以 batch size 64 对整个模型进行了微调。在配备 8 张 H100 GPU 的集群上该训练过程花费了 70 分钟。你可以在这里找到我们训得的模型。
模型地址https://hf.co/HuggingFaceM4/Florence-2-DocVQA
我们都发现 1e-6 的小学习率适合上述所有训练情形。如果学习率变大,模型将很快过拟合。
遛代码
如果你想复现我们的结果,可以在此处找到我们的 Colab 微调笔记本。下面,我们遛一遍在DocVQA上微调Florence-2-base-ft模型。
-
Colab 地址https://colab.research.google.com/drive/1hKDrJ5AH_o7I95PtZ9__VlCTNAo1Gjpf?usp=sharing
-
DocVQAhttps://hf.co/datasets/HuggingFaceM4/DocumentVQA
-
Florence-2-base-fthttps://hf.co/microsoft/Florence-2-base-ft
我们从安装依赖项开始。
go
!pip install -q datasets flash_attn timm einops接着,从 Hugging Face Hub 加载 DocVQA 数据集。
go
import torch
from datasets import load_dataset

data = load_dataset("HuggingFaceM4/DocumentVQA")
我们可以使用 transformers 库中的 AutoModelForCausalLM 和 AutoProcessor 类来加载模型和处理器,并设 trust_remote_code=True ,因为该模型尚未原生集成到 transformers 中,因此需要使用自定义代码。我们还会冻结视觉编码器,以降低微调成本。
go
from transformers import AutoModelForCausalLM, AutoProcessor
import torch

device = torch.device("cuda" if torch.cuda.is_available() else "cpu")

model = AutoModelForCausalLM.from_pretrained(
    "microsoft/Florence-2-base-ft",
    trust_remote_code=True,
    revision='refs/pr/6'
).to(device)
processor = AutoProcessor.from_pretrained("microsoft/Florence-2-base-ft",
    trust_remote_code=True, revision='refs/pr/6')

for param in model.vision_tower.parameters():
  param.is_trainable = False
现在开始微调模型!我们构建一个训练 PyTorch 数据集,并为数据集中的每个问题添加 <DocVQA> 前缀。
go
import torch from torch.utils.data import Dataset

class DocVQADataset(Dataset):

    def __init__(self, data):
        self.data = data

    def __len__(self):
        return len(self.data)

    def __getitem__(self, idx):
        example = self.data[idx]
        question = "<DocVQA>" + example['question']
        first_answer = example['answers'][0]
        image = example['image'].convert("RGB")
        return question, first_answer, image
接着,构建数据整理器,从数据集样本构建训练 batch,以用于训练。在 40GB 内存的 A100 中,batch size 可设至 6。如果你在 T4 上进行训练,batch size 就只能是 1。
go
import os
from torch.utils.data import DataLoader
from tqdm import tqdm
from transformers import AdamW, get_scheduler

def collate_fn(batch):
    questions, answers, images = zip(*batch)
    inputs = processor(text=list(questions), images=list(images), return_tensors="pt", padding=True).to(device)
    return inputs, answers

train_dataset = DocVQADataset(data['train'])
val_dataset = DocVQADataset(data['validation'])
batch_size = 6
num_workers = 0

train_loader = DataLoader(train_dataset, batch_size=batch_size,
                          collate_fn=collate_fn, num_workers=num_workers, shuffle=True)
val_loader = DataLoader(val_dataset, batch_size=batch_size,
                          collate_fn=collate_fn, num_workers=num_workers)
开始训练模型:
go
epochs = 7
optimizer = AdamW(model.parameters(), lr=1e-6)
num_training_steps = epochs * len(train_loader)

lr_scheduler = get_scheduler(name="linear", optimizer=optimizer,
                              num_warmup_steps=0, num_training_steps=num_training_steps,)

for epoch in range(epochs):
    model.train()
    train_loss = 0
    i = -1
    for inputs, answers in tqdm(train_loader, desc=f"Training Epoch {epoch + 1}/{epochs}"):
        i += 1
        input_ids = inputs["input_ids"]
        pixel_values = inputs["pixel_values"]
        labels = processor.tokenizer(text=answers, return_tensors="pt", padding=True, return_token_type_ids=False).input_ids.to(device)
        outputs = model(input_ids=input_ids, pixel_values=pixel_values, labels=labels)
        loss = outputs.loss
        loss.backward()
        optimizer.step()
        lr_scheduler.step()
        optimizer.zero_grad()
        train_loss += loss.item()
    avg_train_loss = train_loss / len(train_loader)
    print(f"Average Training Loss: {avg_train_loss}")

    model.eval()
    val_loss = 0
    with torch.no_grad():
        for batch in tqdm(val_loader, desc=f"Validation Epoch {epoch + 1}/{epochs}"):
            inputs, answers = batch
            input_ids = inputs["input_ids"]
            pixel_values = inputs["pixel_values"]
            labels = processor.tokenizer(text=answers, return_tensors="pt", padding=True, return_token_type_ids=False).input_ids.to(device)
            outputs = model(input_ids=input_ids, pixel_values=pixel_values, labels=labels)
            loss = outputs.loss
            val_loss += loss.item()

      print(val_loss / len(val_loader))
你可以分别对模型和处理器调用 save_pretrained() 以保存它们。微调后的模型在此处,你还可以在此处找到其演示。
总结
本文,我们展示了如何有效地针对自定义数据集微调 Florence-2,以在短时间内在全新任务上取得令人眼前一亮的性能。对于那些希望在设备上或在生产环境中经济高效地部署小模型的人来说,该做法特别有价值。我们鼓励开源社区利用这个微调教程,探索 Florence-2 在各种新任务中的巨大潜力!我们迫不及待地想在 🤗 Hub 上看到你的模型!
有用资源
-
视觉语言模型详解https://hf.co/blog/zh/vlms
-
微调 Colabhttps://colab.research.google.com/drive/1hKDrJ5AH_o7I95PtZ9__VlCTNAo1Gjpf?usp=sharing
-
微调 Github 代码库https://github.com/andimarafioti/florence2-finetuning
-
Florence-2 推理 Notebookhttps://hf.co/microsoft/Florence-2-large/blob/main/sample_inference.ipynb
-
Florence-2 DocVQA 演示https://hf.co/spaces/andito/Florence-2-DocVQA
-
Florence-2 演示https://hf.co/spaces/gokaygo
感谢 Pedro Cuenca 对本文的审阅。
英文原文: https://hf.co/blog/finetune-florence2
原文作者: Andres Marafioti,Merve Noyan,Piotr Skalski
译者: Matrix Yao (姚伟峰),英特尔深度学习工程师,工作方向为 transformer-family 模型在各模态数据上的应用及大规模模型的训练推理。
