文章目录
- 基础语法
- 单双引号的区别
- 前后端分离
- 数据类型
- PHP常量
- 函数
- 运算符
- 数组
- php的控制结构
- 自定义函数
- 数学函数和字符串函数
- 命令执行函数
-
-
-
- system函数
- passthru()函数
- exec()函数
- shell_exec()函数
- [popen 函数](#popen 函数)
-
-
- php的错误处理
- php操作mysql
- PHP制作留言板
- cookie与session
-
-
- session会话函数
- cookie与session的区别
- cookie与session的工作流程:
- [cookie | session | token示例](#cookie | session | token示例)
-
- 文件上传
- 文件遍历
- 文件管理
- 新闻页面开发
- TP框架搭建使用
php安全开发资料 :https://pan.baidu.com/s/10NDMvJYssagahuEbIHbe2w?pwd=cong
PHP是一种广泛应用于Web开发的开源脚本语言,易学且功能丰富,可用于动态网站、Web应用、命令行脚本和桌面应用。其强大的数据库支持和社区资源使它成为开发者的重要工具。
基础语法
-
字符串拼接用"."
-
php能嵌套在html中
-
代码示例:
python<!DOCTYPE html> <html lang="zh-CN"> <head> <meta charset="UTF-8"> <title>css样式优先级</title> </head> <body> <?php echo "唯有学习"; ?> <h1>使我快乐</h1> <?php echo date("Y-m-d H:i:s"); ?> </body> </html>
-
单双引号的区别
代码示例:
python
<?php
header("Content-Type: text/html; charset=utf-8");
$name = 'kobe';
echo '最喜欢的NBA球星是' . $name . '<br>'; // 变量不加符号,遇到字符串拼接,需要加.连接
echo '最喜欢的NBA球星是$name<br>'; // 单引号,不解析变量,原样输出
echo "最喜欢的NBA球星是$name<br>"; // 双引号,解析变量
?>
前后端分离
代码示例:
python
前端:text.html
<!DOCTYPE html>
<html lang="zh-CN">
<head>
    <meta charset="UTF-8">
    <title>首页</title>
</head>
<body>
//数据的提交都是用表单form提交的
//一个网站,大部分都是GET请求,只有通过form提交的才能发起POST请求
<form action="./login.php" method="get">//通过gei方法发送到login.php页面
    用户名:<input type="text" name="username">
    密码:<input type="text" name="password">
    <input type="submit" value="提交">
</form>
</body>
</html>
========================================================
后端   login.html
<!DOCTYPE html>
<html lang="zh-CN">
<head>
    <meta charset="UTF-8">
    <title>网页后台</title>
    <style>
    div{
    text-align:right;
    }
    </style>
</head>
<body>
<div>
    <?php
    $name=$_GET["username"];//接受text.html传来的数据
    echo "欢迎".$name."回来^_^";
    ?>
</div>
</body>
</html>
数据类型
-
布尔类型
- 0/1
falseortrue
-
整型
- 整数范围:
-99999到+99999
- 整数范围:
-
浮点型
- 小数:
-1.9,3.25,3.00005
- 小数:
-
字符串
hello
-
数组
array
-
对象
object
-
资源类型
resource
-
NULL
空
PHP常量
php常量最好是全部大写
python
<?php
define("CONSTANT", "Hello world.");
echo CONSTANT;
?>
函数
var_dump函数
用于输出结果,其返回带有结果的类型,例如string(5) "value"
count函数
用于计算数组元素的个数
print_r函数
打印函数
readfile()函数
读取文件,并返回文件的长度
file_get_contents()函数
读取文件,支持本地和远程文件url
file_put_contents()函数
保存文件
header函数
用于发送原始 HTTP 头到客户端。
代码示例:
python
header('Content-Type: text/html; charset=UTF-8');//设置内容类型
-----------------------------------------------------------------------
header('Location: http://www.example.com');//重定向
exit(); // 使用 exit() 终止脚本执行
-----------------------------------------------------------------------
//设置缓存控制
header('Cache-Control: no-cache, no-store, must-revalidate'); // HTTP 1.1
header('Pragma: no-cache'); // HTTP 1.0
header('Expires: 0'); // Proxies
fopen函数
fopen 函数用于打开文件或 URL,以便进行读取或写入操作。
fread 函数
fread 函数用于从打开的文件中读取指定数量的字节。也可以创建文件(文件不存在时)
代码示例:
python
user.txt:
zhansan:123456
lisi:123
wangwu:12345
zhaoliu:123
--------------------------------
1.php
<?php
header("Content-Type: text/html; charset=utf-8");
$a = fopen('user.txt', 'r');
//$size = filesize('user.txt');
//print_r($size);
$b = fread($a, filesize('user.txt'));
echo $b;
fclose($a);
?>
结果:
zhansan:123456 lisi:123 wangwu:12345 zhaoliu:123
rename函数
将文件名重命名
用法:rename('原始名字','新名字')
copy()函数
将文件进行复制
用法:copy('原始路径','新路径')
unlink()函数
删除文件
file_exists()函数
判断文件是否存在,存在则返回true,不存在就返回false
运算符
| 运算符 | 名称 | 描述 | 实例 | 结果 |
|---|---|---|---|---|
| x + y | 加 | x 和 y 的和 | 2 + 2 | 4 |
| x - y | 减 | x 和 y 的差 | 5 - 2 | 3 |
| x* y | 乘 | x 和 y 的积 | 5* 2 | 10 |
| x / y | 除 | x 和 y 的商 | 15 / 5 | 3 |
| x % y | 模 | x 除以 y 的余数 | 5 % 2<br>10 % 8<br>10 % 2 | 1<br>2<br>0 |
| -x | 取负数 | x 取负数 | <?php $x = 2; echo -$x; ?> |
-2 |
| a . b | 并置 | 连接两个字符串 | "Hi" . "Ha" | HiHa |
数组
普通数组
python
<?php
// 数组普通数组
$d = array('张三风', '李四', '王五', '赵六'); // 数组元素下标 0-3
echo count($d);
echo $d[3];
echo "<hr>";
?>
结果:4赵六
关联数组
python
<?php
// 数组关联数组
$a = array('color' => 'red', 'taste' => 'sweet', 'shape' => 'round', 'name' => 'apple');
echo count($a);
echo $a["color"];
echo $a['name'];
?>
结果:4redapple
数组函数
array_keys() 返回数组的所有的键值
array_values() 返回数组的所有的值
array_rand() 从数组中随机抽取一个或多个元素,注意是键名
unset() 用于删除数组的键值
代码示例:
python
<?php
$name = array('zhangsan', 'lisi', 'wangwu', 'zhaoliu', 'zhangchuan');
echo $name[array_rand($name)];//随机收取键值
echo "<hr>";
print_r($name);
unset($name[2]);//删除键值
echo "<hr>";
print_r($name);
?>
结果:
zhangchuan
Array ( [0] => zhangsan [1] => lisi [2] => wangwu [3] => zhaoliu [4] => zhangchuan )
Array ( [0] => zhangsan [1] => lisi [3] => zhaoliu [4] => zhangchuan )
php的控制结构
if-elseif
-
代码示例:
python<?php // ABC 其他 Sjixiao='F'; if ($jixiao == 'A'){ echo "发放1.2倍薪资"; } elseif ($jixiao == 'B'){ echo "正常发放薪资"; } else if ($jixiao == ''){ echo "发放90%薪资"; } else { echo "发放80%薪资"; } ?> 结果:发放90%薪资
while
-
代码示例:
python<?php $i = 1; while ($i <= 10) { echo "今天天气真好"; echo "<br>"; $i++; echo "<br>"; } ?> 结果: 今天天气真好 今天天气真好 今天天气真好 今天天气真好 今天天气真好 今天天气真好 今天天气真好 今天天气真好 今天天气真好 今天天气真好
for结构
-
代码示例:
python<?php $d = array('张三风', '李四', '王五', '赵六'); $changdu = count($d) - 1; for ($i = 0; $i <= $changdu; $i++) { echo "中奖用户是:" . $d[$i]; echo "<br>"; } ?> 结果: 中奖用户是:张三风 中奖用户是:李四 中奖用户是:王五 中奖用户是:赵六
foreach遍历关联数组
-
代码示例:
python<?php $cars = array("特等奖" => "布加迪", "一等奖" => "捷豹", "二等奖" => "法拉利", "三等奖" => "玛莎拉蒂"); foreach ($cars as $key => $value) { echo $key . "是" . $value; echo "<hr>"; } ?> 结果: 特等奖是布加迪 一等奖是捷豹 二等奖是法拉利 三等奖是玛莎拉蒂
自定义函数
无传参函数
-
代码示例:
python<?php function func1(){ echo "hello,word"; } func1(); ?> 结果: hello,word -
有传参函数
-
代码示例:
python<?php function qiuouhe($a) { $sum = 0; for($i = 1; $i <= $a; $i++) { $jieguo = $i % 2; if ($jieguo == 0) { $sum += $i; } } echo "1到$a 的所有偶数的和:$sum"; } qiuouhe(1000); ?> 结果: 1到1000 的所有偶数的和:250500
-
数学函数和字符串函数
参考文档:PHP Math 函数 (w3school.com.cn)
数学函数
-
代码示例:
pythonecho abs(-4.2); // 绝对值函数,返回 -4.2 的绝对值,即 4.2 echo "<br>"; echo ceil(9.01); // 向上取整函数,返回大于或等于 9.01 的最小整数,即 10 echo "<br>"; echo floor(9.999); // 向下取整函数,返回小于或等于 9.999 的最大整数,即 9 echo "<br>"; echo pow(2, 4); // 幂函数,返回 2 的 4 次方,即 16 echo "<br>"; echo round(1.95583, 2); // 四舍五入函数,返回 1.95583 保留两位小数的值,即 1.96 echo "<br>"; echo mt_rand(1, 9); // 生成一个介于 1 和 9 之间的伪随机整数 echo "<br>"; echo rand(1, 9); // 生成一个介于 1 和 9 之间的伪随机整数 echo "<br>"; echo round(pi(), 2); // 返回圆周率 π 保留两位小数的值,即 3.14 echo "<br>"; 结果: 4.2 10 9 16 1.96 9 8 3.14
字符串函数
  ###### trim函数

  1. 去掉字符串**两端**的空格或其他指定符号

  2. 代码示例:

     ```python
     <?php
     $str=" dms ";
     echo trim($str," ");
     ?>
     结果:dms
``` ###### dirname函数
1. 代码示例:
```python
<?php
$pic_path = 'C:\Users\29691\Desktop\mysite\1.jpg';
echo dirname($pic_path);
echo "<br>";
echo dirname($pic_path) . '\2.jpg';
?>
结果:
C:\Users\29691\Desktop\mysite
C:\Users\29691\Desktop\mysite\2.jpg
``` ##### str_pad函数
1. 代码示例:
```python
<?php
for ($i = 1; $i <= 999; $i++) {
echo str_pad($i, 3, '0', STR_PAD_LEFT);//左填充到3位数,默认是右填充
echo "<br>";
}
?>
结果:
001
002
003
004
005
006
007
008
009
010
011
012
013
014
015
...
``` ##### explode函数
1. 代码示例:
```python
<?php
$a=str_repeat("今天天气真好",13);
$b=explode('.',$a);
var_dump($b);
?>
结果:
array(1) { [0]=> string(234) "今天天气真好今天天气真好今天天气真好今天天气真好今天天气真好今天天气真好今天天气真好今天天气真好今天天气真好今天天气真好今天天气真好今天天气真好今天天气真好" }
```命令执行函数
system函数
用法:system('whoami')
passthru()函数
用法: passthru('whoami')
exec()函数
该函数无回显,需要利用echo函数配合进行回显
python
<?php
echo exec('whoami');
?>
shell_exec()函数
同exec函数一样无回显,利用方式一样
代码示例:
python
<?php
// exec() 示例
$output = [];
exec('whoami', $output);
print_r($output); // 输出所有行
echo '<hr>';
// shell_exec() 示例
$output = shell_exec('whoami');
echo $output; // 输出完整内容
?>
结果:
Array ( [0] => cong\cong )
cong\cong
popen 函数
用于打开一个进程并建立一个管道,以便可以与该进程进行输入或输出的交互。(可执行命令)
代码示例:
python
$handle = popen('dir', 'r');
if ($handle) {
    while (!feof($handle)) {
        $line = fgets($handle);
        echo $line; // 输出每一行
    }
    pclose($handle); // 关闭管道
} else {
    echo "无法打开进程。";
}
php的错误处理
错误显示:
python
<?php
ini_set('display_errors', 1); // 显示错误,注意可能会有敏感文件路径泄露
?>
也可以使用@符号进行隐藏报错,例如$c=@$_POST['content'];即使没有content值传入也不会报错
错误级别:
| 错误类型 | 说明 |
|---|---|
| E_ERROR | 错误,文件直接中断 |
| E_WARNING | 警告,问题比较严重,但还是会继续向下运行 |
| E_NOTICE | 提示,有些小问题不会影响到程序。常发生在项目未定义 |
| E_PARSE | 编译时语法解析错误。解析错误仅仅分析器产生。 |
| E_ALL | 所有的错误 |
| E_STRICT | 启用PHP对代码的修改建议,以确保代码具有最佳的操作性和前向兼容性。 |
| E_DEPRECATED | 启用后将会在未来版本中可能无法正常工作的代码给予警告。 |
php操作mysql
代码示例:
python
<?php
$link = mysqli_connect('127.0.0.1', 'root', 'password', 'pikachu');
var_dump($link);
echo '<hr>';

$sql = 'SELECT * FROM users;';
$result = mysqli_query($link, $sql);
var_dump($result);
echo '<hr>';

while ($row = mysqli_fetch_array($result)) {
    print_r($row);
}
echo '<hr>';
?>
解读:
1. mysqli_connect函数用于与数据库建立连接
2. mysqli_query函数用于执行数据库操作,用法:mysqli_query('数据库链接','SELECT、INSERT、UPDATE、DELETE 等数据库操作')
3. mysqli_query函数只能返回一个结果集,mysqli_fetch_array函数只能获取一行数据,故通过while循环来获取大量数据
结果:
object(mysqli)#1 (19) { ["affected_rows"]=> int(0) ["client_info"]=> string(79) "mysqlnd 5.0.12-dev - 20150407 - $Id: 7cc7cc96e675f6d72e5cf0f267f48e167c2abb23 $" ["client_version"]=> int(50012) ["connect_errno"]=> int(0) ["connect_error"]=> NULL ["errno"]=> int(0) ["error"]=> string(0) "" ["error_list"]=> array(0) { } ["field_count"]=> int(0) ["host_info"]=> string(20) "127.0.0.1 via TCP/IP" ["info"]=> NULL ["insert_id"]=> int(0) ["server_info"]=> string(6) "5.7.26" ["server_version"]=> int(50726) ["stat"]=> string(135) "Uptime: 37925 Threads: 1 Questions: 383 Slow queries: 0 Opens: 125 Flush tables: 1 Open tables: 28 Queries per second avg: 0.010" ["sqlstate"]=> string(5) "00000" ["protocol_version"]=> int(10) ["thread_id"]=> int(53) ["warning_count"]=> int(0) }
--------------------------------------------------------------------------------
object(mysqli_result)#2 (5) { ["current_field"]=> int(0) ["field_count"]=> int(4) ["lengths"]=> NULL ["num_rows"]=> int(3) ["type"]=> int(0) }
--------------------------------------------------------------------------------
Array ( [0] => 1 [id] => 1 [1] => admin [username] => admin [2] => e10adc3949ba59abbe56e057f20f883e [password] => e10adc3949ba59abbe56e057f20f883e [3] => 1 [level] => 1 ) Array ( [0] => 2 [id] => 2 [1] => pikachu [username] => pikachu [2] => 670b14728ad9902aecba32e22fa4f6bd [password] => 670b14728ad9902aecba32e22fa4f6bd [3] => 2 [level] => 2 ) Array ( [0] => 3 [id] => 3 [1] => test [username] => test [2] => e99a18c428cb38d5f260853678922e03 [password] => e99a18c428cb38d5f260853678922e03 [3] => 3 [level] => 3 )
PHP制作留言板
全局变量的获取 :PHP 全局变量 - 超全局变量 (w3school.com.cn)
配置文件config.php
python
<?php
$dbip='localhost';
$dbuser='root';
$dbpass='password';
$dbname='demo01';
$con=mysqli_connect($dbip,$dbuser,$dbpass,$dbname);

//用于连接数据库
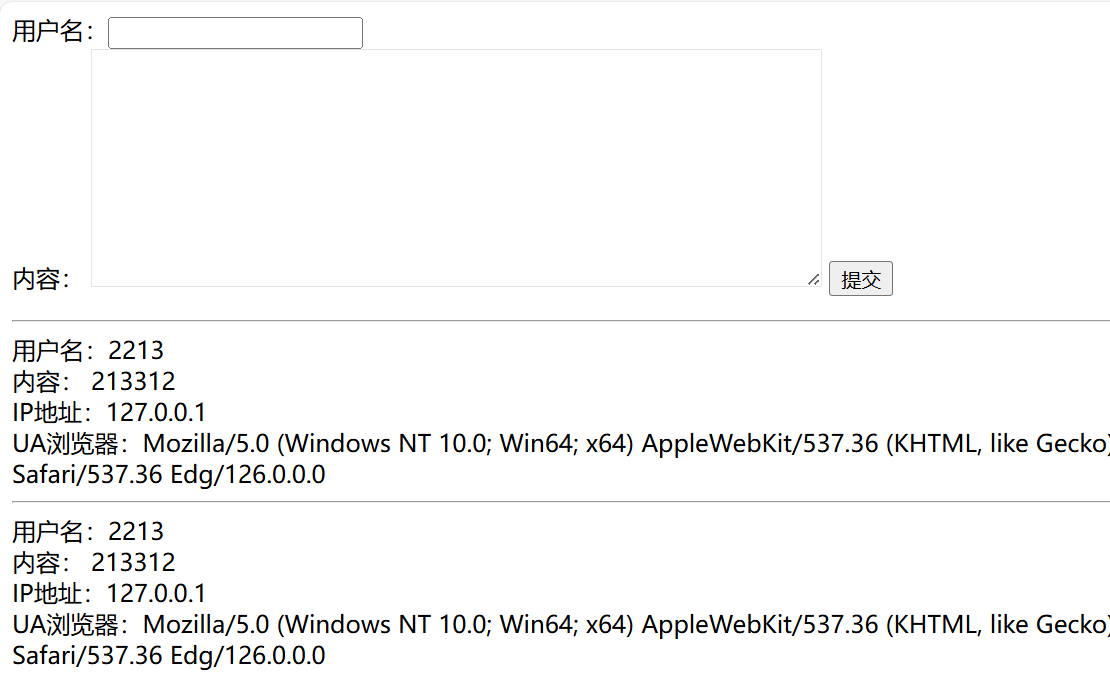
前端页面gbook.php
python
<form id="form1" name="form1" method="post" action="">

	  用户名:<input type="text" name="username" maxlength="2000"><br>

  内容:

	  <textarea id="content" rows="10" cols="70" name="content" style="border:1px solid #E5E5E5;">
    </textarea>
	  <input type="submit" name="submit" id="submit" value="提交">

</form>

<?php
include 'config.php';


function add_gbook($con){
    $u = @$_POST['username'];
    if (isset($u)) {
        $c = @$_POST['content'];
        $i = @$_SERVER['REMOTE_ADDR'];
        $ua = @$_SERVER['HTTP_USER_AGENT'];
        $sql = "insert into gbook(`username`, `content`,`ipaddr`,`uagent`) value('$u', '$c','$i','$ua');";
        if (mysqli_query($con, $sql)) {
            echo "<script>alert('留言成功!')</script>";
        }
    }
}

function show_gbook($con,$del){
    $sql1="select * from gbook";
    $data=mysqli_query($con,$sql1);
    while ($row=mysqli_fetch_row($data)) {
        echo '<hr>';
        echo '用户名:'.$row[0].'<br>';
        echo '内容:'.$row[1].'<br>';
        echo 'IP地址:'.$row[2].'<br>';
        echo 'UA浏览器:'.$row[3].'<br>';
        if($del=='del'){
            echo "<a href='gbook-admin.php?del=$row[0]'>删除</a>";
        }
    }
}

add_gbook($con);
show_gbook($con,'x');


//if (!$con)
//{
//    die("连接错误: " . mysqli_connect_error());
//}else{
//    $u=@$_POST['username'];
//    if(isset($u)){
//        $c=@$_POST['content'];
//        $i=@$_SERVER['REMOTE_ADDR'];
//        $ua=@$_SERVER['HTTP_USER_AGENT'];
//        $sql="insert into gbook(`username`, `content`,`ipaddr`,`uagent`) value('$u', '$c','$i','$ua');";
//        if(mysqli_query($con,$sql)){
//            echo "<script>alert('留言成功!')</script>";
//            $sql1="select * from gbook";
//            $data=mysqli_query($con,$sql1);
//            while ($row=mysqli_fetch_row($data))
//            {
//                echo '<hr>';
//                echo '用户名:'.$row[0].'<br>';
//                echo '内容:'.$row[1].'<br>';
//                echo 'IP地址:'.$row[2].'<br>';
//                echo 'UA浏览器:'.$row[3].'<br>';
//            }
//
//        }else{
//            echo "<script>alert('留言失败!')</script>";
//        }
//
//    }
//
//}
// 此处两种方法,都一样,就是用了函数,主要理解注释那里即可
//配置数据库时需要注意的是,注意字段的长度及其类型,不然传不进去
?>
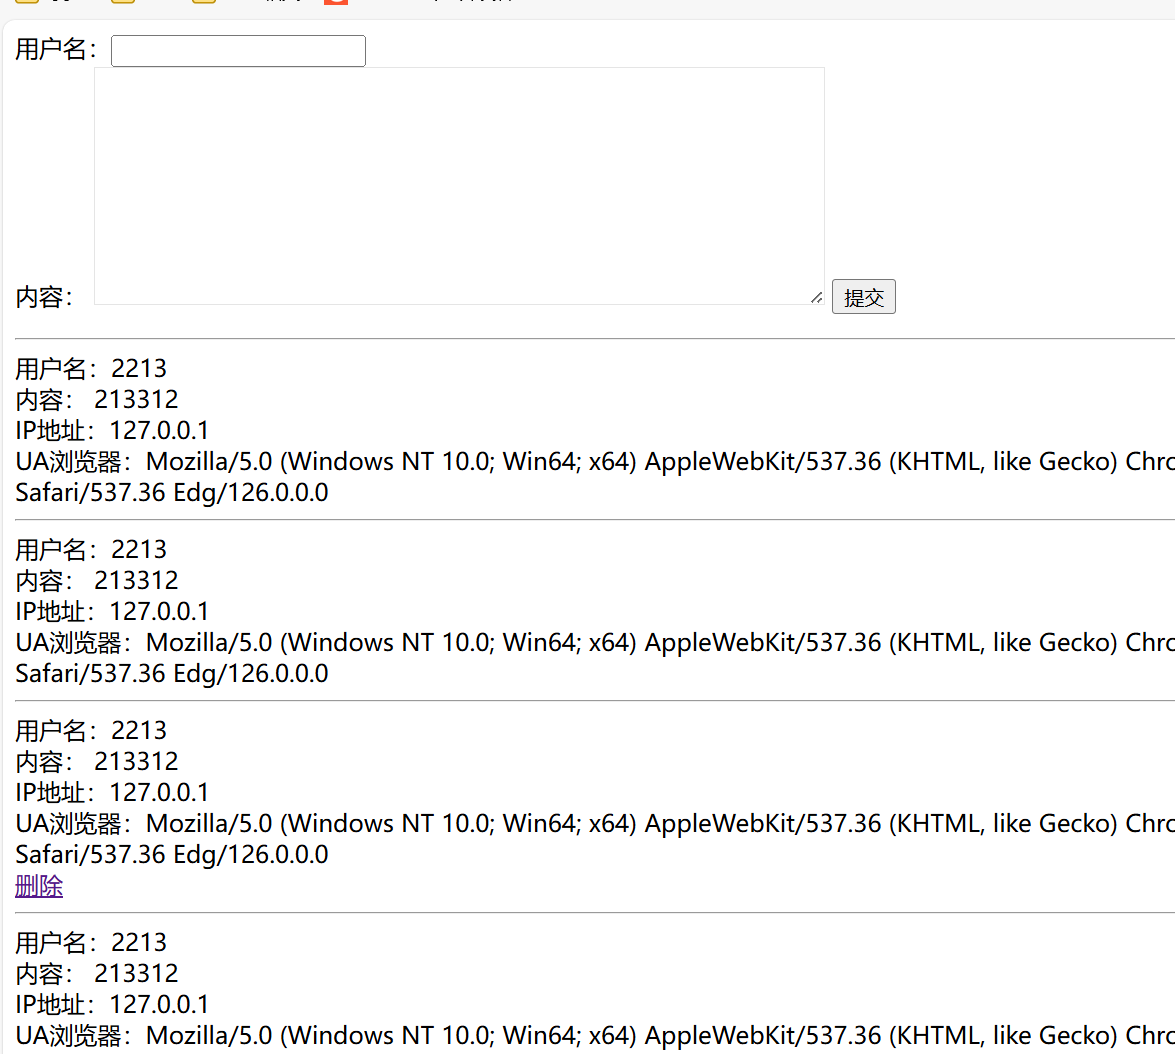
后台管理留言页面gbook-admin.php
python
<?php
include '../config.php';
include '../gbook.php';

show_gbook($con,'del');


$delstr=@$_GET['del'];
if(isset($delstr)){
    $sql2="delete from gbook where username = '$delstr';";
    if(mysqli_query($con,$sql2)){
        echo "<script>alert('删除成功!')</script>";
    }
}
cookie与session
session会话函数
- session_start(): 启动会话,用于开始或恢复一个已经存在的会话。
- $_SESSION: 用于存储和访问当前会话中的所有变量。
- session_destroy(): 销毁当前会话中的所有数据。
- session_unset(): 释放当前会话中的所有变量。
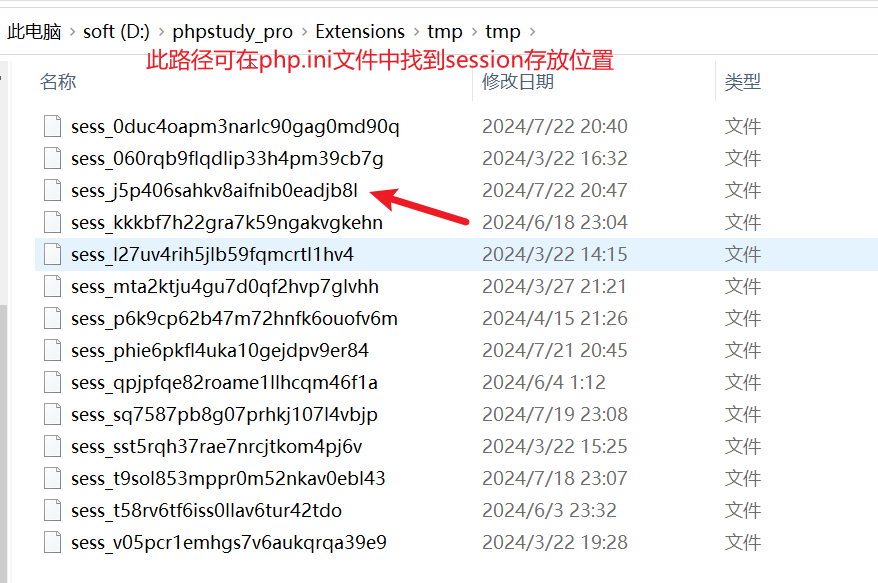
- Session存储路径: PHP.INI中session.save_path设置路径
cookie与session的区别
-
存储位置不同 :
Cookie是存储在客户端(浏览器)上的,而Session是存储在服务器端的。
-
安全性不同 :
Cookie存储在客户端上,可能会被黑客利用窃取信息,而Session存储在服务器上,更加安全。
-
存储容量不同 :
Cookie的存储容量有限,一般为4KB,而Session的存储容量理论上没有限制,取决于服务器的硬件和配置,适合存储购物车。
-
生命周期不同 :
Cookie可以设置过期时间,即便关闭浏览器或者重新打开电脑,Cookie仍然存在,直到过期或者被删除。而Session一般默认在浏览器关闭后就会过期。
-
访问方式不同 :
Cookie可以直接通过JavaScript等客户端脚本语言访问,而Session则需要通过服务器端代码进行读取和设置。
-
使用场景不同:
Cookie一般用于存储小型的数据,如用户的用户名和密码等信息。而Session一般用于存储大型的数据,如购物车、登录状态等信息。
cookie与session的工作流程:
-
用户请求:
- 用户首次访问网站,浏览器向服务器发送请求。
-
服务器创建 Session:
- 服务器接收到请求后,创建一个新的 Session,生成一个唯一的 Session ID。
-
发送 Cookie:
- 服务器将 Session ID 存储在 Cookie 中,并将 Cookie 返回给客户端的浏览器。
-
浏览器存储 Cookie:
- 浏览器接收到 Cookie,并将 Session ID 存储在本地。
-
后续请求:
- 用户进行进一步的操作(如刷新页面或提交表单),浏览器会自动将存储的 Cookie(包含 Session ID)发送回服务器。
-
服务器验证 Session:
- 服务器接收到请求和 Cookie 后,通过 Cookie 中的 Session ID 查找对应的 Session 数据,以验证用户的身份和状态。
-
处理请求:
- 服务器根据 Session 中存储的信息处理请求,例如用户登录状态、购物车内容等。
-
更新 Session:
- 如果需要,服务器可以更新 Session 数据,并可能更新 Cookie(例如,延长 Session 的有效期)。
cookie | session | token示例
cookie验证
-
配置文件config.php
python<?php $dbip='localhost'; $dbuser='root'; $dbpass='password'; $dbname='demo01'; $con=mysqli_connect($dbip,$dbuser,$dbpass,$dbname); //数据库demo01 //表admin //字段 username password -
验证后台页面admin-c.php
python<!DOCTYPE html> <html lang="en"> <head> <meta charset="UTF-8"> <title>后台登录</title> <style> body { background-color: #f1f1f1; } .login { width: 400px; margin: 100px auto; background-color: #fff; border-radius: 5px; box-shadow: 0 0 10px rgba(0,0,0,0.3); padding: 30px; } .login h2 { text-align: center; font-size: 2em; margin-bottom: 30px; } .login label { display: block; margin-bottom: 20px; font-size: 1.2em; } .login input[type="text"], .login input[type="password"] { width: 100%; padding: 10px; border: 1px solid #ccc; border-radius: 5px; font-size: 1.2em; margin-bottom: 20px; } .login input[type="submit"] { background-color: #2ecc71; color: #fff; border: none; padding: 10px 20px; border-radius: 5px; font-size: 1.2em; cursor: pointer; } .login input[type="submit"]:hover { background-color: #27ae60; } </style> </head> <body> <div class="login"> <h2>后台登录</h2> <form action="" method="post"> <label for="username">用户名:</label> <input type="text" name="username" id="username" required> <label for="password">密码:</label> <input type="password" name="password" id="password" required> <input type="submit" value="登录"> </form> </div> </body> </html> <?php include './config.php'; //登录文件 /* * 1、接受输入的帐号密码 * 2、判断帐号密码正确性 * 3、正确后生成的cookie进行保存 * 3、1错误的帐号密码就进行提示 * 4、跳转至成功登录的页面 */ //1、接受输入的帐号密码 $user=$_POST['username']; $pass=$_POST['password']; //2、判断帐号密码正确性 //连接数据库 进行数据库查询将数据进行对比 $sql="select * from admin where username='$user' and password='$pass';"; $data=mysqli_query($con,$sql); if($_SERVER["REQUEST_METHOD"] == "POST"){ //判断用户登录成功 if(mysqli_num_rows($data) > 0){ $expire = time() + 60 * 60 * 24 * 30; // 一个月后过期 setcookie('username', $user, $expire, '/'); setcookie('password', $pass, $expire, '/'); //echo '<script>alert("登录成功!")</script>'; header('Location: index-c.php'); exit(); }else{ //判断用户登录失败 echo '<script>alert("登录失败!")</script>'; } } -
登录成功页面index-c.php
python<?php if($_COOKIE['username']!='admin' and $_COOKIE['password']!='123456'){ header('Location: admin-c.php'); } ?> <!DOCTYPE html> <html> <head> <meta charset="utf-8"> <title>后台首页</title> </head> <body> <h1>后台首页</h1> <p>欢迎您,<?php echo $_COOKIE['username']; ?>!</p> <p><a href="logout-c.php">退出登录</a></p> </body> </html> -
登出页面logout-c.php
python<?php setcookie('username', '', time() - 3600, '/'); setcookie('password', '', time() - 3600, '/'); // 跳转到登录页面 header('Location: admin-c.php'); exit; ?>
cookie+session验证
-
配置文件config.php
python<?php $dbip='localhost'; $dbuser='root'; $dbpass='password'; $dbname='demo01'; $con=mysqli_connect($dbip,$dbuser,$dbpass,$dbname); //数据库demo01 //表admin //字段 username password -
后台登录页面admin-s.php
python<!DOCTYPE html> <html lang="en"> <head> <meta charset="UTF-8"> <title>后台登录</title> <style> body { background-color: #f1f1f1; } .login { width: 400px; margin: 100px auto; background-color: #fff; border-radius: 5px; box-shadow: 0 0 10px rgba(0,0,0,0.3); padding: 30px; } .login h2 { text-align: center; font-size: 2em; margin-bottom: 30px; } .login label { display: block; margin-bottom: 20px; font-size: 1.2em; } .login input[type="text"], .login input[type="password"] { width: 100%; padding: 10px; border: 1px solid #ccc; border-radius: 5px; font-size: 1.2em; margin-bottom: 20px; } .login input[type="submit"] { background-color: #2ecc71; color: #fff; border: none; padding: 10px 20px; border-radius: 5px; font-size: 1.2em; cursor: pointer; } .login input[type="submit"]:hover { background-color: #27ae60; } </style> </head> <body> <div class="login"> <h2>后台登录</h2> <form action="" method="post"> <label for="username">用户名:</label> <input type="text" name="username" id="username" required> <label for="password">密码:</label> <input type="password" name="password" id="password" required> <input type="submit" value="登录"> </form> </div> </body> </html> <?php include '../config.php'; //登录文件-采用session验证 //1、接受输入的帐号密码 $user=$_POST['username']; $pass=$_POST['password']; $sql="select * from admin where username='$user' and password='$pass';"; $data=mysqli_query($con,$sql); if($_SERVER["REQUEST_METHOD"] == "POST"){ if(mysqli_num_rows($data) > 0){ session_start(); $_SESSION['username']=$user; $_SESSION['password']=$pass; header('Location: index-s.php'); exit(); }else{ echo '<script>alert("登录失败!")</script>'; } } -
登录成功页面index-s.php
python<?php //登录成功首页文件-采用session验证 //判断省去了数据库查询获取帐号密码的操作 直接赋值 session_start(); if($_SESSION['username']!='admin' && $_SESSION['password']!='123456'){ header('Location: admin-s.php'); } ?> <!DOCTYPE html> <html> <head> <meta charset="utf-8"> <title>后台首页</title> </head> <body> <h1>后台首页</h1> <p>欢迎您,<?php echo $_SESSION['username']; ?>!</p> <p><a href="logout-s.php">退出登录</a></p> </body> </html> -
logout-s.php
python<?php // 开始会话 session_start(); // 清除 SESSION 变量,并销毁会话 session_unset(); session_destroy(); // 重定向到登录页面 header('Location: admin-s.php'); exit; ?> //session数据存放在服务端处,不易被攻击者获取,但无法防御csrf攻击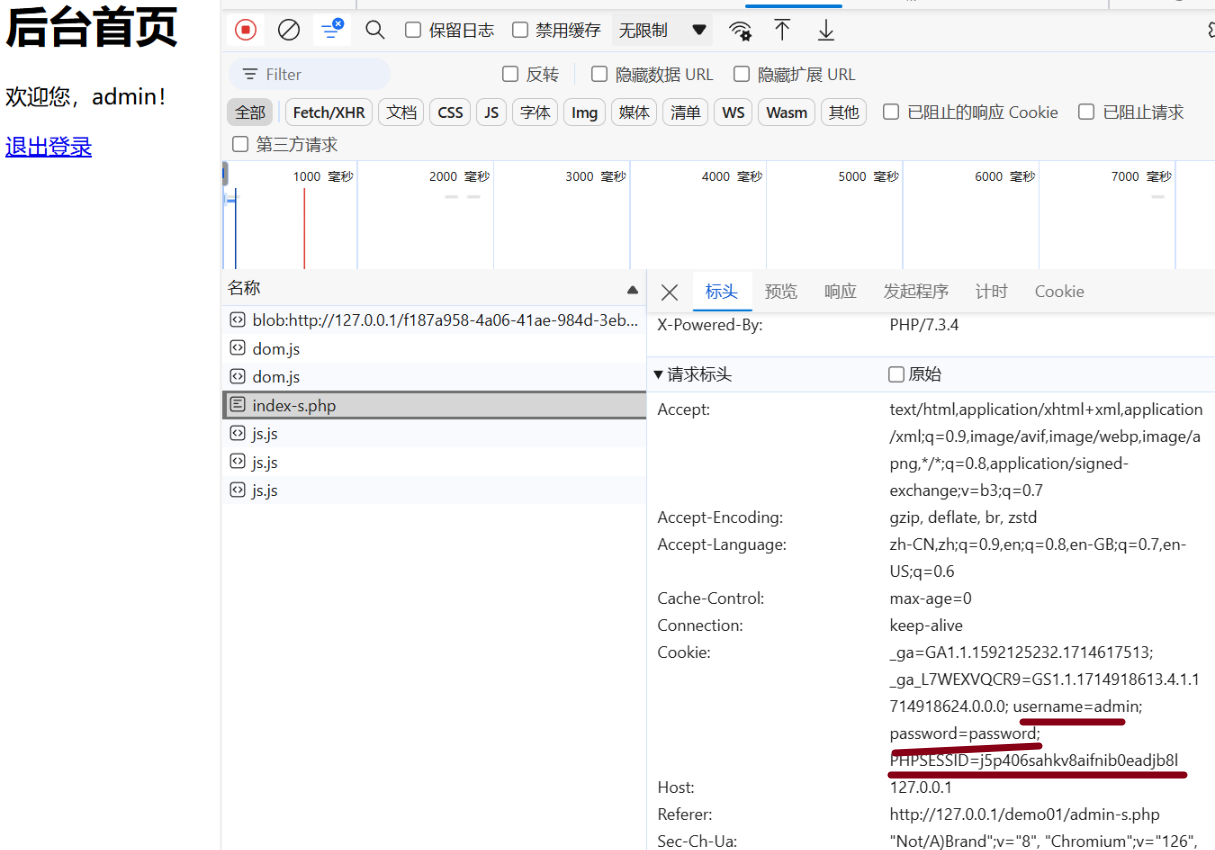

加入Token验证
-
token生成页面token.php
python<?php // 生成Token并将其存储在Session中 session_start(); //1.因为是用的session维持会话,token已经绑定到下面的表单了 //2.token,生成之后直接存到session里,主要是方便重置token, //每次token随表单提交后都需要重置以保持token的唯一性。 $_SESSION['token'] = bin2hex(random_bytes(16)); ?> <!DOCTYPE html> <html lang="en"> <head> <meta charset="UTF-8"> <title>后台登录</title> <style> body { background-color: #f1f1f1; } .login { width: 400px; margin: 100px auto; background-color: #fff; border-radius: 5px; box-shadow: 0 0 10px rgba(0,0,0,0.3); padding: 30px; } .login h2 { text-align: center; font-size: 2em; margin-bottom: 30px; } .login label { display: block; margin-bottom: 20px; font-size: 1.2em; } .login input[type="text"], .login input[type="password"] { width: 100%; padding: 10px; border: 1px solid #ccc; border-radius: 5px; font-size: 1.2em; margin-bottom: 20px; } .login input[type="submit"] { background-color: #2ecc71; color: #fff; border: none; padding: 10px 20px; border-radius: 5px; font-size: 1.2em; cursor: pointer; } .login input[type="submit"]:hover { background-color: #27ae60; } </style> </head> <body> <div class="login"> <h2>后台登录</h2> <form action="token_check.php" method="post"> <input type="hidden" name="token" value="<?php echo $_SESSION['token'] ; ?>"> <label for="username">用户名:</label> <input type="text" name="username" id="username" required> <label for="password">密码:</label> <input type="password" name="password" id="password" required> <input type="submit" value="登录"> </form> </div> </body> </html> -
token检查页面token_check.php
python<?php session_start(); $token = $_POST['token'] ?? ''; if ($token !== $_SESSION['token']) { // token不匹配,禁止访问 header('HTTP/1.1 403 Forbidden'); $_SESSION['token'] = bin2hex(random_bytes(16)); echo 'Access denied'; exit; }else{ $_SESSION['token'] = bin2hex(random_bytes(16)); if($_POST['username']=='admin' && $_POST['password']=='123456'){ echo '登录成功!'; echo '你是管理员可以访问文件管理页面!'; }else{ echo '登录失败!'; } } //第一张图可以看到爆破不了 //第一次可以发包成功第二次就不行了 //成功防御csrf攻击


文件上传
代码示例
       前端页面:upload.html
       <!DOCTYPE html>
       <html lang="en">
       <head>
           <meta charset="UTF-8">
           <title>文件上传页面</title>
           <style>
               body {
                   font-family: Arial, sans-serif;
                   background-color: #f2f2f2;
                   padding: 20px;
               }
               h1 {
                   text-align: center;
                   margin-top: 50px;
               }
               form {
                   background-color: #fff;
                   border-radius: 10px;
                   padding: 20px;
                   margin-top: 30px;
                   max-width: 600px;
                   margin: 0 auto;
               }
               input[type="file"] {
                   margin-top: 20px;
                   margin-bottom: 20px;
               }
               button {
                   background-color: #4CAF50;
                   color: #fff;
                   padding: 10px 20px;
                   border: none;
                   border-radius: 5px;
                   cursor: pointer;
               }
               button:hover {
                   background-color: #3e8e41;
               }
           </style>
       </head>
       <body>
       <h1>文件上传</h1>
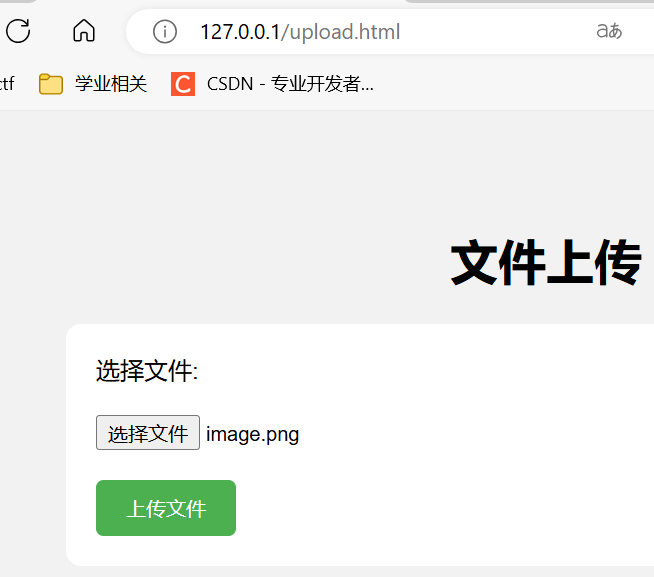
       <form action="upload.php" method="POST" enctype="multipart/form-data">
           <label for="file">选择文件:</label>
           <br>
           <input type="file" id="file" name="f">
           <br>
           <button type="submit">上传文件</button>
       </form>
       </body>
       </html>
       ----------------------------------------------------------------------------------------------------------------
       后端页面:upload.php
       <?php

       $name=$_FILES['f']['name'];//获取上传文件原始名称
       $type=$_FILES['f']['type'];//获取上传文件MIME类型
       $size=$_FILES['f']['size']; //获取上传文件字节单位大小
       $tmp_name=$_FILES['f']['tmp_name'];//获取上传的临时副本文件名
       $error=$_FILES['f']['error']; //获取上传时发生的错误代码

       //echo $name."<br>";
       //echo $type."<br>";
       //echo $size."<br>";
       //echo $tmp_name."<br>";
       //echo $error."<br>";
       //if(move_uploaded_file($tmp_name,'upload/'.$name)){
       //    echo "文件上传成功!";
       //}


       //上传文件后缀过滤 黑名单机制
       //$black_ext=array('php','asp','jsp','aspx');
       xxx.jpg xxx.png
       //$fenge = explode('.',$name);
       //$exts = end($fenge);
       //if(in_array($exts,$black_ext)){
       //    echo '非法后缀文件'.$exts;
       //}else{
       //    move_uploaded_file($tmp_name,'upload/'.$name);
       //    echo '<script>alert("上传成功")</script>';
       //}
       //上传文件后缀过滤 白名单机制
       //$allow_ext=array('png','jpg','gif','jpeg');
       xxx.jpg xxx.png
       //$fenge = explode('.',$name);
       //$exts = end($fenge);
       //if(!in_array($exts,$allow_ext)){
       //    echo '非法后缀文件'.$exts;
       //}else{
       //    move_uploaded_file($tmp_name,'upload/'.$name);
       //    echo '<script>alert("上传成功")</script>';
       //}

       //MIME文件类型过滤
       $allow_type=array('image/png','image/jpg','image/jpeg','image/gif');//过滤文件名
       if(!in_array($type,$allow_type)){//验证文件类型
           echo '非法后缀文件';
       }else{
           move_uploaded_file($tmp_name,'upload/'.$name);
           echo '<script>alert("上传成功")</script>';

       }
       ?>
2. oss文件上传源码(有key,id泄露):oss-h5-upload-js-direct.tar.gz
文件遍历
相关函数
- is_dir() 函数用于检查指定的路径是否是一个目录
- opendir() 函数用于打开指定的目录,返回句柄,用来读取目录中的文件和子目录
- readdir() 函数用于从打开的目录句柄中读取目录中的文件和子目录
- open_basedir:PHP.INI中的设置用来控制脚本程序访问目录
代码示例:
python
file-manage.php
<!DOCTYPE html>
<html>
<head>
    <meta charset="utf-8">
    <title>文件列表</title>
    <link rel="stylesheet" href="https://maxcdn.bootstrapcdn.com/font-awesome/4.7.0/css/font-awesome.min.css">
    <style type="text/css">
        ul {
            list-style: none;
            padding: 0;
            margin: 0;
        }
        li {
            margin-bottom: 10px;
        }
        i {
            margin-right: 10px;
        }
        a {
            text-decoration: none;
            color: #333;
        }
    </style>
</head>
<body>
<h1>当前目录下的文件列表</h1>
<ul>

</ul>
</body>
</html>

<?php
$dir = $_GET['path'] ?? './';

//1.打开目录,读取文件列表 opendir
//2.循环读取文件列表 while readdir
//3.判断是文件还是文件夹 is_dir

//打开目录,读取文件列表 opendir
function filelist($dir){
    if($dh = opendir($dir)){
        //循环读取文件列表 while readdir
        while(($file=readdir($dh) )!== false){
            //判断是文件还是文件夹 is_dir
            if(is_dir($file)){
                echo "<li><i class='fa fa-folder'></i> <a href='?path=$file'>" . $file . '</a></li>';
            }else{
                echo '<li><i class="fa fa-file"></i> <a href="#">' . $file . '</a></li>';
            }
        }
    }
}

filelist($dir);

?>
文件管理
代码示例
python
<?php
ini_set('open_basedir', __DIR__); // 限制 PHP 脚本只能访问当前目录及其子目录,提升安全性
$path = $_GET['path'] ?? './'; // 获取 URL 中的 'path' 参数,如果没有则默认 './'
$action = isset($_GET['a']) ? $_GET['a'] : ''; // 获取 URL 中的 'a' 参数,如果没有则为空字符串
$path = isset($_GET['path']) ? $_GET['path'] : '.'; // 获取 URL 中的 'path' 参数,如果没有则默认 '.'

if (is_file($path)) {
    // 如果 $path 是一个文件
    $file = basename($path); // 获取文件名
    $path = dirname($path); // 获取文件所在目录
} elseif (!is_dir($path)) {
    // 如果 $path 既不是文件也不是目录
    echo '我只会吃瓜!';
}

function getlist($path) {
    $hd = opendir($path); // 打开目录
    while (($file_name = readdir($hd)) !== false) {
        // 遍历目录中的文件和子目录
        if ($file_name != '.' && $file_name != '..') {
            $file_path = "$path/$file_name"; // 构建完整路径
            $file_type = filetype($file_path); // 获取文件类型
        }
        $list[$file_type][] = array(
            'file_name' => $file_name, // 文件名
            'file_path' => $file_path, // 文件路径
            'file_size' => round(filesize($file_path) / 1024), // 文件大小(KB)
            'file_time' => date('Y/m/d H:i:s', filemtime($file_path)), // 文件修改时间
        );
    }
    closedir($hd); // 关闭目录
    return $list; // 返回文件和目录列表
}

$list = getlist($path); // 获取当前目录下的文件和目录列表

// 根据操作参数执行相应的操作
switch ($action) {
    case 'del':
        unlink($file); // 删除文件
        break;
    case 'down':
        header("Content-Type: application/octet-stream"); // 设置下载头信息
        header("Content-Disposition: attachment; filename=\"" . $file . "\""); // 设置下载文件名
        header("Content-Length: " . filesize($file)); // 设置文件大小
        readfile($file); // 读取文件内容并输出
        break;
    case 'edit':
        $content = file_get_contents($file); // 获取文件内容
        echo '<form name="form1" method="post" action="">';
        echo "文件名:" . $file . "<br>";
        echo "文件内容:<br>";
        echo '<textarea name="code" style="resize:none;" rows="100" cols="100">' . $content . '</textarea><br>';
        echo '<input type="submit" name="submit" id="submit" value="提交">';
        echo '</form>';
        break;
}

// 如果提交了编辑后的文件内容
if (isset($_POST['code'])) {
    $f = fopen("$path/$file", 'w+'); // 打开文件以写入
    fwrite($f, $_POST['code']); // 写入新内容
    fclose($f); // 关闭文件
}
?>

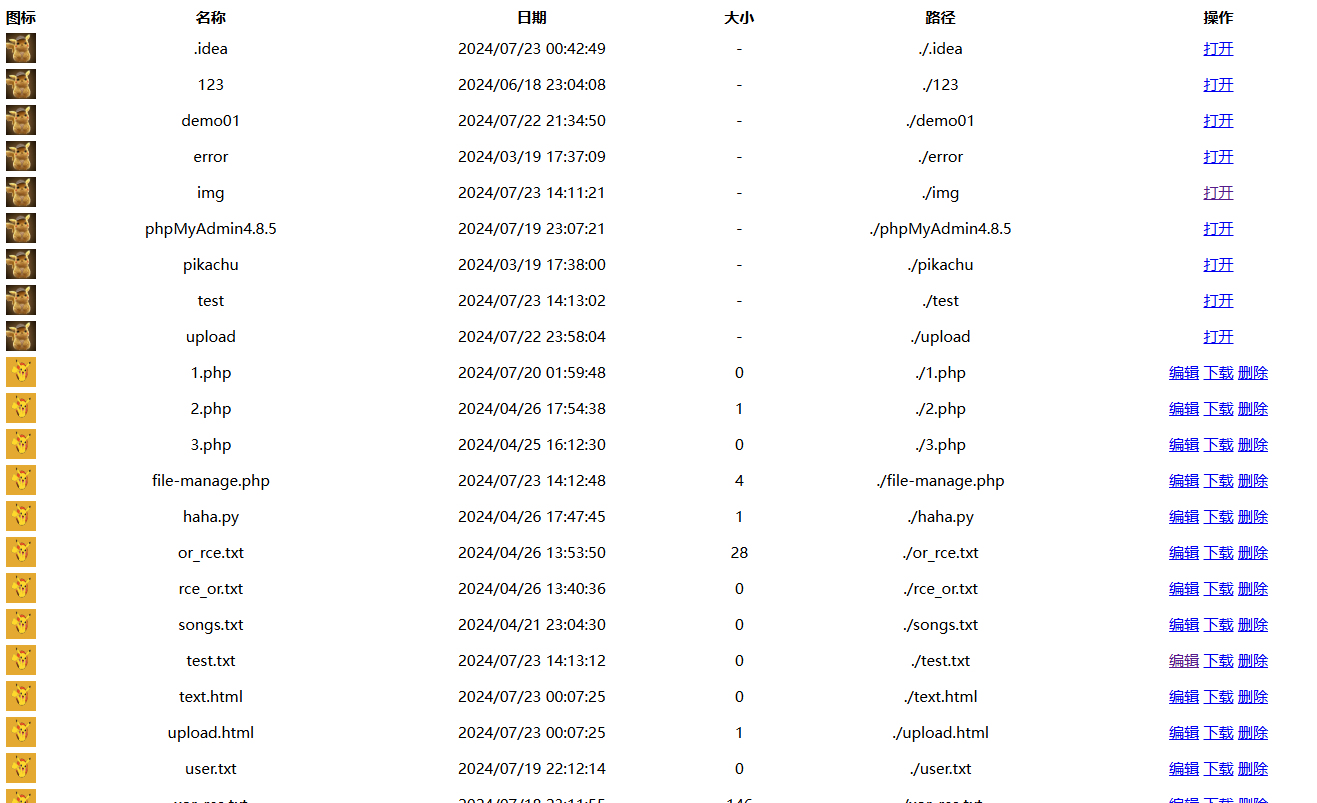
<table width="100%" style="font-size: 10px;text-align: center;">
    <tr>
        <th>图标</th>
        <th>名称</th>
        <th>日期</th>
        <th>大小</th>
        <th>路径</th>
        <th>操作</th>
    </tr>
    <?php foreach ($list['dir'] as $v): // 遍历目录列表 ?>
    <tr>
        <td><img src="./img/list.jpg" width="20" height="20"></td>
        <td><?php echo $v['file_name']?></td>
        <td><?php echo $v['file_time']?></td>
        <td>-</td>
        <td><?php echo $v['file_path']?></td>
        <td><a href="?path=<?php echo $v['file_path']?>">打开</a></td>
    </tr>
    <?php endforeach; ?>

    <?php foreach ($list['file'] as $v): // 遍历文件列表 ?>
    <tr>
        <td><img src="./img/file.jpg" width="20" height="20"></td>
        <td><?php echo $v['file_name']?></td>
        <td><?php echo $v['file_time']?></td>
        <td><?php echo $v['file_size']?></td>
        <td><?php echo $v['file_path']?></td>
        <td>
            <a href="?a=edit&path=<?php echo $v['file_path']?>">编辑</a>
            <a href="?a=down&path=<?php echo $v['file_path']?>">下载</a>
            <a href="?a=del&path=<?php echo $v['file_path']?>">删除</a>
        </td>
    </tr>
    <?php endforeach; ?>
</table>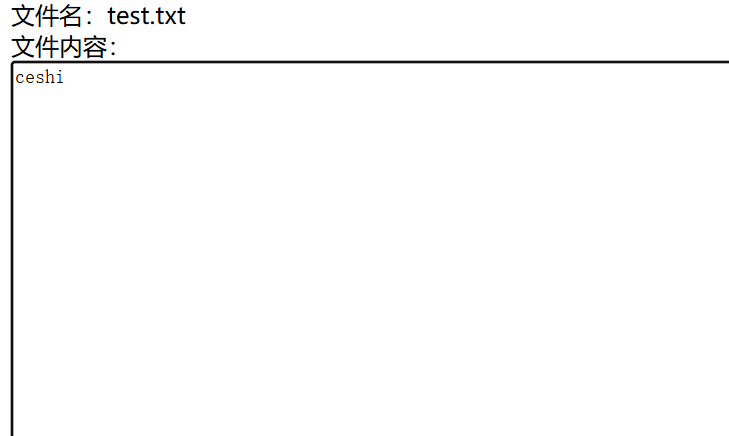

新闻页面开发
个人源码搭建
-
代码示例
python配置文件config.php <?php $dbip='localhost'; $dbuser='root'; $dbpass='password'; $dbname='demo01'; $con=mysqli_connect($dbip,$dbuser,$dbpass,$dbname); --------------------------------------------------------- 前端模版页面new.html <!DOCTYPE html> <html> <head> <meta charset="UTF-8"> <title>{page_title}</title> <style> /* 一些样式 */ body { font-family: Arial, sans-serif; margin: 0; padding: 0; } header { background-color: #4CAF50; color: white; text-align: center; padding: 20px; } nav { background-color: #f2f2f2; display: flex; justify-content: space-between; padding: 10px; } nav a { color: black; text-decoration: none; padding: 10px; border-radius: 5px; transition: background-color 0.3s ease; } nav a:hover { background-color: #4CAF50; color: white; } .container { max-width: 1200px; margin: 0 auto; padding: 20px; } h1 { font-size: 36px; font-weight: bold; margin-bottom: 20px; } p { font-size: 18px; line-height: 1.5; margin-bottom: 20px; } ul { margin-left: 20px; margin-bottom: 20px; } li { margin-bottom: 10px; } </style> </head> <body> <header> <h1>{heading}</h1> </header> <nav> <a href="#">首页</a> <a href="#">新闻</a> <a href="#">留言</a> <a href="#">关于</a> </nav> <div class="container"> <h1>{subheading}</h1> <p>{content}</p> <img src="{$item}" width="1000" height="3000"></img> </div> </body> </html> <?php phpinfo();?> ------------------------------------------------------------------- 后端文章管理页面new.php <?php include './demo01/config.php'; // 读取 new.html 模板文件的内容,并将其存储在 $template 变量中。 $template = file_get_contents('new.html'); // 获取 GET 请求中的 id 参数,如果没有提供,则默认值为 '1'。 $id = $_GET['id'] ?? '1'; $sql = "select * from news where id=$id"; $data = mysqli_query($con, $sql); // 遍历查询结果集,将每一行的内容存储在相应的变量中。 while ($row = mysqli_fetch_row($data)) { $page_title = $row[1]; // 获取第二列的值,作为页面标题。 $heading = $row[2]; // 获取第三列的值,作为标题。 $subheading = $row[3]; // 获取第四列的值,作为副标题。 $content = $row[4]; // 获取第五列的值,作为内容。 $item = $row[5]; // 获取第六列的值,作为项目。 //echo $page_title; // (注释掉的代码) 输出页面标题。 } // 输出页面标题两次,用于调试或显示。 echo "$page_title<br>$page_title"; // 在模板中替换占位符,使用从数据库查询获得的实际值。 $template = str_replace('{page_title}', $page_title, $template); $template = str_replace('{heading}', $heading, $template); $template = str_replace('{subheading}', $subheading, $template); $template = str_replace('{content}', $content, $template); $template = str_replace('{$item}', $item, $template); // 使用 eval 函数执行模板字符串中的 PHP 代码。 eval('?>' . $template); ?> //为什么要用str_replace函数呢? //因为这样通过将一个替换模版的值来减少重复的代码,以达到模版效果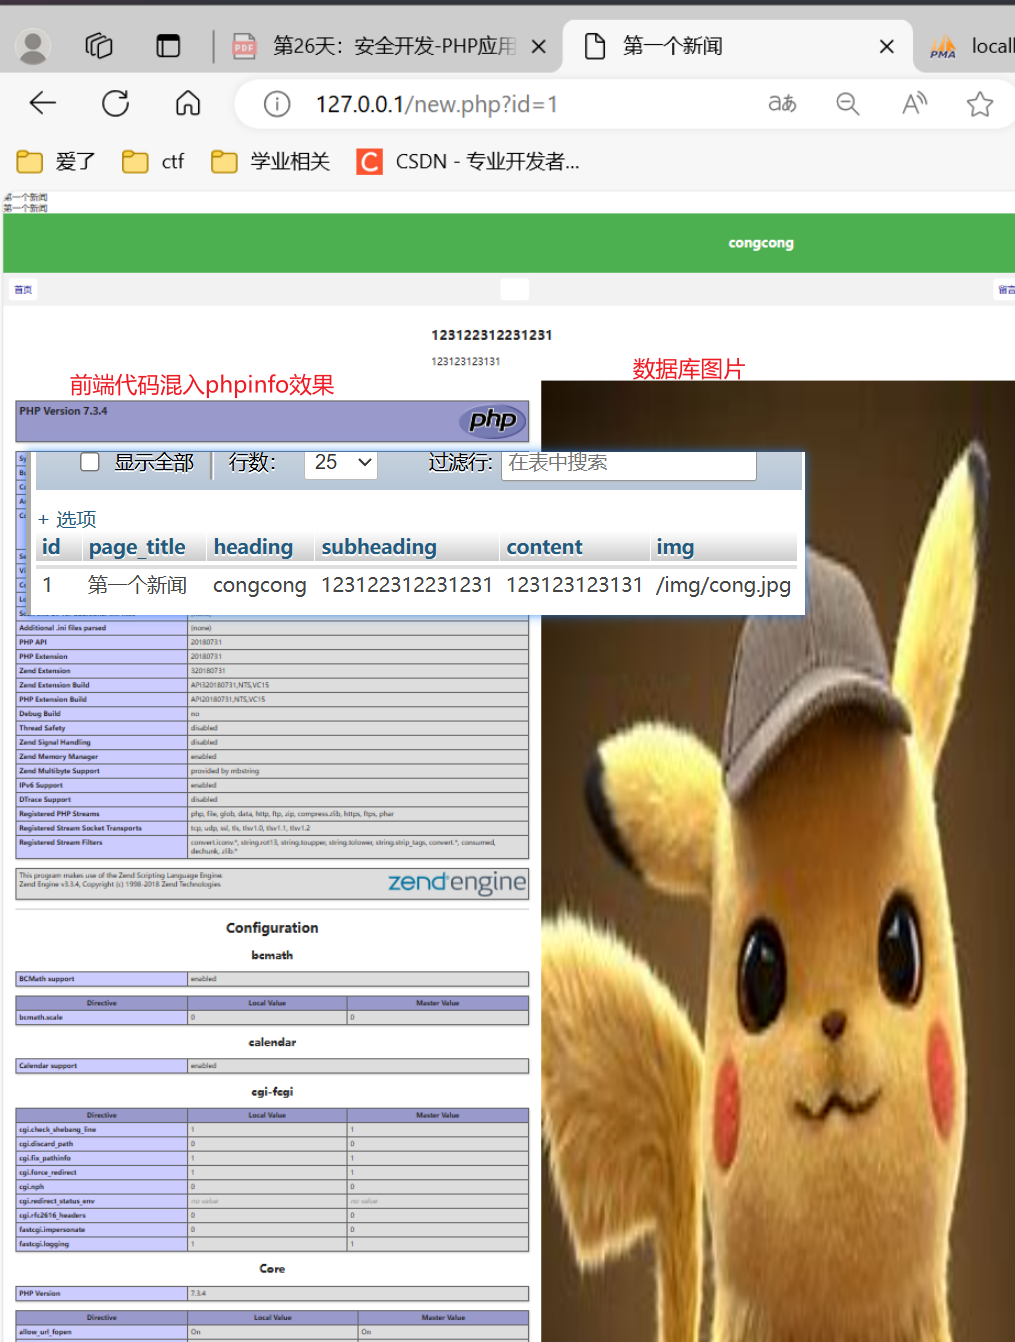
利用(smarty)模板搭建
-
代码示例源码下载:学习文件夹.zip
python本套源码为smarty的3.几,具有代码执行漏洞 index1.php <?php define('SMARTY_ROOT_DIR', str_replace('\\', '/', __DIR__)); define('SMARTY_COMPILE_DIR', SMARTY_ROOT_DIR.'/smarty3/templates_c'); define('SMARTY_CACHE_DIR', SMARTY_ROOT_DIR.'/smarty3/cache'); include_once(SMARTY_ROOT_DIR . '/smarty3/libs/Smarty.class.php'); class testSmarty extends Smarty_Resource_Custom { protected function fetch($name, &$source, &$mtime) { $template = "CVE-2017-1000480 smarty PHP code injection"; $source = $template; $mtime = time(); } } $smarty = new Smarty(); $smarty->setCacheDir(SMARTY_CACHE_DIR); $smarty->setCompileDir(SMARTY_COMPILE_DIR); $smarty->registerResource('test', new testSmarty); $smarty->display('test:'.$_GET['x']);//此处传入x传参 ?> //此处利用的是smarty模版漏洞,payload为*/phpinfo();//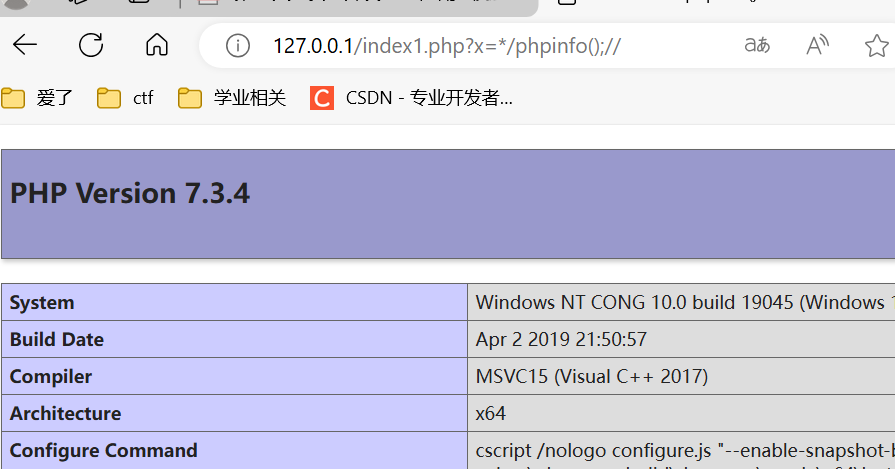
漏洞总结
- 本身代码漏洞
- 第三方插件(ueditor)
- 第三方模版(smarty)
- 第三方组件(shiro fastion等)
TP框架搭建使用
说明文档(很重要,都是根据文档来使用的):ThinkPHP5.1完全开发手册 · 看云 (kancloud.cn)
-
TP的核心文件MVC,model,view,controller(核心)
-
搭建与使用教程
-
安装
-
在phpstudy中安装时只需要将其主域名路径目录安装在入口文件/thinkphp/
public即可- 原因是里面的index指引到application下和加载引导文件
-
-
使用
-
URL访问方式:模块/控制器/操作/[参数名/参数值...]
-
使用方式举例:
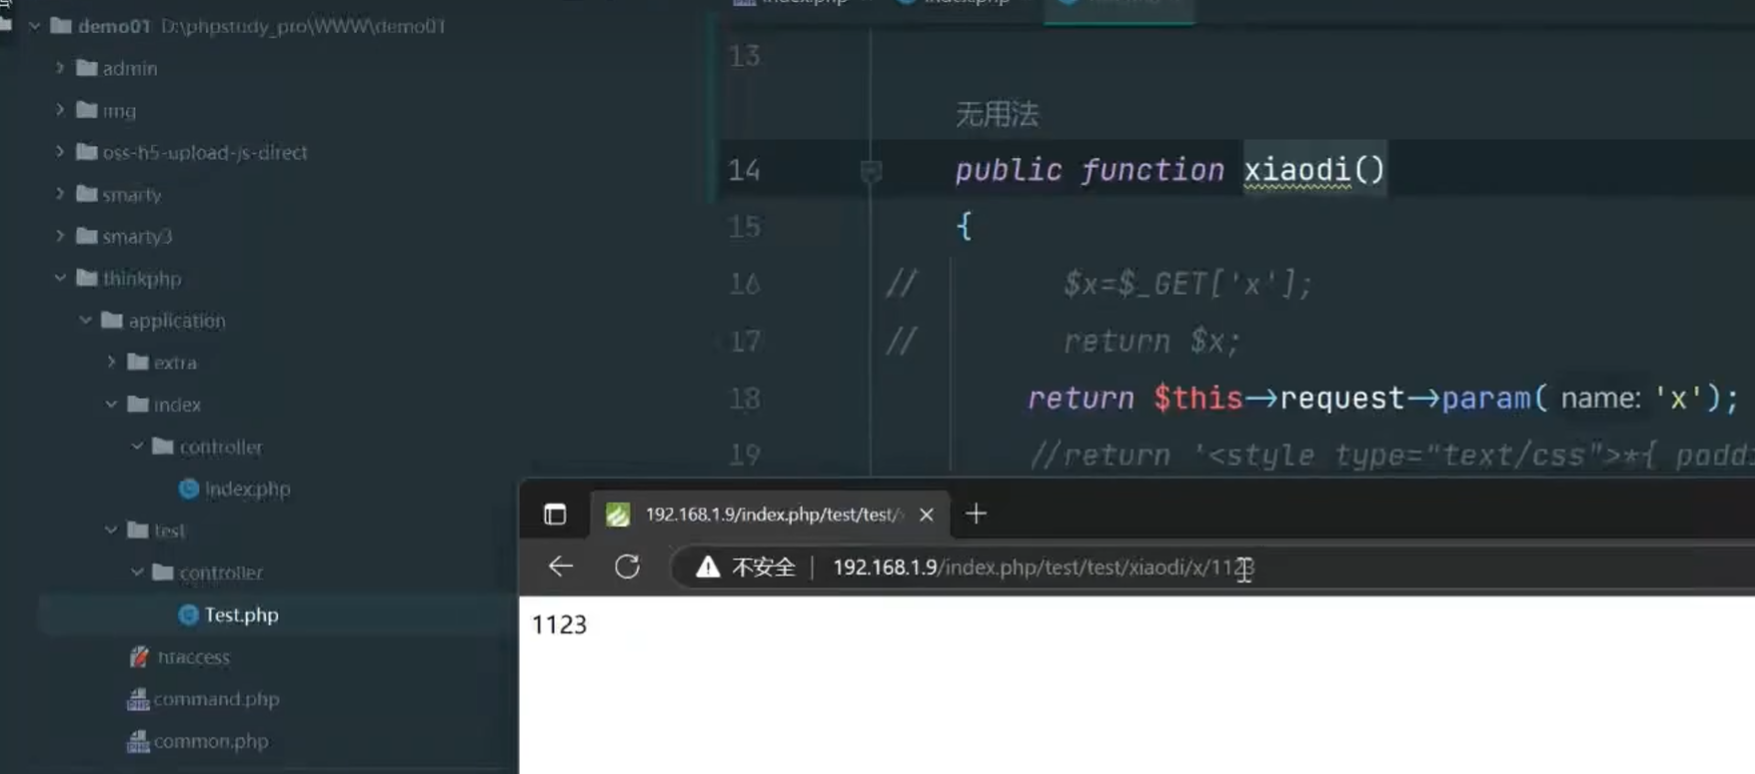
python以新闻,数据库,文件上传,前端页面渲染为例 访问访问方式:ip/index.php/test/test/xiaodi/x/1 D:\phpstudy_pro\WWW\thinkphp\application\test\controller\Test.php源码如下: <?php namespace app\test\controller; use think\Controller; use think\Db; class Test extends Controller {//视图渲染 public function index() { return '123'; //return '<style type="text/css">*{ padding: 0; margin: 0; } .think_default_text{ padding: 4px 48px;} a{color:#2E5CD5;cursor: pointer;text-decoration: none} a:hover{text-decoration:underline; } body{ background: #fff; font-family: "Century Gothic","Microsoft yahei"; color: #333;font-size:18px} h1{ font-size: 100px; font-weight: normal; margin-bottom: 12px; } p{ line-height: 1.6em; font-size: 42px }</style><div style="padding: 24px 48px;"> <h1>:)</h1><p> ThinkPHP V5<br/><span style="font-size:30px">十年磨一剑 - 为API开发设计的高性能框架</span></p><span style="font-size:22px;">[ V5.0 版本由 <a href="http://www.qiniu.com" target="qiniu">七牛云</a> 独家赞助发布 ]</span></div><script type="text/javascript" src="https://tajs.qq.com/stats?sId=9347272" charset="UTF-8"></script><script type="text/javascript" src="https://e.topthink.com/Public/static/client.js"></script><think id="ad_bd568ce7058a1091"></think>'; } public function xiaodi() { // $x=$_GET['x']; // return $x; return $this->request->param('x'); //return '<style type="text/css">*{ padding: 0; margin: 0; } .think_default_text{ padding: 4px 48px;} a{color:#2E5CD5;cursor: pointer;text-decoration: none} a:hover{text-decoration:underline; } body{ background: #fff; font-family: "Century Gothic","Microsoft yahei"; color: #333;font-size:18px} h1{ font-size: 100px; font-weight: normal; margin-bottom: 12px; } p{ line-height: 1.6em; font-size: 42px }</style><div style="padding: 24px 48px;"> <h1>:)</h1><p> ThinkPHP V5<br/><span style="font-size:30px">十年磨一剑 - 为API开发设计的高性能框架</span></p><span style="font-size:22px;">[ V5.0 版本由 <a href="http://www.qiniu.com" target="qiniu">七牛云</a> 独家赞助发布 ]</span></div><script type="text/javascript" src="https://tajs.qq.com/stats?sId=9347272" charset="UTF-8"></script><script type="text/javascript" src="https://e.topthink.com/Public/static/client.js"></script><think id="ad_bd568ce7058a1091"></think>'; } public function testsql()//访问方式ip/index.php/test/test/xiaodi/x/1 { //使用tp框架操作mysql数据 //SELECT * FROM `think_user` WHERE `id` = 1 LIMIT 1 //1、使用TP框架操作数据库 默认是受到框架内置过滤保护 // 安全写法=推荐写法 不安全写法=原生写法(不会受到保护) // 1、安全写法 2、用一半安全写法 3、纯原生写法(完全不是用TP语法) //2、原生态的数据库操作如果没有过滤就会受到SQL注入攻击 //规矩写法:不是绝对安全 看两点 //看版本的内置绕过漏洞 同样也有漏洞,例如thinkphp_5.0.14存在sql注入 // $id=request()->param('x'); // $data=Db::table('news')->where('id',$id)->find(); //用一半安全写法 有安全隐患 // $id=request()->param('x'); // $data=Db::query("select * from news where id=$id"); //纯原生写法 有安全隐患 // $id=$_GET['id'] ?? '1'; // $sql="select * from news where id=$id"; // $data=mysqli_query($con,$sql); // while ($row=mysqli_fetch_row($data)) { $username = request()->get('username/a'); db('admin')->where("id")->update(['username' => $username]); //return json($data); } public function upload(){ // 获取表单上传文件 例如上传了001.jpg $file = request()->file('image'); // 移动到框架应用根目录/uploads/ 目录下 $info = $file->validate(['ext'=>'jpg,png,gif'])->move( '../uploads'); if($info){ // 成功上传后 获取上传信息 // 输出 jpg echo $info->getExtension(); // 输出 20160820/42a79759f284b767dfcb2a0197904287.jpg echo $info->getSaveName(); // 输出 42a79759f284b767dfcb2a0197904287.jpg echo $info->getFilename(); }else{ // 上传失败获取错误信息 echo $file->getError(); } } } -------------------------------------------------------------------------------- D:\phpstudy_pro\WWW\thinkphp\application\index\view\index\index.html源码如下: <!DOCTYPE html> <html lang="en"> <head> <meta charset="UTF-8"> <title>{$name}</title> </head> <body> {$email} </body> </html>
-
-
通过这篇30000字详解PHP安全开发的长文,我们希望您已经全面掌握了从基础语法到高级防护的各种技术和最佳实践。在这个过程中,您不仅学会了如何编写安全的PHP代码,还了解了如何预防和应对常见的安全威胁。
网络安全是一个不断演变的领域,保持对新技术和新威胁的警惕是每个开发者的责任。希望您能将本文中的知识应用到实际开发中,构建更加安全、可靠的Web应用。
感谢您阅读这篇长文,希望它能对您的PHP安全开发之路有所助益。让我们共同努力,打造一个更加安全的网络环境!如果您有任何疑问或建议,欢迎随时与我们交流。
