文章目录
- [0. 源码](#0. 源码)
- [1. 开发环境 & 涉及技术](#1. 开发环境 & 涉及技术)
- [2. 项目 宏观结构](#2. 项目 宏观结构)
-
- [2.1 BS 模式介绍](#2.1 BS 模式介绍)
- [3. 项目内容](#3. 项目内容)
-
- [-------- 后端部分 --------](#-------- 后端部分 --------)
- [3.1 总体架构](#3.1 总体架构)
- [3.2 comm模块](#3.2 comm模块)
- [3.3 compile_server 模块](#3.3 compile_server 模块)
-
- 测试:
- [网络服务 - httplib库测试](#网络服务 - httplib库测试)
- [postman - 测试接口](#postman - 测试接口)
- [3.4 oj_server 模块](#3.4 oj_server 模块)
- [4. 功能扩展](#4. 功能扩展)
- [4. 扩展问题 - 环境搭建](#4. 扩展问题 - 环境搭建)
0. 源码
源码连接如下👇:
1. 开发环境 & 涉及技术
开发环境
- Vmware WorkStation (Linux Centos7 / Ubuntu20.4)
- Vscode
涉及技术
- C++ STL 标准库
- Boost 准标准库(用于字符串切割等操作)
- cpp-httplib 第三方开源网络库(网页服务)
- ctemplate 第三方开源前端网页渲染库
- jsoncpp 第三方开源序列化、反序列化库
- 负载均衡设计
- 多进程、多线程
- MySQL C connect
- Ace前端在线编辑器(用于OJ界面的渲染)
- html/css/js(前端相关)
2. 项目 宏观结构
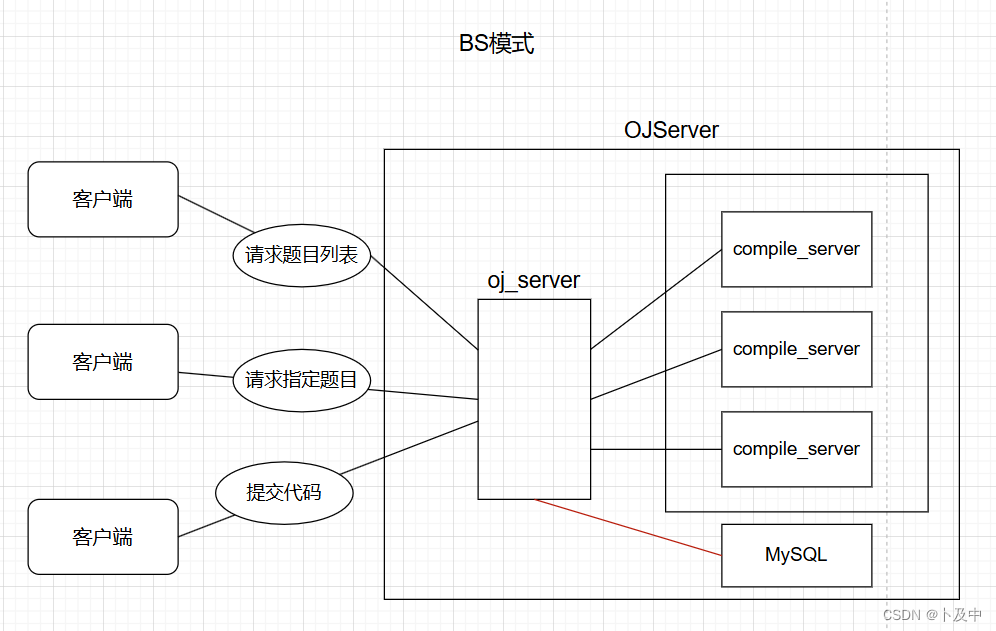
如上图所示。该项目采用 BS模式:
2.1 BS 模式介绍
BS模式 是指浏览器-服务器(Browser-Server)模式(客户端-服务器(Client-Server)模式 的一种变体)。在BS模式中,用户通过浏览器访问应用程序或服务,而应用程序的逻辑和数据都存储在服务器端。
BS模式的优点包括:
- 跨平台性: 由于应用逻辑和界面在服务器端执行,因此用户可以使用任何具有浏览器功能的设备(如PC、平板电脑、智能手机等)来访问应用程序,无需安装特定的客户端软件。
- 集中管理: 应用程序的逻辑和数据都集中存储在服务器端,便于管理和维护。更新和修改只需在服务器端进行,不需要每个客户端都进行更新。
- 安全性: 由于应用程序的逻辑和数据存储在服务器端,客户端只是作为浏览器的显示工具,因此可以更容易地实施安全控制,例如访问控制、数据加密等。
然而,BS模式也存在一些缺点,例如:
- 对网络的依赖性: 客户端与服务器之间需要稳定的网络连接才能正常访问应用程序,如果网络不稳定或断开,可能会影响用户的使用体验。
- 性能问题: 由于应用程序的逻辑和界面都在服务器端执行,可能会造成服务器端的性能压力,特别是在大量用户同时访问时。
- 对浏览器的兼容性要求: 不同的浏览器可能对同一份网页代码的解释和渲染方式不同,因此需要在开发时考虑浏览器的兼容性。
3. 项目内容
-------- 后端部分 --------
下面的代码会根据开发过程来,即按顺序写,部分文件或代码会在后文慢慢完善:
3.1 总体架构
根据上文的内容,待完成的代码主要分为三个模块:
如上图所示,即:
comm:公共模块- 用于写一些普遍的功能性文件,比如Util(辅助功能)、Log(日志文件等)
compile_server:编译服务- 进行编译运行的相关文件
- 服务器连接的文件
oj_server:总的oj服务- 获取题目列表,查看题目编写题目界面,负载均衡,其他功能(登录讨论等)
3.2 comm模块
该模块分为以下内容:

Log.hpp:输出日志文件util.hpp:含了各种辅助函数、宏定义或者类,提供常用功能httplib.h:即httplib库,用于进行http连接的服务
① Log.hpp(日志)
log.hpp用于输出日志文件,根据我们自己的要求自行编写相应的内容:
这里提供的输出格式为:
cpp
#define LOG(level) Log(#level, __FILE__, __LINE__)
② Util.hpp(辅助功能)
util.hpp 是一个通用的命名约定,通常用于包含与实用功能相关的 C++ 头文件。其中可能包含了各种辅助函数、宏定义或者类,用于提供一些常见的、通用的功能,以便在程序中重复使用。
在该文件中,我们定义命名空间 ns_util
在命名空间中创建各种功能类,框架:
cpp
const std::string temp_path = "./temp/";
namespace ns_util
{
	class PathUtil{};
	class FileUtil{};
	class StringUtil{};
}
对于上述框架的内容:
-
PathUtil:
该PathUtil类主要用于 路径相关的辅助函数(构建不同类型的文件路径)
由于在进行编译运行时,需要根据用户提交的代码形成不同的文件(标准输出、标准错误、可执行文件等),所以对于PathUtil,主要进行不同类型的文件路径的构建
-
FileUtil:
- FileUtil类主要包含 文件相关操作的辅助函数
-
StringUtil
- 后面oj_server部分会介绍到题目列表的相关内容,该类主要包含一个功能SpilitString,用于分割字符串
3.3 compile_server 模块
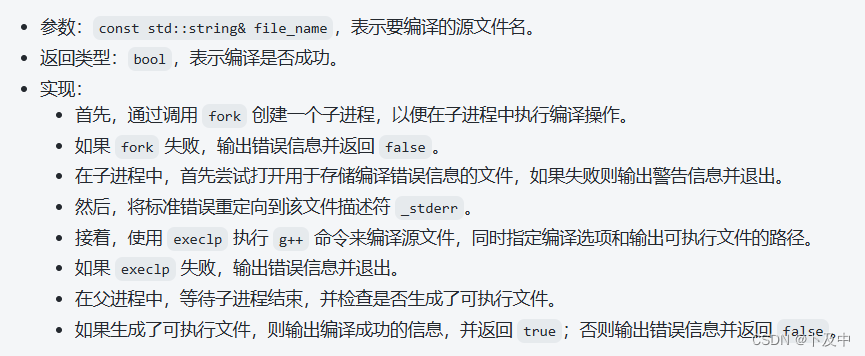
① compiler.hpp
compiler.hpp主要功能 就是 编译指定的源文件
- 通过
fork()创建子进程,子进程负责创建该文件的编译错误文件(.compile_error)以及重定向和编译该源文件 - 父进程等待子进程结束,并判断最终可执行文件.exe是否正确创建,并输出相应日志并返回
具体过程介绍:
cpp
namespace ns_compiler
{
    using namespace ns_util;
    using namespace ns_log;

    class Compiler
    {};
}
② runner.hpp
包括运行程序 与 设置资源限制 ,即运行一个具体文件的步骤
cpp
#include "../comm/log.hpp"
#include "../comm/util.hpp"

namespace ns_runner
{
    using namespace ns_util;
    using namespace ns_log;

    class Runner
	{
	public:
        Runner(){}
        ~Runner(){}
	// 设置 资源占用 约束
    static void SetProcessLimit(int _cpu_limit, int _mem_limit)
    {}

	// 执行指定的可执行文件,并设置 CPU 和内存的占用上限
	static int Run(const std::string& file_name, int cpu_limit, int mem_limit)
	{}

	};
}
③ compile_run.hpp
compile_run.hpp 调用 compiler.hpp 与 runner.hpp 的功能,完成最终的对接收到的内容,进行编译,并将最后的文件以Json形式返回,以便将相关信息返回给客户端
cpp
namespace ns_compile_and_run
{
    using namespace ns_log;
    using namespace ns_util;
    using namespace ns_compiler;
    using namespace ns_runner;

    class CompileAndRun
    {
    public:
        CompileAndRun() = default;
        ~CompileAndRun() = default;

		// 删除临时文件
	    static void RemoveTempFile(const std::string &file_name)
	    {}

		// 返回程序执行的状态码
		static std::string CodeToDesc(int code, const std::string &file_name)
		{}

		// 编译运行
		static void Start(const std::string& in_json, const std::string* out_json)
        {}
	};
}
测试:
④ compile_server.cc
服务器启动运行的文件,用于形成最后的可执行文件:
我们还有很多功能未实现,这里先对目前的代码进行测试:
cpp
#include "compile_run.hpp"

using namespace ns_compile_and_run;

void Usage(std::string proc)
{
    std::cout << "Usage: " << proc << " port" << std::endl;
    std::cout << "Example: " << proc << " 8080" << std::endl;
}

int main(int argc, char* argv[])
{
    // 根据提供的编译运行服务,打包成网络功能
    if(argc != 2) {
        Usage(argv[0]);
        return 1;
    }

    std::string in_json;
    Json::Value in_value;
    in_value["code"] = R"(#include <iostream>
    int main() {
        std::cout << "Hello world!" << std::endl;
        return 0;
    })";

    in_value["input"] = "";
    in_value["language"] = "cpp";
    in_value["cpu_limit"] = 1;
    in_value["mem_limit"] = 10240 * 3;
    Json::FastWriter writer;
    in_json = writer.write(in_value);
    std::cout << in_json << std::endl;

    std::string out_json; // 返回给用户的json串
    Json::Value out_value;
    CompileAndRun::Start(in_json, &out_json);
    std::cout << out_json << std::endl;


    return 0;
}
执行程序结果如下:
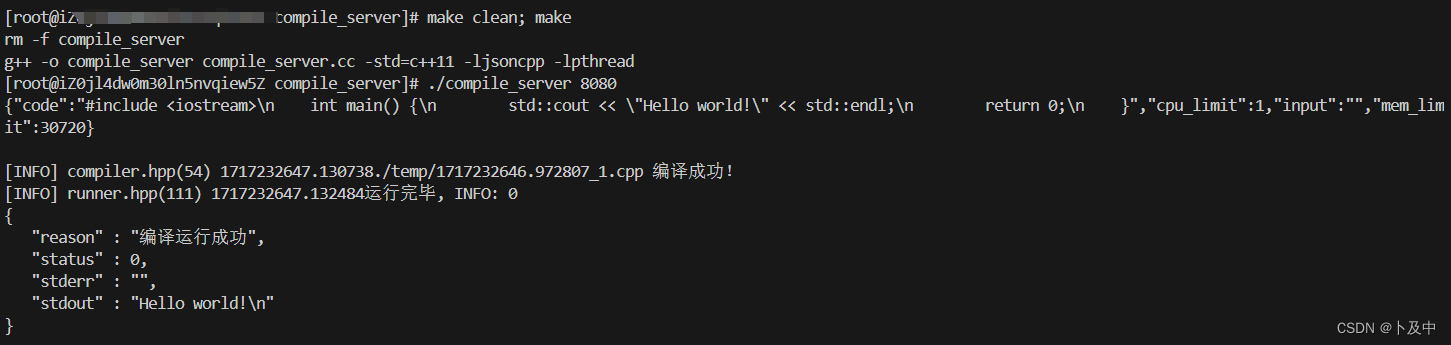
根据执行结果,可以看出此时compile_server编译功能已经基本完成
网络服务 - httplib库测试
为了实现在浏览器上访问的网络服务,我们直接引入一个httplib库(直接下载httplib库将头文件引入到当前的路径即可,在文章结尾环境搭建处)
下面编写一个简单的代码测试httplib:
cpp
#include "compile_run.hpp"
#include "../comm/httplib.h"
using namespace ns_compile_and_run;
using namespace httplib;

void Usage(std::string proc)
{
    std::cout << "Usage: " << proc << " port" << std::endl;
    std::cout << "Example: " << proc << " 8080" << std::endl;
}

int main(int argc, char* argv[])
{
    // 根据提供的编译运行服务,打包成网络功能
    if(argc != 2) {
        Usage(argv[0]);
        return 1;
    }

    Server svr;
    svr.Get("/cr", [](const Request& req, Response& resp) {
        // std::string out_json; // 返回给用户的json串
        // Json::Value out_value;
        // CompileAndRun::Start(req.body, &out_json);
        // 基本测试:
        resp.set_content("这是一个httplib基本测试", "content-type: text/plain;charset=utf-8");
    });


    std::cout << "listen..." << std::endl;
    svr.listen("0.0.0.0", atoi(argv[1]));

	return 0;
}
此时linux下执行程序:


postman - 测试接口
cpp
Server svr;
svr.Post("/compile_and_run", [](const Request& req, Response resp){
std::string in_json = req.body;
std::string out_json;
if(!in_json.empty()) {
CompileAndRun::Start(in_json, &out_json);
resp.set_content(out_json, "application/json;charset=utf-8");
}
});
std::cout << "listen..." << std::endl;
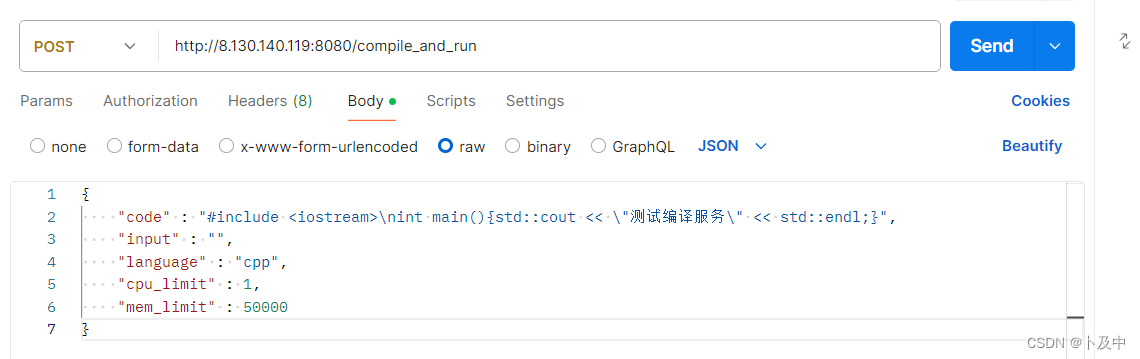
svr.listen("0.0.0.0", atoi(argv[1]));用postman测试接口:输入相应内容后,服务器可以接收到并形成相应文件

3.4 oj_server 模块
对于该项目的oj_server,本质就是建立一个小型网站
包含以下内容:
- 获取首页(题目列表)
- 编辑区域界面
- 提交判题功能
本项目通过 MVC(Model-View-Controller)架构实现,即包含以下三部分:模型(Model)、视图(View)和控制器(Controller)。
- 模型(Model):模型层主要负责数据交互,可以通过文件或者MySQL;
- 视图(View):视图层负责用户界面的呈现。一般读取数据后进行网页的构建与渲染,最后呈现给用户。
- 控制器(Controller):控制器层是模型和视图之间的桥梁,负责协调它们之间的交互。主要就是核心业务逻辑。
>文件版<
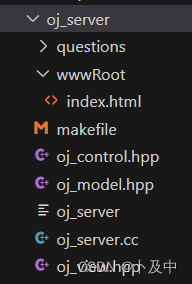
下面是我们进行代码编写时oj_server会包含的内容
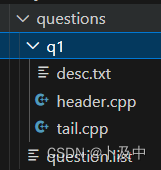
对于文件版,我们将题目相关信息存到questions文件夹中:
- 题目列表放入
questions.list中 - 每个题目作为一个单独的子文件夹包含三部分:
desc.txt- 题目描述header.hpp- 题目头(呈现给用户)tail.cpp- 代码尾(底层调用判断测试用例)- 实际上的代码就是
header.hpp + tail.cpp
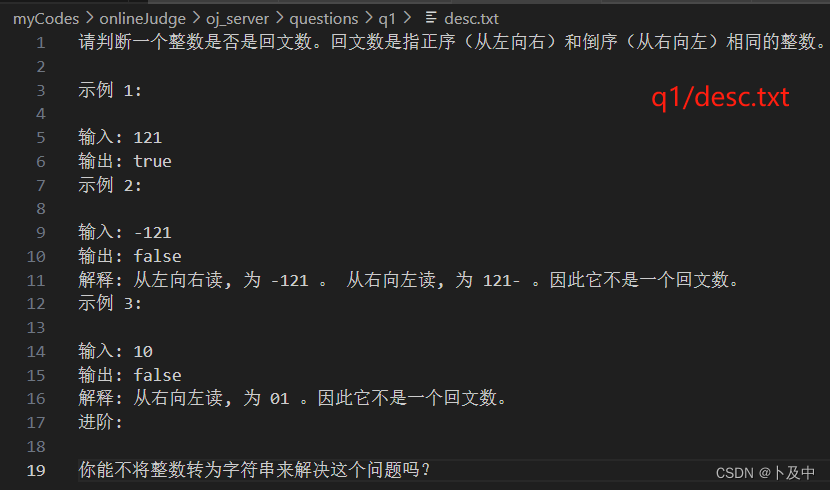
以下面的q1为例:
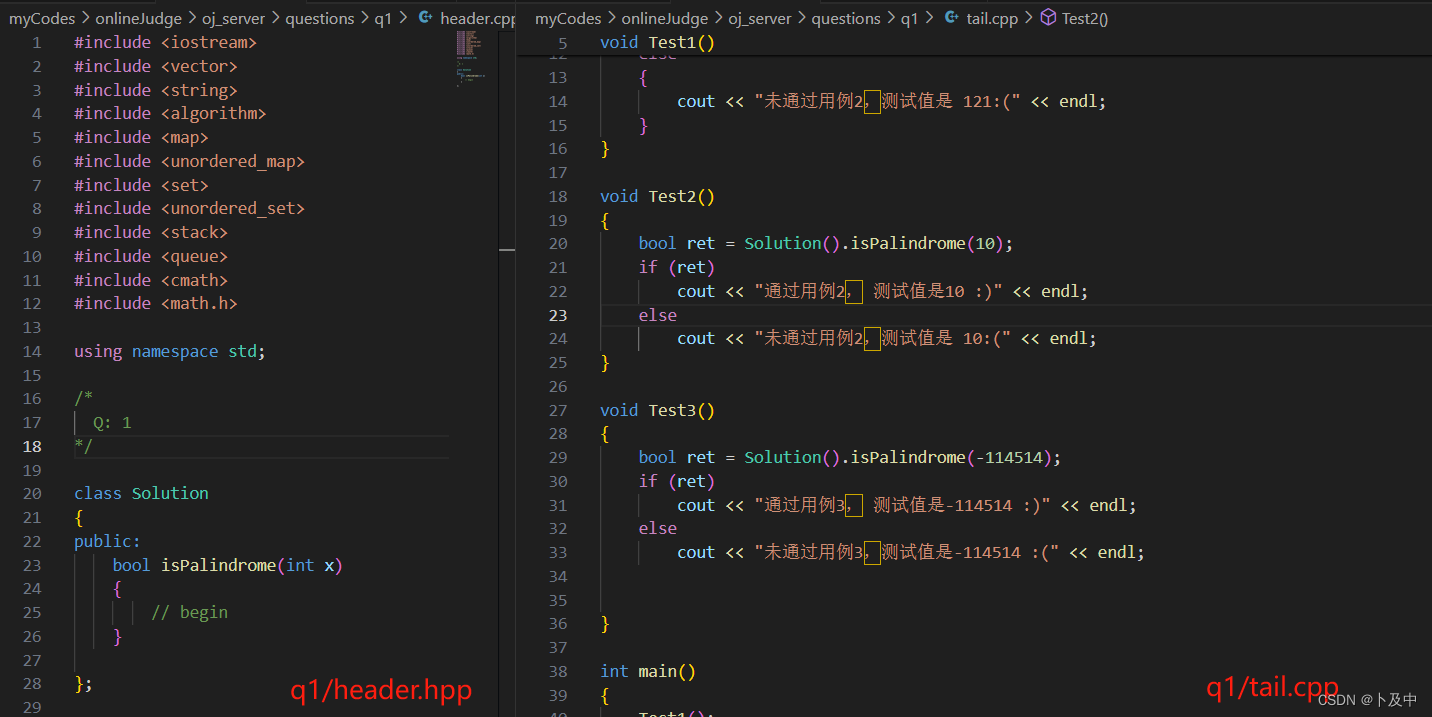
以q1为模板,就可以设置更多的题目,并将每个题目的信息存储到题目列表中:

oj_model.hpp
- ns_model命名空间 - 将相关内容都封装在该命名空间中
- Question结构体,即一道具体题目,包含一些属性
- class Model - 用于具体的题目交互操作,获取某个题目、题目列表等
cpp
#pragma once

#include "../comm/util.hpp"
#include "../comm/log.hpp"

#include <iostream>
#include <string>
#include <vector>
#include <unordered_map>
#include <fstream>
#include <cassert>

namespace ns_model
{
    using namespace std;
    using namespace ns_log;
    using namespace ns_util;

	// 题目列表的路径与具体题目的路径(url)
    const std::string question_list = "./questions/question_list";
    const std::string question_path = "./question/";

    struct Question // 一道题目都有哪些属性
    {
        std::string number; // 题目编号 唯一值
        std::string title; // 标题
        std::string level; // 难度
        int cpu_limit; // 时间要求(s)
        int mem_limit; // 空间要求(kb)
        std::string desc; // 描述
        std::string header; // 预设代码
        std::string tail; // 测试用例 header + tail = 完整代码
    };

    class Model
    {
    private:
        // <题号,题目内容>
        unordered_map<string, Question> questions;
    public:
        Model()
		{}

        ~Model()
        {}

        // 加载配置文件
        // questions/question.list + 题目编号
        bool LoadQuestionList(const string& question_list)
        {}

        // 获取所有题目 | out: 输出型参数
        bool GetAllQuestions(vector<Question> *out)
        {}

        // 获取单个题目
        bool GetSingleQuestion(const std::string &number, Question* out)
        {}
    };
}
oj_view.hpp
在oj_model部分,我们进行了加载题目列表、获取所有题目、指定题目的功能、此时还未对接上网页,oj_view就用于解决这一问题:
首先要介绍一个类 - ctemplate
可以从该链接下载ctemplate ------> ctemplate - gitee
ctemplate类介绍
CTemplate::TemplateDictionary 是一个用于构建模板的 C++ 类。它通常用于在 CTemplate(也称为 Google CTemplate)库中创建和管理模板数据。
这个类的主要作用是构建模板数据结构,可以向其添加键值对,然后将这些数据传递给模板引擎,以生成最终的文本输出。在使用 CTemplate 构建模板时,通常会遵循以下步骤:
-
创建 TemplateDictionary 对象 :使用
CTemplate::TemplateDictionary类创建一个模板字典对象。 -
添加模板数据 :使用
TemplateDictionary对象的方法,如SetValue()或SetFormattedValue(),向模板字典中添加键值对。这些键值对可以是变量名和对应的值,或者是列表等数据结构。 -
将模板数据传递给模板引擎:将填充了数据的模板字典对象传递给模板引擎进行处理。
-
生成输出:模板引擎将根据模板文件和填充的数据生成最终的输出文本。
下面的的示例代码,用于演示用 CTemplate::TemplateDictionary 构建模板数据:
cpp
#include <ctemplate/template.h>
#include <iostream>

int main() {
    // 创建模板字典对象
    ctemplate::TemplateDictionary dict("example");

    // 添加模板数据
    dict.SetValue("name", "John Doe");
    dict.SetIntValue("age", 30);
    dict.SetFormattedValue("message", "Hello, my name is %s and I am %d years old.", "John Doe", 30);

    // 将模板数据传递给模板引擎并生成输出
    std::string output;
    ctemplate::ExpandTemplate("example_template.tpl", ctemplate::DO_NOT_STRIP, &dict, &output);

    // 输出生成的文本
    std::cout << output << std::endl;

    return 0;
}
在这个示例中,我们创建了一个名为
example的模板字典对象,并向其中添加了名为name、age和message的模板数据。然后,我们将模板字典对象传递给模板引擎,使用example_template.tpl模板文件进行处理,并将生成的输出存储在output变量中,最后将其输出到控制台。
对于oj_view.hpp:
cpp
#pragma once

#include <iostream>
#include <string>
#include <ctemplate/template.h>

#include "oj_controller.hpp"
#include "oj_model.hpp"


namespace ns_view
{
    using namespace ns_model;

    const std::string template_path = "./template_html/";

    class View
    {
    public: // 构造 + 析构
        View(){}
        ~View(){}
    public:
        // 将全部题目信息渲染到html中
        // questions 输入型参数 html 输出型参数
        void AllExpandHtml(const vector<Question> &questions, std::string* html)
        {}

        // 将单个题目信息渲染到html中
        // question 输入型参数 html 输出型参数
        void SingleExpandHtml(const Question &q, std::string* html)
        {}
    };
}
oj_controller.hpp
完成了数据交互(model)与 网页显示(view)的相关内容后,下面编写核心的功能(controller):
对于controller,我们主要包含三个类(自然都在命名空间ns_controller)
Machine:即提供编译服务的主机LoadBalance:负载均衡核心内容Controller:通过调用Model类与View类的方法,将信息内容转为html网页
cpp
#pragma once

#include <iostream>
#include <string>
#include <fstream>
#include <vector>
#include <algorithm>
#include <jsoncpp/json/json.h>

#include "../comm/log.hpp"
#include "../comm/util.hpp"
#include "../comm/httplib.h"
#include "oj_model.hpp"
#include "oj_view.hpp"


namespace ns_controller
{
    using namespace std;
    using namespace ns_log;
    using namespace ns_util;
    using namespace httplib;
    using namespace ns_model;
    using namespace ns_view;

    class Mechine
    {
    public:
        // 编译服务的相关参数
        std::string ip; // ip
        int port; // 端口
        uint64_t load; // 负载
        std::mutex* mtx; // (cpp中mutex禁止拷贝)
    public: // 构造 + 析构
        Mechine() : ip(""), port(0), load(0), mtx(nullptr) {}
        ~Mechine(){}

    public:
        // 提升主机负载
        void IncLoad()
        {}

        // 减少主机负载
        void DecLoad()
        {}

        // 获取主机负载
        uint64_t GetLoad()
        {}

        // 重设负载
        void ResetLoad()
        {}
    };

    const std::string service_machine = "./conf/service_machine.conf"; // 主机配置文件
    class LoadBalance
    {
    private: // 成员变量
        std::vector<Mechine> machines; // 所有主机(可以提供编译服务的)
        std::vector<int> online; // 在线主机id(下标对应id)
        std::vector<int> offline; // 离线主机id
        std::mutex mtx; // 保证LoadBalance的数据安全

    public: // 构造 + 析构
        LoadBalance()
        {
            assert(LoadConf(service_machine));
        }

        ~LoadBalance()
        {}

    public:
        // 将conf中的主机内容加载到相应容器中
        bool LoadConf(const std::string &machine_conf)
        {}

        // id, m -> 输出型参数
        bool IntelligentSelect(int *id, Mechine **m)
        {}

        // 关闭指定主机
        void OfflineMachine(int machine_id)
        {}

        // 统一上线主机
        void OnlineMachine()
        {}

        // 显示当前主机
        void ShowMachines()
        {}
    };


    class Controller
    {
    private:
        Model _model;
        View _view;
        LoadBalance _lb;

    public:
        Controller(){}
        ~Controller(){}
    public:

        // 根据题目数据进行网页构建 - 全部题目
        bool AllQuestionToHtml(string* html)
        {}

        bool SingleQuestionToHtml(const string& number, string* html)
        {}


		void Judge(const std::string &q_id, const std::string &in_json,std::string *out_json)
		{}
    };

}
**
此时后端的功能(负载均衡)基本就结束了
**
>MySQL版<
前置部分
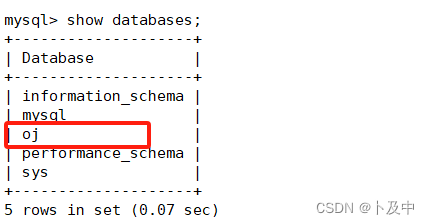
首先我们登录mysql,创建一个用户oj_client,并赋予远程访问等权限,后创建数据库oj:
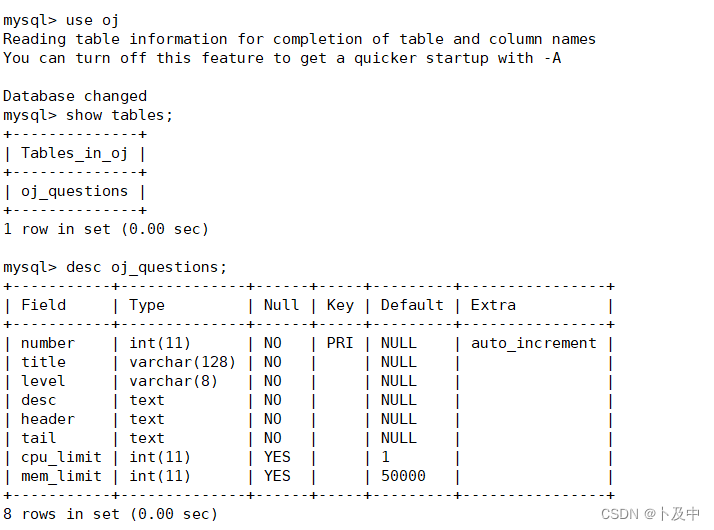
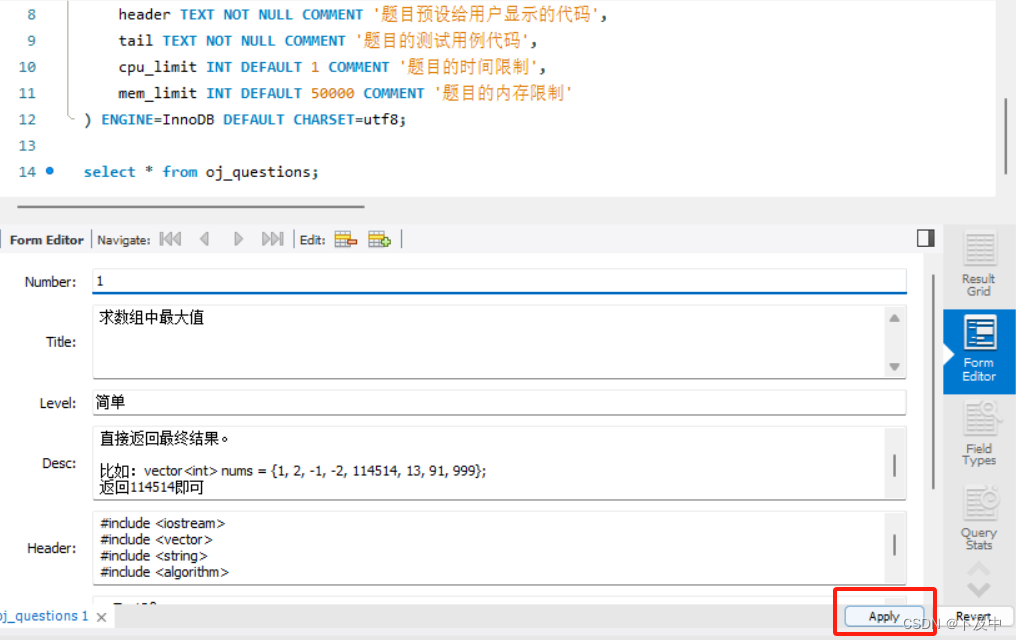
在oj中创建表oj_questions:
sql
USE oj;

CREATE TABLE IF NOT EXISTS oj_questions (
    number INT PRIMARY KEY AUTO_INCREMENT COMMENT '题目编号',
    title VARCHAR(128) NOT NULL COMMENT '题目标题',
    level VARCHAR(8) NOT NULL COMMENT '题目难度',
    `desc` TEXT NOT NULL COMMENT '题目描述',
    header TEXT NOT NULL COMMENT '题目预设给用户显示的代码',
    tail TEXT NOT NULL COMMENT '题目的测试用例代码',
    cpu_limit INT DEFAULT 1 COMMENT '题目的时间限制',
    mem_limit INT DEFAULT 50000 COMMENT '题目的内存限制'
) ENGINE=InnoDB DEFAULT CHARSET=utf8;
此时在数据库中可以查到创建出的表:
随后向表中插入数据:
此时可以着手去编写mysql的代码部分:
代码部分
我们只需要将model模块(数据交互)进行更改即可:即将 "从文件获取数据" 改为 "用数据库管理数据":
基本文件版的Model类,我们主要对获取题目的功能进行重写,以及一个用于连接mysql访问相关数据的函数QueryMySQL(根据sql语句对题库进行操作)
cpp
#pragma once

#include "../comm/util.hpp"
#include "../comm/log.hpp"
// include "include/mysql.h"
#include <mysql/mysql.h>

#include <iostream>
#include <string>
#include <vector>
#include <unordered_map>
#include <fstream>
#include <cassert>

namespace ns_model
{
    using namespace std;
    using namespace ns_log;
    using namespace ns_util;

    struct Question // 一道题目都有哪些属性
    {
        std::string number; // 题目编号 唯一值
        std::string title; // 标题
        std::string level; // 难度
        int cpu_limit; // 时间要求(s)
        int mem_limit; // 空间要求(kb)
        std::string desc; // 描述
        std::string header; // 预设代码
        std::string tail; // 测试用例 header + tail = 完整代码
    };

    const std::string oj_questions = "oj_questions";
    const std::string host = "127.0.0.1";
    const std::string user = "oj_client";
    const std::string passwd = "114514";
    const std::string db = "oj"; // 数据库
    const int port = 3306;

    class Model
    {
    private:
        // <题号,题目内容>
        unordered_map<string, Question> questions;
    public:
        Model()
        {}

        ~Model()
        {}

		// mysql远程连接 + 根据sql语句对题库进行操作
        bool QueryMySQL(const std::string &sql, vector<Question> *out)
        {}

        // 获取所有题目 | out: 输出型参数
        bool GetAllQuestions(vector<Question> *out)
        {}

        // 获取单个题目
        // select * from oj_questions where number = "1001"
        bool GetSingleQuestion(const std::string &number, Question* out)
        {}
    };
}
对于具体的代码实现依然都在源码中。
oj_server.cc
此时底层部分彻底设计完毕,文件版与MySQL版均可正常使用,接下来的工作就是设计与前端的交互(oj_sevrer.cc)
这里不再对前端html部分作解释,都在源码中,则对于oj_server.cc,主要需要利用创建出的Server对象进行相关的Post与Get:
cpp
// 启动主机
void Recovery(int sig)
{
    ctrl_ptr->RecoveryMachines();
}

int main(int argc, char* argv[])
{
    if(argc != 2) {
        std::cerr << "Usage: " << argv[0] << " port" << std::endl;
        std::cout << "Example: " << argv[0] << " 8080" << std::endl;
        return -1;
    }

    signal(SIGQUIT, Recovery);

    // std::shared_ptr: 自动释放
    std::shared_ptr<Users> users(new Users);
    std::shared_ptr<Server> svr(new Server);
    Controller ctrl;
    ctrl_ptr = &ctrl;

    // 用户相关操作
    svr->Post("/login.html", [&users](const httplib::Request &req, httplib::Response &resp){
        LOG(INFO) << "Received a login request" << std::endl;

        // 从请求体中获取用户名和密码
        std::string username = req.get_param_value("username");
        std::string password = req.get_param_value("password");

        // 调用 login 函数进行验证
        Users user;
        if (user.login(username, password)) {
            resp.set_content("登录成功", "text/plain; charset=utf-8");
        } else {
            resp.set_content("登录失败", "text/plain; charset=utf-8");
        }
    });

    svr->Post("/register.html", [&users](const httplib::Request &req, httplib::Response &resp){
        LOG(INFO) << "Received a register request" << std::endl;
        // 从请求体中获取用户名和密码
        std::string username = req.get_param_value("username");
        std::string password = req.get_param_value("password");

        // 调用 registerUser 函数进行用户注册
        Users user;
        if (!username.empty() && !password.empty()) {
            if (user.registerUser(username, password)) {
                resp.set_content("注册成功", "text/plain; charset=utf-8");
            } else {
                resp.set_content("注册失败", "text/plain; charset=utf-8");
            }
        } else {
            resp.set_content("用户名或密码不能为空", "text/plain; charset=utf-8");
        }
    });

    svr->Get("/all_questions", [&ctrl](const Request &req, Response &resp){
        std::string html;
        ctrl.AllQuestionToHtml(&html);
        /*用户所看到的即: 网页数据 + 题目相关数据*/
        resp.set_content(html, "text/html; charset=utf-8");
    });

    /*
     * 根据题目编号 获取题目内容
     * question/114514 -> 正则匹配
     * R"()" -> raw string(原始字符串),保持字符串原貌-不做转义
     * (\d+) -> 匹配一个或多个数字
    */
    svr->Get(R"(/question/(\d+))", [&ctrl](const Request &req, Response &resp){
        std::string number = req.matches[1];
        std::string html;
        ctrl.SingleQuestionToHtml(number, &html);
        resp.set_content(html, "text/html; charset=utf-8");
   });

   /*
     * 提交代码
     * 1. 获取用户提交代码
     * 2. 调用编译器 (compile_and_run)
     * 3. 调用判题系统 // 每道题的测试用例
     * 4. 返回判题结果
    */
    svr->Post(R"(/judge/(\d+))", [&ctrl](const Request &req, Response &resp){
        std::string number = req.matches[1];
        // std::string code = req.body;
        std::string result_json;

        // 调用判题系统
        ctrl.Judge(number, req.body, &result_json);
        resp.set_content(result_json, "application/json; charset=utf8");
    });


    svr->set_base_dir("./wwwRoot");
    std::cout << "listen..." << std::endl;
    svr->listen("0.0.0.0", atoi(argv[1]));

    return 0;
}
4. 功能扩展
根据上述内容,一个在线的负载均衡式的OJ网站就已经成立了:

在此项目的基础上,下面进行一个用户管理功能的扩充:
用户相关
4. 扩展问题 - 环境搭建
httplib
直接将httplib库拷贝到项目目录下,就可以使用
bash
cpp-httplib gitee链接:https://gitee.com/yuanfeng1897/cpp-httplib?_from=gitee_search
v0.7.15版本链接: https://gitee.com/yuanfeng1897/cpp-httplib/tree/v0.7.15
jsoncpp
cpp
sudo apt install libjsoncpp-dev