文章目录
以下是一个测距的应用,在图像上计算目标离参考点的距离,测距的方法存在一些偶然性,例如目标检测模型在某一帧里面没有检测到物体,或者目标检测的框在目标物周围跳动,这些因素在实际的数值上就会表现出很多毛刺尖峰,但是目标物的移动都是平滑的不会跳变,在此场景下采用kalman滤波可以使距离值变得更加平滑。
原理
kalman滤波一:基础理论
kalman滤波二:二维目标跟踪
一维kalman滤波
测量的值是一个目标物离参考点的距离,在kalman滤波中状态变量考虑位置和速度两个变量。具体如下:
状态变量
x = [ d , d ˙ ] T x = [d, \dot{d}]^T x=[d,d˙]T
d : 目标物离参考点的距离 d:目标物离参考点的距离 d:目标物离参考点的距离
d ˙ : 目标相对参考点的速度 \dot{d}: 目标相对参考点的速度 d˙:目标相对参考点的速度
测量值
z = [ d ] z = [d] z=[d]
状态转移矩阵
F = [ 1 Δ t 0 1 ] \mathbf{F}= \begin{bmatrix} 1 & \Delta{t} \\ 0 & 1 \end{bmatrix} F=[10Δt1]
示例代码:
python
import os
import numpy as np
import matplotlib.pyplot as plt

def generate_mock_data(n_points=100, start=0, noise_level=5):
    """
    Generate mock distance data with a linear trend and some noise.

    Args:
    n_points : int - number of data points to generate.
    start : float - starting value of the distance.
    noise_level : float - standard deviation of the Gaussian noise.

    Returns:
    np.array - array of mock distance data.
    """
    true_values = start + np.linspace(0, 10, n_points)
    noisy_values = true_values + np.random.normal(0, noise_level, n_points)
    return noisy_values

def demo_of_kalman():
    # Generate mock data
    distance_list = generate_mock_data(n_points=100, start=10, noise_level=5)

    # Initialize Kalman Filter
    kf = KalmanFilter()
    predict_list = []

    # Run Kalman Filter on the mock data
    for distance in distance_list:
        kf.update(np.array([[distance]]))
        predict = kf.predict()
        predict_list.append(predict[0][0])

    # Plotting the results
    frame_id = np.arange(len(distance_list))
    frame_id = frame_id * 4  # Assuming data is collected at a rate of 4 Hz
    plt.figure(figsize=(10, 6))
    plt.plot(frame_id, distance_list, label="Measured Distance")
    plt.plot(frame_id, predict_list, label="Kalman Filter Prediction", linestyle='--')
    plt.xlabel("Frame ID")
    plt.ylabel("Distance")
    plt.title("Kalman Filter Demo")
    plt.legend()
    plt.grid(True)
    plt.show()

class KalmanFilter:
    def __init__(self):
        self.dt = 1.0 / 25.0 * 4.0
        self.F = np.array([[1, self.dt], [0, 1]])  # State transition matrix
        self.H = np.array([[1, 0]])  # Observation matrix
        self.Q = np.array([[1, 0], [0, 0.1]])  # Process noise covariance
        self.R = np.array([[25]])
        self.P = np.array([[1, 0], [0, 1]])  # State estimate covariance
        self.x = np.array([[0], [0]])

    def predict(self):
        self.x = self.F.dot(self.x)  # x(k) = F * x(k-1)
        self.P = self.F.dot(self.P).dot(self.F.T) + self.Q
        return self.x

    def update(self, z):
        K = self.P.dot(self.H.T).dot(np.linalg.inv(self.H.dot(self.P).dot(self.H.T) + self.R))
        self.x = self.x + K.dot(z - self.H.dot(self.x))
        S = np.eye(2) - K.dot(self.H)
        self.P = S.dot(self.P).dot(S.T) + K.dot(self.R).dot(K.T)

if __name__ == "__main__":
    demo_of_kalman()
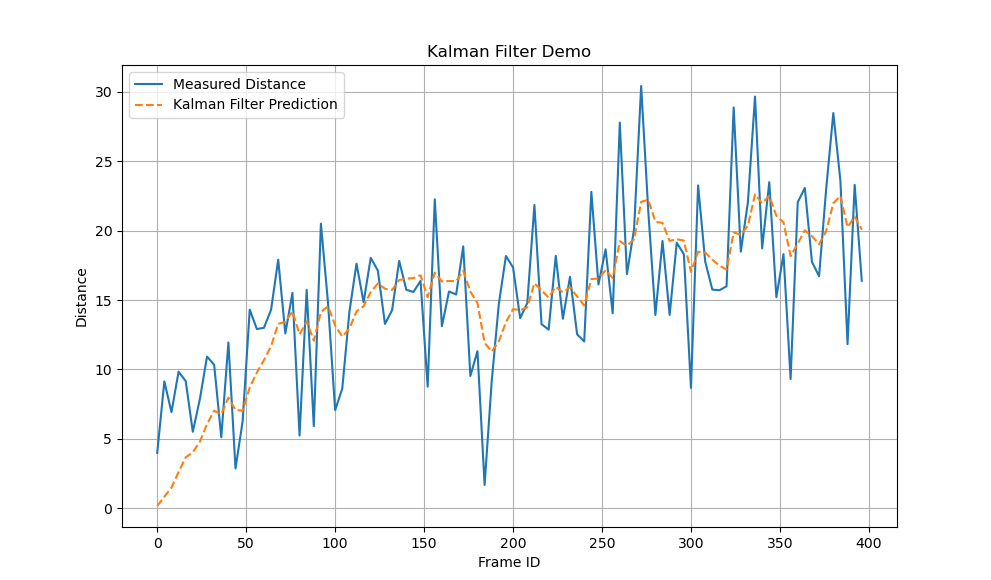
运行结果:

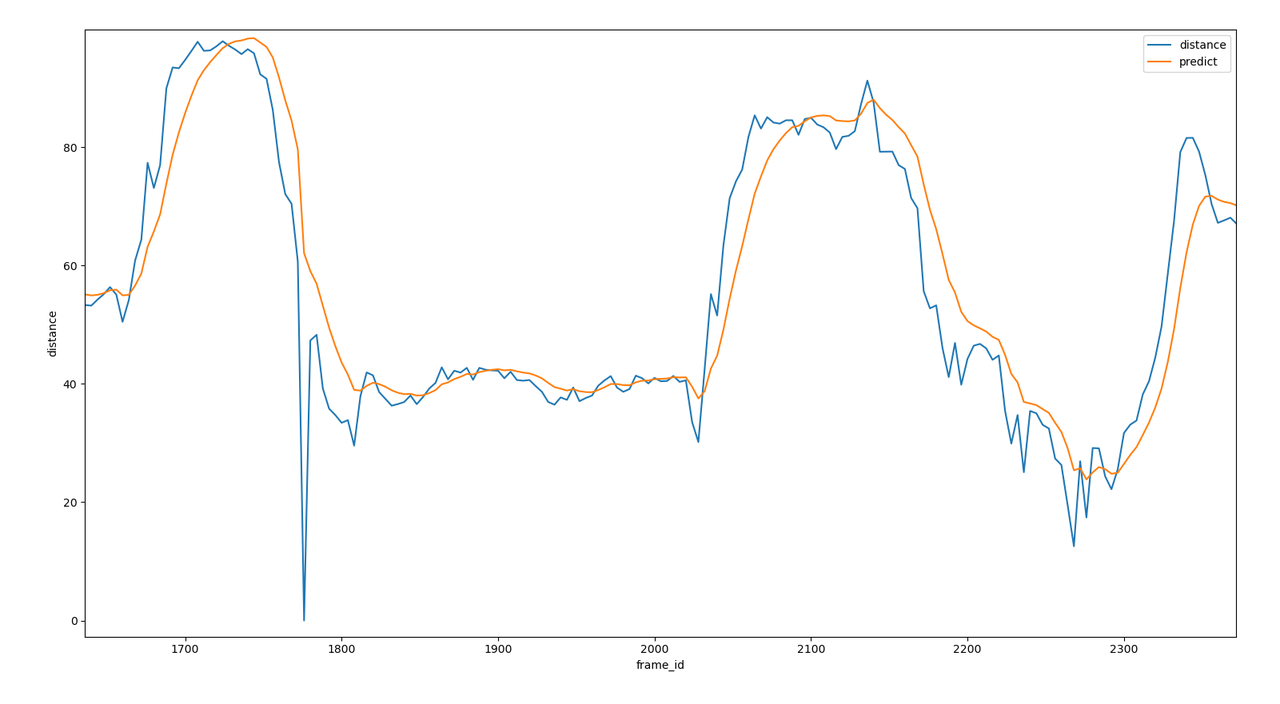
真实场景示例
以下是真实场景中使用kalman滤波的距离,可以看到一维kalman滤波不仅很好的滤除了尖峰毛刺还有部分缺失数据,而且能很好的跟上真实数据的变化。
