代码已上传GitHub:plumqm/OpenCV-Projects at master
EigenFace、FisherFace、LBPHFace
这三种方法的代码区别不大所以就一段代码示例。
EigenFace与FisherFace
1. 将人脸图像展开为一维向量,组成训练数据集
2. PCA(EigenFace)或LDA(FisherFace)特征分解,得到一组特征向量,代表了训练集中人脸的主要特征,即特征脸
3. 将新的人脸展平为向量,减去训练数据的特征脸(即归一化)
4. 人脸向量与特征向量进行点积,得到在特征空间中的投影坐标
5. 投影得到的新坐标向量与数据库中已存的人脸投影坐标进行比较。通过计算距离(如欧氏距离),找到最相似的匹配,进行身份识别。
EigenFace和FisherFace的主要区别在于它们使用的特征分解方法不同:
FisherFace对光照、表情、姿态变化更具鲁棒性,因为它专注于区分类别,而不是仅仅关注图像的整体方差。
PCA只是从全局数据出发,而没有考虑类别之间的区分。这意味着,它虽然对所有人脸都有较好的重建能力,但可能对区分不同个体的表现较差,特别是当光照或姿态变化较大时。
- **EigenFace(PCA)**注重最大化数据的方差,它主要捕捉的是图像中的全局特征,不区分类别。
- **FisherFace(LDA)**则注重区分不同个体,最大化类间差异,因此在分类问题中通常表现得更好。
LBPH工作原理LBPH算法通过将人脸图像分成多个小的局部区域,并计算每个区域的局部二值模式(Local Binary Patterns, LBP)直方图来描述这些区域的纹理特征。然后,它将这些局部直方图串联起来形成一个特征向量,这个特征向量就可以用来识别或分类人脸。
具体步骤:
灰度图转换:
- 首先,LBPH算法需要输入一张灰度图像。因为LBPH主要基于像素的纹理特征,所以不需要彩色信息,直接将人脸图像转换为灰度图即可。
计算局部二值模式(LBP):
- 对于每个像素点,LBP算法将以它为中心,比较它与周围8个像素的灰度值。根据灰度值的大小,将大于或等于中心像素的邻近像素标记为1,反之为0,得到一个8位二进制数。这个二进制数就是该像素的局部二值模式值。
- 例如,假设中心像素值为 50,周围的像素值为 55, 60, 45, 30, 70, 40, 80, 90,根据规则将大于50的像素标记为1,小于的标记为0,得到的二进制模式可能是11010101,转换为十进制就是213。
划分区域:
- 将人脸图像分成若干个小的区域(通常是网格状,如10x10的网格),然后对每个区域计算该区域内所有像素的LBP直方图。
构建特征向量:
- 对于每个区域,LBPH都会计算局部二值模式的直方图,这些直方图包含了该区域内纹理的统计信息。然后,将所有区域的直方图连接起来,形成一个完整的特征向量。
特征匹配:
- 一旦提取了人脸的特征向量,就可以使用距离度量方法(如欧氏距离、卡方距离等)来比较新的人脸图像与数据库中已知的人脸特征向量。如果两个特征向量的距离足够小,则判定这两张人脸是同一个人。
准备阶段
导入包
python
import numpy as np
import cv2
import matplotlib.pyplot as plt
import dlib

%matplotlib inline
读取gif格式
读取gif格式的文件,通过调用cv2的VideoCapture方法
python
# 读取gif格式

img_path = './images/yalefaces/subject01.gif'
cap = cv2.VideoCapture(img_path)
ret,img = cap.read()
plt.imshow(cv2.cvtColor(img,cv2.COLOR_BGR2RGB))
Hog人脸检测器
python
#构造hog人脸检测器
hog_face_detector = dlib.get_frontal_face_detector()
图片预处理
用hog检测器检测出人脸部分,返回截取的人脸部分和标签
python
# 图片预处理
def getFaceImgLabel(filename):
    cap = cv2.VideoCapture(filename)
    ret,img = cap.read()

    # 转灰度图
    img = cv2.cvtColor(img, cv2.COLOR_BGR2GRAY)

    # 检测人脸
    detections = hog_face_detector(img, 1)

    if len(detections) > 0:
        # 获取人脸区域坐标
        x = detections[0].left()
        y = detections[0].top()
        r = detections[0].right()
        b = detections[0].bottom()

        # 截取人脸
        img_crop = img[y:b,x:r]

        img_crop = cv2.resize(img_crop,(120,120))

        # 获取人脸label
        label_id = int(filename.split('/')[-1].split('.')[0].split('subject')[-1])

        return img_crop, label_id
    else :
        return None, -1

# img,label = getFaceImgLabel(img_path)
# plt.imshow(cv2.cvtColor(img,cv2.COLOR_BGR2RGB))
处理训练集
把训练集即train文件夹下的内容存入img_list,标签存入label_list,以便后面train函数直接训练
python
# 遍历训练文件夹
import glob
file_list = glob.glob('./images/yalefaces/*.gif')

img_list =[]
label_list = []

for file in file_list:
    img_crop, label_id = getFaceImgLabel(file)

    if img_crop is not None:
        img_list.append(img_crop)
        label_list.append(label_id)

# print(len(img_list),len(label_list))
构造分类器
这个就包含三种方法,EigenFace、FisherFace、LBPHFace。
后面两种方法要求输入的图片大小一致,但是第一种没有要求,我们的代码就统一resize了。
python
# 构造分类器
face_cls = cv2.face.LBPHFaceRecognizer_create()
# cv2.face.EigenFaceRecognizer_create()
# cv2.face.FisherFaceRecognizer_create()

# 后面两个方法要求人脸大小一致
训练
python
# 训练
face_cls.train(img_list, np.array(label_list))
试验图片
python
# 预测图片
test_file = './images/test/subject06.sad.gif'

img_crop, label_id = getFaceImgLabel(test_file)

plt.imshow(cv2.cvtColor(img_crop,cv2.COLOR_BGR2RGB))  # 显示图片
# plt.imshow(img_crop)
if img_crop is not None:
    predict_id,distance = face_cls.predict(img_crop)
    print(predict_id)
评估模型
其实也就是在试验单张图片的基础上通过大量测试集来评估模型好坏。
python
# 评估模型

import glob
file_list = glob.glob('./images/test/*.gif')

true_list = []
predict_list = []

for file in file_list:
    img_crop, label_id = getFaceImgLabel(file)

    if img_crop is not None:
        predict_id,distance = face_cls.predict(img_crop)
        predict_list.append(predict_id)
        true_list.append(label_id)

print(predict_list)
print(true_list)
查看准确率
python
# 查看准确率
from sklearn.metrics import accuracy_score
accuracy_score(true_list,predict_list)
结果可视化
python
# 获取融合矩阵
from sklearn.metrics import confusion_matrix
cm = confusion_matrix(true_list,predict_list)
cm

# 可视化
import seaborn
seaborn.heatmap(cm,annot=True)
热力图:
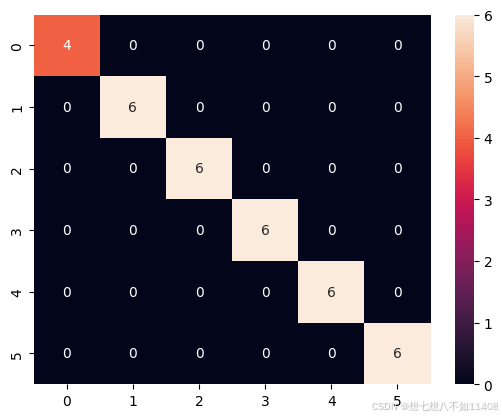
(因为我没找到好的测试集,test文件夹就直接放的训练集的图片,所以结果怪怪的)
保存模型
python
# 保存模型
path = './weights/LBPG.yml'
face_cls.save(path)

# 调用模型
new_cls = cv2.face.LBPHFaceRecognizer_create()
new_cls.read(path)

# 预测一张图片
test_file = './images/test/subject06.sad.gif'

img_crop, label_id = getFaceImgLabel(test_file)

# plt.imshow(cv2.cvtColor(img_crop,cv2.COLOR_BGR2RGB))  # 显示图片
# plt.imshow(img_crop)
if img_crop is not None:
    predict_id,distance = new_cls.predict(img_crop)
    print(predict_id)
Residual Network
导入包
python
import numpy as np
import cv2
import matplotlib.pyplot as plt
import dlib

# %matplotlib inline
plt.rcParams['figure.dpi'] = 200
提取关键点
python
# 获取人脸68个关键点
hog_face_detector = dlib.get_frontal_face_detector()
# 关键点检测模型
shape_detector = dlib.shape_predictor('./weights/shape_predictor_68_face_landmarks.dat')
python
# 读取1张测试图片
img = cv2.imread('./images/others/Walid_Al-Awadi/Walid_Al-Awadi_0001.jpg')
# plt.imshow(img)
# 检测人脸
detections = hog_face_detector(img,1)

for face in detections:
    l,t,r,b = face.left(),face.top(),face.right(),face.bottom()

    # 获取68个关键点
    points = shape_detector(img,face)
    # 绘制关键点
    for point in points.parts():
        cv2.circle(img,(point.x,point.y),2,(0,255,0),1)
    # 绘制矩形框
    cv2.rectangle(img,(l,t),(r,b),(255,0,0),2)

plt.imshow(cv2.cvtColor(img,cv2.COLOR_BGR2RGB))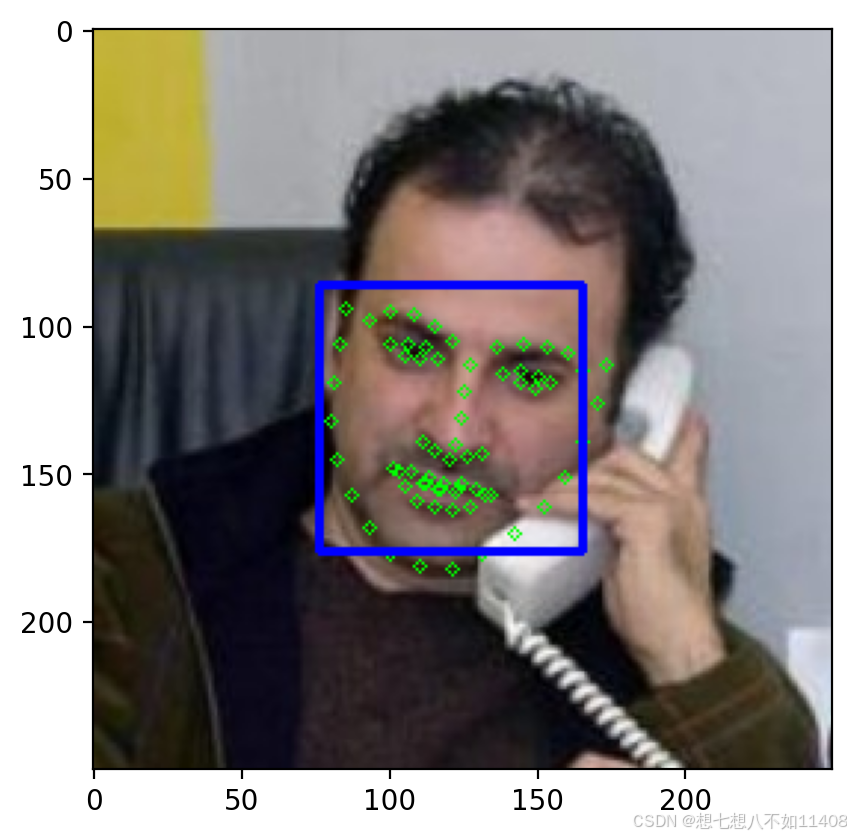
导入Resent模型
python
# resent模型
face_descriptor_extractor = dlib.face_recognition_model_v1('./weights/dlib_face_recognition_resnet_model_v1.dat')
提取单张图片的特征描述符和label
通过face_descriptor_extractor.compute_face_descriptor计算特征描述符
python
# 提取单张图片的特征描述符label
def getFaceFeatLabel(filename):
    label_id = int(filename.split('/')[-1].split('.')[0].split('subject')[-1])

    # 读取图片
    cap = cv2.VideoCapture(filename)
    ret,img = cap.read()

    img = cv2.cvtColor(img, cv2.COLOR_BGR2RGB)

    # 检测人脸
    detections = hog_face_detector(img, 1)

    face_decriptor = None
    for face in detections:
        # 获取关键点
        points = shape_detector(img,face)
        # 获取特征描述符
        face_decriptor = face_descriptor_extractor.compute_face_descriptor(img,points)
        # 转为numpy格式数组
        face_decriptor = [f for f in face_decriptor]
        face_decriptor = np.asarray(face_decriptor,dtype=np.float64)
        face_decriptor = np.reshape(face_decriptor,(1,-1))

    return label_id,face_decriptor
# img,label = getFaceImgLabel(img_path)
# plt.imshow(cv2.cvtColor(img,cv2.COLOR_BGR2RGB))

id1,fd1 = getFaceFeatLabel('./images/test/subject06.sad.gif')
fd1.shape
训练
python
# 遍历训练文件夹
import glob
file_list = glob.glob('./images/yalefaces/*.gif')
file_list = [file.replace('\\', '/') for file in file_list]

label_list = []
feature_list = None

name_list = {}
index = 0
for file in file_list:
    label, feature = getFaceFeatLabel(file)

    if feature is not None:
        # 文件名列表
        name_list[index] = file
        # label列表
        label_list.append(label)
        index += 1

        if feature_list is None:
            feature_list = feature
        else:
            # 特征列表
            feature_list = np.concatenate((feature_list ,feature),axis=0)
            # feature_list = np.concatenate((feature_list, feature.reshape(1, -1)), axis=0)

# print(len(img_list),len(label_list))
print(name_list)
评估模型
距离的计算
python
# 计算距离
np.linalg.norm((feature_list[20]-feature_list[100]))

# 计算某个特征描述符与所有特征描述符的距离
np.linalg.norm((feature_list[100]-feature_list),axis=1)

# 寻找最小值索引

min_index = np.argmin(np.linalg.norm((feature_list[0]-feature_list[1:]),axis=1))
min_index
模型评估
python
# 评估模型

import glob
file_list = glob.glob('./images/test/*.gif')
file_list = [file.replace('\\', '/') for file in file_list]

label_list = []
predict_list = []

# 距离阈值
threshold = 0.5

for file in file_list:
    label, feat = getFaceFeatLabel(file)

    cap = cv2.VideoCapture(file)
    ret,img = cap.read()

    img = cv2.cvtColor(img, cv2.COLOR_BGR2RGB)


    if feat is not None:
        # 计算距离
        distances = np.linalg.norm((feat-feature_list),axis=1)
        # 找最短距离
        min_index = np.argmin(distances)
        min_distance = distances[min_index]

        if min_distance < threshold:
            # 同一个人
            predict_id = int(name_list[min_index].split('/')[-1].split('.')[0].split('subject')[-1])
        else:
            predict_id = -1

        predict_list.append(predict_id)
        label_list.append(label)

        cv2.putText(img,'True:'+str(label),(10,30),cv2.FONT_HERSHEY_COMPLEX_SMALL,1,(0,255,0))
        cv2.putText(img,'Pred:'+str(predict_id),(10,50),cv2.FONT_HERSHEY_COMPLEX_SMALL,1,(0,255,0))
        cv2.putText(img,'Dist:'+str(min_distance),(10,70),cv2.FONT_HERSHEY_COMPLEX_SMALL,1,(0,255,0))
        plt.figure()
        plt.imshow(img)

print(len(label_list))
print(len(predict_list))
准确率
python
# 公式评估
from sklearn.metrics import accuracy_score
accuracy_score(label_list,predict_list)