一 CICD是什么
CI/CD 是指持续集成(Continuous Integration)和持续部署(Continuous Deployment)或持续交付(Continuous Delivery)
1.1 持续集成(Continuous Integration)
持续集成是一种软件开发实践,团队成员频繁地将他们的工作集成到共享的代码仓库中。其主要特点包括:
- 频繁提交代码:开发人员可以每天多次提交代码,确保代码库始终保持最新状态。
- 自动化构建:每次提交后,自动触发构建过程,包括编译、测试、静态分析等。
- 快速反馈:如果构建失败或测试不通过,能够快速地向开发人员提供反馈,以便及时修复问题。
1.2 持续部署(Continuous Deployment)
持续部署是在持续集成的基础上,将通过所有测试的代码自动部署到生产环境中。其特点如下:
- 自动化流程:从代码提交到生产环境的部署完全自动化,无需人工干预。
- 高频率部署:可以实现频繁的部署,使得新功能能够快速地提供给用户。
- 风险控制:需要有强大的测试和监控体系来确保部署的稳定性和可靠性。
1.3 持续交付(Continuous Delivery)
持续交付与持续部署类似,但不一定自动部署到生产环境,而是随时可以部署。其重点在于确保软件随时处于可发布状态。
CI/CD 的好处包括:
- 提高开发效率:减少手动操作和等待时间,加快开发周期。
- 尽早发现问题:通过频繁的集成和测试,问题能够在早期被发现和解决。
- 降低风险:减少了大规模部署时可能出现的问题,提高了软件的质量和稳定性。
- 增强团队协作:促进团队成员之间的沟通和协作,提高团队的整体效率。
常见的 CI/CD 工具包括 Jenkins、GitLab CI/CD、Travis CI 等。这些工具可以帮助团队实现自动化的构建、测试和部署流程。
二 git工具使用

2.1 git简介
Git 是一个分布式版本控制系统,被广泛用于软件开发中,以管理代码的版本和变更。
主要特点:
- 分布式
- 每个开发者都有完整的代码仓库副本,这使得开发者可以在离线状态下进行工作,并且在网络出现问题时也不会影响开发。
- 即使中央服务器出现故障,开发者仍然可以在本地进行开发和查看项目历史。
- 高效的分支管理
- Git 中的分支创建和切换非常快速和简单。开发人员可以轻松地创建新的分支来进行新功能的开发或修复 bug,而不会影响主分支。
- 合并分支也相对容易,可以使用多种合并策略来满足不同的需求。
- 快速的版本回退
- 如果发现某个版本存在问题,可以快速回退到之前的版本。
- 可以查看每个版本的详细变更记录,方便了解代码的演进过程。
- 强大的提交管理
- 每个提交都有一个唯一的标识符,可以方便地引用和查看特定的提交。
- 提交可以包含详细的提交信息,描述本次提交的更改内容。
- 支持协作开发
- 开发者可以将自己的更改推送到远程仓库,供其他开发者拉取和合并。
- 可以处理多个开发者同时对同一文件进行修改的情况,通过合并冲突解决机制来确保代码的完整性。
Git必看秘籍:https://git-scm.com/book/zh/v2
2.2 git 工作流程
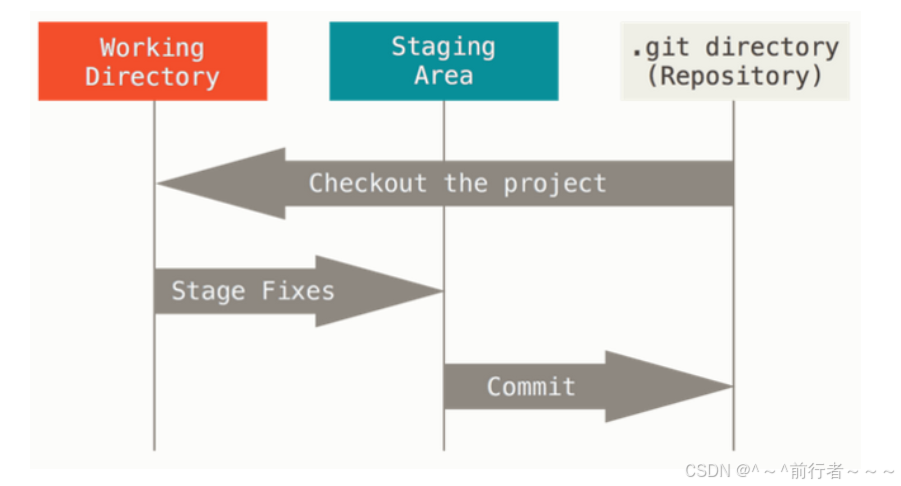
Git 有三种状态:已提交(committed)、已修改(modified) 和 已暂存(staged)。
- 已修改表示修改了文件,但还没保存到数据库中。
- 已暂存表示对一个已修改文件的当前版本做了标记,使之包含在下次提交的快照中。
- 已提交表示数据已经安全地保存在本地数据库中。
这会让我们的 Git 项目拥有三个阶段:工作区、暂存区以及 Git 目录。
三 部署git
3.1 安装git
bash
#在rhel9的系统中默认自带git
[root@CICD-node1 ~]# dnf install git  -y

#设定命令补全功能
[root@CICD-node1 timinglee]# echo "source  /usr/share/bash-completion/completions/git" >> ~/.bashrc
[root@CICD-node1 timinglee]# source  ~/.bashrc
3.2 初始化
获取 Git 仓库通常有两种方式:
- 将尚未进行版本控制的本地目录转换为 Git 仓库。
- 从其它服务器克隆 一个已存在的 Git 仓库。比如: git clone
初始化版本库
bash
[root@CICD-node1 ~]# mkdir  timinglee
[root@CICD-node1 timinglee]# git init
提示:使用 'master' 作为初始分支的名称。这个默认分支名称可能会更改。要在新仓库中
提示:配置使用初始分支名,并消除这条警告,请执行:
提示:
提示:  git config --global init.defaultBranch <名称>
提示:
提示:除了 'master' 之外,通常选定的名字有 'main'、'trunk' 和 'development'。
提示:可以通过以下命令重命名刚创建的分支:
提示:
提示:  git branch -m <name>
已初始化空的 Git 仓库于 /root/timinglee/.git/

[root@CICD-node1 timinglee]# ls -a
.  ..  .git
[root@CICD-node1 timinglee]# ls .git/
branches  config  description  HEAD  hooks  info  objects  refs

#设定用户信息
[root@CICD-node1 timinglee]# git config --global user.name "timinglee"
[root@CICD-node1 timinglee]# git config --global user.email "timinglee@timinglee.org"

#查看当前文件状态
[root@CICD-node1 timinglee]# git status
位于分支 master

尚无提交

无文件要提交(创建/拷贝文件并使用 "git add" 建立跟踪)

[root@CICD-node1 timinglee]# git status -s		#简化输出
!WARNING
.git目录是git跟踪管理版本库的,没事别瞎溜达
四 git的使用方法
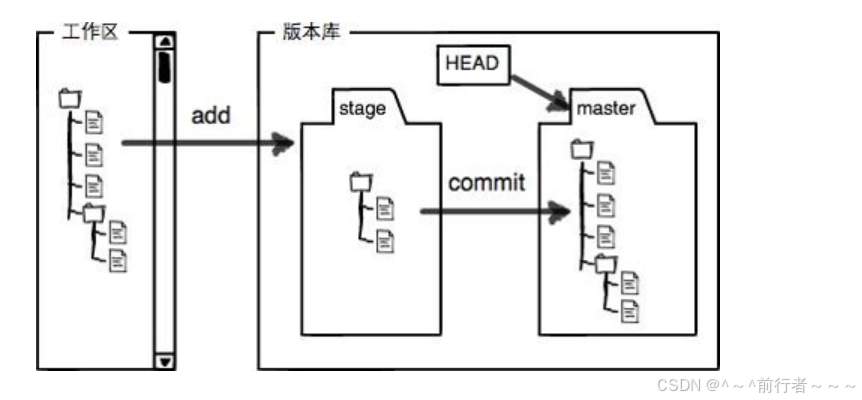
4.1 常用方法
bash
[root@CICD-node1 timinglee]# echo timnglee > README.md
[root@CICD-node1 timinglee]# git status
位于分支 master

尚无提交

未跟踪的文件:
  (使用 "git add <文件>..." 以包含要提交的内容)
        README.md

提交为空,但是存在尚未跟踪的文件(使用 "git add" 建立跟踪)
[root@CICD-node1 timinglee]# git status -s
?? README.md					#??	新建文件未添加到版本库

[root@CICD-node1 timinglee]# git add README.md
[root@CICD-node1 timinglee]# git status  -s
A  README.md					#A 已添加到暂存区

#提交暂存区的数据
[root@CICD-node1 timinglee]# git commit -m "add README.md"
[master(根提交) 74625b0] add README.md
 1 file changed, 1 insertion(+)
 create mode 100644 README.md

[root@CICD-node1 timinglee]# git status -s		#无任何显示,标识已经提交到版本库

#再次修改
[root@CICD-node1 timinglee]# vim README.md
timnglee
timnglee
[root@CICD-node1 timinglee]# git status -s
 M README.md									#右M 表示文件在工作区被修改

#撤销修改
[root@CICD-node1 timinglee]# git checkout -- README.md
从索引区更新了 1 个路径
[root@CICD-node1 timinglee]# cat README.md
timnglee

#从新修改
[root@CICD-node1 timinglee]# echo timinglee> README.md
[root@CICD-node1 timinglee]# git add README.md
[root@CICD-node1 timinglee]# git status -s
M  README.md									#左M表示文件已经在版本库中并被跟踪,

#从暂存区撤销
[root@CICD-node1 timinglee]# git restore --staged README.md
[root@CICD-node1 timinglee]# git status -s
 M README.md

#从新提交
[root@CICD-node1 timinglee]# git add README.md
[root@CICD-node1 timinglee]# git status -s
M  README.md

#更新
[root@CICD-node1 timinglee]# git commit -m "update v1"
[master 6a14bb5] update v1
 1 file changed, 1 insertion(+), 1 deletion(-)

[root@CICD-node1 timinglee]# git status -s

#更新文件
[root@CICD-node1 timinglee]# echo timinglee >> README.md
[root@CICD-node1 timinglee]# git add README.md
[root@CICD-node1 timinglee]# echo timinglee >> README.md
[root@CICD-node1 timinglee]# git status -s
MM README.md								#MM表示有一部分在暂存区,还有一部分没有提交

#如果现在提交只能提交在暂存区中的部分
[root@CICD-node1 timinglee]# git commit -m "update v2"
[master dc9b45f] update v2
 1 file changed, 1 insertion(+)
[root@CICD-node1 timinglee]# git status -s
 M README.md								#右M还在


#查看已暂存和未暂存的修改变化
[root@CICD-node1 timinglee]# echo timinglee >> README.md
[root@CICD-node1 timinglee]# git diff
diff --git a/README.md b/README.md
index 62be538..87bd0f6 100644
--- a/README.md
+++ b/README.md
@@ -1,2 +1,3 @@
 timinglee
 timinglee
+timinglee

#跳过使用暂存区,只能在提交过的在版本库中存在的文件使用如果文件状态是"??"不能用此方法
[root@CICD-node1 timinglee]# git commit -a -m "update v3"
[master 3579560] update v3
 1 file changed, 1 insertion(+)

#撤销工作区中删除动作
[root@CICD-node1 timinglee]# touch lee.txt
[root@CICD-node1 timinglee]# git add lee.txt
[root@CICD-node1 timinglee]# git commit  -m "add lee.txt"
[master 16141e7] add lee.txt
 1 file changed, 0 insertions(+), 0 deletions(-)
 create mode 100644 lee.txt
[root@CICD-node1 timinglee]# git status -s
 D lee.txt								#右D表示文件在工作区被删除
[root@CICD-node1 timinglee]# git checkout -- lee.txt
[root@CICD-node1 timinglee]# ls
dir1  lee.txt  README.md

#从版本库中删除文件
[root@CICD-node1 timinglee]# git rm lee.txt
rm 'lee.txt'
[root@CICD-node1 timinglee]# git status -s
D  lee.txt								#左D表示文件删除动作被提交到暂存区

[root@CICD-node1 timinglee]# git commit -m "delete lee.txt"
[master 85483db] delete lee.txt
 1 file changed, 0 insertions(+), 0 deletions(-)
 delete mode 100644 lee.txt
[root@CICD-node1 timinglee]# git status -s

#恢复从版本库中被删除的文件
[root@CICD-node1 timinglee]# git log			#查看操作日志
commit 85483db3cb7f543950f678b7d04b85daef96c248 (HEAD -> master)
Author: timinglee <timinglee@timinglee.org>
Date:   Wed Sep 11 01:52:49 2024 +0800

    delete lee.txt

commit 16141e793a06cdce042e203e5c4a78f8fc92736b
Author: timinglee <timinglee@timinglee.org>
Date:   Wed Sep 11 01:48:45 2024 +0800

    add lee.txt

commit 3579560e8307005cc26cf51f4decfe2024762d4c
Author: timinglee <timinglee@timinglee.org>
Date:   Wed Sep 11 01:46:38 2024 +0800

    update v3

commit dc9b45fea7284911e24733dce044ca18624e791b
Author: timinglee <timinglee@timinglee.org>
Date:   Wed Sep 11 01:32:43 2024 +0800

    update v2

commit 6a14bb58e424a96c3b18c694fbe444bd1e662605
Author: timinglee <timinglee@timinglee.org>
Date:   Wed Sep 11 01:28:35 2024 +0800

    update v1

commit 74625b07475241cea36cc23565ebd0eb7a95142c
Author: timinglee <timinglee@timinglee.org>
Date:   Wed Sep 11 01:18:56 2024 +0800

    add README.md


[root@CICD-node1 timinglee]# git reflog			#查看提交动作
85483db (HEAD -> master) HEAD@{0}: commit: delete lee.txt
16141e7 HEAD@{1}: commit: add lee.txt
3579560 HEAD@{2}: commit: update v3
dc9b45f HEAD@{3}: commit: update v2
6a14bb5 HEAD@{4}: commit: update v1
74625b0 HEAD@{5}: commit (initial): add README.md

#版本回退到删除之前
[root@CICD-node1 timinglee]# git reset --hard 16141e7
HEAD 现在位于 16141e7 add lee.txt
[root@CICD-node1 timinglee]# ls
dir1  lee.txt  README.md
4.2 git对于文件如何忽略
在做软件开发时对源码编译会产生一些临时文件,我们在提交时需要忽略这些临时文件
bash
[root@CICD-node1 timinglee]# mkdir dir1/
[root@CICD-node1 timinglee]# touch dir1/.file2
[root@CICD-node1 timinglee]# git status -s
?? .file1
?? dir1/


[root@CICD-node1 timinglee]# echo .file1 > .gitignore
[root@CICD-node1 timinglee]# git status -s
?? .gitignore
?? dir1/
[root@CICD-node1 timinglee]# echo ".*" > .gitignore
[root@CICD-node1 timinglee]# git status -s
五 gitlab代码仓库
5.1 gitlab简介

- GitLab 是一个用于仓库管理系统的开源项目,使用 Git 作为代码管理工具,并在此基础上搭建起来的 web 服务。
- GitLab 具有很多功能,比如代码托管、持续集成和持续部署(CI/CD)、问题跟踪、合并请求管理等。它可以帮助开发团队更好地协作开发软件项目,提高开发效率和代码质量。
官网:https://about.gitlab.com/install/
中文站点: https://gitlab.cn/install/
官方包地址:https://packages.gitlab.com/gitlab/gitlab-ce
5.2 gitlab 的部署实施
5.2.1 部署gitlab
部署gitlab需要内存大于4G
bash
#在安装包之前需配置好软件仓库来解决依赖性
[root@CICD-node1 ~]# yum install -y curl policycoreutils-python openssh-server perl

[root@CICD-node1 ~]# dnf install gitlab-ce-17.1.6-ce.0.el9.x86_64.rpm -y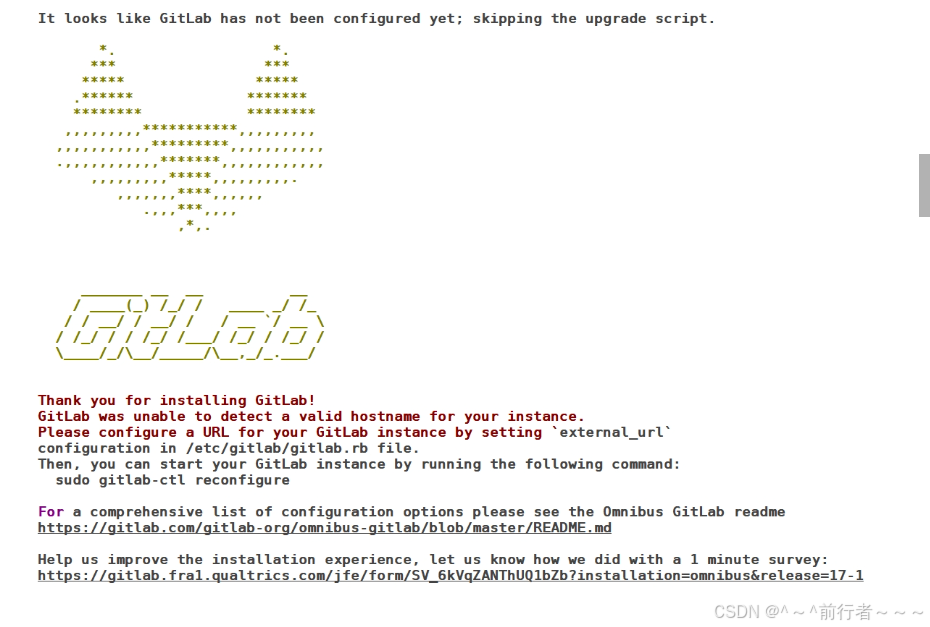
5.2.2 配置gitlab
bash
#修改配置文件
[root@CICD-node1 ~]# cd /etc/gitlab/
[root@CICD-node1 gitlab]# ls
gitlab.rb
[root@CICD-node1 gitlab]# vim gitlab.rb
32 external_url 'http://172.25.254.80'

#修改配置文件后需利用gitlab-crt来生效,
[root@CICD-node1 gitlab]# gitlab-ctl reconfigure

#执行命令成功后会把所有组件全部启动起来
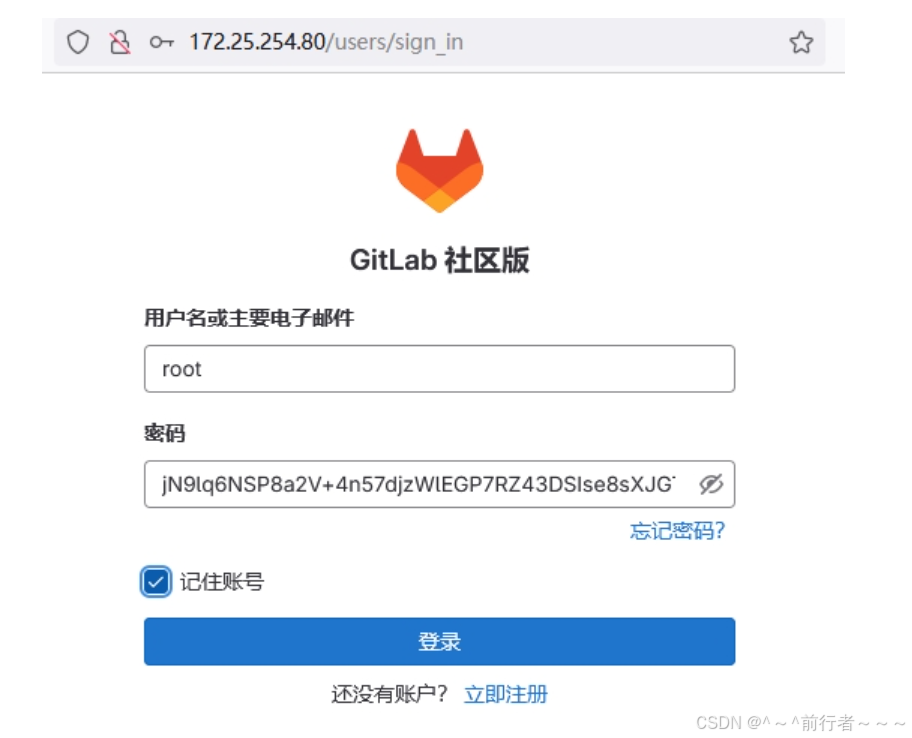
5.2.3 登陆gitlab
用户名默认为 root 。如果在安装过程中指定了初始密码,则用初始密码登录,如果未指定密码,则系统会随机生成一个密码并存储在 /etc/gitlab/initial_root_password 文件中, 查看随机密码并使用 root 用户名登录。
!WARNING
注意:出于安全原因,24 小时后,
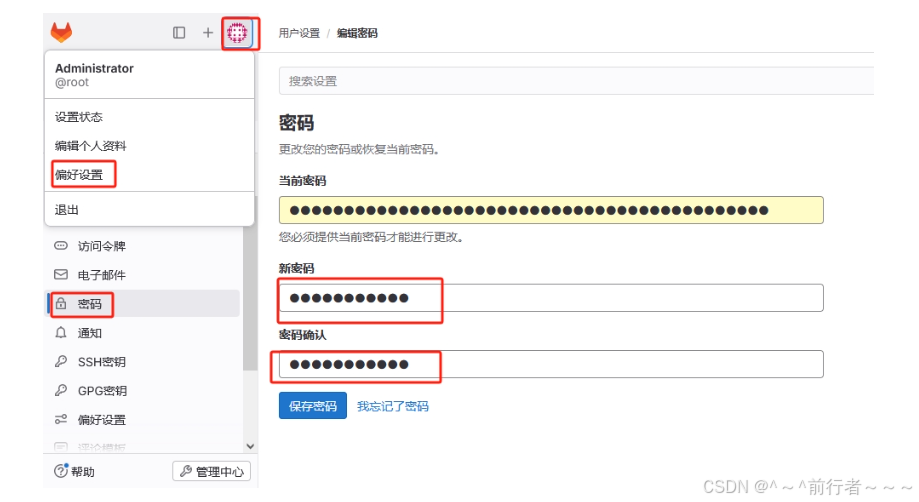
/etc/gitlab/initial_root_password会被第一次gitlab-ctl reconfigure自动删除,因此若使用随机密码登录,建议安装成功初始登录成功之后,立即修改初始密码。
bash
#查看原始密码
[root@CICD-node1 gitlab]# cat /etc/gitlab/initial_root_password
# WARNING: This value is valid only in the following conditions
#          1. If provided manually (either via `GITLAB_ROOT_PASSWORD` environment variable or via `gitlab_rails['initial_root_password']` setting in `gitlab.rb`, it was provided before database was seeded for the first time (usually, the first reconfigure run).
#          2. Password hasn't been changed manually, either via UI or via command line.
#
#          If the password shown here doesn't work, you must reset the admin password following https://docs.gitlab.com/ee/security/reset_user_password.html#reset-your-root-password.

Password: jN9lq6NSP8a2V+4n57djzWlEGP7RZ43DSIse8sXJGTQ=		#密码

# NOTE: This file will be automatically deleted in the first reconfigure run after 24 hours.
登陆
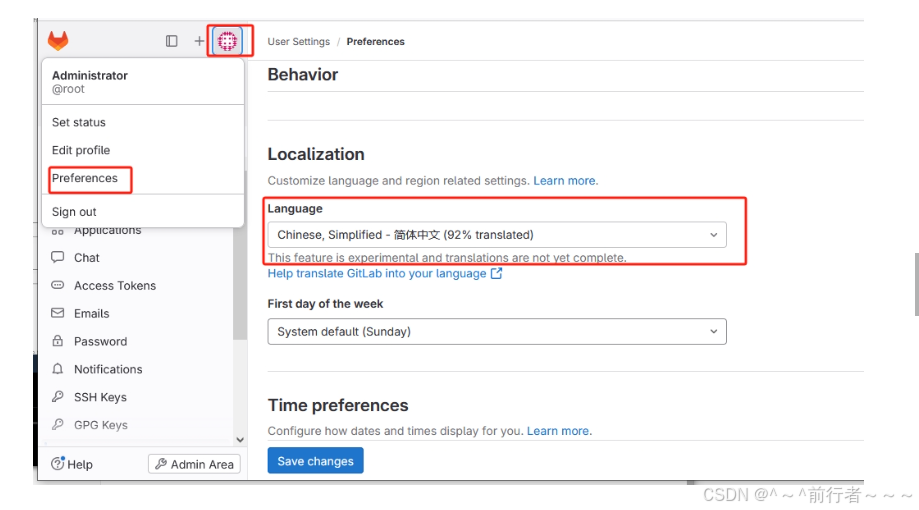
设置语言
设置密码
5.3 在gitlab中新建项目


bash
#生成sshd密钥
[root@CICD-node1 ~]# ssh-keygen
Generating public/private rsa key pair.
Enter file in which to save the key (/root/.ssh/id_rsa):
Enter passphrase (empty for no passphrase):
Enter same passphrase again:
Your identification has been saved in /root/.ssh/id_rsa
Your public key has been saved in /root/.ssh/id_rsa.pub
The key fingerprint is:
SHA256:QuEqZNMwIrNC3yV1yPMhYBtxqyDO2mcdMH9/D07qjmo root@CICD-node1.timinglee.org
The key's randomart image is:
+---[RSA 3072]----+
|+.o  **+..       |
|o+.+o.**o.       |
|o.+o+oo.+ .      |
|+o...*.  .       |
| o. ..+ S        |
|.. . . + .       |
|. . o .   . +    |
|   o  E  . = o   |
|     ....o+ . .  |
+----[SHA256]-----+
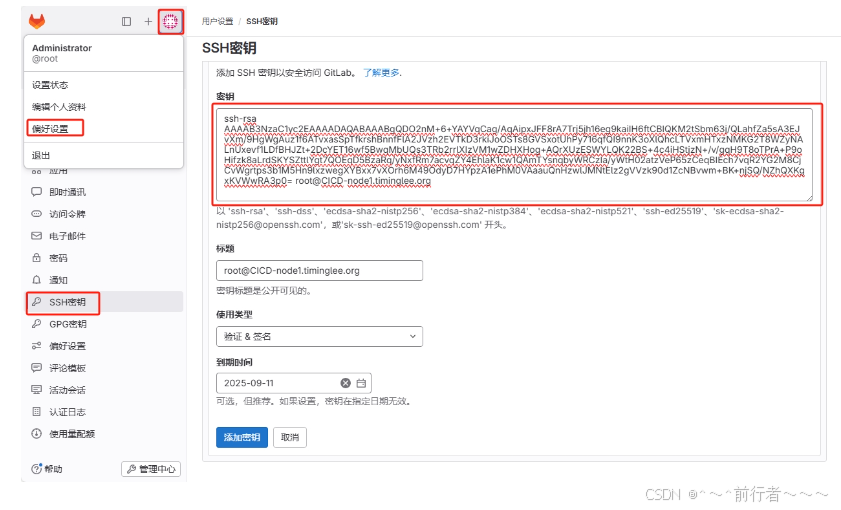
[root@CICD-node1 ~]# cat .ssh/id_rsa.pub
ssh-rsa AAAAB3NzaC1yc2EAAAADAQABAAABgQDO2nM+6+YAYVqCag/AqAipxJFF8rA7Trj5jh16eg9kaiIH6ftCBIQKM2tSbm63j/QLahfZa5sA3EJvXm/9HgWgAuz1f6ATvxasSpTfkrshBnnfFlA2JVzh2EVTkD3rkiJoOSTs8GVSxotUhPy716qfQI9nnK3oXlQhcLTVxmHTxzNMKG2T8WZyNALnUxevf1LDfBHJZt+2DcYET16wf5BwqMbUQs3TRb2rrlXIzVM1wZDHXHog+AQrXUzESWYLQK22BS+4c4iHStjzN+/v/gqH9T8oTPrA+P9oHifzk8aLrdSKYSZttlYgt7QOEqD5BzaRq/yNxfRm7acvqZY4EhlaK1cw1QAmTYsnqbyWRCzIa/yWtH02atzVeP65zCeqBIEch7vqR2YG2M8CjCvWgrtps3b1M5Hn9lxzwegXYBxx7vXOrh6M49OdyD7HYpzA1ePhM0VAaauQnHzwlJMNtElz2gVVzk90d1ZcNBvwm+BK+njSQ/NZhQXKgxKVWwRA3p0= root@CICD-node1.timinglee.org
上传公钥到gitlab中
下载项目
bash
[root@CICD-node1 ~]# git clone  git@172.25.254.80:root/timinglee.git
正克隆到 'timinglee'...
The authenticity of host '172.25.254.80 (172.25.254.80)' can't be established.
ED25519 key fingerprint is SHA256:G3bSH82EUaYIfG+I6cDLyKgyKY2DngMYwt5U1Ch71jI.
This key is not known by any other names
Are you sure you want to continue connecting (yes/no/[fingerprint])? yes
Warning: Permanently added '172.25.254.80' (ED25519) to the list of known hosts.
remote: Enumerating objects: 3, done.
remote: Counting objects: 100% (3/3), done.
remote: Compressing objects: 100% (2/2), done.
remote: Total 3 (delta 0), reused 0 (delta 0), pack-reused 0 (from 0)
接收对象中: 100% (3/3), 完成.

[root@CICD-node1 ~]# ls -R
.:
timinglee

./timinglee:
README.md

[root@CICD-node1 ~]# cd timinglee/
[root@CICD-node1 timinglee]# ls
README.md
[root@CICD-node1 timinglee]# git remote -v
origin  git@172.25.254.80:root/timinglee.git (fetch)
origin  git@172.25.254.80:root/timinglee.git (push)


#文件提交
[root@CICD-node1 timinglee]# echo timinglee > timinglee
[root@CICD-node1 timinglee]# git add timinglee
[root@CICD-node1 timinglee]# git commit -m "add timinglee"
[main 6c08cbb] add timinglee
 1 file changed, 1 insertion(+)
 create mode 100644 timinglee
[root@CICD-node1 timinglee]# git push -u origin main
枚举对象中: 4, 完成.
对象计数中: 100% (4/4), 完成.
使用 4 个线程进行压缩
压缩对象中: 100% (2/2), 完成.
写入对象中: 100% (3/3), 274 字节 | 274.00 KiB/s, 完成.
总共 3(差异 0),复用 0(差异 0),包复用 0
To 172.25.254.80:root/timinglee.git
   2a97cba..6c08cbb  main -> main
分支 'main' 设置为跟踪 'origin/main'。
六 jenkins
6.1 jenkins 简介

- Jenkins是开源CI&CD软件领导者, 提供超过1000个插件来支持构建、部署、自动化, 满足任何项目的需要。
- Jenkins用Java语言编写,可在Tomcat等流行的servlet容器中运行,也可独立运行
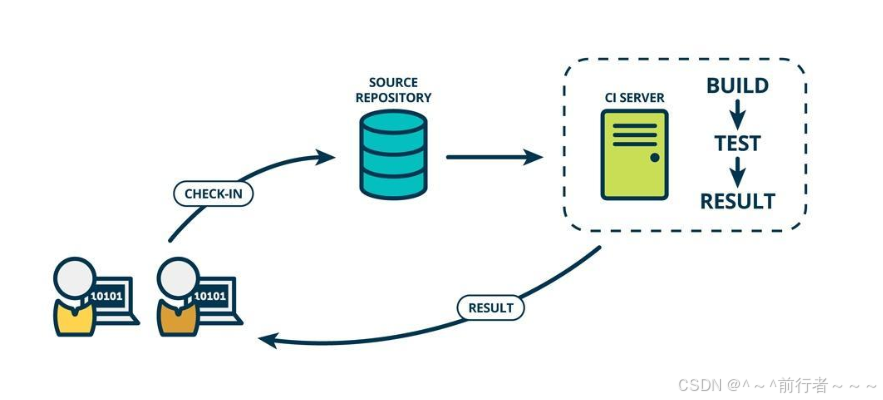
CI(Continuous integration持续集成)持续集成强调开发人员提交了新代码之后,立刻进行构建、(单元)测试。
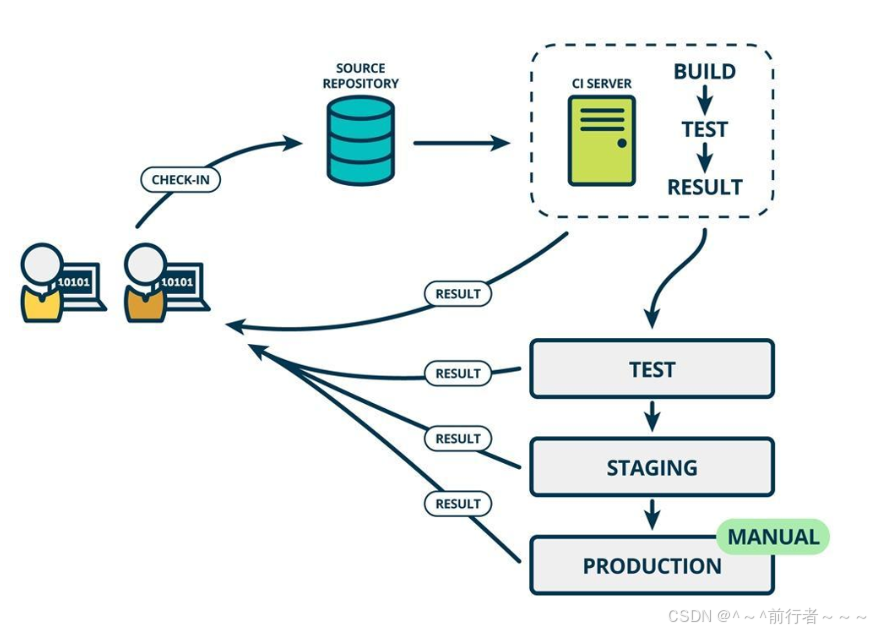
CD(Continuous Delivery持续交付) 是在持续集成的基础上,将集成后的代码部署到更贴近真实运行环境(类生产环境)中
6.2 部署 jenkins
软件下载:https://www.jenkins.io/download/
jenkins需要部署在新的虚拟机中
!WARNING
jenkins需要部署在新的虚拟机中,建议最少4G内存,4核心cpu
bash
#安装依赖包
[root@jenkins ~]# yum install fontconfig java-17-openjdk git

#安装jenkins
[root@jenkins ~]# dnf install jenkins-2.476-1.1.noarch.rpm

#启动jenkins
[root@jenkins ~]# systemctl enable --now jenkins.service

#查看原始密码
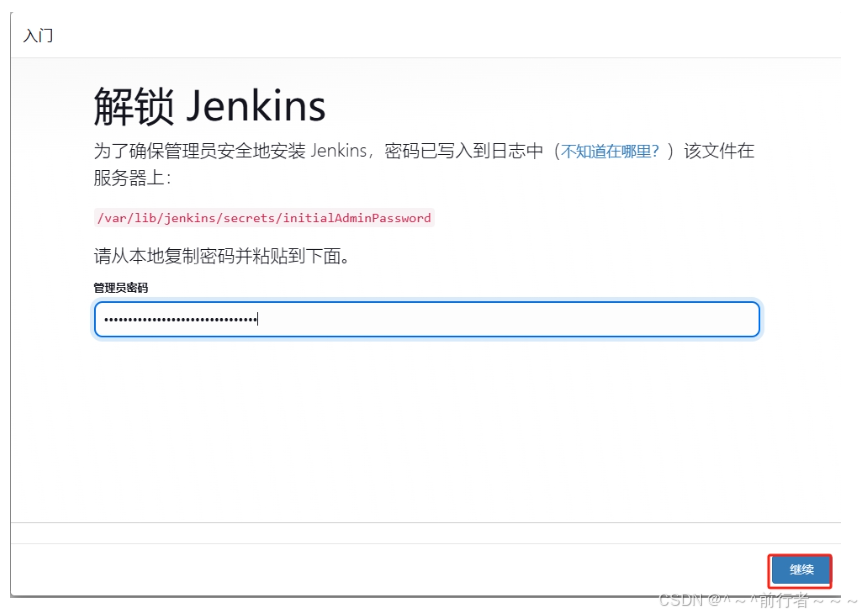
[root@jenkins ~]# cat /var/lib/jenkins/secrets/initialAdminPassword
b081aab333d24530a640e91579fdc6fc
部署插件


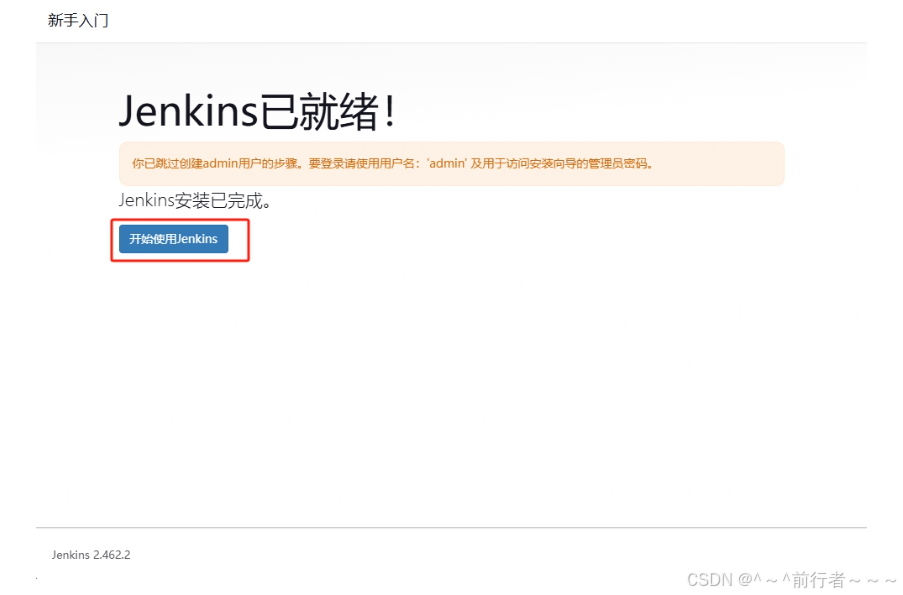
!NOTE
建议修改admin的密码,在admin的设置中修改即可
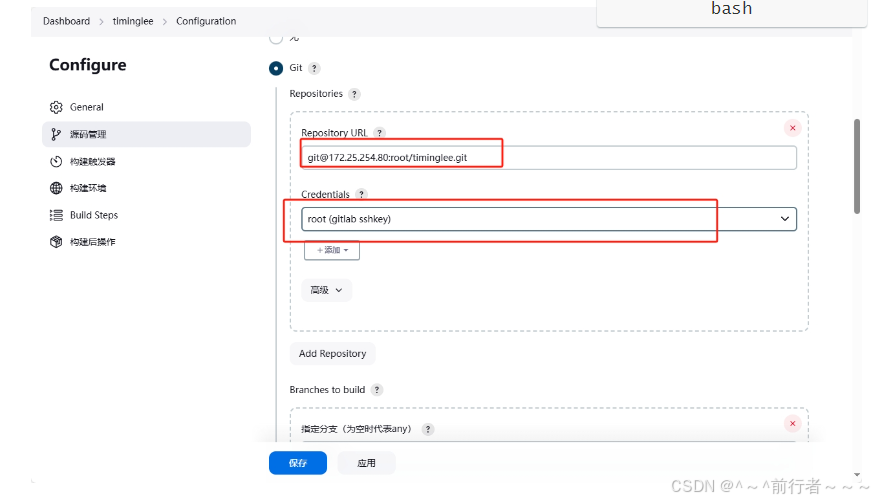
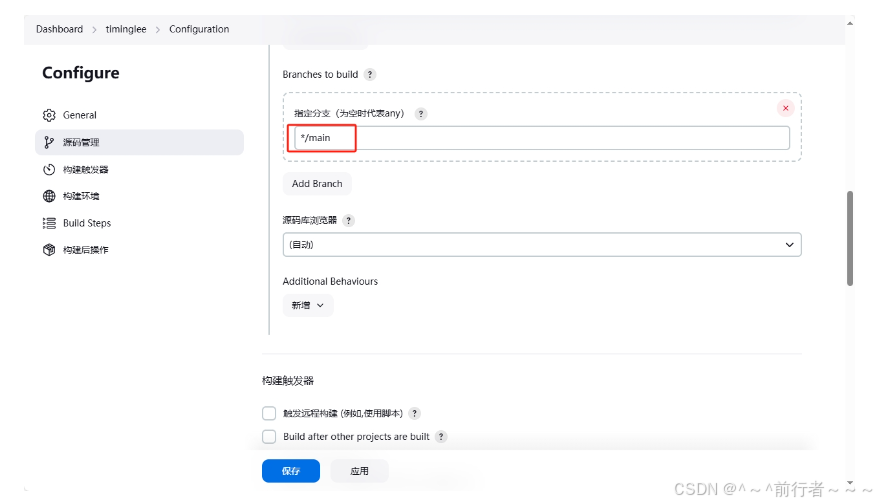
6.3 jenkins 与gitlab的整合
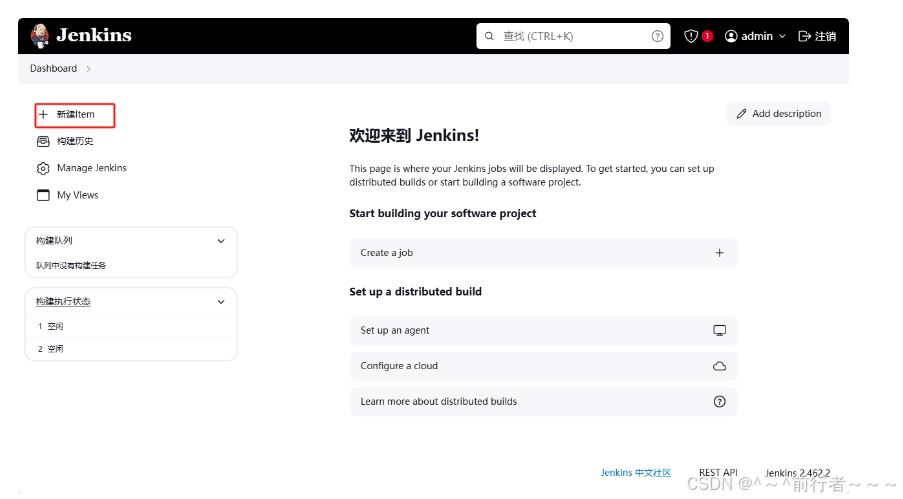

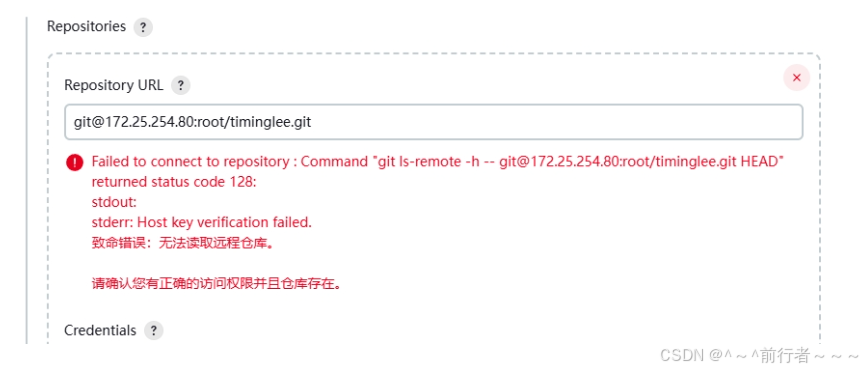
这个错误的原因是因为本机没有gitlab上的sshkey
[root@jenkins ~]# ssh-keygen
Generating public/private rsa key pair.
Enter file in which to save the key (/root/.ssh/id_rsa):
Enter passphrase (empty for no passphrase):
Enter same passphrase again:
Your identification has been saved in /root/.ssh/id_rsa
Your public key has been saved in /root/.ssh/id_rsa.pub
The key fingerprint is:
SHA256:WYl62PK9yE5QWuWRr6IKT7BJwkYpvmn1lAQa7W2js5s root@jenkins.timinglee.org
The key's randomart image is:
+---[RSA 3072]----+
| ...      o.     |
|  +..    +.o     |
|.+. ..  + +.     |
|=  ..+.B o  .    |
|.+o.ooB S  .     |
|.o+*o  =...      |
| ++ +. .o..      |
|.  =. .o . .     |
|   E+. .+ .      |
+----[SHA256]-----+
[root@jenkins ~]# cat /root/.ssh/id_rsa.pub
ssh-rsa AAAAB3NzaC1yc2EAAAADAQABAAABgQDA1imI8HrTo8mc457kNDBPmGvSYSdEeXKE977DL1vTzG5KdICUn5Si3reddc1BUe6F+sKO1bKuh7f7QqZ79fbJVl2xOJjbf4d9XJKQQQs06aa72p2HfNVDdgA+u0vOPJ6NY2hmatmU98GtiBzAXbbq+qcK4hT28fS39GWNWjHhoKpvglxMMR+W6xWNQHMj/9aN9v7ggW9jRPmENXKbY+8k0j0sPOfapQvH2nqUbRBfl6Fv26ExerPLKeNzhWzNOSOWoz47OFF186W12z+NtV3RDBjxJK77hzkHCCT245kzfuY3ZN8f25aS5+RMr7eIfzWlmoaKHCVC3ltOz6LCRwV/ldKuBYSKwjN7HqYbhjCWIVA0pqQUdDGgYvCJiHA8zjzPYDMyNcCKhAlWbj3FwYhLfdkiO4UQXkNbosJtqLRVcKf04FoaeRKEQm1lYMaVvCn603g/H2srN5e/9Tf+ydPVGHMqrGHFyMiGrHGDEp6HxFP8L6mLylvnhZ0a9HVuDJ0= root@jenkins.timinglee.org
把此密钥添加到gitlab上即可
添加密钥凭据
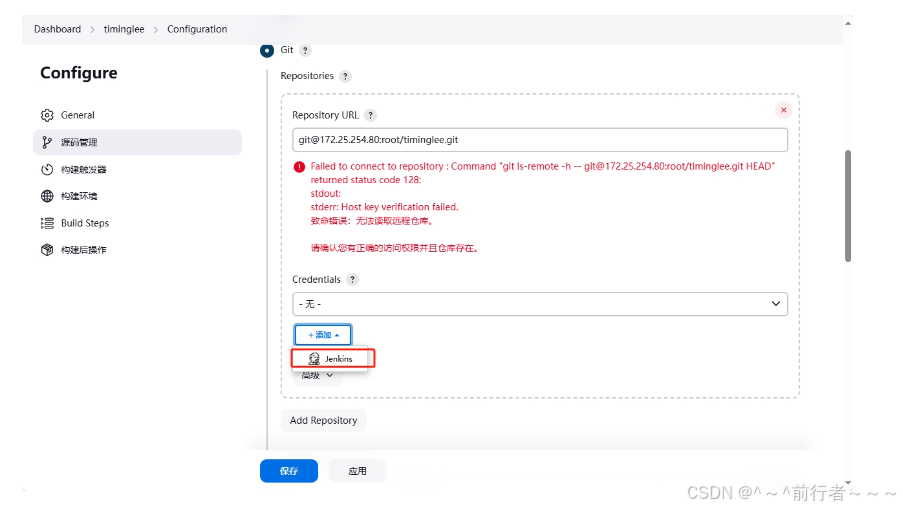
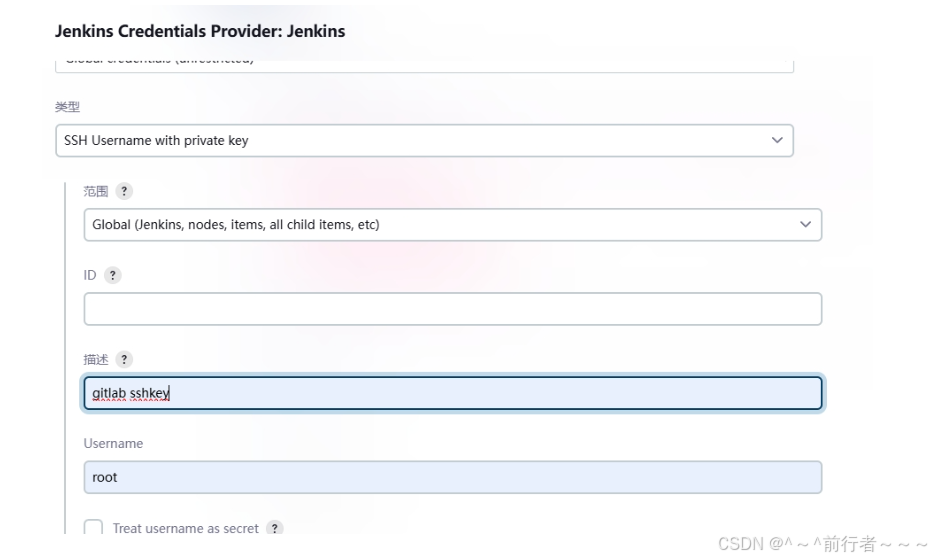
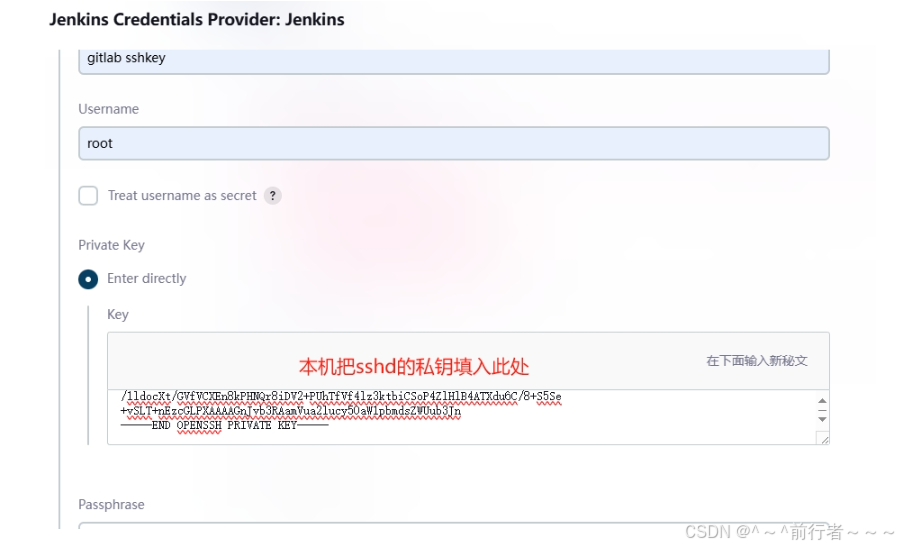
添加完成后报错依然存在,因为ssh首次连接主机是需要签名认证,需要手动输入yes
还有两太主机之间一定要做好解析
bash
[root@jenkins ~]# vim /etc/ssh/ssh_config
Host *
    StrictHostKeyChecking no