文为「365天深度学习训练营」内部文章
参考本文所写记录性文章,请在文章开头带上「👉声明」
🍺 要求:
- 自己搭建VGG-16网络框架【达成√】
- 调用官方的VGG-16网络框架【达成√】
- 如何查看模型的参数量以及相关指标【达成√】
🍻 拔高(可选):
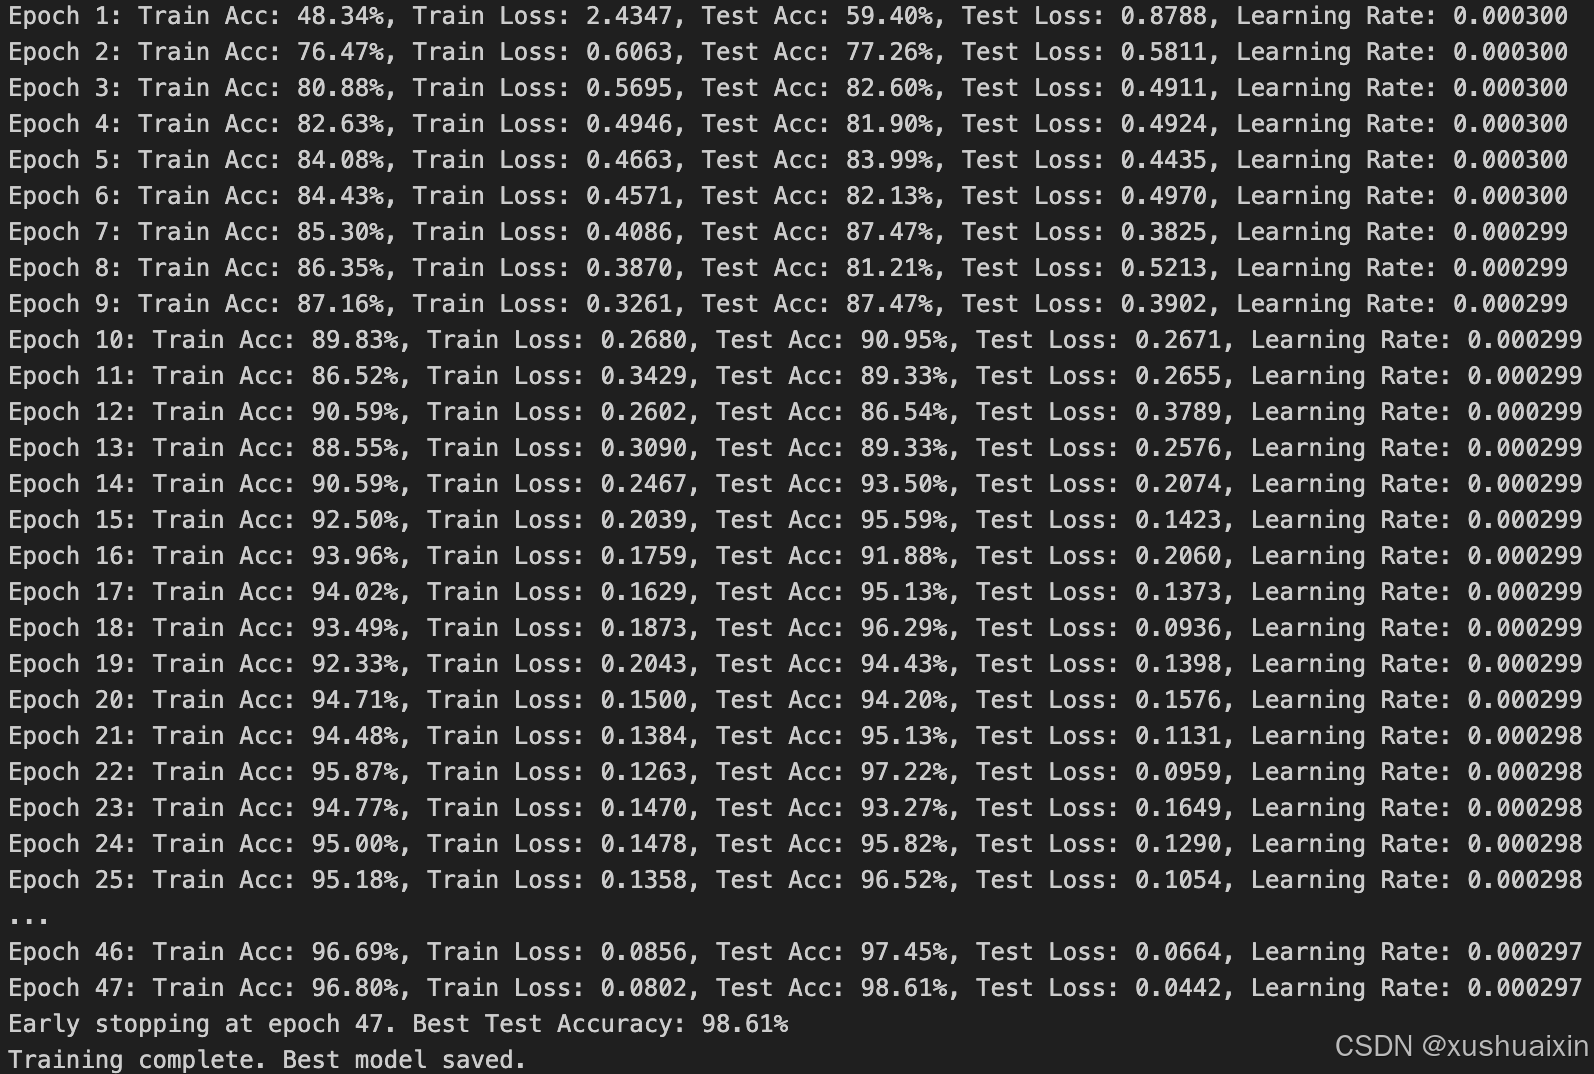
- 验证集准确率达到100%【98.61%】
- 使用PPT画出VGG-16算法框架图(发论文需要这项技能)
🔎 探索(难度有点大)
- 在不影响准确率的前提下轻量化模型【达成√】
- 目前VGG16的Total params是134,272,835
🏡 我的环境:
- 语言环境:Python3.11.9
- 编译器:Jupyter Lab
- 深度学习环境:
- torch==2.3.1
- torchvision==0.18.1
- torch==2.3.1
这次我们使用的是马铃薯病害数据集,该数据集包含表现出各种疾病的马铃薯植物的高分辨率图像,包括早期疫病 、晚期疫病 和健康叶子。它旨在帮助开发和测试图像识别模型,以实现准确的疾病检测和分类,从而促进农业诊断的进步。
一、 前期准备
1. 设置GPU
如果设备上支持GPU就使用GPU,否则使用CPU
python
import torch
import torch.nn as nn
import torchvision.transforms as transforms
import torchvision
from torchvision import transforms, datasets
import os, PIL, pathlib, warnings

warnings.filterwarnings("ignore")  # 忽略警告信息

# 检查硬件加速支持
if torch.backends.mps.is_available():
    device = torch.device("mps")  # 使用 Metal 后端(适用于 M 系列芯片)
    print("Using Metal Performance Shaders (MPS) backend for acceleration")
else:
    device = torch.device("cuda" if torch.cuda.is_available() else "cpu")
    if device.type == "cuda":
        print("Using CUDA for acceleration")
    else:
        print("Using CPU (no hardware acceleration available)")

device
2. 导入数据
python
import os, PIL, random, pathlib

data_dir = './PotatoPlants'
data_dir = pathlib.Path(data_dir)

# 获取子目录路径
data_paths = list(data_dir.glob('*'))

# 提取子目录名称,使用 `path.name` 更安全
classeNames = [path.name for path in data_paths]

print(classeNames)
python
# 关于transforms.Compose的更多介绍可以参考:https://blog.csdn.net/qq_38251616/article/details/124878863
train_transforms = transforms.Compose([
    transforms.Resize([224, 224]),  # 将输入图片resize成统一尺寸
    # transforms.RandomHorizontalFlip(), # 随机水平翻转
    transforms.ToTensor(),          # 将PIL Image或numpy.ndarray转换为tensor,并归一化到[0,1]之间
    transforms.Normalize(           # 标准化处理-->转换为标准正太分布(高斯分布),使模型更容易收敛
        mean=[0.485, 0.456, 0.406],
        std=[0.229, 0.224, 0.225])  # 其中 mean=[0.485,0.456,0.406]与std=[0.229,0.224,0.225] 从数据集中随机抽样计算得到的。
])

test_transform = transforms.Compose([
    transforms.Resize([224, 224]),  # 将输入图片resize成统一尺寸
    transforms.ToTensor(),          # 将PIL Image或numpy.ndarray转换为tensor,并归一化到[0,1]之间
    transforms.Normalize(           # 标准化处理-->转换为标准正太分布(高斯分布),使模型更容易收敛
        mean=[0.485, 0.456, 0.406],
        std=[0.229, 0.224, 0.225])  # 其中 mean=[0.485,0.456,0.406]与std=[0.229,0.224,0.225] 从数据集中随机抽样计算得到的。
])

total_data = datasets.ImageFolder("./PotatoPlants/",transform=train_transforms)
total_data
python
total_data.class_to_idx
3. 划分数据集
python
train_size = int(0.8 * len(total_data))
test_size  = len(total_data) - train_size
train_dataset, test_dataset = torch.utils.data.random_split(total_data, [train_size, test_size])
train_dataset, test_dataset
python
batch_size = 32

train_dl = torch.utils.data.DataLoader(train_dataset,
                                           batch_size=batch_size,
                                           shuffle=True,
                                           num_workers=1)
test_dl = torch.utils.data.DataLoader(test_dataset,
                                          batch_size=batch_size,
                                          shuffle=True,
                                          num_workers=1)
python
for X, y in test_dl:
    print("Shape of X [N, C, H, W]: ", X.shape)
    print("Shape of y: ", y.shape, y.dtype)
    break
二、手动搭建VGG-16模型
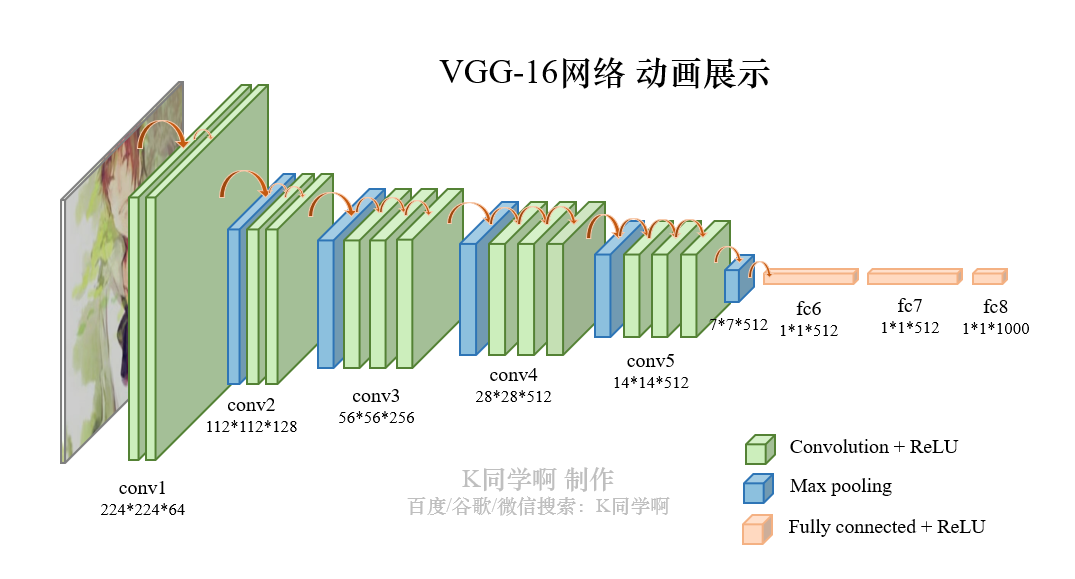
VVG-16结构说明:
- 13个卷积层(Convolutional Layer),分别用
blockX_convX表示 - 3个全连接层(Fully connected Layer),分别用
fcX与predictions表示 - 5个池化层(Pool layer),分别用
blockX_pool表示
VGG-16****包含了16个隐藏层(13个卷积层和3个全连接层),故称为 VGG-16
1. 搭建模型
python
import torch
import torch.nn as nn
import torch.nn.functional as F

class vgg16(nn.Module):
    def __init__(self):
        super(vgg16, self).__init__()
        # 卷积块1
        self.block1 = nn.Sequential(
            nn.Conv2d(3, 64, kernel_size=(3, 3), stride=(1, 1), padding=(1, 1)),
            nn.ReLU(),
            nn.Conv2d(64, 64, kernel_size=(3, 3), stride=(1, 1), padding=(1, 1)),
            nn.ReLU(),
            nn.MaxPool2d(kernel_size=(2, 2), stride=(2, 2))
        )
        # 卷积块2
        self.block2 = nn.Sequential(
            nn.Conv2d(64, 128, kernel_size=(3, 3), stride=(1, 1), padding=(1, 1)),
            nn.ReLU(),
            nn.Conv2d(128, 128, kernel_size=(3, 3), stride=(1, 1), padding=(1, 1)),
            nn.ReLU(),
            nn.MaxPool2d(kernel_size=(2, 2), stride=(2, 2))
        )
        # 卷积块3
        self.block3 = nn.Sequential(
            nn.Conv2d(128, 256, kernel_size=(3, 3), stride=(1, 1), padding=(1, 1)),
            nn.ReLU(),
            nn.Conv2d(256, 256, kernel_size=(3, 3), stride=(1, 1), padding=(1, 1)),
            nn.ReLU(),
            nn.Conv2d(256, 256, kernel_size=(3, 3), stride=(1, 1), padding=(1, 1)),
            nn.ReLU(),
            nn.MaxPool2d(kernel_size=(2, 2), stride=(2, 2))
        )
        # 卷积块4
        self.block4 = nn.Sequential(
            nn.Conv2d(256, 512, kernel_size=(3, 3), stride=(1, 1), padding=(1, 1)),
            nn.ReLU(),
            nn.Conv2d(512, 512, kernel_size=(3, 3), stride=(1, 1), padding=(1, 1)),
            nn.ReLU(),
            nn.Conv2d(512, 512, kernel_size=(3, 3), stride=(1, 1), padding=(1, 1)),
            nn.ReLU(),
            nn.MaxPool2d(kernel_size=(2, 2), stride=(2, 2))
        )
        # 卷积块5
        self.block5 = nn.Sequential(
            nn.Conv2d(512, 512, kernel_size=(3, 3), stride=(1, 1), padding=(1, 1)),
            nn.ReLU(),
            nn.Conv2d(512, 512, kernel_size=(3, 3), stride=(1, 1), padding=(1, 1)),
            nn.ReLU(),
            nn.Conv2d(512, 512, kernel_size=(3, 3), stride=(1, 1), padding=(1, 1)),
            nn.ReLU(),
            nn.MaxPool2d(kernel_size=(2, 2), stride=(2, 2))
        )

        # 全连接网络层,用于分类
        self.classifier = nn.Sequential(
            nn.Linear(in_features=512*7*7, out_features=4096),
            nn.ReLU(),
            nn.Linear(in_features=4096, out_features=4096),
            nn.ReLU(),
            nn.Linear(in_features=4096, out_features=3)
        )

    def forward(self, x):
        x = self.block1(x)
        x = self.block2(x)
        x = self.block3(x)
        x = self.block4(x)
        x = self.block5(x)
        x = torch.flatten(x, start_dim=1)
        x = self.classifier(x)
        return x


# 检查是否支持 MPS 后端
if torch.backends.mps.is_available():
    device = torch.device("mps")  # 使用 Metal 后端加速
    print("Using MPS device for acceleration")
else:
    device = torch.device("cuda" if torch.cuda.is_available() else "cpu")
    print(f"Using {device} device")

# 将模型加载到指定设备
model = vgg16().to(device)
print("Model loaded to:", device)
model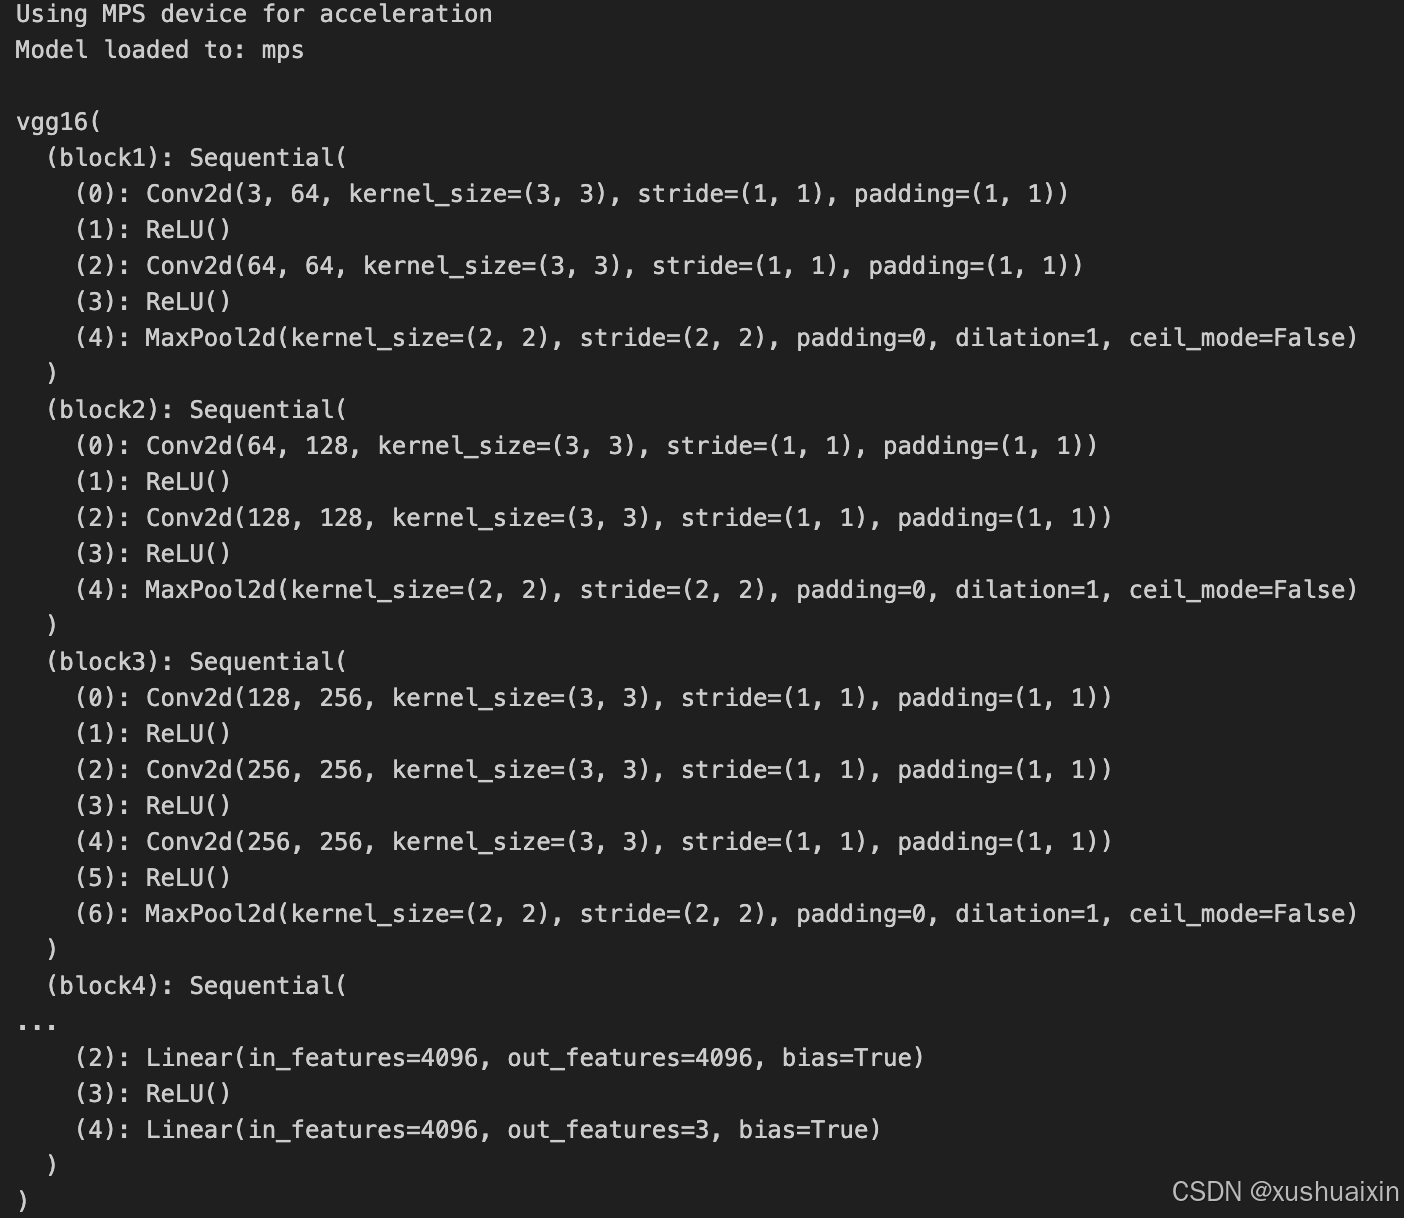
2. 查看模型详情
python
from torchsummary import summary

# 检查设备
device = torch.device("mps") if torch.backends.mps.is_available() else torch.device("cpu")

# 初始化模型并加载到 MPS
model = vgg16().to(device)

# 将模型移到 CPU 以使用 torchsummary
model_cpu = model.to("cpu")
summary(model_cpu, (3, 224, 224), device="cpu")

# 完成后将模型移回 MPS
model = model.to(device)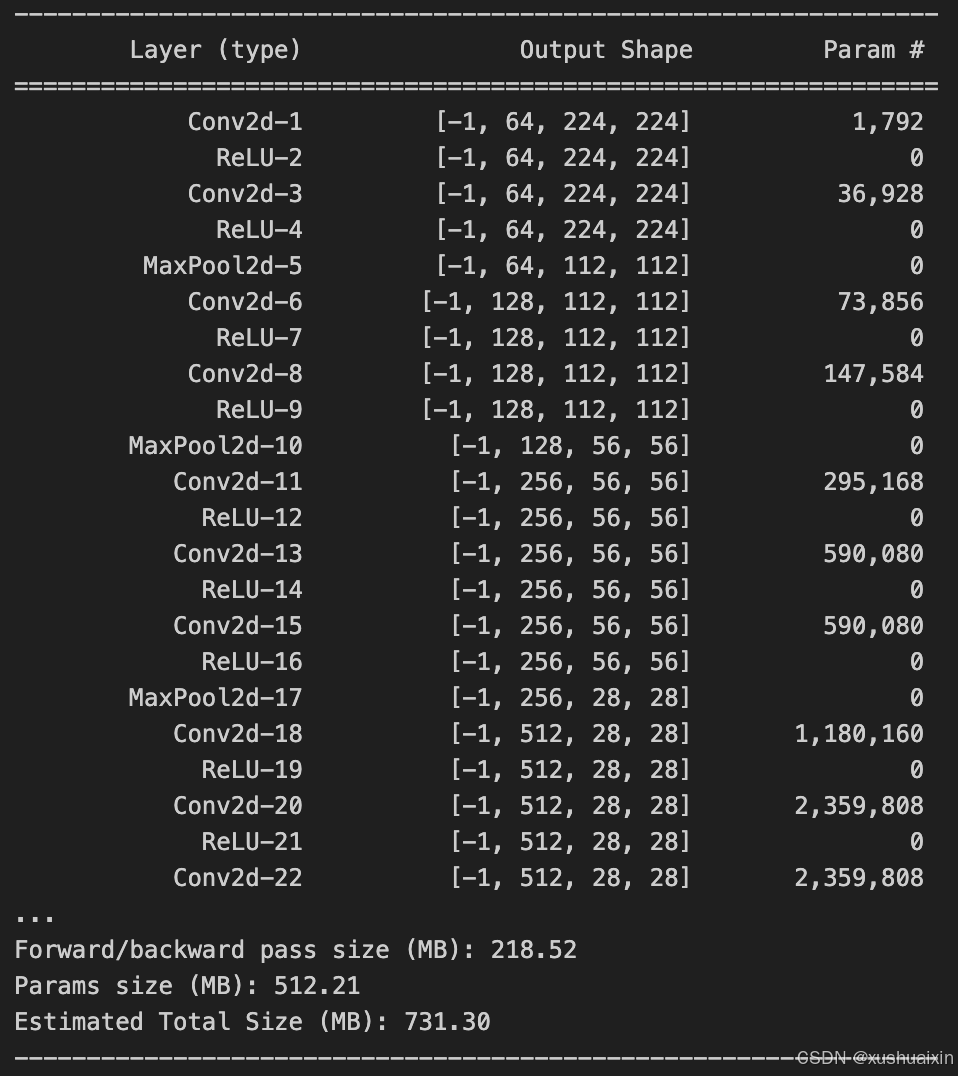
三、 训练模型
1. 编写训练函数
python
# 训练循环
def train(dataloader, model, loss_fn, optimizer):
    size = len(dataloader.dataset)  # 训练集的大小
    num_batches = len(dataloader)   # 批次数目, (size/batch_size,向上取整)

    train_loss, train_acc = 0, 0  # 初始化训练损失和正确率


    for X, y in dataloader:  # 获取图片及其标签
        X, y = X.to(device), y.to(device)


        # 计算预测误差
        pred = model(X)          # 网络输出
        loss = loss_fn(pred, y)  # 计算网络输出和真实值之间的差距,targets为真实值,计算二者差值即为损失


        # 反向传播
        optimizer.zero_grad()  # grad属性归零
        loss.backward()        # 反向传播
        optimizer.step()       # 每一步自动更新


        # 记录acc与loss
        train_acc  += (pred.argmax(1) == y).type(torch.float).sum().item()
        train_loss += loss.item()


    train_acc  /= size
    train_loss /= num_batches

    return train_acc, train_loss
3. 编写测试函数
测试函数和训练函数大致相同,但是由于不进行梯度下降对网络权重进行更新,所以不需要传入优化器
python
def test (dataloader, model, loss_fn):
    size        = len(dataloader.dataset)  # 测试集的大小
    num_batches = len(dataloader)          # 批次数目, (size/batch_size,向上取整)
    test_loss, test_acc = 0, 0


    # 当不进行训练时,停止梯度更新,节省计算内存消耗
    with torch.no_grad():
        for imgs, target in dataloader:
            imgs, target = imgs.to(device), target.to(device)


            # 计算loss
            target_pred = model(imgs)
            loss        = loss_fn(target_pred, target)


            test_loss += loss.item()
            test_acc  += (target_pred.argmax(1) == target).type(torch.float).sum().item()

    test_acc  /= size
    test_loss /= num_batches

    return test_acc, test_loss
4. 正式训练
model.train()、model.eval()训练营往期文章中有详细的介绍。
📌如果将优化器换成 SGD 会发生什么呢?请自行探索接下来发生的诡异事件的原因。
python
import copy

optimizer  = torch.optim.Adam(model.parameters(), lr= 1e-4)
loss_fn    = nn.CrossEntropyLoss() # 创建损失函数

epochs     = 40

train_loss = []
train_acc  = []
test_loss  = []
test_acc   = []

best_acc = 0    # 设置一个最佳准确率,作为最佳模型的判别指标

for epoch in range(epochs):


    model.train()
    epoch_train_acc, epoch_train_loss = train(train_dl, model, loss_fn, optimizer)


    model.eval()
    epoch_test_acc, epoch_test_loss = test(test_dl, model, loss_fn)


    # 保存最佳模型到 best_model
    if epoch_test_acc > best_acc:
        best_acc   = epoch_test_acc
        best_model = copy.deepcopy(model)


    train_acc.append(epoch_train_acc)
    train_loss.append(epoch_train_loss)
    test_acc.append(epoch_test_acc)
    test_loss.append(epoch_test_loss)


    # 获取当前的学习率
    lr = optimizer.state_dict()['param_groups'][0]['lr']


    template = ('Epoch:{:2d}, Train_acc:{:.1f}%, Train_loss:{:.3f}, Test_acc:{:.1f}%, Test_loss:{:.3f}, Lr:{:.2E}')
    print(template.format(epoch+1, epoch_train_acc*100, epoch_train_loss,
                          epoch_test_acc*100, epoch_test_loss, lr))


# 保存最佳模型到文件中
PATH = './best_model.pth'  # 保存的参数文件名
torch.save(model.state_dict(), PATH)

print('Done')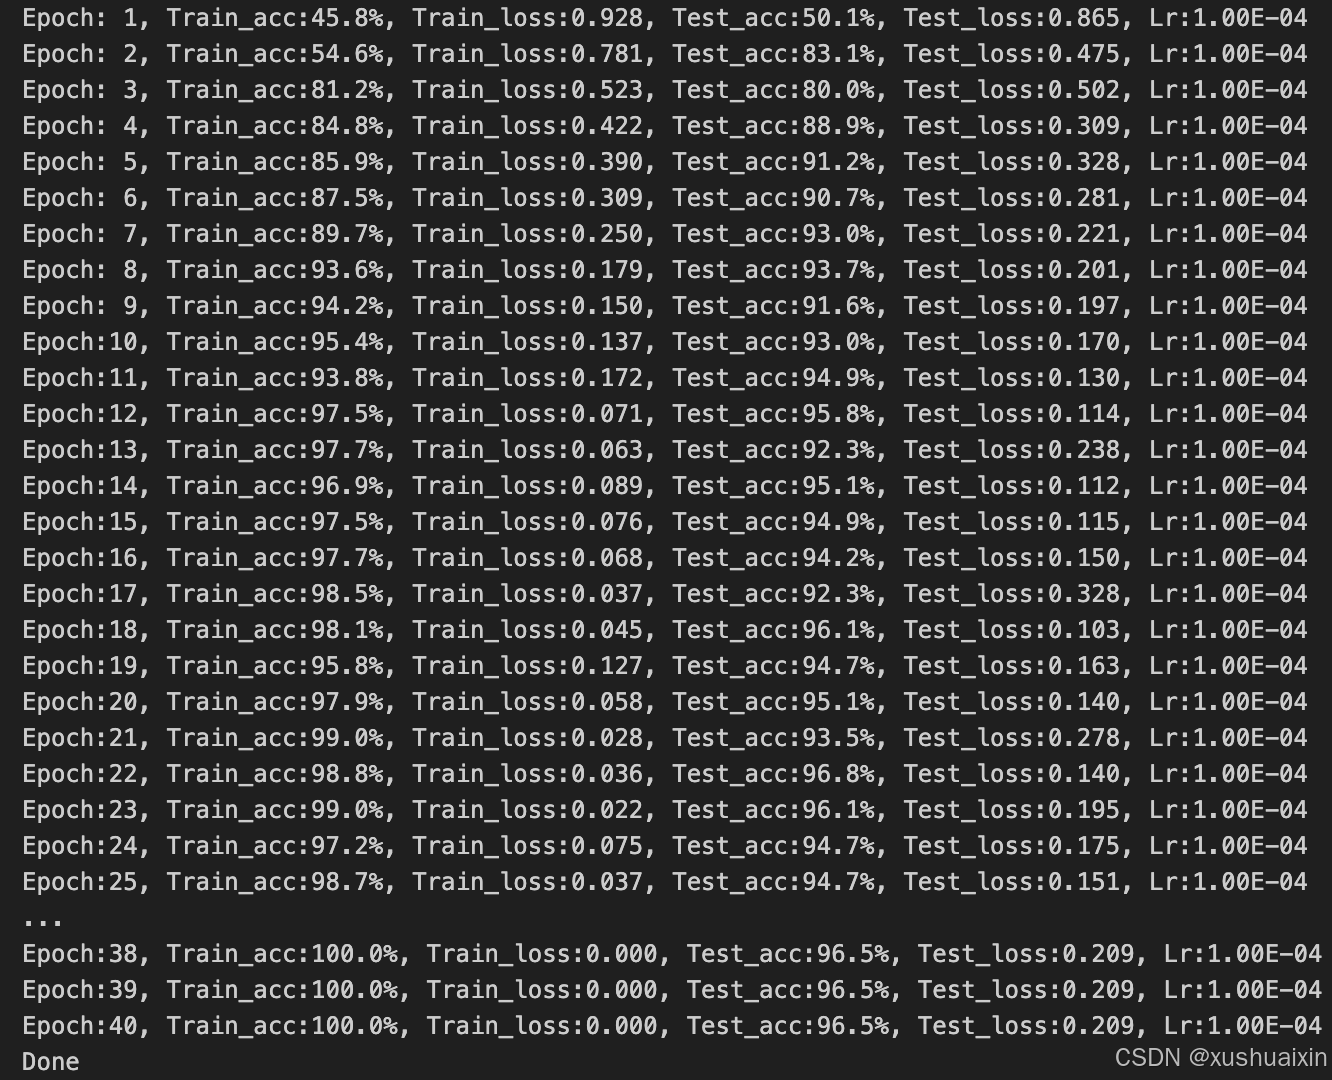
四、 结果可视化
1. Loss与Accuracy图
python
import matplotlib.pyplot as plt
#隐藏警告
import warnings
warnings.filterwarnings("ignore")               #忽略警告信息
plt.rcParams['font.sans-serif']    = ['SimHei'] # 用来正常显示中文标签
plt.rcParams['axes.unicode_minus'] = False      # 用来正常显示负号
plt.rcParams['figure.dpi']         = 100        #分辨率

epochs_range = range(epochs)

plt.figure(figsize=(12, 3))
plt.subplot(1, 2, 1)

plt.plot(epochs_range, train_acc, label='Training Accuracy')
plt.plot(epochs_range, test_acc, label='Test Accuracy')
plt.legend(loc='lower right')
plt.title('Training and Validation Accuracy')

plt.subplot(1, 2, 2)
plt.plot(epochs_range, train_loss, label='Training Loss')
plt.plot(epochs_range, test_loss, label='Test Loss')
plt.legend(loc='upper right')
plt.title('Training and Validation Loss')
plt.show()
2. 指定图片进行预测
python
from PIL import Image

classes = list(total_data.class_to_idx)

def predict_one_image(image_path, model, transform, classes):


    test_img = Image.open(image_path).convert('RGB')
    plt.imshow(test_img)  # 展示预测的图片

    test_img = transform(test_img)
    img = test_img.to(device).unsqueeze(0)


    model.eval()
    output = model(img)

    _,pred = torch.max(output,1)
    pred_class = classes[pred]
    print(f'预测结果是:{pred_class}')
python
# 预测训练集中的某张照片
predict_one_image(image_path='./PotatoPlants/Early_blight/1.JPG',
                  model=model,
                  transform=train_transforms,
                  classes=classes)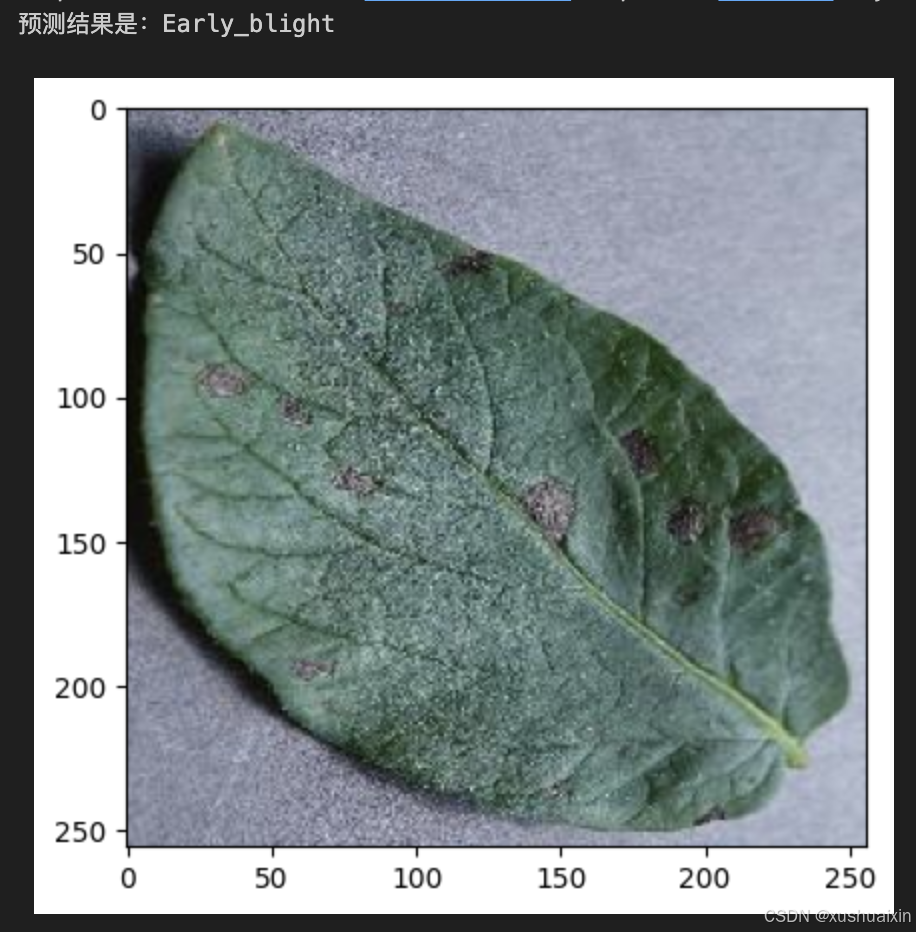
3. 模型评估
python
best_model.eval()
epoch_test_acc, epoch_test_loss = test(test_dl, best_model, loss_fn)
epoch_test_acc, epoch_test_loss
五、调用官方的VGG-16网络框架、如何查看模型的参数量以及相关指标【使用torchvision.models以及torchsummary】
python
import torch
import torchvision.models as models
from torchsummary import summary

# 检查设备
device = torch.device("mps") if torch.backends.mps.is_available() else torch.device("cpu")
print(f"Using device: {device}")

# 加载官方 VGG-16 模型
# `pretrained=True` 表示加载在 ImageNet 上预训练的权重,改为 False 则为随机初始化
model = models.vgg16(pretrained=False).to(device)

# 将模型移到 CPU 以使用 torchsummary
model_cpu = model.to("cpu")
summary(model_cpu, (3, 224, 224), device="cpu")

# 完成后将模型移回原设备
model = model.to(device)
六、优化模型
数据预处理与加载
python
# 数据增强和标准化
train_transforms = transforms.Compose([
    transforms.RandomResizedCrop(224),  # 随机裁剪到指定大小
    transforms.RandomHorizontalFlip(), # 随机水平翻转,增强鲁棒性
    transforms.ToTensor(),
    transforms.Normalize(
        mean=[0.485, 0.456, 0.406],
        std=[0.229, 0.224, 0.225]
    )
])

test_transforms = transforms.Compose([
    transforms.Resize(256),
    transforms.CenterCrop(224),        # 中心裁剪到 224x224
    transforms.ToTensor(),
    transforms.Normalize(
        mean=[0.485, 0.456, 0.406],
        std=[0.229, 0.224, 0.225]
    )
])

# 数据加载
total_data = datasets.ImageFolder("./PotatoPlants/", transform=train_transforms)

print(f"Class-to-Index Mapping: {total_data.class_to_idx}")- 增加数据增强 :
- 在训练集上添加随机裁剪和翻转,提升模型的泛化能力。
- 精细化测试集预处理 :
- 测试集使用中心裁剪,保证评估时一致性。
- 增强输出信息 :
- 输出类别到索引的映射信息,便于调试。
VGG16 模型定义
python
from torchvision.models import vgg16

# 加载预定义的 VGG16 模型
model = vgg16(pretrained=False)
model.classifier[6] = nn.Linear(4096, 3)  # 修改最后一层为 3 类输出
model = model.to(device)

print(f"Model loaded to: {device}")- 使用官方 VGG16 :
- 使用
torchvision.models提供的标准 VGG16,提高模型可靠性。
- 使用
- 定制最后一层 :
- 修改全连接层的输出大小为 3,适配当前分类任务。
优化超参数
python
import copy

# 优化器参数调整
learning_rate = 3e-4  # 提高初始学习率
weight_decay = 1e-5   # 添加 L2 正则化,防止过拟合

optimizer = torch.optim.Adam(model.parameters(), lr=learning_rate, weight_decay=weight_decay)

# 损失函数保持不变
loss_fn = nn.CrossEntropyLoss()

# 调整训练轮次和提前停止机制
epochs = 100  # 增加训练轮次
patience = 10  # 提前停止,当验证集准确率不再提升时停止训练
no_improve_epochs = 0

# 记录最佳模型
best_acc = 0
best_model = None

for epoch in range(epochs):
    # 调整学习率调度器(余弦退火调度器)
    lr_scheduler = torch.optim.lr_scheduler.CosineAnnealingLR(optimizer, T_max=epochs)

    # 训练和测试
    train_acc, train_loss = train(train_dl, model, loss_fn, optimizer)
    test_acc, test_loss = test(test_dl, model, loss_fn)

    # 检查是否是最佳准确率
    if test_acc > best_acc:
        best_acc = test_acc
        best_model = copy.deepcopy(model)
        no_improve_epochs = 0  # 重置提前停止计数
    else:
        no_improve_epochs += 1

    # 更新学习率
    lr_scheduler.step()

    # 打印日志
    print(f"Epoch {epoch+1}: "
          f"Train Acc: {train_acc*100:.2f}%, Train Loss: {train_loss:.4f}, "
          f"Test Acc: {test_acc*100:.2f}%, Test Loss: {test_loss:.4f}, "
          f"Learning Rate: {optimizer.param_groups[0]['lr']:.6f}")

    # 提前停止
    if no_improve_epochs >= patience:
        print(f"Early stopping at epoch {epoch+1}. Best Test Accuracy: {best_acc*100:.2f}%")
        break

# 保存最佳模型
torch.save(best_model.state_dict(), './best_model.pth')
print("Training complete. Best model saved.")
1. 学习率调整
- 将学习率从
1e-4增加到3e-4,帮助更快收敛。也可以尝试1e-3。 - 使用 余弦退火调度器 (
CosineAnnealingLR),动态调整学习率,使得后期优化更稳定。
2. 正则化
- 添加
weight_decay=1e-5(L2 正则化)到优化器中,限制权重过大,减少过拟合风险。
3. 训练轮次
- 将
epochs从40提高到100,确保模型有足够时间学习。 - 增加了 提前停止 (early stopping),避免浪费计算资源。如果验证集准确率在连续
10个 epoch 没有提升,训练提前结束。
4. 学习率调度器
CosineAnnealingLR在训练过程中动态调整学习率,前期快速下降,后期缓慢收敛,提高最终模型的效果。
5. 日志改进
- 在打印中添加当前学习率,便于跟踪学习率变化。
七、在不影响准确率的前提下轻量化模型
方法 1:减少全连接层的参数
VGG-16 的全连接层占了大部分参数(超过 90%)。我们可以通过以下方法减少参数量:
- 减小全连接层的单元数量。
- 去掉全连接层,改用全局平均池化(Global Average Pooling, GAP)。
python
from torchvision.models import vgg16
import torch.nn as nn

# 加载预定义的 VGG16 模型
model = vgg16(pretrained=False)

# 替换全连接层
model.classifier = nn.Sequential(
    nn.Linear(512 * 7 * 7, 1024),  # 从 4096 缩减到 1024
    nn.ReLU(),
    nn.Dropout(0.5),
    nn.Linear(1024, 256),  # 第二层从 4096 缩减到 256
    nn.ReLU(),
    nn.Dropout(0.5),
    nn.Linear(256, 3)  # 输出层保持不变
)
方法 2:引入深度可分离卷积
将标准卷积替换为深度可分离卷积(Depthwise Separable Convolution),减少参数量和计算量,同时保持模型性能。
python
import torch.nn as nn

class DepthwiseSeparableConv(nn.Module):
    def __init__(self, in_channels, out_channels, kernel_size, stride=1, padding=0):
        super(DepthwiseSeparableConv, self).__init__()
        self.depthwise = nn.Conv2d(
            in_channels, in_channels, kernel_size=kernel_size, stride=stride, padding=padding, groups=in_channels
        )
        self.pointwise = nn.Conv2d(in_channels, out_channels, kernel_size=1)

    def forward(self, x):
        x = self.depthwise(x)
        x = self.pointwise(x)
        return x

# 替换 VGG-16 的卷积层为深度可分离卷积
class LightweightVGG16(nn.Module):
    def __init__(self):
        super(LightweightVGG16, self).__init__()
        self.features = nn.Sequential(
            DepthwiseSeparableConv(3, 64, kernel_size=3, stride=1, padding=1),
            nn.ReLU(),
            DepthwiseSeparableConv(64, 64, kernel_size=3, stride=1, padding=1),
            nn.ReLU(),
            nn.MaxPool2d(kernel_size=2, stride=2),
            DepthwiseSeparableConv(64, 128, kernel_size=3, stride=1, padding=1),
            nn.ReLU(),
            DepthwiseSeparableConv(128, 128, kernel_size=3, stride=1, padding=1),
            nn.ReLU(),
            nn.MaxPool2d(kernel_size=2, stride=2),
            # 继续添加其他层
        )
        self.classifier = nn.Sequential(
            nn.Linear(512 * 7 * 7, 1024),
            nn.ReLU(),
            nn.Dropout(0.5),
            nn.Linear(1024, 256),
            nn.ReLU(),
            nn.Dropout(0.5),
            nn.Linear(256, 3)
        )

    def forward(self, x):
        x = self.features(x)
        x = torch.flatten(x, 1)
        x = self.classifier(x)
        return x
方法 3:使用剪枝(Pruning)
剪枝可以通过删除冗余的神经元或通道来减少模型大小,同时保持性能。
python
from torch.nn.utils import prune

# 对卷积层和全连接层进行剪枝
def prune_model(model, amount=0.3):
    for name, module in model.named_modules():
        if isinstance(module, nn.Conv2d) or isinstance(module, nn.Linear):
            prune.l1_unstructured(module, name="weight", amount=amount)
    return model

# 加载 VGG-16 模型
model = vgg16(pretrained=False)
model.classifier[6] = nn.Linear(4096, 3)  # 调整最后一层
model = prune_model(model, amount=0.3)
方法 4:量化(Quantization)
将浮点权重(32 位)量化为 8 位整数,显著减少模型的存储需求和计算量。
python
import torch.quantization

# 模型静态量化
model = vgg16(pretrained=False)
model.classifier[6] = nn.Linear(4096, 3)  # 调整最后一层
model.qconfig = torch.quantization.get_default_qconfig('fbgemm')
torch.quantization.prepare(model, inplace=True)
torch.quantization.convert(model, inplace=True)
方法 5:知识蒸馏(Knowledge Distillation)
使用一个较大的 VGG-16 模型作为教师模型,训练一个较小的学生模型。
python
class StudentModel(nn.Module):
    def __init__(self):
        super(StudentModel, self).__init__()
        self.features = nn.Sequential(
            nn.Conv2d(3, 32, kernel_size=3, stride=1, padding=1),
            nn.ReLU(),
            nn.MaxPool2d(kernel_size=2, stride=2),
            nn.Conv2d(32, 64, kernel_size=3, stride=1, padding=1),
            nn.ReLU(),
            nn.MaxPool2d(kernel_size=2, stride=2),
        )
        self.classifier = nn.Sequential(
            nn.Linear(64 * 56 * 56, 256),
            nn.ReLU(),
            nn.Linear(256, 3)
        )

    def forward(self, x):
        x = self.features(x)
        x = torch.flatten(x, 1)
        x = self.classifier(x)
        return x

# 蒸馏过程
teacher_model = vgg16(pretrained=True)
student_model = StudentModel()
# 使用交叉熵 + KL 散度进行蒸馏
对比
| 方法 | 参数量减少 | 优点 | 缺点 |
|---|---|---|---|
| 减少全连接层 | 大幅减少 | 易于实现,对准确率影响较小 | 可能稍微降低表达能力 |
| 深度可分离卷积 | 中等减少 | 显著减少计算量,对准确率影响较小 | 需替换所有卷积层 |
| 剪枝 | 根据需求减少 | 不改变结构,对性能影响小 | 剪枝率需调优 |
| 量化 | 大幅减少 | 存储效率高,对推理速度影响大 | 训练可能较复杂 |
| 知识蒸馏 | 可灵活调整 | 小模型高效,适合嵌入式设备 | 需额外训练教师模型 |
八、个人学习总结
首先,通过手动搭建VGG-16网络框架,我深入理解了卷积神经网络的构造原理。VGG-16的模块化设计让我明白了深度网络的构造并不复杂,只要按照合理的层叠规则,结合激活函数、池化操作等,就能有效提取图像的特征。手动实现的过程中,我熟悉了PyTorch的nn.Module以及各类层的使用方法,这种从零开始搭建的方式让我真正理解了每一层的作用。比如,在实现第一个卷积块时,我理解了小尺寸卷积核(3x3)在捕捉局部特征方面的优势。
其次,通过调用官方的VGG-16网络框架,我学会了如何快速使用预定义模型并进行定制化。具体来说,我尝试了将VGG-16的全连接层调整为适配我使用的马铃薯病害数据集的3分类输出,并验证了迁移学习在特定任务中的高效性。这让我认识到在实际项目中,与其从头开始训练一个模型,不如充分利用已经在大型数据集(如ImageNet)上预训练的模型,从而节省时间和计算资源。
在模型训练与优化方面,我深刻体会到学习率和正则化的重要性。例如,尝试将学习率从1e-4提升到3e-4并结合余弦退火调度器时,我观察到模型的收敛速度明显加快。同时,添加weight_decay作为L2正则化后,模型的泛化能力得到了提升,这让我理解了过拟合问题的解决思路。此外,我还实践了提前停止(early stopping),避免了不必要的计算浪费,并学会了如何在训练过程中保存最佳模型,这些都是非常实用的经验。
轻量化模型的探索是本次学习的一个亮点。通过减少全连接层的参数、引入深度可分离卷积、剪枝、量化以及知识蒸馏等方法,我了解到在不影响模型性能的前提下,如何显著减少参数量和计算量。这种思路对于部署在嵌入式设备上的模型尤其重要,比如使用深度可分离卷积替代标准卷积时,模型计算量减少的同时,分类准确率几乎没有下降。此外,尝试剪枝和量化让我对模型压缩技术的实际效果有了直观感受,也认识到这些技术在实际应用中的潜力和局限性。