Django部署
一、今日学习内容概述
| 学习模块 | 重要程度 | 主要内容 |
|---|---|---|
| 生产环境配置 | ⭐⭐⭐⭐⭐ | settings配置、环境变量 |
| WSGI服务器 | ⭐⭐⭐⭐⭐ | Gunicorn配置、性能优化 |
| Nginx配置 | ⭐⭐⭐⭐ | 反向代理、静态文件 |
| 安全设置 | ⭐⭐⭐⭐⭐ | SSL证书、安全选项 |
二、生产环境配置
2.1 项目结构调整
plaintext
myproject/
├── config/
│   ├── __init__.py
│   ├── settings/
│   │   ├── __init__.py
│   │   ├── base.py
│   │   ├── development.py
│   │   └── production.py
│   ├── urls.py
│   └── wsgi.py
├── requirements/
│   ├── base.txt
│   ├── development.txt
│   └── production.txt
└── manage.py
2.2 生产环境设置
python
# config/settings/base.py
import os
from pathlib import Path

BASE_DIR = Path(__file__).resolve().parent.parent.parent

ALLOWED_HOSTS = []

INSTALLED_APPS = [
    'django.contrib.admin',
    'django.contrib.auth',
    'django.contrib.contenttypes',
    'django.contrib.sessions',
    'django.contrib.messages',
    'django.contrib.staticfiles',
    # 自定义应用
    'myapp',
]

MIDDLEWARE = [
    'django.middleware.security.SecurityMiddleware',
    'django.contrib.sessions.middleware.SessionMiddleware',
    'django.middleware.common.CommonMiddleware',
    'django.middleware.csrf.CsrfViewMiddleware',
    'django.contrib.auth.middleware.AuthenticationMiddleware',
    'django.contrib.messages.middleware.MessageMiddleware',
    'django.middleware.clickjacking.XFrameOptionsMiddleware',
]

# config/settings/production.py
from .base import *
from decouple import config

DEBUG = False

ALLOWED_HOSTS = [
    'example.com',
    'www.example.com',
]

# 数据库配置
DATABASES = {
    'default': {
        'ENGINE': 'django.db.backends.postgresql',
        'NAME': config('DB_NAME'),
        'USER': config('DB_USER'),
        'PASSWORD': config('DB_PASSWORD'),
        'HOST': config('DB_HOST'),
        'PORT': config('DB_PORT', default='5432'),
    }
}

# 静态文件配置
STATIC_ROOT = os.path.join(BASE_DIR, 'staticfiles')
STATIC_URL = '/static/'

# 媒体文件配置
MEDIA_ROOT = os.path.join(BASE_DIR, 'media')
MEDIA_URL = '/media/'

# 安全设置
SECURE_SSL_REDIRECT = True
SECURE_PROXY_SSL_HEADER = ('HTTP_X_FORWARDED_PROTO', 'https')
SESSION_COOKIE_SECURE = True
CSRF_COOKIE_SECURE = True

# 缓存配置
CACHES = {
    'default': {
        'BACKEND': 'django.core.cache.backends.redis.RedisCache',
        'LOCATION': config('REDIS_URL'),
    }
}

# 电子邮件配置
EMAIL_BACKEND = 'django.core.mail.backends.smtp.EmailBackend'
EMAIL_HOST = config('EMAIL_HOST')
EMAIL_PORT = config('EMAIL_PORT', default=587, cast=int)
EMAIL_HOST_USER = config('EMAIL_HOST_USER')
EMAIL_HOST_PASSWORD = config('EMAIL_HOST_PASSWORD')
EMAIL_USE_TLS = True
2.3 环境变量配置
ini
# .env
SECRET_KEY=your-secret-key
DB_NAME=myproject
DB_USER=dbuser
DB_PASSWORD=dbpassword
DB_HOST=localhost
DB_PORT=5432
REDIS_URL=redis://localhost:6379/1
EMAIL_HOST=smtp.gmail.com
EMAIL_PORT=587
EMAIL_HOST_USER=your-email@gmail.com
EMAIL_HOST_PASSWORD=your-email-password
三、WSGI服务器配置
3.1 Gunicorn配置
python
# gunicorn_config.py
import multiprocessing

# 绑定IP和端口
bind = "127.0.0.1:8000"

# 工作进程数
workers = multiprocessing.cpu_count() * 2 + 1

# 工作模式
worker_class = "gevent"

# 最大客户端并发数量
worker_connections = 1000

# 进程名称
proc_name = "myproject"

# 超时时间
timeout = 30

# 访问日志路径
accesslog = "/var/log/gunicorn/access.log"

# 错误日志路径
errorlog = "/var/log/gunicorn/error.log"

# 日志级别
loglevel = "info"

# 后台运行
daemon = True

# PID文件路径
pidfile = "/var/run/gunicorn.pid"
3.2 Supervisor配置
ini
# /etc/supervisor/conf.d/myproject.conf
[program:myproject]
command=/path/to/venv/bin/gunicorn -c /path/to/gunicorn_config.py config.wsgi:application
directory=/path/to/myproject
user=www-data
autostart=true
autorestart=true
redirect_stderr=true
stdout_logfile=/var/log/supervisor/myproject.log
四、Nginx配置
nginx
# /etc/nginx/sites-available/myproject
upstream app_server {
    server 127.0.0.1:8000 fail_timeout=0;
}

server {
    listen 80;
    server_name example.com www.example.com;

    # 强制HTTPS
    return 301 https://$server_name$request_uri;
}

server {
    listen 443 ssl;
    server_name example.com www.example.com;

    ssl_certificate /path/to/ssl/certificate.crt;
    ssl_certificate_key /path/to/ssl/private.key;

    # SSL配置
    ssl_protocols TLSv1.2 TLSv1.3;
    ssl_ciphers HIGH:!aNULL:!MD5;
    ssl_prefer_server_ciphers on;
    ssl_session_cache shared:SSL:10m;
    ssl_session_timeout 10m;

    # 客户端上传文件大小限制
    client_max_body_size 10M;

    # 静态文件
    location /static/ {
        alias /path/to/myproject/staticfiles/;
        expires 30d;
        add_header Cache-Control "public, no-transform";
    }

    # 媒体文件
    location /media/ {
        alias /path/to/myproject/media/;
        expires 30d;
        add_header Cache-Control "public, no-transform";
    }

    # 代理设置
    location / {
        proxy_set_header X-Forwarded-For $proxy_add_x_forwarded_for;
        proxy_set_header X-Forwarded-Proto $scheme;
        proxy_set_header Host $http_host;
        proxy_redirect off;
        proxy_pass http://app_server;
    }
}
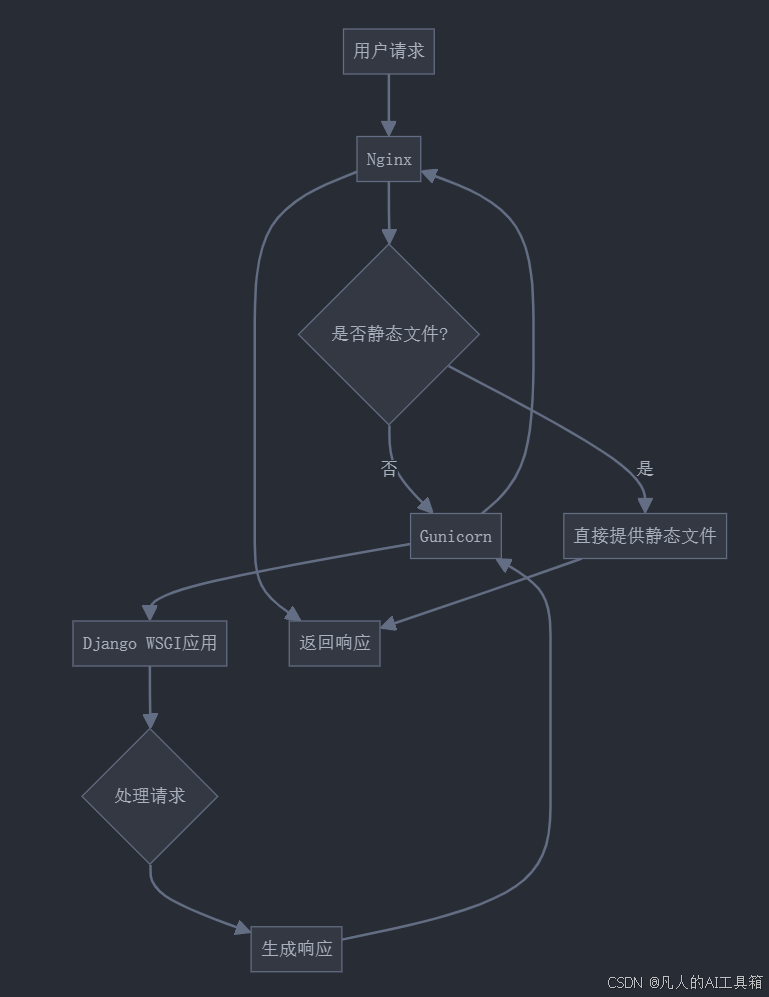
五、部署流程图

六、部署检查清单
6.1 部署前检查
python
# manage.py check --deploy
from django.core.management.commands.check import Command as BaseCommand

class Command(BaseCommand):
    def handle(self, *args, **options):
        options['deploy'] = True
        return super().handle(*args, **options)
6.2 静态文件收集
bash
# 收集静态文件
python manage.py collectstatic --noinput

# 压缩静态文件
python manage.py compress --force
6.3 数据库迁移
bash
# 生成数据库迁移文件
python manage.py makemigrations

# 应用迁移
python manage.py migrate
七、监控和日志
7.1 日志配置
python
# config/settings/production.py
LOGGING = {
    'version': 1,
    'disable_existing_loggers': False,
    'formatters': {
        'verbose': {
            'format': '{levelname} {asctime} {module} {process:d} {thread:d} {message}',
            'style': '{',
        },
    },
    'handlers': {
        'file': {
            'level': 'ERROR',
            'class': 'logging.FileHandler',
            'filename': '/var/log/django/error.log',
            'formatter': 'verbose',
        },
        'mail_admins': {
            'level': 'ERROR',
            'class': 'django.utils.log.AdminEmailHandler',
        },
    },
    'loggers': {
        'django': {
            'handlers': ['file'],
            'level': 'ERROR',
            'propagate': True,
        },
        'django.request': {
            'handlers': ['mail_admins'],
            'level': 'ERROR',
            'propagate': False,
        },
    },
}
八、性能优化建议
-
数据库优化
- 使用数据库连接池
- 配置适当的数据库缓存
- 优化查询性能
-
缓存策略
- 使用Redis缓存
- 实现页面缓存
- 配置会话缓存
-
静态文件处理
- 使用CDN
- 开启Gzip压缩
- 设置适当的缓存头
-
安全措施
- 配置SSL证书
- 设置安全头部
- 实现跨站请求伪造保护
怎么样今天的内容还满意吗?再次感谢朋友们的观看,关注GZH:凡人的AI工具箱,回复666,送您价值199的AI大礼包。最后,祝您早日实现财务自由,还请给个赞,谢谢!