✨个人主页:熬夜学编程的小林
💗系列专栏: 【C语言详解】 【数据结构详解】【C++详解】【Linux系统编程】【MySQL】
目录
[1. 卸载不要的环境](#1. 卸载不要的环境)
[2. 检查系统安装包](#2. 检查系统安装包)
[3. 卸载这些默认安装包](#3. 卸载这些默认安装包)
[4. 获取mysql官方yum源](#4. 获取mysql官方yum源)
[5. 安装mysql yum 源,对比前后yum源](#5. 安装mysql yum 源,对比前后yum源)
[6. 看看能不能正常工作](#6. 看看能不能正常工作)
[7. 安装mysql服务](#7. 安装mysql服务)
[8. 查看配置文件和数据存储位置](#8. 查看配置文件和数据存储位置)
[9. 启动服务和查看启动服务](#9. 启动服务和查看启动服务)
[10. 登陆](#10. 登陆)
[10. 1 登陆方法一【不行就下⼀个】](#10. 1 登陆方法一【不行就下⼀个】)
[10.2. 登陆方法二【不行就下一个】](#10.2. 登陆方法二【不行就下一个】)
[10.3. 登陆方式三【应该行了吧】](#10.3. 登陆方式三【应该行了吧】)
[12. 设置开机启动可以不设](#12. 设置开机启动[可以不设])
[13. 配置my.cnf](#13. 配置my.cnf)
说明:
• 安装与卸载中,用户全部切换成为root ,⼀旦安装,普通用户能使用。
• 初期练习,mysql不进行用户管理,全部使用root进行,尽快适应mysql语句,后面学了用户管理,在考虑新建普通用户。
1. 卸载不要的环境
命令代码
[jkl@host mysql]$ ps ajx |grep mariadb # 先检查是否有mariadb存在
14311 14510 14509 14311 pts/1    14509 S+    1003   0:00 grep --color=auto mariadb
[jkl@host mysql]$ ps ajx | grep mysql
14311 14625 14624 14311 pts/1    14624 S+    1003   0:00 grep --color=auto mysql
运行结果

2. 检查系统安装包
命令代码
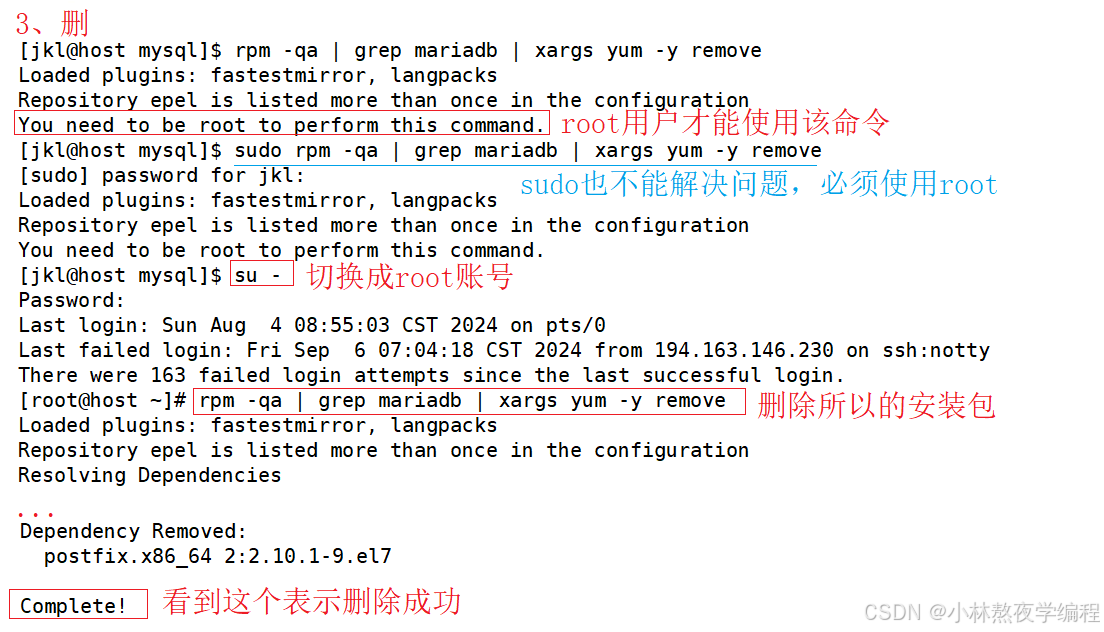
[jkl@host mysql]$ rpm -qa | grep mariadb
mariadb-libs-5.5.68-1.el7.x86_64
[jkl@host mysql]$ rpm -qa | grep mysql
运行结果

3. 卸载这些默认安装包
命令代码
[jkl@host mysql]$ rpm -qa | grep mariadb | xargs yum -y remove
Loaded plugins: fastestmirror, langpacks
Repository epel is listed more than once in the configuration
You need to be root to perform this command. # 普通用户不能卸载
[jkl@host mysql]$ su -
Password:
Last login: Sun Aug  4 08:55:03 CST 2024 on pts/0
Last failed login: Fri Sep  6 07:04:18 CST 2024 from 194.163.146.230 on ssh:notty
There were 163 failed login attempts since the last successful login.
[root@host ~]# rpm -qa | grep mariadb | xargs yum -y remove
...
Complete!
运行结果
4. 获取mysql官方yum源
查看系统版本
命令代码
[root@host ~]# cat /etc/redhat-release
CentOS Linux release 7.6.1810 (Core) 
 将文件导入Linux中
建议先将文件保存到桌面
命令代码
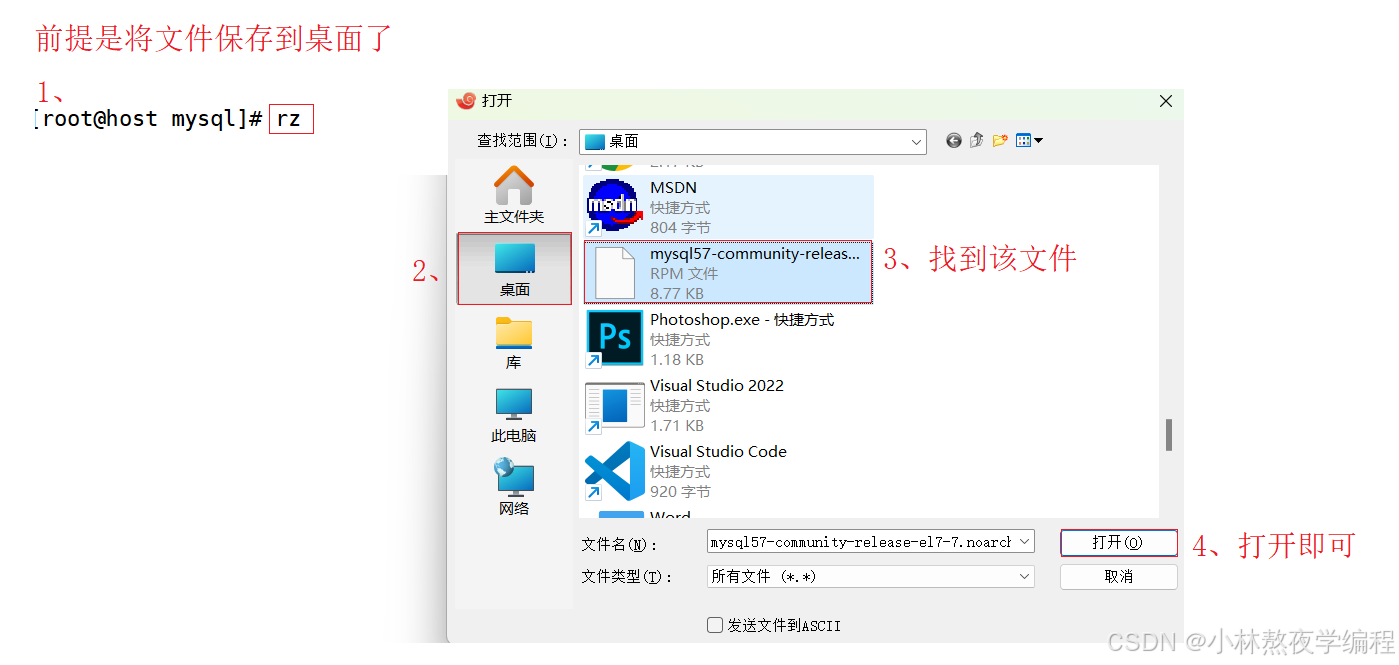
[root@host mysql]# rz

[root@host mysql]# ll
total 12
-rw-r--r-- 1 root root 8984 Sep  6 09:41 mysql57-community-release-el7-7.noarch.rpm
图片演示

5. 安装mysql yum 源,对比前后yum源
安装yum 源之前
命令代码
[root@host mysql]# ls /etc/yum.repos.d -l
total 16
-rw-r--r-- 1 root root  614 Apr 11 18:38 CentOS-Base.repo
-rw-r--r-- 1 root root  230 Apr 11 18:38 CentOS-Epel.repo
-rw-r--r-- 1 root root 1358 Sep  5  2021 epel.repo
-rw-r--r-- 1 root root 1457 Sep  5  2021 epel-testing.repo
运行结果

安装yum 源
命令代码
[root@host mysql]# rpm -ivh mysql57-community-release-el7-7.noarch.rpm 运行结果

安装yum 源之后
命令代码
[root@host mysql]# ls /etc/yum.repos.d -l
total 24
-rw-r--r-- 1 root root  614 Apr 11 18:38 CentOS-Base.repo
-rw-r--r-- 1 root root  230 Apr 11 18:38 CentOS-Epel.repo
-rw-r--r-- 1 root root 1358 Sep  5  2021 epel.repo
-rw-r--r-- 1 root root 1457 Sep  5  2021 epel-testing.repo
-rw-r--r-- 1 root root 1033 Oct 16  2015 mysql-community.repo
-rw-r--r-- 1 root root 1036 Oct 16  2015 mysql-community-source.repo
运行结果

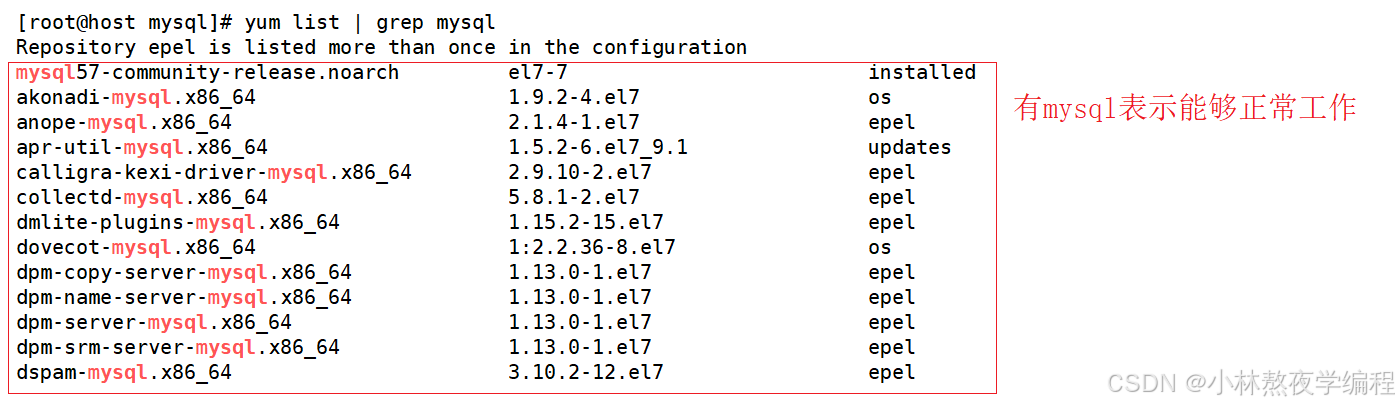
6. 看看能不能正常工作
命令代码
[root@host mysql]# yum list | grep mysql
Repository epel is listed more than once in the configuration
mysql-community-client.x86_64            5.7.44-1.el7                  @mysql57-community
mysql-community-common.x86_64            5.7.44-1.el7                  @mysql57-community
mysql-community-libs.x86_64              5.7.44-1.el7                  @mysql57-community
mysql-community-server.x86_64            5.7.44-1.el7                  @mysql57-community
...
运行结果
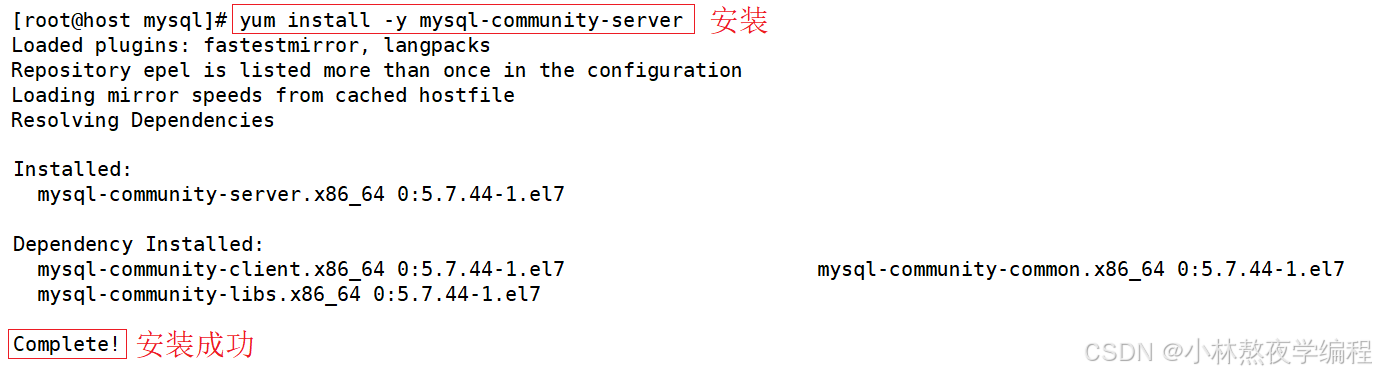
7. 安装mysql服务
命令代码
[root@host mysql]# yum install -y mysql-community-server
Loaded plugins: fastestmirror, langpacks
Repository epel is listed more than once in the configuration
Loading mirror speeds from cached hostfile
可能出现下面的情况
运行结果
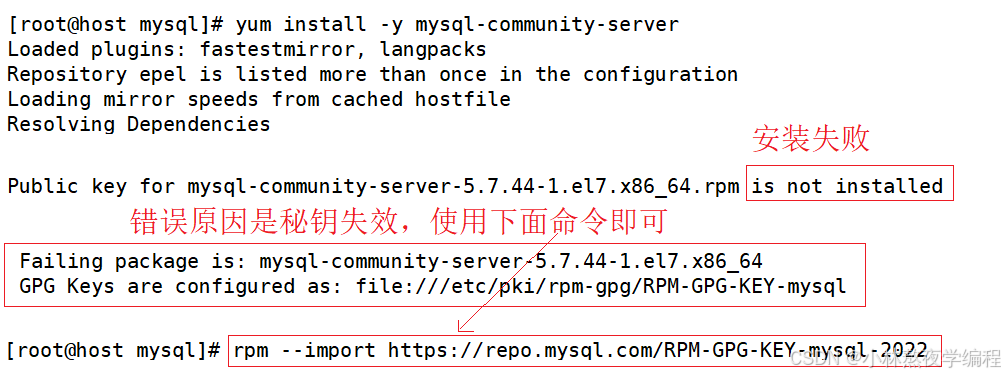
秘钥失效使用下面的命令
rpm --import https://repo.mysql.com/RPM-GPG-KEY-mysql-2022安装成功情况
运行结果
8. 查看配置文件和数据存储位置
命令代码
[root@host mysql]# ls /etc/my.cnf
/etc/my.cnf
[root@host mysql]# ls /var/lib/mysql
运行结果

9. 启动服务和查看启动服务
命令代码
[root@host mysql]# systemctl start mysqld.service
[root@host mysql]# ps ajx | grep mysql
    1  8380  8379  8379 ?           -1 Sl      27   0:01 /usr/sbin/mysqld --daemonize --pid-file=/var/run/mysqld/mysqld.pid
 4993 30174 30173  4993 pts/2    30173 S+       0   0:00 grep --color=auto mysql
运行结果

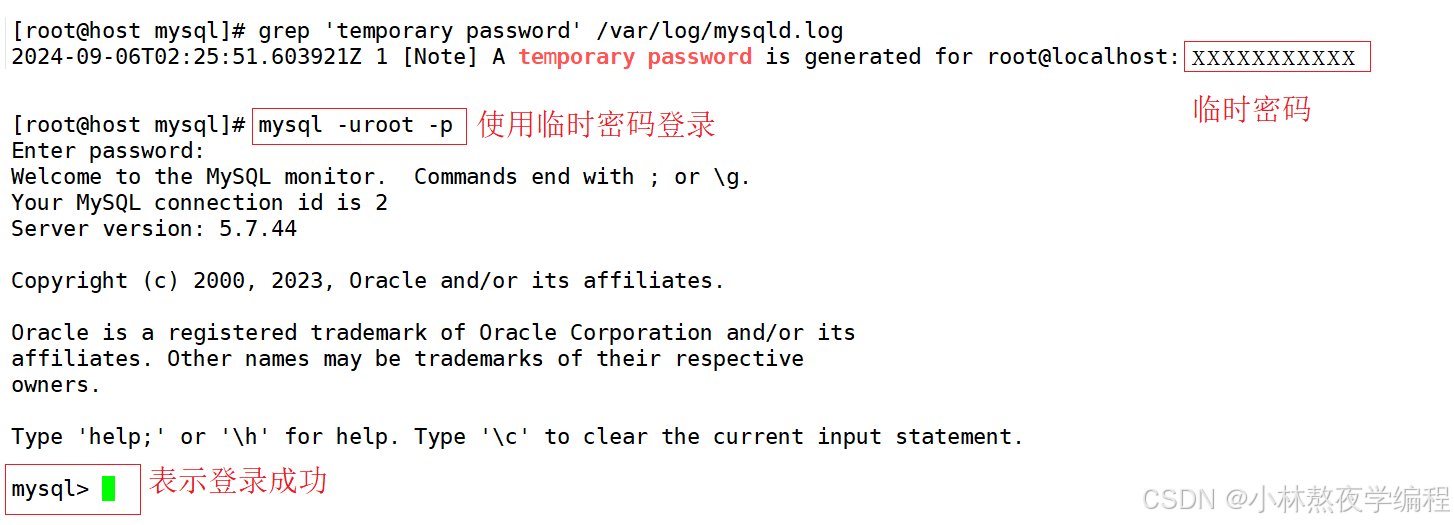
10. 登陆
10. 1 登陆方法一【不行就下⼀个】
命令代码
# 获取临时root密码
[root@host mysql]# grep 'temporary password' /var/log/mysqld.log
2024-09-06T02:25:51.603921Z 1 [Note] A temporary password is generated for root@localhost: xxxxxxxxxxx
# 使用临时密码登录
[root@host mysql]# mysql -uroot -p
Enter password:
Welcome to the MySQL monitor.  Commands end with ; or \g.
Your MySQL connection id is 2
Server version: 5.7.44

Copyright (c) 2000, 2023, Oracle and/or its affiliates.

Oracle is a registered trademark of Oracle Corporation and/or its
affiliates. Other names may be trademarks of their respective
owners.

Type 'help;' or '\h' for help. Type '\c' to clear the current input statement.

mysql>
运行结果
10.2. 登陆方法二【不行就下一个】
- 如果你安装的最新的mysql,没有所谓的临时密码,root默认没有密码
- 试着直接client登陆⼀下 。
10.3. 登陆方式三【应该行了吧】
命令代码
[root@bite-alicloud mysql]# vim /etc/my.cnf
# 打开mysql配置⽂件
在[mysqld]最后⼀栏配置(不知道是什么,就放在配置⽂件最后) 加⼊: skip-grant-tables 选项,
并保存退出
[root@bite-alicloud mysql]# systemctl restart mysqld # 重启mysql服务
# 登陆成功
[root@bite-alicloud mysql]# mysql -uroot
Welcome to the MySQL monitor. Commands end with ; or \g.
Your MySQL connection id is 2
Server version: 5.7.41 MySQL Community Server (GPL)
Copyright (c) 2000, 2023, Oracle and/or its affiliates.
Oracle is a registered trademark of Oracle Corporation and/or its
affiliates. Other names may be trademarks of their respective
owners.
Type 'help;' or '\h' for help. Type '\c' to clear the current input statement.
mysql>
12. 设置开机启动可以不设
命令代码
#开启开机⾃启动
[root@host mysql]# systemctl enable mysqld
[root@host mysql]# systemctl daemon-reload
13. 配置my.cnf
命令代码
vim /etc/my.cnf # 编辑该文件

# 将下面三个配置进去即可
port=3306
datadir=/var/lib/mysql
socket=/var/lib/mysql/mysql.sock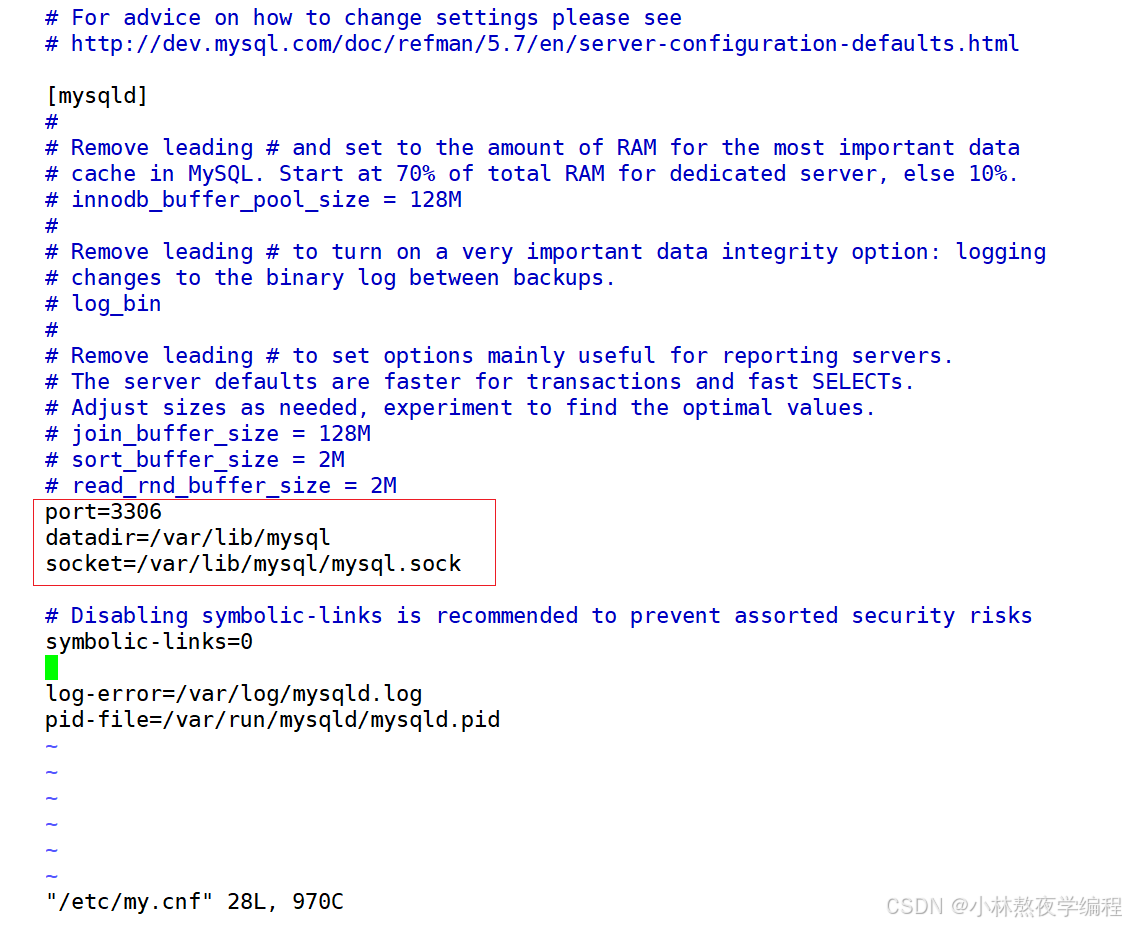
配置完重启一些mysql服务
systemctl restart mysqld # 重启mysql服务 查看配置信息
命令代码
[root@host mysql]# netstat -nltp
Active Internet connections (only servers)
Proto Recv-Q Send-Q Local Address           Foreign Address         State       PID/Program name
tcp        0      0 0.0.0.0:22              0.0.0.0:*               LISTEN      1262/sshd
tcp6       0      0 :::3306                 :::*                    LISTEN      8380/mysqld
tcp6       0      0 :::22                   :::*                    LISTEN      1262/sshd
运行结果
