1、目标
在场景间切换时,场景中的数据能够保存和恢复。
2、解决的问题
在Scene1中,我们拾取了房屋门前的道具。
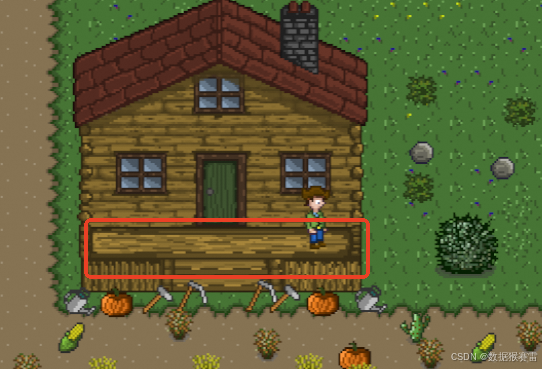
然后我们进入Scene2后再返回Scene1,房屋门前的那些道具又出现了。
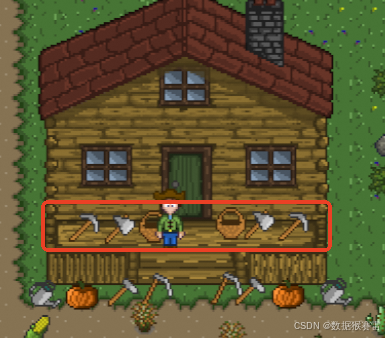
这个是因为在场景切换时我们没有保存信息。
3、原理概述
(1)为什么在场景间Items会消失
每次加载场景时,会创建许多的游戏对象。
这些对象包含场景中的Items。
当一个场景第一次加载时,所有的Items都被实例化。
然后玩家在场景中行走,收集道具并添加到他的库存中,然后移动到不同的场景做了同样的事情。移回第一个场景,他之前收集的道具又重新出现了。
这不是一个错误。每次场景加载实例化,场景对玩家的道具一无所知。
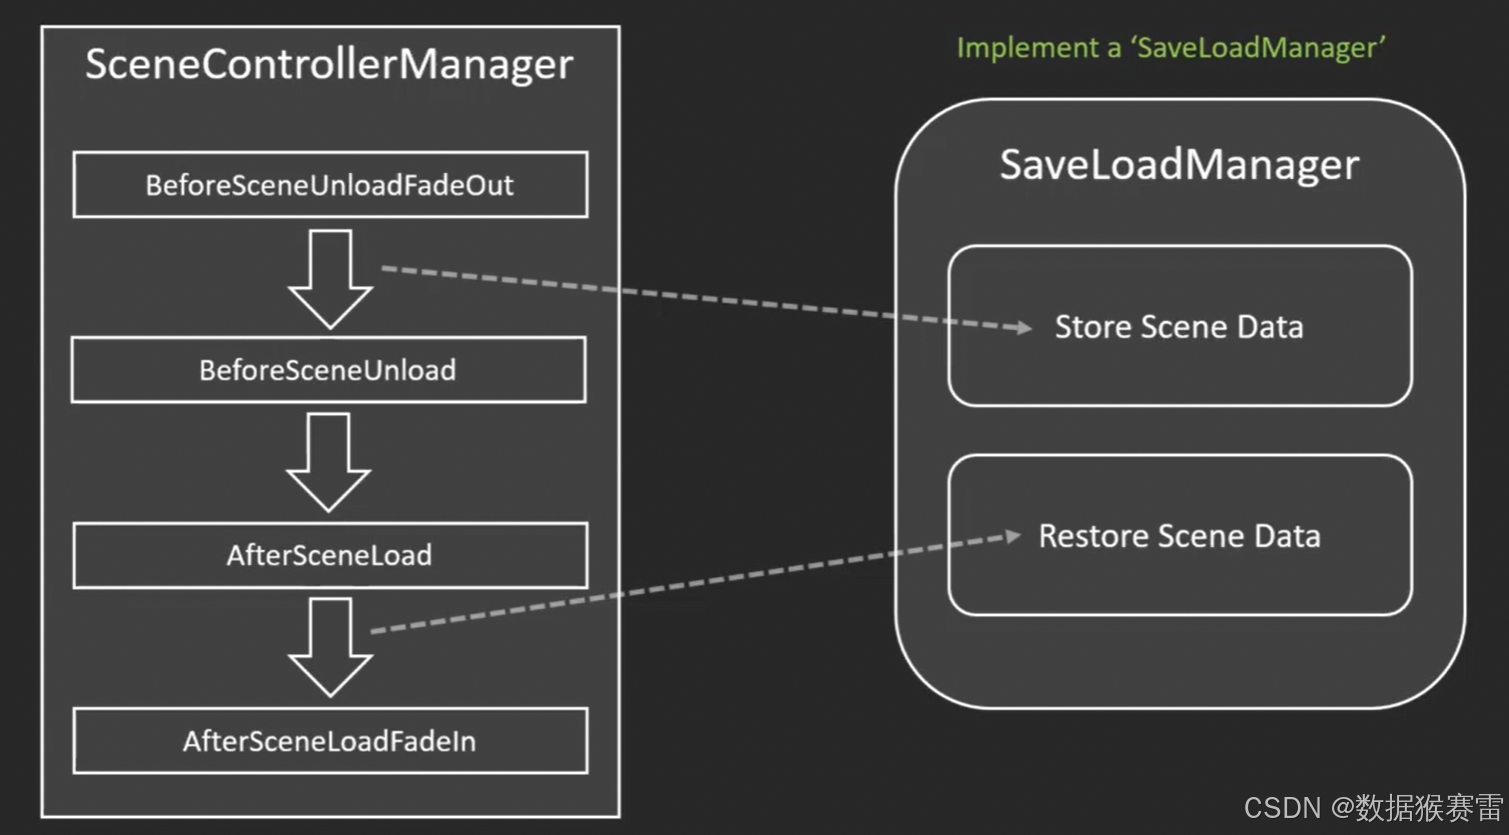
所以,我们需要一种追踪场景状态的方法,即在这种情况下记录玩家得到的道具,当玩家重新访问场景时,只会显示应该存在的道具。在场景加载过程中,我们可以通过使用相同的控制器管理器,在适当的时候存储和恢复数据来实现这一点。
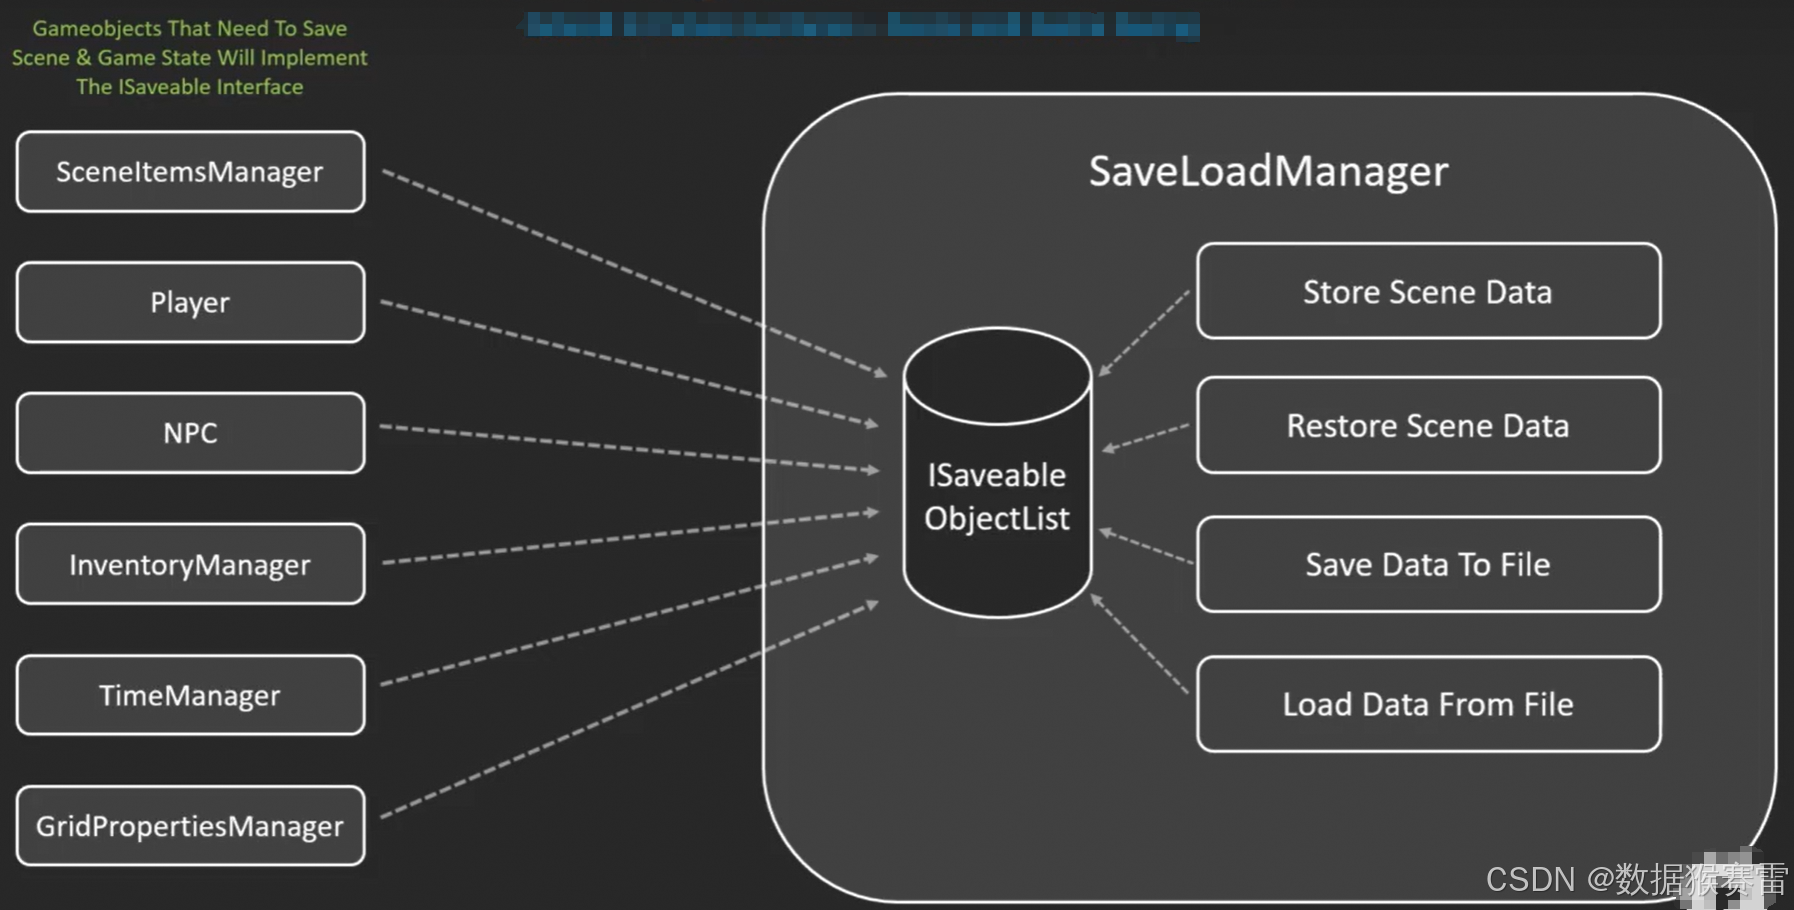
(2)保存场景状态的方法
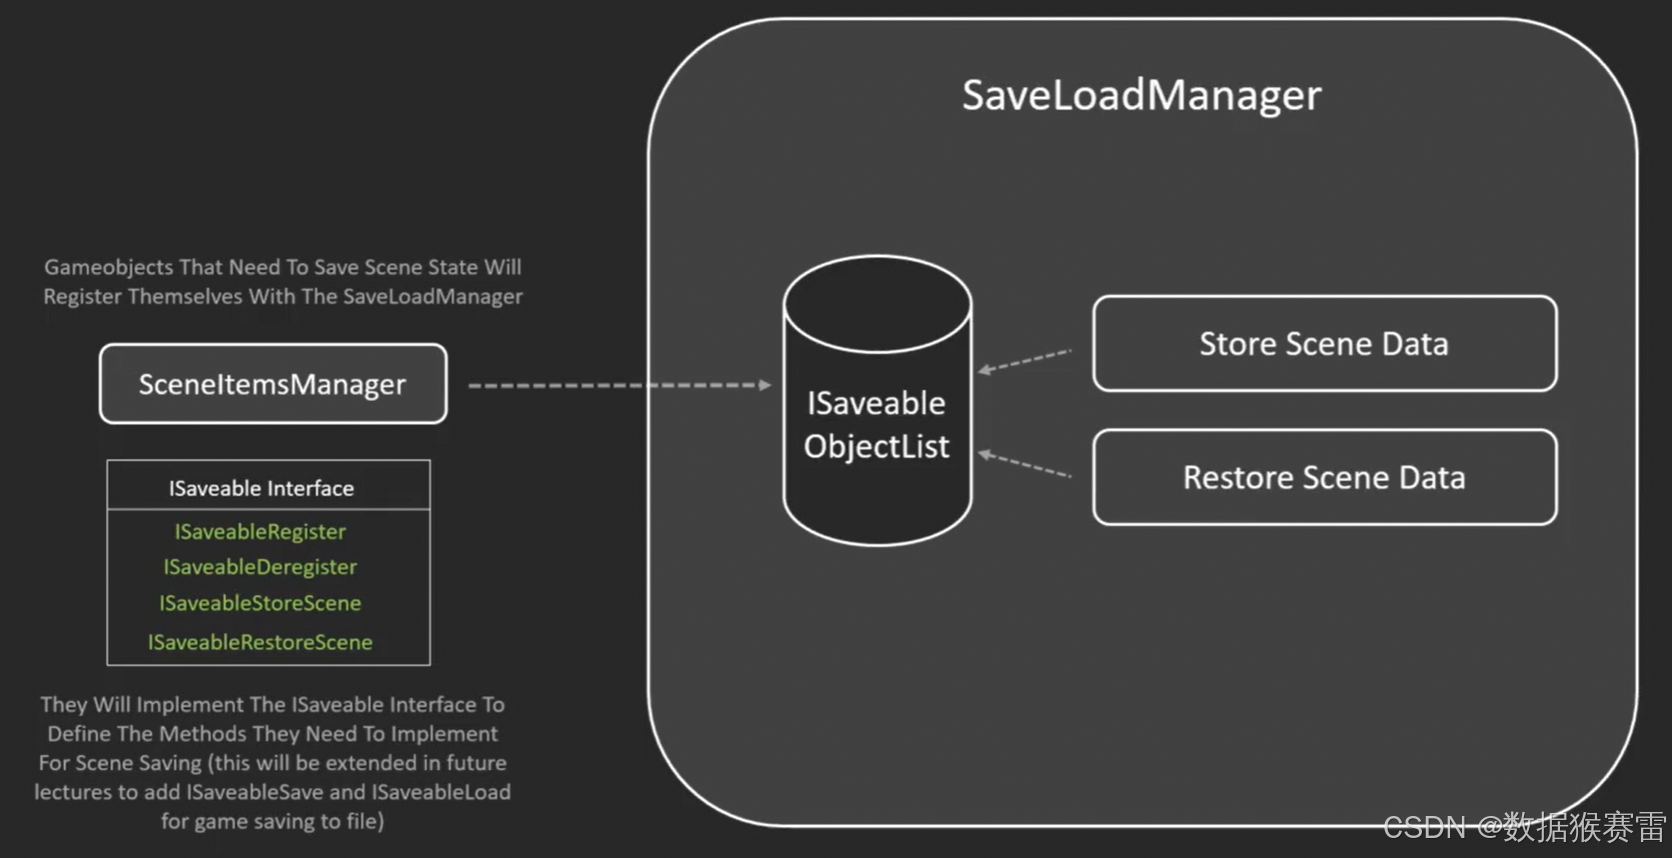
(3)创建Save&Load管理器
(4)保存Scene&Game状态
(5)高级的存储系统
(6)使用SceneItemsManager保存场景Item数据
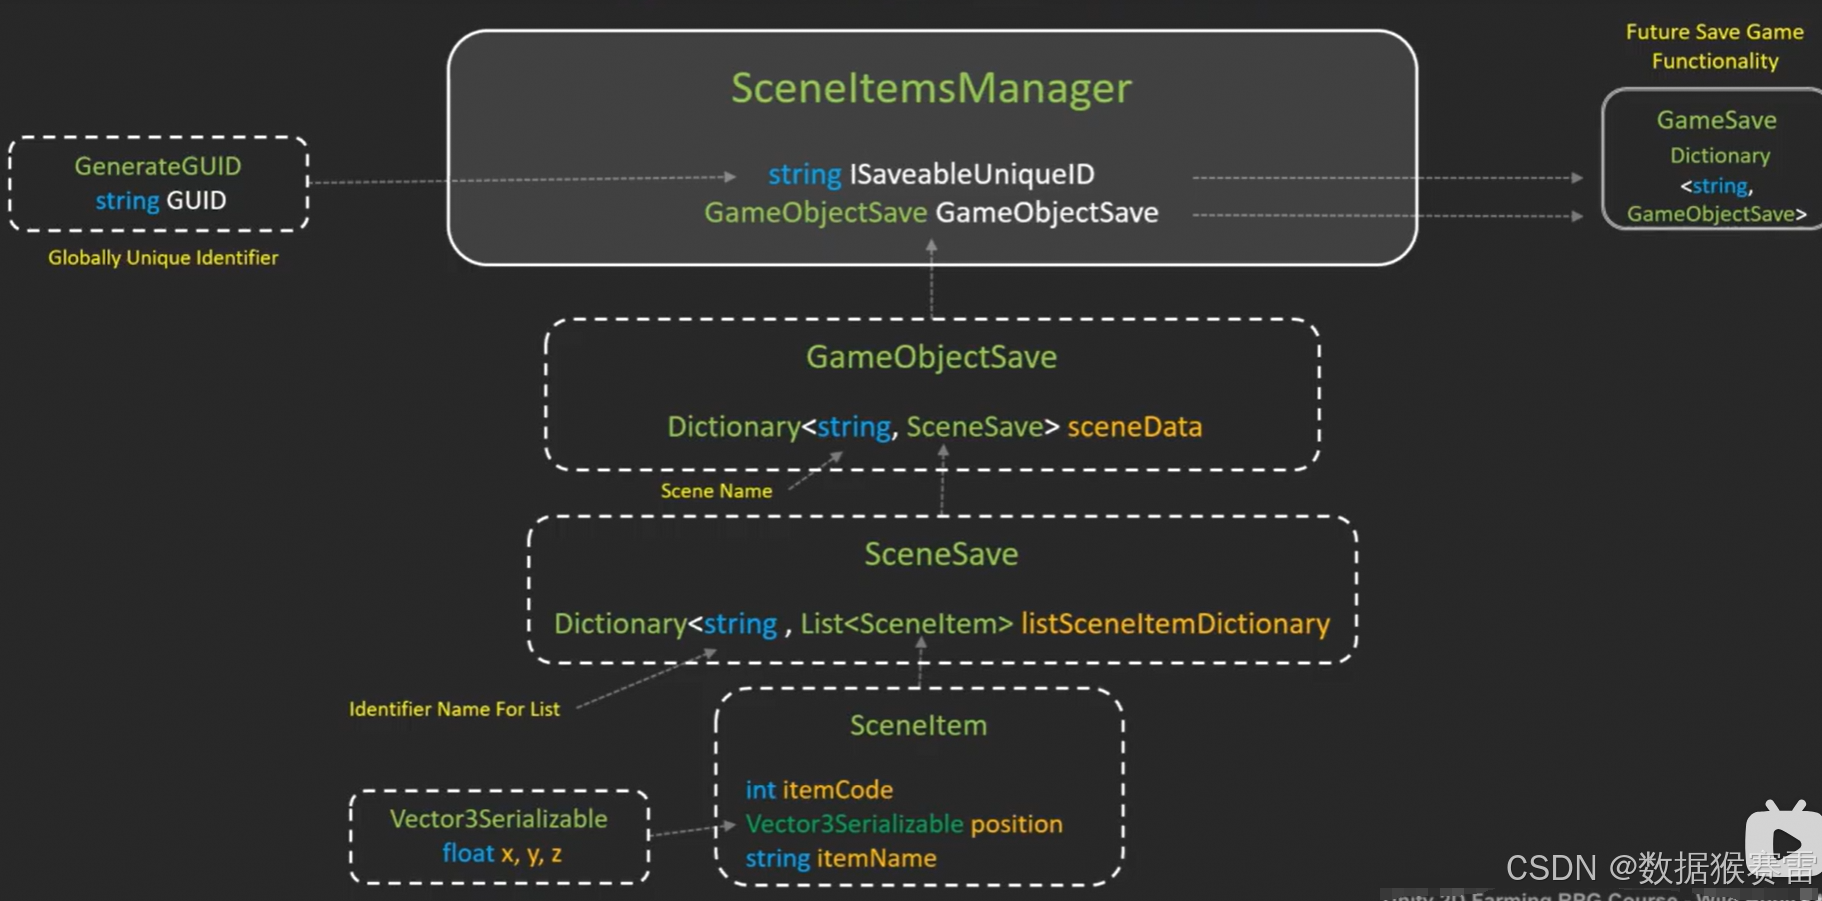
SceneItemsManager类:
-- string ISaveableUniqueID // 唯一ID字段
-- GameObjectSave GameObjectSave // 保存游戏中所有场景的存储项目数据
唯一ID字段会把偶才能全局唯一标识符,由GenerateGUID方法生成GUID(Globally Unique Identifier)。
GameObjectSave的形式:Dictionary<string, SceneSave> sceneData,key为Scene Name。value值SceneSave的形式:Dictionary<string, List<SceneItem>> listSceneItemDictionary,key为Identifier Name For List,value为List<SceneItem>。
SceneItem的构成:
-- int itemCode
-- Vector3Serializable position
-- string itemName
4、创建基础脚本
按照第3部分的原理,我们创建了如下的脚本。
(1)创建Vector3Serializable脚本
在Assets -> Scripts -> Misc下创建Vector3Serializable脚本。
它是位置信息相关的类。
cs
[System.Serializable]
public class Vector3Serializable
{
    public float x, y, z;

    public Vector3Serializable(float x, float y, float z)
    {
        this.x = x;
        this.y = y;
        this.z = z;
    }

    public Vector3Serializable() { }
}
我们手工进行序列化的原因是:Unity中标准的Vector3类型不是可序列化的。
(2)创建SceneItem脚本
在Assets -> Scripts下创建SaveSystem的目录,然后在其下再创建SceneItem脚本。
cs
[System.Serializable]
public class SceneItem
{
    public int itemCode;
    public Vector3Serializable position;
    public string itemName;

    public SceneItem()
    {
        position = new Vector3Serializable();
    }
}
(3)创建SceneSave脚本
在Assets -> Scripts -> SaveSystem目录下创建SceneSave脚本。
cs
using System.Collections.Generic;

[System.Serializable]

public class SceneSave
{
    // string key is an identifier name we choose for this list
    public Dictionary<string, List<SceneItem>> listSceneItemDictionary;
}
(4)创建GameObjectSave脚本
在Assets -> Scripts -> SaveSystem目录下创建GameObjectSave脚本。
cs
using System.Collections.Generic;

[System.Serializable]

public class GameObjectSave
{
    // string key = scene name
    public Dictionary<string, SceneSave> sceneData;

    public GameObjectSave()
    {
        sceneData = new Dictionary<string, SceneSave>();
    }

    public GameObjectSave(Dictionary<string, SceneSave> sceneData)
    {
        this.sceneData = sceneData;
    }
}
(5)创建GenerateGUID脚本
在Assets -> Scripts -> SaveSystem目录下创建GenerateGUID脚本。
cs
using UnityEngine;


[ExecuteAlways]
public class GenerateGUID : MonoBehaviour
{
    [SerializeField]
    private string _gUID = "";

    public string GUID
    {
        get { return _gUID; }
        set { _gUID = value; }
    }

    private void Awake()
    {
        // Only populate in the editor
        if (!Application.IsPlaying(gameObject))
        {

            // Ensure the object has a guaranteed unique id
            if(_gUID == "")
            {
                // Assign GUID
                _gUID = System.Guid.NewGuid().ToString();
            }
        }
    }


}添加了ExecuteAlways标识后可以同时在播放模式和编辑器模式下运行,而这次我们希望它只在编辑器中运行。
GUID作为公共属性可以进行读取和写入。
5、场景保存和恢复
(1)整体思路
当切换场景前,将当前所有的Items保存到SceneItemsManager中。当切换到新场景之后,从SceneItemsManager中恢复Items。
SceneItemsManager的作用:存储和恢复在场景中的项目
SaveLoadManager的作用:存储场景数据,恢复场景数据。
(2)创建ISaveable接口
在Assets -> Scripts -> SaveSystem下创建ISaveable脚本。
cs
public interface ISaveable
{
    string ISaveableUniqueID {  get; set; }

    GameObjectSave GameObjectSave { get; set; }

    void ISaveableRegister();

    void ISaveableDeregister();

    void ISaveableStoreScene(string sceneName);

    void ISaveableRestoreScene(string sceneName);
}
该接口包含2个属性和4个方法。
在C#中,接口是一种约定,它规定了实现该接口的类必须要实现的成员(属性、方法等)。
在接口中,不能声明字段,只能声明属性。
(3)创建SaveLoadManager脚本
在Assets -> Scripts -> SaveSystem下创建SaveLoadManager脚本。
cs
using System.Collections;
using System.Collections.Generic;
using UnityEngine;
using UnityEngine.SceneManagement;

public class SaveLoadManager : SingletonMonobehaviour<SaveLoadManager>
{
    public List<ISaveable> iSaveableObjectList;

    protected override void Awake()
    {
        base.Awake();

        iSaveableObjectList = new List<ISaveable>();
    }

    public void StoreCurrentSceneData()
    {
        // loop through all ISaveable objects and trigger store scene data for each
        foreach(ISaveable iSaveableObject in iSaveableObjectList)
        {
            // 将所有的数据都存储在当前场景名下
            iSaveableObject.ISaveableStoreScene(SceneManager.GetActiveScene().name);
        }
    }

    public void RestoreCurrentSceneData()
    {
        // loop through all ISaveble objects and trigger restore scene data for each
        foreach(ISaveable iSaveableObject in iSaveableObjectList)
        {
            // 根据当前场景名恢复数据
            iSaveableObject.ISaveableRestoreScene(SceneManager.GetActiveScene().name);
        }
    }

}
SaveLoadManager的功能:
- 初始化 保存数据 的列表
- 根据当前场景名 保存所有数据
- 根据当前场景名 恢复所有数据
(4)创建SceneItemsManager脚本
在Assets -> Scripts -> Scene 下创建SceneItemsManager脚本。
cs
using System.Collections;
using System.Collections.Generic;
using UnityEngine;
[RequireComponent(typeof(GenerateGUID))]
public class SceneItemsManager : SingletonMonobehaviour<SceneItemsManager>, ISaveable
{
private Transform parentItem;
[SerializeField] private GameObject itemPrefab = null;
private string _iSaveableUniqueID;
private GameObjectSave _gameObjectSave;
public string ISaveableUniqueID { get { return _iSaveableUniqueID; } set { _iSaveableUniqueID = value; } }
public GameObjectSave GameObjectSave { get { return _gameObjectSave; } set { _gameObjectSave = value; } }
private void AfterSceneLoad()
{
parentItem = GameObject.FindGameObjectWithTag(Tags.ItemsParentTransform).transform;
}
protected override void Awake()
{
base.Awake();
ISaveableUniqueID = GetComponent<GenerateGUID>().GUID;
GameObjectSave = new GameObjectSave();
}
private void OnEnable()
{
ISaveableRegister();
EventHandler.AfterSceneLoadEvent += AfterSceneLoad;
}
private void OnDisable()
{
ISaveableDeregister();
EventHandler.AfterSceneLoadEvent -= AfterSceneLoad;
}
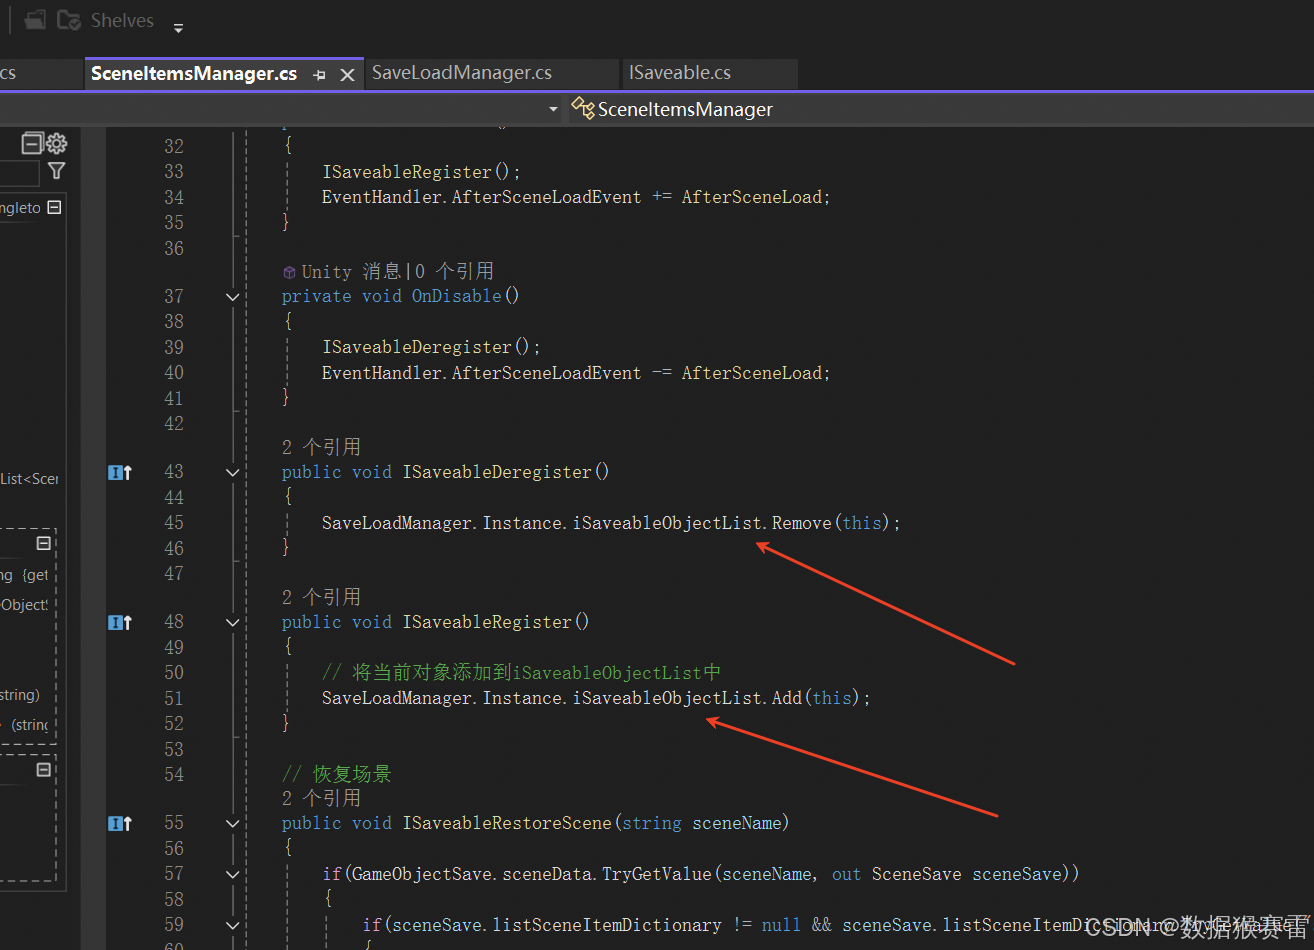
public void ISaveableDeregister()
{
SaveLoadManager.Instance.iSaveableObjectList.Remove(this);
}
public void ISaveableRegister()
{
// 将当前对象添加到iSaveableObjectList中
SaveLoadManager.Instance.iSaveableObjectList.Add(this);
}
// 恢复场景
public void ISaveableRestoreScene(string sceneName)
{
if(GameObjectSave.sceneData.TryGetValue(sceneName, out SceneSave sceneSave))
{
if(sceneSave.listSceneItemDictionary != null && sceneSave.listSceneItemDictionary.TryGetValue("sceneItemList", out List<SceneItem> sceneItemList))
{
// scene list items found - destroy existing items in scene
DestroySceneItems();
// new instantiate the list of scene items
InstantiateSceneItems(sceneItemList);
}
}
}
private void InstantiateSceneItems(List<SceneItem> sceneItemList)
{
GameObject itemGameObject;
foreach(SceneItem sceneItem in sceneItemList)
{
itemGameObject = Instantiate(itemPrefab, new Vector3(sceneItem.position.x, sceneItem.position.y, sceneItem.position.z), Quaternion.identity, parentItem);
Item item = itemGameObject.GetComponent<Item>();
item.ItemCode = sceneItem.itemCode;
item.name = sceneItem.itemName;
}
}
// Destroy items currently in the scene
private void DestroySceneItems()
{
// Get all items in the scene
Item[] itemsInScene = GameObject.FindObjectsOfType<Item>();
// Loop through all scene items and destroy them
for(int i = itemsInScene.Length - 1; i > -1; i--)
{
Destroy(itemsInScene[i].gameObject);
}
}
// 保存场景
public void ISaveableStoreScene(string sceneName)
{
// Remove old scene save for gameObject if exists
GameObjectSave.sceneData.Remove(sceneName);
// Get all items in the scene
List<SceneItem> sceneItemList = new List<SceneItem>();
Item[] itemsInScene = FindObjectsOfType<Item>();
// Loop through all scene items
foreach(Item item in itemsInScene)
{
SceneItem sceneItem = new SceneItem();
sceneItem.itemCode = item.ItemCode;
sceneItem.position = new Vector3Serializable(item.transform.position.x,
item.transform.position.y,
item.transform.position.z);
sceneItem.itemName = item.name;
// Add scene item to list
sceneItemList.Add(sceneItem);
}
// Create list scene items dictionary in scene save and add to it
SceneSave sceneSave = new SceneSave();
sceneSave.listSceneItemDictionary = new Dictionary<string, List<SceneItem>>();
sceneSave.listSceneItemDictionary.Add("sceneItemList", sceneItemList);
// Add scene save to gameobject
GameObjectSave.sceneData.Add(sceneName, sceneSave);
}
}- GameObject.FindObjectsOfType():该方法允许你找到场景中所有指定类型的游戏对象(GameObject)。这对于需要遍历特定类型的所有对象并执行某些操作时非常有用。
- 在SceneItemsManager脚本中,通过ISaveableRegister方法将ISaveable类型对象添加到了 SaveLoadManager.Instance.iSaveableObjectList中。
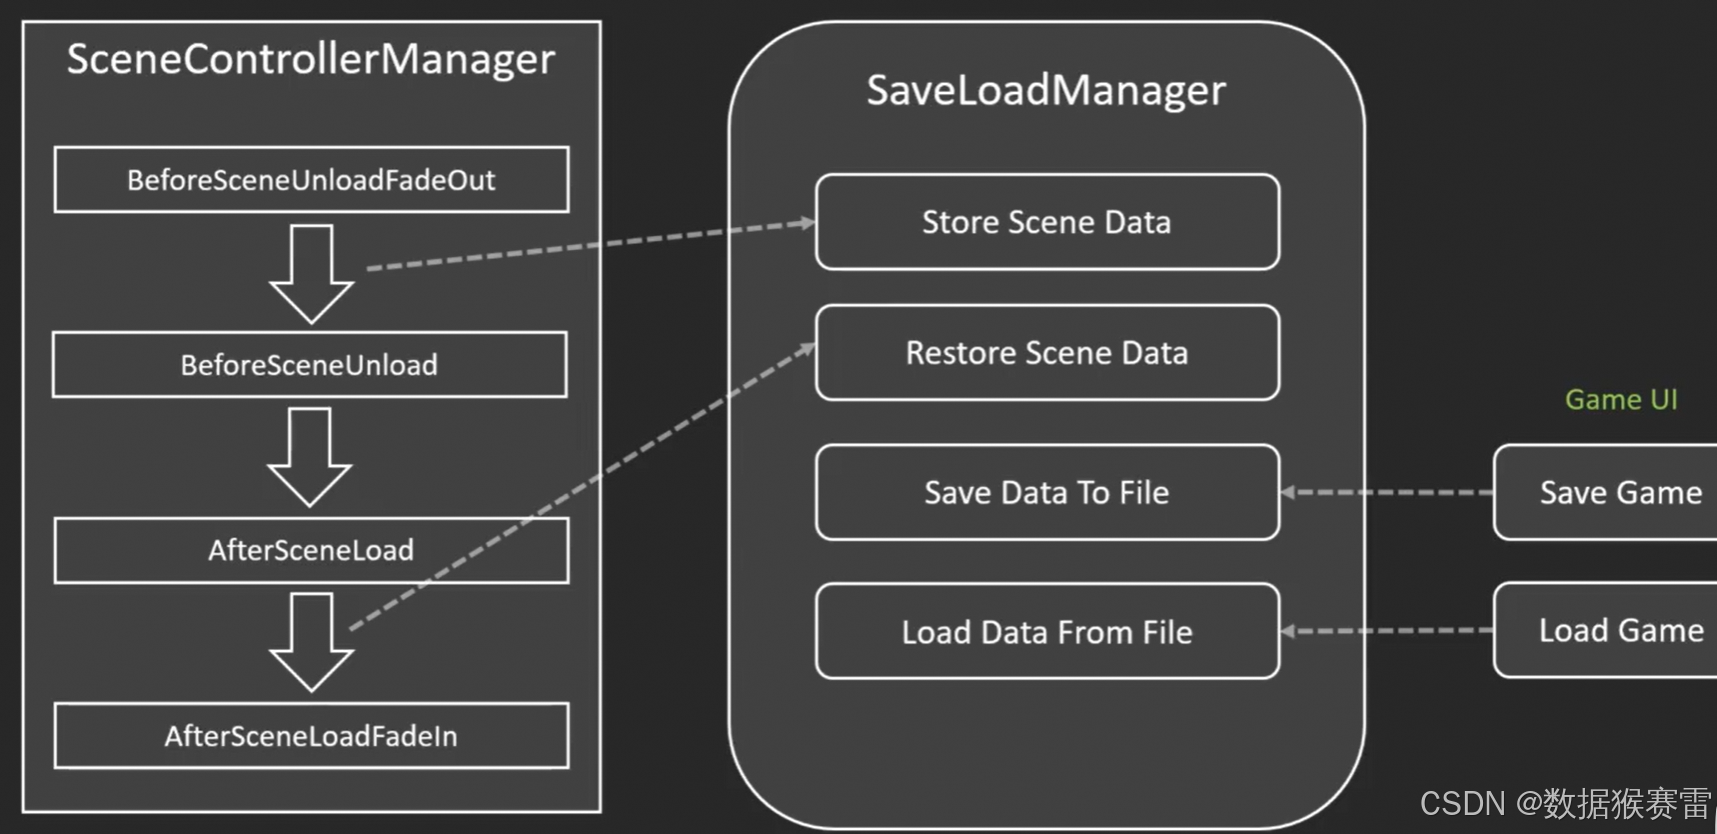
(5)优化SceneControllerManager脚本
代码位于:Assets -> Scripts -> Scene下。
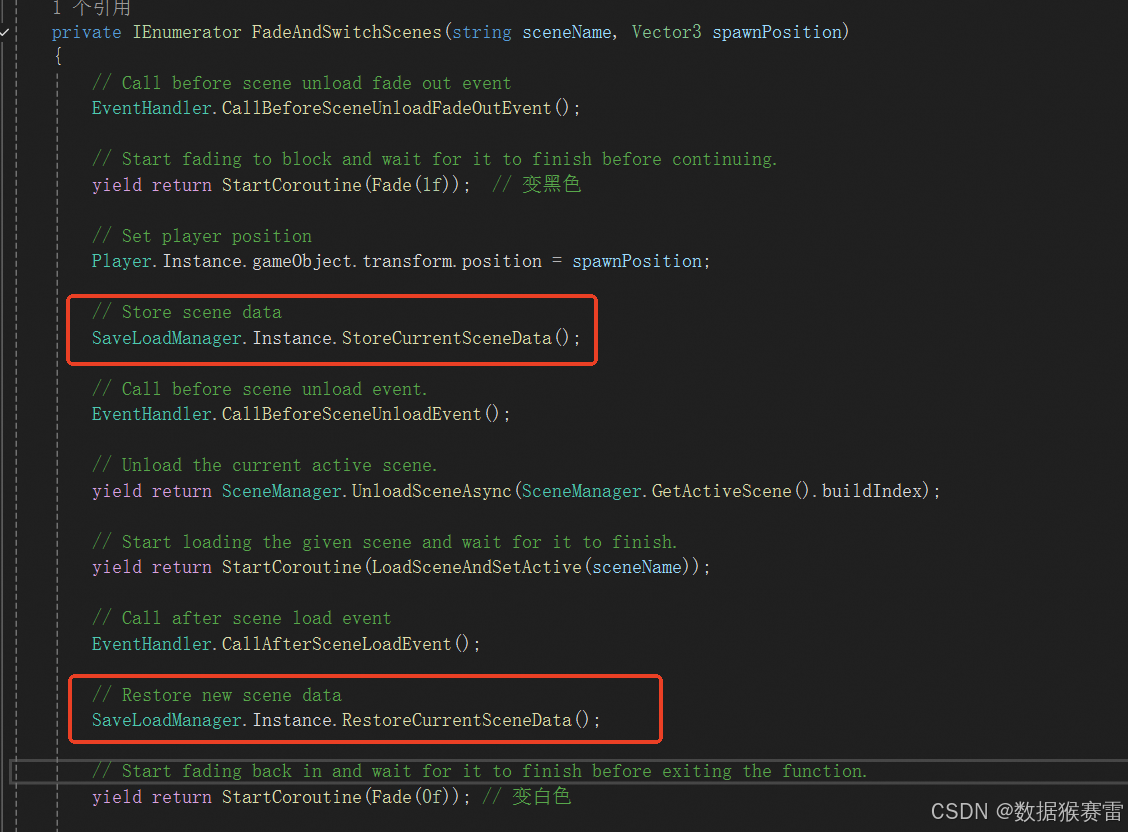
在Scene切换时通过StoreCurrentSceneData()实现当前场景数据的保存。在LoadSceneAndSetActive()之后进入到新场景,通过RestoreCurrentSceneData()恢复新场景的数据。
注意:场景转变之后,通过SceneManager.GetActiveScene().name获取到的都是最新的场景信息。

每次进入到新场景,都恢复一下场景下的数据信息。
完整代码如下:
cs
using System.Collections;
using System.Collections.Generic;
using UnityEngine;
using UnityEngine.SceneManagement;
using UnityEngine.UI;


public class SceneControllerManager : SingletonMonobehaviour<SceneControllerManager>
{
    private bool isFading;
    [SerializeField] private float fadeDuration = 1f;
    [SerializeField] private CanvasGroup faderCanvasGroup = null;
    [SerializeField] private Image faderImage = null;
    public SceneName startingSceneName;


    // This is the main external point of contact and influence from the rest of the project.
    // This will be called when the player wants to switch scenes.
    // sceneName:目标场景名称
    // spawnPosition: 主角出现的位置
    public void FadeAndLoadScene(string sceneName, Vector3 spawnPosition)
    {
        // If a fade isn't happening then start fading and switching scenes.
        if (!isFading)
        {
            StartCoroutine(FadeAndSwitchScenes(sceneName, spawnPosition));
        }
    }

    // This is the coroutine where the 'building blocks' of the script are put together.
    private IEnumerator FadeAndSwitchScenes(string sceneName, Vector3 spawnPosition)
    {
        // Call before scene unload fade out event
        EventHandler.CallBeforeSceneUnloadFadeOutEvent();

        // Start fading to block and wait for it to finish before continuing.
        yield return StartCoroutine(Fade(1f));  // 变黑色

        // Set player position
        Player.Instance.gameObject.transform.position = spawnPosition;

        // Store scene data
        SaveLoadManager.Instance.StoreCurrentSceneData();

        // Call before scene unload event.
        EventHandler.CallBeforeSceneUnloadEvent();

        // Unload the current active scene.
        yield return SceneManager.UnloadSceneAsync(SceneManager.GetActiveScene().buildIndex);

        // Start loading the given scene and wait for it to finish.
        yield return StartCoroutine(LoadSceneAndSetActive(sceneName));

        // Call after scene load event
        EventHandler.CallAfterSceneLoadEvent();

        // Restore new scene data
        SaveLoadManager.Instance.RestoreCurrentSceneData();

        // Start fading back in and wait for it to finish before exiting the function.
        yield return StartCoroutine(Fade(0f)); // 变白色

        // Call after scene load fade in event
        EventHandler.CallAfterSceneLoadFadeInEvent();

    }

    private IEnumerator Fade(float finalAlpha)
    {
        // Set the fading flag to true so the FadeAndSwitchScenes coroutine won't be called again.
        isFading = true;

        // Make sure the CanvasGroup blocks raycasts into the scene so no more input can be accepted.
        faderCanvasGroup.blocksRaycasts = true;

        // Calculate how fast the CanvasGroup should fade based on it's current alpha,
        // it's final alpha and how long it has to change between the two.
        float fadeSpeed = Mathf.Abs(faderCanvasGroup.alpha - finalAlpha) / fadeDuration;

        // while the CanvasGroup hasn't reached the final alpha yet...
        while( !Mathf.Approximately(faderCanvasGroup.alpha, finalAlpha))
        {
            // ... move the alpha towards it's target alpha.
            faderCanvasGroup.alpha = Mathf.MoveTowards(faderCanvasGroup.alpha, finalAlpha,
                fadeSpeed * Time.deltaTime);

            // Wait for a frame then continue.
            yield return null;
        }

        // Set the flag to false since the fade has finished.
        isFading = false;

        // Stop the CanvasGroup from blocking raycasts so input is no longer ignored.
        faderCanvasGroup.blocksRaycasts = false;
    }


    private IEnumerator LoadSceneAndSetActive(string sceneName)
    {
        // Allow the given scene to load over serval frames and add it to the already
        // loaded scenes (just the Persistent scene at this point).
        yield return SceneManager.LoadSceneAsync(sceneName, LoadSceneMode.Additive);

        // Find the scene that was most recently loaded (the one at the last index of the loaded scenes).
        Scene newlyLoadedScene = SceneManager.GetSceneAt(SceneManager.sceneCount - 1);

        // Set the newly loaded scene as the active scene(this marks it as the one to be unloaded next).
        SceneManager.SetActiveScene(newlyLoadedScene);
    }

    private IEnumerator Start()
    {
        // Set the initial alpha to start off with a block screen.
        faderImage.color = new Color(0f, 0f, 0f, 1f);
        faderCanvasGroup.alpha = 1f;

        // Start the first scene loading and wait for it to finish
        yield return StartCoroutine(LoadSceneAndSetActive(startingSceneName.ToString()));

        // If this event has any subscribers, call it
        EventHandler.CallAfterSceneLoadEvent();

        SaveLoadManager.Instance.RestoreCurrentSceneData();

        // Once the scene is finished loading, start fading in
        StartCoroutine(Fade(0f));
    }

}
(6)改变脚本执行顺序
Edit -> Project Settings -> Script Execution Order。
添加SaveLoadManager,并设置值为-80。
我们希望SceneControllerManager初始化之后,立马初始化SaveLoadManager。
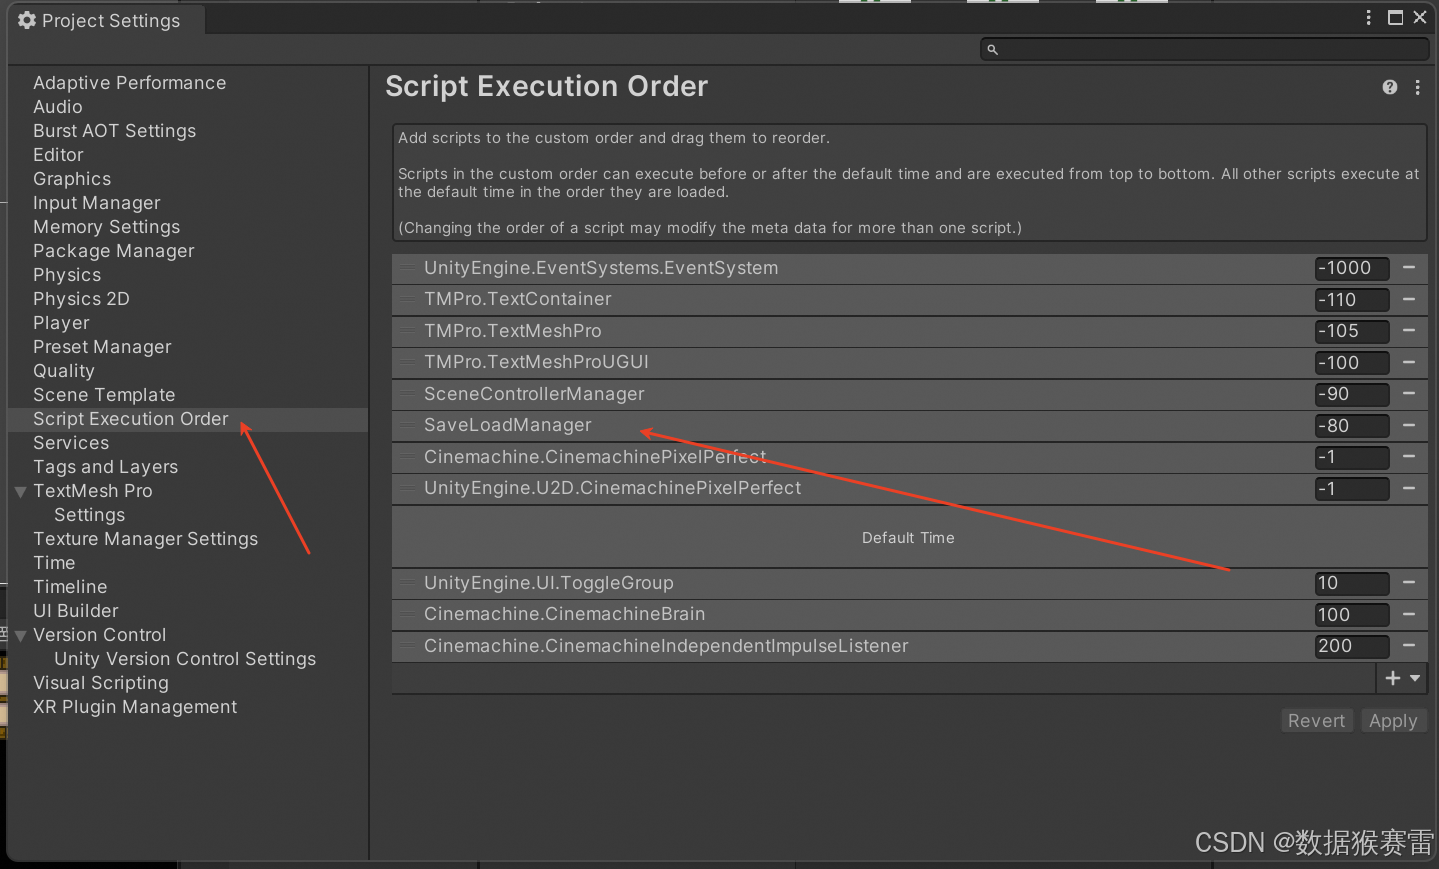
这样做的好处:
SceneItemsManager的OnEnable()中会调用ISaveableRegister()方法,而在ISaveableRegister()的方法中会直接操作SaveLoadManager.Instance.iSaveableObjectList的属性。如果该属性在使用前没有被初始化,则会报错。
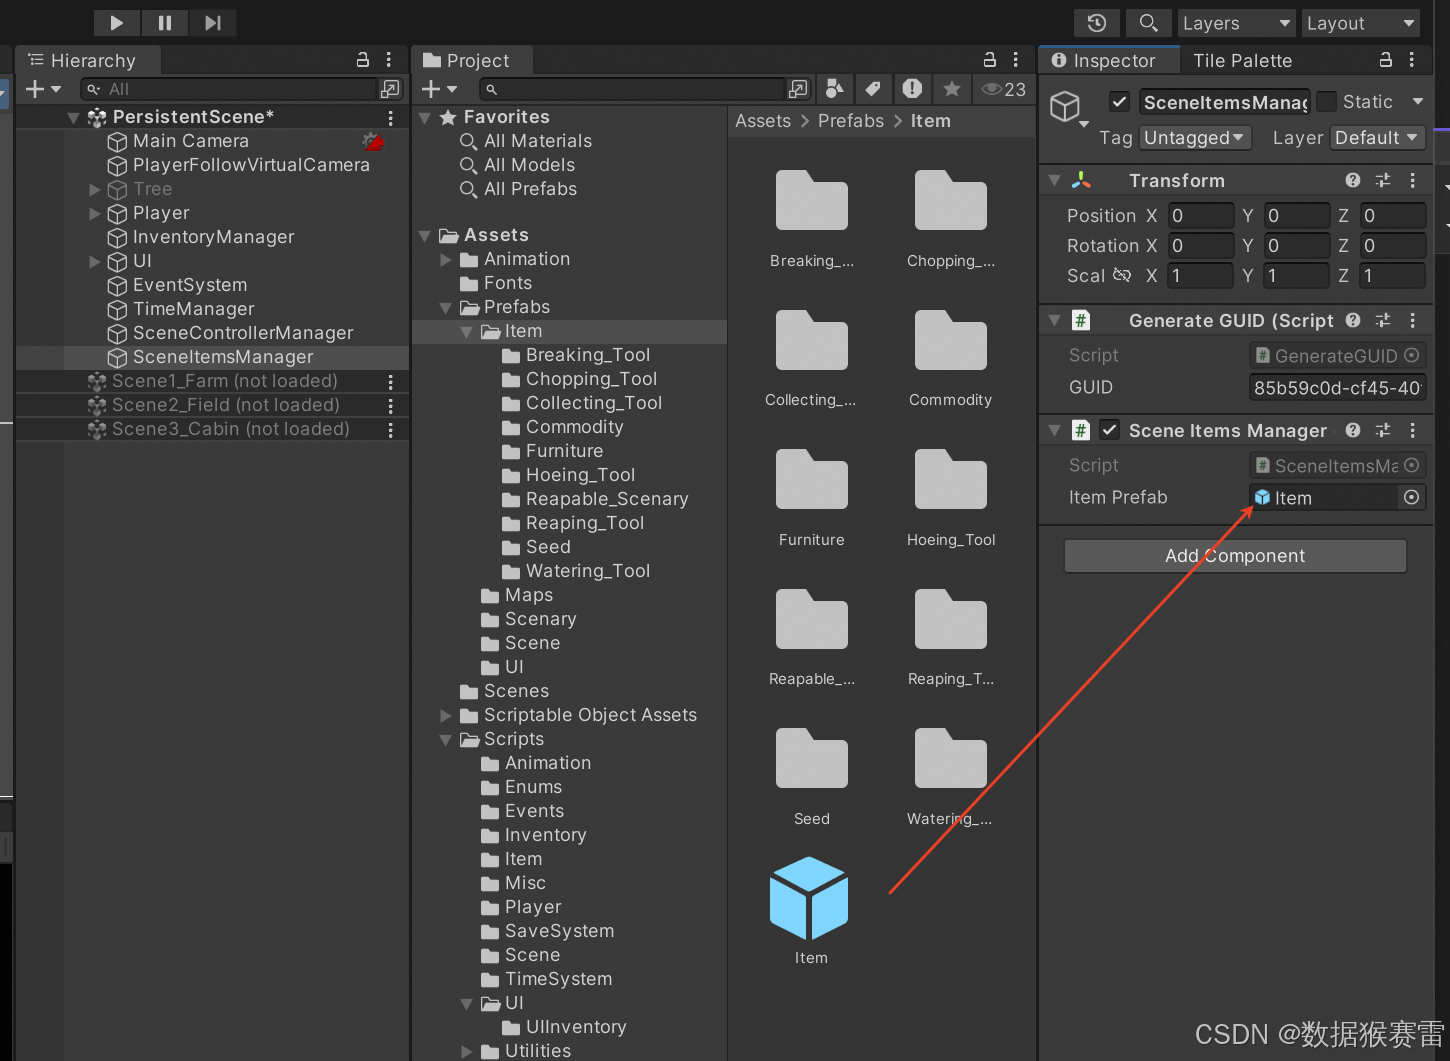
(7)创建SceneItemsManager对象
在Hierarchy -> PersistentScene下创建空物体命令为SceneItemsManager。
给该对象添加SceneItemsManager的脚本。
同时将Assets -> Prefabs -> Item下的Item预设体移到SceneItemsManager的Item Prefab参数下。
(8)创建SaveLoadManager对象
在Hierarchy -> PersistentScene下创建空物体命令为SaveLoadManager。
给该对象添加SaveLoadManager的脚本。
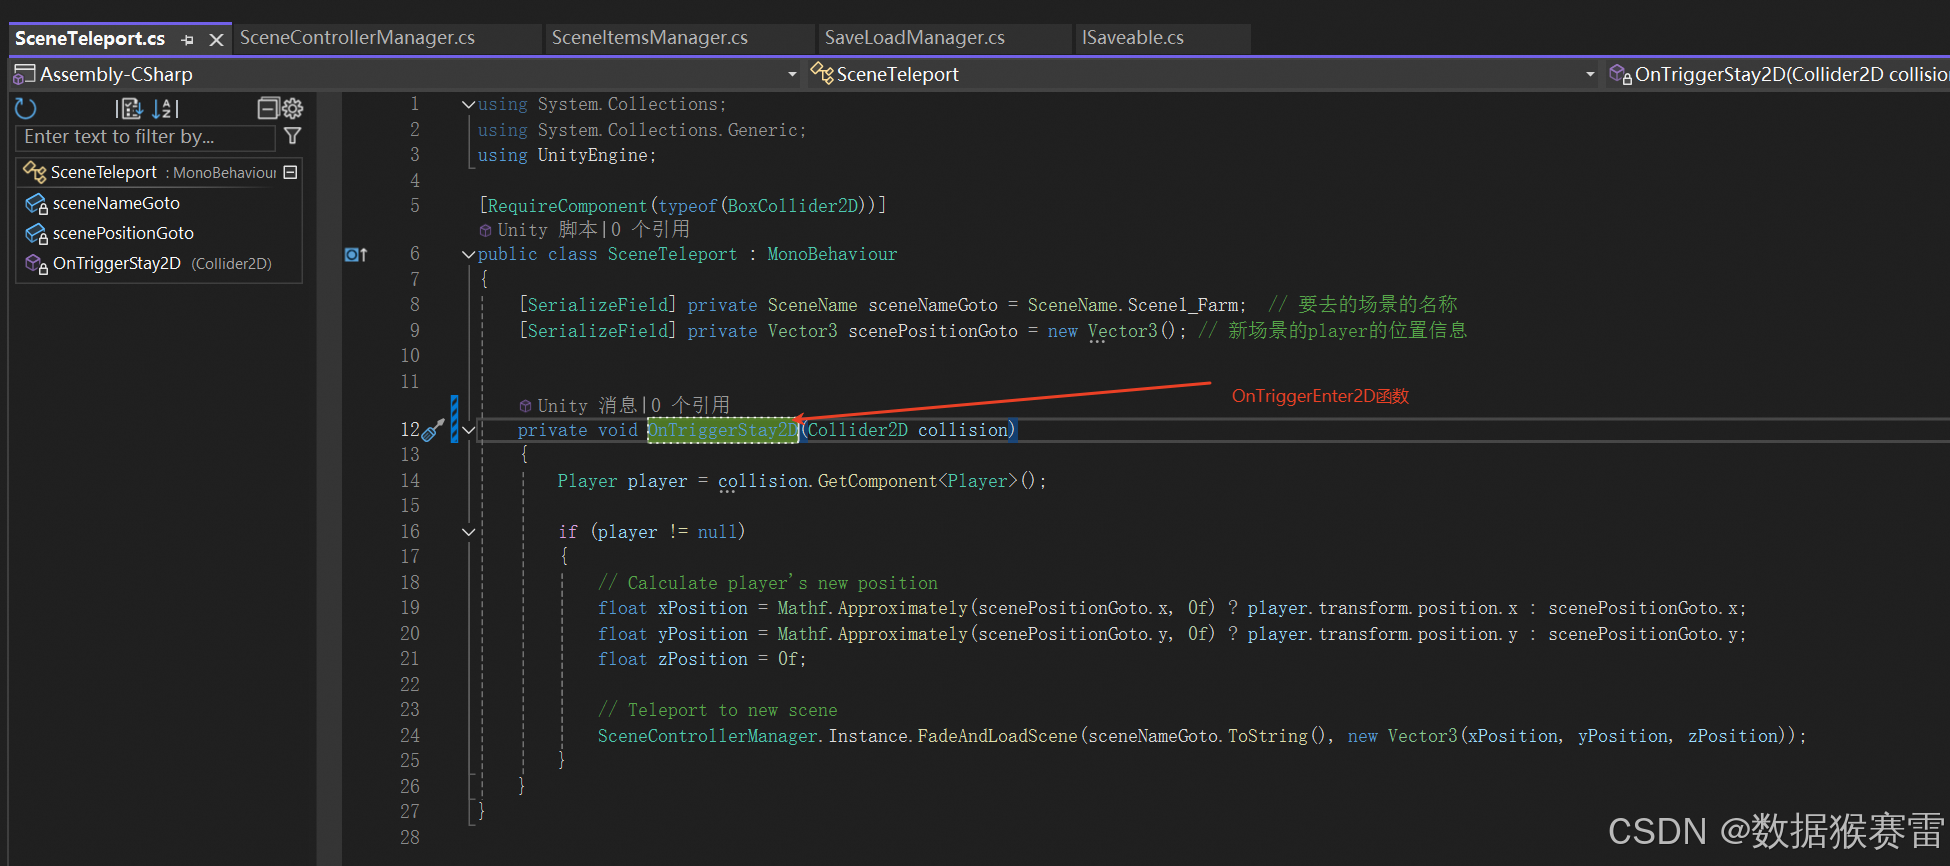
(9)优化SceneTeleport脚本
将OnTriggerEnter2D修改为OnTriggerStay2D。
6、效果