本地docker及 docker-compose版本

安装参考:
1.下载源码
shell
git clone https://github.com/infiniflow/ragflow.git2.运行docker-compose拉取镜像
shell
cd ragflow/docker
docker-compose up -d
3.启动报错问题解决
-
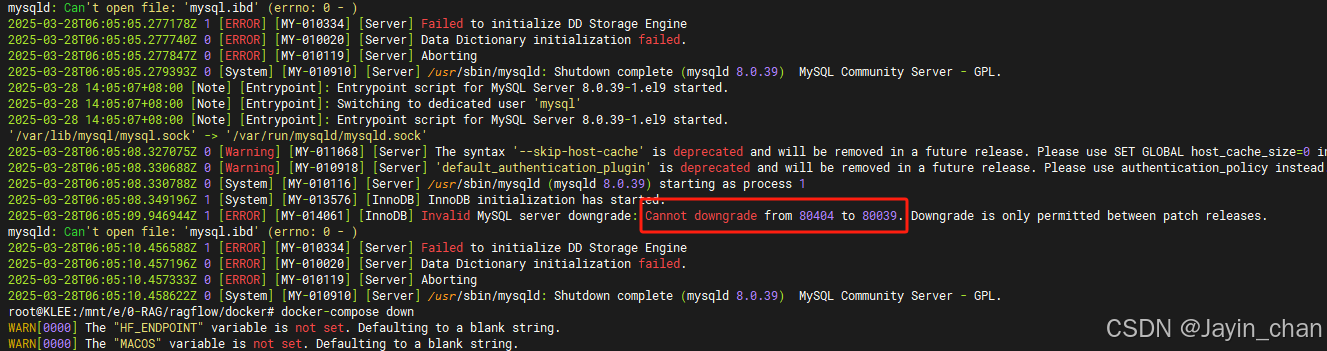
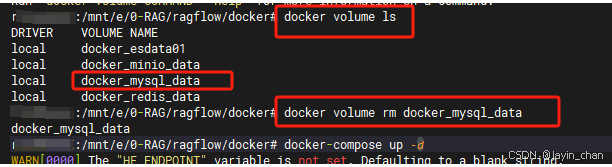
mysql启动报错:这个是由于我之前本地有个8.4版本的。直接删除容器卷上的数据就可以了
-
docker网络问题
不知道是不是wsl的原因,docker没有创建网络,手动创建的网络,几个容器服务也是不能互通,打印ragflow-server服务的日志就可以看到了(这个以后有时间再看看咋回事,现在先把服务跑起来要紧),所以我全部切成本地网络shell# 查询网络 docker network ls # 创建网络 docker network create ragflow # 查看网络信息 docker network inspect ragflow # 移除网络 docker network rm ragflow切换后的docker-compose文件编排内容如下:
-
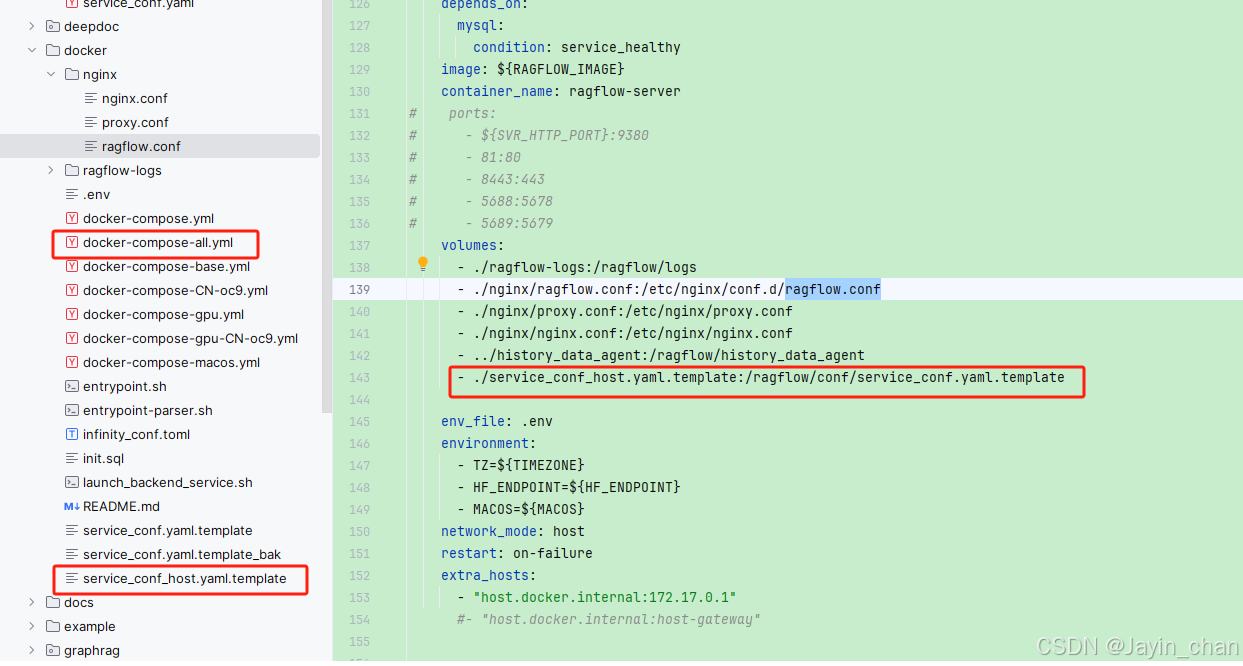
docker-compose-all.yaml (命名随意)
- 因为我本地之前拉取过其他版本的es、minio,所以就直接用之前拉取的镜像
- service_conf_host.yaml.template 用本地网络涉及到端口调整,所以我加了这个文件挂载
yamlservices: es01: container_name: ragflow-es-01 profiles: - elasticsearch #这里用了我本地的es image: docker.elastic.co/elasticsearch/elasticsearch:8.13.2 volumes: - esdata01:/usr/share/elasticsearch/data ports: - ${ES_PORT}:9200 env_file: .env environment: - node.name=es01 - ELASTIC_PASSWORD=${ELASTIC_PASSWORD} - bootstrap.memory_lock=false - discovery.type=single-node - xpack.security.enabled=true - xpack.security.http.ssl.enabled=false - xpack.security.transport.ssl.enabled=false - cluster.routing.allocation.disk.watermark.low=5gb - cluster.routing.allocation.disk.watermark.high=3gb - cluster.routing.allocation.disk.watermark.flood_stage=2gb - TZ=${TIMEZONE} mem_limit: ${MEM_LIMIT} ulimits: memlock: soft: -1 hard: -1 healthcheck: test: ["CMD-SHELL", "curl http://localhost:9200"] interval: 10s timeout: 10s retries: 120 network_mode: host restart: on-failure mysql: image: mysql:8.0.39 container_name: ragflow-mysql env_file: .env environment: - MYSQL_ROOT_PASSWORD=${MYSQL_PASSWORD} - TZ=${TIMEZONE} command: --max_connections=1000 --character-set-server=utf8mb4 --collation-server=utf8mb4_unicode_ci --default-authentication-plugin=mysql_native_password --tls_version="TLSv1.2,TLSv1.3" --port=${MYSQL_PORT} --init-file /data/application/init.sql volumes: - mysql_data:/var/lib/mysql - ./init.sql:/data/application/init.sql network_mode: host healthcheck: test: ["CMD", "mysqladmin" ,"ping", "-uroot", "-p${MYSQL_PASSWORD}"] interval: 10s timeout: 10s retries: 3 restart: on-failure minio: #这里用了我本地的minio image: minio/minio:RELEASE.2023-03-20T20-16-18Z container_name: ragflow-minio command: server --console-address ":9001" /data ports: - ${MINIO_PORT}:9000 - ${MINIO_CONSOLE_PORT}:9001 env_file: .env environment: - MINIO_ROOT_USER=${MINIO_USER} - MINIO_ROOT_PASSWORD=${MINIO_PASSWORD} - TZ=${TIMEZONE} volumes: - minio_data:/data network_mode: host restart: on-failure redis: image: valkey/valkey:8 container_name: ragflow-redis command: redis-server --requirepass ${REDIS_PASSWORD} --port ${REDIS_PORT} --maxmemory 128mb --maxmemory-policy allkeys-lru env_file: .env volumes: - redis_data:/data network_mode: host restart: on-failure ragflow: depends_on: mysql: condition: service_healthy image: ${RAGFLOW_IMAGE} container_name: ragflow-server # ports: # - ${SVR_HTTP_PORT}:9380 # - 81:80 # - 8443:443 # - 5688:5678 # - 5689:5679 volumes: - ./ragflow-logs:/ragflow/logs - ./nginx/ragflow.conf:/etc/nginx/conf.d/ragflow.conf - ./nginx/proxy.conf:/etc/nginx/proxy.conf - ./nginx/nginx.conf:/etc/nginx/nginx.conf - ../history_data_agent:/ragflow/history_data_agent #这里挂载了service_conf.yaml.template - ./service_conf_host.yaml.template:/ragflow/conf/service_conf.yaml.template env_file: .env environment: - TZ=${TIMEZONE} - HF_ENDPOINT=${HF_ENDPOINT} - MACOS=${MACOS} network_mode: host restart: on-failure extra_hosts: # 这里改成docker的ip - "host.docker.internal:172.17.0.1" #- "host.docker.internal:host-gateway" volumes: esdata01: driver: local infinity_data: driver: local mysql_data: driver: local minio_data: driver: local redis_data: driver: local -
service_conf_host.yaml.template
(参考原来的service_conf.yaml.template进行调整即可)shellragflow: host: ${RAGFLOW_HOST:-0.0.0.0} http_port: 9380 mysql: name: '${MYSQL_DBNAME:-rag_flow}' user: '${MYSQL_USER:-root}' password: '${MYSQL_PASSWORD:-infini_rag_flow}' host: '${MYSQL_HOST:-mysql}' port: ${MYSQL_PORT:-3306} max_connections: 100 stale_timeout: 30 minio: user: '${MINIO_USER:-rag_flow}' password: '${MINIO_PASSWORD:-infini_rag_flow}' host: '${MINIO_HOST:-localhost}:9000' es: hosts: 'http://${ES_HOST:-es01}:9200' username: '${ES_USER:-elastic}' password: '${ELASTIC_PASSWORD:-infini_rag_flow}' infinity: uri: '${INFINITY_HOST:-infinity}:23817' db_name: 'default_db' redis: db: 1 password: '${REDIS_PASSWORD:-infini_rag_flow}' host: '${REDIS_HOST:-redis}:6379'
-
ragflow.conf
这个的话,是因为我切换成本地网络导致的,直接修改成localhost就行了。
ragflow-server打印的日志,第一二行就会有ragflow.conf报错提醒。之前忘记截图了。

修改完之后重启服务就行了。

-
本次可能用到的docker命令:
shell# 启动所有服务 docker-compose -f docker-compose-all.yaml up -d # 关闭所有服务 docker-compose -f docker-compose-all.yaml down # 查看所有运行容器 docker ps # 容器日志打印 docker logs -f ragflow-server # 容器日志打印最新的300行 # docker logs -f --tail 300 ragflow-server # 删除容器 # docker rm -f ragflow-server # 启动单个容器服务 docker-compose -f docker-compose-all.yaml up -d ragflow
4.访问:直接localhost就可以访问到了

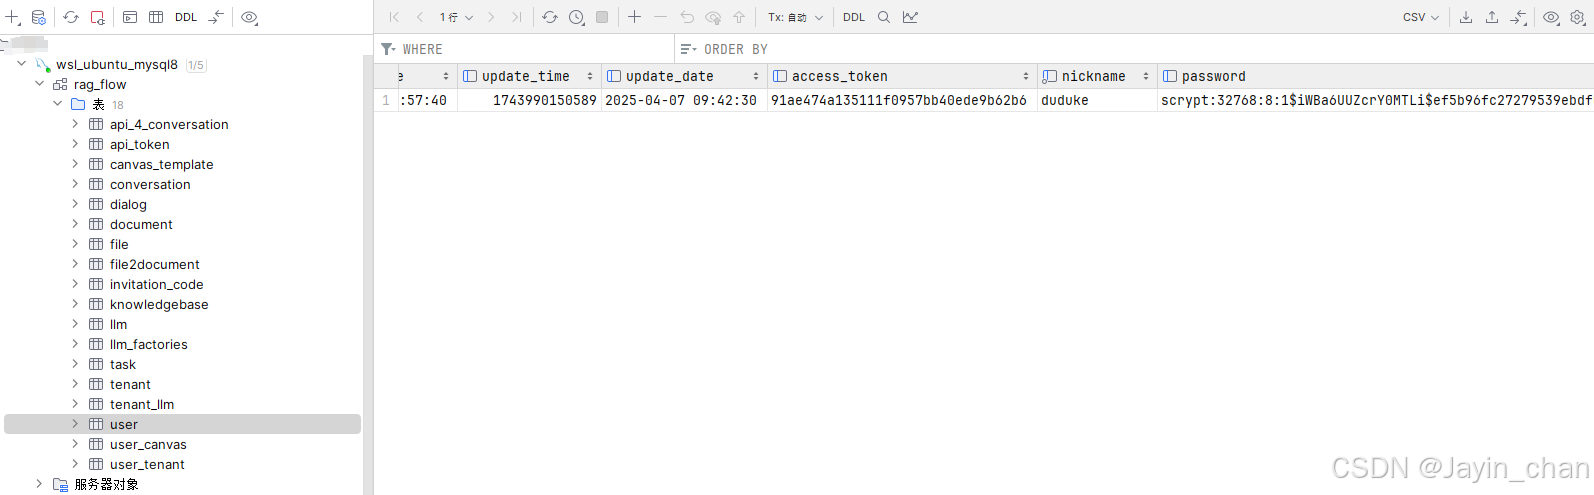
- 注册账号:随便注册一个。
注册的数据信息在数据库里可以查看到
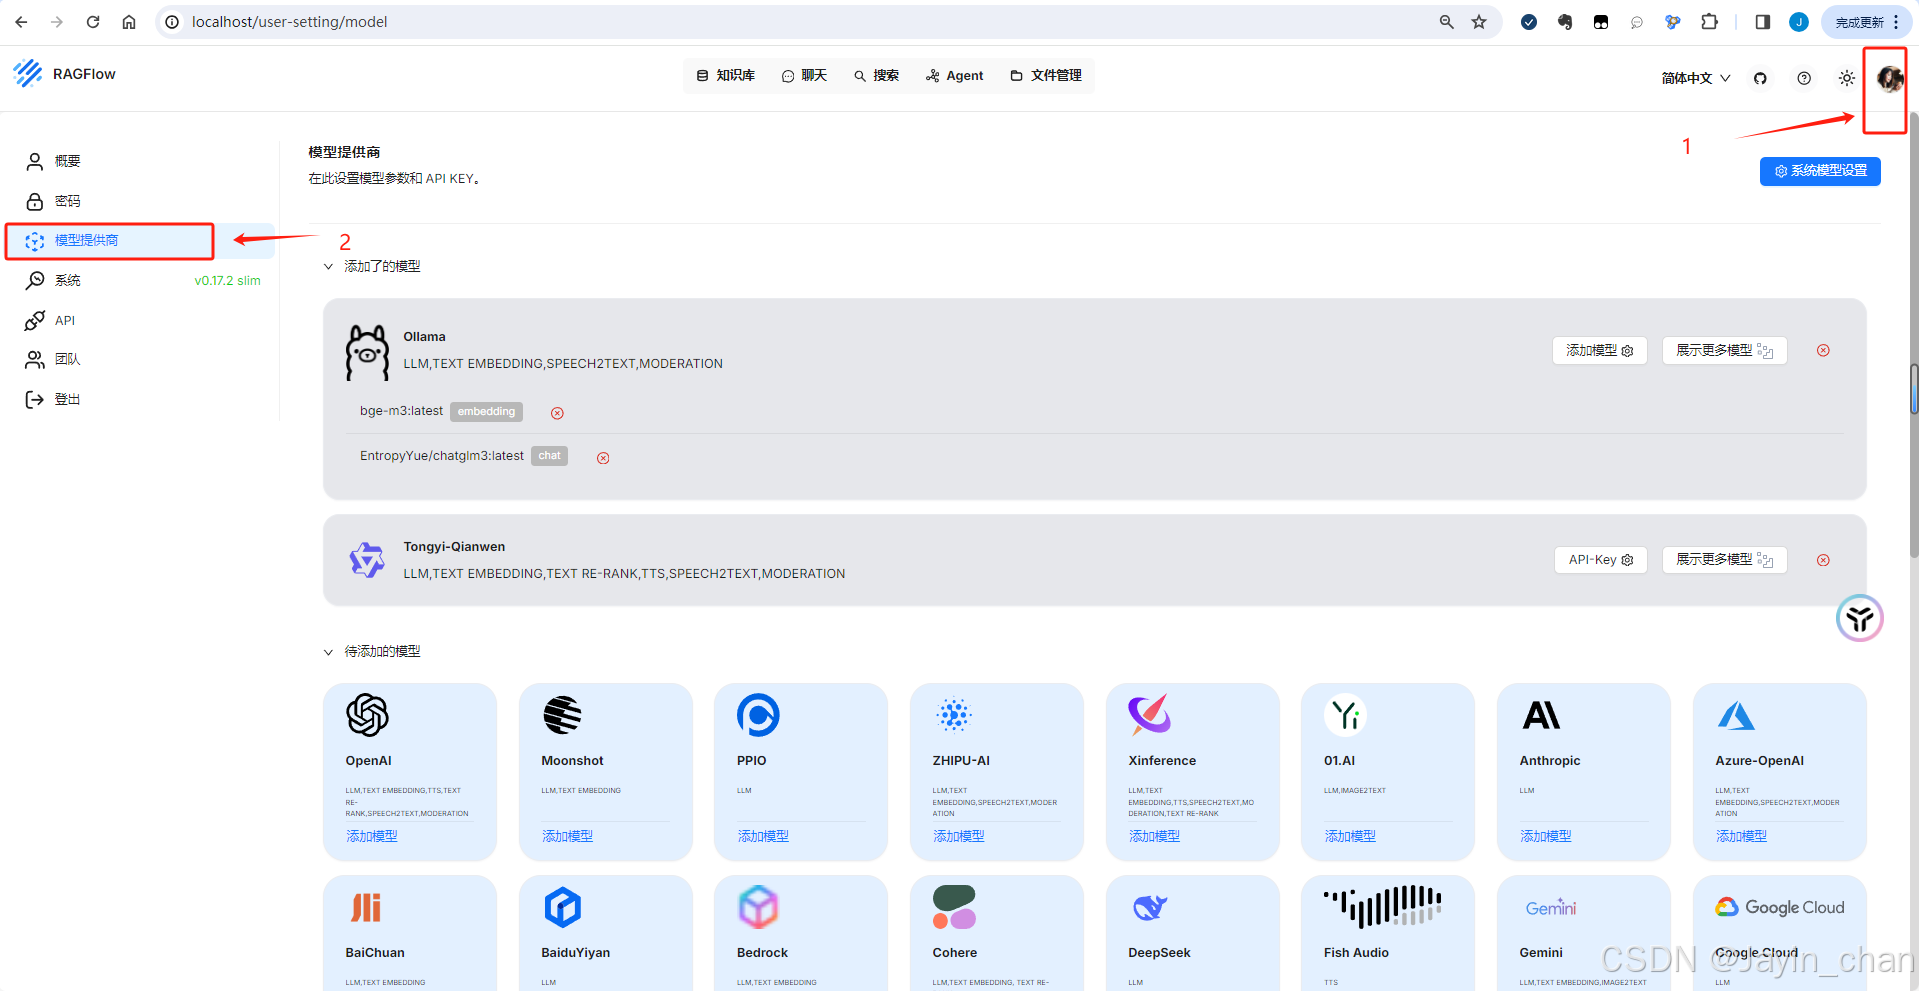
- 配置模型(我用的本地ollama)
ollama部署大模型的可以参考:使用Ollama在本地运行AI大模型(gemma、deepseek等)及UI整合(chatbox、Cherry Studio、Page Assist等)
- 创建知识库

一切都正常。