目录
[1. 训练](#1. 训练)
[2. 转表](#2. 转表)
[3. 测试](#3. 测试)
本文是对ECLUT技术的代码解读,原文解读请看ECLUT。
原文概要
ECLUT通过EC模块增大网络感受野,提升超分效果,实现SRLUT的改进,主要是2个创新点:
- 提出了一个扩展卷积(expand Conv),跟RCLUT一样,是一个用于低成本提升RF大小的模块。
- 一个简单有效的scaling方法来减小旋转累计的量化误差,该方法的计算成本基本可以忽略不计。
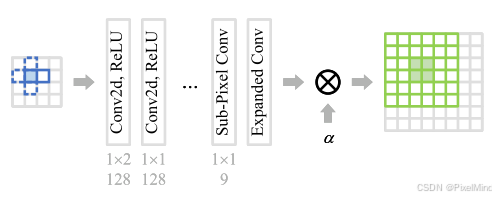
其网络结构图如下:
Expanded Conv:
首先根据前面的讲解,我们可以发现ECLUT是在SRLUT的基础上进行的优化,ECLUT因为只使用了2个查询点,因此LUT的size在全尺寸下也不会很大。作者是采用了1的间隔来实现ECLUT,所以精度是能够得到保证的,流程就可以分为,训练、转表以及推理,忽略确保精度的微调步骤。
1. 训练
代码实现如下:
python
### A lightweight deep network ###
class SRNet(torch.nn.Module):
    def __init__(self, upscale=4):
        super(SRNet, self).__init__()

        self.upscale = upscale

        self.conv1 = nn.Conv2d(1, 64, [2,1], stride=1, padding=0, dilation=1)
        self.conv2 = nn.Conv2d(64, 64, 1, stride=1, padding=0, dilation=1)
        self.conv3 = nn.Conv2d(64, 64, 1, stride=1, padding=0, dilation=1)
        self.conv4 = nn.Conv2d(64, 64, 1, stride=1, padding=0, dilation=1)
        self.conv5 = nn.Conv2d(64, 64, 1, stride=1, padding=0, dilation=1)
        self.conv6 = nn.Conv2d(64, 9*upscale*upscale, 1, stride=1, padding=0, dilation=1)
        self.pixel_shuffle = nn.PixelShuffle(upscale)
        self.expand_conv = ExpandConv()

        # Init weights
        for m in self.modules():
            classname = m.__class__.__name__
            if classname.lower().find('conv') != -1:
                nn.init.kaiming_normal(m.weight)
                nn.init.constant(m.bias, 0)
            elif classname.find('bn') != -1:
                m.weight.data.normal_(1.0, 0.02)
                m.bias.data.fill_(0)


    def forward(self, x_in, alpha):
        B, C, H, W = x_in.size()
        x_in = x_in.reshape(B*C, 1, H, W)

        x = self.conv1(x_in)
        x = self.conv2(F.relu(x))
        x = self.conv3(F.relu(x))
        x = self.conv4(F.relu(x))
        x = self.conv5(F.relu(x))
        x = self.conv6(F.relu(x))
        x = self.pixel_shuffle(x)
        x = self.expand_conv(x)
        x = x.reshape(B, C, self.upscale*(H-1), self.upscale*W)

        return x * alpha
根据前面的讲解,ECLUT是在SRLUT的基础上进行的优化,因此整体结构的实现博主采取了与SRLUT的代码差不多的方式。不同之处在于:
1)ECLUT因为只使用了2个查询点,因此首层的卷积kernel_size是2x1。
2)pixel_shuffle之前的通道多了9倍,因为需要进行我们讲到的EC模块,即expand_conv。
3)最后的alpha加权,减小量化误差。
这里关于最重要的模块expand_conv的实现如下:
python
class ExpandConv(torch.nn.Module):
def __init__(self):
super(ExpandConv, self).__init__()
pass
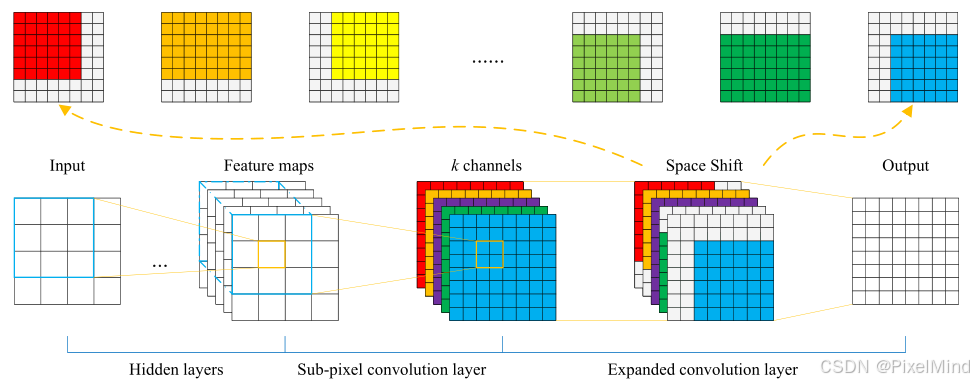
def forward(self, inputs):
# b, 9, h*scale, w*scale
# (0,0) -> (2, 2)
# pad left right top bottom
shift_x1 = F.pad(inputs[:, 0:1, 1:, 1:], (0,1,0,1), mode='reflect')
shift_x2 = F.pad(inputs[:, 1:2, 1:, :], (0,0,0,1), mode='reflect')
shift_x3 = F.pad(inputs[:, 2:3, 1:, :-1], (1,0,0,1), mode='reflect')
shift_x4 = F.pad(inputs[:, 3:4, :, 1:], (0,1,0,0), mode='reflect')
shift_x5 = inputs[:, 4:5, :, :]
shift_x6 = F.pad(inputs[:, 5:6, :, :-1], (1,0,0,0), mode='reflect')
shift_x7 = F.pad(inputs[:, 6:7, :-1, 1:], (0,1,1,0), mode='reflect')
shift_x8 = F.pad(inputs[:, 7:8, :-1, :], (0,0,1,0), mode='reflect')
shift_x9 = F.pad(inputs[:, 8:9, :-1, :-1], (1,0,1,0), mode='reflect')
result = shift_x1 + shift_x2 + shift_x3 +\
shift_x4 + shift_x5 + shift_x6 + shift_x7 + shift_x8 + shift_x9
result /= 9
return result对inputs进行9个方向的偏移,然后pad对应的长度使得其输出大小不变,最后将他们相加进行一个融合,完成了这个EC模块的计算过程。
2. 转表
首先我们需要初始化一个2D的输入。
python
def get_ec_lut(interval):
    # 1D input
    base = torch.arange(0, 257, interval)  # 0-256
    base[-1] -= 1
    L = base.size(0)

    # 2D input
    # 256*256   0 0 0...    |1 1 1...     |...|255 255 255...
    first = base.cuda().unsqueeze(1).repeat(1, L).reshape(-1)
    # 256*256   0 1 2 .. 255|0 1 2 ... 255|...|0 1 2 ... 255
    second = base.cuda().repeat(L)
    onebytwo = torch.stack([first, second], 1)  # [256*256, 2]

     # Rearange input: [N, 4] -> [N, C=1, H=2, W=2]
    input_tensor = onebytwo.unsqueeze(1).unsqueeze(
        1).reshape(-1, 1, 2, 1).float() / 255.0
    return input_tensor
然后送入推理即可,因为ECLUT是通过对多输出进行偏移得到更大的RF,因此这里就已经得到了最终所需要的LUT。
3. 测试
测试的部分,针对第一个卷积及其后面的1x1卷积部分,可以转换为一个完全精度的2D LUT,这个查询是不需要插值的,因此十分简单,第二个是expand_conv,只需要我们将1.训练中实现的torch版本改写为numpy的版本即可,对于最后的alpha加权,使用加2再右移2位来实现。这个代码的实现在ECLUT的讲解中有提到。
以上针对于ECLUT代码实现的部分讲解完毕,如果有不清楚的问题欢迎大家提出。