基于OpenCV的图像分割技术深度解析与实践指南
-
- 项目概述与技术背景
- 环境配置与项目结构
- 核心算法实现解析
-
- [1. 阈值分割(Otsu方法)](#1. 阈值分割(Otsu方法))
- [2. Canny边缘检测](#2. Canny边缘检测)
- [3. 分水岭算法](#3. 分水岭算法)
- 实战应用指南
-
- [1. 基础分割流程](#1. 基础分割流程)
- [2. 多算法比较框架](#2. 多算法比较框架)
- [3. 医学图像分割专项](#3. 医学图像分割专项)
- 常见问题与解决方案
-
- [1. 过分割问题](#1. 过分割问题)
- [2. 边缘断裂问题](#2. 边缘断裂问题)
- [3. 光照不均影响](#3. 光照不均影响)
- 性能优化技巧
-
- [1. 多尺度处理](#1. 多尺度处理)
- [2. ROI优先处理](#2. ROI优先处理)
- [3. 并行计算加速](#3. 并行计算加速)
- 学术背景与扩展阅读
- 应用场景与展望
图像分割是计算机视觉领域的核心任务之一,它将数字图像划分为多个区域或对象,为高级视觉理解奠定基础。本文将深入剖析Kite团队开发的基于OpenCV的图像分割项目,从传统算法原理到现代实现技巧,提供一套完整的实战指南。
项目概述与技术背景
项目核心特点
Kite的图像分割项目展示了OpenCV在传统图像分割任务中的典型应用:
- 多算法实现:包含阈值分割、边缘检测、区域生长等多种经典方法
- 模块化设计:各分割技术独立实现,便于扩展和比较
- 教育导向:代码注释详尽,适合学习传统图像处理技术
- 轻量级实现:仅依赖OpenCV和NumPy,无需深度学习框架
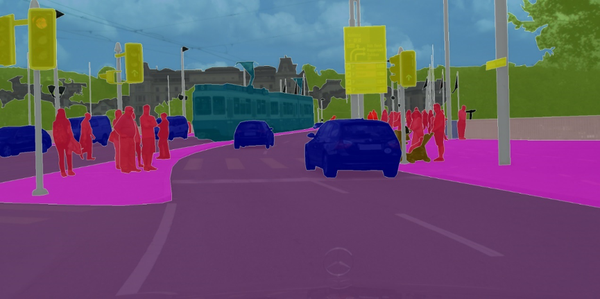
图:项目实现的多种分割效果对比(来源:项目仓库)
传统分割算法分类
项目涵盖的主要算法类型:
- 基于阈值的分割:Otsu方法、自适应阈值
- 基于边缘的分割:Canny边缘检测、Sobel算子
- 基于区域的分割:分水岭算法、区域生长
- 基于聚类的分割:K-means色彩聚类
环境配置与项目结构
系统要求
| 组件 | 最低要求 | 推荐配置 |
|---|---|---|
| Python | 3.6 | 3.8+ |
| OpenCV | 4.2 | 4.5+ |
| NumPy | 1.19 | 1.21+ |
| 内存 | 4GB | 8GB+ |
安装步骤
bash
# 克隆项目仓库
git clone https://github.com/kiteco/kite-python-blog-post-code.git
cd kite-python-blog-post-code/image-segmentation

# 创建虚拟环境
python -m venv venv
source venv/bin/activate  # Linux/Mac
# venv\Scripts\activate   # Windows

# 安装依赖
pip install opencv-python numpy matplotlib

# 验证安装
python -c "import cv2; print(f'OpenCV版本: {cv2.__version__}')"
项目结构解析
image-segmentation/
├── images/                # 示例图像
│   ├── sample.jpg
│   └── medical.png
├── thresholding.py        # 阈值分割实现
├── edge_based.py          # 边缘检测分割
├── region_based.py        # 区域分割算法
├── clustering.py          # 色彩聚类分割
├── utils.py               # 辅助函数
└── evaluate.py            # 分割评估指标
核心算法实现解析
1. 阈值分割(Otsu方法)
python
# thresholding.py
import cv2
import numpy as np

def otsu_thresholding(img_path):
    img = cv2.imread(img_path, cv2.IMREAD_GRAYSCALE)
    blur = cv2.GaussianBlur(img, (5,5), 0)

    # Otsu自动阈值计算
    _, thresh = cv2.threshold(
        blur, 0, 255,
        cv2.THRESH_BINARY + cv2.THRESH_OTSU
    )

    return thresh
数学原理 :
Otsu方法最大化类间方差:
math
\sigma_b^2(t) = \omega_1(t)\omega_2(t)[\mu_1(t)-\mu_2(t)]^2其中:
- ω i \omega_i ωi 为各类别概率
- μ i \mu_i μi 为各类别均值
2. Canny边缘检测
python
# edge_based.py
def canny_segmentation(img_path, low=50, high=150):
    img = cv2.imread(img_path, cv2.IMREAD_GRAYSCALE)
    blur = cv2.GaussianBlur(img, (5,5), 0)

    # Canny边缘检测
    edges = cv2.Canny(blur, low, high)

    # 边缘闭合处理
    kernel = cv2.getStructuringElement(cv2.MORPH_ELLIPSE, (3,3))
    closed = cv2.morphologyEx(
        edges, cv2.MORPH_CLOSE,
        kernel, iterations=2
    )

return closed参数优化建议:
- 高低阈值比通常为1:2或1:3
- 先进行高斯模糊减少噪声影响
- 形态学操作可改善边缘连续性
3. 分水岭算法
python
# region_based.py
def watershed_segmentation(img_path):
    img = cv2.imread(img_path)
    gray = cv2.cvtColor(img, cv2.COLOR_BGR2GRAY)

    # 前景/背景标记
    _, thresh = cv2.threshold(gray, 0, 255,
        cv2.THRESH_BINARY_INV + cv2.THRESH_OTSU)

    # 确定确定背景区域
    kernel = np.ones((3,3), np.uint8)
    sure_bg = cv2.dilate(thresh, kernel, iterations=3)

    # 距离变换找确定前景
    dist = cv2.distanceTransform(thresh, cv2.DIST_L2, 5)
    _, sure_fg = cv2.threshold(
        dist, 0.7*dist.max(), 255, 0)

    # 未知区域计算
    sure_fg = np.uint8(sure_fg)
    unknown = cv2.subtract(sure_bg, sure_fg)

    # 标记连通域
    _, markers = cv2.connectedComponents(sure_fg)
    markers += 1
    markers[unknown==255] = 0

    # 应用分水岭
    markers = cv2.watershed(img, markers)
    img[markers == -1] = [255,0,0]  # 标记边界

return img关键步骤说明:
- 通过距离变换识别种子区域
- 标记确定背景、前景和未知区域
- 连通域标记初始化分水岭
- 边界像素标记为-1
实战应用指南
1. 基础分割流程
python
import cv2
from thresholding import otsu_thresholding

# 加载图像
input_path = "images/sample.jpg"
output_path = "results/threshold_result.jpg"

# 应用Otsu阈值分割
result = otsu_thresholding(input_path)

# 保存结果
cv2.imwrite(output_path, result)
2. 多算法比较框架
python
import matplotlib.pyplot as plt
from thresholding import otsu_thresholding
from edge_based import canny_segmentation
from region_based import watershed_segmentation

methods = {
    "Otsu": otsu_thresholding,
    "Canny": canny_segmentation,
    "Watershed": watershed_segmentation
}

img = cv2.imread("images/medical.png", cv2.IMREAD_COLOR)

plt.figure(figsize=(15,10))
for i, (name, func) in enumerate(methods.items(), 1):
    plt.subplot(2, 2, i)
    result = func(img)
    plt.imshow(result, cmap='gray')
    plt.title(name)

plt.tight_layout()
plt.savefig("comparison.png")
3. 医学图像分割专项
python
def medical_image_processing(img_path):
    # 读取DICOM或PNG图像
    img = cv2.imread(img_path, cv2.IMREAD_GRAYSCALE)

    # 对比度增强
    clahe = cv2.createCLAHE(clipLimit=2.0, tileGridSize=(8,8))
    enhanced = clahe.apply(img)

    # 自适应阈值
    thresh = cv2.adaptiveThreshold(
        enhanced, 255,
        cv2.ADAPTIVE_THRESH_GAUSSIAN_C,
        cv2.THRESH_BINARY, 11, 2
    )

    # 小区域去除
    contours, _ = cv2.findContours(
        thresh, cv2.RETR_EXTERNAL,
        cv2.CHAIN_APPROX_SIMPLE)
    for cnt in contours:
        if cv2.contourArea(cnt) < 100:
            cv2.drawContours(thresh, [cnt], 0, 0, -1)

    return thresh
常见问题与解决方案
1. 过分割问题
现象:单个对象被分割为多个区域
解决方法:
-
预处理平滑:
pythonblur = cv2.bilateralFilter(img, 9, 75, 75) -
后处理合并:
pythonkernel = cv2.getStructuringElement(cv2.MORPH_ELLIPSE, (5,5)) merged = cv2.morphologyEx(result, cv2.MORPH_CLOSE, kernel) -
调整参数:
python# 增大分水岭的距离变换阈值 _, sure_fg = cv2.threshold(dist, 0.5*dist.max(), 255, 0)
2. 边缘断裂问题
现象:对象边界不连续
优化方案:
-
增强边缘检测:
pythonedges = cv2.Canny(img, low_thresh, high_thresh, apertureSize=5) -
形态学修复:
pythonkernel = np.ones((3,3), np.uint8) closed = cv2.morphologyEx(edges, cv2.MORPH_CLOSE, kernel) -
使用结构化森林边缘检测:
pythonedge_detector = cv2.ximgproc.createStructuredEdgeDetection("model.yml") edges = edge_detector.detectEdges(np.float32(img)/255.0
3. 光照不均影响
现象:阴影区域分割失败
处理策略:
-
背景减除:
pythonbg_model = cv2.createBackgroundSubtractorMOG2() fg_mask = bg_model.apply(img) -
局部阈值:
pythonthresh = cv2.adaptiveThreshold( img, 255, cv2.ADAPTIVE_THRESH_MEAN_C, cv2.THRESH_BINARY, 51, 10 ) -
同态滤波:
pythondef homomorphic_filter(img): img_log = np.log1p(np.float32(img)) rows, cols = img.shape crow, ccol = rows//2, cols//2 mask = np.zeros((rows, cols), np.float32) D = 30 for i in range(rows): for j in range(cols): d = np.sqrt((i-crow)**2 + (j-ccol)**2) mask[i,j] = 1 - np.exp(-(d**2)/(2*(D**2))) filtered = np.fft.ifft2(np.fft.ifftshift(np.fft.fftshift( np.fft.fft2(img_log)) * mask)) return np.exp(np.real(filtered))-1
性能优化技巧
1. 多尺度处理
python
def multi_scale_segmentation(img_path):
    img = cv2.imread(img_path, cv2.IMREAD_GRAYSCALE)
    results = []

    for scale in [0.5, 1.0, 2.0]:
        resized = cv2.resize(
            img, None,
            fx=scale, fy=scale,
            interpolation=cv2.INTER_AREA)

        # 在不同尺度下分割
        thresh = cv2.threshold(
            resized, 0, 255,
            cv2.THRESH_BINARY + cv2.THRESH_OTSU)[1]

        # 还原到原尺寸
        thresh = cv2.resize(
            thresh, (img.shape[1], img.shape[0]),
            interpolation=cv2.INTER_NEAREST)
        results.append(thresh)

    # 融合多尺度结果
    final = np.mean(np.stack(results), axis=0)
    return (final > 127).astype(np.uint8) * 255
2. ROI优先处理
python
def roi_based_segmentation(img_path):
    img = cv2.imread(img_path)
    gray = cv2.cvtColor(img, cv2.COLOR_BGR2GRAY)

    # 粗略检测感兴趣区域
    blur = cv2.GaussianBlur(gray, (25,25), 0)
    _, rough_thresh = cv2.threshold(
        blur, 0, 255,
        cv2.THRESH_BINARY + cv2.THRESH_OTSU)

    # 在ROI内精细分割
    contours, _ = cv2.findContours(
        rough_thresh, cv2.RETR_EXTERNAL,
        cv2.CHAIN_APPROX_SIMPLE)

    mask = np.zeros_like(gray)
    for cnt in contours:
        if cv2.contourArea(cnt) > 1000:
            x,y,w,h = cv2.boundingRect(cnt)
            roi = gray[y:y+h, x:x+w]

            # 精细处理
            roi_thresh = cv2.adaptiveThreshold(
                roi, 255,
                cv2.ADAPTIVE_THRESH_GAUSSIAN_C,
                cv2.THRESH_BINARY, 11, 2)

            mask[y:y+h, x:x+w] = roi_thresh

    return mask
3. 并行计算加速
python
from multiprocessing import Pool
import os

def process_image(img_file):
    img_path = os.path.join("images", img_file)
    result = otsu_thresholding(img_path)
    cv2.imwrite(f"results/{img_file}", result)

if __name__ == "__main__":
    img_files = [f for f in os.listdir("images") if f.endswith(".jpg")]
    with Pool(4) as p:
        p.map(process_image, img_files)
学术背景与扩展阅读
基础论文
-
Otsu阈值法:
- Otsu N. "A Threshold Selection Method from Gray-Level Histograms" IEEE Trans. Sys. Man. Cyber. 1979
-
Canny边缘检测:
- Canny J. "A Computational Approach to Edge Detection" IEEE PAMI 1986
-
分水岭算法:
- Vincent L, Soille P. "Watersheds in Digital Spaces: An Efficient Algorithm Based on Immersion Simulations" IEEE PAMI 1991
现代发展
-
图割方法:
- Boykov Y, Jolly M. "Interactive Graph Cuts for Optimal Boundary & Region Segmentation" ICCV 2001
-
超像素技术:
- Achanta R, et al. "SLIC Superpixels Compared to State-of-the-Art" IEEE PAMI 2012
-
能量最小化框架:
- Rother C, et al. "GrabCut: Interactive Foreground Extraction" SIGGRAPH 2004
应用场景与展望
典型工业应用
- 医学影像:肿瘤区域分割
- 自动驾驶:道路场景解析
- 工业检测:缺陷区域识别
- 遥感图像:地表覆盖分类
未来发展方向
- 与传统CV融合:结合深度学习特征
- 实时处理优化:边缘设备部署
- 交互式分割:人机协同工作流
- 三维扩展:体数据分割技术
Kite的这个OpenCV图像分割项目虽然聚焦于传统算法,但其清晰的实现和模块化设计为理解图像分割基础提供了绝佳的学习材料。通过本文的技术解析和实战指南,读者可以掌握经典分割技术的核心思想,并具备将其应用于实际项目的能力。在深度学习大行其道的今天,这些传统方法仍在小样本、实时性要求高的场景中发挥着不可替代的作用。