目录
- 引言
- 前期准备
-
- [Step1 创建工程](#Step1 创建工程)
- [Step2 创建接口](#Step2 创建接口)
- [Step3 创建基类](#Step3 创建基类)
- [Step4 添加海康SDK](#Step4 添加海康SDK)
- [Step5 实现海康SDK的操作相机实例和设置相机参数接口方法](#Step5 实现海康SDK的操作相机实例和设置相机参数接口方法)
-
- [5.1 获取相机SN枚举(枚举相机)](#5.1 获取相机SN枚举(枚举相机))
- 5.2初始化相机(创建相机实例打开相机)
- [5.3 回调函数(图像采集Event)](#5.3 回调函数(图像采集Event))
- [Step6 调用封装的DLL实现取图](#Step6 调用封装的DLL实现取图)
引言
机器视觉实际应用场景广泛,连接的相机品牌多样化,本教程旨在演示如何利用C#语言中类的继承与多态的特性实现多种工业相机的SDK调用快速封装,可适用于海康威视/Basler/Cognex/华睿科技/迈德威视等各种品牌。
本教程先演示如何封装海康工业相机。
前期准备
下载并安装海康工业相机客户端MVS
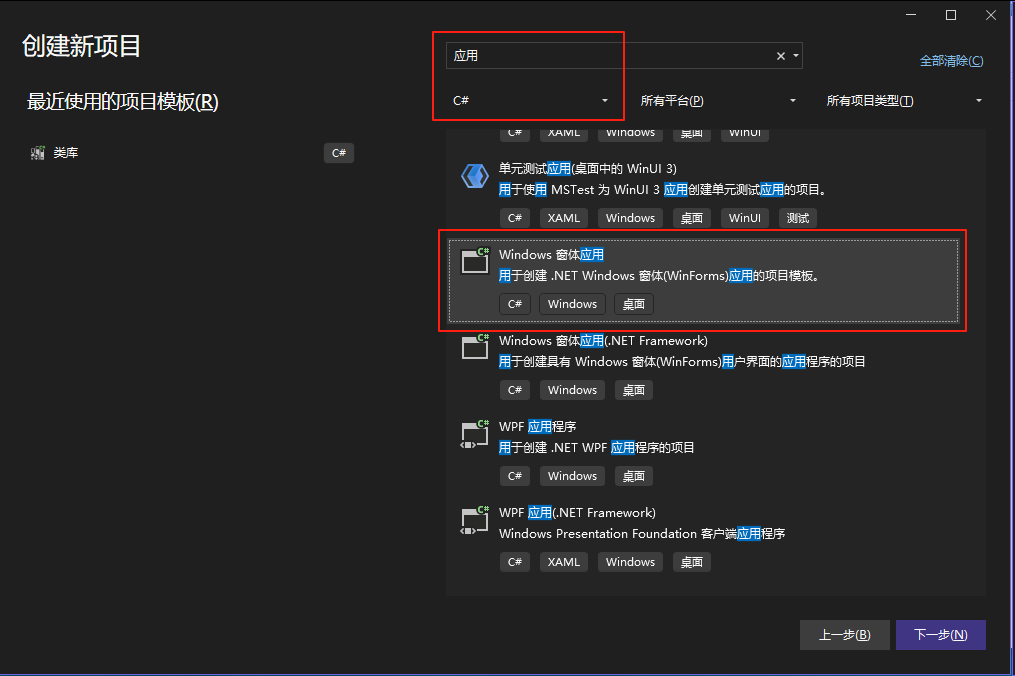
Step1 创建工程
利用Visual Studio创建.NET6.0工程
根据实际情况选择.NET/.NET Framework/WPF
Step2 创建接口
创建相机接口ICamera
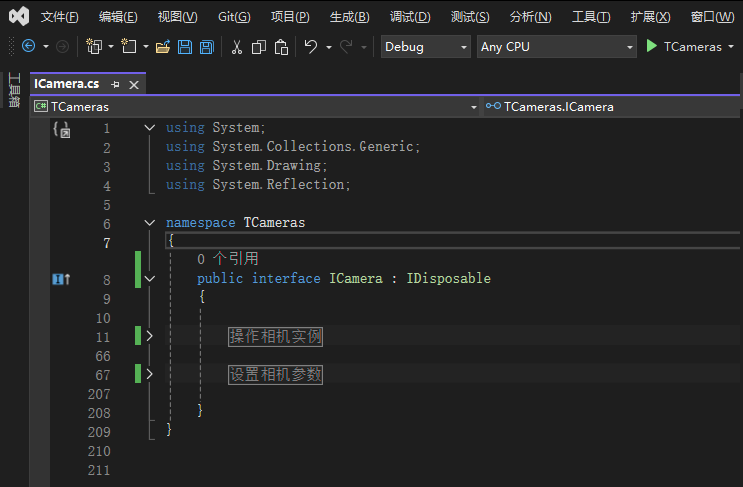
2.1定义操作相机实例接口方法
| 接口 | 传参 | 说明 |
|---|---|---|
| List< string > GetListEnum() | / | 获取相机SN枚举 |
| bool InitDevice(string SN, object Handle = null) | 相机SN && 窗口句柄 | 初始化相机 |
| bool CloseDevice() | / | 关闭相机 |
| bool StartBySoftTriggerModel() | / | 相机开始采集并设置为软触发模式 |
| bool StartByHardTriggerModel(TriggerSource triggerSource = TriggerSource.Line0) | 触发源 | 相机开始采集并设置为硬触发模式 |
| bool SoftTrigger() | / | 软触发一次 |
2.2定义设置相机参数接口方法(部分)
| 接口 | 传参 | 说明 |
|---|---|---|
| bool SetTriggerMode(TriggerMode mode, TriggerSource source = TriggerSource.Line0) | 触发模式&&触发源 | 设置触发模式及触发源 |
| bool SetExpouseTime(double value) | 曝光时长 | 设置曝光时长 |
Step3 创建基类
这里涉及到类的继承与多态,读者不了解可自行扩展学习 之所以定义相机基类是为了规范该接口适用于其他品牌相机的SDK例如巴斯勒/康耐视/华睿/迈德威视等
3.1定义操作相机实例&&设置相机参数的抽象层
| 接口 | 传参 | 说明 |
|---|---|---|
| public abstract List< string > GetListEnum() | / | 获取相机SN枚举 |
| public abstract bool InitDevice(string SN, object Handle = null) | 相机SN && 窗口句柄 | 初始化相机 |
| public abstract bool CloseDevice() | / | 关闭相机 |
| public abstract bool StartBySoftTriggerModel() | / | 相机开始采集并设置为软触发模式 |
| public abstract bool StartByHardTriggerModel(TriggerSource triggerSource = TriggerSource.Line0) | 触发源 | 相机开始采集并设置为硬触发模式 |
| public abstract bool SoftTrigger() | / | 软触发一次 |
| public abstract bool SetTriggerMode(TriggerMode mode, TriggerSource source = TriggerSource.Line0) | 触发模式&&触发源 | 设置触发模式及触发源 |
| public abstract bool SetExpouseTime(double value) | 曝光时长 | 设置曝光时长 |
3.2定义操作相机实例&&设置相机参数的公用方法
1.获取当前帧图片
所有的相机取图都通过回调的方式获取
通过获取相机回调的CallBackImg来实现
该方法不能用于实时取图存在多线程问题
csharp
/// <summary>
/// 获取当前帧图像
/// </summary>
/// <param name="bitmap"></param>
/// <param name="outtime"></param>
/// <returns></returns>
public bool GetImage(out Bitmap bitmap, int outtime = 50)
{
    bitmap = null;
    if (CallBackImg == null)
        return false;
    lock (CallBackImg)
    {
        //bitmap = this.CallBackImg.Clone() as Bitmap;
        bitmap = CallBackImg;
        Bitmap = bitmap;
        //必须清空CallBackImg
        CallBackImg = null;
        return true;
    }
}
在相机的图像回调函数中需要将当前帧取图的结果暂存在CallBackImg变量中,具体解释可见Step5-5.3 回调函数
2.软触发获取图像
软触发取图前将暂存原触发方式在本地便于硬触发工况下取图测试
实际操作为发送一次软触发指令通过获取回调返回的单帧图像
csharp
/// <summary>
/// 软触发获取图像
/// </summary>
/// <param name="bitmap"></param>
/// <param name="outtime"></param>
/// <returns></returns>
public bool GetImageWithSoftTrigger(out Bitmap bitmap, int outtime = 3000)
{
    if (!isGrabbing)
        StartGrabbing();

    // 开始时间
    DateTime startTime = DateTime.Now; // 当前时间
    // 设置超时时间
    DateTime lastTime = startTime.AddMilliseconds(outtime);

    // 判断是否超时
    while (lastTime > DateTime.Now)// 设置超时时间为 3 秒
    {
        if (isGrabbing)
            break;
    }

    GetTriggerMode(out TriggerMode triggerMode, out TriggerSource triggerSource);
    SetTriggerMode(TriggerMode.On, TriggerSource.Software);

    bitmap = null;

    // 开始时间
    startTime = DateTime.Now; // 当前时间
    // 设置超时时间
    lastTime = startTime.AddMilliseconds(outtime);

    if (!SoftTrigger()) return false;

    // 判断是否超时
    while (lastTime > DateTime.Now)// 设置超时时间为 3 秒
    {
        GetImage(out bitmap, outtime);
        if (bitmap != null)
            break;
    }

    if (triggerMode == TriggerMode.On)
        SetTriggerMode(triggerMode, triggerSource);
    return (bitmap != null);
}
3.获取和设置相机参数
csharp
public void SetCamConfig(CameraConfig config)
{
    SetTriggerMode(config.TriggerMode, config.TriggerSource);
    SetTriggerPolarity(config.TriggerPolarity);
    SetTriggerDelay(config.TriggerDelay);
    SetTriggerFliter(config.TriggerFilter);
    SetExpouseTime(config.ExpouseTime);
    SetGain(config.Gain);
}

public void GetCamConfig(out CameraConfig config)
{
    string SN = this.SN;
    CameraBrand Brand = this.Brand;
    GetTriggerMode(out TriggerMode triggerMode, out TriggerSource triggerSource);
    GetTriggerPolarity(out TriggerPolarity triggerPolarity);
    GetTriggerFliter(out double triggerfilter);
    GetTriggerDelay(out double triggerdelay);
    GetExpouseTime(out double expouseTime);
    GetGain(out double gain);

    config = new CameraConfig()
    {
        CameraSN = SN,
        Brand = Brand,
        TriggerMode = triggerMode,
        TriggerSource = triggerSource,
        TriggerPolarity = triggerPolarity,
        TriggerFilter = triggerfilter,
        TriggerDelay = triggerdelay,
        ExpouseTime = expouseTime,
        Gain = gain
    };
}
Step4 添加海康SDK
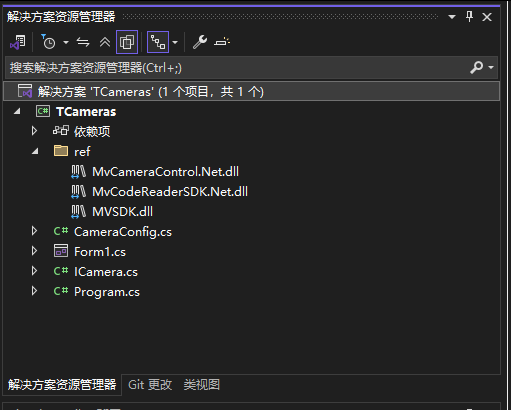
4.1在工程文件中创建ref文件夹
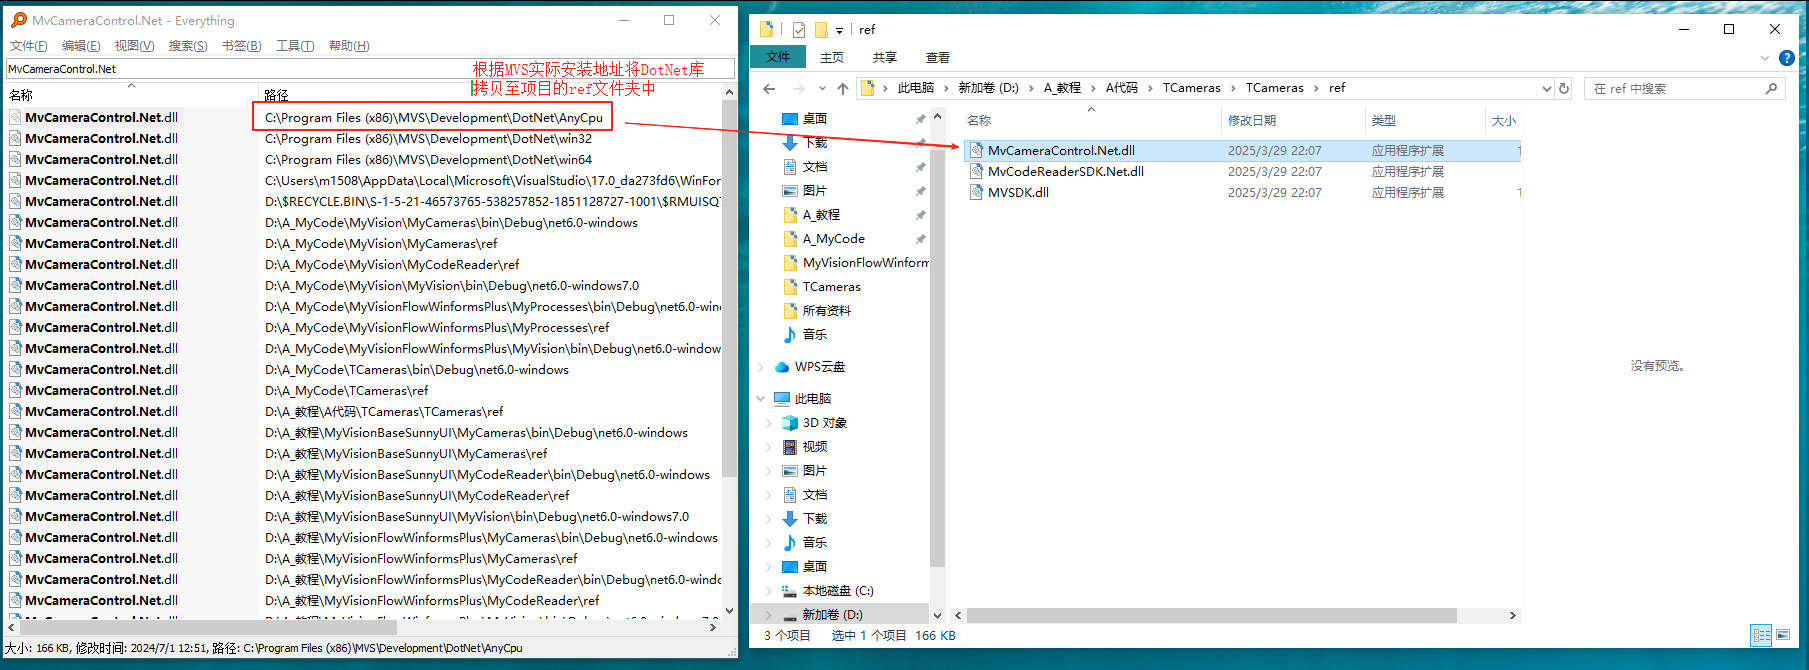
拷贝成功后在解决方案资源管理器中ref下会有对于的dll(没有则手动添加)
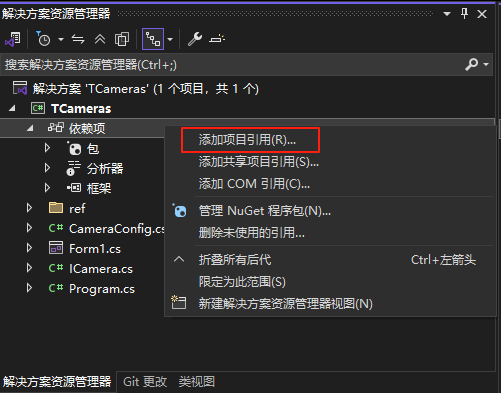
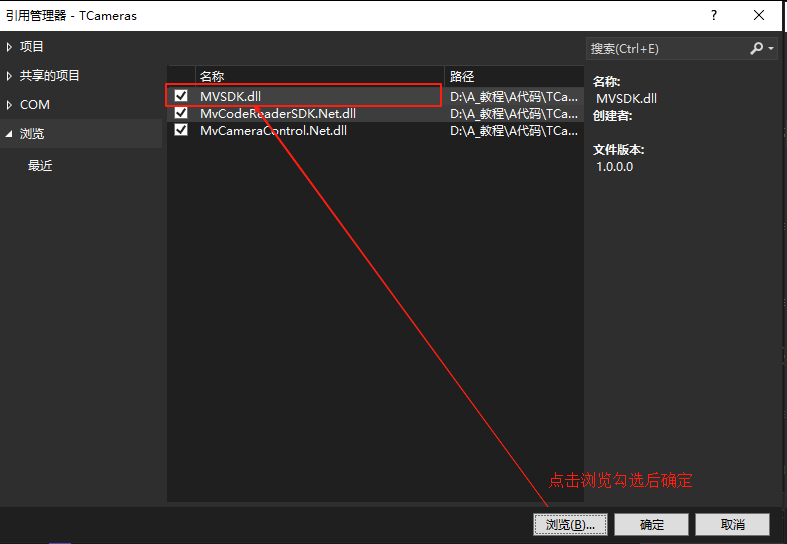
4.2解决方案添加引用
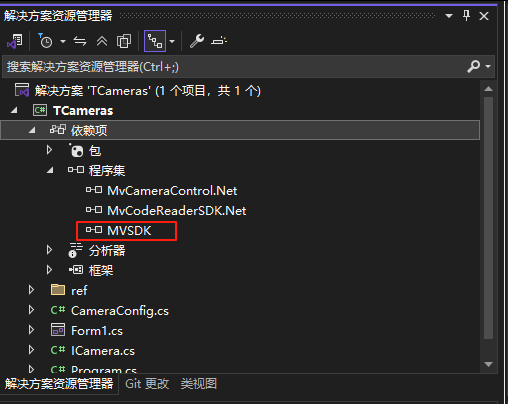
程序集下有MVSDK即代表添加DLL完成
Step5 实现海康SDK的操作相机实例和设置相机参数接口方法
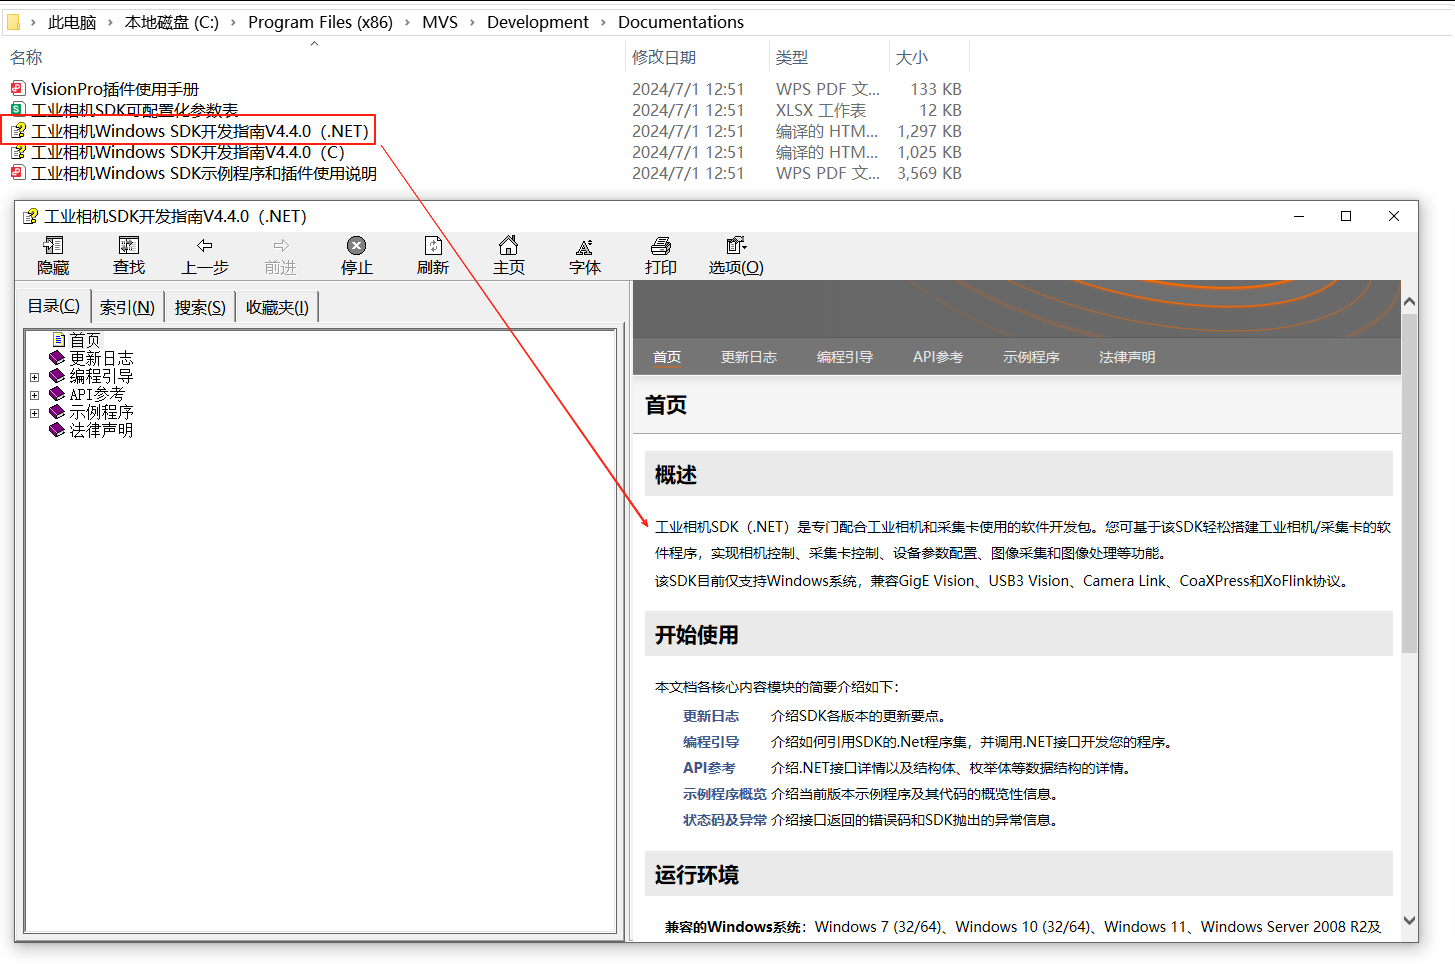
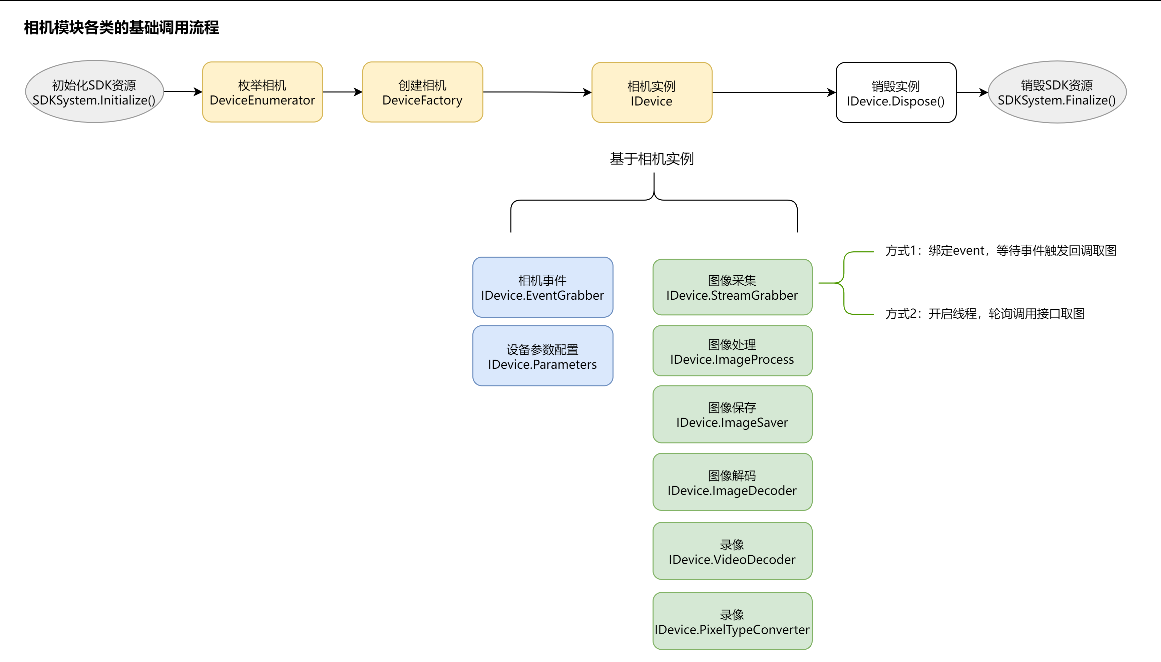
所有相机厂家的SDK都会有接口文档提供,海康工业相机SDK的接口文档路径如下,下面会介绍如何通过接口文档实现自己的接口方法
5.1 获取相机SN枚举(枚举相机)
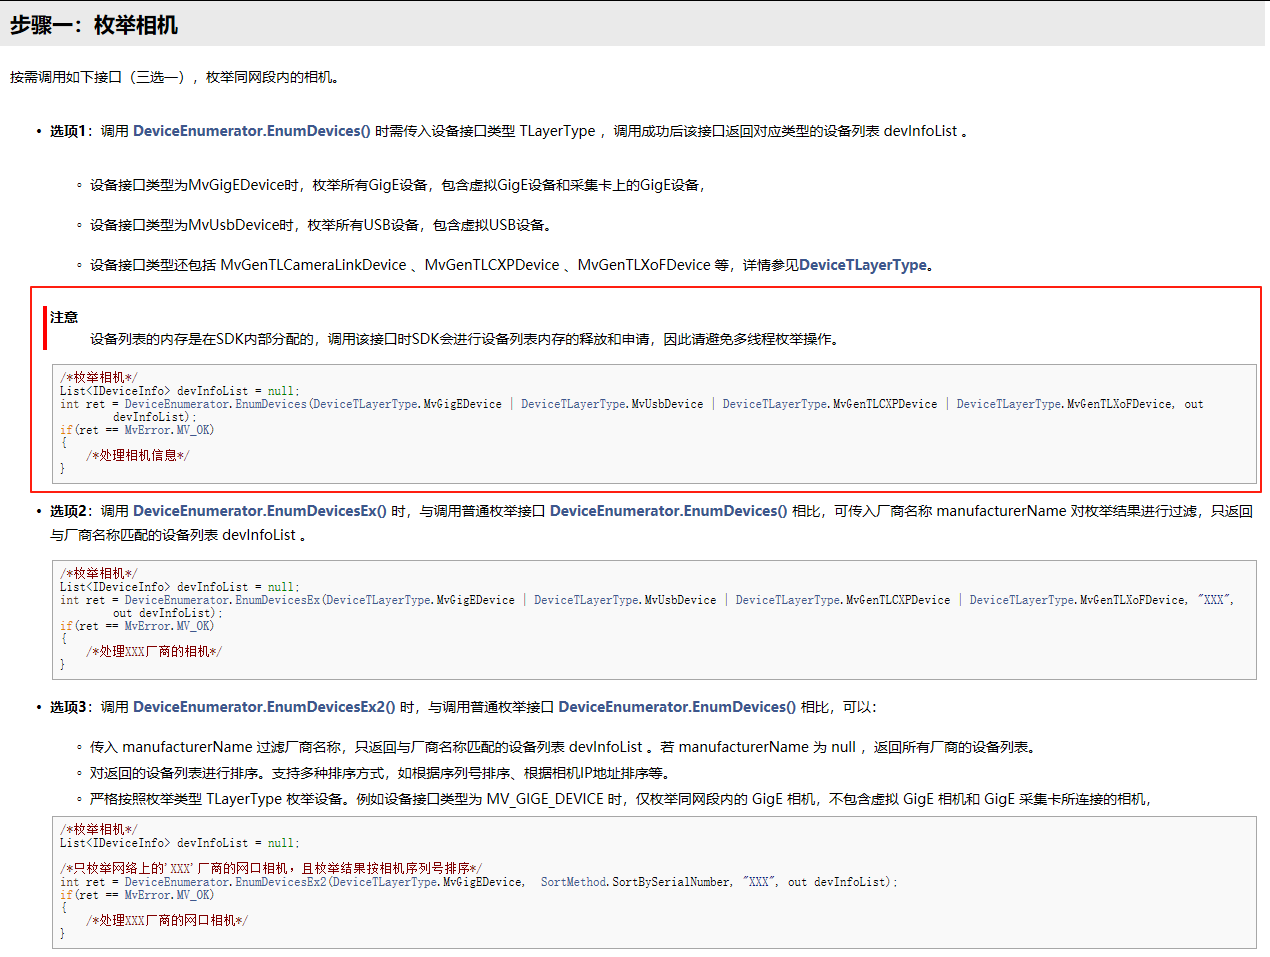
参考SDK接口文档的选项1枚举相机,返回相机SN队列List< string >
csharp
public override List<string> GetListEnum()
{
    List<string> deviceList = new List<string>();
    foreach (var item in GetListInfoEnum())
    {
        IDeviceInfo deviceInfo = item;
        if (deviceInfo.UserDefinedName != "")
            deviceList.Add(deviceInfo.SerialNumber);
        else
            deviceList.Add(deviceInfo.SerialNumber);
    }
    return deviceList;
}

private List<IDeviceInfo> GetListInfoEnum()
{
    System.GC.Collect();
    deviceInfoList.Clear();
    // ch:创建设备列表 | en:Create Device List
    int nRet = DeviceEnumerator.EnumDevices(enumTLayerType, out deviceInfoList);
    if (nRet != MvError.MV_OK)
    {
        ShowErrorMsg("Enumerate devices fail!", nRet);
        return new List<IDeviceInfo>();
    }
    return deviceInfoList;
}
IDeviceInfo中包含了相机的SerialNumber序列号(SN)
为了方便调用只将相机的SN进行了返回
5.2初始化相机(创建相机实例打开相机)
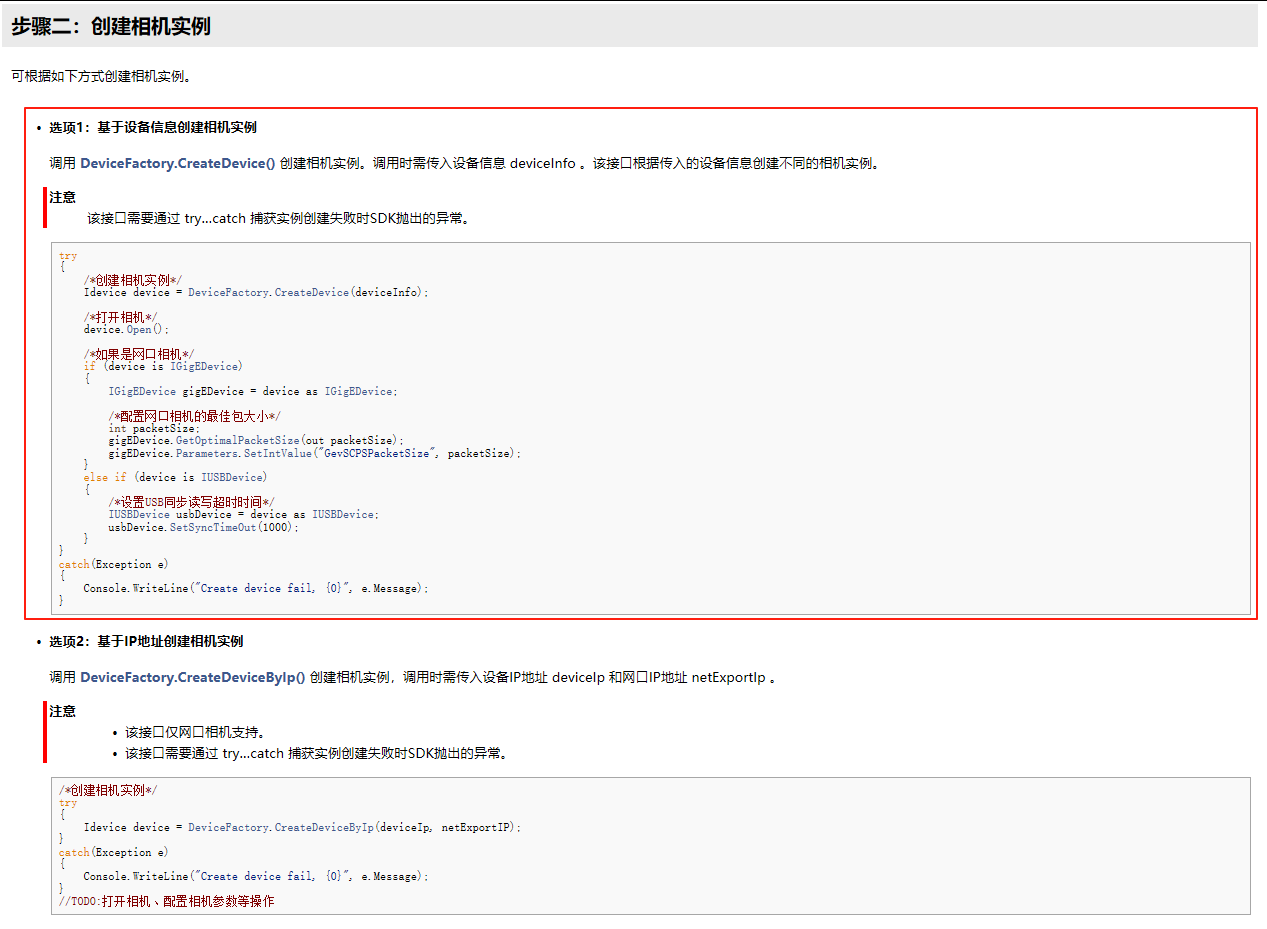
创建相机实例也就是打开相机并且占用相机资源
csharp
public override bool InitDevice(string CamSN, object handle = null)
{
    try
    {
        int nRet;
        if (string.IsNullOrEmpty(CamSN)) return false;
        var infolist = GetListInfoEnum();
        if (infolist.Count < 1) return false;

        IDeviceInfo deviceInfo = infolist[0];
        bool selectSNflag = false;
        foreach (var item in infolist)
        {
            if (item.SerialNumber.Equals(CamSN))
            {
                deviceInfo = item;
                selectSNflag = true;
                break;
            }
        }
        if (!selectSNflag) return false;

        try
        {
            // ch:打开设备 | en:Open device
            device = DeviceFactory.CreateDevice(deviceInfo);
        }
        catch (Exception ex)
        {
            MessageBox.Show("Create Device fail!" + ex.Message);
            return false;
        }


        nRet = device.Open();
        if (nRet != MvError.MV_OK)
        {
            ShowErrorMsg("Open Device fail!", nRet);
            return false;
        }

        // ch:探测网络最佳包大小(只对GigE相机有效) | en:Detection network optimal package size(It only works for the GigE camera)
        if (device is IGigEDevice)
        {
            int packetSize;
            nRet = (device as IGigEDevice).GetOptimalPacketSize(out packetSize);
            if (packetSize > 0)
            {
                nRet = device.Parameters.SetIntValue("GevSCPSPacketSize", packetSize);
                if (nRet != MvError.MV_OK)
                    Console.WriteLine("Warning: Set Packet Size failed {0:x8}", nRet);

                else
                    Console.WriteLine("Set PacketSize to {0}", packetSize);

            }
            else
                Console.WriteLine("Warning: Get Packet Size failed {0:x8}", nRet);

        }

        // ch:设置触发模式为On || en:set trigger mode as On
        // 设置为Off会一直触发回调
        SetTriggerMode(TriggerMode.On, TriggerSource.Software);
        device.Parameters.SetEnumValueByString("AcquisitionMode", "Continuous");

        // ch:注册回调函数 | en:Register image callback
        // 注册回调函数操作应放在打开采集流操作之前
        device.StreamGrabber.FrameGrabedEvent += CallBackEventHandler;

        if (nRet != MvError.MV_OK)
        {
            Console.WriteLine("Set TriggerMode failed:{0:x8}", nRet);
            return false;
        }

        if (!StartGrabbing())
        {
            Console.WriteLine("开始采集失败");
            return false;
        }

        //ch: 设置合适的缓存节点数量 | en: Setting the appropriate number of image nodes
        device.StreamGrabber.SetImageNodeNum(5);

        SN = CamSN;
        Brand = CameraBrand.HikCamera;
        return true;
    }
    catch { return false; }
}
1.初始化相机最主要的就是SN,通过枚举相机匹配到对应相机的IDeviceInfo
2.创建并打开相机后进行设备参数配置和图像采集绑定Event
3.设备参数配置将设置为软触发模式
4.图像采集绑定Event订阅了CallBackEventHandler函数
5.相机开始采集成功确认SN与品牌
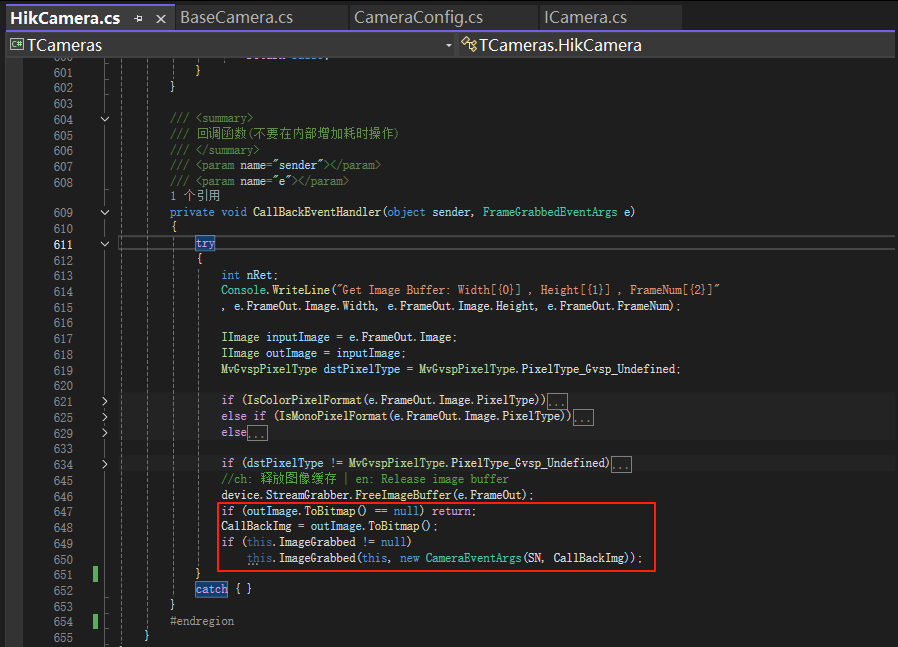
5.3 回调函数(图像采集Event)
被事件订阅的回调函数在每次帧结束后被触发
/// <summary>
/// 回调函数(不要在内部增加耗时操作)
/// </summary>
/// <param name="sender"></param>
/// <param name="e"></param>
private void CallBackEventHandler(object sender, FrameGrabbedEventArgs e)
{
    try
    {
        int nRet;
        Console.WriteLine("Get Image Buffer: Width[{0}] , Height[{1}] , FrameNum[{2}]"
        , e.FrameOut.Image.Width, e.FrameOut.Image.Height, e.FrameOut.FrameNum);

        IImage inputImage = e.FrameOut.Image;
        IImage outImage = inputImage;
        MvGvspPixelType dstPixelType = MvGvspPixelType.PixelType_Gvsp_Undefined;

        if (IsColorPixelFormat(e.FrameOut.Image.PixelType))
                {
                    dstPixelType = MvGvspPixelType.PixelType_Gvsp_RGB8_Packed;
                }
        else if (IsMonoPixelFormat(e.FrameOut.Image.PixelType))
                {
                    dstPixelType = MvGvspPixelType.PixelType_Gvsp_Mono8;
                }
        else
                {
                    Console.WriteLine("Don't need to convert!");
                }

        if (dstPixelType != MvGvspPixelType.PixelType_Gvsp_Undefined)
                {
                    // ch:像素格式转换 | en:Pixel type convert
                    nRet = device.PixelTypeConverter.ConvertPixelType(inputImage, out outImage, dstPixelType);
                    if (nRet != MvError.MV_OK)
                    {
                        Console.WriteLine("Image Convert failed:{0:x8}", nRet);
                        return;
                    }
                    Console.WriteLine("Image Convert success!");
                }
        //ch: 释放图像缓存 | en: Release image buffer
        device.StreamGrabber.FreeImageBuffer(e.FrameOut);
        if (outImage.ToBitmap() == null) return;
        CallBackImg = outImage.ToBitmap();
        if (this.ImageGrabbed != null)
            this.ImageGrabbed(this, new CameraEventArgs(SN, CallBackImg));
    }
    catch { }
}
1.BaseCamera基类中定义了事件public EventHandler< CameraEventArgs > ImageGrabbed = delegate { };
2.CameraEventArgs含有取图完成的相机SN与单帧图片等信息可自由扩展
3.回调的图片存储在CallBackImg变量中可用于软触发回调
4.返回的图片统一为Bitmap格式通用性强
Step6 调用封装的DLL实现取图
6.1创建工程并引用DLL
创建TestTCameras工程,引用TCameras工程生成的.dll

6.2设计演示窗口
演示窗口只包含了最基础的操作:
1、(Form1_Load)打开窗体时显示可用相机到combox1中
2、(button1_Click)点击button1连接相机
3、(button2_Click)点击button2软触发取图
4、(Form1_FormClosing)关闭窗口前断开已连接的相机
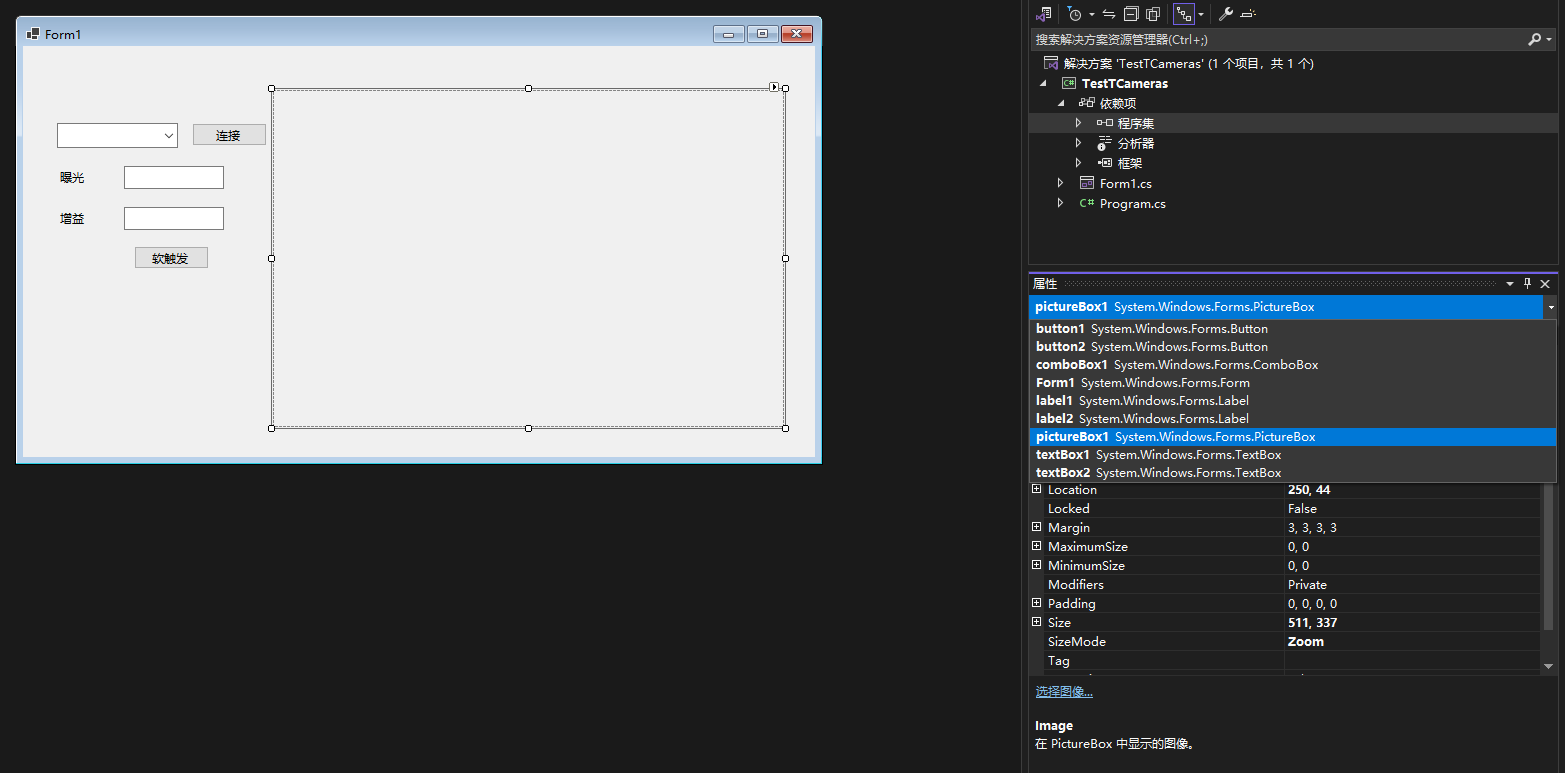
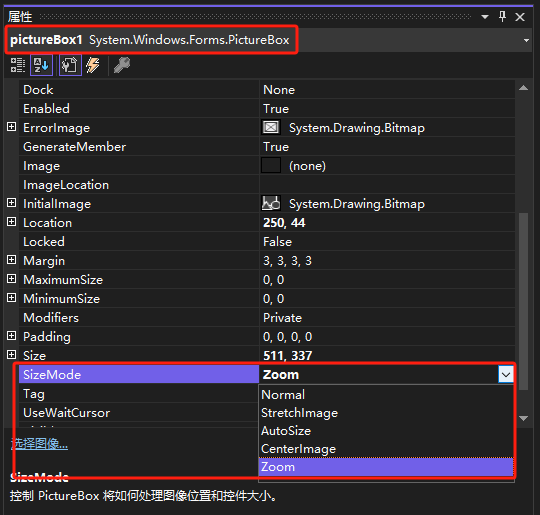
picturbox的SizeMode属性需要设置为Zoom否则无法显示完整
6.3演示窗口代码
csharp
using System.Xml.Linq;
using TCameras;

namespace TestTCameras
{
    public partial class Form1 : Form
    {
        public Form1()
        {
            InitializeComponent();
        }

        BaseCamera camera = new HikCamera();

        private void Form1_Load(object sender, EventArgs e)
        {
            List<string> lstSN = camera.GetListEnum();
            comboBox1.Items.Clear();
            foreach (var sn in lstSN)
                comboBox1.Items.Add(sn);
        }

        private void Form1_FormClosing(object sender, FormClosingEventArgs e)
        {
            if (camera != null || camera.isGrabbing)
                camera.Dispose();
        }

        private void button1_Click(object sender, EventArgs e)
        {
            if (camera != null && camera.isGrabbing)
            {
                camera.CloseDevice();
                camera = new HikCamera();
            }
            string sn = comboBox1.Text;
            if (camera.InitDevice(sn, this.Handle))
            {
                camera.GetExpouseTime(out float exp);
                camera.GetGain(out float gain);

                textBox1.Text = exp.ToString();
                textBox2.Text = gain.ToString();

                MessageBox.Show($"[{sn}]连接成功");
            }
        }

        private void button2_Click(object sender, EventArgs e)
        {
            if (camera == null || !camera.isGrabbing)
            {
                MessageBox.Show($"相机未连接");
                return;
            }

            if (float.TryParse(textBox1.Text, out float exp) && float.TryParse(textBox2.Text, out float gain))
            {
                camera.SetExpouseTime(exp);
                camera.SetGain(gain);

                if (camera.GetImageWithSoftTrigger(out Bitmap bitmap))
                {
                    pictureBox1.Image = bitmap;
                }
                else
                    MessageBox.Show($"获取图像失败");
            }

        }
    }
}
6.4效果展示
相机SDK封装取图